
Create a Kafka Cluster in Confluent Cloud
Create an Apache Kafka® cluster in Confluent Cloud to start streaming. Confluent Cloud clusters are fully managed: you choose a cluster type and a cloud provider and region, and Confluent handles provisioning, scaling, and fault tolerance.
Get Started for Free
Sign up for a Confluent Cloud trial and get $400 of free credit.
Requirements
Operator or administrator access to a Confluent Cloud environment.
API requests must include an authorization header with an API key and secret. For more information, see Authentication in the Confluent Cloud API reference.
You can create clusters using the Confluent Cloud Console, Confluent CLI, and REST API. For a description of cluster types, service level agreements (SLA), and resource quotas for clusters, see Kafka Cluster Types in Confluent Cloud and Service Quotas for Confluent Cloud.
Considerations:
Cloud provider and region cannot be changed after provisioning a cluster.
For data residency and sovereignty requirements, data you produce to a topic and send through Kafka does not move out of the geographic region you select. For more information, see the whitepaper (PDF) Confluent Cloud Security Controls.
Cluster name (
display_name) is a friendly name with the following requirements:Use 64 characters or less
Use whitespace, Unicode letters, numbers, and the following special characters: Period (
.), Comma (,), Ampersand (&), Underscore (_), Plus (+), Bar (|), Open square bracket ([), Close square bracket (]), Slash (/), Dash (-)
Tip
The business use of a cluster is a good choice for cluster name.
Choose a cluster type.
Navigate to the clusters page for your environment. If this is your fist cluster, click Create cluster on my own. Otherwise, click + Add cluster.
Choose Basic or Standard and click Begin configuration.
Select a cloud provider tile, Region, and Uptime SLA and click Continue.
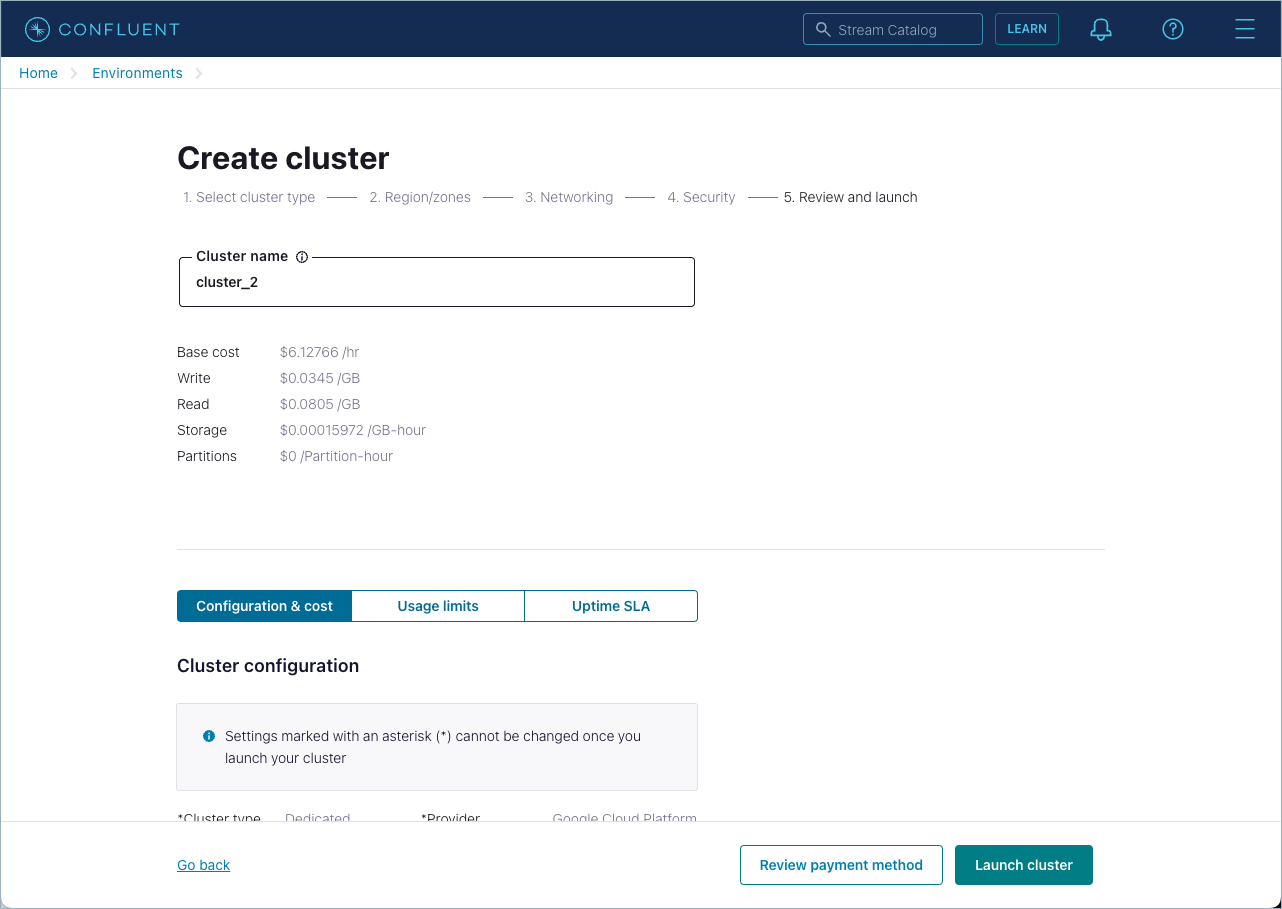
Specify Cluster name.
Review your configuration and click Launch cluster.
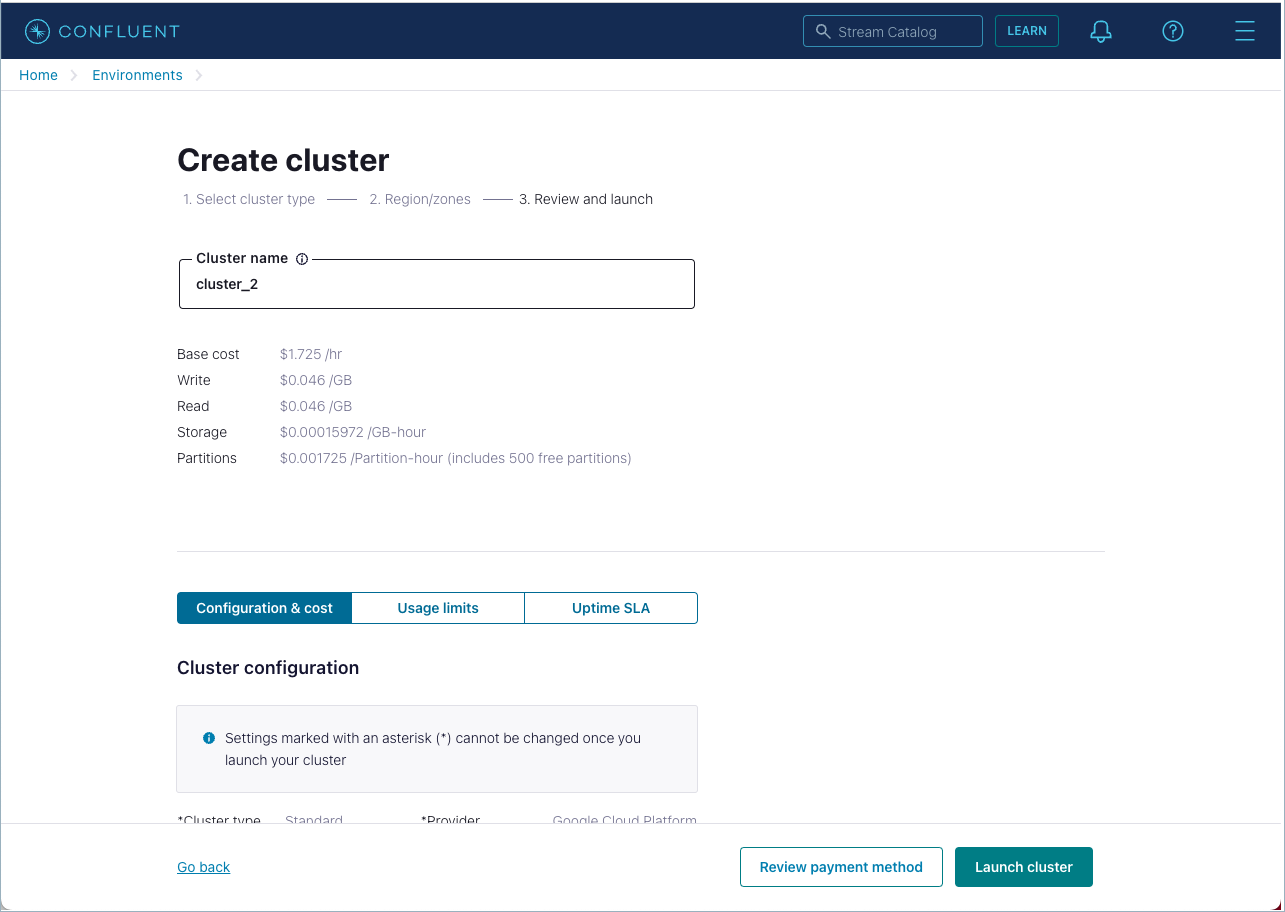
To verify or add a payment method, or use a promotional code, click Review payment method.
Navigate to the clusters page for your environment. If this is your first cluster, click Create cluster on my own. Otherwise, click + Add cluster.
Choose Enterprise and click Begin configuration.
Select a cloud provider tile, Region, and Uptime SLA and click Continue.
For network configuration, select I will configure later and click Continue to setup networking later or select a cloud provider to set up private networking now:
AWS private network options:
To create inbound or outbound connections
Click Create configuration.
Enter a gateway name, review your selected provider and region, and then click Submit.
Configure the networking using Terraform, the Confluent Cloud Console, or Confluent CLI. For more information, see Use AWS PrivateLink for Serverless Products on Confluent Cloud.
To create a Private Network Interface connection
Click Create configuration.
Enter a gateway name, review your selected provider and region, and select three zones for your gateway.
Click Submit.
Configure the networking using Terraform, the Confluent Cloud Console, or Confluent CLI. For more information, see Use Private Network Interface on Confluent Cloud.
To create inbound or outbound connections
Click Create configuration.
Enter a gateway name, review your selected provider and region, and then click Submit.
Configure the networking using Terraform, the Confluent Cloud Console, or Confluent CLI. For more information, see Use Azure Private Link for Serverless Products on Confluent Cloud.
To create inbound connections
Click Create configuration.
Enter a gateway name, review your selected provider and region, and then click Submit.
Configure the networking using Terraform, the Confluent Cloud Console, or Confluent CLI. For more information, see Use Google Cloud Private Service Connect for Serverless Products on Confluent Cloud.
Specify Cluster name.
Review your configuration and click Launch cluster.
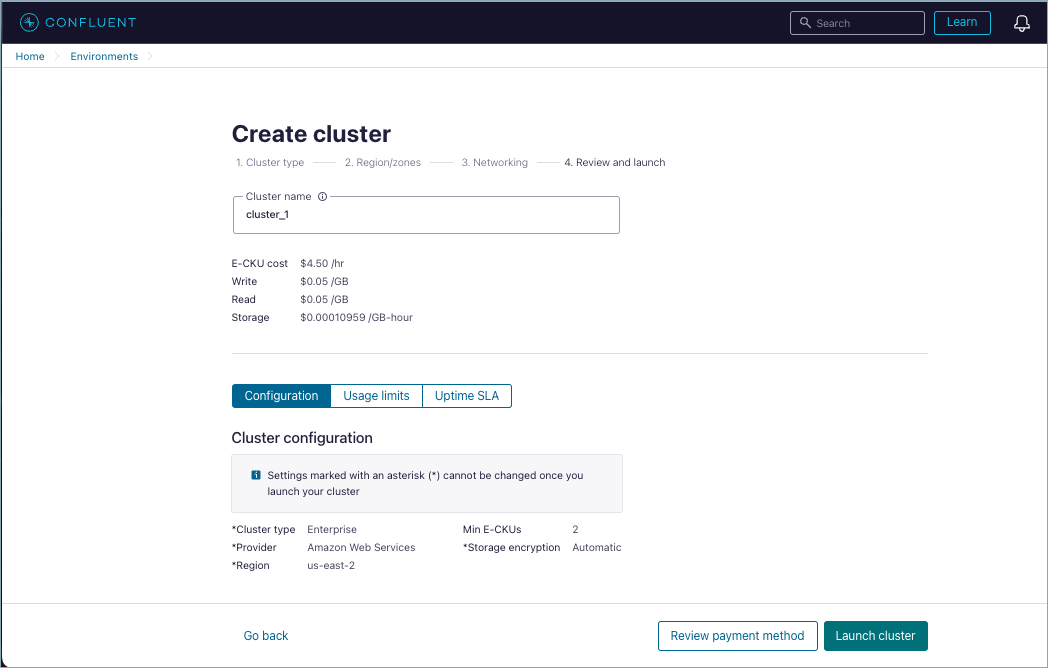
To verify or add a payment method, or use a promotional code, click Review payment method.
You must contact Confluent to create Freight clusters. With Freight clusters, you first work with the sales team to determine a maximum eCKU for your cluster before you provision.
Navigate to the clusters page for your environment. If this is your first cluster, click Create cluster on my own. Otherwise, click + Add cluster.
Choose Freight and click Begin configuration.
Select a cloud provider tile, Region, and click Continue.
Select I will configure later and click Continue, or click + Create configuration to configure a gateway.
If you choose to configure, take one of the following options:
Click Continue if a gateway for the selected region is available.
Enter a gateway name, review your selected provider and region, and then click Submit.
Configure the networking using Terraform, the Confluent Cloud Console, or Confluent CLI.
Specify Cluster name.
Review your configuration and click Launch cluster.
To verify or add a payment method, or use a promotional code, click Review payment method.
Considerations:
The number of Confluent Unit for Kafka (CKU) determines the capacity of Dedicated clusters. You can manage CKUs after provisioning. For more information on CKUs and how to update them, see Fixed limits and recommended guidelines and Update Kafka clusters.
To review network options, see Manage Networking on Confluent Cloud.
To encrypt your at-rest Kafka cluster data to ensure only the appropriate entity or user can decrypt it, use the cluster creation steps in Protect Data at Rest Using Self-Managed Encryption Keys on Confluent Cloud.
To create a Dedicated cluster
Navigate to the clusters page for your environment. If this is your fist cluster, click Create cluster on my own. Otherwise, click + Add cluster.
In Dedicated, specify a cluster size or accept the default size of one CKU and click Begin configuration.
Multi-zone availability requires two CKUs.
Select a cloud provider tile, Region, and Availability and click Continue.
Select Internet and click Continue, or choose a cloud provider to specify a private network:
AWS private network options:
Select Transit Gateway, VPC Peering, or PrivateLink.
Choose Use existing, select the existing network, and click Continue.
Select VPC Peering.
Choose Create new and enter Network name.
Select your zones.
Enter a CIDR block in CIDR for Confluent Cloud Network.
Click Continue.
Select Transit Gateway.
Choose Create new and enter Network name.
Select your zones.
Enter a CIDR block in CIDR for Confluent Cloud Network.
Click Continue.
Select PrivateLink.
Choose Create new and enter Network name.
Select your zones.
(Optional) Select Private DNS resolution to resolve your cluster endpoints using a private DNS zone. Otherwise, public DNS resolution is used.
Click Continue.
Azure private network options:
Select Private Link or VNet Peering.
Choose Use existing, select the existing network, and click Continue.
Choose Private Link.
Choose Create new and enter Network name.
(Optional) Select Private DNS resolution to resolve your cluster endpoints using a private DNS zone. Otherwise, public DNS resolution is used.
Click Continue.
Choose VNet Peering.
Choose Create new and enter Network name.
Enter a CIDR block in CIDR for Confluent Cloud Network.
Click Continue.
GCP private network options:
Select VPC Peering, or Private Service Connect.
Choose Use existing, select the existing network, and click Continue.
Select VPC Peering.
Choose Create new and enter Network name.
Select your zones.
Enter a CIDR block in CIDR for Confluent Cloud Network.
Click Continue.
Select Private Service Connect.
Choose Create new and enter Network name.
Select your zones.
(Optional) Select Private DNS resolution to resolve your cluster endpoints using a private DNS zone. Otherwise, public DNS resolution is used.
Click Continue.
For more information, see Manage Networking on Confluent Cloud.
Specify Automatic security and click Continue.
For self-managed options, follow the on-screen steps to register your key. For more information, see Protect Data at Rest Using Self-Managed Encryption Keys on Confluent Cloud.
Specify Cluster name.
Review your configuration and click Launch cluster.
To verify or add a payment method, or use a promotional code, click Review payment method.
Create a cluster.
confluent kafka cluster create <name> [flags]
For example:
confluent kafka cluster create my_new_cluster --cloud "aws" --region "us-west-2"

It may take up to 5 minutes for the Kafka cluster to be ready.
+----------------------+---------------------------------------------------------+
| Current              | false                                                   |
| ID                   | lkc-123exa                                              |
| Name                 | my_new_cluster                                          |
| Type                 | BASIC                                                   |
| Ingress Limit (MB/s) |                                                     250 |
| Egress Limit (MB/s)  |                                                     750 |
| Storage              | 5 TB                                                    |
| Cloud                | aws                                                     |
| Region               | us-west-2                                               |
| Availability         | single-zone                                             |
| Status               | PROVISIONING                                            |
| Endpoint             | SASL_SSL://pkc-exa45.us-west-2.aws.confluent.cloud:9092 |
| REST Endpoint        | https://pkc-exa45.us-west-2.aws.confluent.cloud:443     |
+----------------------+---------------------------------------------------------+
To create a cluster, make a POST request with a JSON payload that specifies the requirements.
POST /cmk/v2/clusters
Request (all cluster types)
When you make the request, include a JSON payload that contains a spec object with the following:
Parameter | Required or Optional | Description |
|---|---|---|
| Required | The display name of the cluster. |
| Required |
Availability changes for Basic/Standard/Enterprise clusters Beginning April 16, 2024, the Legacy availability for Basic, Standard, and Enterprise clustersThe cluster availability: ``SINGLE_ZONE`` or ``MULTI_ZONE``. |
| Required |
|
| Required | A valid region for the cloud provider. |
| Required | Object that contains the cluster type: |
| Required | Object that contains the environment identifier: |
| Required for private network | Object that contains the network identifier: |
If the Dedicated cluster should be created in a private network, create the network first, then specify the network when you create the cluster.
The following example demonstrates the request format for Basic and Standard clusters:
POST /cmk/v2/clusters HTTP/1.1
Host: api.confluent.cloud

{
   "spec":{
      "display_name":"ProdKafkaCluster",
      "availability":"Low",
      "cloud":"GCP",
      "region":"us-east4",
      "config":{
         "kind":"Basic"
      },
      "environment":{
         "id":"env-a12b34"
      }
   }
}
The following example demonstrates the request format for an Enterprise cluster in a private network.
POST /cmk/v2/clusters HTTP/1.1
Host: api.confluent.cloud

{
   "spec":{
      "display_name":"ProdKafkaCluster",
      "availability":"High",
      "cloud":"AWS",
      "region":"us-east-1",
      "config":{
         "kind":"Enterprise"
      },
      "environment":{
         "id":"env-a12b34"
      },
      "network":{
         "id":"n-12345",
         "environment": "env-a12b34"
      }
   }
}
The following examples demonstrate the request format for Dedicated clusters.
The following example demonstrates the request on a secure public endpoint. You specify the number of CKUs in the config element:
POST /cmk/v2/clusters HTTP/1.1
Host: api.confluent.cloud

{
   "spec":{
      "display_name":"ProdKafkaCluster",
      "availability":"SINGLE_ZONE",
      "cloud":"GCP",
      "region":"us-east4",
      "config":{
         "kind":"Dedicated",
         "cku": 2
      },
      "environment":{
         "id":"env-a12b34"
      }
   }
}
The following example demonstrates the request format for a private network. You specify the network in which to create the cluster in the network element.
POST /cmk/v2/clusters HTTP/1.1
Host: api.confluent.cloud

{
   "spec":{
      "display_name":"ProdKafkaCluster",
      "availability":"SINGLE_ZONE",
      "cloud":"GCP",
      "region":"us-east4",
      "config":{
         "kind":"Dedicated",
         "cku": 2
      },
      "environment":{
         "id":"env-a12b34"
      },
      "network":{
         "id":"n-12345",
         "environment": "env-a12b34"
      }
   }
}
Response
Successful calls return HTTP 202 ACCEPTED with a JSON payload that describes the cluster.
Responses include the following information:
The cloud provider (AWS, GCP, AZURE) and region for the cluster.
The cluster status (PROVISIONED, PROVISIONING, FAILED) and
kind(Basic, Standard, Enterprise, Dedicated, and Freight).Information about the environment that contains the cluster.
Dedicated clusters only - the number of CKUs allocated to the cluster.
Example response for Basic and Standard clusters:
HTTP/1.1 202 ACCEPTED
Content-Type: application/json

{
      "api_version": "cmk/v2",
      "id": "abc-f3a90de",
      "kind": "Cluster",
      "metadata": {
         "created_at": "2022-04-22T20:45:26.657894Z",
         "self": "https://api.confluent.cloud/v2/kafka-clusters/abc-f3a90de",
         "resource_name": "crn://confluent.cloud/kafka=abc-f3a90de",
         "updated_at": "2022-04-22T20:45:26.659364Z"
      },
      "spec": {
         "display_name": "ProdKafkaCluster",
         "availability": "Low",
         "cloud": "GCP",
         "region": "us-east4",
         "config": {
               "kind": "Basic"
         },
         "kafka_bootstrap_endpoint": "abc-00000-00000.us-east4.gcp.glb.confluent.cloud:9092",
         "http_endpoint": "https://abc-00000-00000.us-east4.gcp.glb.confluent.cloud",
         "environment": {
            "api_version": "org/v2",
            "id": "env-a12b34",
            "kind":"Environment"
            "related": "https://api.confluent.cloud/v2/environments/env-a12b34",
            "resource_name": "crn://confluent.cloud/organization=1234abcd-edef-46ac-8a41-c49e44a3fd9a/environment=env-a12b34"
         }
      },
      "status": {
         "phase": "PROVISIONING"
      }
}
Example response for Enterprise clusters in a private network
HTTP/1.1 202 ACCEPTED
Content-Type: application/json

{
   "api_version": "cmk/v2",
   "kind": "Cluster",
   "id": "abc-f3a90de",
   "metadata": {
      "self": "https://api.confluent.cloud/v2/kafka-clusters/abc-f3a90de",
      "resource_name": "crn://confluent.cloud/kafka=abc-f3a90de",
      "created_at": "2023-06-22T20:45:26.657894Z",
      "updated_at": "2023-06-22T21:13:55.742641944Z"
   },
   "spec": {
      "display_name": "ProdKafkaCluster",
      "availability": "High",
      "cloud": "AWS",
      "region": "us-east-1",
      "config": {
         "kind": "Enterprise"
      },
      "kafka_bootstrap_endpoint": "abc-00000-00000.us-east-1.aws.glb.confluent.cloud:9092",
      "http_endpoint": "https://abc-00000-00000.us-east-1.aws.glb.confluent.cloud",
      "environment": {
         "api_version": "org/v2",
         "id": "env-a12b34",
         "kind":"Environment"
         "related": "https://api.confluent.cloud/v2/environments/env-a12b34",
         "resource_name": "https://api.confluent.cloud/organization=abcd41c4-edef-46ac-8a41-c49e44a3fd9a/environment=env-a12b34",
         },
         "network": {
         "id": "n-00000",
         "environment": "env-a12b34",
         "related": "https://api.confluent.cloud/networking/v1/networks/n-00000",
         "resource_name": "https://api.confluent.cloud/organization=abcd41c4-edef-46ac-8a41-c49e44a3fd9a/network=n-00000",
         "api_version": "networking/v1",
         "kind": "Network"
         }
      },
   "status": {
      "phase": "PROVISIONING"
   }
}
Example response on a secure public endpoint:
HTTP/1.1 202 ACCEPTED
Content-Type: application/json

{
   "api_version": "cmk/v2",
   "kind": "Cluster",
   "id": "abc-f3a90de",
   "metadata": {
      "self": "https://api.confluent.cloud/v2/kafka-clusters/abc-f3a90de",
      "resource_name": "crn://confluent.cloud/kafka=abc-f3a90de",
      "created_at": "2022-04-22T20:45:26.657894Z",
      "updated_at": "2022-04-22T21:13:55.742641944Z"
   },
   "spec": {
      "display_name": "ProdKafkaCluster",
      "availability": "SINGLE_ZONE",
      "cloud": "GCP",
      "region": "us-east4",
      "config": {
         "kind": "Dedicated",
         "cku": 2
      },
      "kafka_bootstrap_endpoint": "abc-00000-00000.us-east4.gcp.glb.confluent.cloud:9092",
      "http_endpoint": "https://abc-00000-00000.us-east4.gcp.glb.confluent.cloud",
      "environment": {
         "api_version": "org/v2",
         "id": "env-a12b34",
         "kind":"Environment"
         "related": "https://api.confluent.cloud/v2/environments/env-a12b34",
         "resource_name": "crn://confluent.cloud/organization=1234abcd-edef-46ac-8a41-c49e44a3fd9a/environment=env-a12b34"
      }
   },
   "status": {
      "phase": "PROVISIONING",
      "cku": 2
   }
}
Example response in a private network:
HTTP/1.1 202 ACCEPTED
Content-Type: application/json

{
   "api_version": "cmk/v2",
   "kind": "Cluster",
   "id": "abc-f3a90de",
   "metadata": {
      "self": "https://api.confluent.cloud/v2/kafka-clusters/abc-f3a90de",
      "resource_name": "crn://confluent.cloud/kafka=abc-f3a90de",
      "created_at": "2022-04-22T20:45:26.657894Z",
      "updated_at": "2022-04-22T21:13:55.742641944Z"
   },
   "spec": {
      "display_name": "ProdKafkaCluster",
      "availability": "SINGLE_ZONE",
      "cloud": "GCP",
      "region": "us-east4",
      "config": {
         "kind": "Dedicated",
         "cku": 2
      },
      "kafka_bootstrap_endpoint": "abc-00000-00000.us-east4.gcp.glb.confluent.cloud:9092",
      "http_endpoint": "https://abc-00000-00000.us-east4.gcp.glb.confluent.cloud",
      "environment": {
         "api_version": "org/v2",
         "id": "env-a12b34",
         "kind":"Environment"
         "related": "https://api.confluent.cloud/v2/environments/env-a12b34",
         "resource_name": "https://api.confluent.cloud/organization=abcd41c4-edef-46ac-8a41-c49e44a3fd9a/environment=env-a12b34",
         },
         "network": {
         "id": "n-00000",
         "environment": "env-a12b34",
         "related": "https://api.confluent.cloud/networking/v1/networks/n-00000",
         "resource_name": "https://api.confluent.cloud/organization=abcd41c4-edef-46ac-8a41-c49e44a3fd9a/network=n-00000",
         "api_version": "networking/v1",
         "kind": "Network"
         }
      },
   "status": {
      "phase": "PROVISIONING",
      "cku": 2
   }
}