
Egress Private Service Connect Endpoint Setup: Couchbase on Google Cloud for Confluent Cloud
The Couchbase Sink connector for Confluent Cloud supports Google Cloud Private Service Connect through Egress Private Service Connect Endpoints. Use this guide to configure the connector and set up the required endpoints.
Note
After completing the instructions, contact Confluent Support to update the network=external connector configuration in the backend.
Prerequisites
The following is a list of prerequisites for configuring the Couchbase DB connector with an Egress Private Service Connect endpoint:
In Confluent Cloud, one of the following cluster types is set up with the specified network resource:
A Dedicated cluster with a Confluent Cloud network
For the steps to create a Confluent Cloud network, see Create a Confluent Cloud network. The Connection type of the network must be Private Service Connect.
A Enterprise cluster with a network gateway
For the steps to create a gateway, see Create a gateway for outbound connectivity in Confluent Cloud.
Couchbase Capella account with a Google Cloud cluster deployed in a paid account.
Confluent Cloud network (Dedicated or Serverless Egress Gateway) is set up within the same region and cloud provider as the Couchbase Capella cluster.
A source topic is created to sink data into the Couchbase database.
Step 1. Create a Couchbase Capella private endpoint
To create a private endpoint for your Dedicated or Enterprise Couchbase database in the Couchbase Capella console, follow these steps:
Select the cluster where you want to add a Google Cloud Private Service Connect connection.
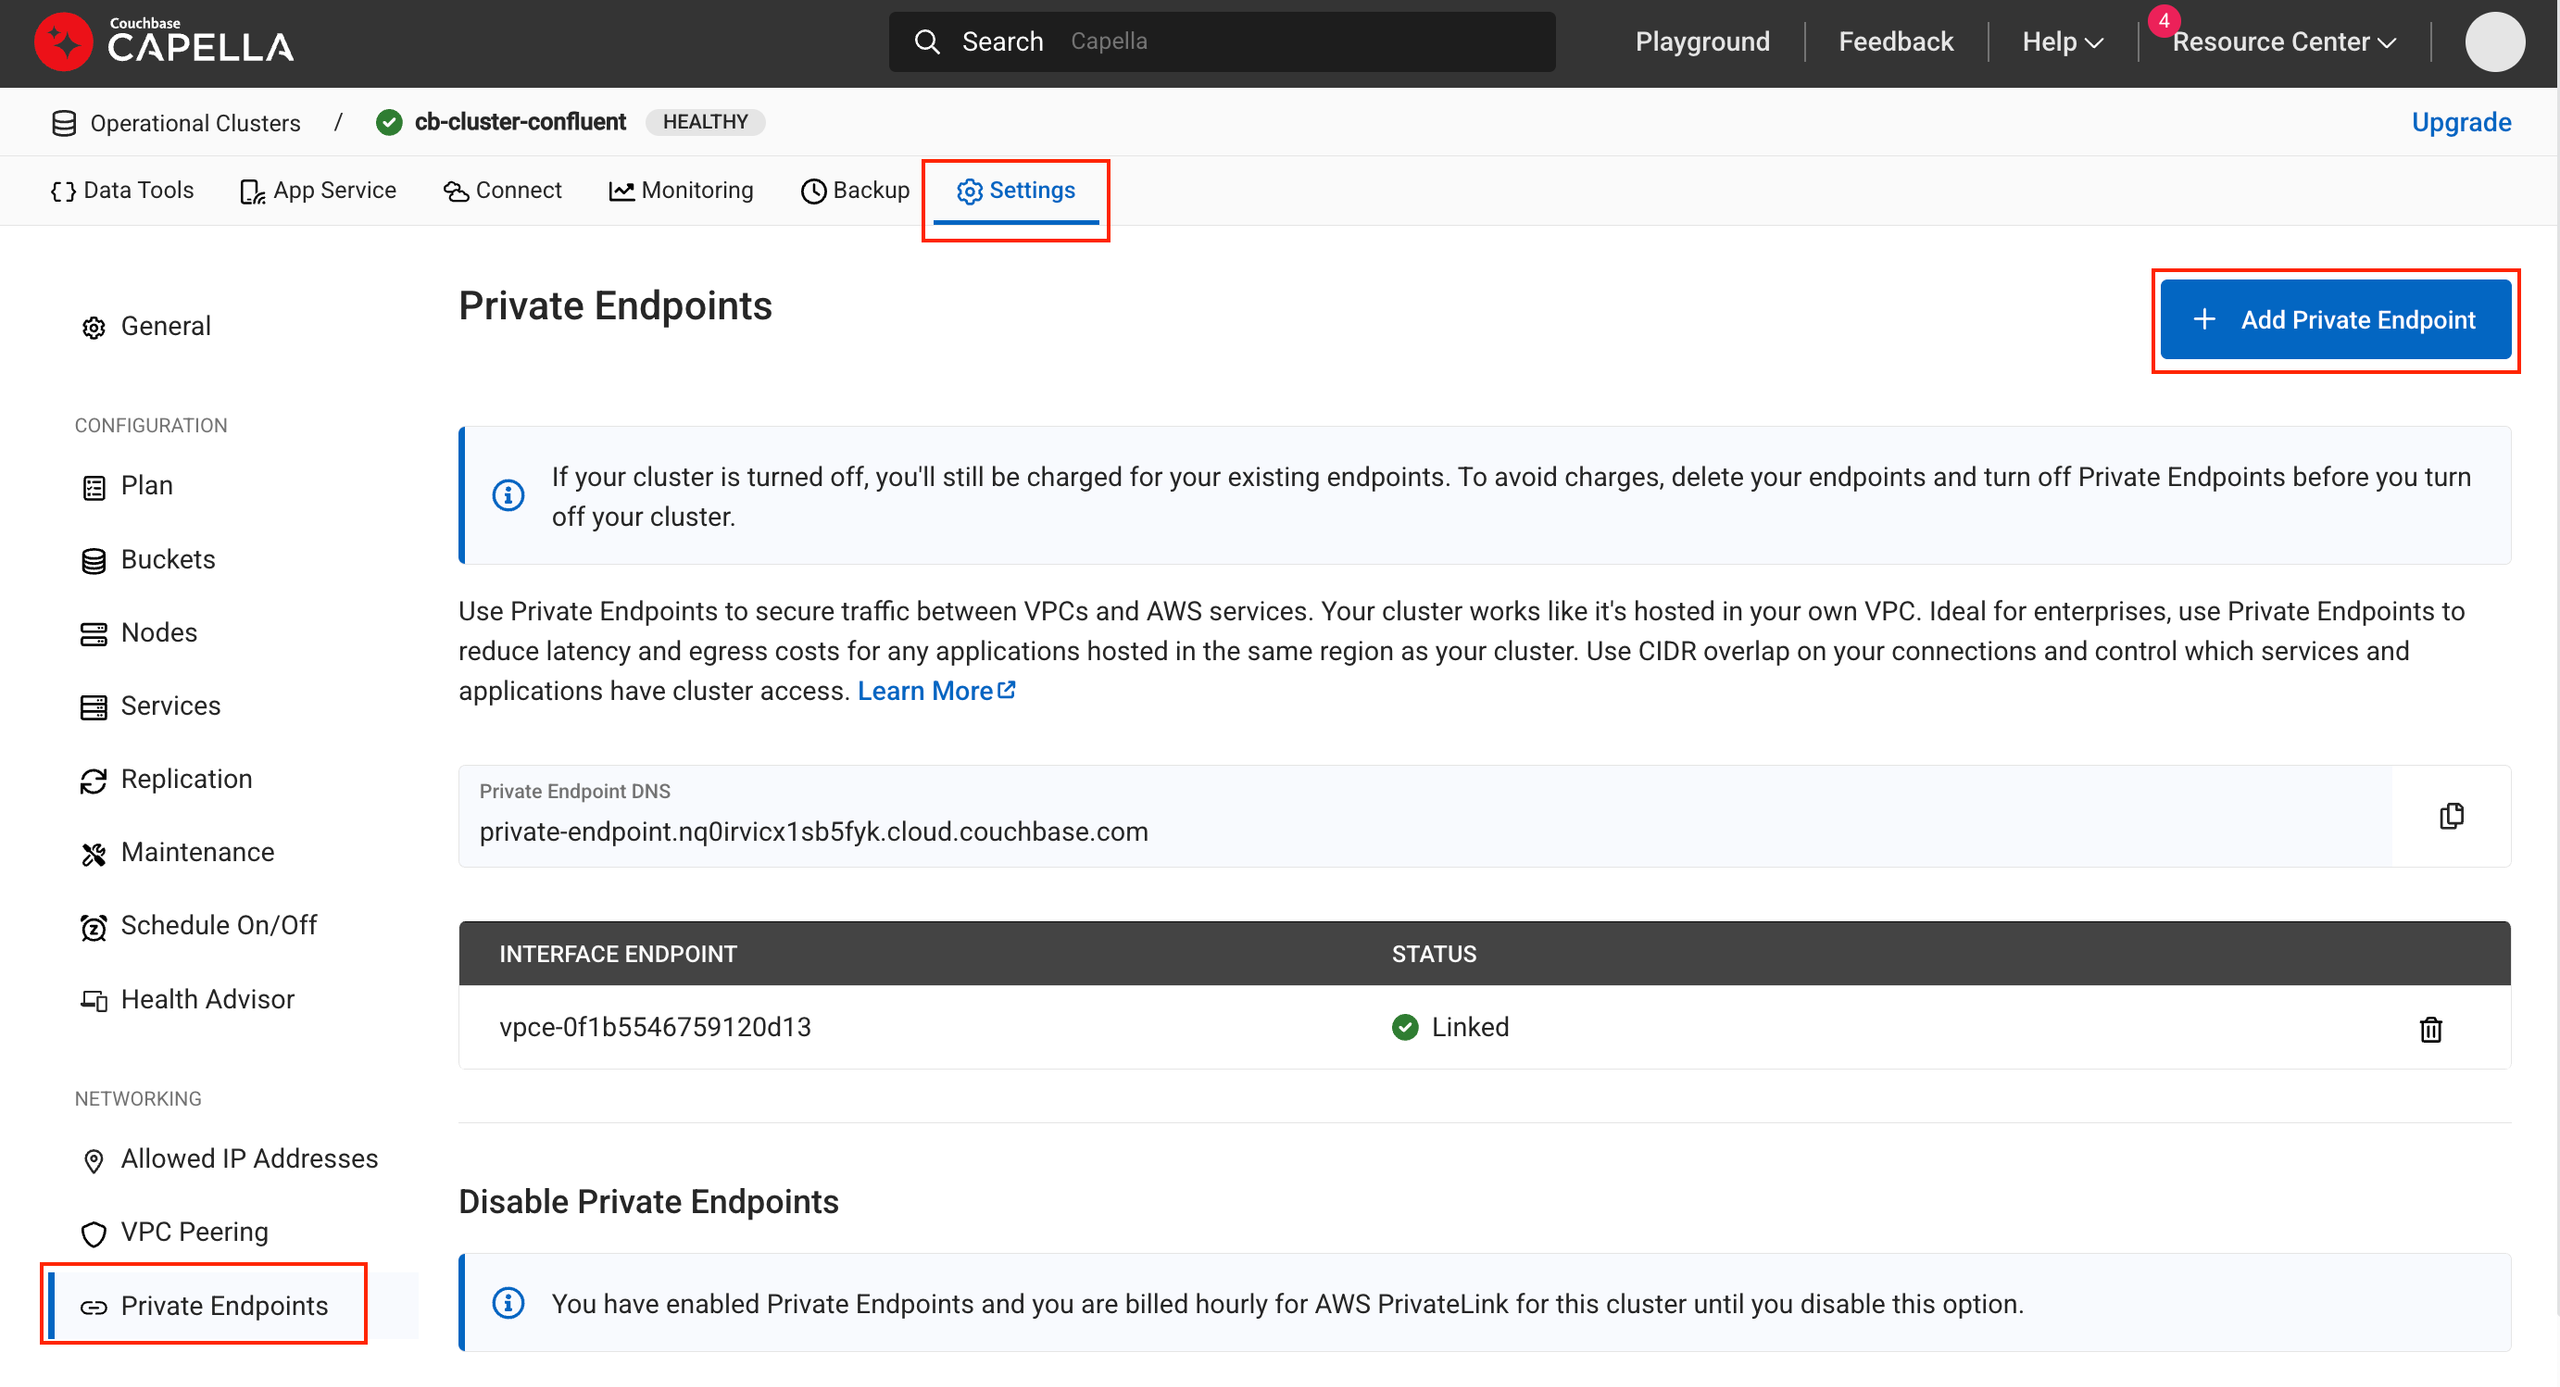
In the Networking section, go to Settings > Private Endpoints.
Click + Add Private Endpoint. Note that if this is the first private endpoint, click Enable Private Endpoint first.
Add a Couchbase Capella Private Endpoint
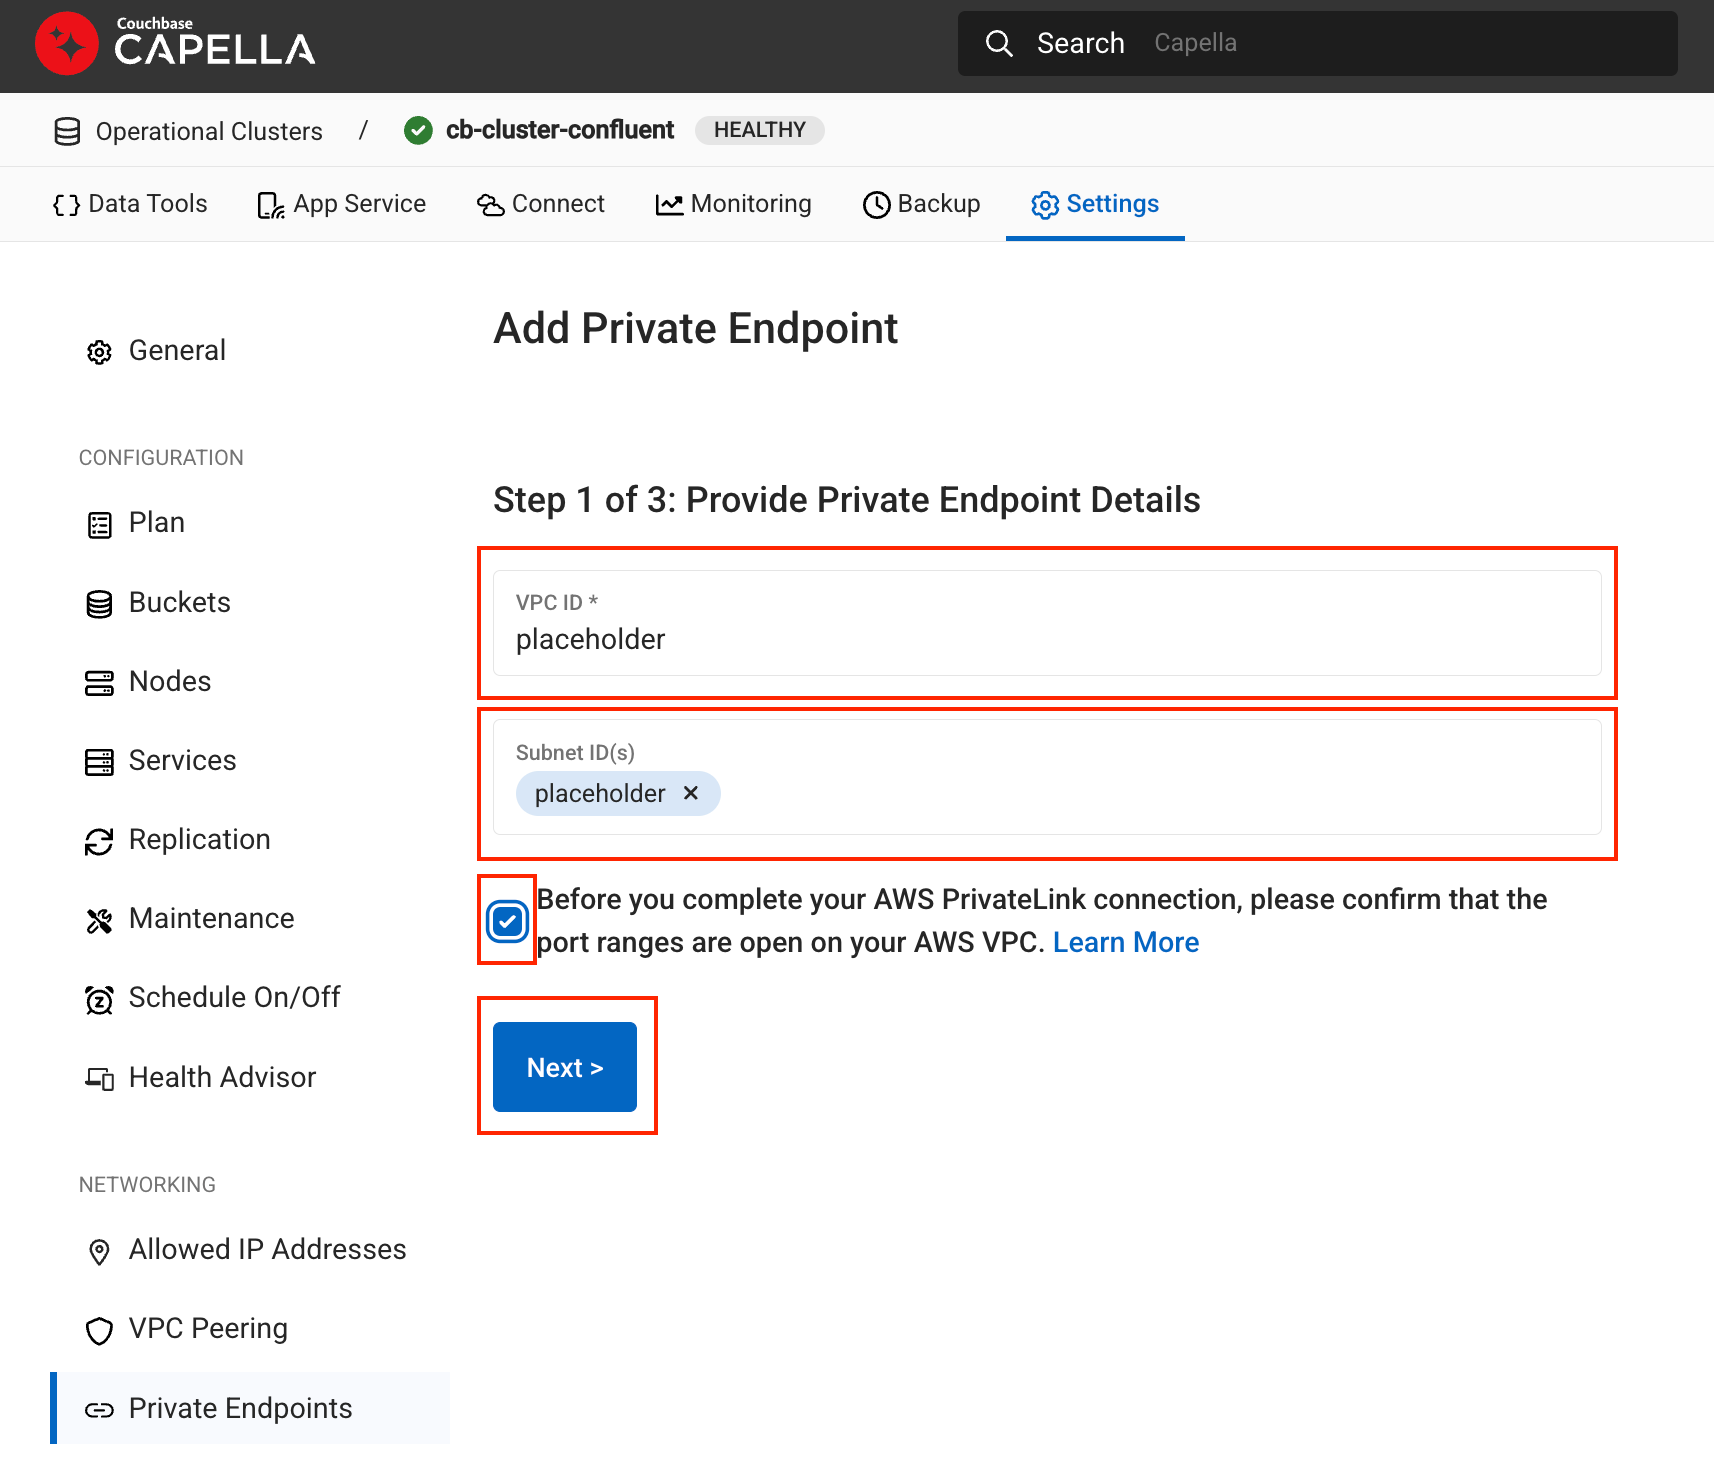
Enter the VPC ID and Subnet ID of your Couchbase database. This field cannot be left empty. You can add any placeholder text here.
Select the confirmation checkbox and click Next.
Couchbase Capella Private Endpoint Details
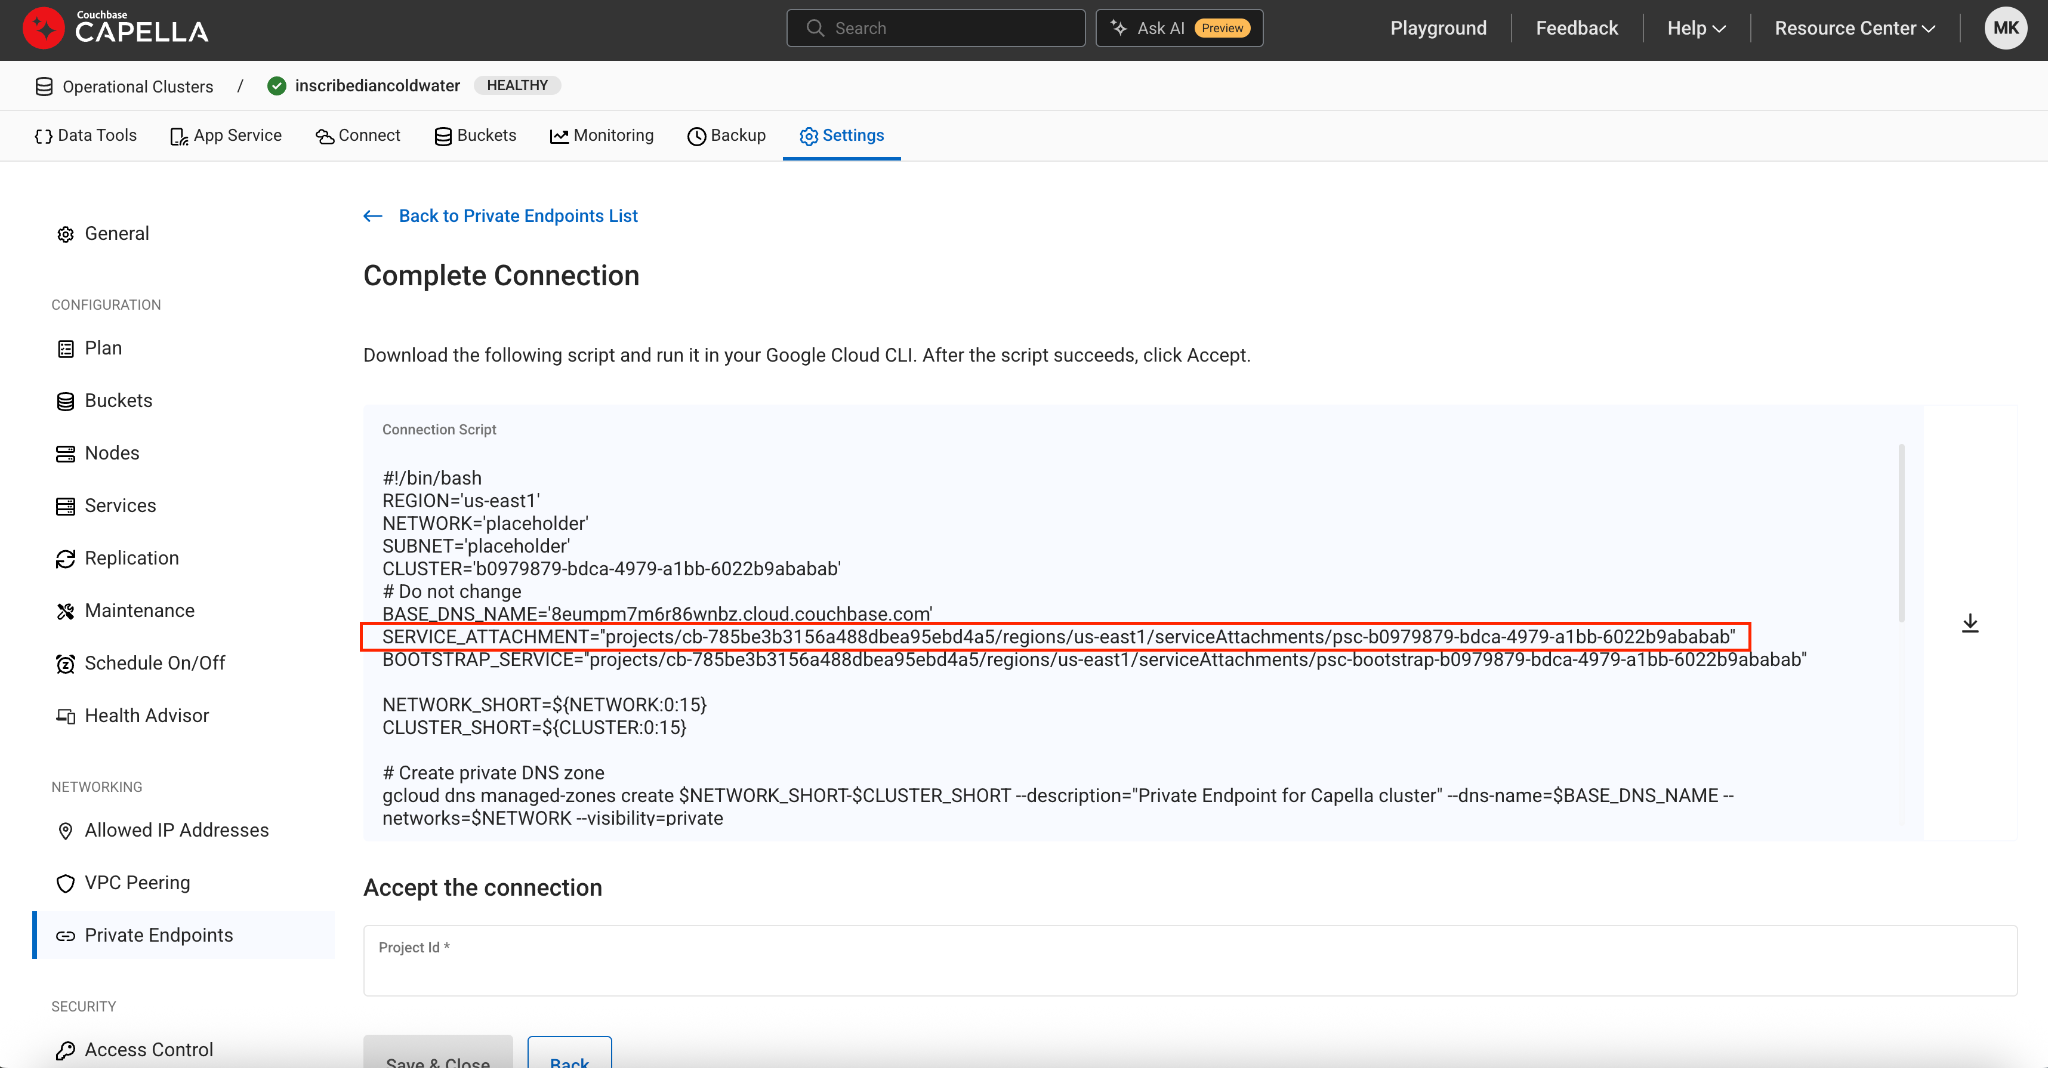
Make a note of the Couchbase service attachment names. You will need these to create your Confluent Cloud Egress Private Service Connect endpoints.
Service Attachment: Used for data plane connectivity.
Bootstrap Service: Used for initial cluster bootstrap.
Couchbase Service Attachment Names
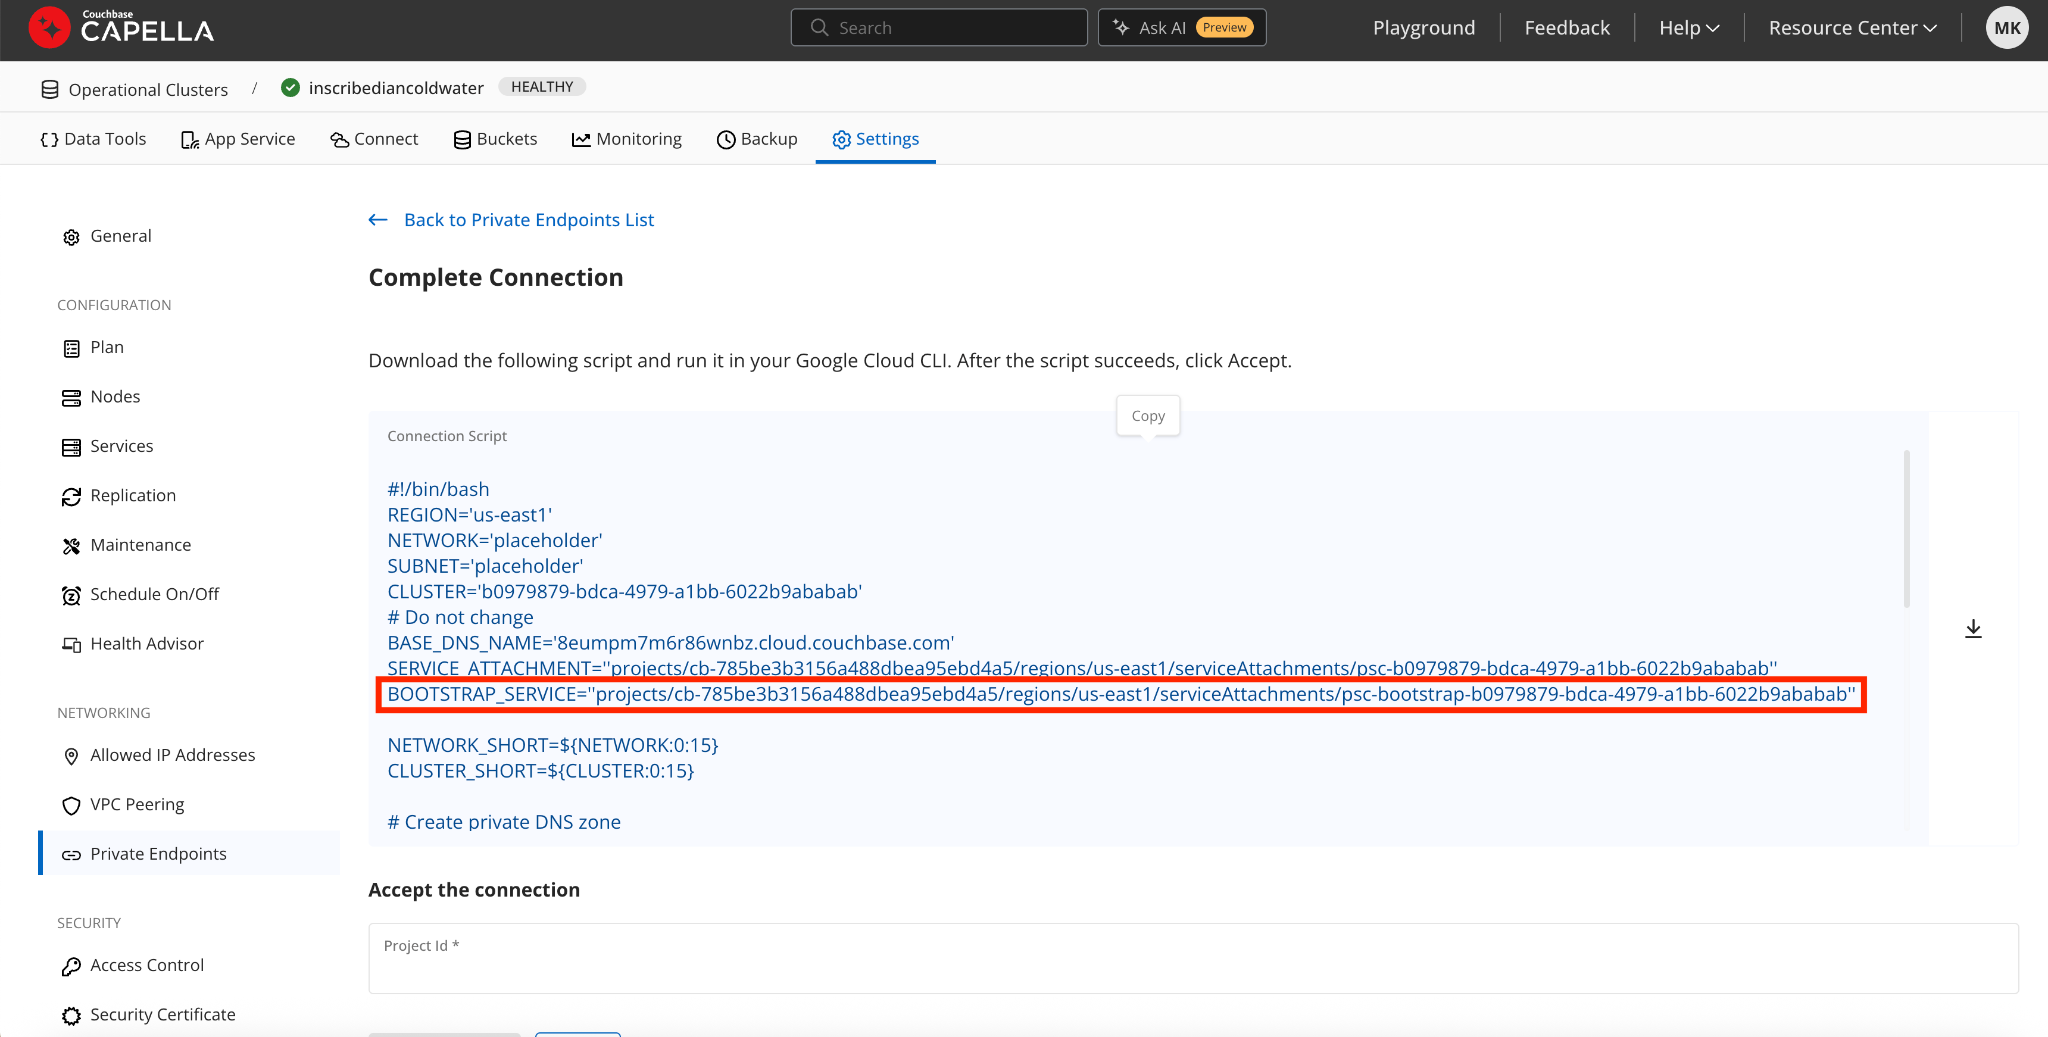
Couchbase Bootstrap Service Attachment
Close the workflow. You will complete the rest of the configuration after you create a Private Service Connect endpoint in Confluent Cloud.
Step 2. Create Confluent Cloud Egress Private Service Connect endpoints
You must create two Egress Private Service Connect endpoints: one for the Service Attachment and one for the Bootstrap Service retrieved in Step 1. Create a Couchbase Capella private endpoint.
In the Network management page or tab of the desired Confluent Cloud environment, click the Confluent Cloud network you want to add the Private Service Connect endpoint to. The Connection Type of the network should be Private Service Connect.
Click Create endpoint in the Egress connections tab.
Click the service you want to connect to, specifically, Couchbase. Select Other if you do not see the specific service.
Follow the steps below to specify the following field values:
Service: Name of service connecting to Couchbase.
Endpoint Name: Name of the Private Service Connect endpoint.
PrivateLink service name: The Service Attachment URI you retrieved in Step 1. Create a Couchbase Capella private endpoint.
Create an endpoint with high availability: Check the box if you wish to deploy an endpoint with high availability.
Endpoints deployed with high availability have network interfaces deployed in multiple availability zones.
Click Create endpoint.
Copy the GCP Project ID that is generated. You will need this in Step 3. Configure the Couchbase Capella private endpoint.
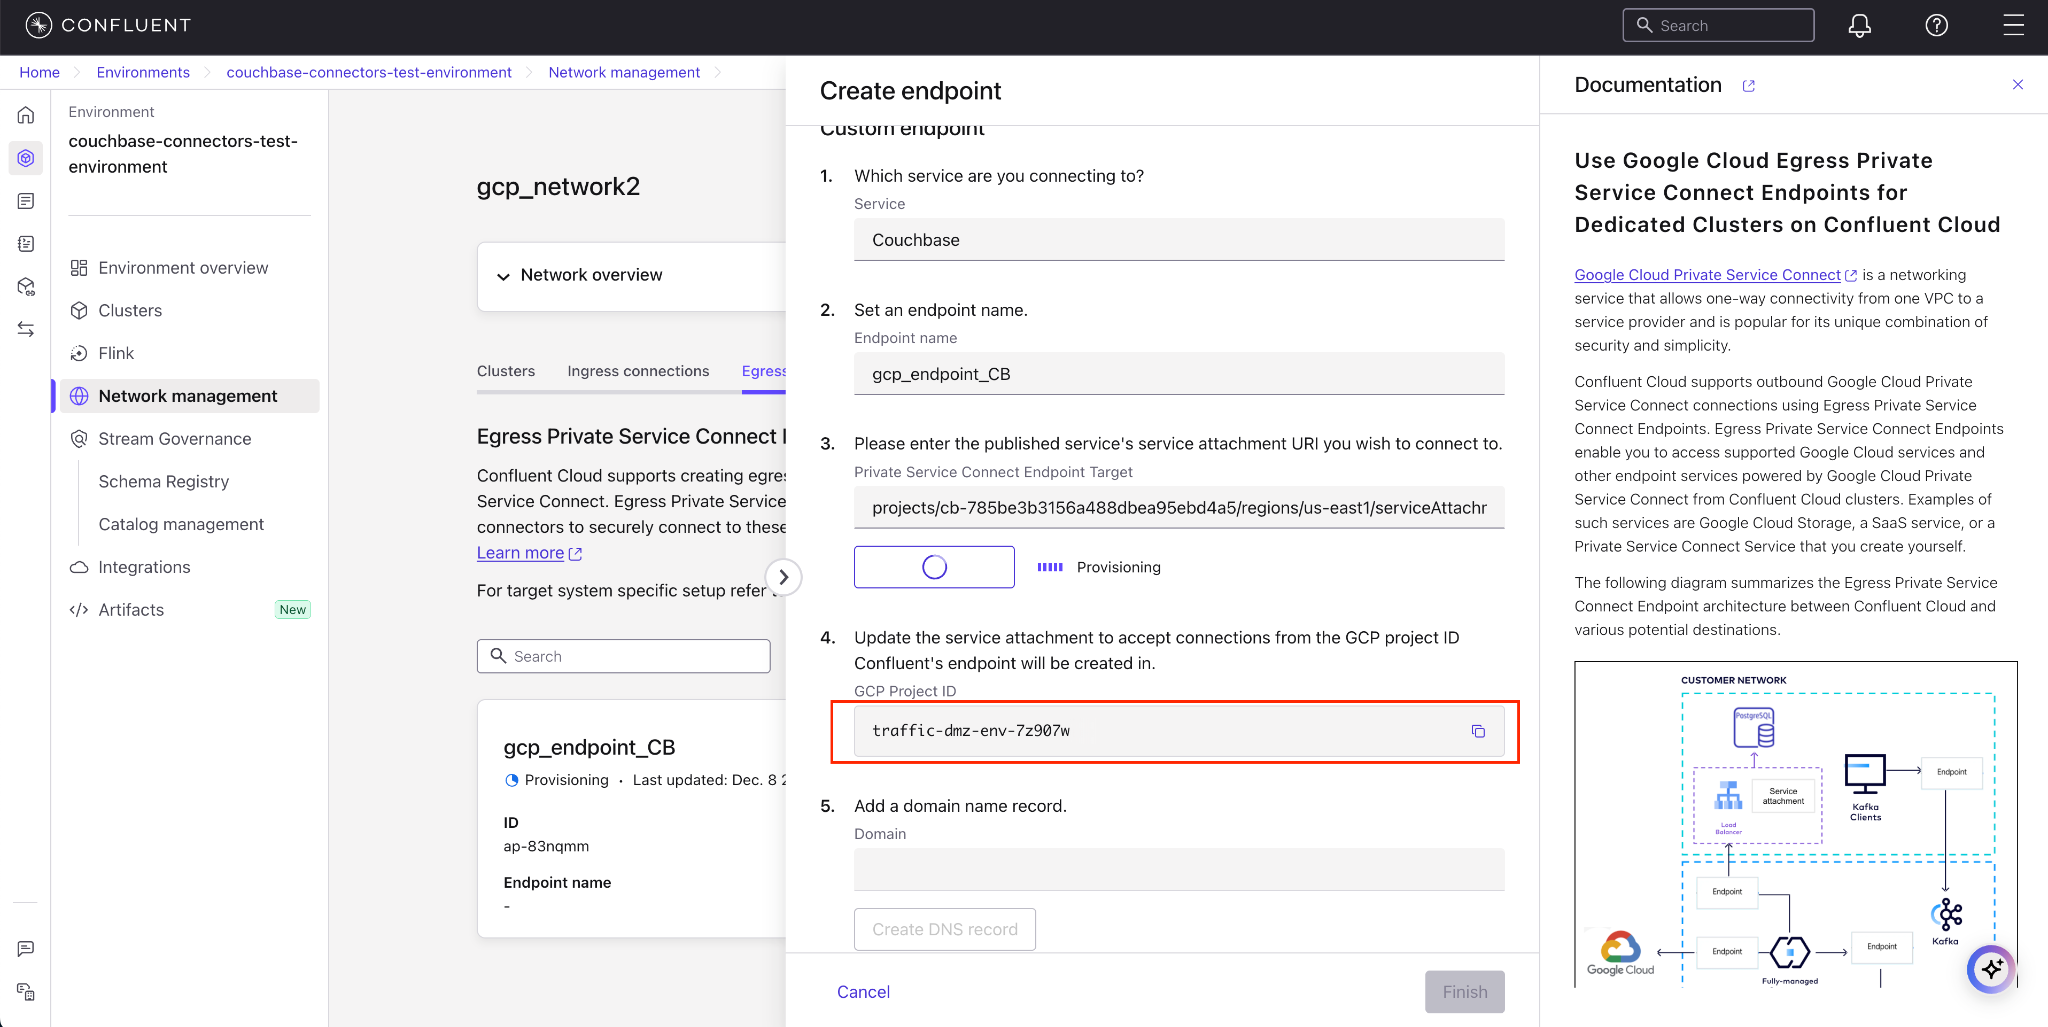
GCP Project ID
Repeat the steps 2-5 to create a second endpoint for the Bootstrap Service attachment. Add
_bootstrapas a suffix in the endpoint name to easily differentiate between the two endpoints.Note
The GCP Project ID is the same for both endpoints. You only need to add it to Couchbase Capella once in the next step.
In the Network management page or tab of the desired Confluent Cloud environment, click the For serverless products tab.
Click the gateway to which you want to add the Private Service Connect endpoint.
In the Access points tab, click Add access point.
Click the service you want to connect to, specifically, Couchbase. Select Other if you do not see the specific service.
Specific services are listed based on the cloud provider for the gateway.
Follow the steps below to specify the following field values:
Access point name: Name of the Private Service Connect endpoint.
Create an endpoint with high availability: Check the box if you wish to deploy an endpoint with high availability.
Endpoints deployed with high availability have network interfaces deployed in multiple availability zones.
PrivateLink service name: The Service Attachment URI you retrieved in Step 1. Create a Couchbase Capella private endpoint.
Click Create access point to create the Private Service Connect endpoint.
Copy the GCP Project ID that is generated. You will need this in Step 3. Configure the Couchbase Capella private endpoint.
Repeat the steps 3-6 to create a second access point for the Bootstrap Service attachment. Add
_bootstrapas a suffix in the access point name to easily differentiate between the two endpoints.Note
The GCP Project ID is the same for both endpoints. You only need to add it to Couchbase Capella once in the next step.
Step 3. Configure the Couchbase Capella private endpoint
To complete the connection, you must authorize the Confluent Cloud project within the Couchbase Capella console.
In the Couchbase Capella console, go to the previously created Couchbase private endpoint screen.
In the Accept the connection section, enter the GCP Project ID retrieved from Step 2. Create Confluent Cloud Egress Private Service Connect endpoints.
Click Save & Close.
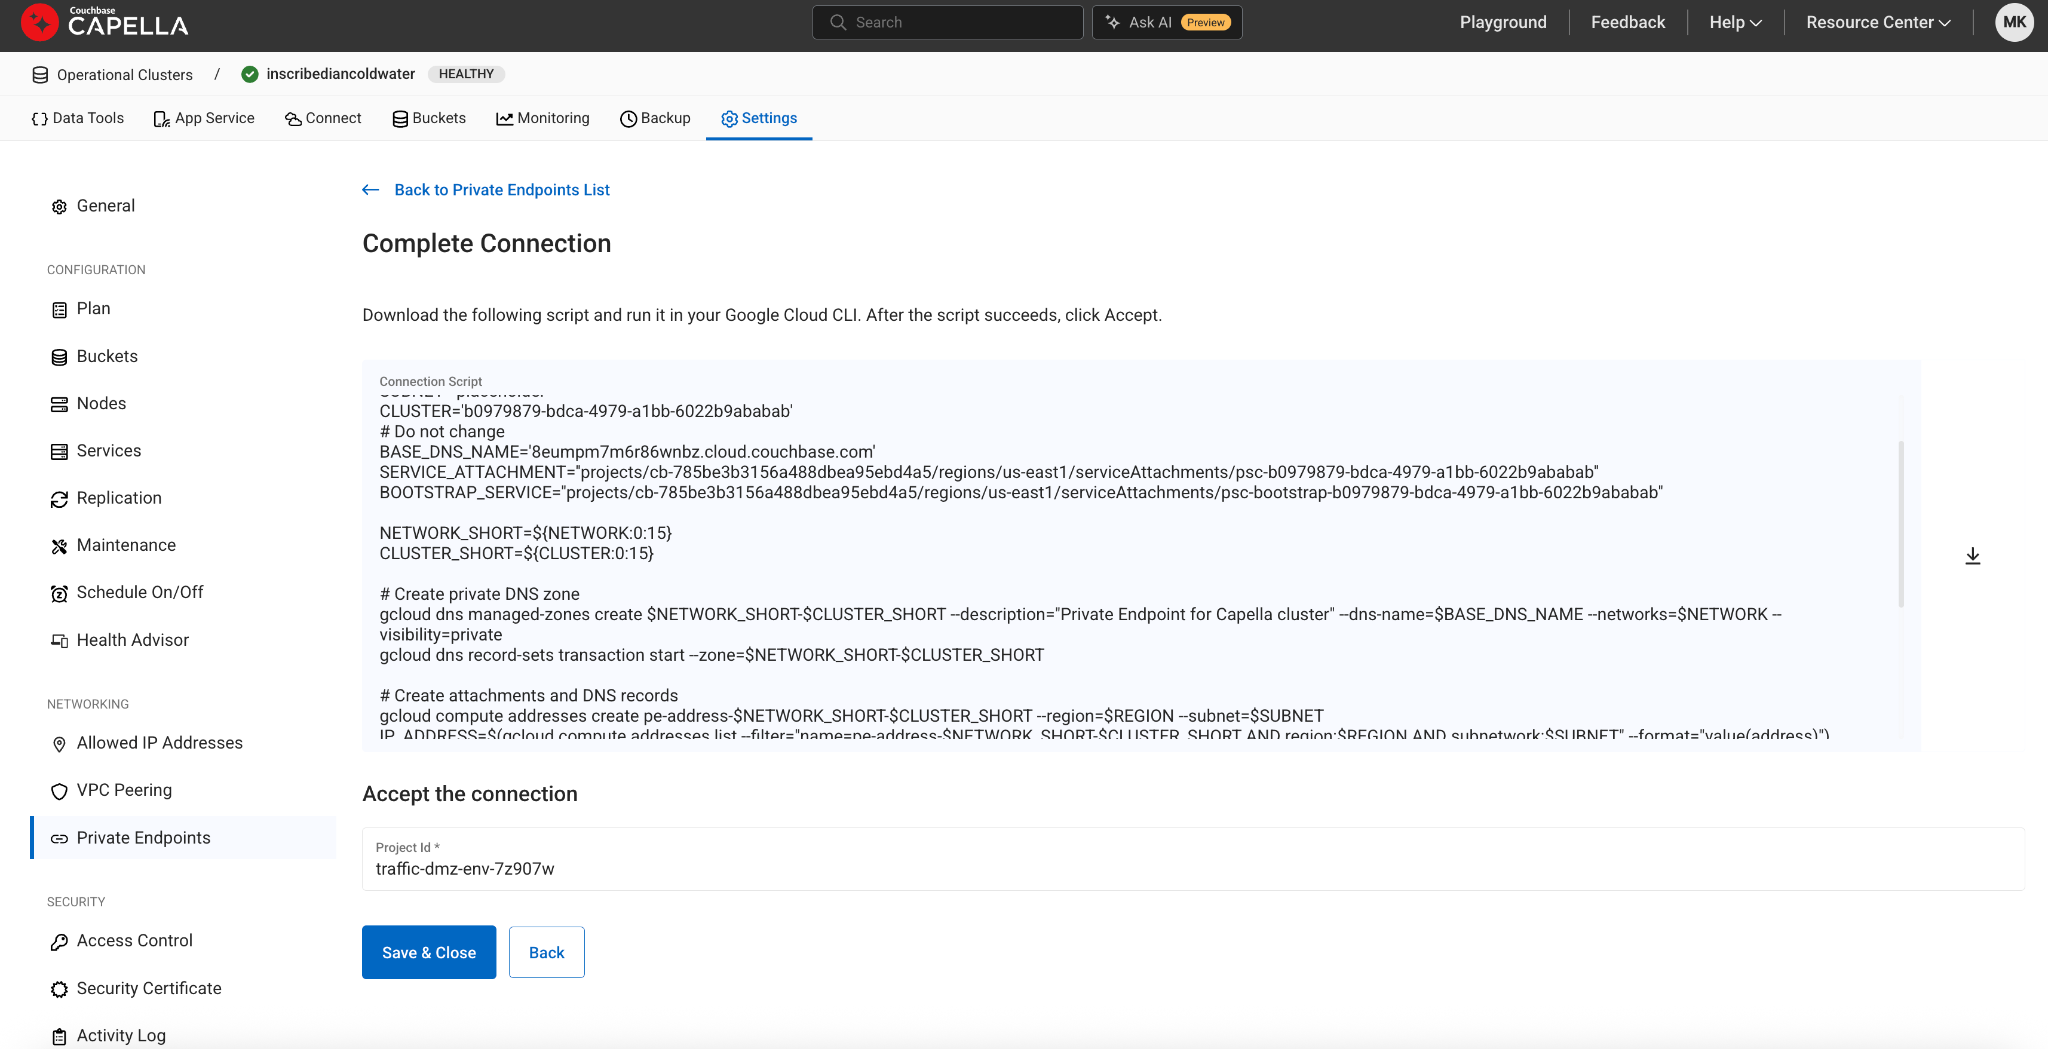
Accept Connection with GCP Project ID
Make a note of the Private Endpoint DNS. You will need this to create DNS records in the next step.
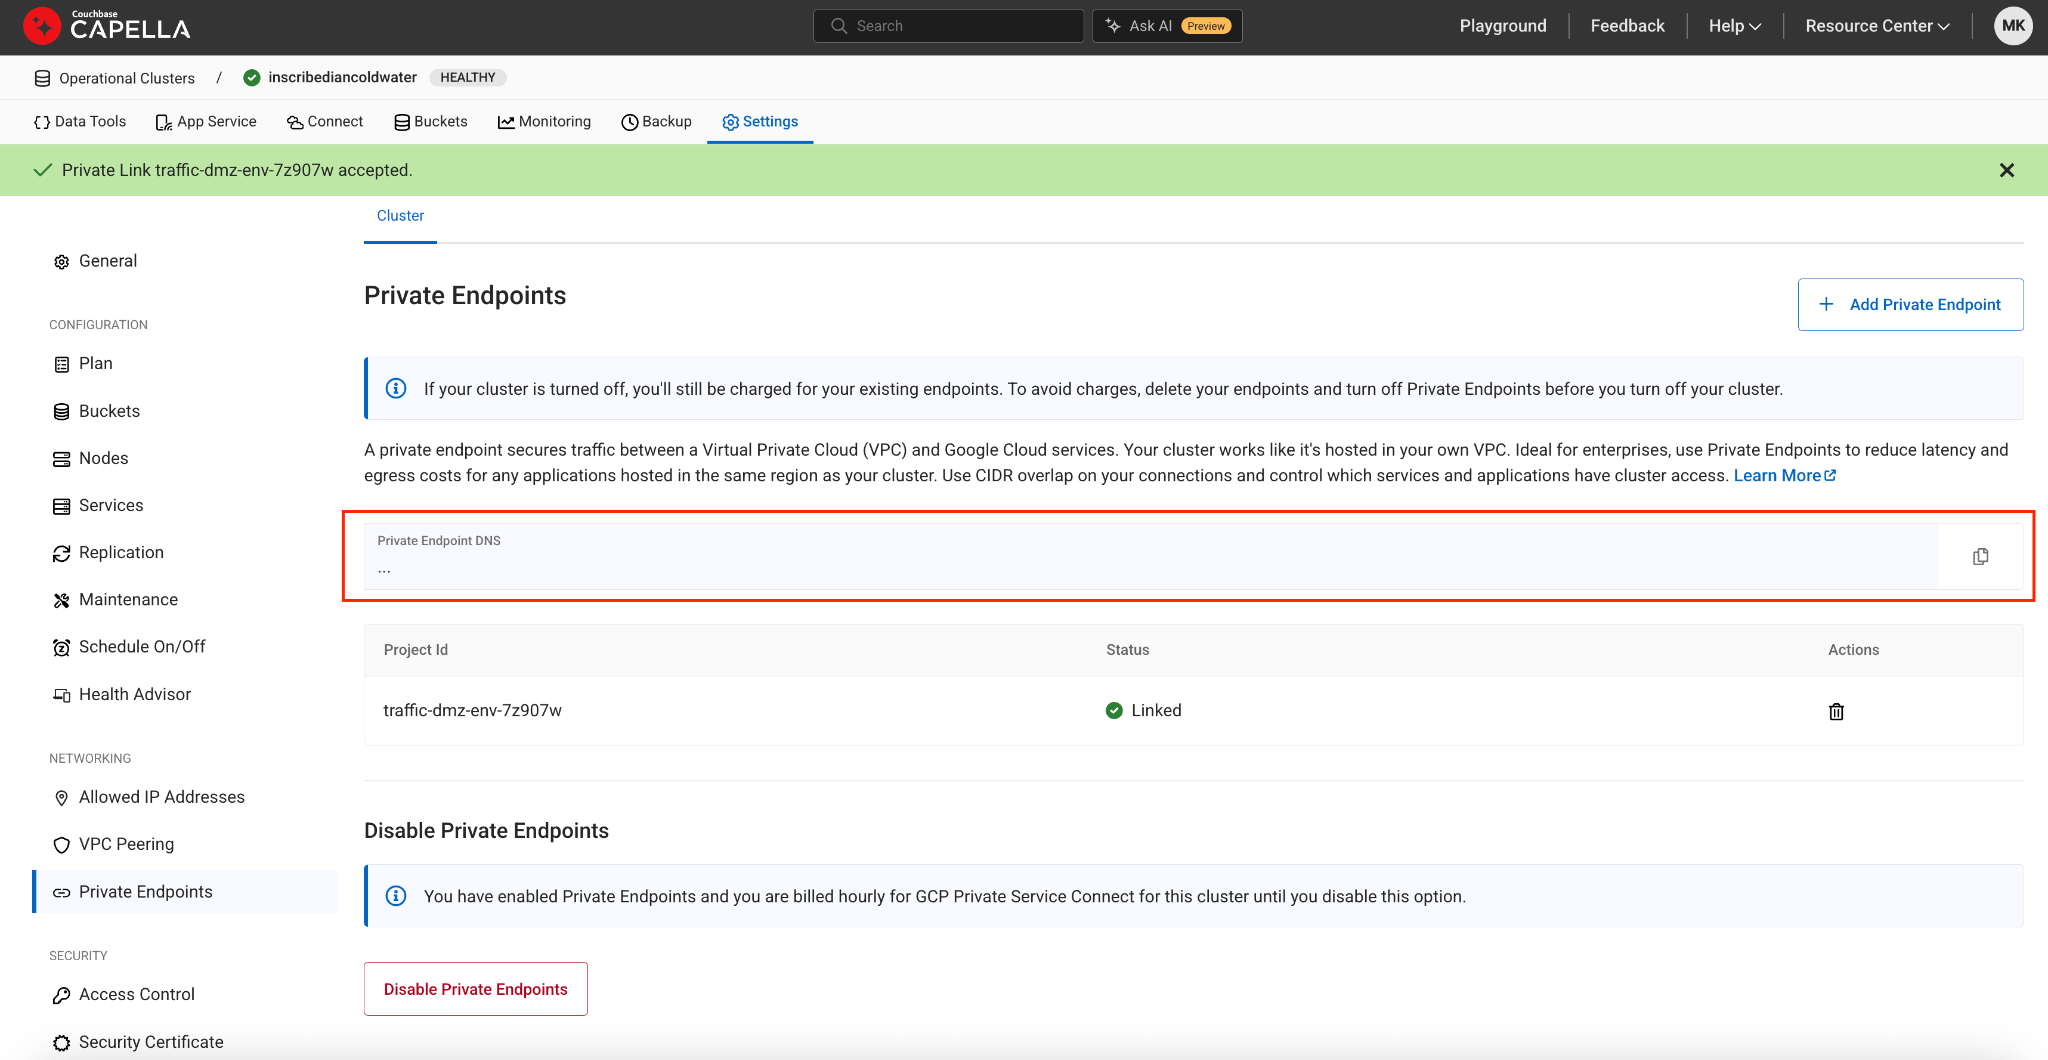
Couchbase Capella Private Endpoint DNS
Step 4. Create DNS records for each endpoint
You must create a DNS record for each of the two Private Service Connect endpoints created in Step 2. Create Confluent Cloud Egress Private Service Connect endpoints.
When the Private Service Connect endpoint status transitions to Ready, in the Egress connections tab, click Create record on the associated Private Service Connect endpoint.
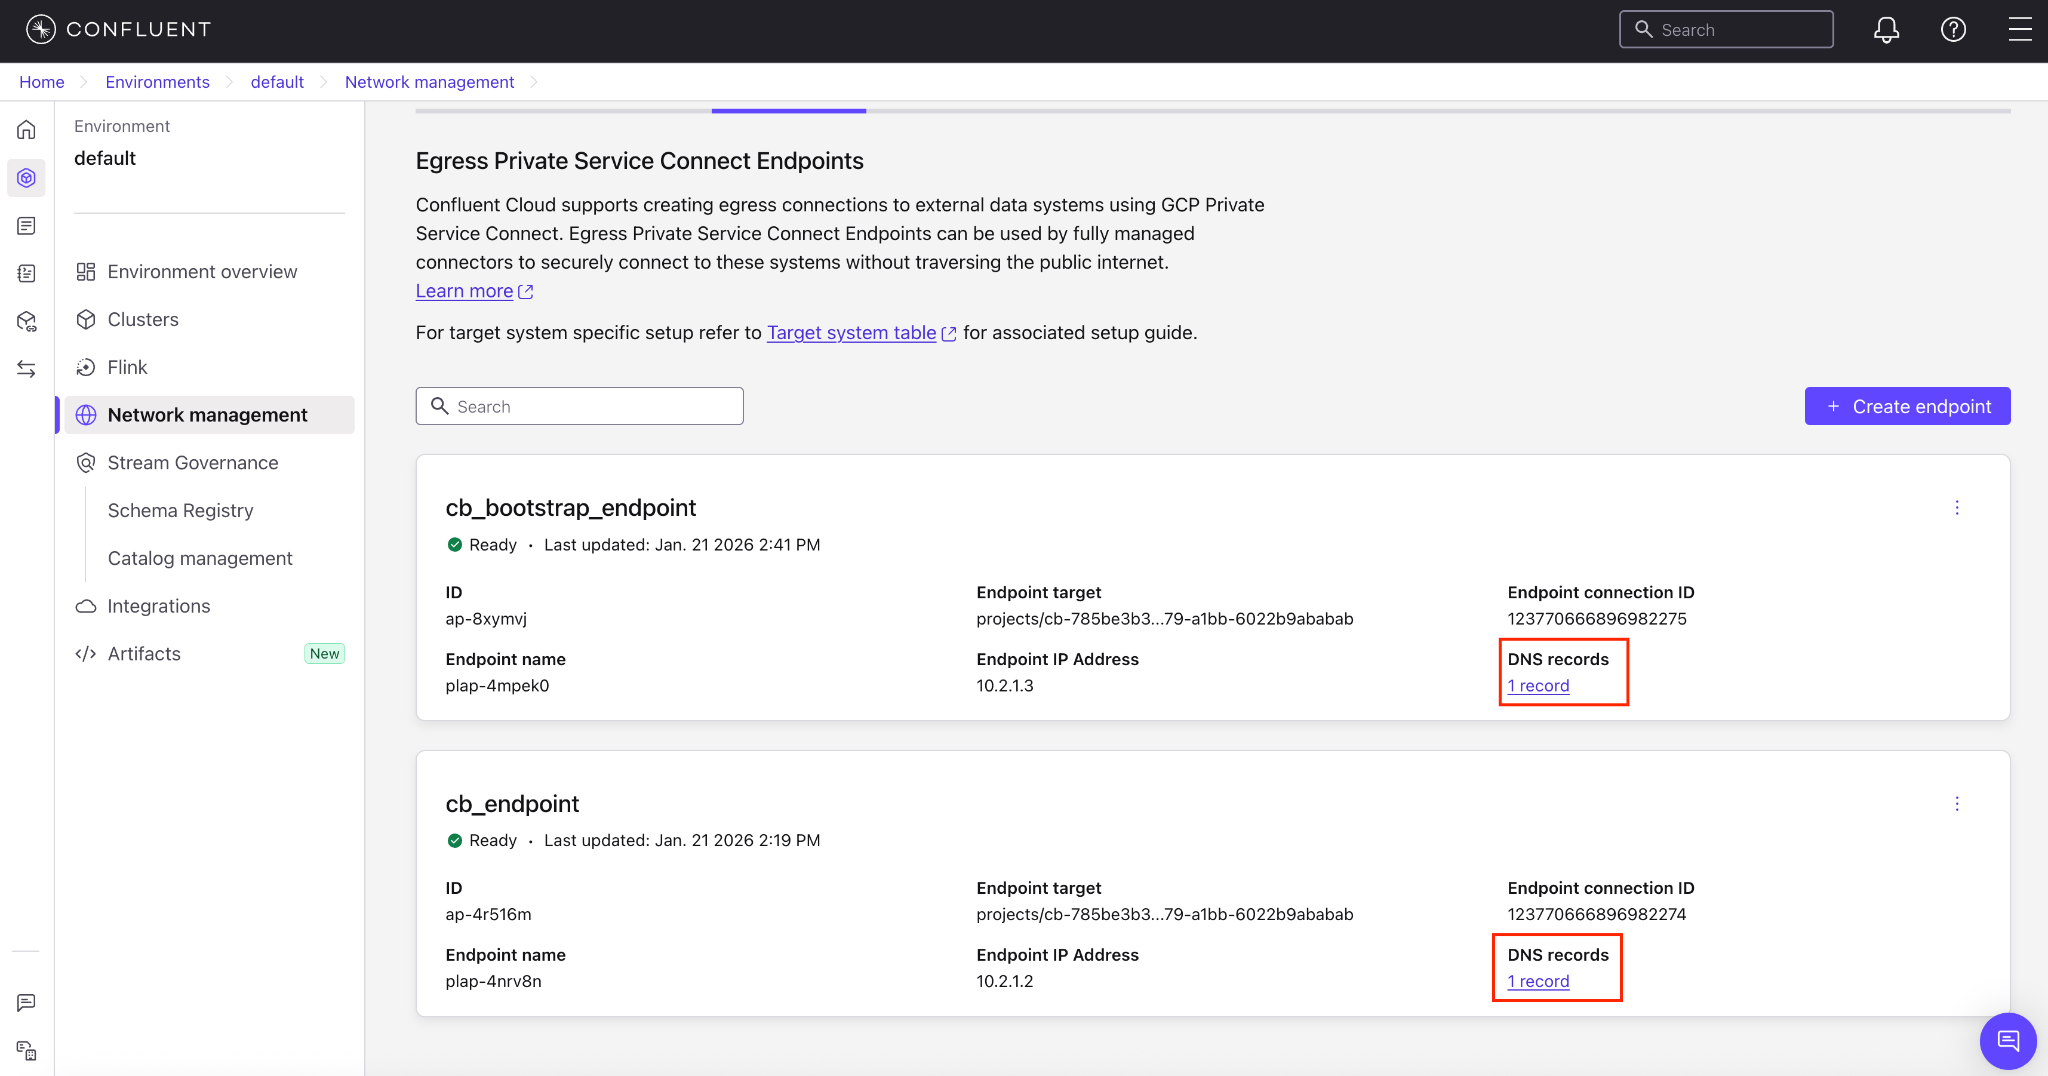
Create a DNS Record
Specify the following, and click Save.
Access point: Select the Private Service Connect endpoint you created in Step 2. Create Confluent Cloud Egress Private Service Connect endpoints.
Domain: Enter the domain name as the Private Endpoint DNS name retrieved from Couchbase Capella in Step 3. Configure the Couchbase Capella private endpoint.
Repeat these steps to create a DNS record for the second (bootstrap) endpoint, using the corresponding bootstrap DNS name from Couchbase Capella.
In the Network Management tab of your environment, click the For serverless products tab, and click the Confluent Cloud gateway you want to add the DNS record to.
In the DNS tab, click Create DNS record.
Specify the following field values:
Access point: Select the Private Service Connect endpoint you created above in Step 2. Create Confluent Cloud Egress Private Service Connect endpoints.
Domain: Enter the domain name as the Private Endpoint DNS name retrieved from Couchbase Capella in Step 3. Configure the Couchbase Capella private endpoint.
Click Save.
Repeat these steps to create a DNS record for the second (bootstrap) endpoint, using the corresponding bootstrap DNS name from Couchbase Capella.
Step 5. Create the Couchbase Sink connector
The final step is to configure the connector using the DNS endpoints you established.
Specify the authentication details for Couchbase.
For the Couchbase Seed Node, specify the Private Endpoint DNS name you retrieved in Step 3. Configure the Couchbase Capella private endpoint and prepend it with the prefix
couchbases://and append?network=externalat the end of the connection string (for example,couchbases://<private-endpoint-dns>?network=external).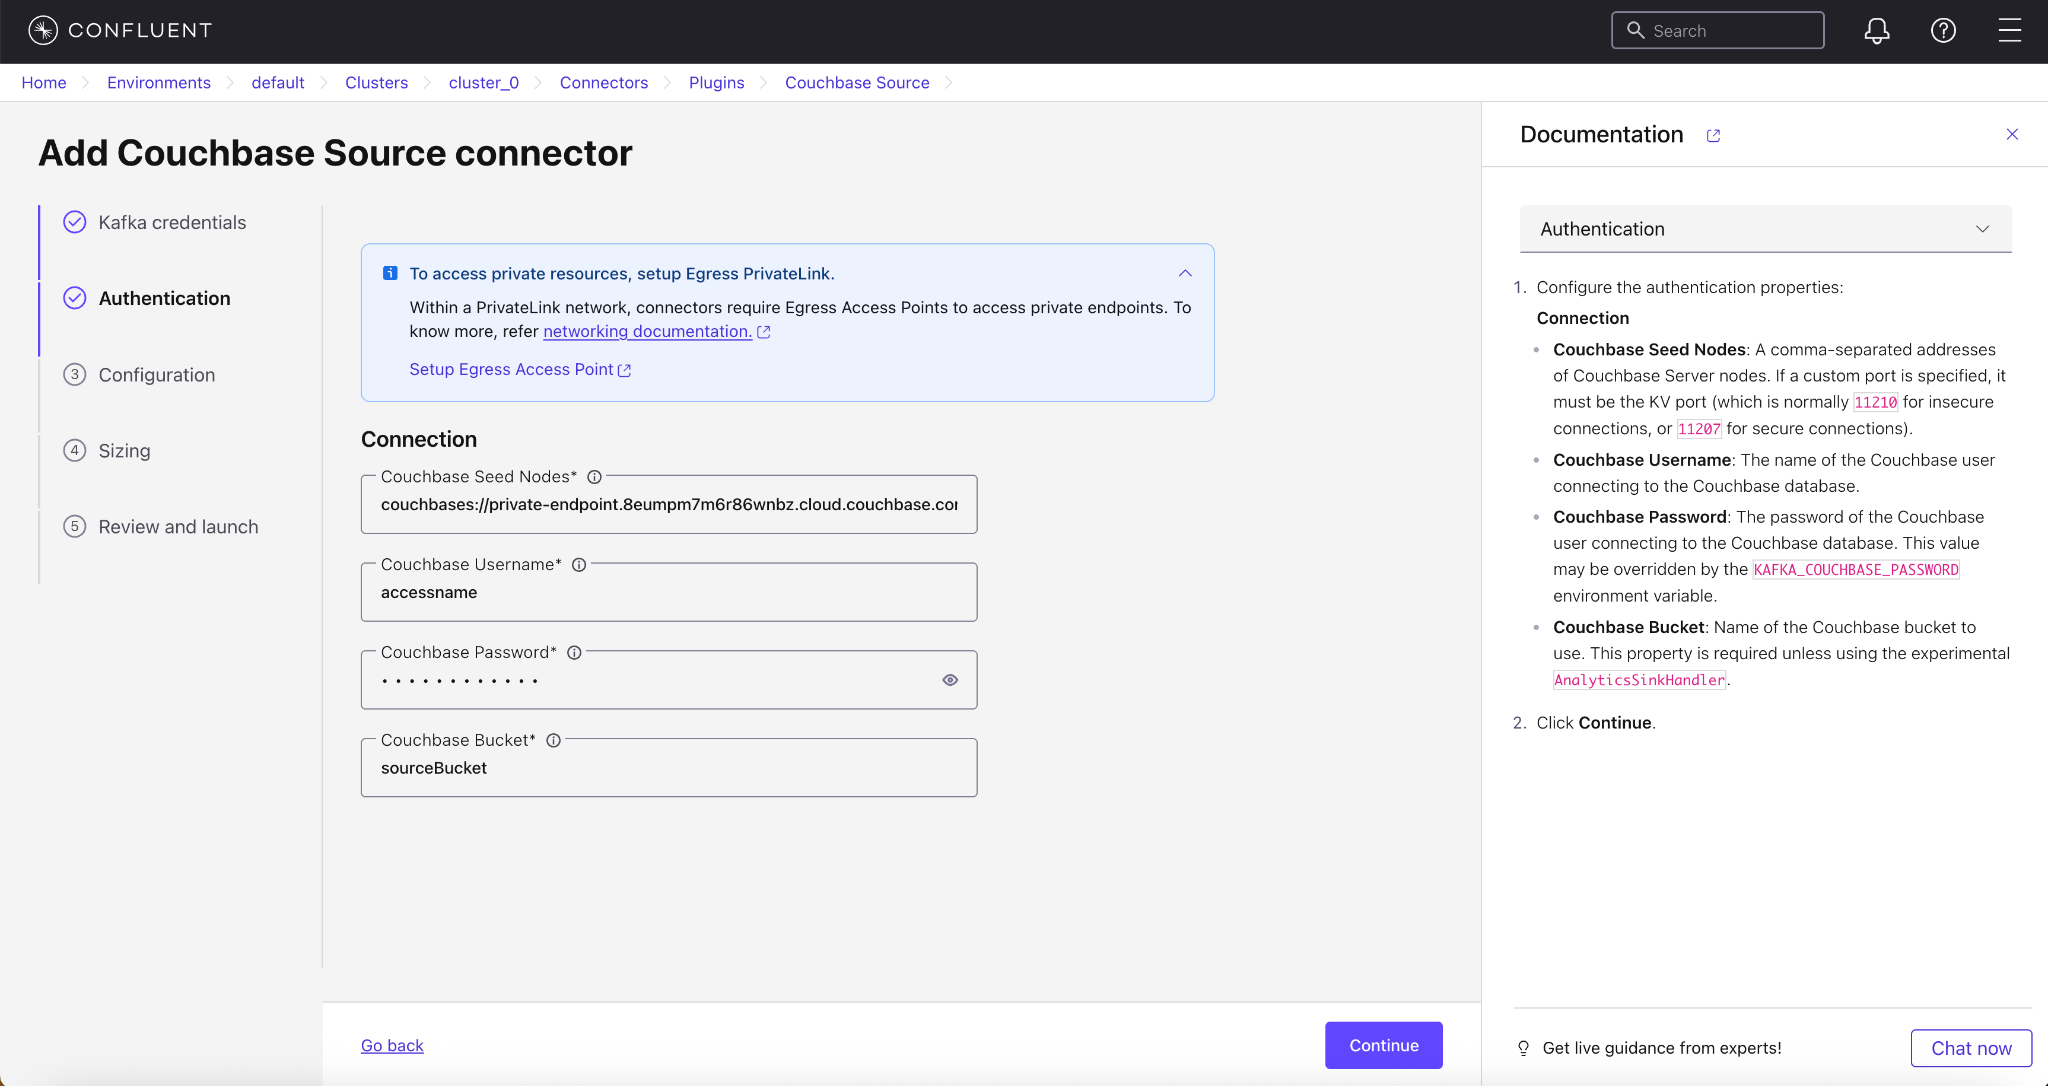
Create a Couchbase DB Sink Connector
Follow the steps to create the sink connector in Confluent Cloud.
After the connector is provisioned, contact Confluent Support and provide the Connector Unique ID to enable the
network=externalparameter in the backend. The connector begins processing data once this backend configuration is complete.