
PostgreSQL CDC Source Connector (Debezium) [End of Life] for Confluent Cloud
Important
This connector reached its end of life (EOL) on March 31, 2026. Confluent recommends migrating to PostgreSQL CDC Source V2 (Debezium) connector. For more information, see Deprecated and end of life connectors.
The fully-managed PostgreSQL Change Data Capture (CDC) Source connector (Debezium) [Deprecated] for Confluent Cloud can obtain a snapshot of the existing data in a PostgreSQL database and then monitor and record all subsequent row-level changes to that data. The connector supports Avro, JSON Schema, Protobuf, or JSON (schemaless) output data formats. All of the events for each table are recorded in a separate Apache Kafka® topic. The events can then be easily consumed by applications and services.
Note
This Quick Start is for the fully-managed Confluent Cloud connector. If you are installing the connector locally for Confluent Platform, see Debezium PostgreSQL Source Connector for Confluent Platform.
For more information about Debezium connectors, see Debezium documentation.
If you require private networking for fully-managed connectors, make sure to set up the proper networking beforehand. For more information, see Manage Networking for Confluent Cloud Connectors.
Features
The PostgreSQL CDC Source connector (Debezium) [Deprecated] provides the following features:
Topics created automatically: The connector automatically creates Kafka topics using the naming convention:
<database.server.name>.<schemaName>.<tableName>. The topics are created with the properties:topic.creation.default.partitions=1andtopic.creation.default.replication.factor=3. For more information, see Maximum message size.Logical decoding plugins supported:
wal2json,wal2json_rds,wal2json_streaming,wal2json_rds_streaming,pgoutput,decoderbufs. The default used ispgoutput.Database authentication: Uses password authentication.
SSL support: Supports one-way SSL.
Output data formats: The connector supports Avro, JSON Schema, Protobuf, or JSON (schemaless) output Kafka record value format. It supports Avro, JSON Schema, Protobuf, JSON (schemaless), and String output record key format. Schema Registry must be enabled to use a Schema Registry-based format (for example, Avro, JSON_SR (JSON Schema), or Protobuf).
Tasks per connector: Organizations can run multiple connectors with a limit of one task per connector (that is,
"tasks.max": "1").Select configuration properties:
Tables included and Tables excluded: Allows you to set whether a table is or is not monitored for changes. By default, the connector monitors every non-system table.
Snapshot mode: Allows you to specify the criteria for running a snapshot.
Tombstones on delete: Allows you to configure whether a tombstone event should be generated after a delete event. Default is
true.Other configuration properties:
poll.interval.msmax.batch.sizemax.queue.size
Incremental snapshot: Supports incremental snapshotting via signaling. Note that you need to manually add the signal table to the publication if
publication.autocreate.modeis set tofilteredordisabled.Offset management capabilities: Supports offset management. For more information, see Manage custom offsets.
For more information and examples to use with the Confluent Cloud API for Connect, see the Confluent Cloud API for Connect Usage Examples section.
Supported database versions
The PostgreSQL CDC Source connector (Debezium) [Legacy] is compatible with the following PostgreSQL versions: 10, 11, 12, 13, 14, 15, 16.
Limitations
Be sure to review the following information.
For connector limitations, see PostgreSQL CDC Source (Debezium) [Legacy] Connector limitations.
If you plan to use one or more Single Message Transformations (SMTs), see SMT Limitations.
If you plan to use one or more Custom SMTs, see Custom SMT limitations.
Database roles and permissions
By default, superusers have the REPLICATION and LOGIN roles. To follow the principle of least privilege, do not provide the Debezium replication user with elevated privileges. Instead, create a Debezium user with the following minimum required privileges:
Replication privilege
This privilege allows the user to stream changes from the write-ahead log (WAL). Define a PostgreSQL role with at least REPLICATION and LOGIN permissions:
CREATE ROLE <user_name> with LOGIN REPLICATION PASSWORD '<password>';
Database connection privilege
This privilege permits the user to connect to the specific database only.
GRANT CONNECT ON DATABASE <database_name> TO <user_name>;
Publication privilege
You have several options for creating publications. In general, it is best to manually create publications for the tables that you want to capture before configuring the connector. Alternatively, you can configure your environment to allow Debezium to automatically create publications and specify the data to include.
The following permissions are required only if the connector must manage the publication.
When using pgoutput as the logical decoding plugin, the connector requires specific privileges to create and manage publications. If the source table already exists, the replication user must have shared ownership with the original owner. Configure this by creating a replication group:
CREATE ROLE <replication_group>;                                     //Create a replication group
GRANT <replication_group> TO <original_owner>;                       //Add the original owner of the table to the group
GRANT <replication_group> TO <user_name>;                            //Add the Debezium replication user to the group.
ALTER TABLE <schema_name>.<table_name> OWNER TO <replication_group>; //Transfer ownership of the table to <replication_group>
In addition to the permissions above, the user requires CREATE privileges on the database to manage publications. Run the following command:
GRANT CREATE ON DATABASE <database_name> TO <user_name>;
If the connector user does not own the source tables, you must transfer ownership of every table the connector captures to that user. For future tables, you can automate this process using a database trigger. For example, configure a trigger to execute the following command whenever a CREATE TABLE event occurs in the target schema:
ALTER TABLE <schema_name>.<table_name> OWNER TO <replication_group>;
Maximum message size
This connector creates topics automatically. When it creates topics, the internal connector configuration property max.message.bytes is set to the following:
Basic cluster:
8 MBStandard cluster:
8 MBEnterprise cluster:
8 MBDedicated cluster:
20 MB
For more information about Confluent Cloud clusters, see Kafka Cluster Types in Confluent Cloud.
Log retention during snapshot
When launched, the CDC connector creates a snapshot of the existing data in the database to capture the nominated tables. To do this, the connector executes a “SELECT *” statement. Completing the snapshot can take a while if one or more of the nominated tables is very large.
During the snapshot process, the database server must retain redo logs and transaction logs so that when the snapshot is complete, the CDC connector can start processing database changes that have completed since the snapshot process began. These logs are retained in a binary log (binlog) on the database server.
If one or more of the tables are very large, the snapshot process could run longer than the binlog retention time set on the database server (that is, expire_logs_days = <number-of-days>). To capture very large tables, you should temporarily retain the binlog for longer than normal by increasing the expire_logs_days number.
Manage custom offsets
You can manage the offsets for this connector. Offsets provide information on the point in the system from which the connector is accessing data. For more information, see Manage Offsets for Fully-Managed Connectors in Confluent Cloud.
To manage offsets:
Manage offsets using Confluent Cloud APIs. For more information, see Connect offsets API reference.
Note
When you reset the offset to a Log Sequence Number (LSN) from an earlier transaction, the connector might not be able to replay older events if that LSN precedes the confirmed_flush_lsn of the replication slot.
To get the current offset, make a GET request that specifies the environment, Kafka cluster, and connector name.
GET /connect/v1/environments/{environment_id}/clusters/{kafka_cluster_id}/connectors/{connector_name}/offsets
Host: https://api.confluent.cloud
Response:
Successful calls return HTTP 200 with a JSON payload that describes the offset.
{
    "id": "lcc-example123",
    "name": "{connector_name}",
    "offsets": [
      {
        "partition": {
          "server": "server_01"
        },
        "offset": {
          "lsn": 9943856034248,
          "lsn_proc": 9943856034248,
          "lsn_commit": 9943856034156,
          "messageType": "INSERT",
          "transaction_id": null,
          "txId": 1142586,
          "ts_usec": 1714023032677090
        }
      }
    ],
    "metadata": {
        "observed_at": "2025-07-28T17:57:48.139635200Z"
    }
}
Responses include the following information:
The position of latest offset.
The observed time of the offset in the metadata portion of the payload. The
observed_attime indicates a snapshot in time for when the API retrieved the offset. A running connector is always updating its offsets. Useobserved_atto get a sense for the gap between real time and the time at which the request was made. By default, offsets are observed every minute. CallingGETrepeatedly will fetch more recently observed offsets.Information about the connector.
To update the offset, make a POST request that specifies the environment, Kafka cluster, and connector name. Include a JSON payload that specifies new offset and a patch type.
POST /connect/v1/environments/{environment_id}/clusters/{kafka_cluster_id}/connectors/{connector_name}/offsets/request
Host: https://api.confluent.cloud

 {
     "type": "PATCH",
     "offsets": [
       {
         "partition": {
           "server": "server_01"
         },
         "offset": {
           "lsn": 9943855924248,
           "lsn_commit": 9943855924192,
           "lsn_proc": 9943855924248
         }
       }
     ]
 }
Considerations:
You can only make one offset change at a time for a given connector.
This is an asynchronous request. To check the status of this request, you must use the check offset status API. For more information, see Get the status of an offset request.
For source connectors, the connector attempts to read from the position defined by the requested offsets.
Response:
Successful calls return HTTP 202 Accepted with a JSON payload that describes the offset.
{
    "id": "lcc-example123",
    "name": "{connector_name}",
    "offsets": [
      {
          "partition": {
              "server": "server_01"
          },
          "offset": {
              "lsn": 9943855924248,
              "lsn_commit": 9943855924192,
              "lsn_proc": 9943855924248
          }
      }
    ],
    "requested_at": "2025-07-28T17:58:45.606796307Z",
    "type": "PATCH"
}
Responses include the following information:
The requested position of the offsets in the source.
The time of the request to update the offset.
Information about the connector.
To delete the offset, make a POST request that specifies the environment, Kafka cluster, and connector name. Include a JSON payload that specifies the delete type.
 POST /connect/v1/environments/{environment_id}/clusters/{kafka_cluster_id}/connectors/{connector_name}/offsets/request
 Host: https://api.confluent.cloud

{
  "type": "DELETE"
}
Considerations:
Delete requests delete the offset for the provided partition and reset to the base state. A delete request is as if you created a fresh new connector.
This is an asynchronous request. To check the status of this request, you must use the check offset status API. For more information, see Get the status of an offset request.
Do not issue delete and patch requests at the same time.
For source connectors, the connector attempts to read from the position defined in the base state.
Response:
Successful calls return HTTP 202 Accepted with a JSON payload that describes the result.
{
  "id": "lcc-example123",
  "name": "{connector_name}",
  "offsets": [],
  "requested_at": "2025-07-28T17:59:45.606796307Z",
  "type": "DELETE"
}
Responses include the following information:
Empty offsets.
The time of the request to delete the offset.
Information about Kafka cluster and connector.
The type of request.
To get the status of a previous offset request, make a GET request that specifies the environment, Kafka cluster, and connector name.
GET /connect/v1/environments/{environment_id}/clusters/{kafka_cluster_id}/connectors/{connector_name}/offsets/request/status
Host: https://api.confluent.cloud
Considerations:
The status endpoint always shows the status of the most recent PATCH/DELETE operation.
Response:
Successful calls return HTTP 200 with a JSON payload that describes the result. The following is an example of an applied patch.
{
   "request": {
      "id": "lcc-example123",
      "name": "{connector_name}",
      "offsets": [
         {
             "partition": {
                 "server": "server_01"
             },
             "offset": {
                 "lsn": 9943855924248,
                 "lsn_commit": 9943855924192,
                 "lsn_proc": 9943855924248
             }
         }
       ],
      "requested_at": "2025-07-28T17:58:45.606796307Z",
      "type": "PATCH"
   },
   "status": {
      "phase": "APPLIED",
      "message": "The Connect framework-managed offsets for this connector have been altered successfully. However, if this connector manages offsets externally, they will need to be manually altered in the system that the connector uses."
   },
   "previous_offsets": [
       {
           "partition": {
             "server": "server_01"
           },
           "offset": {
             "lsn": 9943856034248,
             "lsn_proc": 9943856034248,
             "lsn_commit": 9943856034156,
             "messageType": "INSERT",
             "transaction_id": null,
             "txId": 1142586,
             "ts_usec": 1714023032677090
           }
       }
   ],
   "applied_at": "2025-07-28T17:58:48.079141883Z"
}
Responses include the following information:
The original request, including the time it was made.
The status of the request: applied, pending, or failed.
The time you issued the status request.
The previous offsets. These are the offsets that the connector last updated prior to updating the offsets. Use these to try to restore the state of your connector if a patch update causes your connector to fail or to return a connector to its previous state after rolling back.
JSON payload
The table below offers a description of the unique fields in the JSON payload for managing offsets of the PostgreSQL Change Data Capture (CDC) Source (Debezium) connector.
Field | Definition | Required/Optional |
|---|---|---|
| The logical name of the server, specified by the configuration | Required |
| The Log Sequence Number (LSN) is a 64-bit number to identify the position of Write Ahead Log (WAL) records.
| Required |
| The LSN of the last processed event. When consuming from the replication slot, commits and their corresponding commit LSNs are totally ordered. While LSNs of change events within a transaction maintain order, it is important to note that LSN ordering is not preserved across transactions. Hence, to establish totally ordered positions, both the commit LSN and the LSN of the last processed event are required. | Required |
|
| Required |
| The operation associated with the event for which the offset is committed. This is added to identify | Optional |
| If the configuration | Optional |
| If the configuration | Optional |
| Id of the transaction to which the event corresponds. | Optional |
| Time in microseconds for the | Optional |
Quick Start
Use this quick start to get up and running with the Confluent Cloud PostgreSQL CDC Source (Debezium) [Legacy] connector. The quick start provides the basics of selecting the connector and configuring it to obtain a snapshot of the existing data in a PostgreSQL database and then monitoring and recording all subsequent row-level changes.
- Prerequisites
Authorized access to a Confluent Cloud cluster on Amazon Web Services (AWS), Microsoft Azure (Azure), or Google Cloud.
The Confluent CLI installed and configured for the cluster. See Install the Confluent CLI.
Schema Registry must be enabled to use a Schema Registry-based format (for example, Avro, JSON_SR (JSON Schema), or Protobuf).
You cannot use a basic database with Azure. You must use a general purpose or memory-optimized PostgreSQL database.
The PostgreSQL database must be configured for CDC. For details, see PostgreSQL in the Cloud.
Clients from Azure Virtual Networks are not allowed to access the server by default. Check that your Azure Virtual Network is correctly configured and that Allow access to Azure Services is enabled.
Public access may be required for your database. See Manage Networking for Confluent Cloud Connectors for details. The following example shows the AWS Management Console when setting up a PostgreSQL database.
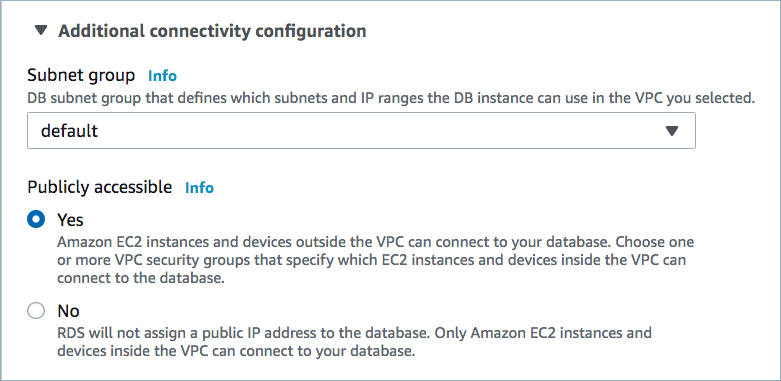
Public access enabled
A parameter group with the property
rds.logical_replication=1is required. An example is shown below. Once created, you must reboot the database.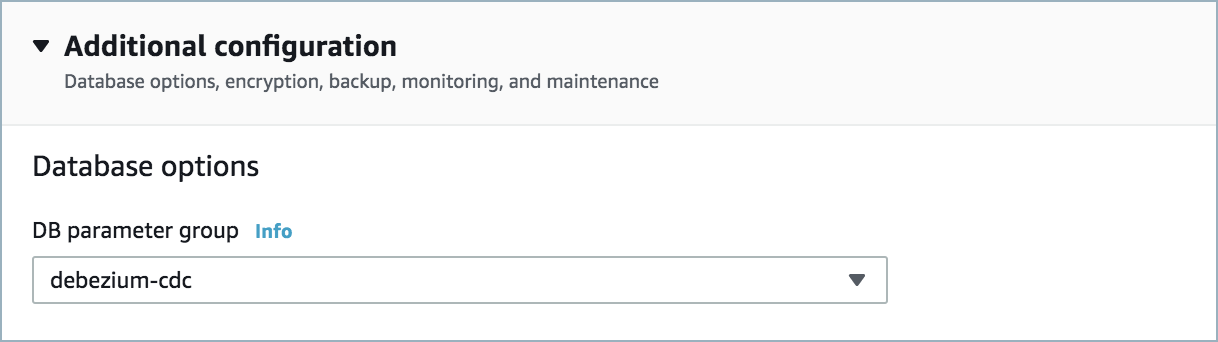
Parameter group

RDS logical replication
For networking considerations, see Networking and DNS. To use a set of public egress IP addresses, see Public Egress IP Addresses for Confluent Cloud Connectors. The following example shows the AWS Management Console when setting up security group rules for the VPC.

Open inbound traffic
Note
See your specific cloud platform documentation for how to configure security rules for your VPC.
Kafka cluster credentials. The following lists the different ways you can provide credentials.
Enter an existing service account resource ID.
Create a Confluent Cloud service account for the connector. Make sure to review the ACL entries required in the service account documentation. Some connectors have specific ACL requirements.
Create a Confluent Cloud API key and secret. To create a key and secret, you can use confluent api-key create or you can autogenerate the API key and secret directly in the Cloud Console when setting up the connector.
Using the Confluent Cloud Console
Step 1: Launch your Confluent Cloud cluster
To create and launch a Kafka cluster in Confluent Cloud, see Create a kafka cluster in Confluent Cloud.
Step 2: Add a connector
In the left navigation menu, click Connectors. If you already have connectors in your cluster, click + Add connector.
Step 3: Select your connector
Click the PostgreSQL CDC Source (Debezium) [Legacy] connector card.
Step 4: Enter the connector details
Note
Make sure you have all your prerequisites completed.
An asterisk ( * ) designates a required entry.
At the Add Postgres CDC Source (Debezium) [Legacy] Connector screen, complete the following:
Select the way you want to provide Kafka Cluster credentials. You can choose one of the following options:
My account: This setting allows your connector to globally access everything that you have access to. With a user account, the connector uses an API key and secret to access the Kafka cluster. This option is not recommended for production.
Service account: This setting limits the access for your connector by using a service account. This option is recommended for production.
Use an existing API key: This setting allows you to specify an API key and a secret pair. You can use an existing pair or create a new one. This method is not recommended for production environments.
Note
Freight clusters support only service accounts for Kafka authentication.
Click Continue.
Configure the authentication properties:
Database name: The name of the PostgreSQL database to connect to.
Database server name: The logical name of the PostgreSQL server/cluster. This logical name forms a namespace and is used in all the names of the Kafka topics and the Kafka Connect schema names.
SSL mode: The SSL mode to use to connect to your database.
How should we connect to your database?
Database hostname: The address of the PostgreSQL.
Database port: The port number of the PostgreSQL.
Database username: The name of the PostgreSQL database user connecting to the PostgreSQL database.
Database password: The password for the PostgreSQL database user connecting to the PostgreSQL database.
Click Continue.
Output Kafka record value format: Select the output record value format (data going to the Kafka topic): AVRO, JSON, JSON_SR (JSON Schema), or PROTOBUF. Schema Registry must be enabled to use a Schema Registry-based format (for example, Avro, JSON Schema, or Protobuf). For additional See information.
Output Kafka record key format: Select the output Kafka record key format. Valid entries are AVRO, JSON_SR, PROTOBUF, STRING or JSON. Note that you need to have Confluent Cloud Schema Registry configured if using a schema-based message format like AVRO, JSON_SR, and PROTOBUF.
Show advanced configurations
Schema context: Select a schema context to use for this connector, if using a schema-based data format. This property defaults to the Default context, which configures the connector to use the default schema set up for Schema Registry in your Confluent Cloud environment. A schema context allows you to use separate schemas (like schema sub-registries) tied to topics in different Kafka clusters that share the same Schema Registry environment. For example, if you select a non-default context, a Source connector uses only that schema context to register a schema and a Sink connector uses only that schema context to read from. For more information about setting up a schema context, see What are schema contexts and when should you use them?.
Snapshot mode: Specifies the criteria for performing a database snapshot when the connector starts.
Signal data collection: Fully-qualified name of the data collection that is used to send signals to the connector. The collection name is of the form
schemaName.tableName. These signals can be used to perform incremental snapshotting.Plugin name: The name of the Postgres logical decoded plugin installed on server.
Slot name: The name of the PostgreSQL logical decoding slot that is created for streaming changes from a particular plug-in and for a particular database/schema. The server uses this slot to stream events to the connector.
Publication name: The name of the PostgreSQL publication created for streaming changes when using pgoutput. Defaults to
dbz_publication.Publication auto-create mode: Determines how creation of publication should work when using pgoutput. Possible options are:
all_tables,disabledandfiltered.all_tables(default): If a publication exists, the connector uses it. If a publication does not exist, the connector creates a publication for all tables in the database for which the connector is capturing changes. This requires that the database user that has permission to perform replications also has permission to create a publication.disabled: The connector does not attempt to create a publication. A database administrator or the user configured to perform replications must have created the publication before running the connector. If the connector cannot find the publication, the connector throws an exception and stops.filtered: If a publication exists, the connector uses it. If no publication exists, the connector creates a new publication for tables that match the current filter configuration as specified by theTables included, andTables excludedconnector configuration properties.
Heartbeat action query: Specifies a query that the connector executes on the source database when the connector sends a heartbeat message.
HStore handling mode: Specifies how
HSTOREcolumns should be represented in change events.Interval handling mode: Specifies how
INTERVALcolumns should be represented in change events.Schema refresh mode: Select the conditions that triggers a refresh of the in-memory schema for a table.
Additional Configs
value.converter.replace.null.with.default: Whether to replace fields that have a default value and that are null to the default value. When set to true, the default value is used, otherwise null is used. Applicable for JSON Converter.
Value Converter Reference Subject Name Strategy: Sets the subject reference name strategy for values. Valid entries are
DefaultReferenceSubjectNameStrategyorQualifiedReferenceSubjectNameStrategy. You can use this strategy only withPROTOBUFformat; the default strategy isDefaultReferenceSubjectNameStrategy.value.converter.schemas.enable: Include schemas within each of the serialized values. Input messages must contain schema and payload fields and may not contain additional fields. For plain JSON data, set this to false. Applicable for JSON Converter.
errors.tolerance: Use this property if you would like to configure the connector’s error handling behavior. WARNING: This property should be used with CAUTION for SOURCE CONNECTORS as it may lead to dataloss. If you set this property to ‘all’, the connector will not fail on errant records, but will instead log them (and send to DLQ for Sink Connectors) and continue processing. If you set this property to ‘none’, the connector task will fail on errant records.
value.converter.ignore.default.for.nullables: When set to true, this property ensures that the corresponding record in Kafka is NULL, instead of showing the default column value. Applicable for AVRO,PROTOBUF and JSON_SR Converters.
Value Converter Decimal Format: Specifies the
JSONorJSON_SRserialization format for ConnectDECIMALlogical type values with two allowed literals:BASE64to serializeDECIMALlogical types as base64 encoded binary data, andNUMERICto serializeDECIMALlogical type values inJSONorJSON_SRas a number representing the decimal value.Key Converter Schema ID Serializer: The class name of the schema ID serializer for keys. This is used to serialize schema IDs in the message headers.
Value Converter Connect Meta Data: Enables the Connect converter to add its metadata to the output schema. Applies to Avro converters.
Value Converter Value Subject Name Strategy: Determines how to construct the subject name under which the value schema is registered with Schema Registry.
Key Converter Key Subject Name Strategy: Determines how to construct the subject name for key schema registration.
Value Converter Schema ID Serializer: The class name of the schema ID serializer for values. This is used to serialize schema IDs in the message headers.
Auto-restart policy
Enable Connector Auto-restart: Enables the auto-restart behavior of the connector and its task in the event of user-actionable errors. Defaults to
true, enabling the connector to automatically restart in case of user-actionable errors. Set this property tofalseto disable auto-restart for failed connectors. If disabled, you must manually restart the connector.
Database details
Tables included: Enter a comma-separated list of fully-qualified table identifiers for the connector to monitor. By default, the connector monitors all non-system tables. A fully-qualified table name is in the form
schemaName.tableName. This property cannot be used with the property Tables excluded.Tables excluded: Enter a comma-separated list of fully-qualified table identifiers for the connector to ignore. A fully-qualified table name is in the form
schemaName.tableName. This property cannot be used with the property Tables included.Tombstones on delete: Configure whether a tombstone event should be generated after a delete event. The default is
true.Columns Excluded: Regular expressions matching columns to exclude from change events
Propagate Source Types by Data Type: Enter a comma-separated list of regular expressions matching database-specific data types. The property adds the data type’s original type and original length (as parameters) to the corresponding field schemas in the emitted change records.
Connection details
Poll interval (ms): Set the time in milliseconds to wait for new change events when no data is returned. Default is
500ms.Max batch size: Enter the maximum number of events the connector batches during each iteration. Defaults to
1000events.Event processing failure handling mode: Specify how the connector reacts to exceptions when processing binlog events. Defaults to
fail. Selectskiporwarnto skip the event or issue a warning, respectively.Heartbeat interval (ms): Controls how frequently the connector sends heartbeat messages to a Kafka topic. The behavior of default value 0 is that the connector does not send heartbeat messages.
Output messages
After-state only: Defaults to true, which results in the Kafka record having only the record state from change events applied. Select false to maintain the prior record states after applying the change events.
Connector details
Provide transaction metadata: Select whether transaction metadata is enabled. Transaction metadata is stored in a dedicated Kafka topic. Defaults to
false.Decimal handling mode: Specify how
DECIMALandNUMERICcolumns are represented in change events.precise(the default) uses java.math.BigDecimal to represent values. The values are encoded in change events using a binary representation and the Connect org.apache.kafka.connect.data.Decimal data type. Selectstringto use string type to represent values.doublerepresents values using Java’sdoubledata type.doubledoes not provide precision, but is much easier to use in consumers.Binary handling mode: Specify how binary (blob, binary) columns are represented in change events. Select
bytes(the default) to represent binary data in byte array format. Selectbase64to represent binary data in base64-encoded string format. Selecthexto represent binary data in hex-encoded (base16) string format.Time precision mode: Time, date, and timestamps can be represented with different kinds of precision. Select
adaptive(the default) to base the precision for time, date, and timestamp values on the database column’s precision.adaptive_time_microsecondsis essentially the same as adaptive mode, with the exception thatTIMEfields always use microseconds precision.connectalways represents time, date, and timestamp values using Connect’s built-in representations for Time, Date, and Timestamp.connectuses millisecond precision regardless of what precision is used for the database columns. For more information, see Temporal types.Topic cleanup policy: Set the topic retention cleanup policy. Select
delete(the default) to discard old topics. Selectcompactto enable log compaction on the topic.
Transforms
Single Message Transformations: To add a new SMT, see Add transforms. For more information about unsupported SMTs, see Unsupported transformations.
Processing position
Set offsets: Click Set offsets to define a specific offset for this connector to begin procession data from. For more information on managing offsets, see Manage offsets.
For all property values and definitions, see Configuration Properties.
Click Continue.
Based on the number of topic partitions you select, you will be provided with a recommended number of tasks.
This connector supports a single task only.
Click Continue.
Verify the connection details by previewing the running configuration.
After you’ve validated that the properties are configured to your satisfaction, click Launch.
The status for the connector should go from Provisioning to Running.
Step 5: Check the Kafka topic
After the connector is running, verify that messages are populating your Kafka topic.
For more information and examples to use with the Confluent Cloud API for Connect, see the Confluent Cloud API for Connect Usage Examples section.
Using the Confluent CLI
Complete the following steps to set up and run the connector using the Confluent CLI.
Note
Make sure you have all your prerequisites completed.
Step 1: List the available connectors
Enter the following command to list available connectors:
confluent connect plugin list
Step 2: List the connector configuration properties
Enter the following command to show the connector configuration properties:
confluent connect plugin describe <connector-plugin-name>
The command output shows the required and optional configuration properties.
Step 3: Create the connector configuration file
Create a JSON file that contains the connector configuration properties. The following example shows the required connector properties.
{
  "connector.class": "PostgresCdcSource",
  "name": "PostgresCdcSourceConnector_0",
  "kafka.auth.mode": "KAFKA_API_KEY",
  "kafka.api.key": "****************",
  "kafka.api.secret": "****************************************************************",
  "database.hostname": "debezium-1.<host-id>.us-east-2.rds.amazonaws.com",
  "database.port": "5432",
  "database.user": "postgres",
  "database.password": "**************",
  "database.dbname": "postgres",
  "database.server.name": "cdc",
  "table.include.list":"public.passengers",
  "plugin.name": "pgoutput",
  "output.data.format": "JSON",
  "tasks.max": "1"
}
Note the following property definitions:
"connector.class": Identifies the connector plugin name."name": Sets a name for your new connector.
"kafka.auth.mode": Identifies the connector authentication mode you want to use. There are two options:SERVICE_ACCOUNTorKAFKA_API_KEY(the default). To use an API key and secret, specify the configuration propertieskafka.api.keyandkafka.api.secret, as shown in the example configuration (above). To use a service account, specify the Resource ID in the propertykafka.service.account.id=<service-account-resource-ID>. To list the available service account resource IDs, use the following command:confluent iam service-account list
For example:
confluent iam service-account list

   Id     | Resource ID |       Name        |    Description
+---------+-------------+-------------------+-------------------
   123456 | sa-l1r23m   | sa-1              | Service account 1
   789101 | sa-l4d56p   | sa-2              | Service account 2
"table.includelist": (Optional) Enter a comma-separated list of fully-qualified table identifiers for the connector to monitor. By default, the connector monitors all non-system tables. A fully-qualified table name is in the formschemaName.tableName."database.sslmode": If not entered,disableis the default option used. If you enter"database.sslmode" : "require", the connector uses a secure (encrypted) connection. The connector fails if a secure connection cannot be established. This mode does not do Certification Authority (CA) validation."output.data.format": Sets the output record format (data coming from the connector). Valid entries are AVRO, JSON_SR, PROTOBUF, or JSON. You must have Confluent Cloud Schema Registry configured if using a schema-based record format (for example, Avro, JSON_SR (JSON Schema), or Protobuf)."after.state.only": (Optional) Defaults to true, which results in the Kafka record having only the record state from change events applied. Enter false to maintain the prior record states after applying the change events. For additional details, see After-state only output limitation."json.output.decimal.format": (Optional) Defaults to BASE64. Specify the JSON/JSON_SR serialization format for Connect DECIMAL logical type values with two allowed literals:BASE64 to serialize DECIMAL logical types as base64 encoded binary data.
NUMERIC to serialize Connect DECIMAL logical type values in JSON or JSON_SR as a number representing the decimal value.
"column.exclude.list": (Optional) A comma-separated list of regular expressions that match the fully-qualified names of columns to exclude from change event record values. Fully-qualified names for columns are in the formdatabaseName.tableName.columnName."plugin.name": (Optional) Sets the plugin to use. Options arewal2json,wal2json_rds,wal2json_streaming,wal2json_rds_streaming,pgoutput, anddecoderbufs. The default ispgoutput."slot.name": (Optional) The name of the PostgreSQL logical decoding slot created for streaming changes from a plugin and for a database. The slot name can contain only lower-case letters, numbers, and the underscore character. The default value isdebezium."publication.name": (Optional) The name of the PostgreSQL publication created for streaming changes when using pgoutput. The default isdbz_publication."publication.autocreate.mode": (Optional) Determines how creation of publication should work when using pgoutput. Possible options are:all_tables,disabledandfiltered.all_tables(default): If a publication exists, the connector uses it. If a publication does not exist, the connector creates a publication for all tables in the database for which the connector is capturing changes. This requires that the database user that has permission to perform replications also has permission to create a publication.disabled: The connector does not attempt to create a publication. A database administrator or the user configured to perform replications must have created the publication before running the connector. If the connector cannot find the publication, the connector throws an exception and stops.filtered: If a publication exists, the connector uses it. If no publication exists, the connector creates a new publication for tables that match the current filter configuration as specified by the database.exclude.list, schema.include.list, schema.exclude.list, and table.include.list connector configuration properties.
"snapshot.mode": (Optional) Specifies the criteria for performing a database snapshot when the connector starts.The default setting is
initial. When selected, the connector takes a snapshot of the structure and data from captured tables. This is useful if you want the topics populated with a complete representation of captured table data when the connector starts.neverspecifies that the connector should never perform snapshots, and that when starting for the first time, the connector starts reading from where it last left off.exportedspecifies that the database snapshot is based on the point in time when a replication slot was created. Note that this is a good way to perform a lock-free snapshot (see Snapshot isolation).
"signal.data.collection": (Optional) Fully-qualified name of the data collection that is used to send signals to the connector. The collection name is of the formschemaName.tableName. These signals can be used to perform incremental snapshotting."tasks.max": Enter the number of tasks in use by the connector. Organizations can run multiple connectors with a limit of one task per connector (that is,"tasks.max": "1").
SMTs: For details about adding SMTs using the Confluent CLI, see the Single Message Transformations documentation. For additional information about the Debezium SMTs ExtractNewRecordState and EventRouter (Debezium), see Debezium transformations.
See Configuration Properties for all property values and definitions.
Step 4: Load the properties file and create the connector
Enter the following command to load the configuration and start the connector:
confluent connect cluster create --config-file <file-name>.json
For example:
confluent connect cluster create --config-file postgresql-cdc-source.json
Example output:
Created connector PostgresCdcSourceConnector_0 lcc-ix4dl
Step 5: Check the connector status
Enter the following command to check the connector status:
confluent connect cluster list
Example output:
ID          |            Name              | Status  |  Type
+-----------+------------------------------+---------+-------+
lcc-ix4dl   | PostgresCdcSourceConnector_0 | RUNNING | source
Step 6: Check the Kafka topic.
After the connector is running, verify that messages are populating your Kafka topic.
For more information and examples to use with the Confluent Cloud API for Connect, see the Confluent Cloud API for Connect Usage Examples section.
Configuration Properties
Use the following configuration properties with the fully-managed connector. For self-managed connector property definitions and other details, see the connector docs in Self-managed connectors for Confluent Platform.
How should we connect to your data?
nameSets a name for your connector.
Type: string
Valid Values: A string at most 64 characters long
Importance: high
Kafka Cluster credentials
kafka.auth.modeKafka Authentication mode. It can be one of KAFKA_API_KEY or SERVICE_ACCOUNT. It defaults to KAFKA_API_KEY mode, whenever possible.
Type: string
Valid Values: SERVICE_ACCOUNT, KAFKA_API_KEY
Importance: high
kafka.api.keyKafka API Key. Required when kafka.auth.mode==KAFKA_API_KEY.
Type: password
Importance: high
kafka.service.account.idThe Service Account that will be used to generate the API keys to communicate with Kafka Cluster.
Type: string
Importance: high
kafka.api.secretSecret associated with Kafka API key. Required when kafka.auth.mode==KAFKA_API_KEY.
Type: password
Importance: high
Schema Config
schema.context.nameAdd a schema context name. A schema context represents an independent scope in Schema Registry. It is a separate sub-schema tied to topics in different Kafka clusters that share the same Schema Registry instance. If not used, the connector uses the default schema configured for Schema Registry in your Confluent Cloud environment.
Type: string
Default: default
Importance: medium
How should we connect to your database?
database.hostnameThe address of the PostgreSQL server.
Type: string
Importance: high
database.portPort number of the PostgreSQL server.
Type: int
Valid Values: [0,…,65535]
Importance: high
database.userThe name of the PostgreSQL user that has the required authorization.
Type: string
Importance: high
database.passwordThe password for the PostgreSQL user that has the required authorization.
Type: password
Importance: high
database.dbnameThe name of the PostgreSQL database to connect to.
Type: string
Importance: high
database.server.nameThe logical name of the PostgreSQL server/cluster. This logical name forms a namespace and is used in all the names of the Kafka topics and the Kafka Connect schema names. The logical name is also used for the namespaces of the corresponding Avro schema, if Avro data format is used. Kafka topics should/will be created with the prefix
database.server.name. Only alphanumeric characters, underscores, hyphens and dots are allowed.Type: string
Importance: high
database.sslmodeWhat SSL mode should we use to connect to your database. require establishes an encrypted connection or fails if one cannot be made for any reason. If your database server enforces SSL, please use require. disable uses an unencrypted connection.
Type: string
Default: disable
Importance: low
Database details
signal.data.collectionFully-qualified name of the data collection that needs to be used to send signals to the connector. Use
schemaName.tableNameformat to specify the fully-qualified collection name. Note that you need to manually add the signal table to the publication ifpublication.autocreate.modeis set tofilteredordisabled.Type: string
Importance: medium
publication.autocreate.modeDetermines how creation of a publication should work when using pgoutput. Possible options are: all_tables, disabled, and filtered. Check the documentation for more details on each option.
Type: string
Default: all_tables
Valid Values: all_tables, disabled, filtered
Importance: medium
publication.nameThe name of the PostgreSQL publication created for streaming changes when using pgoutput
Type: string
Default: dbz_publication
Valid Values: Must match the regex
^[^\s\"\'\`]+$Importance: medium
table.include.listAn optional comma-separated list of strings that match fully-qualified table identifiers for tables to be monitored. Any table not included in this config property is excluded from monitoring. Each identifier is in the form
schemaName.tableName. By default the connector monitors every non-system table in each monitored schema. May not be used with “Table excluded”.Type: list
Importance: medium
table.exclude.listAn optional comma-separated list of strings that match fully-qualified table identifiers for tables to be excluded from monitoring. Any table not included in this config property is monitored. Each identifier is in the form
schemaName.tableName. May not be used with “Table included”.Type: list
Importance: medium
snapshot.modeSpecifies the criteria for running a snapshot upon startup of the connector. The default setting is
initial, and specifies the connector can run a snapshot only when no offsets have been recorded for the logical server name. Theneveroption specifies that the connect should never use snapshots and that, upon first startup with a logical server name, the connector should read from where it last left off (last LSN position) or start from the beginning, based on the point of the view of the logical replication slot. Theexportedoption specifies that the database snapshot will be based on the point in time when the replication slot was created and is an excellent way to perform the snapshot in a lock-free way.Type: string
Default: initial
Valid Values: exported, initial, never
Importance: low
datatype.propagate.source.typeA comma-separated list of regular expressions matching the database-specific data type names that adds the data type’s original type and original length as parameters to the corresponding field schemas in the emitted change records.
Type: list
Importance: low
tombstones.on.deleteControls whether a tombstone event should be generated after a delete event. When set to
true, the delete operations are represented by a delete event and a subsequent tombstone event. When set tofalse, only a delete event is sent. Emitting the tombstone event (the default behavior) allows Kafka to completely delete all events pertaining to the given key, once the source record got deleted.Type: boolean
Default: true
Importance: high
column.exclude.listRegular expressions matching columns to exclude from change events
Type: list
Importance: medium
plugin.nameThe name of the Postgres logical decoding plugin installed on the server. Note: pgoutput is only available in PostgreSQL 10+.
Type: string
Default: pgoutput
Importance: high
slot.nameThe name of the PostgreSQL logical decoding slot that was created for streaming changes from a particular plug-in and for a particular database/schema. The server uses this slot to stream events to the connector.
Type: string
Default: debezium
Valid Values: Must match the regex
^[a-z0-9_]+$Importance: low
Connection details
poll.interval.msPositive integer value that specifies the number of milliseconds the connector should wait during each iteration for new change events to appear. Defaults to 1000 milliseconds, or 1 second.
Type: int
Default: 1000 (1 second)
Valid Values: [1,…]
Importance: low
max.batch.sizePositive integer value that specifies the maximum size of each batch of events that should be processed during each iteration of this connector.
Type: int
Default: 1000
Valid Values: [1,…,5000]
Importance: low
event.processing.failure.handling.modeSpecifies how the connector should react to exceptions during processing of binlog events.
Type: string
Default: fail
Valid Values: fail, skip, warn
Importance: low
heartbeat.interval.msControls how frequently the connector sends heartbeat messages to a Kafka topic. The behavior of default value 0 is that the connector does not send heartbeat messages.
Type: int
Default: 0
Valid Values: [0,…]
Importance: low
heartbeat.action.querySpecifies a query that the connector executes on the source database when the connector sends a heartbeat message.
Type: string
Importance: low
Connector details
provide.transaction.metadataStores transaction metadata information in a dedicated topic and enables the transaction metadata extraction together with event counting.
Type: boolean
Default: false
Importance: low
decimal.handling.modeSpecifies how DECIMAL and NUMERIC columns should be represented in change events, including: ‘precise’ (the default) uses java.math.BigDecimal to represent values, which are encoded in the change events using a binary representation and Kafka Connect’s ‘org.apache.kafka.connect.data.Decimal’ type; ‘string’ uses string to represent values; ‘double’ represents values using Java’s ‘double’, which may not offer the precision but will be far easier to use in consumers.
Type: string
Default: precise
Valid Values: double, precise, string
Importance: medium
binary.handling.modeSpecifies how binary (blob, binary, etc.) columns should be represented in change events, including: ‘bytes’ (the default) represents binary data as byte array; ‘base64’ represents binary data as base64-encoded string; ‘hex’ represents binary data as hex-encoded (base16) string.
Type: string
Default: bytes
Valid Values: base64, bytes, hex
Importance: low
time.precision.modeTime, date, and timestamps can be represented with different kinds of precisions, including: ‘adaptive’ (the default) bases the precision of time, date, and timestamp values on the database column’s precision; ‘adaptive_time_microseconds’ like ‘adaptive’ mode, but TIME fields always use microseconds precision; ‘connect’ always represents time, date, and timestamp values using Kafka Connect’s built-in representations for Time, Date, and Timestamp, which uses millisecond precision regardless of the database columns’ precision.
Type: string
Default: adaptive
Valid Values: adaptive, adaptive_time_microseconds, connect
Importance: medium
cleanup.policySet the topic cleanup policy
Type: string
Default: delete
Valid Values: compact, delete
Importance: medium
hstore.handling.modeSpecifies how HSTORE columns should be represented in change events.
Type: string
Default: json
Valid Values: json, map
Importance: medium
interval.handling.modeSpecifies how INTERVAL columns should be represented in change events.
Type: string
Default: numeric
Valid Values: numeric, string
Importance: medium
schema.refresh.modeSpecify the conditions that trigger a refresh of the in-memory schema for a table. columns_diff (the default) is the safest mode, ensuring the in-memory schema stays in-sync with the database table’s schema at all times. columns_diff_exclude_unchanged_toast instructs the connector to refresh the in-memory schema cache if there is a discrepancy between it and the schema derived from the incoming message, unless unchanged TOASTable data fully accounts for the discrepancy.
Type: string
Default: columns_diff
Valid Values: columns_diff, columns_diff_exclude_unchanged_toast
Importance: medium
Output messages
output.data.formatSets the output Kafka record value format. Valid entries are AVRO, JSON_SR, PROTOBUF, or JSON. Note that you need to have Confluent Cloud Schema Registry configured if using a schema-based message format like AVRO, JSON_SR, and PROTOBUF.
Type: string
Default: JSON
Importance: high
output.key.formatSets the output Kafka record key format. Valid entries are AVRO, JSON_SR, PROTOBUF, STRING or JSON. Note that you need to have Confluent Cloud Schema Registry configured if using a schema-based message format like AVRO, JSON_SR, and PROTOBUF
Type: string
Default: JSON
Valid Values: AVRO, JSON, JSON_SR, PROTOBUF, STRING
Importance: high
after.state.onlyControls whether the generated Kafka record should contain only the state after applying change events.
Type: boolean
Default: true
Importance: low
Number of tasks for this connector
tasks.maxMaximum number of tasks for the connector.
Type: int
Valid Values: [1,…,1]
Importance: high
Additional Configs
value.converter.connect.meta.dataAllow the Connect converter to add its metadata to the output schema. Applicable for Avro Converters.
Type: boolean
Importance: low
errors.toleranceUse this property if you would like to configure the connector’s error handling behavior. WARNING: This property should be used with CAUTION for SOURCE CONNECTORS as it may lead to dataloss. If you set this property to ‘all’, the connector will not fail on errant records, but will instead log them (and send to DLQ for Sink Connectors) and continue processing. If you set this property to ‘none’, the connector task will fail on errant records.
Type: string
Default: none
Importance: low
key.converter.key.schema.id.serializerThe class name of the schema ID serializer for keys. This is used to serialize schema IDs in the message headers.
Type: string
Default: io.confluent.kafka.serializers.schema.id.PrefixSchemaIdSerializer
Importance: low
key.converter.key.subject.name.strategyHow to construct the subject name for key schema registration.
Type: string
Default: TopicNameStrategy
Importance: low
value.converter.decimal.formatSpecify the JSON/JSON_SR serialization format for Connect DECIMAL logical type values with two allowed literals:
BASE64 to serialize DECIMAL logical types as base64 encoded binary data and
NUMERIC to serialize Connect DECIMAL logical type values in JSON/JSON_SR as a number representing the decimal value.
Type: string
Default: BASE64
Importance: low
value.converter.ignore.default.for.nullablesWhen set to true, this property ensures that the corresponding record in Kafka is NULL, instead of showing the default column value. Applicable for AVRO,PROTOBUF and JSON_SR Converters.
Type: boolean
Default: false
Importance: low
value.converter.reference.subject.name.strategySet the subject reference name strategy for value. Valid entries are DefaultReferenceSubjectNameStrategy or QualifiedReferenceSubjectNameStrategy. Note that the subject reference name strategy can be selected only for PROTOBUF format with the default strategy being DefaultReferenceSubjectNameStrategy.
Type: string
Default: DefaultReferenceSubjectNameStrategy
Importance: low
value.converter.replace.null.with.defaultWhether to replace fields that have a default value and that are null to the default value. When set to true, the default value is used, otherwise null is used. Applicable for JSON Converter.
Type: boolean
Default: true
Importance: low
value.converter.schemas.enableInclude schemas within each of the serialized values. Input messages must contain schema and payload fields and may not contain additional fields. For plain JSON data, set this to false. Applicable for JSON Converter.
Type: boolean
Default: false
Importance: low
value.converter.value.schema.id.serializerThe class name of the schema ID serializer for values. This is used to serialize schema IDs in the message headers.
Type: string
Default: io.confluent.kafka.serializers.schema.id.PrefixSchemaIdSerializer
Importance: low
value.converter.value.subject.name.strategyDetermines how to construct the subject name under which the value schema is registered with Schema Registry.
Type: string
Default: TopicNameStrategy
Importance: low
Auto-restart policy
auto.restart.on.user.errorEnable connector to automatically restart on user-actionable errors.
Type: boolean
Default: true
Importance: medium
Next Steps
For an example that shows fully-managed Confluent Cloud connectors in action with Confluent Cloud for Apache Flink, see the Cloud ETL Demo. This example also shows how to use Confluent CLI to manage your resources in Confluent Cloud.
After-state only output limitation
When a connector is configured with the property After-state only=false, you expect to see the previous values of all columns under before in the record. However, for certain conditions before will contain null or partially displayed columns. If Protobuf is used, the record may not contain the before field at all. The following example shows this issue and provides a corrective action to take.
For example, the connector is configured with JSON and After-state only is set to false. When a record is updated in the PostgreSQL database, you may see a record similar to the following sample, where "before" is null.
{
  "before": null,
  "after": {
    "id": 5,
    "name": "Allen William Henry",
    "sex": "male",
    "age": 25,
    "sibsp": 0,
    "parch": 0,
    "created_at": "2018-01-02T15:22:14.831461Z"
   },
   "source": {
     "version": "1.3.1.Final",
     "connector": "postgresql",
     "name": "test",
     "ts_ms": 1621389097781,
     "snapshot": "false",
     "db": "postgres",
     "schema": "public",
     "table": "passengers",
     "txId": 572,
     "lsn": 872429856,
     "xmin": null
   },
   "op": "u",
   "ts_ms": 1621389098688,
   "transaction": null
}
For an updated record to contain the previous (before) values of all columns in the row, you need to modify the passengers table by running ALTER TABLEpassengers REPLICA IDENTITY FULL. After you make this change in the PostgreSQL database, and records are updated, you should see records similar to the following sample.
{
  "before": {
    "id": 8,
    "name": "Gosta Leonard",
    "sex": "male",
    "age": 2,
    "sibsp": 3,
    "parch": 1,
    "created_at": "2018-01-03T20:53:55.955056Z"
  },
  "after": {
    "id": 8,
    "name": "Gosta Leonard",
    "sex": "male",
    "age": 25,
    "sibsp": 3,
    "parch": 1,
    "created_at": "2018-01-03T20:53:55.955056Z"
  },
  "source": {
    "version": "1.3.1.Final",
    "connector": "postgresql",
    "name": "test",
    "ts_ms": 1621390542864,
    "snapshot": "false",
    "db": "postgres",
    "schema": "public",
    "table": "passengers",
    "txId": 581,
    "lsn": 1207967968,
    "xmin": null
  },
  "op": "u",
  "ts_ms": 1621390544032,
  "transaction": null
}