
Configure Custom SMT for Kafka Connectors in Confluent Cloud
With Custom Single Message Transformations (SMTs), you can bring your own SMTs to Confluent Cloud and use them with fully-managed connectors. Custom SMTs are supported on Amazon Web Services (AWS), Microsoft Azure (Azure), and Google Cloud (GCP).
SMT implementations provide the bulk of the logic in an abstract class. The SMT implementation then provides two concrete subclasses called Key and Value that specify whether to process the Connect record’s key or value. When using a custom transformation, you must provide the fully qualified class names of either the Key or Value subclass.
This page explains how to upload a Custom SMT artifact file to Confluent Cloud and then deploy a fully-managed connector that uses this Custom SMT. For simplicity, these guides are using an artifact file downloaded from Confluent Marketplace.
Limitations
For Custom SMT limitations, see Custom SMT limitations.
Using Confluent Cloud Console
This section explains how to set up a Custom SMT using Confluent Cloud Console.
Step 1: Create a Custom SMT
To create a Custom SMT in Confluent Cloud, follow the steps below:
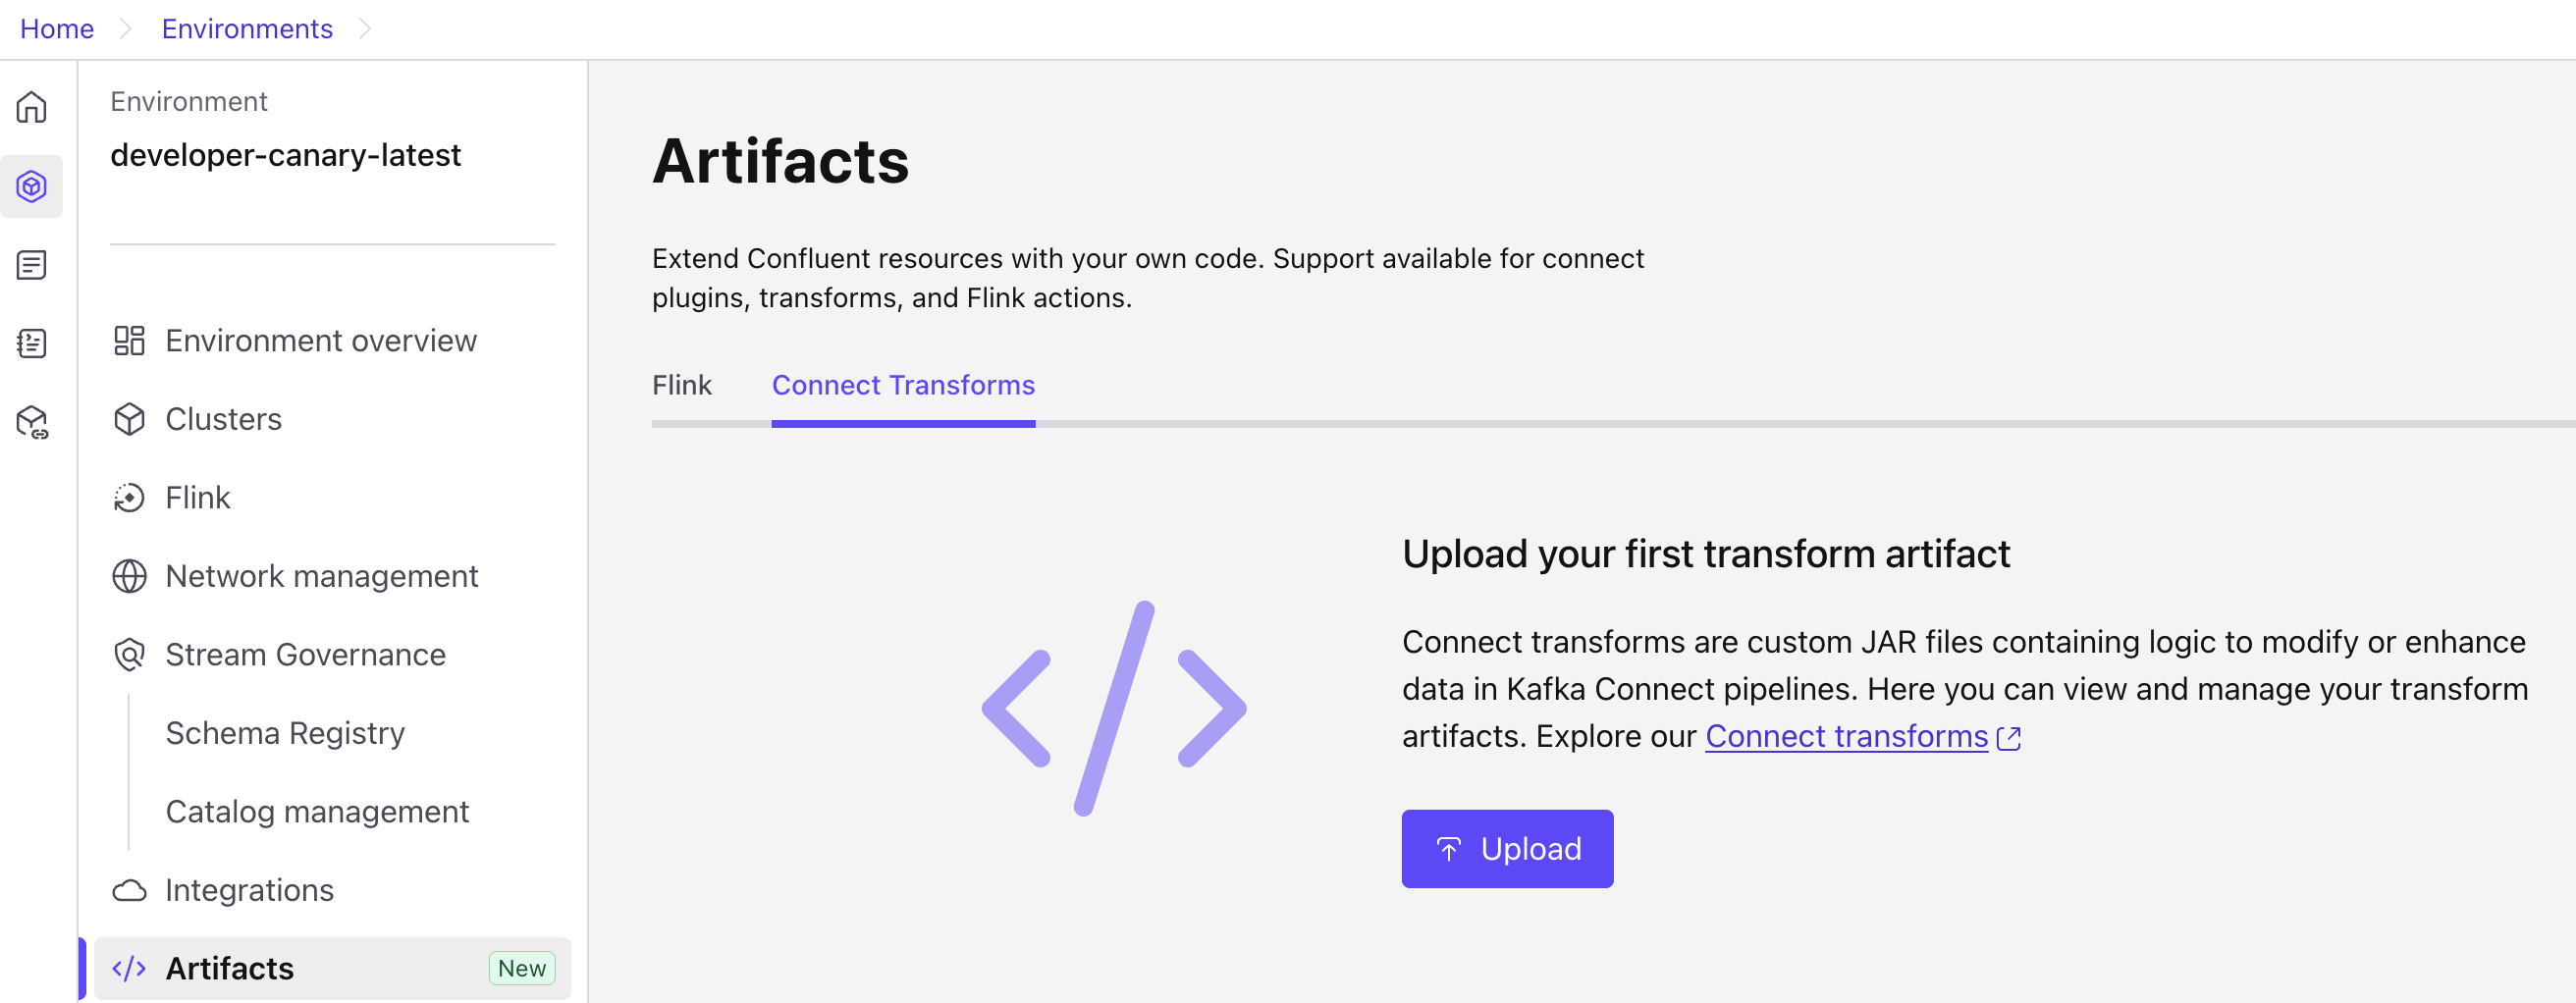
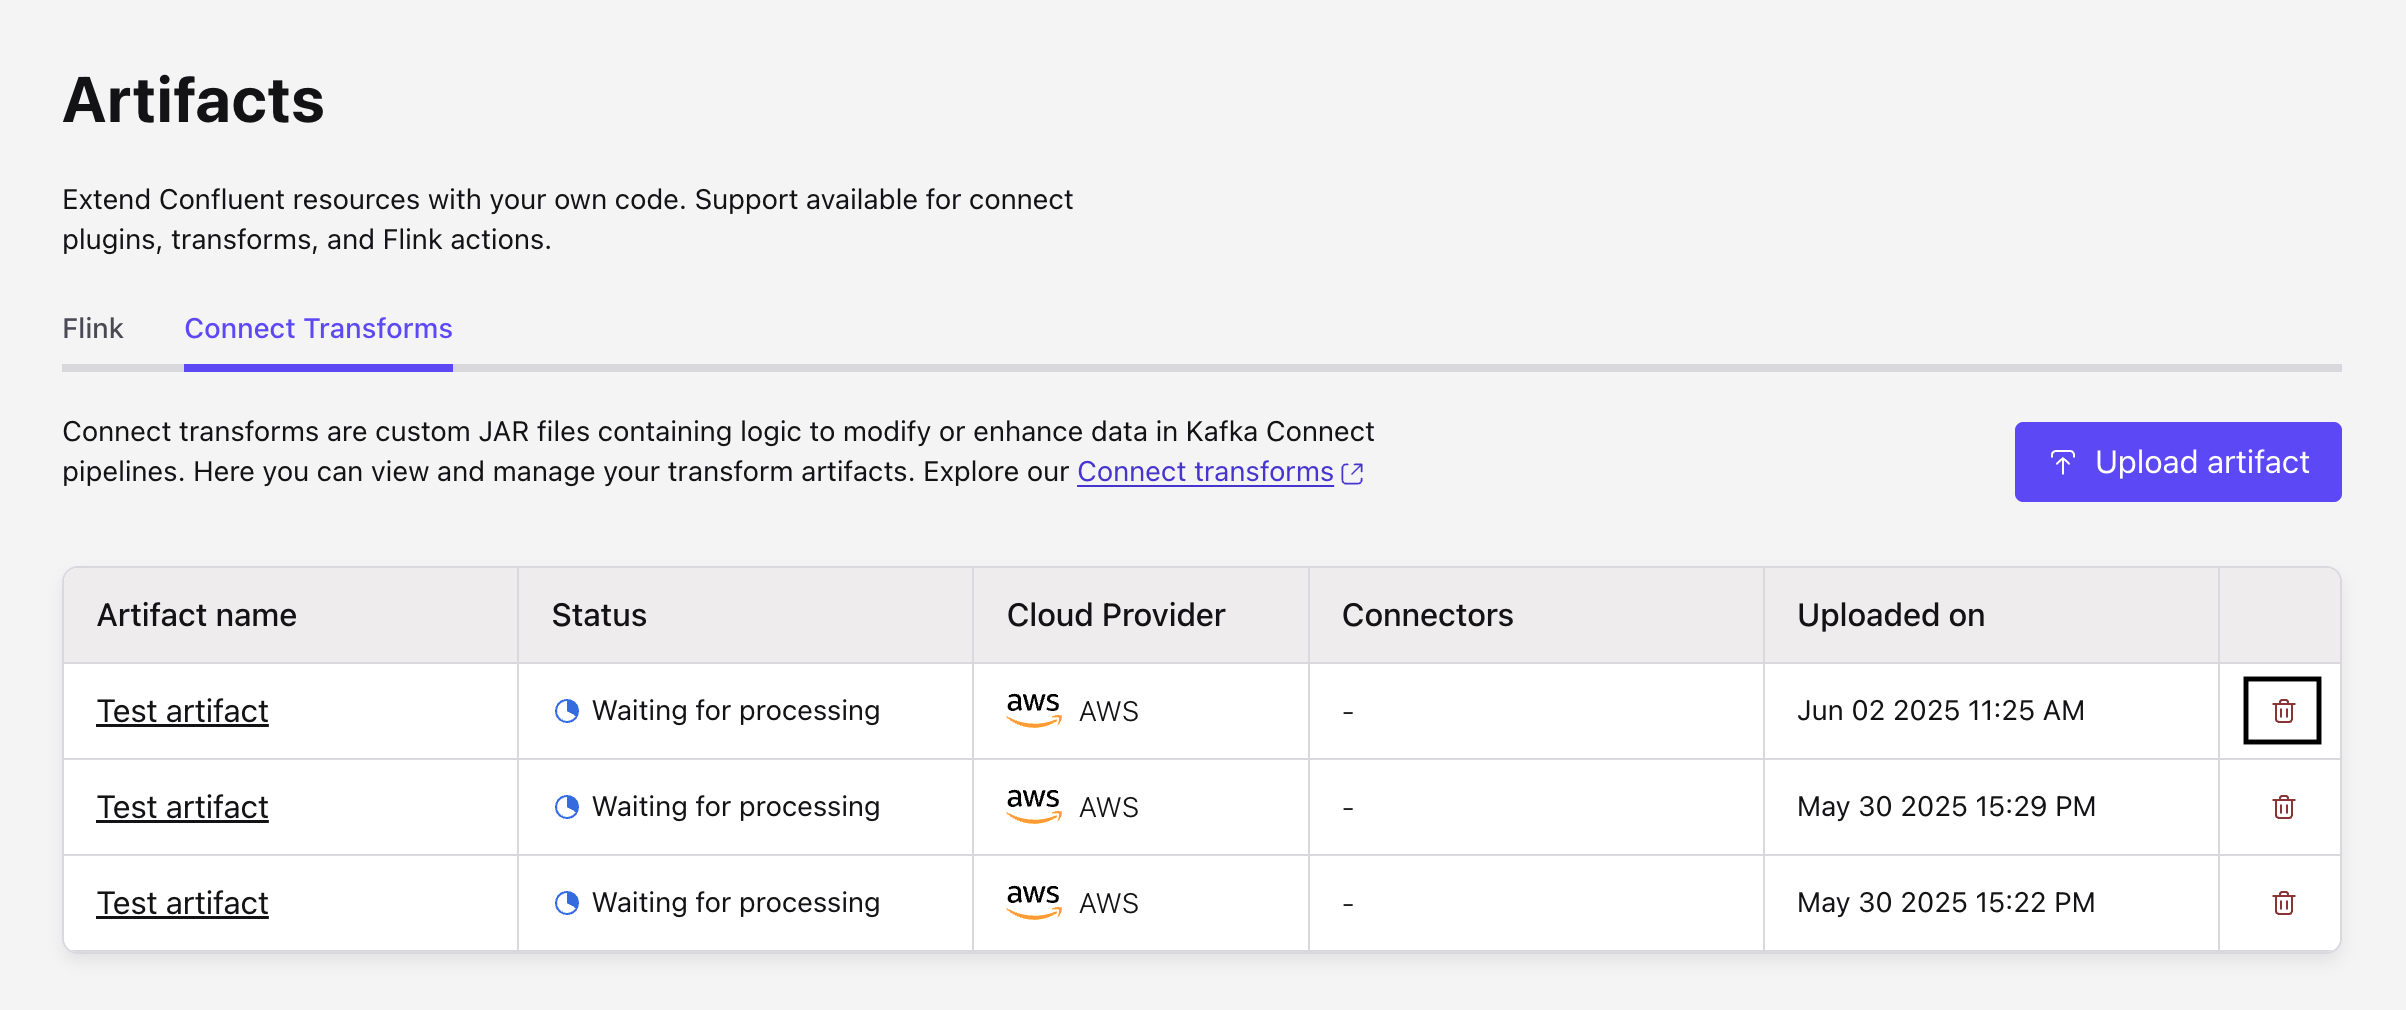
Open your environment and navigate to Artifacts on the sidebar.
In the Connect Transforms tab, click Upload.
In the Upload Transform artifact panel, enter the Name, Description and select your Cloud Provider. Click the Upload JAR file button and select the JAR file to be uploaded.
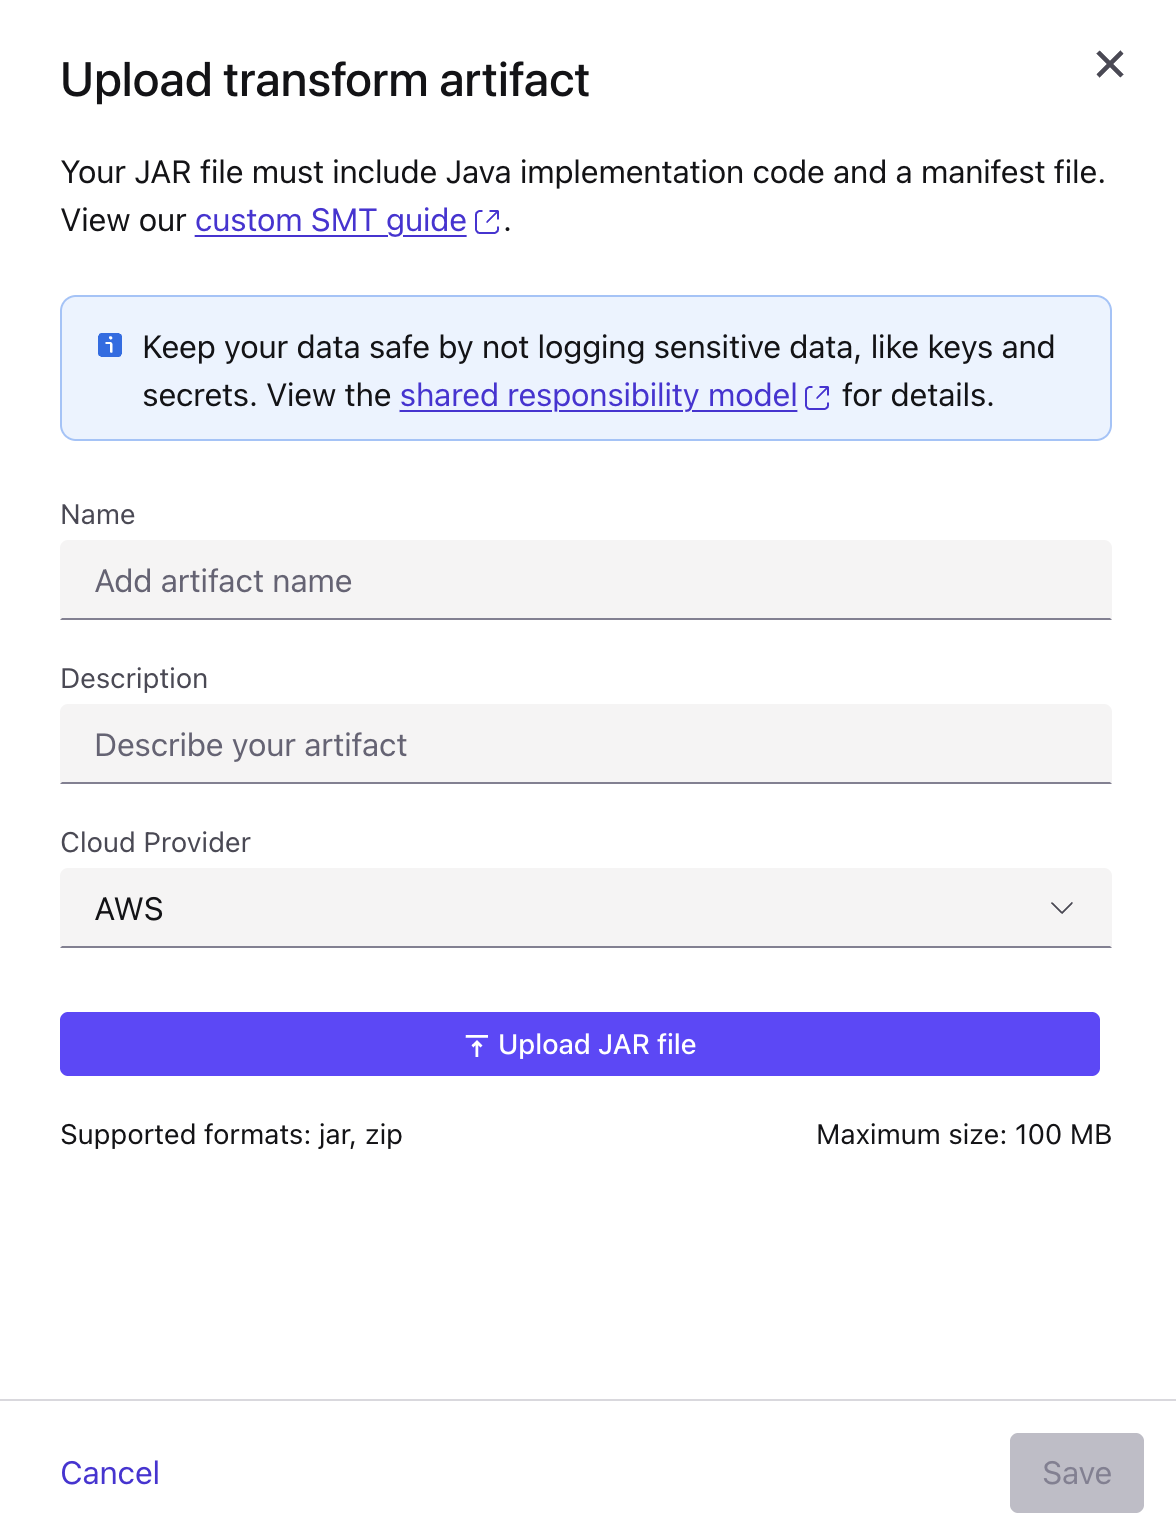
Click Save. Confluent scans the uploaded JAR file and creates a Custom SMT. The scanning fails if the uploaded file is not compatible.
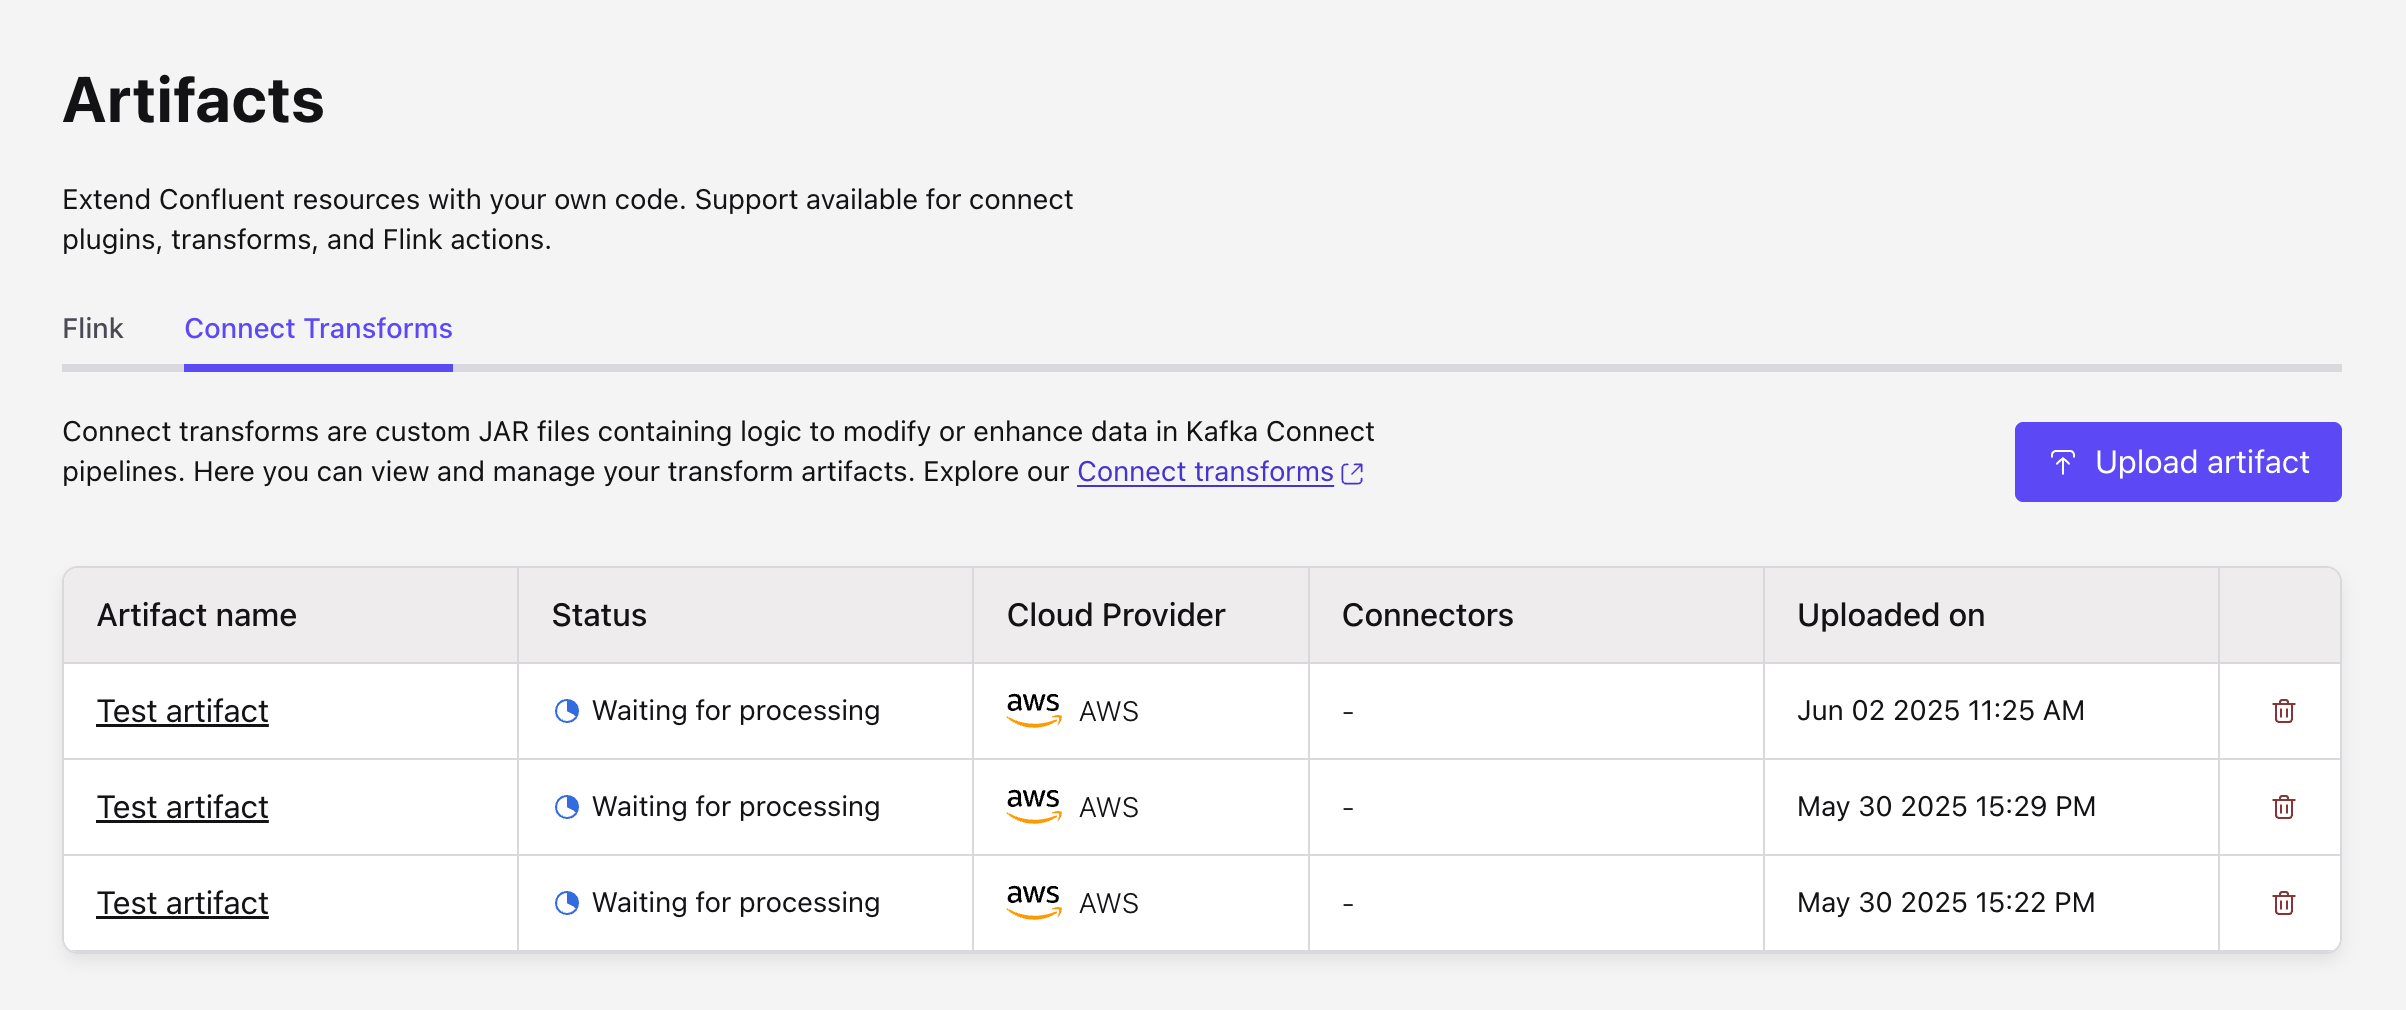
Once saved, you can see the uploaded artifact in the Connect Transforms tab.
Step 2: Deploy a fully-managed connector with Custom SMT
Follow the steps below to configure a connector with the newly created Custom SMT:
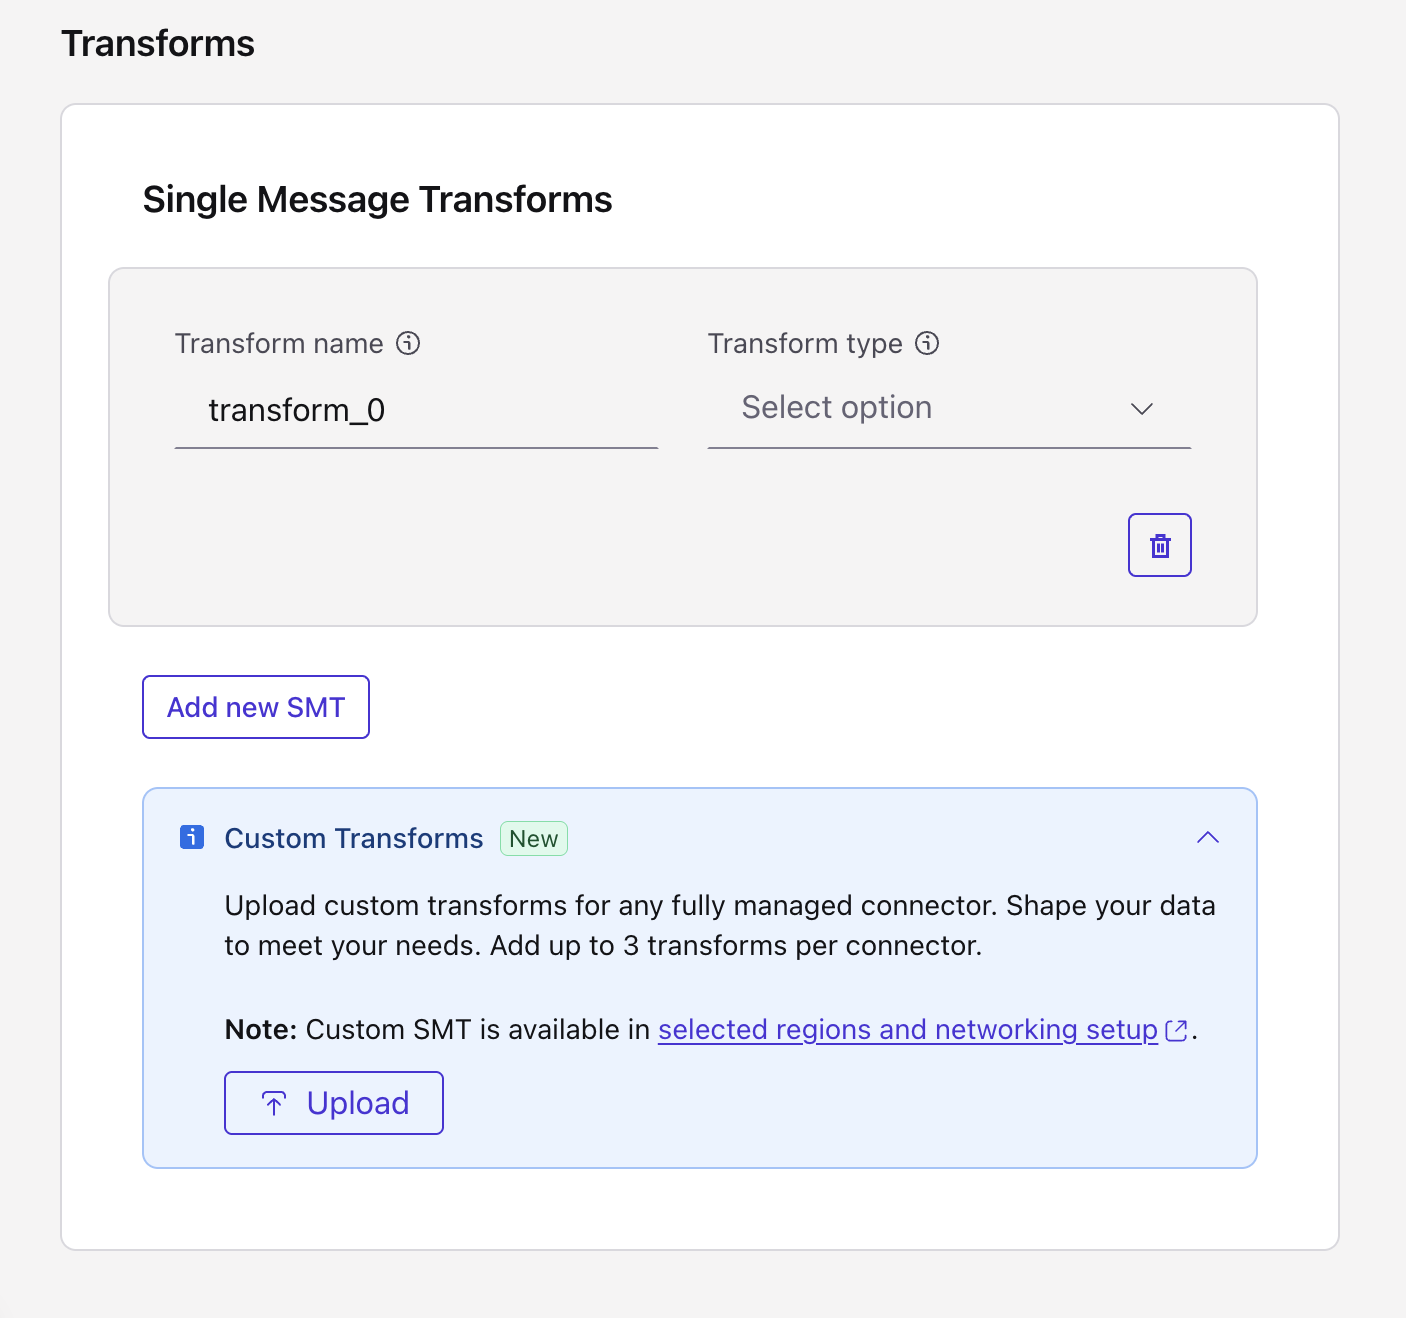
Go to Transforms under the Advanced Configurations section of the connector UI and click Add SMT.
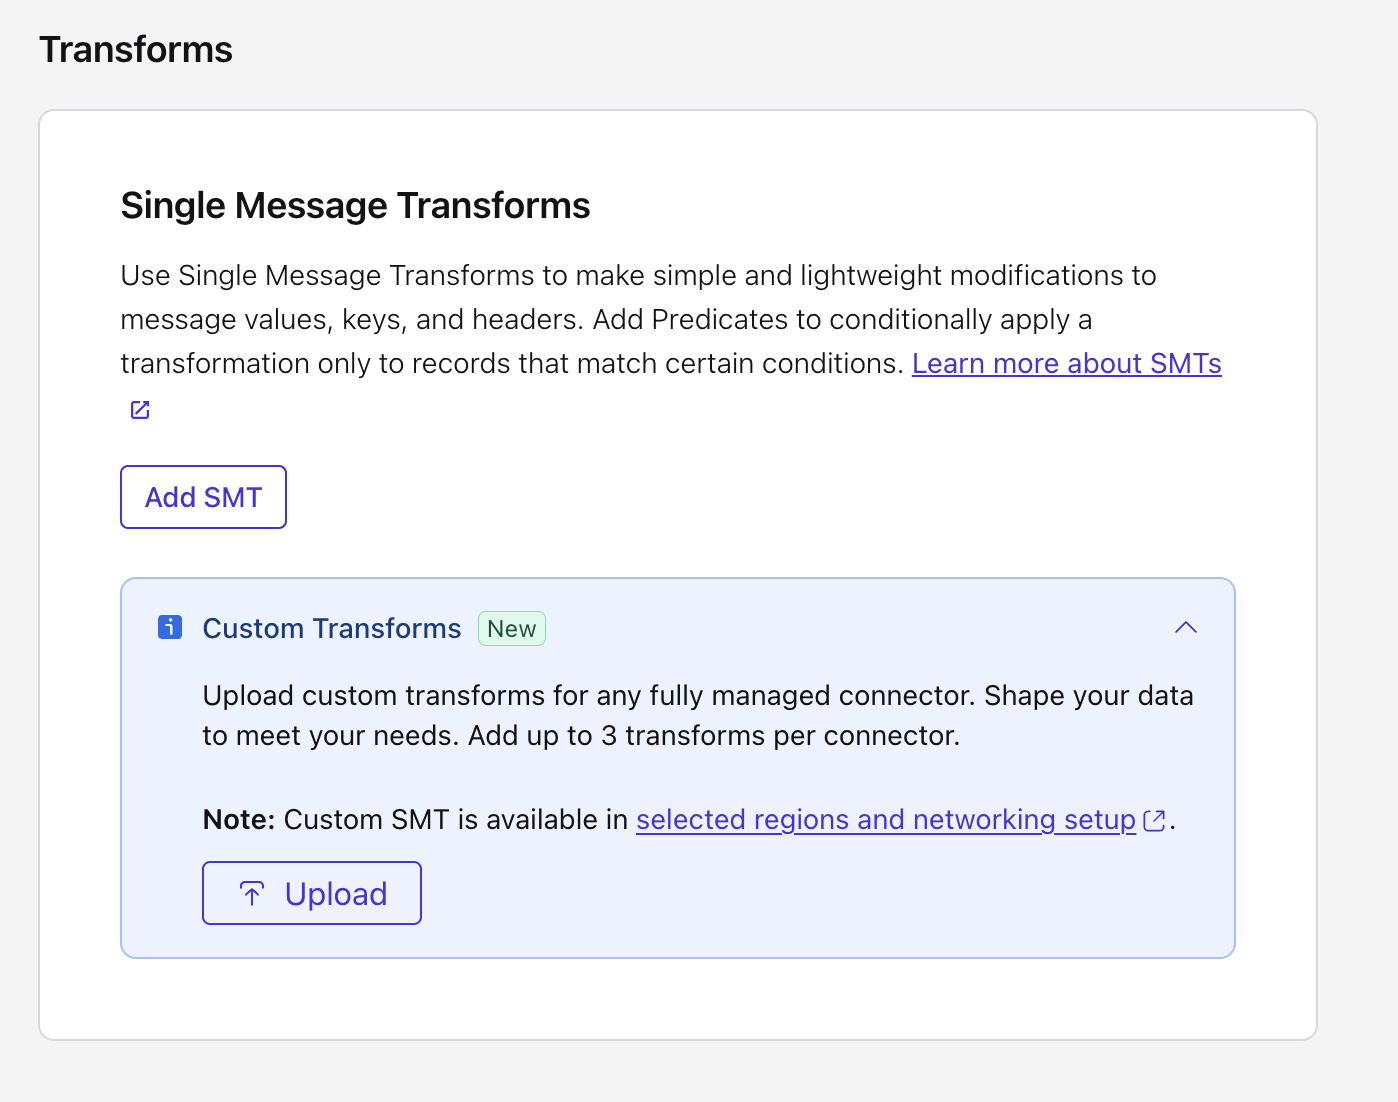
Enter the transform name in the Transforms name field.
Select the Custom SMT you want to configure from the Transform type dropdown. Custom SMTs are listed under the Custom transforms label in the dropdown.
Note
You can also create a Custom SMT from the Configuration section. Click Upload under Custom Transforms to create a Custom SMT using the artifact file. See Using Confluent Cloud Console for further steps.
After selecting the Custom SMT, enter the relevant information in additional property fields displayed.
You can click Add new SMT to add another SMT. If you want to add a predicate to the SMT, click Add Predicate. For more information about adding predicates, see Add, link, and delete predicates.
Click Continue and complete any remaining connector startup tasks.
(Optional) Click Request preview and verify that the data output in the
"record"section is what you want. The preview will take a few minutes to generate. If the data preview shows what you want, launch the connector.
Step 3: Delete Custom SMT
To delete a Custom SMT:
Navigate to the Connect Transforms tab under Artifacts.
Click the delete button for the Custom SMT artifact you want to delete.
Using the Confluent CLI
This section explains how to configure a Custom SMT using the Confluent CLI.
Prerequisites
Authorized access to a Confluent Cloud cluster on Amazon Web Services (AWS), Microsoft Azure (Azure), or Google Cloud (GCP).
The Confluent CLI installed and configured for the cluster. For information on how to install the CLI, see the CLI documentation.
A Confluent Cloud API key to authenticate with the Confluent Cloud APIs. Every API request must include the resource key and secret encoded as Base64. For information about how to create a Confluent Cloud API key, see Manage API Keys.
The EnvironmentAdmin role to upload custom artifact file. If you do not have the appropriate role, reach out to your EnvironmentAdmin.
Step 1: Build a SMT JAR file
To build a Custom SMT JAR file, follow the steps below:
Clone the Kafka Connect SMT to add a random UUID repository from GitHub.
git clone https://github.com/confluentinc/kafka-connect-insert-uuid.git
Go to the cloned project’s root folder and run the Maven package to create executable JAR file:
mvn package -DskipTests
This will download the necessary dependencies and generate a JAR file.
The generated JAR file will be placed in target/InsertUuid-1.0-SNAPSHOT.jar.
Step 2: Create a Custom SMT
Follow the steps below to create a Custom SMT using Confluent CLI:
Log into your Confluent Cloud account.
confluent login --url <confluent-cloud-url>
Enter the following command to create an artifact file by uploading the Custom SMT JAR file (created in Step 1). Replace
<CLOUD_PROVIDER>withaws,azure, orgcpdepending on where your cluster is hosted.confluent connect artifact create <artifact-name> --artifact-file <custom-SMT-jar-file-path> --cloud <CLOUD_PROVIDER> --description "A simple SMT which inserts uuid" --environment <environment-id>
For example, to create an artifact file named
custom-SMT-1, add SMT file path in--artifact-fileand environment ID in--environmentstring.confluent connect artifact create custom-SMT-1 --artifact-file /src/kafka-connect-insert-uuid/target/InsertUuid-1.0-SNAPSHOT.jar --cloud aws --description "A simple SMT which inserts uuid" --environment env-abcdef
To confirm that the SMT JAR file has been uploaded, enter the following command to list artifacts in your Confluent environment:
confluent connect artifact list --cloud <CLOUD_PROVIDER> --environment env-abcdef
Step 3: Create a fully-managed connector with Custom SMT
Create a JSON file that contains the connector configuration properties to create a source connector with Custom SMT. The following code shows an example configuration:
# cat conn-config.json
{
  "connector.class": "DatagenSource",
  "kafka.service.account.id": "sa-stgcmv7d2m1",
  "kafka.auth.mode": "SERVICE_ACCOUNT",
  "kafka.topic": "datagen-source-csmt",
  "max.interval": "3000",
  "name": "DatagenSourceCSMT98",
  "output.data.format": "JSON",
  "quickstart": "ORDERS",
  "tasks.max": "10",
  "transforms": "insertuuid,dropKeyExample",
  "transforms.insertuuid.custom.smt.artifact.id": "cca-stgcmvm9d7",
  "transforms.insertuuid.type": "com.github.cjmatta.kafka.connect.smt.InsertUuid$Value",
  "transforms.insertuuid.uuid.field.name": "uuid",
  "transforms.dropKeyExample.type": "io.confluent.connect.transforms.Drop$Key"
}
Run the following command to create a source connector using the JSON file:
confluent connect cluster create --config-file conn-config.json --cluster cluster-abcd
Create a JSON file that contains the connector configuration properties to create a sink connector with Custom SMT. The following code shows an example configuration:
{
  "connector.class": "RedshiftSink",
  "name": "csmtRedshiftSink",
  "schema.context.name": "default",
  "input.data.format": "JSON_SR",
  "kafka.auth.mode": "SERVICE_ACCOUNT",
  "kafka.service.account.id": "sa-stgcmv7d2m1",
  "topics": "topic1",
  "aws.redshift.domain": "redshift-cluster-1.c0djldukjalr.us-west-2.redshift.amazonaws.com",
  "aws.redshift.port": "5439",
  "aws.redshift.user": "awsuser",
  "aws.redshift.password": "REDACTED",
  "aws.redshift.database": "dev",
  "db.timezone": "UTC",
  "batch.size": "3000",
  "auto.create": "true",
  "auto.evolve": "false",
  "max.poll.interval.ms": "300000",
  "max.poll.records": "500",
  "tasks.max": "1",
  "auto.restart.on.user.error": "true",
  "value.converter.decimal.format": "BASE64",
  "value.converter.reference.subject.name.strategy": "DefaultReferenceSubjectNameStrategy",
  "value.converter.value.subject.name.strategy": "TopicNameStrategy",
  "key.converter.key.subject.name.strategy": "TopicNameStrategy",
  "transforms": "insertuuid",
  "transforms.insertuuid.custom.smt.artifact.id": "cca-stgcmvm9d7",
  "transforms.insertuuid.type": "com.github.cjmatta.kafka.connect.smt.InsertUuid$Value",
  "transforms.insertuuid.uuid.field.name": "uuid"
}
Run the following command to create a sink connector using the JSON file:
confluent connect cluster create --config-file conn-config.json --cluster cluster-abcd
Step 4: Delete resources
When you are finished with the quick start, delete the resources you created to avoid unexpected charges to your account.
Delete the fully-managed connector: Use the following
DELETEcommand to delete the connector you created with the Custom SMT -confluent connect cluster delete <connector_id> --cluster <cluster_id>
Delete the Custom SMT artifact file: Delete a Custom SMT artifact file in your environment using the following command -
confluent connect artifact delete <artifact_id> --cloud <CLOUD_PROVIDER> --environment <Environment-id>
Using the Confluent APIs
This section explains how to configure Custom SMT using Confluent API.
Prerequisites
Authorized access to a Confluent Cloud cluster on Amazon Web Services (AWS), Microsoft Azure (Azure), or Google Cloud (GCP).
cURL and jq installed to use the API request examples in this document.
A Confluent Cloud API key to authenticate with the Confluent Cloud APIs. Every API request must include the resource key and secret encoded as Base64. For information about how to create a Confluent Cloud API key, see Manage API Keys.
The EnvironmentAdmin role to upload custom artifact file. If you do not have the appropriate role, reach out to your EnvironmentAdmin.
Step 1: Upload Custom SMT artifact file to Confluent Cloud
To get started with Custom SMT on Confluent Cloud, you first need to package SMT into JAR/ZIP file and get the pre-signed URL. Then upload the custom artifact file in your environment. Follow the steps below:
Important
To upload custom artifact files, your account must have the EnvironmentAdmin role assigned.
Go to Confluent Marketplace, and download a pre-packaged artifact file - connect-transformations to your local machine.
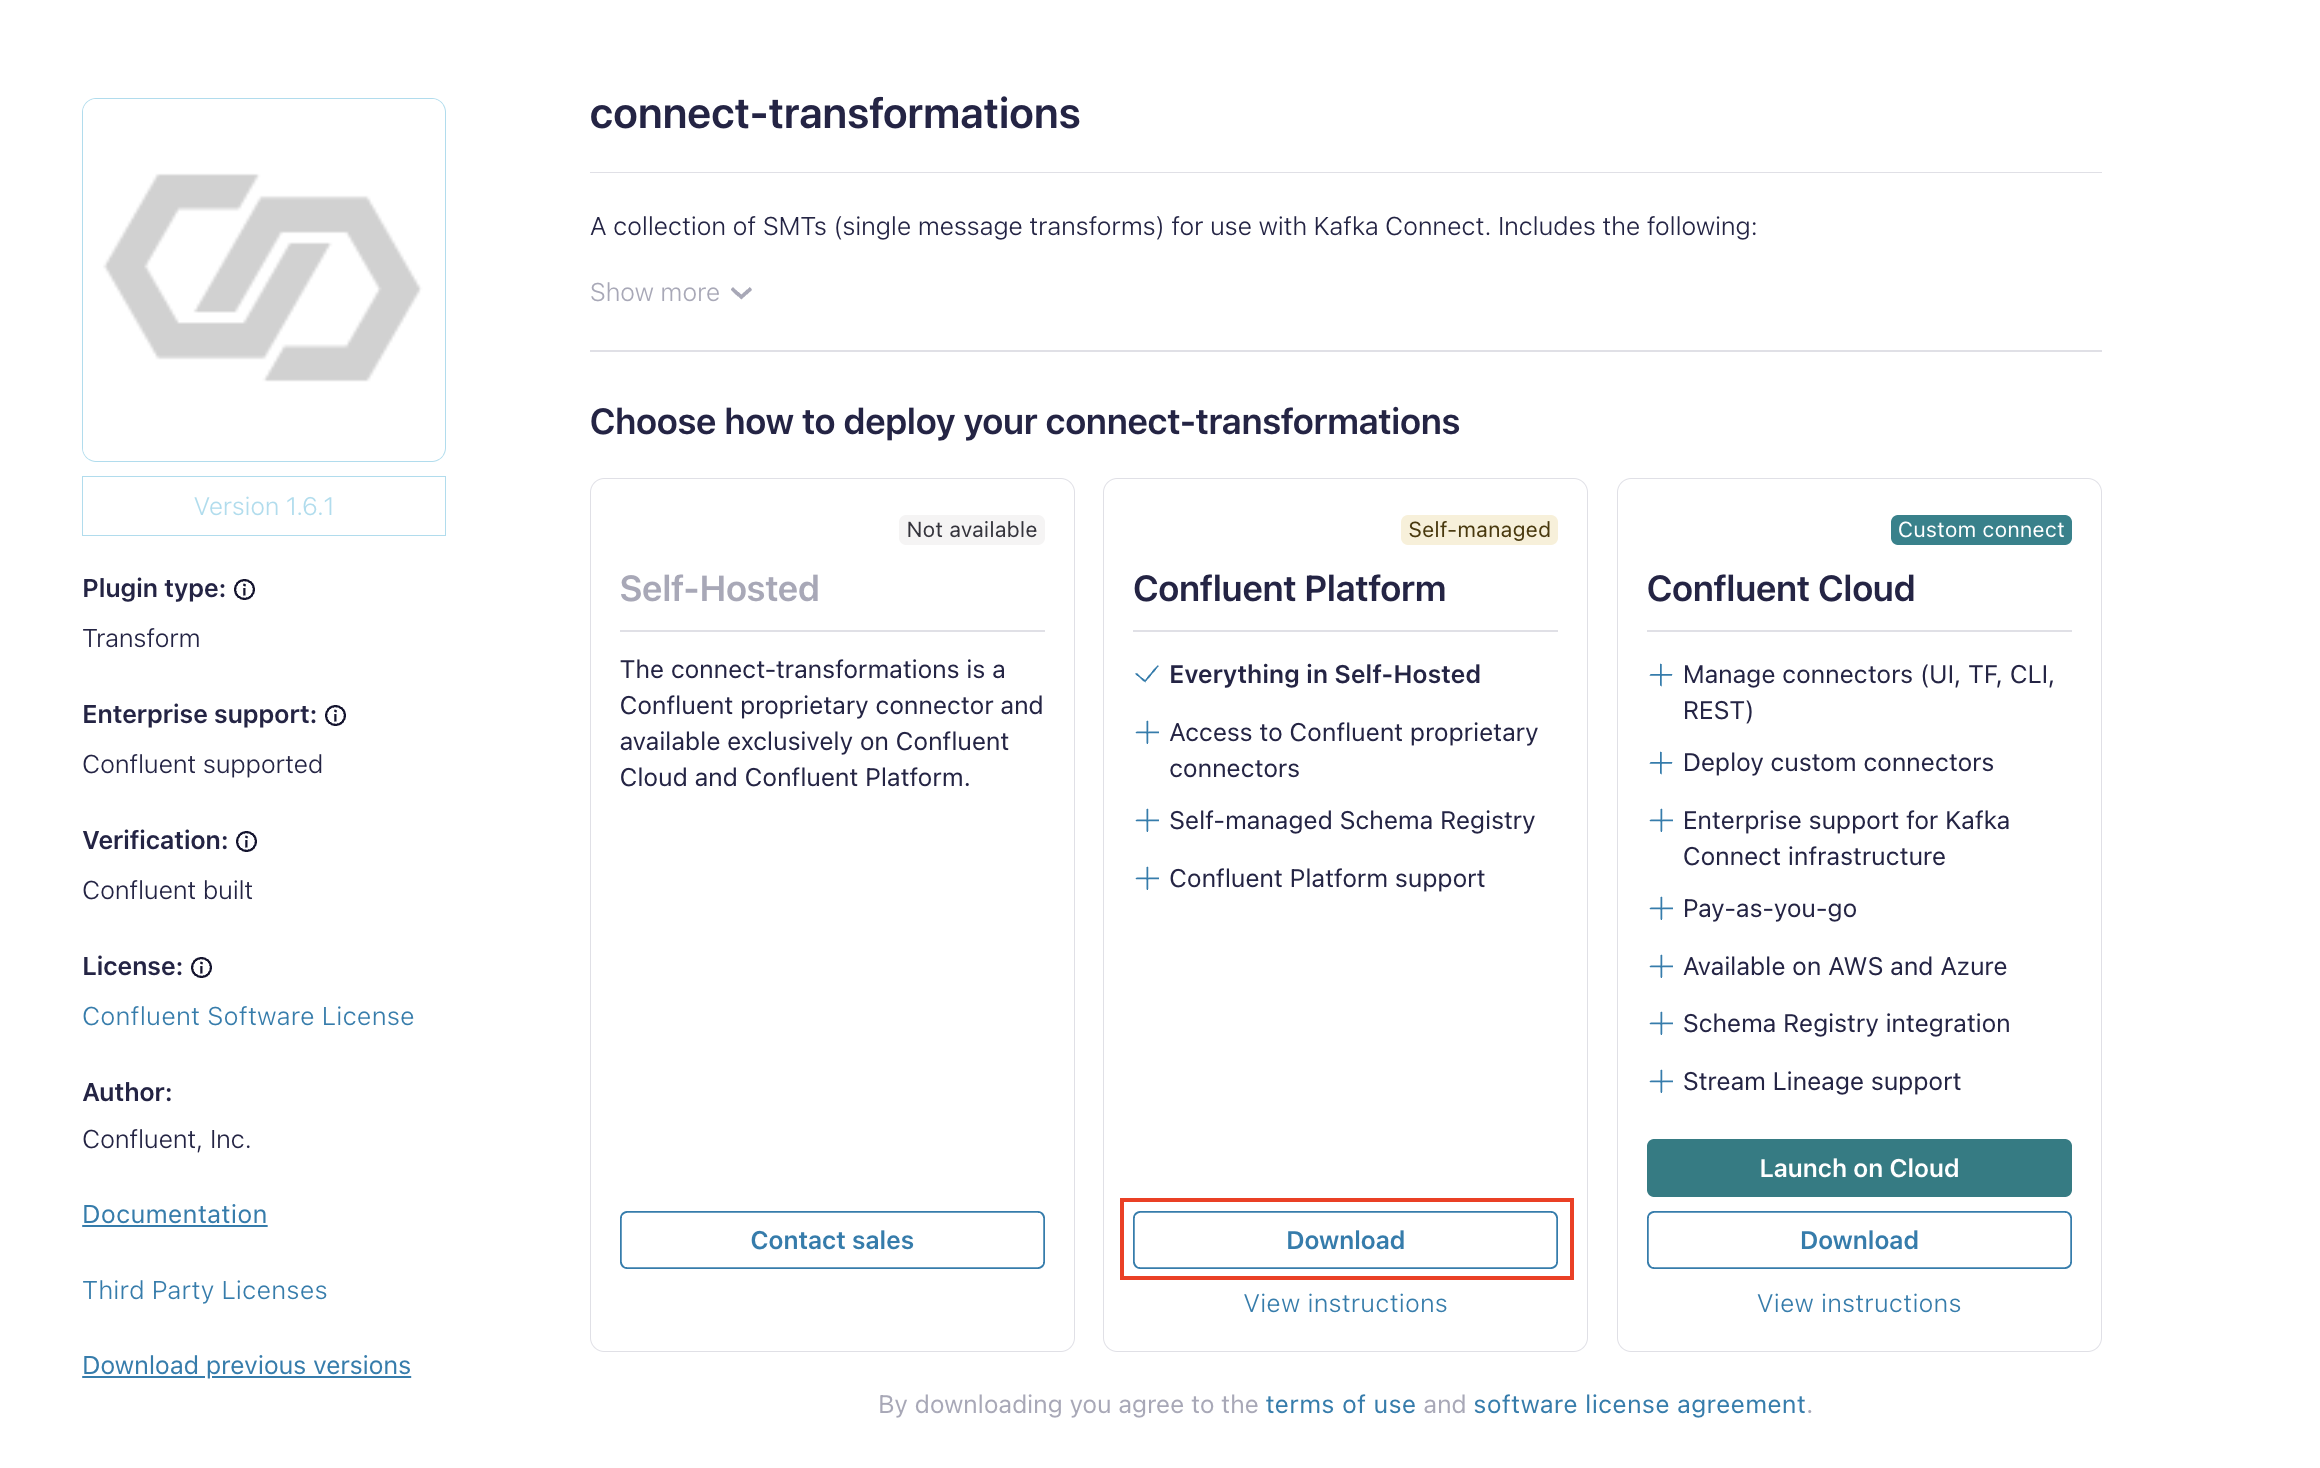
Download Custom SMT artifact file from Confluent Marketplace
Request a pre-signed URL for a new Custom SMT artifact by sending a POST request to the pre-signed URL endpoint.
curl --request POST \
    --url 'https://api.confluent.cloud/cam/v1/presigned-upload-url' \
    --header 'accept: application/json' \
    --header 'authorization: Basic <Replace_Basic_Auth>' \
    --header 'content-type: application/json' \
    --data '{
    "content_format":"<File_Type>",
    "cloud":"<Cloud_Provider>",
    "environment":"<Env_ID>"
  }' | jq
Example request:
curl --request POST \
    --url 'https://api.confluent.cloud/cam/v1/presigned-upload-url' \
    --header 'accept: application/json' \
    --header 'authorization: Basic <base64-encoded-key-and-secret>' \
    --header 'content-type: application/json' \
    --data '{
    "content_format":"ZIP",
    "cloud":"AWS",
    "environment":"env-stgcznox3d"
  }' | jq
The output displays the details for the pre-signed URL and upload ID:
{
    "api_version": "connect/v1",
    "content_format": "ZIP",
    "kind": "PresignedUrl",
    "upload_form_data": {
        "bucket": "confluent-custom-smts-prod-us",
        "key": "staging/ccp/v1/.../custom-plugins/.../plugin.zip",
        "policy": "...",
        "x-amz-algorithm": "AWS4-HMAC-SHA256",
        "x-amz-credential": "ASIA3UFUYVKN2TJBCYPQ/20230911/us-west-2/s3/aws4_request",
        "x-amz-date": "20230911T210830Z",
        "x-amz-security-token": "..."
      },
    "upload_id": "...",
    "upload_url": "https://confluent-custom-smts-prod.s3.dualstack.us-west-2.amazonaws.com/"
}
Once you have the presigned URL, ID, bucket policy, and other security details, upload your Custom SMT ZIP or JAR file to the bucket. The following example shows the curl command to upload the ZIP or JAR file.
curl -X  POST "https://confluent-custom-smts-prod.s3.dualstack.us-west-2.amazonaws.com/" \
-F "bucket=confluent-custom-smts-prod-us-west-2" \
-F "key=staging/ccp/v1/.../custom-plugins/.../plugin.zip" \
-F "policy=eyJleHBpcmF0...TA3Mzc0MTgyNF1dfQ==" \
-F "x-amz-algorithm=AWS4-HMAC-SHA256" \
-F "x-amz-credential=.../20230912/us-west-2/s3/aws4_request" \
-F "x-amz-date=20230912T151736Z" \
-F "x-amz-security-token=IQoJ...SmyuK0=" \
-F "x-amz-signature=2a6e8e5...a4d5bef0e" \
-F file=@/Users/<username>/Downloads/confluentinc-connect-transforms-1.6.1.zip
A successful command returns the command prompt.
Step 2: Create a Custom SMT
Use the following API request to create a custom connector SMT. The following are required configuration properties:
display_name: A meaningful Custom SMT name to be displayed in the UI and CLI.upload_source: For this property, you use the valuesPRESIGNED_URL_LOCATIONand the upload ID.description(Optional): A meaningful description for the plugin.
curl --request POST \
    --url 'https://api.confluent.cloud/cam/v1/connect-artifacts?environment=<Env_ID>&spec.cloud=<Cloud_Provider>' \
    --header 'accept: application/json' \
    --header 'authorization: Basic <Replace_Basic_Auth>' \
    --header 'content-type: application/json' \
    --data '{
    "spec": {
      "display_name": "<Custom_SMT_Name>",
      "description": "<Description>",
      "upload_source": {
          "location": "<Presigned_URL_Location>",
          "upload_id": "<Upload_ID>"
        }
    }
}'
Example request:
curl --request POST \
    --url 'https://api.confluent.cloud/cam/v1/connect-artifacts?environment=<Env_ID>&spec.cloud=<Cloud_Provider>' \
    --header 'accept: application/json' \
    --header 'authorization: Basic <base64-encoded-key-and-secret>' \
    --header 'content-type: application/json' \
    --data '{
    "spec": {
      "display_name": "Confluent_Custom_SMT",
      "description": "Confluent Custom SMT Example",
      "upload_source": {
          "location": "PRESIGNED_URL_LOCATION",
          "upload_id": "748d7b70-a885-46ed-a02e-4d32836957ca"
        }
    }
}'
Example response:
{
  "api_version": "cam/v1",
  "id": "cca-stgcyoj9dj",
  "kind": "ConnectArtifact",
  "metadata": {
     "created_at": "2025-04-14T05:35:19.544012Z",
     "resource_name": "crn://confluent.cloud/organization=31d218ba-d8e8-49a5-9ad1-f93327d3b4b7/environment=env-stgcznox3d/connect-artifact=cca-stgcyoj9dj",
     "self": "https://confluent.cloud/cam/v1/connect-artifacts/cca-stgcyoj9dj",
     "updated_at": "2025-04-14T05:35:19.544012Z"
    },
  "spec": {
     "cloud": "aws",
     "content_format": "ZIP",
     "description": "Confluent Custom SMT Example",
     "display_name": "Confluent_Custom_SMT",
     "environment": "env-stgcznox3d",
     "usages": []
    },
  "status": {
     "phase": "READY"
    }
}
Step 3: Create a fully-managed connector with Custom SMT
After you have configured the Custom SMT, use the following POST request to create a connector with Custom SMT:
curl --request POST \
  --url 'https://api.confluent.cloud/connect/v1/environments/<Env_ID>/clusters/<Kafka_Cluster_ID>/connectors' \
  --header 'Authorization: Basic <REPLACE_BASIC_AUTH>' \
  --header 'content-type: application/json' \
  --data '{"name":"string","config":{"connector.class":"string","name":"string","kafka.api.key":"string","kafka.api.secret":"string","property1":"string","property2":"string"},"offsets":[{"partition":{},"offset":{}}]}'
Example request:
curl -X POST https://api.confluent.cloud/connect/v1/environments/env-stgcznox3d/clusters/lkc-12rq15/connectors \
--header 'Authorization: Basic <auth-header>' \
--header 'Content-Type: application/json' \
--data '{
  "name": "Datagen_Custom_SMT",
  "config": {
      "connector.class": "DatagenSource",
      "name": "Datagen_Custom_SMT",
      "tasks.max": "1",
      "kafka.api.key": "3IGZA2J6VTH4ASQU",
      "kafka.api.secret": "<api-secret>",
      "kafka.topic": "datagen-source-custom-smt",
      "max.interval": "3000",
      "output.data.format": "JSON",
      "quickstart": "ORDERS",
      "tasks.max": "1",
      "transforms": "customSMT",
      "transforms.customsmt.type": "io.confluent.connect.transforms.ExtractTopic$Value",
      "transforms.customsmt.custom.smt.artifact.id": "cca-stgcyoj9dj",
      "transforms.customsmt.field": "itemid"
    }
}'
Original Record:
{
  "ordertime": 1512446289869,
  "orderid": 417794,
  "itemid": "Item_430",
  "orderunits": 5.085317150755766,
  "address": {
      "city": "City_19",
      "state": "State_88",
      "zipcode": 72688
    }
}
Transformed Record: Goes to item_430 instead of configures topic.
{
  "ordertime": 1512446289869,
  "orderid": 417794,
  "itemid": "Item_430",
  "orderunits": 5.085317150755766,
  "address": {
      "city": "City_19",
      "state": "State_88",
      "zipcode": 72688
    }
}
Step 4: Delete resources
When you are finished with the Quick Start, delete the resources you created to avoid unexpected charges to your account.
Delete the fully-managed connector: Use the following
DELETErequest to delete the connector you created with the Custom SMT:curl --request DELETE \ --url 'https://api.confluent.cloud/connect/v1/environments/<Env_ID>/clusters/<Kafka_Cluster_ID>/connectors/<Connector_Name>' \ --header 'Authorization: Basic <Replace_Basic_Auth>'
Example request:
curl --request DELETE \
   --url 'https://api.confluent.cloud/connect/v1/environments/env-stgcznox3d/clusters/lkc-12rq15/connectors/Datagen_Custom_SMT' \
   --header 'Authorization: Basic <auth-header>'
Delete the Custom SMT artifact file: Delete a Custom SMT artifact in your environment by invoking a
DELETErequest to the Delete artifact endpoint.curl --request DELETE \ --url 'https://api.confluent.cloud/cam/v1/connect-artifacts/<Custom_SMT_artifact_ID>?spec.cloud=<Cloud_Provider>&environment=<Env_ID>' \ --header 'accept: application/json' \ --header 'authorization: Basic <Replace_Basic_Auth>' \ --header 'content-type: application/json' | jq
Example request:
curl --request DELETE \
   --url 'https://api.confluent.cloud/cam/v1/connect-artifacts/cca-stgcyoj9dj?spec.cloud=aws&environment=env-stgcznox3d' \
   --header 'accept: application/json' \
   --header 'authorization: Basic <base64-encoded-key-and-secret>' \
   --header 'content-type: application/json' | jq