
Egress Private Service Connect Endpoints Setup Guide: Self-Managed Services on Google Cloud for Confluent Cloud
This topic describes how to set up Egress Private Service Connect (PSC) Endpoints for self-managed services on Google Cloud to enable fully-managed connectors in Confluent Cloud using Google Cloud Private Service Connect.
Prerequisites
Ensure you have the following setup in Confluent Cloud:
In Confluent Cloud, the following cluster type was set up with the specified network resource:
A Dedicated cluster.
A Confluent Cloud network with a connection type of Private Service Connect.
For steps to create a Confluent Cloud network, see Create a Confluent Cloud network on Google Cloud.
Step 1: Create an Instance Group
In the Google Cloud console, go to Compute Engine > Instance groups.
Click Create instance group.
Select New unmanaged instance group.
Specify the group details:
Name: Provide a descriptive name for the instance group.
Location: Select the Region and Zone. These must match the location of the virtual machine (VM) running your service.
Network and instances: Select the same VPC network and subnet as your VM.
VM instances: Select the VM that hosts your service.
Port mapping: Leave this blank. You will attach this group to an internal passthrough Network Load Balancer (NLB), which does not use named ports.
Click Create.
Step 2: Create an Internal Passthrough Network Load Balancer
In the Google Cloud console, go to Network Services > Load balancing.
Click Create load balancer.
Configure the load balancer type:
Type of load balancer: Network Load Balancer
Proxy or passthrough: Passthrough load balancer
Public facing or internal: Internal
Click Configure.
Specify the basic configuration:
Load Balancer name: The name of your load balancer.
Region: Select the same region as your VM.
Network: Select the same VPC network as your VM.
Specify the backend configuration:
Backend type: Instance group
Protocol: TCP
Health Check: Create a new health check using the in-place option, targeting the port exposed by your service.
You can add multiple backends, but this setup requires only one. Specify the following backend settings:
IP stack type: IPv4 (single-stack)
Instance group: Select the instance group created in Step 1: Create an Instance Group section.
Click Done.
Specify the frontend configuration:
Each frontend configuration automatically creates a forwarding rule. Since Private Service Connect accepts only one forwarding rule, configure only one frontend.
Protocol: TCP
IP version: IPv4
Subnetwork: Select the same subnet as your VM
Internal IP purpose: Non-shared
IP address: Ephemeral (Automatic)
Ports: Choose based on your requirement:
Single: if you need access to a single port exposed by your service. Specify the port number after selection.
Multiple: if you need access to at max 5 ports exposed by your service. Specify the port numbers after selection.
All: If you need access to more than 5 ports exposed by your service.
Global access: Disable
Click Done.
Click Create.
Step 3: Retrieve the Google Cloud Project IDs from Confluent Cloud
In Confluent Cloud, select the network where you want to create the egress Private Service Connect Endpoint.
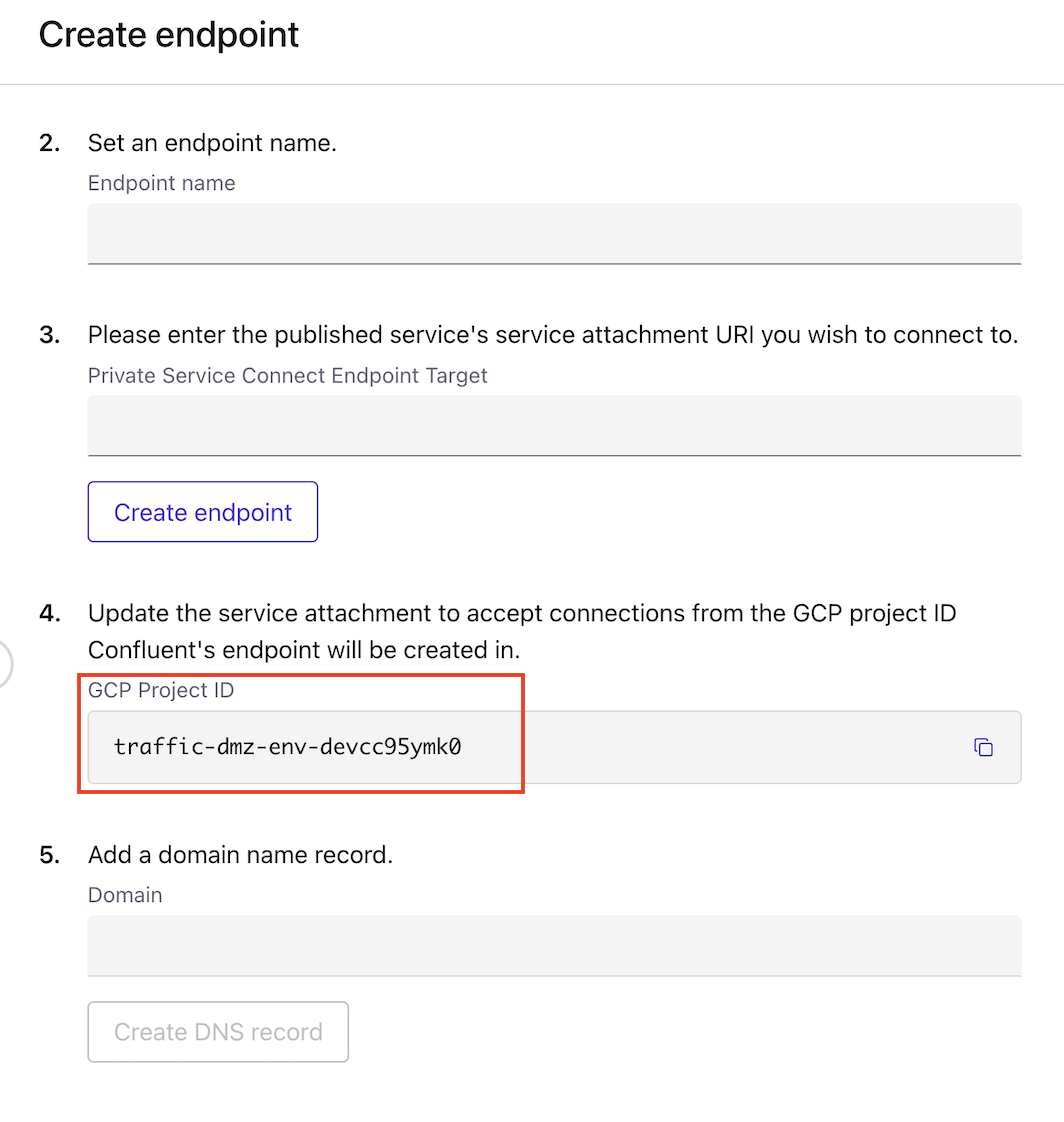
Click Egress connections tab, then click Create endpoint.
Click the service you want to connect to. Select Other if you do not see the specific service.
Copy the Project ID where Confluent’s endpoint will be created.
Step 4: Create a Private Service Connect
In the Google Cloud console, go to Network Services > Private Service Connect.
Go to the Published services tab and click + Publish service.
Specify the target details:
Target details: Load balancer
Load balancer type: Internal passthrough Network Load Balancer
Load balancer: Select the load balancer created in Step 2: Create an Internal Passthrough Network Load Balancer section.
Forwarding rule: Select the forwarding rule created in Step 2: Create an Internal Passthrough Network Load Balancer associated with the load balancer.
Specify the service details:
Service name: The name for your service.
Subnets: Reserve a subnet using the in-place option, This subnet is used for PSC-generated IPs that consumers use to reach your service.
Note
Since the service is backed by an internal passthrough Network Load Balancer, you must add the reserved PSC subnet CIDR to the Source IPv4 ranges in your VM’s firewall rules. If you do not add this range, traffic from PSC will not reach the VM.
Specify the connection details:
Connection preference: Accept connections for selected projects.
Accepted projects: Add the project ID retrieved in Step 3: Retrieve the Google Cloud Project IDs from Confluent Cloud.
Click Add service.
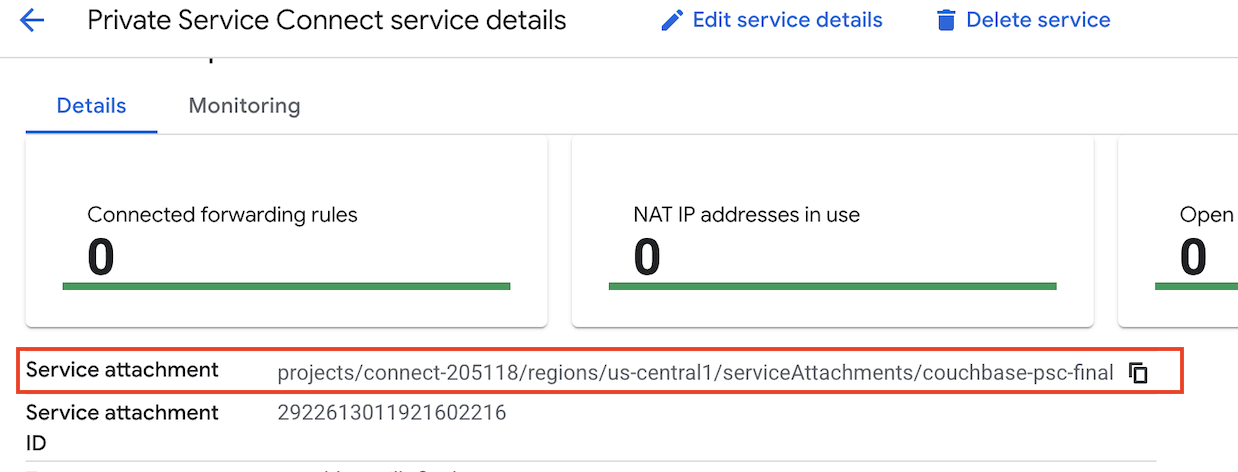
Step 5: Retrieve Service Attachment URI
Go to the published service once it is created.
Copy the service attachment URI which is required when you create egress private service connect endpoint.
Step 6: Create an Egress Private Service Connect Endpoint
In the Confluent Cloud, go to Network management tab of the desired Confluent Cloud environment.
Click the Confluent Cloud network to which you want to add the Private Service Connect Endpoint. Ensure the Connection Type is Private Service Connect.
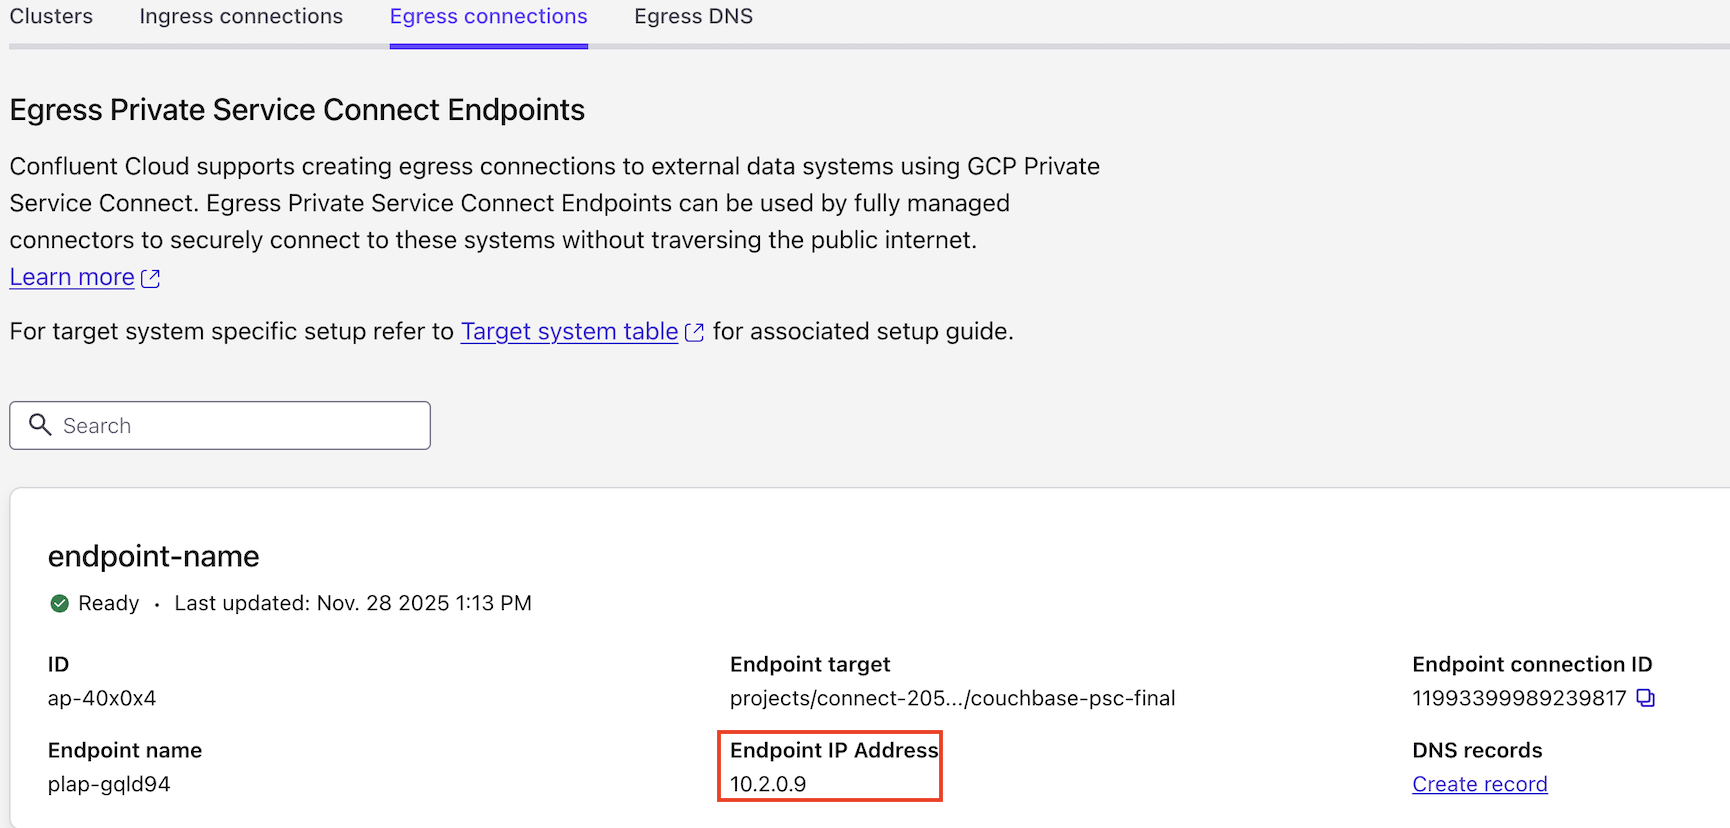
Click Create endpoint in the Egress connections tab.
Click the service you want to connect to. Select Other if you do not see the specific service.
Follow the guided steps to specify the field values, including:
Name: The name of the Private Service Connect Endpoint.
Service Attachment URI: The published service’s Service attachment URI.
The service attachment URI is the one noted above, in the last step of the Step 5: Retrieve Service Attachment URI section.
Click Create to create the Private Service Connect Endpoint.
If prompted, complete any additional steps for the specific target service, then click Finish.
Step 7: (Optional) Create the DNS Records
When the Private Service Connect Endpoint status transitions to Ready, click Create DNS record in the DNS tab, or click Create Record on the associated Private Service Connect Endpoint tile.
Specify the following:
Egress endpoint: The Egress Private Service Connect Endpoint you created in the Step 6: Create an Egress Private Service Connect Endpoint section.
Domain: The associated service endpoint.
Click Save to create the record.
Step 8: Create the Connector
When the DNS Record status transitions to Ready, you can create the connector.
For the connector’s Endpoint/Host/Hostname, specify the IP address of the Endpoint if no associated DNS records have been created.
For the steps to create the connector, refer to the connector-specific documentation that is listed for your specific connector in Supported connectors.