Use Single Sign-on (SSO) for Authentication on Confluent Cloud
Use single sign-on (SSO) for Confluent Cloud to manage your Confluent Cloud users and authenticate them using your existing identity provider instead of using Confluent Cloud local user accounts and passwords. Enabling SSO in Confluent Cloud lets you manage your users in one place and allows users to sign in to Confluent Cloud using their existing SSO credentials. Using SSO improves your security and lets you use multi-factor authentication (MFA), if provided by your identity provider.
You can use single sign-on (SSO) with Confluent Cloud with:
Your SAML-based identity provider. To enable, see Enable SAML Single Sign-on (SSO) on Confluent Cloud.
Your OIDC-based Azure Marketplace identity provider. See Use Single Sign-on with Azure Marketplace on Confluent Cloud.
In Confluent Cloud, SSO is enabled at the organization level. After SSO is enabled, the authentication behavior changes as follows:
All new invited users to the organization are authenticated using SSO (by default).
Once a user authenticates using SSO, they cannot be added as a local user in other organizations.
Warning
When SSO is disabled, the authentication method for users does not automatically change. Before you disable SSO, make sure that you have a local user account with the OrganizationAdmin role to be able to sign in to your organization.
For details about SSO user accounts, see Manage Single Sign-on (SSO) User Accounts on Confluent Cloud. Multi-factor authentication (MFA), including two-factor authentication (2FA), is an SSO option available from most identity providers.
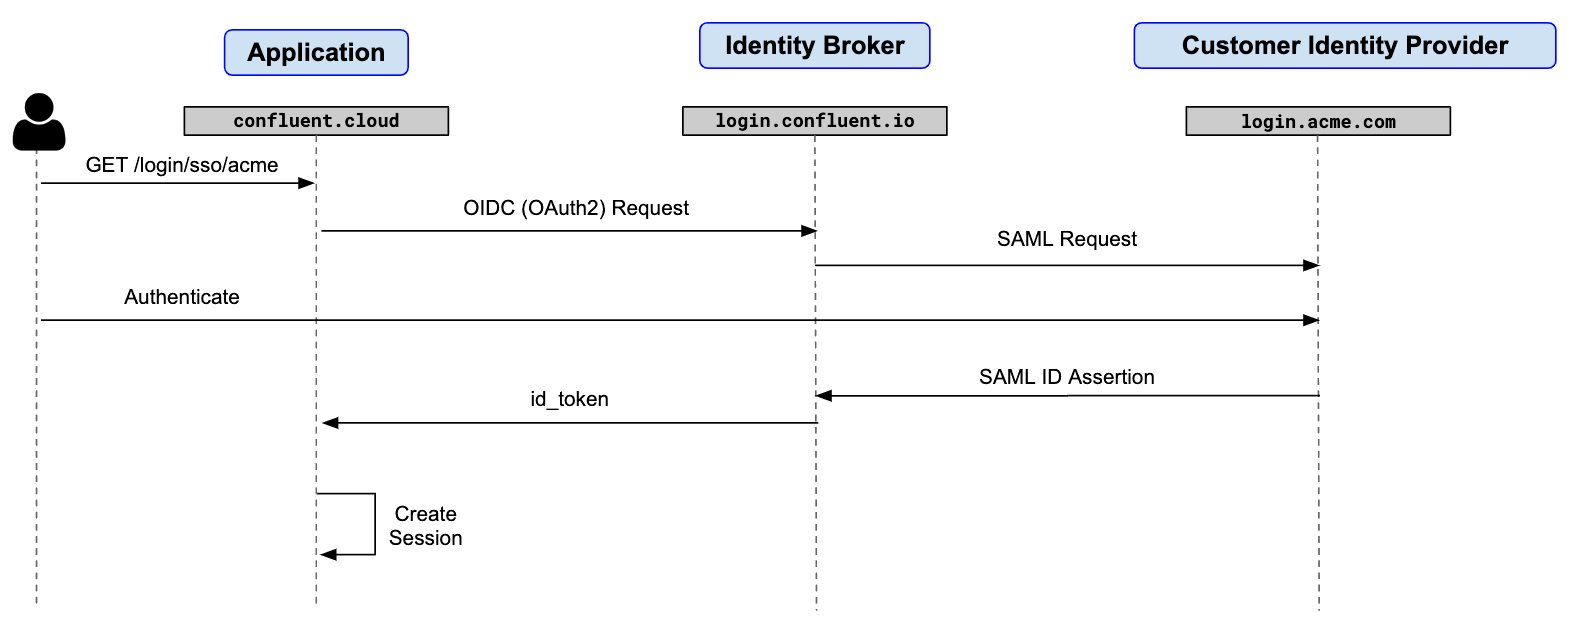
Confluent Cloud SAML-based SSO workflow
Web browser
With SSO enabled, users sign in at confluent.cloud/login/sso/<sso-identifier>. The browser makes an OpenID Connect (OIDC) request to the identity broker at login.confluent.io, which then redirects the browser to send a SAML request to the organization’s identity provider. After the user successfully authenticates, the identity provider responds with a signed SAML ID Assertion, which the identity broker translates into a JSON Web Token (JWT). Confluent Cloud uses this token to authenticate additional requests from the browser.

Confluent Cloud SSO workflow
Confluent CLI
When SSO is enabled and the confluent login command is issued, the following browser-based workflow is launched:
Generates an HTTP server on
localhostto receive the authentication callback.Initiates the SSO flow by navigating to
login.confluent.ioin the browser.The browser automatically redirects the user to the identity provider sign-in page.
After successfully signing in, the browser redirects the user back to
localhostwith a signedid_token.Confluent CLI uses the
id_tokento obtain a Confluent Cloud back-end session.If the Confluent CLI is running on a server without a web browser (also known as a “jump host”), then this flow does not work. In such cases, you must sign in using the
--no-browseroption. For details, refer to Sign in to Confluent Cloud using SSO.
Sign in to Confluent Cloud using SSO
You can sign in to Confluent Cloud using the Confluent CLI or the Confluent Cloud Console.
For SSO-enabled organizations, you can sign in to your Confluent Cloud organization using the following Confluent CLI command with your SSO user account:
confluent login
If you are using SSO-based authentication, the confluent login CLI command does not prompt the user for a password. SSO relies on your identity provider for authentication.
If the Confluent CLI is running on a server without a web browser (also known as a “jump host”), then you must sign in using confluent login with the --no-browser option, like this:
confluent login --no-browser
After running this command, you receive a printout of a URL, which you must copy and paste into a local browser. After you provide your credentials and successfully log in, the browser displays a code that you must copy and paste back into in the Confluent CLI. Your workflow should look like the following:
confluent login --no-browser
Updates are available for ccloud. To install them, please run:
$ confluent update

Enter your Confluent credentials:
Email: smith@confluent.io
Navigate to the following link in your browser to authenticate:
https://login.confluent.io/authorize?response_type=code&code_challenge=NovO_c6FO44G-6cfRbqTrBcEOrDnvm7GNZLCHCmbPM8&code_challenge_method=S252&client_id=hPbGLM8G55HSaUsaaieiiAprnJaEc3rH&redirect_uri=https://confluent.cloud/cli_callback&scope=email%20openid&audience=https://confluent.auth0.com/api/v2/&state=CoOGX1aQhvwdH2dFSvKV-gh09INnYcXFaYbUnWq3Ekw&connection=big-company

After authenticating in your browser, paste the code here:
#### The following code was copied and pasted from the browser #####
CoOGX1aQhvwdH2dFSvKV-gh09INnXcXFaYbUnWq3Ekw/bf1jJFSANhlQBqPn
Logged in as smith@confluent.io
Using environment t21388 ("default")
After new users are invited to use SSO, they receive an email notification that includes a link to the new SSO sign-in page. The wording and format of the notification varies by organization, but it will always include a link that the recipient must click to accept the invitation and complete account setup. This link is for one-time use only by the recipient of the email notification.
Fill in the acceptance form and click Submit. The new SSO login screen appears. The organization-specific SSO login URL should look like https://confluent.cloud/login/sso/<sso-identifier>, where sso-identifier is replaced by the identifier for your organization. This is your new permanent Confluent Cloud SSO login page. If using bookmarks, save this URL.