
Configure Storage for Tableflow in Confluent Cloud
Apache Iceberg™ tables managed by Tableflow are stored in Confluent Managed Storage or in a custom storage provider. You can configure storage to use Use Confluent Managed Storage or Bring Your Own Storage (BYOS).
For more information, see Storage with Tableflow.
Use Confluent Managed Storage
Confluent Managed Storage is the default storage option for Tableflow. There are no additional configurations required to use Confluent Managed Storage with Tableflow. Simply enable Tableflow on your topic.
To access tables stored in Confluent Managed Storage, use a query engine that supports the Iceberg REST API and vended credentials.
Data caching and key revocation
Confluent internal systems may locally cache decrypted data and keys for up to six hours for performance and cost efficiency. Confluent proactively evicts cached data and keys on a best-effort basis when key revocation is detected.
Cleaning up tables stored in Confluent Managed Storage
Table data for topics that have had Tableflow disabled is deleted automatically within a few days. Tableflow doesn’t have user-facing controls to immediately delete tables that are stored in Confluent Managed Storage. To have these tables deleted before automatic deletion is triggered, you must file a support request.
Bring Your Own Storage (BYOS)
You can configure Tableflow to use your own storage provider instead of Confluent Managed Storage.
Important
You should start with an empty storage location when you first enable Tableflow. Existing objects in the location may cause Tableflow to fail to start or may be lost entirely during initialization.
Amazon S3
You can use an Amazon S3 bucket that you own as Tableflow storage.
Note
Private Networking
Tableflow exclusively uses Amazon S3 Gateway endpoints to establish a secure connection with S3 for both public and private networked clusters.
The following steps show how to use Tableflow with S3 for storage.
In AWS, create a bucket in S3.
Set up a Confluent Cloud provider integration for Tableflow. In the permission policy, specify the bucket you created previously. Choose one of the following options based on your setup:
Option 1: S3 bucket and KMS key in the same |aws| account
{
  "Version": "2012-10-17",
  "Statement": [
    {
      "Effect": "Allow",
      "Action": [
        "s3:GetBucketLocation",
        "s3:ListBucketMultipartUploads",
        "s3:ListBucket"
      ],
      "Resource": [
        "arn:aws:s3:::<bucket-name>"
      ]
    },
    {
      "Effect": "Allow",
      "Action": [
        "s3:PutObject",
        "s3:PutObjectTagging",
        "s3:GetObject",
        "s3:DeleteObject",
        "s3:AbortMultipartUpload",
        "s3:ListMultipartUploadParts"
      ],
      "Resource": [
        "arn:aws:s3:::<bucket-name>/*"
      ]
    }
  ]
}
Option 2: S3 bucket and KMS key in different |aws| accounts
If your S3 bucket and KMS key are in different AWS accounts, you must include KMS permissions in the IAM role policy:
{
  "Version": "2012-10-17",
  "Statement": [
    {
      "Effect": "Allow",
      "Action": [
        "s3:GetBucketLocation",
        "s3:ListBucketMultipartUploads",
        "s3:ListBucket"
      ],
      "Resource": [
        "arn:aws:s3:::<bucket-name>"
      ]
    },
    {
      "Effect": "Allow",
      "Action": [
        "s3:PutObject",
        "s3:PutObjectTagging",
        "s3:GetObject",
        "s3:DeleteObject",
        "s3:AbortMultipartUpload",
        "s3:ListMultipartUploadParts"
      ],
      "Resource": [
        "arn:aws:s3:::<bucket-name>/*"
      ]
    },
    {
      "Effect": "Allow",
      "Action": [
        "kms:Decrypt",
        "kms:Encrypt",
        "kms:ReEncrypt*",
        "kms:GenerateDataKey",
        "kms:DescribeKey"
      ],
      "Resource": "arn:aws:kms:<region>:<kms-account-id>:key/<key-id>"
    }
  ]
}
If your S3 bucket and IAM role are in different AWS accounts, you must also add a bucket policy to the S3 bucket to grant cross-account access. In the AWS console, navigate to your S3 bucket, select the Permissions tab, and add the following bucket policy. Replace the Principal ARN with your IAM role ARN from the provider integration, and replace the bucket name in the Resource fields.
{
    "Version": "2012-10-17",
    "Statement": [
        {
            "Sid": "AllowCrossAccountAccess",
            "Effect": "Allow",
            "Principal": {
                "AWS": "arn:aws:iam::<confluent-account-id>:role/<iam-role-name>"
            },
            "Action": [
                "s3:GetBucketLocation",
                "s3:ListBucketMultipartUploads",
                "s3:ListBucket",
                "s3:PutObject",
                "s3:PutObjectTagging",
                "s3:GetObject",
                "s3:DeleteObject",
                "s3:AbortMultipartUpload",
                "s3:ListMultipartUploadParts"
            ],
            "Resource": [
                "arn:aws:s3:::<bucket-name>",
                "arn:aws:s3:::<bucket-name>/*"
            ]
        }
    ]
}
Add the following permission rule to the key policy attached to the AWS KMS key used to encrypt your S3 bucket. This allows Confluent to use the key. If your KMS key and S3 buckets are in different AWS accounts, read our documentation on configuring provider integrations.
{
  "Sid": "Allow Confluent account(s) to use the key",
  "Effect": "Allow",
  "Principal": {
    "AWS": [
      "{USER_ROLE_ARN}"
    ]
  },
  "Action": [
    "kms:Encrypt",
    "kms:Decrypt",
    "kms:ReEncrypt*",
    "kms:GenerateDataKey*",
    "kms:DescribeKey"
  ],
  "Resource": "*"
}
When you enable Tableflow, specify the provider integration and bucket name.
For more information, see Tableflow Quick Start Using Your Storage.
Cleaning up Tableflow files in Amazon S3
Table data for topics that have had Tableflow disabled is deleted automatically within a few days. If you require your data to be deleted sooner, follow these steps to delete your table from Amazon S3 manually.
Disable Tableflow on the topic that you’re deleting the table for.
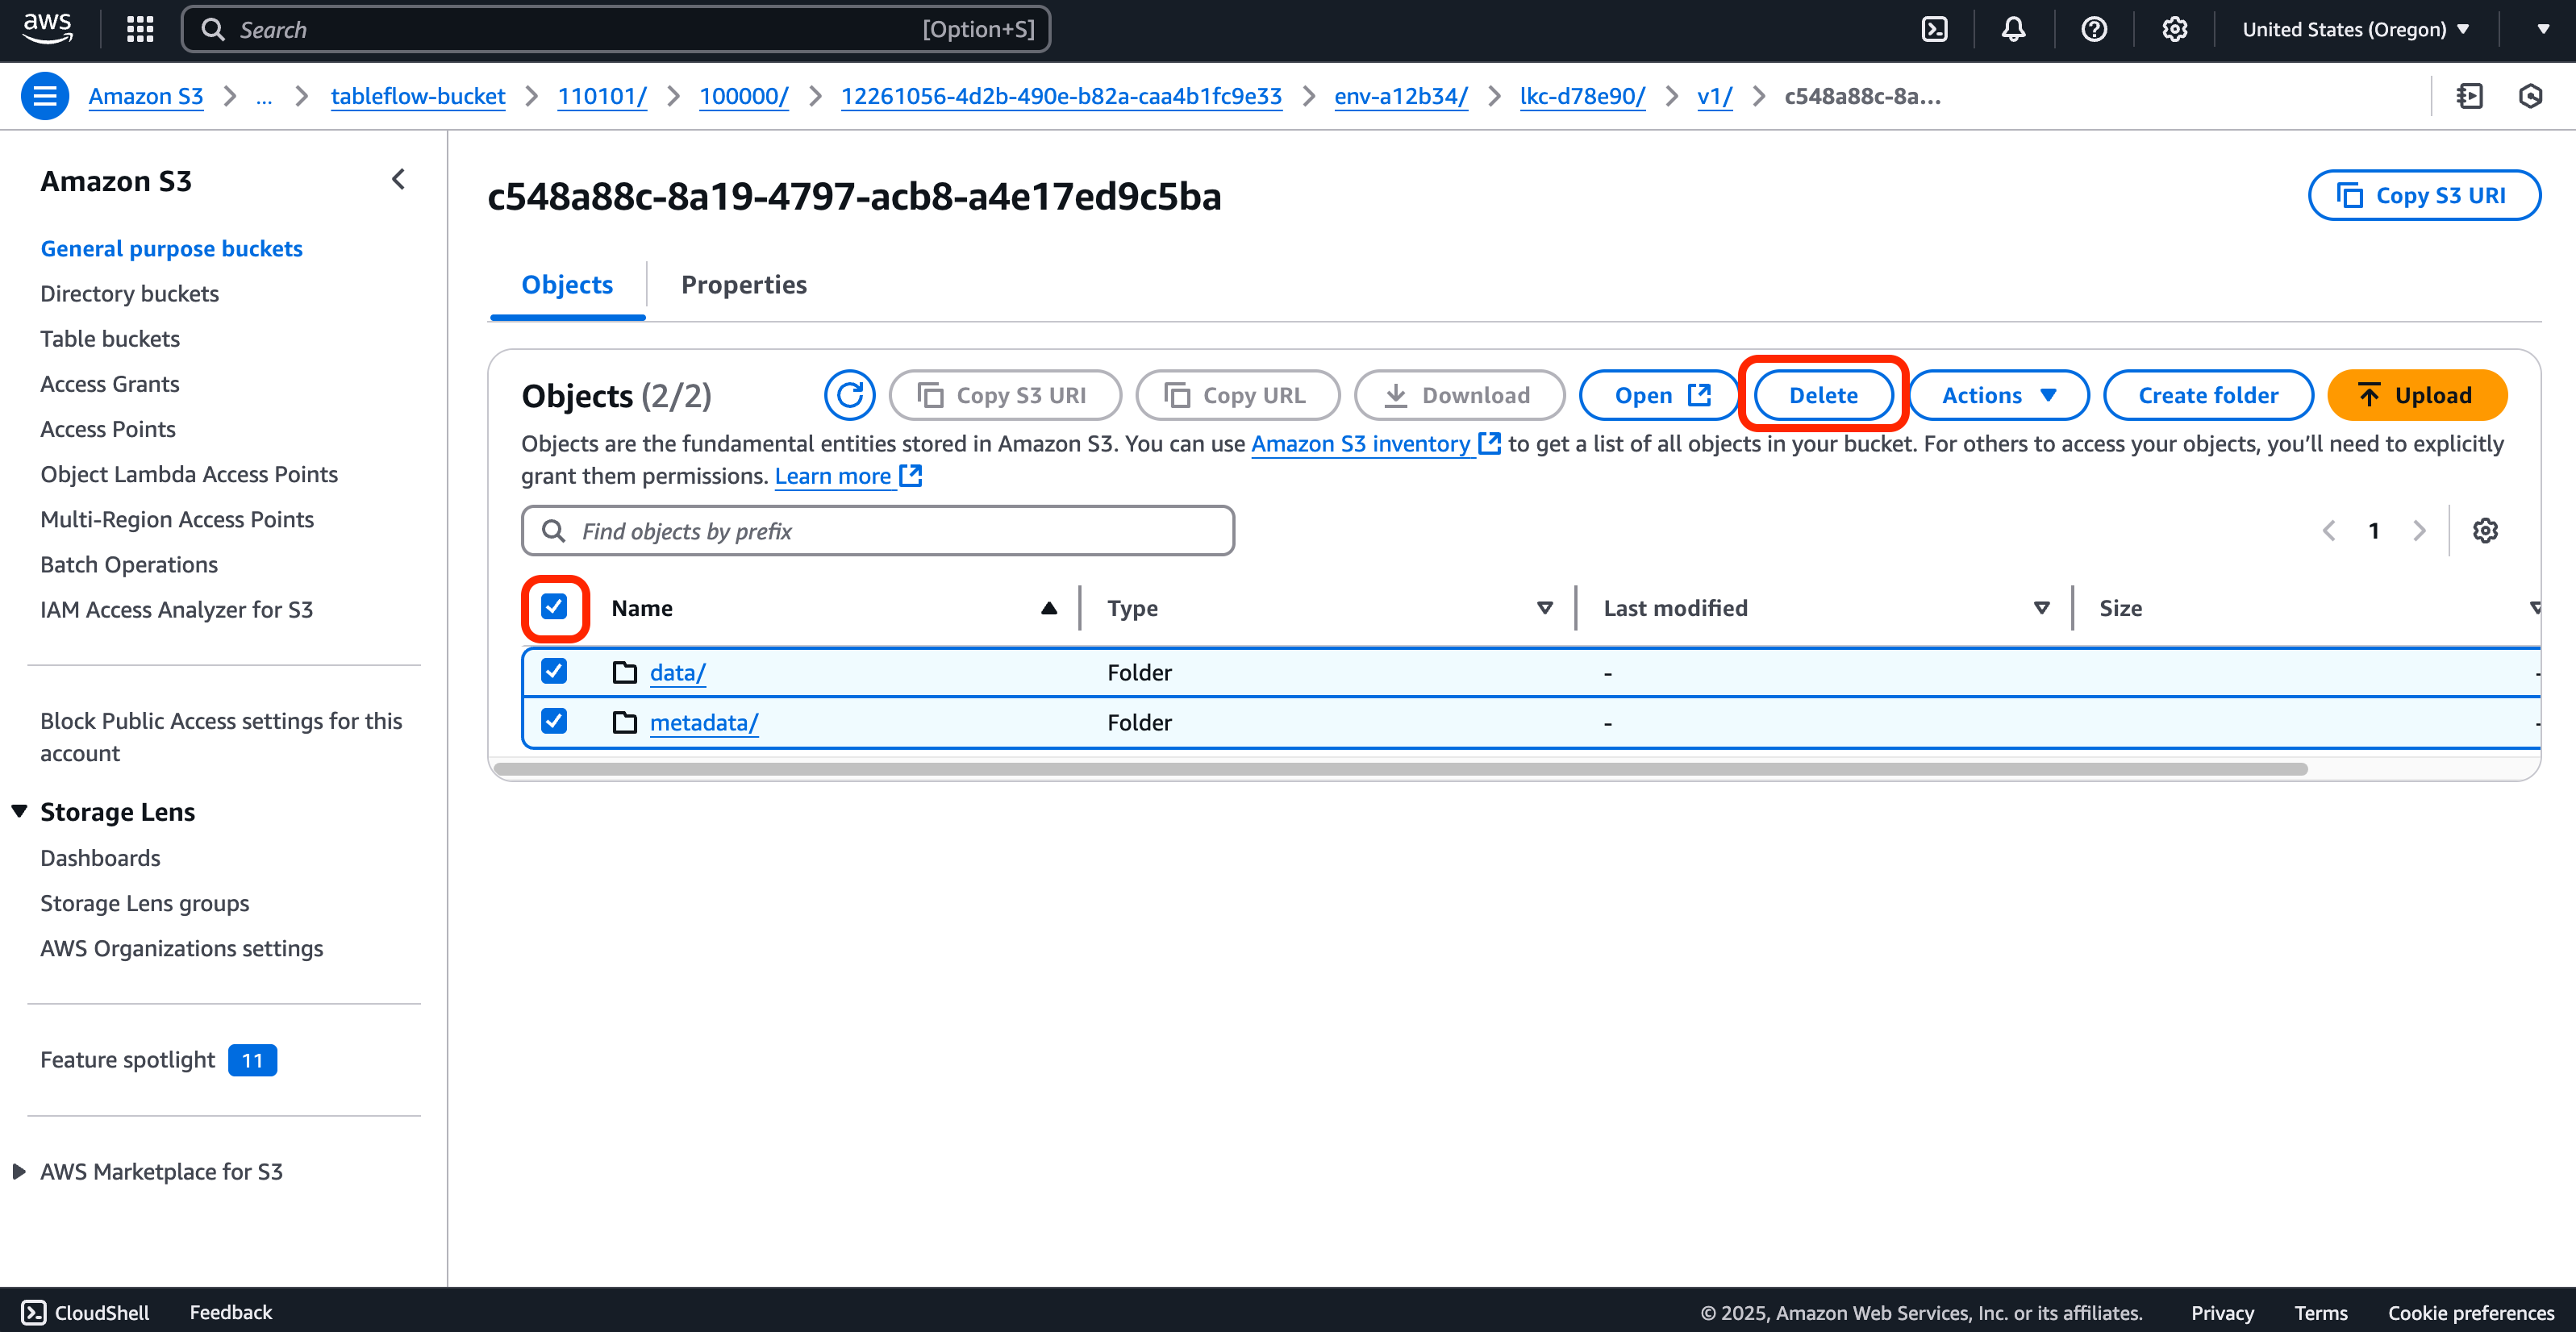
Identify the object prefix (folder) that is used for the table.
Tables stored in your bucket have the following prefix naming convention:
s3://<bucket-name>/######/######/<UUID>/<env-id>/<lkc-id>/<version>/<UUID-of-table>/.Option 1: If you’re using AWS Glue Data Catalog, find the location column which has a value that resembles:
s3://<table-prefix>/metadata/<current-table-metadata>/.Note that deleting a table from the AWS Glue Data Catalog does not delete the table data itself.Option 2: From a query engine that has access to the table, run the following query to find the table location.
SELECT
  file_path
FROM
  `[lkc ID]`.`[table name]`.files                  -- Spark
--`[lkc ID]`.`[table name]$files`                  -- Trino
--"AwsDataCatalog"."[lkc ID]"."[table name]$files" -- Athena
LIMIT 10;
Delete all objects that have the matching object prefix (folder) in the table.
If you’re using AWS Glue Data Catalog, delete the table entry from the catalog.
Azure Data Lake Storage
Tableflow supports Azure Data Lake Storage (ADLS) Gen2 as a storage provider for your tables.
Note
Private Networking: Tableflow supports connecting to Azure Storage Accounts over Azure Private Endpoints when using Enterprise or Dedicated clusters. If no private endpoints are configured, Tableflow will fall back to using Azure Service Endpoints to communicate with the Azure Storage Account.
The following steps show how to use Tableflow with ADLS:
In Azure, create an Azure Storage Account or use an existing one that is compatible with ADLS. Ensure that hierarchical namespace is enabled. For more information, see Create a storage account for Azure Data Lake Storage.
Create an empty storage container in your Azure Storage account.
Set up a Confluent Cloud provider integration for Tableflow.
Return to Azure, and add the
Storage Blob Data Contributorrole and theReaderrole for your Azure Storage Account to the Confluent service principal which was added to your account as part of the provider integration setup.In Confluent Cloud, enable Tableflow, and enter your provider integration, Azure Storage Account, and storage container in the designated fields.
Clean up Tableflow files in Azure Data Lake Storage
Data for topics that have had Tableflow disabled is deleted automatically within a few days. If you require your data to be deleted sooner, follow these steps to delete your table from Azure Data Lake Storage Gen2 manually.
Disable Tableflow on the topic that you’re deleting the table for.
Identify the object prefix (folder) that is used for the table.
Tables stored in your storage container have the following prefix naming convention:
alds://<azure storage account>.blob.core.windows.net/<storage container>/######/######/<org UUID>/<env-ID>/<lkc-ID>/v1/<table UUID>. You can find this location in the Cloud Console or the Tableflow API.