Use Confluent Control Center with Confluent Manager for Apache Flink
Manage Apache Flink® environments and applications in Confluent Manager for Apache Flink (CMF) by using Confluent Control Center. Confluent Control Center is a web-based user interface that provides a graphical way to manage Flink environments and applications.
You can use Confluent Control Center to manage the following CMF resources:
Using Confluent Control Center, you can perform these actions, and more:
View Flink cluster details
Create a new Flink environment
Update or delete an existing Flink environment
Create a new Flink application
Update or delete an existing Flink application
Track the evolution of Flink applications over time through application instances
Monitor the health of an Flink application through lifecycle events
Prerequisites
Following are the prerequisites to view and manage Flink environments and applications in Confluent Control Center:
You must have Confluent Platform and CMF installed.
To install Confluent Platform, see Install Confluent Platform.
To install CMF, see Install Confluent Manager for Apache Flink.
You must have Confluent Control Center installed, which is a separate download from CMF and Confluent Platform. To install Confluent Control Center, see Confluent Control Center Installation.
You must set some Confluent Control Center configuration properties to view CMF environments in Confluent Control Center.
The following properties are required to view CMF environments in Confluent Control Center:
confluent.controlcenter.cmf.enable=true
confluent.controlcenter.cmf.url=<cmf-url>
For more information about the Confluent Control Center configuration properties, see Configure CMF.
You may need to set some CMF security properties for Confluent Control Center. For more information, see Security Properties for CMF.
View cluster details
In Confluent Control Center, you can view the details of an Flink cluster by accessing the Flink menu item. The Resource overview page displays the details of the cluster, including the number of environments and applications,
The following image shows the Resource overview page in Confluent Control Center:
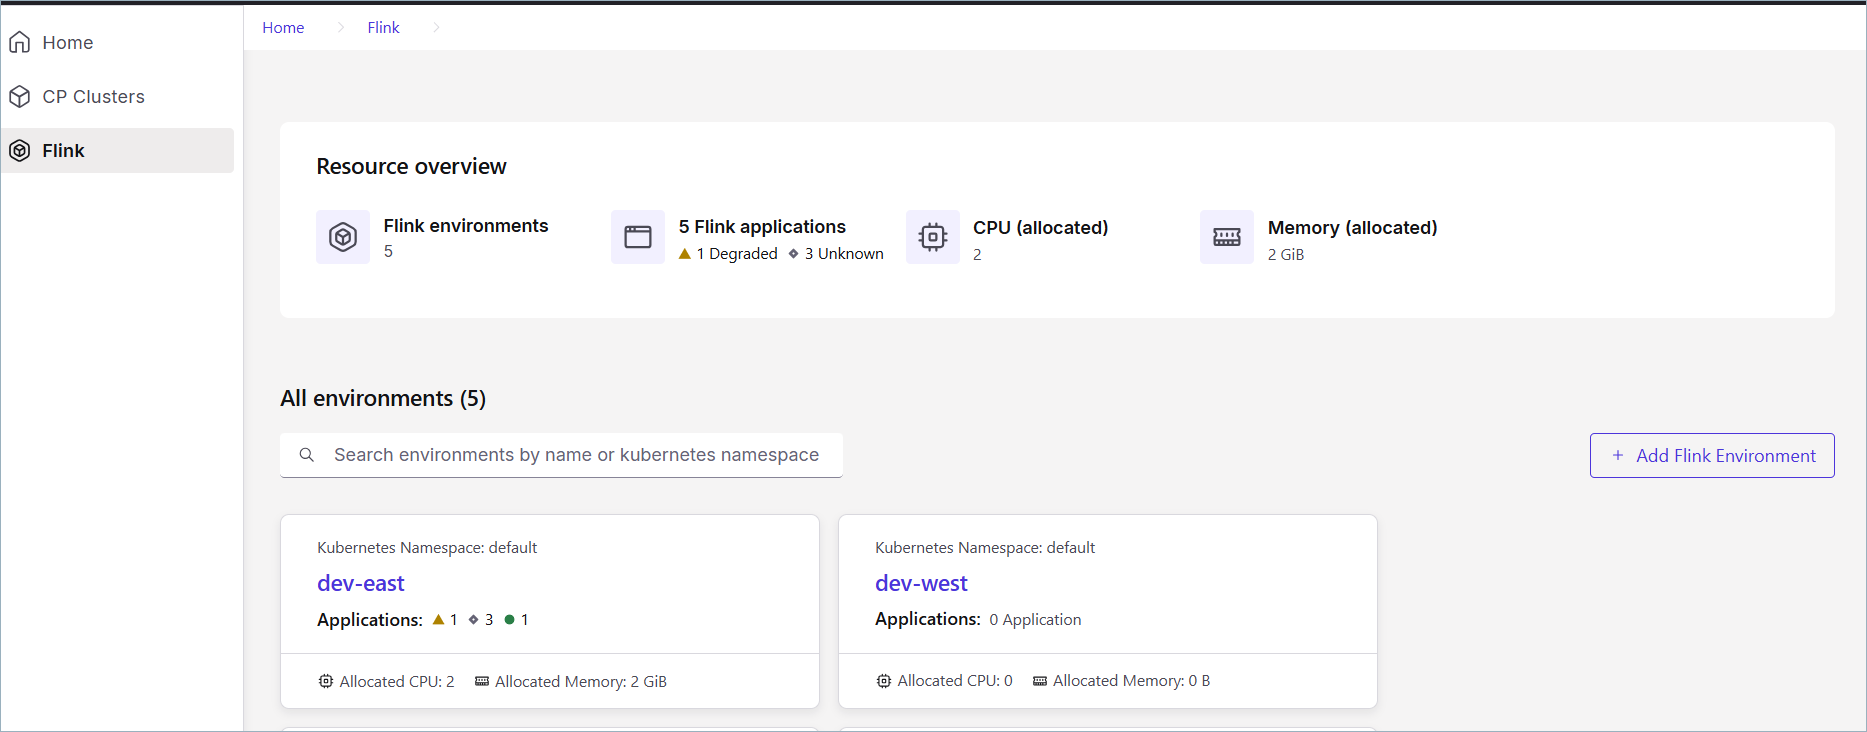
Following is a description of the displayed information:
Flink environment(s): The total number of Flink Environments that are available in the cluster.
Flink application(s): The total number of Flink applications that are available in the cluster.
CPU (allocated): The total number of CPUs allocated to the cluster. This is calculated based on the number of applications and their specified default.
Memory (allocated): The total quantity of memory for the cluster. This is calculated based on the number of applications and their specified default.
The All environments section lists Flink Environments and the number of Flink applications they contain, as well as allocated resources.
There is a maximum of 1000 applications displayed per environment.
The resource usage values are approximated based on the status information of the Flink application and may differ from the actual resource allocation on Kubernetes, in particular if the deployment is not fully reconciled.
Manage Flink environments
The following sections describe how to create, update, and delete Flink environments in Confluent Control Center.
Create a new Flink environment
To create an environment:
Navigate to the Flink Resource overview page, and choose + Add Flink Environment.
In the Create Flink Environment page, enter the following information:
Name: The name of the environment.
Kubernetes namespace: In CMF, one Flink environment is attached to one Kubernetes namespace. To learn more about environments, see - Flink Environments.
Optionally click Edit Flink application defaults and paste or upload a JSON or YAML file with the application defaults that you prefer.
Click Create environment when you are finished.
Update an existing Flink environment
You can update the defaults for Flink application in Flink environment similar to how you create an environment.
Navigate to the Flink Resource overview page, and choose a Flink Environment.
In the Application defaults section, choose Edit.
Choose YAML or JSON and paste in or upload a JSON or YAML file with the defaults that you prefer.
Click Save changes when you are finished.
Delete an Flink environment
You can easily delete an existing Flink environment if it is already empty.
Navigate to the Flink Resource overview page, and choose a Flink Environment.
In the Actions menu, choose Delete.
Select Delete.
You will see a pop-up window that asks you to confirm the deletion. To confirm you will need to type the name of the environment.
Click Delete environment to delete the Flink environment.
Manage Flink applications
The next few sections describe how to create, update, and delete Flink applications in Confluent Control Center.
View Flink application details
You can view all of the Flink applications for an environment by accessing the Flink menu item, choosing an environment, and selecting Applications in the menu.
The Flink applications will display. There is a maximum of 1000 application displayed per environment and by default they are sorted by the order they are created. The following image shows the Applications page in Confluent Control Center:

Create a new application
To create a new application:
Navigate to the Flink Resource overview page, and choose a Flink Environment.
Select Application in menu, and choose + Add application.
In the Application defaults section, paste in or upload a JSON or YAML file with the application defaults for this application. For example, your JSON file might look like the following:
 {
    "apiVersion": "cmf.confluent.io/v1",
    "kind": "FlinkApplication",
    "metadata": {
       "name": "basic-example",
       "creationTimestamp": "2025-05-09T21:49:33.113Z",
       "updateTimestamp": "2025-05-09T21:51:33.881Z"
    },
    "spec": {
       "flinkConfiguration": {
          "metrics.reporter.prom.factory.class": "org.apache.flink.metrics.prometheus.PrometheusReporterFactory",
          "metrics.reporter.prom.port": "9249-9250",
          "taskmanager.numberOfTaskSlots": "1"
       },
       "flinkVersion": "v1_19",
       "image": "confluentinc/cp-flink:1.19.1-cp2",
       "job": {
          "jarURI": "local:///opt/flink/examples/streaming/StateMachineExample.jar",
          "parallelism": 3,
          "state": "running",
          "upgradeMode": "stateless"
       },
       "jobManager": {
          "resource": {
          "cpu": 1,
          "memory": "1024m"
          }
       },
       "serviceAccount": "flink",
       "taskManager": {
          "resource": {
          "cpu": 1,
          "memory": "1024m"
          }
       }
    }
}
Click Create application when you are finished.
Suspend or delete an Flink application
To suspend or delete an application:
Navigate to the Flink Resource overview page, and choose a Flink Environment, and an application.
In the Actions menu, select Suspend or Delete
If you choose Suspend, a pop-up appears and you must click Suspend again to pause your Flink application. You can also click Cancel if you change your mind.
If you choose Delete, a pop-up appears and you must type the name of the application to confirm the deletion and click Delete application.
You can also click Suspend instead if you want to pause the Flink application instead of deleting it.
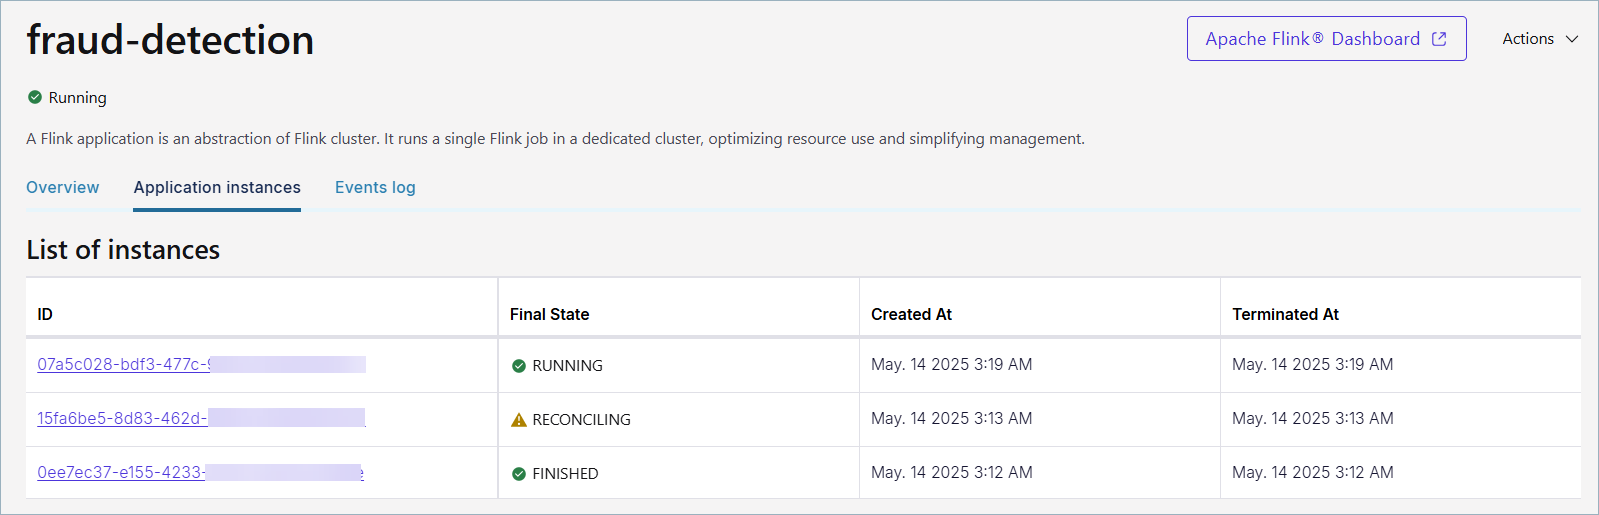
Check application instance details
You can check the effective configuration for every deployed Flink application version in the Application instances tab.
To view this tab, navigate to the Flink Resource overview page, and choose a Flink Environment.
Select an application, and click the Application instances tab. This will show you each instance of the application and its status.
The following image shows the Applications instances tab in Confluent Control Center:
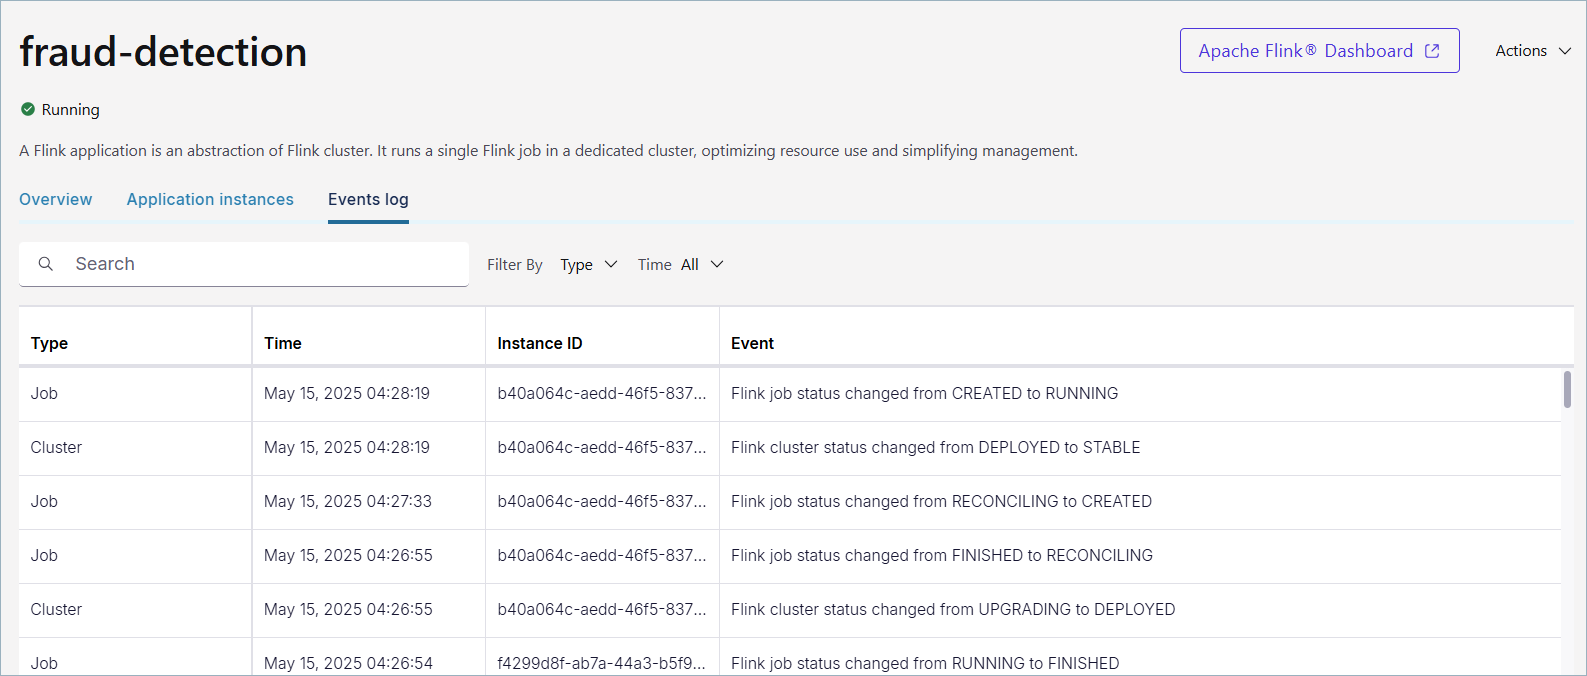
Check event logs for a Flink application
You can check the event logs for a Flink application in the Events log tab. Events help you track the status of your Flink applications and clusters. An event occurs:
When the CMF application is created or updated
When the cluster status changes
When the job status changes
To view events:
In Confluent Control Center, navigate to the Flink Resource overview page, and choose a Flink Environment.
Select a Flink application, and click the Events log tab.
The following image shows the Events log tab in Confluent Control Center: