Important
You are viewing documentation for an older version of Confluent Platform. For the latest, click here.
Kafka DevOps with Kubernetes and GitOps
The kafka-devops project is a simulated production environment running a streaming application targeting Apache Kafka® on Confluent Cloud. Applications and resources are managed by GitOps with declarative infrastructure, Kubernetes, and the Operator Pattern. This document contains usage instructions and highlights of the project.
For additional details on kafka-devops, see the Kafka Devops with Kubernetes and Gitops Blog post.
You may find this project helpful by simply referencing the documentation, code, and strategies for managing event streaming applications on Kubernetes. Additionally, if you wish to operate your own version of the project, the following usage instructions will guide you.
Usage
Setup
This project highlights a GitOps workflow for operating microservices on Kubernetes. Using GitOps will require the FluxCD appliation to have read/write access to the repository. It is required that you use a Fork of this repository for your own local version, otherwise the GitOps automation will not be authorized to read and write from the repository. Use the GitHub Fork function to create a personal fork of the project and clone it locally.

After forking and cloning the repository, export the following two shell variables so that the installation of the project is configured to the proper GitHub repository and your GitHub account.
- Export the
REPO_URLvariable to point to the git URL of your forked repository
export REPO_URL=git@github.com:your-fork/kafka-devops
- Export the
GHUSERvariable with your GitHub user id
export GHUSER="Your GitHub User ID"
- Export the
Prerequisites
Confluent Cloud
This project utilizes Confluent Cloud for Kafka and Schema Registry. In order to run a copy of the kafka-devops project you will need a Confluent Cloud account. When signing up for a new account, use the promo code DEVOPS200 to receive an additional $200 free usage (details).
Warning
The automation built into this project will build and manage real Confluent Cloud resources. It will create Confluent Cloud environments, clusters, topics, ACLs, service accounts, and potentially other Confluent Cloud resources that are billable. To avoid unexpected charges, carefully evaluate the cost of resources before launching any demo and manually verify that all Confluent Cloud resources are destroyed after you are done.
Development Tools
This project requires various tools to be installed on your local development machine. Below we will list those requirements including links for installing them. You may choose to install these tools manually or, if you use macOS, you can use a provided make target to install the dependencies for you. This make target uses a combination of Homebrew and downloading and copying binaries to /usr/local/bin.
If you are using another operating system or prefer to manually install the dependencies, you can skip this step and follow the individual tool installation instructions below.
Warning
If you use this make command you will be prompted for your adminstrative passwod to install files to /usr/local/bin
make install-deps
Once you have the local development tools, proceed to the next section below.
| Tool | Info | Install Instructions |
|---|---|---|
ccloud |
ccloud CLI is used to manage Confluent Cloud resources |
https://docs.confluent.io/current/cloud/cli/install.html |
kubectl |
Required to interact with your Kubernetes cluster, create secrets, etc. | https://kubernetes.io/docs/tasks/tools/install-kubectl/ |
helm |
Used to install FluxCD into the Kubernetes cluster | https://helm.sh/docs/intro/install/ |
fluxctl |
Required to interact with the FluxCD controller inside the Kubernetes cluster | https://docs.fluxcd.io/en/1.18.0/references/fluxctl.html |
k3d |
(Optional) Used to run the project on a local Docker based Kubernetes cluster | https://github.com/rancher/k3d#get |
Kustomize |
Environments (dev, stg, prd, etc.) are created by using Kustomize style overlays | https://kubernetes-sigs.github.io/kustomize/installation/ |
kubeseal |
Sealed Secrets and kubeseal are used to encrypt secrets, which are then committed to the Git repository |
https://github.com/bitnami-labs/sealed-secrets |
jq |
Used for processing JSON | https://stedolan.github.io/jq/ |
yq |
Used for processing YAML | https://github.com/mikefarah/yq |
Kubernetes Cluster
The project uses Kubernetes to host applications connected to Confluent Cloud Kafka and Schema Registry. If you’d like to use an existing Kubernetes cluster, you only need to ensure your
kubectlcommand is configured to administer it properly. If you’d like to create a local test Kubernetes cluster on Docker using k3d, use this provided make target:make cluster
Verify
kubectlis configured properly and the cluster is ready:kubectl get nodes
NAME                        STATUS   ROLES    AGE   VERSION
k3d-kafka-devops-server-0   Ready    master   24s   v1.18.4+k3s1
k3d-kafka-devops-server-1   Ready    master   15s   v1.18.4+k3s1
k3d-kafka-devops-server-2   Ready    master   12s   v1.18.4+k3s1
k3d-kafka-devops-server-3   Ready    master   10s   v1.18.4+k3s1
Create Secrets
This project uses Bitnami Sealed Secrets to manage secret values (passwords, api keys, etc.). Now that the
kubectlclient is configured for the Kubernetes cluster you will use, install the sealed secret controller into Kubernetes with:make install-bitnami-secret-controller
And wait for the sealed secret controller to be ready by repeating this command until the return value transitions from
nullto1:kubectl get -n kube-system deployment/sealed-secrets-controller -o json | jq '.status.availableReplicas'
Retrieve the secret controller’s public key and use it to seal (encrypt) secrets. The Sealed Secrets are committed to the Git repository and later installed into the Kubernetes cluster by the GitOps process. Only the secret controller, which generated a public/private key pair, can decrypt the Sealed Secrets inside the Kubernetes cluster.
If your cluster has public nodes (which is true for the local dev cluster setup in these instructions), you can obtain and save the public key using:
make get-public-key-dev
If you are using an existing cluster that is private (
kubesealcannot reach the secret controller because of network policies), you need to copy the secret controller’s key from the secret controller’s log file into the key file stored locally. If you have administrative permission to the cluster withkubectl, you may be able to get the logs by executing the following command:kubectl logs -n kube-system deployment/sealed-secrets-controller
When you obtain the public key, store it in a file located at
secrets/keys/dev.crt. This file need not be checked into the repository, however it is not secret information. The remaining setup scripts look in thesecrets/keys/dev.crtlocation for the public key in order to encrypt the secrets.Note
See the Bitnami docs for long term management of secrets and more details on private clusters .
You can validate your
secrets/key/dev.crtfile contents with:cat secrets/keys/dev.crt
Verify with a result that looks similar to:
-----BEGIN CERTIFICATE-----
MIIErTCCApWgAwIBAgIQH5QEHe0tYPRHi2fPNkCZITANBgkqhkiG9w0BAQsFADAA
MB4XDTIwMDkwMjE0MDcwOFoXDTMwMDgzMTE0MDcwOFowADCCAiIwDQYJKoZIhvcN
AQEBBQADggIPADCCAgoCggIBAKoUaCGavOp4Aqz9b3eTDibdytlq46jsBpBGfF7R
...
pzdWVMSumzZnWE/bu9+OQ4TX0d2p6ka/paOXuOObGOlJclex3lEc3Hw06iL9TnJJ
K4qei3kT6H/QlcjslyWaJtPO5liZLbjBBitXjONM3A8vLfKXA+3IVHG4QAr39jtv
2Q==
-----END CERTIFICATE-----
The process for sealing secrets will follow this pattern (example commands are given after this explanation):
- Create a local text file containing the secrets that are to be sealed. This file contains the raw secret data and should be protected like any secret.
- Create a local Kubernetes Secret manifest file using the
kubectl create secret filecommand and put the file into a staging area. This file contains raw secret data (in base64 encoding) and should be protected like any secret. - The
kubesealcommand is run with the secret controller’s public key and the Kubernetes Secret file you created in the previous step. This encrypts and creates a Sealed Secret Kubernetes manifest file. This file contains the encrypted secret and can be safely committed to a git repository (even a public one) as only the secret controller can decrypt the secret with its internal private key. - Commit and push the Sealed Secret files to the repository.
- FluxCD will syncronize the Sealed Secrets to the Kubernetes Cluster.
- The Sealed Secret controller inside the Kubernetes cluster observes the new Sealed Secrets and unseals them installing them as Opaque Secrets inside the cluster.
The following steps guide you through this process.
Note
In the below commands, the namespace, secret name, and generic secret file name are specific and linked to subsequent commands. Do not change these values without understanding the
scripts/seal-secrets.shscript.There are two specific secrets required to utilize this project.
ccloudCLI login credentials are used to manage the Confluent Cloud resources. Create a file that contains the following:XX_CCLOUD_EMAIL=your-ccloud-email XX_CCLOUD_PASSWORD=your-ccloud-password
Ensure you do not commit this file to any repository and protect it like you would any secret. Execute the following
kubectl create secretcommand, passing the path to theccloudcredentials file you just created into the--from-env-fileargument.kubectl create secret generic cc.ccloud-secrets --namespace=default --from-env-file=<path-to-your-file> --dry-run=client -o yaml > secrets/local-toseal/dev/default-cc.ccloud-secrets.yaml
The project contains microservices, which utilize a MySQL database to demonstrate Connect and Change Data Capture. Credentials for the database need to be created as a Secret inside the Kubernetes cluster. An example of the layout of this file can be found in the sample
secrets/example-connect-operator-secrets.props. There isn’t a need to create a personal copy of the database credentials file, as that service is ran entirely inside the Kubernetes cluster and is not publically accessible. Therefore, you can just use the provided example file.kubectl create secret generic connect-operator-secrets --namespace=default --from-env-file=./secrets/example-connect-operator-secrets.props --dry-run=client -o yaml > secrets/local-toseal/dev/default-connect-operator-secrets.yaml
The above commands have created generic Kubernetes Secret manifests from your plain text secrets files and put them into a staging area (
secrets/local-toseal/dev). Now you will seal the secrets with the followingmaketarget which, in turn, uses thescripts/seal-secrets.shscript. This command will place the sealed secrets insecrets/sealed/dev, and these files are safe to commit to the Git repository. This command will also delete the unsealed secret files from the staging area (secrets/local-toseal/dev):make seal-secrets-dev
You should see the following:
Sealing-secrets-----------------------------------
➜ ./scripts/seal-secrets.sh dev
INFO - Successfully sealed secrets/local-toseal/dev/default-cc.ccloud-secrets.yaml
INFO - Successfully sealed secrets/local-toseal/dev/default-connect-operator-secrets.yaml
Now you can commit the sealed secret to the repository so that Flux can sync it to the K8s cluster:
git add secrets/sealed/dev/.
git commit -m 'New secrets!'
git push origin master # (or to the appropriate branch if you are doing GitOps by PR already!)
Install FluxCD
Now that the Secrets are sealed and committed to the repository, install FluxCD into the Kubernetes cluster
make install-flux-dev
This
maketarget uses thescripts/flux-init.shscript to install FluxCD into the cluster. FluxCD requires access to your Git repository in order to faciliate GitOps based continuous delivery. After installation, FluxCD is waiting to successfully connect to the configured GitHub repository. The script will output a deploy key that FluxCD generated. Add this deploy key to your GitHub forked repository underSettings->Deploykeys, giving the key write access to the repository.Note
Write access is required for Flux to manage Tags to control the syncronized state. See the Flux documentation for more details.
After configuring the Deploy Key, you should see the following output from the
make install-flux-devcommand if the syncronization between FluxCD and the GitHub repository is set up properly:>>> Github deploy key is ready >>> Cluster bootstrap done!
FluxCD will now begin to deploy the Kubernetes resources. Depending on your Kubernetes cluster and network bandwidth, it can take up to 10 mintues for FluxCD to complete this job. After this startup period, verify the applications are deployed with the below command, which will show you various Kubernetes resources deployed in the
defaultnamespace.kubectl get all
Which should show you something like the following:
NAME                                                  READY   STATUS      RESTARTS   AGE
pod/add-inventory-1599062700-x98dd                    0/1     Completed   0          3m29s
pod/ccloud-operator                                   1/1     Running     0          44h
pod/connect-operator                                  1/1     Running     0          46h
pod/connect-service-66b8988b6d-j2fgq                  1/1     Running     0          47h
pod/email-service-7457445bcb-vqzbv                    1/1     Running     0          26h
pod/fraud-service-7dbdb87689-hzhpk                    1/1     Running     0          27h
pod/inventory-service-6c85b9769-j489p                 1/1     Running     1          27h
pod/mysql-5f97b96f84-xp6gs                            1/1     Running     0          4d18h
pod/order-details-service-68fb4bd656-whwff            1/1     Running     0          27h
pod/orders-and-payments-simulator-fb9ccbc75-6bsww     1/1     Running     1          26h
pod/orders-service-754d77d5c5-szksg                   1/1     Running     0          43h
pod/validations-aggregator-service-6f8f5ddb9d-cjss2   1/1     Running     3          26h

NAME                     TYPE        CLUSTER-IP   EXTERNAL-IP   PORT(S)    AGE
service/connect          ClusterIP   10.66.4.37   <none>        80/TCP     4d18h
service/kubernetes       ClusterIP   10.66.0.1    <none>        443/TCP    5d1h
service/mysql            ClusterIP   None         <none>        3306/TCP   4d18h
service/orders-service   ClusterIP   10.66.6.78   <none>        80/TCP     46h

NAME                                             READY   UP-TO-DATE   AVAILABLE   AGE
deployment.apps/connect-service                  1/1     1            1           4d18h
deployment.apps/email-service                    1/1     1            1           26h
deployment.apps/fraud-service                    1/1     1            1           27h
deployment.apps/inventory-service                1/1     1            1           27h
deployment.apps/mysql                            1/1     1            1           4d18h
deployment.apps/order-details-service            1/1     1            1           27h
deployment.apps/orders-and-payments-simulator    1/1     1            1           26h
deployment.apps/orders-service                   1/1     1            1           46h
deployment.apps/validations-aggregator-service   1/1     1            1           26h

NAME                                                        DESIRED   CURRENT   READY   AGE
replicaset.apps/connect-service-66b8988b6d                  1         1         1       4d18h
replicaset.apps/email-service-7457445bcb                    1         1         1       26h
...
replicaset.apps/validations-aggregator-service-6f8f5ddb9d   1         1         1       26h
replicaset.apps/validations-aggregator-service-7557d6cc48   0         0         0       26h

NAME                                 COMPLETIONS   DURATION   AGE
job.batch/add-inventory-1599062700   1/1           5s         3m29s

NAME                          SCHEDULE      SUSPEND   ACTIVE   LAST SCHEDULE   AGE
cronjob.batch/add-inventory   */5 * * * *   False     0        3m38s           43h
If you experience issues with the setup process, see the Troubleshooting section for information.
Highlights
Connector Management with connect-operator
Managing Kafka Connect Connector configurations is a common task for administrators of event streaming platforms. Connector configurations are defined in JSON and managed via the Connect Worker HTTP API, which makes them suited to the Declare -> Apply model of Kubernetes. The kafka-devops project includes a tool called the connect-operator , which can help you automate management of Connector deployments declaratively.
Note
connect-operator is not a supported Confluent product and is provided as a reference for users looking for methods to manage Kafka Connect resources with Kubernetes
The connect-operator is based on a common concept in Kubernetes called the Operator pattern. connect-operator uses the open source project shell-operator as a method for implementing a very basic Operator solution for Connector management. When deployed, the connect-operator advertises to the shell-operator runtime what kind of Kubernetes resources it wishes to monitor. When these resources are added, removed, or updated, the connect-operator is notified by the execution of scripts inside it’s running container.
In the case of the connect-operator, it is monitoring ConfigMaps in Kubernetes, which match a particular filter described here:
configVersion: v1
kubernetes:
- name: ConnectConfigMapMonitor
  apiVersion: v1
  kind: ConfigMap
  executeHookOnEvent: ["Added","Deleted","Modified"]
  labelSelector:
    matchLabels:
      destination: connect
  namespace:
    nameSelector:
      matchNames: ["default"]
  jqFilter: ".data"
When ConfigMaps matching this filter are added, deleted or modified in the Kubernetes API, the scripts inside connect-operator are invoked and passed the modified declarations. The connect-operator performs three important functions in order:
- Materializes the JSON Connector configuration at deploy time with variables provided by Kubernetes allowing for templated configuration of variables like secrets, connection strings, and hostnames
- Determines if desired Kafka Connect configurations require an update based on the current actual configuration, preventing unnecessary calls to the Connect REST API
- Manages connectors by adding, updating or deleting them utilizing the Connect REST API
The connect-operator is configured to use Kubernetes volumes and environment variable, which contain configurations and secrets required by the Connectors it manages. For example, the Schema Registry URL configuration for a Connectors Kafka connection is provided by a volume mount like this snippet inside a Kubernetes Deployment:
...
name: schema-registry-url-volume
secret:
  secretName: cc.schema-registry-url.kafka-devops
...
When the connect-operator scripts are invoked, containing the updated Connector JSON, they take the volume mounted and environment variable configurations, and materialize a JSON configuration for the Connector with the proper values. Here is the sample source Connector ConfigMap which contains a JSON Connector Config. This file contains variables that are filled in at deployment time by the connect-operator, like this JSON snippet from the above configuration:
"value.converter.schema.registry.url": $SCHEMA_REGISTRY_URL,
connect-operator accommplishes this by using the jq command line processing tool. Within the connect-operator scripts you can see how the tool fills in variables from files and from envrionment variables in order to materialize a valid JSON configuration for the Connector. The load_configs shell function loads all values found in all proeprties files in the /etc/config/connect-operator folder and passes them to the jq command.
Additionally, the JSON can contain environment variable values , which are templated into the JSON document like this:
"connection.user": env.MYSQL_CONNECTION_USER,
Once the connect-operator has sucessfully materialized the JSON configuration for the Connector, it will determine what action to take based on the current state of any Connector in existence with the same name. See the connect-operator apply_conector function for the details.
GitOps Workflow to scale the Connect Deployment
The kafka-devops project utilizes a GitOps approach to management of Kubernetes and Confluent Cloud resources. One benefit of using a GitOps approach is the ability to using a Pull Request (PR) style review process for auditing changes to infastructure code in the same way you would for application code. Here we’re going to highlight a basic PR-based workflow to scale up the number of Kafka Connect workers in a Connect cluster using the PR based GitOps approach.
Your team observes an increase in resource utilization of the kafka Connect worker nodes and determines that the number of nodes should be increased from
1to2:kubectl get deployments/connect-service NAME READY UP-TO-DATE AVAILABLE AGE connect-service 1/1 1 1 18d
Make a change to the number of deployed Connect Workers using the
replicasfield inside the Kafka Connect Deployment definition. A PR is opened to target themasterbranch with the change: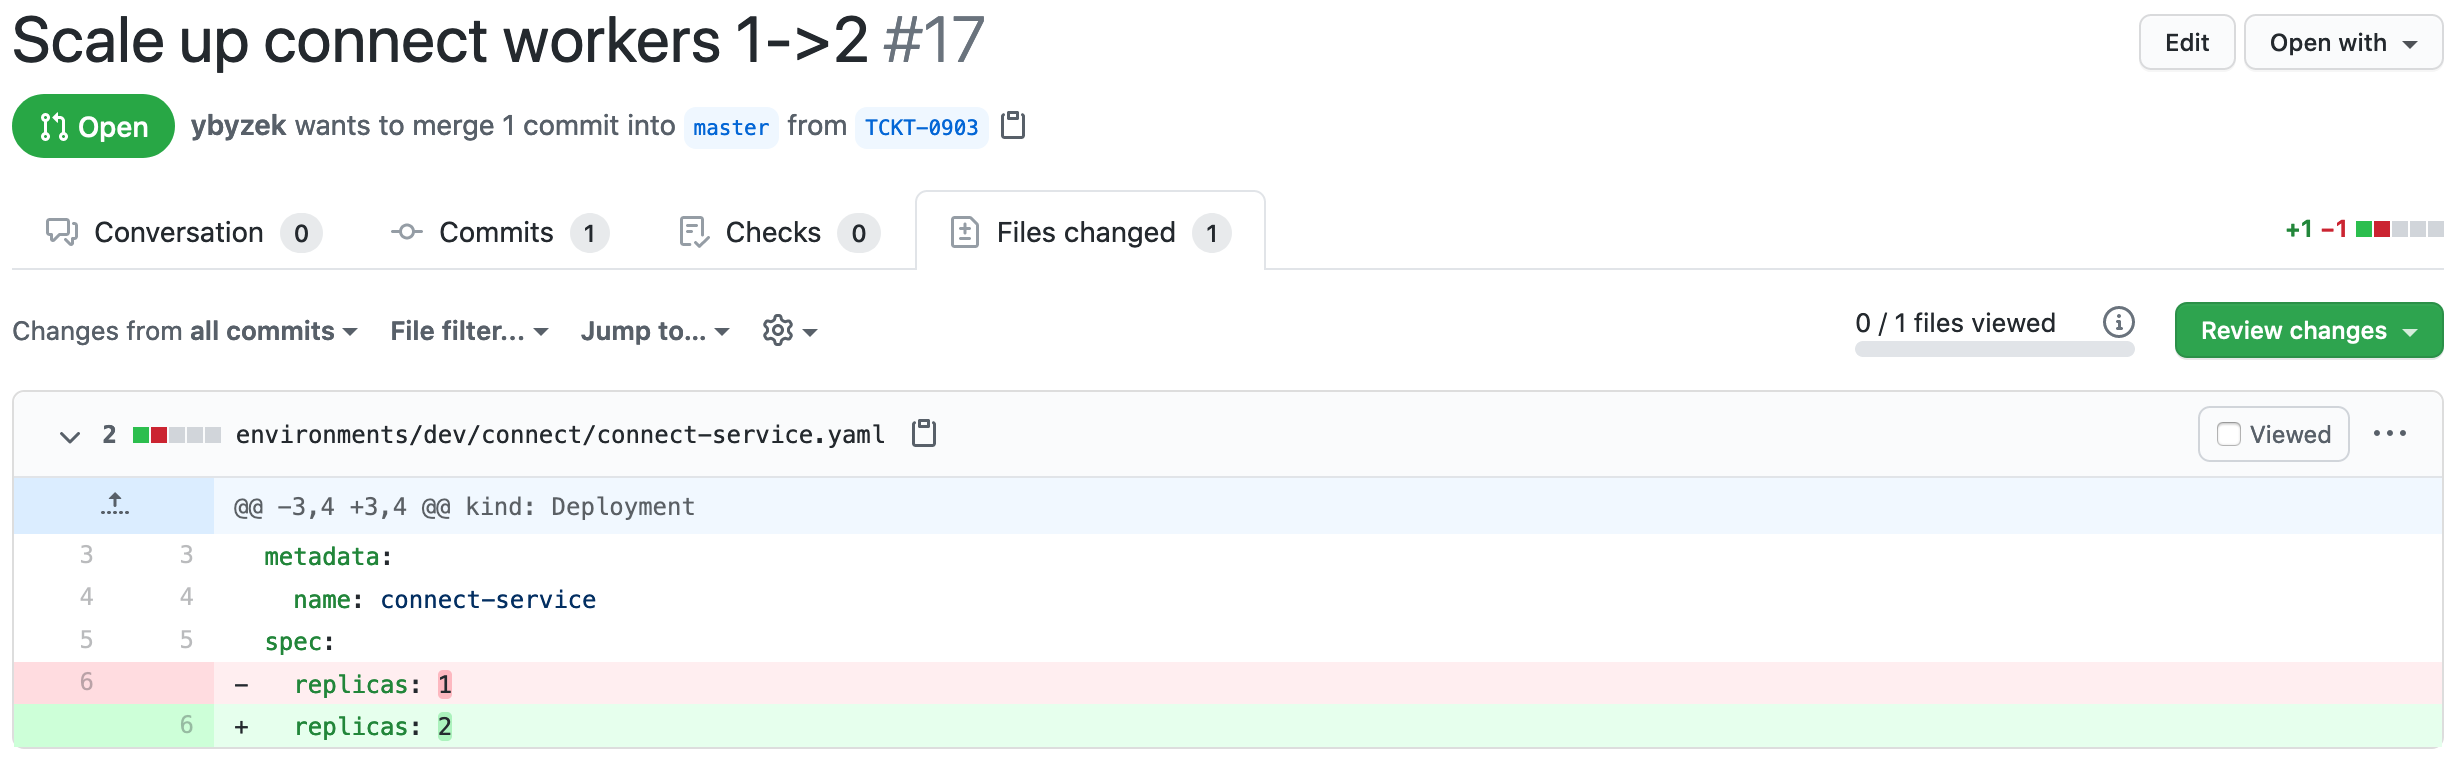
Using the familiar PR code review process, the PR is accepted or denied:

When accpeted, the PR code change will be merged into the
masterbranch and the GitOps process takes over by scaling up the number of replicas in theconnect-serviceDeployment: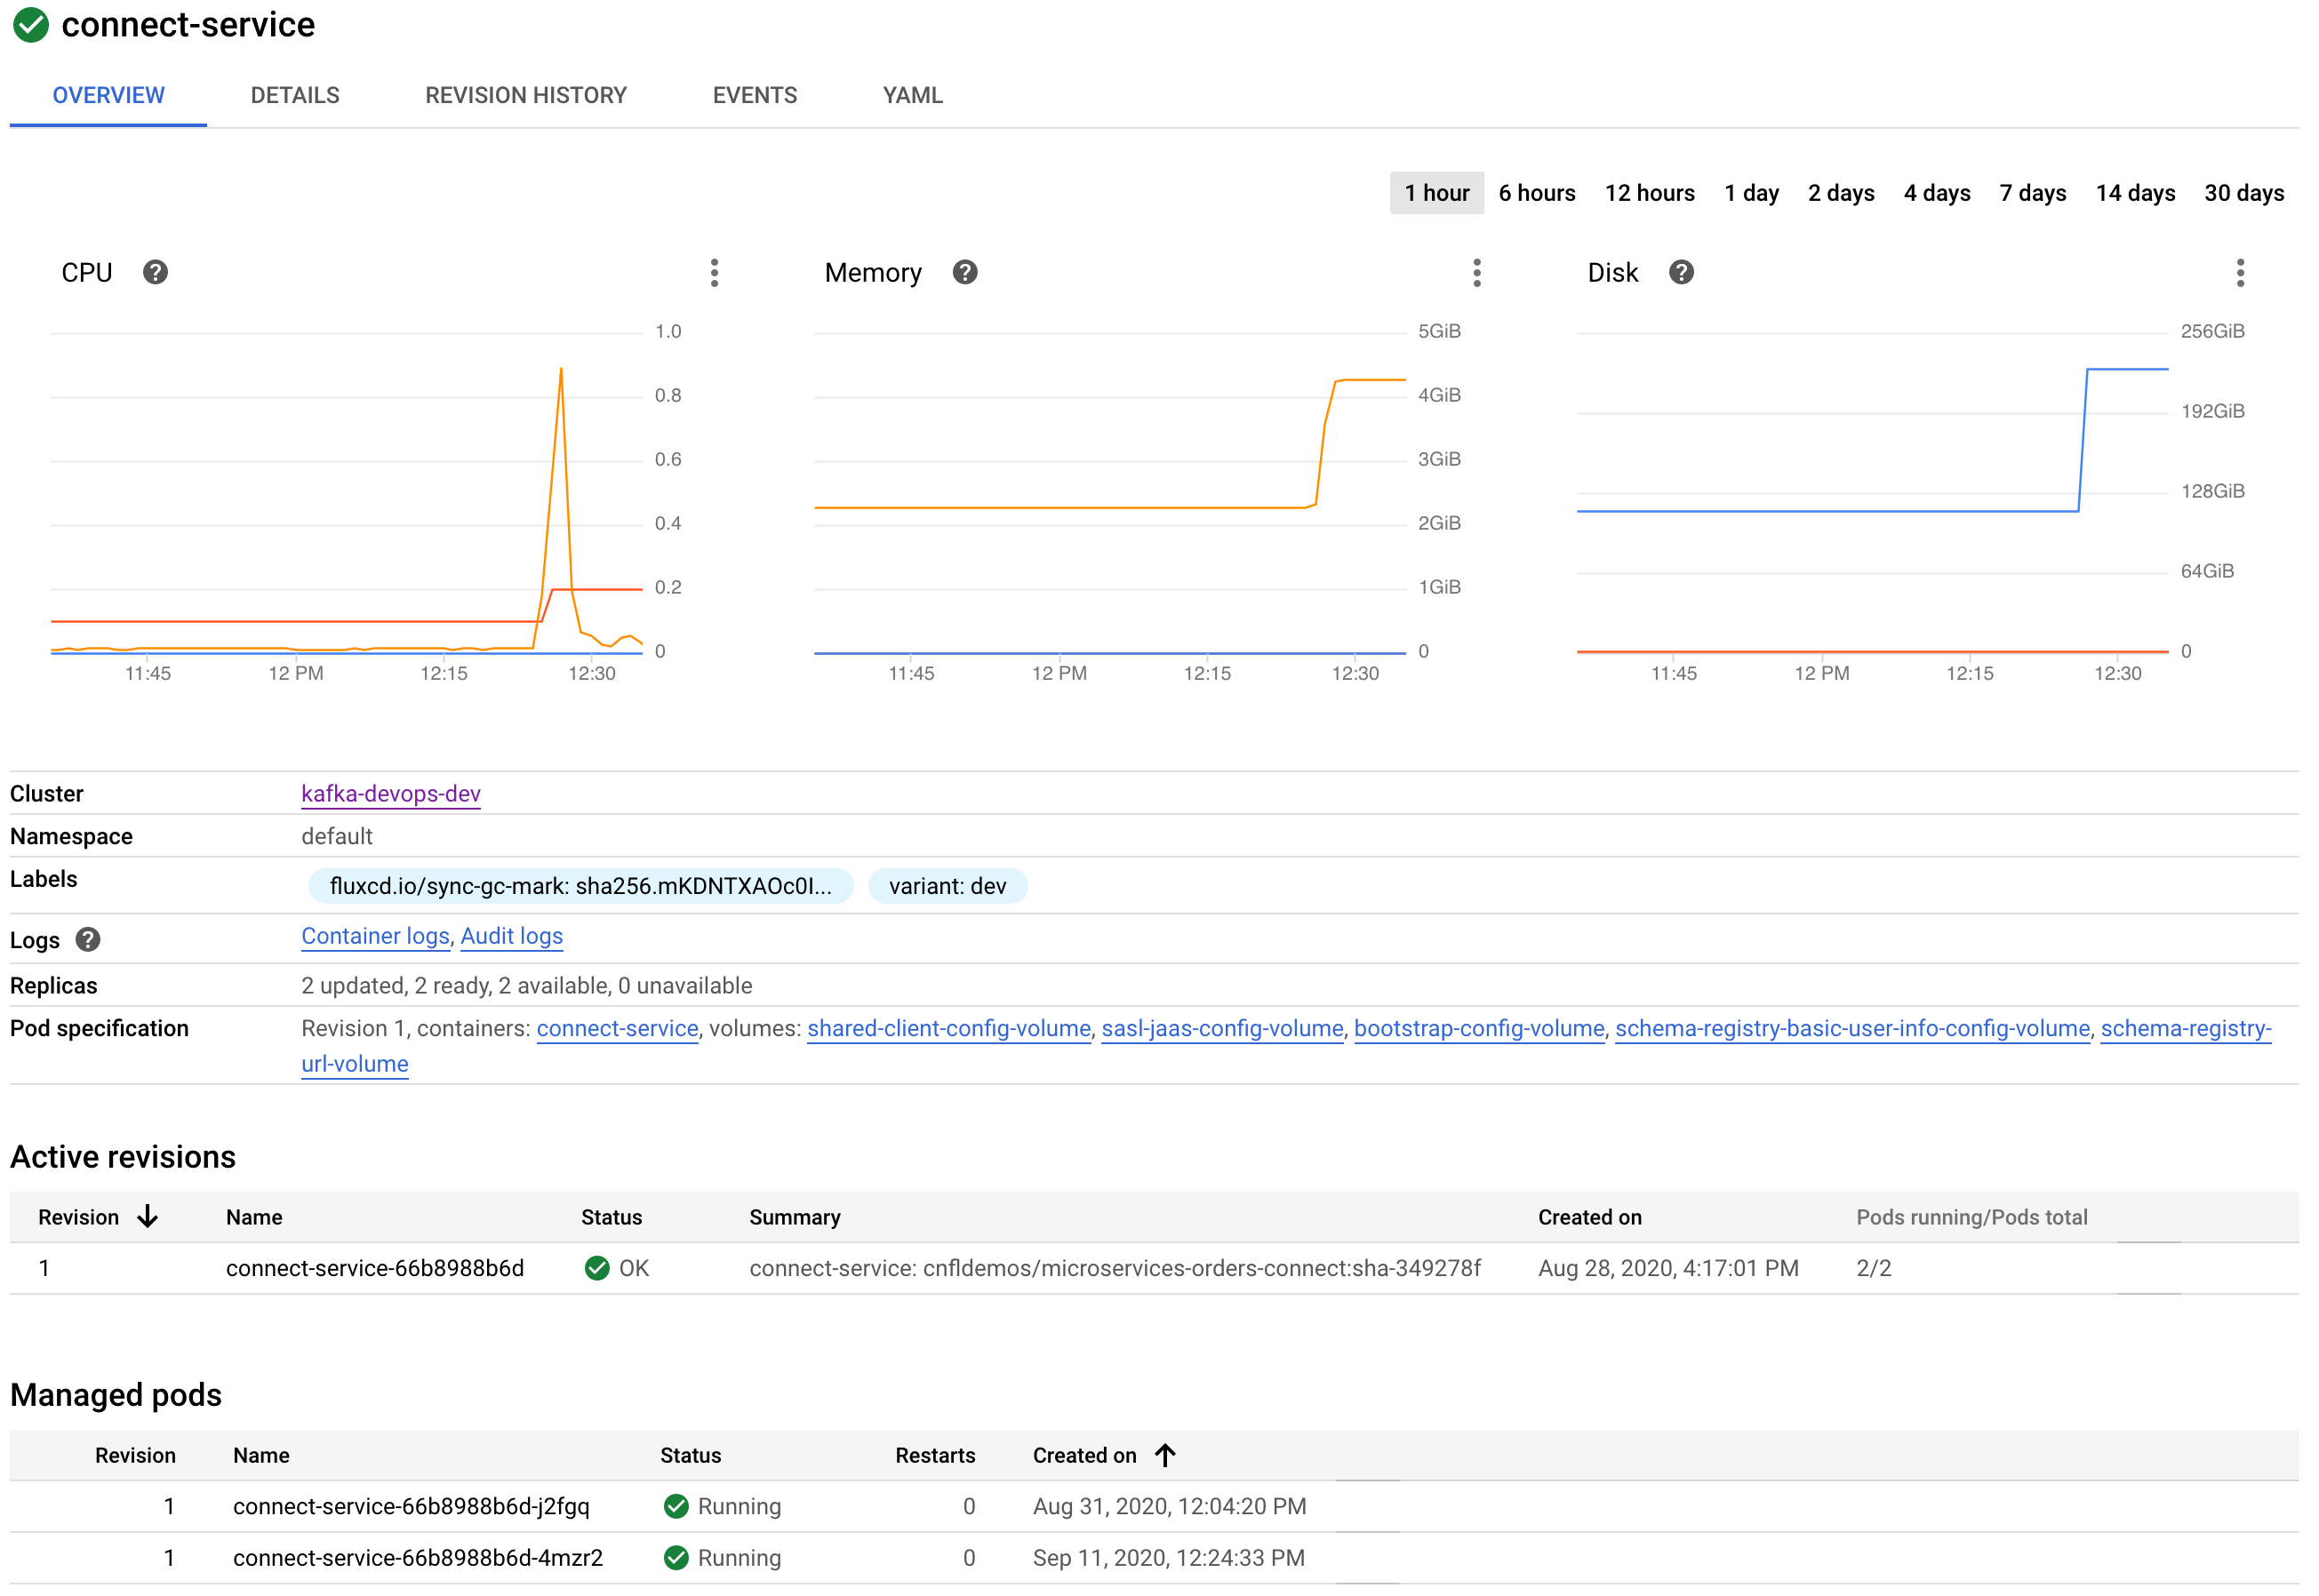
Tips
FluxCD is configured to sync with the Git repository once per minute. If you make changes to the repository you can force a syncronization with the command:
make sync
You can open a terminal inside the Kubernetes cluster on a utility pod pre-loaded with some dev tools by using the
promptmake target. This can be useful for interacting with services and resources from inside the cluster. For example you can view the status of the deployed Kafka Connector:make prompt bash-5.0# curl -s http://connect/connectors/jdbc-customers/status | jq { "name": "jdbc-customers", "connector": { "state": "RUNNING", "worker_id": "10.0.2.8:8083" }, "tasks": [ { "id": 0, "state": "RUNNING", "worker_id": "10.0.2.8:8083" } ], "type": "source" }
Troubleshooting
- When using the
k3dlocal Kubernetes cluster, you may encounter errors duing themake clusterstep of the usage instructions. These errors are often due to insufficient space allocated for Docker images on the host machine. If you encounter errors at this step, verify that there is sufficient free space on your Docker installation and re-try themake clustercommand.