Tutorial: Set Up a Multi-Broker Kafka Cluster
The following tutorial shows how to run a multi-broker cluster and provides example configurations for your KRaft controller and brokers, for learning and development purposes. This tutorial requires installation using a ZIP or TAR archive, and does not use Docker. You will learn how do basic command-line operations and how to use Confluent Control Center to view your cluster.
Ready to get started?
Sign up for Confluent Cloud, the fully managed cloud-native service for Apache Kafka® and get started for free using the Cloud quick start.
Download Confluent Platform, the self managed, enterprise-grade distribution of Apache Kafka and get started using the Confluent Platform quick start.
The examples show a KRaft isolated mode configuration for a multi-broker cluster managed by a single controller. To learn more about KRaft, see KRaft Overview for Confluent Platform and Kraft mode under Configure Confluent Platform for production.
You must have Confluent Platform installed to run the examples. Verify that you have the following Confluent Platform prerequisites.
Prerequisites
Internet connectivity.
Operating system currently supported by Confluent Platform. For a supported list, see Operating systems.
A supported version of Java downloaded and installed. Java 17, Java 11 are supported in this version of Confluent Platform. Java 8 has been deprecated and Java 9 and 10 are not supported. For more information, see Java supported versions. For a full list of system requirements, see Confluent Platform System Requirements.
Confluent Platform 8 or later installed on your local machine. To do this, see Install Confluent Platform using ZIP and TAR Archives, and complete the first two steps, Get the software and Configure CONFLUENT_HOME and PATH.
Environment Variables
As part of setup tasks described in this tutorial, you will be using these shell environment variables:
$CONFLUENT_HOME - Indicates the full path to your local Confluent Platform installation. You should set this up now. For example, change directories into your local Confluent Platform install, and type the following from the top level of the directory:
export CONFLUENT_HOME=`pwd`
$CONTROL_CENTER_HOME - Indicates full path to your Confluent Control Center installation. You can set this up later, as described in (Optional) Install and configure Confluent Control Center.
$KAFKA_CLUSTER_ID - Generated
random-uuidfor the cluster, as described in Start the controller and brokers.
What you will configure
In this tutorial, you will configure three brokers and one KRaft controller.
To run a single cluster with multiple brokers you need:
1 controller properties file
3 Kafka broker properties files with unique broker IDs, listener ports (to surface details for all brokers on Control Center), and log file directories.
Control Center properties file with the REST endpoints for
controlcenter.clustermapped to your brokers.Metrics Reporter JAR file installed and enabled on the brokers. (If you start Confluent Platform as described below, from
$CONFLUENT_HOME/bin/, the Metrics Reporter is automatically installed on the broker. Otherwise, you would need to add the path to the Metrics Reporter JAR file to your CLASSPATH.)Properties files for any other Confluent Platform components you want to run, with default settings to start with.

Configuration snapshot preview: Basic configuration for a three-broker cluster
This table shows a summary of the configurations you will specify for each of these files, as a reference to check against if needed. The next sections guide you through a quick way to set up these files, using the default broker and controller as a basis for your specialized ones.
Ready to get started? Skip ahead to Configure the servers.
File | Configurations |
|---|---|
my-controller.properties | The values for these basic properties must be unique for the controller:
|
broker-0.properties | The values for these basic properties must be them unique per broker. An exception is that they all use the same Controller quorum:
Add the following listener configuration to specify the REST endpoint for this broker:
|
broker-1.properties | The values for these basic properties must be unique per broker. An exception is that they all use the same Controller quorum:
Provide the listener configuration to specify the REST endpoint unique to this broker:
|
broker-2.properties | The values for these basic properties must be unique per broker. An exception is that they all use the same Controller quorum:
Provide the listener configuration to specify the REST endpoint unique to this broker:
|
Understanding replication factors
The broker.properties file that ships with Confluent Platform has the replication factor set to 1 on several system topics to support development test environments and Quick Start for Confluent Platform scenarios. For real-world scenarios, however, a replication factor greater than 1 is preferable to support fail-over and auto-balancing capabilities on both system and user-created topics.
For the purposes of this example, you will set the replication factors to 3 to match the number of brokers you have. When you create your topics, make sure that they also have the needed replication factor, depending on the number of brokers.
When you complete the setup, your broker files should show the following configs:
offsets.topic.replication.factor=3transaction.state.log.replication.factor=3confluent.license.topic.replication.factor=3confluent.metadata.topic.replication.factor=3confluent.balancer.topic.replication.factor=3
Configure the servers
Follow these steps to configure three brokers and one controller.
Broker 0
Copy
broker.propertiesto use as the basis forbroker-0.propertiescp $CONFLUENT_HOME/etc/kafka/broker.properties $CONFLUENT_HOME/etc/kafka/broker-0.properties
Update the node ID for broker 0:
sed -i '' -e "s/node.id=2/node.id=0/g" $CONFLUENT_HOME/etc/kafka/broker-0.properties
Update the controller quorum configuration.
sed -i '' -e "s/controller.quorum.bootstrap.servers/#controller.quorum.bootstrap.servers/g" $CONFLUENT_HOME/etc/kafka/broker-0.properties
echo "controller.quorum.voters=3@localhost:9097" >> $CONFLUENT_HOME/etc/kafka/broker-0.properties
Disable the default telemetry configuration. (You will configure Confluent Control Center specific telemetry settings in subsequent steps.)
sed -i '' -e "s/#confluent.telemetry.enabled=true/confluent.telemetry.enabled=false/g" $CONFLUENT_HOME/etc/kafka/broker-0.properties
Update the top-level log directories name for this broker:
sed -i '' -e "s/kraft-broker-logs/kraft-broker-logs-0/g" $CONFLUENT_HOME/etc/kafka/broker-0.properties
Update replication configurations:
sed -i '' -e "s/replication.factor=1/replication.factor=3/g" $CONFLUENT_HOME/etc/kafka/broker-0.properties
sed -i '' -e "s/#confluent.metrics.reporter.topic.replicas=1/confluent.metrics.reporter.topic.replicas=1/g" $CONFLUENT_HOME/etc/kafka/broker-0.properties
Add the REST endpoint listener configuration for this broker at the end of the file:
echo "confluent.http.server.listeners=http://localhost:8090" >> $CONFLUENT_HOME/etc/kafka/broker-0.properties
Broker 1
Copy the properties file for the first broker to use as a basis for broker 1:
cp $CONFLUENT_HOME/etc/kafka/broker-0.properties $CONFLUENT_HOME/etc/kafka/broker-1.properties
Update the node ID, listener, and data directories for broker-1, and then update the REST endpoint listener for this broker:
sed -i '' -e "s/node.id=0/node.id=1/g" $CONFLUENT_HOME/etc/kafka/broker-1.properties
sed -i '' -e "s/9092/9093/g" $CONFLUENT_HOME/etc/kafka/broker-1.properties
sed -i '' -e "s/kraft-broker-logs-0/kraft-broker-logs-1/g" $CONFLUENT_HOME/etc/kafka/broker-1.properties
sed -i '' -e "s/8090/8091/g" $CONFLUENT_HOME/etc/kafka/broker-1.properties
Broker 2
Copy the properties file for the first broker to use as a basis for broker 2:
cp $CONFLUENT_HOME/etc/kafka/broker-0.properties $CONFLUENT_HOME/etc/kafka/broker-2.properties
Update the node ID, listener, controller, and data directories for broker-2, and then update the REST endpoint listener for this broker:
sed -i '' -e "s/node.id=0/node.id=2/g" $CONFLUENT_HOME/etc/kafka/broker-2.properties
sed -i '' -e "s/9092/9094/g" $CONFLUENT_HOME/etc/kafka/broker-2.properties
sed -i '' -e "s/kraft-broker-logs-0/kraft-broker-logs-2/g" $CONFLUENT_HOME/etc/kafka/broker-2.properties
sed -i '' -e "s/8090/8092/g" $CONFLUENT_HOME/etc/kafka/broker-2.properties
Controller
These steps describe how to create the controller, based on the default controller.properties file that ships with the Confluent Platform installation.
Finally, copy
controller.propertiesto use as the basis formy-controller.properties, then update the controller node ID, quorum bootstrap port, and telemetry configurations:cp $CONFLUENT_HOME/etc/kafka/controller.properties $CONFLUENT_HOME/etc/kafka/my-controller.properties
Specify a unique node ID for the controller:
sed -i '' -e "s/node.id=1/node.id=3/g" $CONFLUENT_HOME/etc/kafka/my-controller.properties
Update the controller quorum configuration to explicitly specify the controller using
controller.quorum.voters. (This is a recommended best practice. The current example shows a single controller setup, but if you ever wanted to transition this to be production-ready using multiple controllers, you could simply expand the list specified forcontroller.quorum.votersto include more entries. Note that you already provided this same configuration in the brokers on previous steps.)sed -i '' -e "s/controller.quorum.bootstrap.servers/#controller.quorum.bootstrap.servers/g" $CONFLUENT_HOME/etc/kafka/my-controller.properties
sed -i '' -e "s/#controller.quorum.voters=1@localhost:9093/controller.quorum.voters=3@localhost:9097/g" $CONFLUENT_HOME/etc/kafka/my-controller.properties
Update the listener ports:
sed -i '' -e "s/9093/9097/g" $CONFLUENT_HOME/etc/kafka/my-controller.properties
Disable the default telemetry configuration. (You will configure Confluent Control Center specific telemetry settings in subsequent steps.)
sed -i '' -e "s/#confluent.telemetry.enabled=true/confluent.telemetry.enabled=false/g" $CONFLUENT_HOME/etc/kafka/my-controller.properties
When you have completed this step, you will have three properties files and a controller that match the configurations shown in the Configuration snapshot preview: Basic configuration for a three-broker cluster:
broker-0.propertieswhich corresponds to node/broker 0broker-1.propertieswhich corresponds to node/broker 1broker-2.propertieswhich corresponds to node/broker 2my-controller.propertieswhich will act as the controller
Run this command to list the files:
ls $CONFLUENT_HOME/etc/kafka/
Start the controller and brokers
For KRaft mode, you must run the following commands from `$CONFLUENT_HOME to generate a random cluster ID, and format log directories for the controller and each broker in dedicated command windows. You will then start the controller and brokers from those same dedicated windows.
The kafka-storage command is run only once per broker/controller. You cannot use the kafka-storage command to update an existing cluster. If you make a mistake in configurations at that point, you must recreate the log directories from scratch, and work through the steps again. (See also, Troubleshooting.)
Controller
In a new dedicated command window, change directories into
$CONFLUENT_HOMEto run the KRaft setup commands and start the controller.cd $CONFLUENT_HOME
Generate a
random-uuidfor the cluster using the kafka-storage tool.KAFKA_CLUSTER_ID="$(bin/kafka-storage random-uuid)"
Get the value for KAFKA_CLUSTER_ID and add it to your
.bash_profile,.bashrc,.zshor similar so that it is available to you in new command windows for running the brokers. Alternatively, in each new broker window, manually assign the ID with:export KAFKA_CLUSTER_ID=<KAFKA-CLUSTER-ID>. You will need this same cluster ID to start the controller and all of the brokers. You will use this same cluster ID for all brokers.echo $KAFKA_CLUSTER_ID
Format the log directories for the controller:
./bin/kafka-storage format -t $KAFKA_CLUSTER_ID -c $CONFLUENT_HOME/etc/kafka/my-controller.properties --ignore-formatted --standalone
Start the controller:
kafka-server-start $CONFLUENT_HOME/etc/kafka/my-controller.properties
broker-0.properties (node 0)
In a new command window dedicated to running node 0, change directories into
$CONFLUENT_HOMEto run the KRaft setup commands and start your first broker.cd $CONFLUENT_HOME
Make sure that the KAFKA_CLUSTER_ID you generated for the controller is available in this shell as an environment variable. (To define this locally,
export KAFKA_CLUSTER_ID=<KAFKA-CLUSTER-ID>. Then use theechocommand shown below to verify.)echo $KAFKA_CLUSTER_ID
Format the log directories for this broker:
./bin/kafka-storage format -t $KAFKA_CLUSTER_ID -c $CONFLUENT_HOME/etc/kafka/broker-0.properties --ignore-formatted
Start the broker:
kafka-server-start $CONFLUENT_HOME/etc/kafka/broker-0.properties
broker-1.properties (node 1)
In a new command window dedicated to running node 1, change directories into
$CONFLUENT_HOMEto run the KRaft setup commands and start broker-1.cd $CONFLUENT_HOME
Make sure that the KAFKA_CLUSTER_ID you generated for the controller is available in this shell as an environment variable. (To define this locally,
export KAFKA_CLUSTER_ID=<KAFKA-CLUSTER-ID>. Then use theechocommand shown below to verify.)echo $KAFKA_CLUSTER_ID
Format the log directories for broker-1:
./bin/kafka-storage format -t $KAFKA_CLUSTER_ID -c $CONFLUENT_HOME/etc/kafka/broker-1.properties --ignore-formatted
Start the broker:
kafka-server-start $CONFLUENT_HOME/etc/kafka/broker-1.properties
broker-2.properties (node 2)
In a new command window dedicated to running node 2, change directories into
$CONFLUENT_HOMEto run the KRaft setup commands and start broker-2.cd $CONFLUENT_HOME
Make sure that the KAFKA_CLUSTER_ID you generated for the controller is available in this shell as an environment variable. (To define this locally,
export KAFKA_CLUSTER_ID=<KAFKA-CLUSTER-ID>. Then use theechocommand shown below to verify.)echo $KAFKA_CLUSTER_ID
Format the log directories for this broker-2:
./bin/kafka-storage format -t $KAFKA_CLUSTER_ID -c $CONFLUENT_HOME/etc/kafka/broker-2.properties --ignore-formatted
Start the broker:
kafka-server-start $CONFLUENT_HOME/etc/kafka/broker-2.properties
Troubleshooting
If you get errors upon running the kafka-storage commands, try removing existing log files in /tmp (for example, rm -rf /tmp/kraft-broker-logs-0), and then rerun the kafka-storage commands for brokers and controller to create new log directories. (You might run into this problem if you are re-testing and creating multiple deployments, as the log directories from older deployments will conflict with newer ones.)
Test your deployment with basic topic commands
Now that you have a controller and three brokers running, run the following commands to make sure your deployment is working properly.
Create a test topic.
kafka-topics --create --topic test-topic --bootstrap-server localhost:9092
You should get a confirmation that the test topic was created.
List all topics.
kafka-topics --list --bootstrap-server localhost:9092
You should see your
test-topicin the list (along with some built-in, “system” topics which are always prefixed with an underscore).
(Optional) Install and configure Confluent Control Center
Confluent Control Center is not a requirement for running for this tutorial, but it does give further visibility into the process, and provide additional monitoring context.
If you don’t want to use Control Center, you can skip this section and go directly to Start the controller and brokers.
If you want to run Control Center, don’t start Confluent Platform yet. Instead, follow the steps below to get Control Center up-and-running, add Control Center specific configs to your Confluent Platform properties files, and then start Confluent Platform.
As of Confluent Platform 8.0, Control Center ships, installs, and runs independently of Confluent Platform, as described in Single-node manual installation. Since this packaging, install, and run process is new in 8.0, and a bit complicated as it relates to testing multi-broker-broker cluster, full instructions are provided below to get you started. The monitoring backend now uses Prometheus for metrics collection, which serves as the dedicated metrics store and query engine for Control Center. The new Control Center (next generation) can scale to monitor larger workloads compared to the old version.
While you can accomplish the following tasks in any order, the suggested sequence will avoid logging errors on running brokers and controllers that would be caused by adding the Control Center telemetry configs to the Confluent Platform files before you have Prometheus and Control Center running to collect those metrics. (The errors would look similar to this: ERROR Failed to send request POST http://localhost:9090/api/v1/otlp/v1/metrics.)
1. Download, extract, and configure Control Center
Download, extract, and configure Control Center to run a Single-node manual installation using the archives (not Docker). Note that the Control Center installation will live and run in its own directory ($CONTROL_CENTER_HOME) at the same level as $CONFLUENT_HOME. This is different from the setup in previous versions of Confluent Platform, where Control Center resided in a subdirectory under $CONFLUENT_HOME.
Download Control Center and unzip/extract the
tar.gzfile.wget https://packages.confluent.io/confluent-control-center-next-gen/archive/confluent-control-center-next-gen-2.2.0.tar.gztar -xvf confluent-control-center-next-gen-2.2.0.tar.gz
Change directories (cd) into
confluent-control-center-next-gen-2.2.0-0to make modifications to the C3 files.cd confluent-control-center-next-gen-2.2.0
Configure $CONTROL_CENTER_HOME for convenience, and verify it.
export CONTROL_CENTER_HOME=`pwd`
echo $CONTROL_CENTER_HOME
2. Configure Control Center with REST endpoints and advertised listeners
You must tell Control Center about the REST endpoints for all brokers in your cluster, and the advertised listeners for the other components you may want to run. Without these configurations, the brokers and components will not show up on Control Center.
In $CONTROL_CENTER_HOME/etc/confluent-control-center/control-center-dev.properties, you must replace the default value for the Kafka REST endpoint URL to include all brokers. You can either:
Manually edit the file with a copy-paste of the following lines to match your multi-broker configuration, and save the file:
# Kafka REST endpoint URL
confluent.controlcenter.streams.cprest.url=http://localhost:8090,http://localhost:8091,http://localhost:8092
Or:
Use these two commands to update this configuration in the file:
sed -i '' -e "s/confluent.controlcenter.streams.cprest.url/#confluent.controlcenter.streams.cprest.url/g" $CONTROL_CENTER_HOME/etc/confluent-control-center/control-center-dev.properties
echo "confluent.controlcenter.streams.cprest.url=http://localhost:8090,http://localhost:8091,http://localhost:8092" >> $CONTROL_CENTER_HOME/etc/confluent-control-center/control-center-dev.properties
Tip
Control Center depends on embedded REST Proxy to manage brokers. To learn more, see confluent.controlcenter.streams.cprest.url in the Control Center Configuration Reference for Confluent Platform.
3. Start Prometheus and (Control Center)
If you are not already there, change directories into $CONTROL_CENTER_HOME.
cd $CONTROL_CENTER_HOME
Start Prometheus in this dedicated window.
On Linux or Windows, use the following command:
bin/prometheus-start
On Mac OS:
(Optional) Edit/update
bin/prometheus-startto run on Mac as follows, and save the file. (If you do not make these changes to the file, Prometheus will still run, but will not output any visible logging information to indicate that it is running.)At the end of the last line in the file replace,
&>> $LOG_FILEwith2>&1 | tee -a "$LOG_FILE". So instead of the end of the last line looking like this:$METRICS_RETENTION_DAYS &>> $LOG_FILE, it should look like this:$METRICS_RETENTION_DAYS 2>&1 | tee -a "$LOG_FILE"Start Prometheus using the following Mac specific command.
bash bin/prometheus-start
Start Control Center in a dedicated window. (If you have not stored $CONTROL_CENTER_HOME into a profile, remember to set this variable in the new shell to point to your Control Center installation, as you did before.)
cd $CONTROL_CENTER_HOME
./bin/control-center-start $CONTROL_CENTER_HOME/etc/confluent-control-center/control-center-dev.properties
4. Configure the controller and brokers to send metrics to Control Center with Prometheus
In the following next steps, you will configure your Kafka brokers and controller to export their metrics using the confluent.telemetry.exporter._c3.client.base.url setting to push OTLP (OpenTelemetry Protocol) metrics. Control Center will act as an OTLP receiver, listening on localhost:9090 for the incoming metrics.
If you are working through this tutorial sequentially, you will have started your brokers and controller and created a test topic. If this is the case, stop these components in the reverse order from which you started them:
Stop each broker by using Ctrl-C in each window.
Finally, stop the controller with Ctrl-C in its window.
Leave the windows open so that you can quickly re-start the controller and brokers after you’ve added the additional required configurations.
Add the following lines to the end of the properties files for the controller and each of the brokers to emit metrics to Prometheus, the OTLP endpoint. (The fourth line with the value for
confluent.telemetry.exporter._c3.metrics.include=iis very long. Simply copy the code block as provided and paste it in at the end of the properties files. This line will paste in as a single line, even though it shows as wrapped in the documentation.)metric.reporters=io.confluent.telemetry.reporter.TelemetryReporter confluent.telemetry.exporter._c3.type=http confluent.telemetry.exporter._c3.enabled=true confluent.telemetry.exporter._c3.metrics.include=io.confluent.kafka.server.request.(?!.*delta).*|io.confluent.kafka.server.server.broker.state|io.confluent.kafka.server.replica.manager.leader.count|io.confluent.kafka.server.request.queue.size|io.confluent.kafka.server.broker.topic.failed.produce.requests.rate.1.min|io.confluent.kafka.server.tier.archiver.total.lag|io.confluent.kafka.server.request.total.time.ms.p99|io.confluent.kafka.server.broker.topic.failed.fetch.requests.rate.1.min|io.confluent.kafka.server.broker.topic.total.fetch.requests.rate.1.min|io.confluent.kafka.server.partition.caught.up.replicas.count|io.confluent.kafka.server.partition.observer.replicas.count|io.confluent.kafka.server.tier.tasks.num.partitions.in.error|io.confluent.kafka.server.broker.topic.bytes.out.rate.1.min|io.confluent.kafka.server.request.total.time.ms.p95|io.confluent.kafka.server.controller.active.controller.count|io.confluent.kafka.server.session.expire.listener.zookeeper.disconnects.total|io.confluent.kafka.server.request.total.time.ms.p999|io.confluent.kafka.server.controller.active.broker.count|io.confluent.kafka.server.request.handler.pool.request.handler.avg.idle.percent.rate.1.min|io.confluent.kafka.server.session.expire.listener.zookeeper.disconnects.rate.1.min|io.confluent.kafka.server.controller.unclean.leader.elections.rate.1.min|io.confluent.kafka.server.replica.manager.partition.count|io.confluent.kafka.server.controller.unclean.leader.elections.total|io.confluent.kafka.server.partition.replicas.count|io.confluent.kafka.server.broker.topic.total.produce.requests.rate.1.min|io.confluent.kafka.server.controller.offline.partitions.count|io.confluent.kafka.server.socket.server.network.processor.avg.idle.percent|io.confluent.kafka.server.partition.under.replicated|io.confluent.kafka.server.log.log.start.offset|io.confluent.kafka.server.log.tier.size|io.confluent.kafka.server.log.size|io.confluent.kafka.server.tier.fetcher.bytes.fetched.total|io.confluent.kafka.server.request.total.time.ms.p50|io.confluent.kafka.server.tenant.consumer.lag.offsets|io.confluent.kafka.server.session.expire.listener.zookeeper.expires.rate.1.min|io.confluent.kafka.server.log.log.end.offset|io.confluent.kafka.server.broker.topic.bytes.in.rate.1.min|io.confluent.kafka.server.partition.under.min.isr|io.confluent.kafka.server.partition.in.sync.replicas.count|io.confluent.telemetry.http.exporter.batches.dropped|io.confluent.telemetry.http.exporter.items.total|io.confluent.telemetry.http.exporter.items.succeeded|io.confluent.telemetry.http.exporter.send.time.total.millis|io.confluent.kafka.server.controller.leader.election.rate.(?!.*delta).*|io.confluent.telemetry.http.exporter.batches.failed confluent.telemetry.exporter._c3.client.base.url=http://localhost:9090/api/v1/otlp confluent.telemetry.exporter._c3.client.compression=gzip confluent.telemetry.exporter._c3.api.key=dummy confluent.telemetry.exporter._c3.api.secret=dummy confluent.telemetry.exporter._c3.buffer.pending.batches.max=80 confluent.telemetry.exporter._c3.buffer.batch.items.max=4000 confluent.telemetry.exporter._c3.buffer.inflight.submissions.max=10 confluent.telemetry.metrics.collector.interval.ms=60000 confluent.telemetry.remoteconfig._confluent.enabled=false confluent.consumer.lag.emitter.enabled=true
When you have completed this step, you will have added the above configurations at the end of the following files in
$CONFLUENT_HOME/etc/kafka/broker-0.propertieswhich corresponds to node/broker 0broker-1.propertieswhich corresponds to node/broker 1broker-2.propertieswhich corresponds to node/broker 2my-controller.properties, which is the controller for this cluster
Save the updated files.
Restart the controller and brokers
Now that you have the controller and brokers configured to send metrics to Control Center, you can restart them, and monitor Self-Balancing with Control Center.
If you left the windows open, you should have the proper $KAFKA_CLUSTER_ID in every shell, and can simply restart each component in its requisite window as shown below. If you closed the windows and/or don’t have the $KAFKA_CLUSTER_ID saved in a profile, you will need to export it again into each window before starting each component.
Restart the controller:
kafka-server-start $CONFLUENT_HOME/etc/kafka/my-controller.properties
Restart each of the brokers in separate windows:
kafka-server-start $CONFLUENT_HOME/etc/kafka/broker-0.properties
kafka-server-start $CONFLUENT_HOME/etc/kafka/broker-1.properties
kafka-server-start $CONFLUENT_HOME/etc/kafka/broker-2.properties
(Optional) Explore Control Center
Confluent Control Center is a web-based tool for managing and monitoring Kafka in Confluent Platform. If you opted to install it as described in (Optional) Install and configure Confluent Control Center, you can use if for monitoring, to create topics, and other actions.
To view your cluster running locally in Control Center, open a browser and navigate to http://localhost:9021/.
To learn about managing clusters with Confluent Control Center, see Manage Kafka Clusters Using Control Center for Confluent Platform
To view brokers in Confluent Control Center, see Manage Kafka Brokers Using Control Center for Confluent Platform
To manage topics in Confluent Control Center, see Manage Topics Using Control Center for Confluent Platform
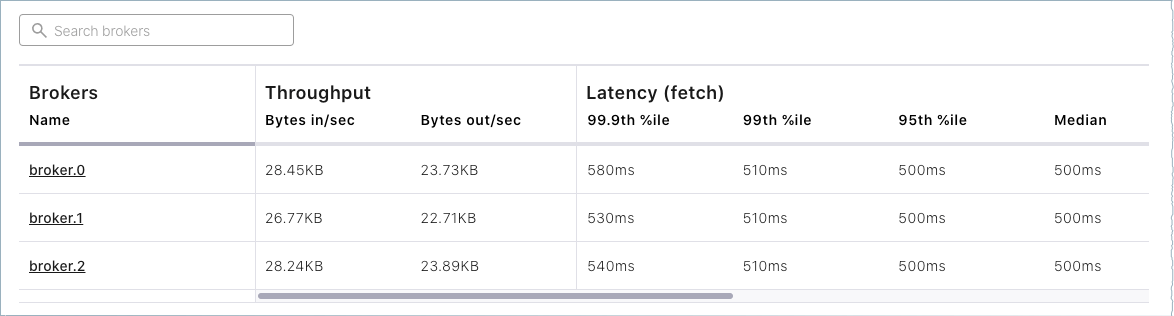
Click either the Brokers card or Brokers on the menu to view broker metrics. From the brokers list at the bottom of the page, you can view detailed metrics and drill down on each broker.
Click Topics on the navigation menu.
Note that only your test topic and the system (internal) topics are available at this point. The
default_ksql_processing_logwill show up as a topic if you configured and started ksqlDB.
There is a lot more to Confluent Control Center, but it is not the focus of this tutorial. To complete similar steps using Confluent Control Center, see the Quick Start for Confluent Platform.
Use the command line tools
After you have Confluent Platform running, the next step is to learn some basic Kafka command-line operations to create topics and work with producers and consumers. These provide a means of testing and working with basic functionality, as well as configuring and monitoring deployments.
A few things to note:
Confluent Platform ships with Kafka tools and utilities in
$CONFLUENT_HOME/bin. Thisbin/directory includes both Confluent proprietary and open source Kafka utilities. A full list is provided in CLI Tools Shipped With Confluent Platform. Those in the list that begin withkafka-are the Kafka open source command utilities. A reference for Confluent proprietary commands is provided in CLI Tools for Confluent Platform.With Confluent Platform installed and running on your system, you can run Kafka commands from anywhere; for example, from your
$HOME(~/) directory. You do not have to run these from within$CONFLUENT_HOME.Command line help is available by typing any of the commands with no arguments; for example,
kafka-topicsorkafka-producer-perf-test.
To help get you started, the sections below provide examples for some of the most fundamental and widely-used Kafka scripts.
Create, list and describe topics
You can use kafka-topics for operations on topics (create, list, describe, alter, delete, and so forth).
In a command window, run the following commands to experiment with topics.
Create three topics,
cool-topic,warm-topic,hot-topic.kafka-topics --create --topic cool-topic --bootstrap-server localhost:9092
kafka-topics --create --topic warm-topic --bootstrap-server localhost:9092
kafka-topics --create --topic hot-topic --partitions 2 --replication-factor 2 --bootstrap-server localhost:9092
List all topics.
kafka-topics --list --bootstrap-server localhost:9092
Tip
Internal system topics are prefaced by an underscore in the output. The topics you created are listed at the end.
Describe a topic.
This shows partitions, replication factor, and in-sync replicas for the topic.
kafka-topics --describe --topic cool-topic --bootstrap-server localhost:9092
Your output should resemble the following:
Topic: cool-topic PartitionCount: 1       ReplicationFactor: 1    Configs: segment.bytes=1073741824
  Topic: cool-topic       Partition: 0    Leader: 0       Replicas: 0     Isr: 0  Offline:
Tip
If you run
kafka-topics --describewith no specified topic, you get a detailed description of every topic on the cluster (system and user topics).Describe another topic, using one of the other brokers in the cluster as the bootstrap server.
kafka-topics --describe --topic hot-topic --bootstrap-server localhost:9094
Here is that example output:
Topic: hot-topic  PartitionCount: 2       ReplicationFactor: 2    Configs: segment.bytes=1073741824
  Topic: hot-topic        Partition: 0    Leader: 1       Replicas: 1,0   Isr: 1,0        Offline:
  Topic: hot-topic        Partition: 1    Leader: 0       Replicas: 0,2   Isr: 0,2        Offline:
You can connect to any of the brokers in the cluster to run these commands because they all have the same data.
Alter a topic’s configuration.
For this example, change the partition count on hot-topic from
2to9.kafka-topics --alter --topic hot-topic --partitions 9 --bootstrap-server localhost:9092
Tip
Dynamic topic modification is limited by the current configurations. For example, you cannot decrease the number of partitions or modify the replication factor for a topic, as that would require partition reassignment.
Rerun
--describeon the same topic.kafka-topics --describe --topic hot-topic --bootstrap-server localhost:9092
Here is that example output, and verify that the partition count is updated to
9:Topic: hot-topic PartitionCount: 9 ReplicationFactor: 2 Configs: segment.bytes=1073741824 Topic: hot-topic Partition: 0 Leader: 2 Replicas: 2,1 Isr: 2,1 Offline: Topic: hot-topic Partition: 1 Leader: 1 Replicas: 1,0 Isr: 1,0 Offline: Topic: hot-topic Partition: 2 Leader: 1 Replicas: 1,2 Isr: 1,2 Offline: Topic: hot-topic Partition: 3 Leader: 2 Replicas: 2,1 Isr: 2,1 Offline: Topic: hot-topic Partition: 4 Leader: 0 Replicas: 0,2 Isr: 0,2 Offline: Topic: hot-topic Partition: 5 Leader: 1 Replicas: 1,0 Isr: 1,0 Offline: Topic: hot-topic Partition: 6 Leader: 2 Replicas: 2,0 Isr: 2,0 Offline: Topic: hot-topic Partition: 7 Leader: 0 Replicas: 0,1 Isr: 0,1 Offline: Topic: hot-topic Partition: 8 Leader: 1 Replicas: 1,2 Isr: 1,2 Offline:
Delete a topic.
kafka-topics --delete --topic warm-topic --bootstrap-server localhost:9092
List all topics.
kafka-topics --list --bootstrap-server localhost:9092
Run producers and consumers to send and read messages
The command utilities kafka-console-producer and kafka-console-consumer allow you to manually produce messages to and consume from a topic.
Open two new command windows, one for a producer, and the other for a consumer.
Run a producer to produce to
cool-topic.kafka-console-producer --topic cool-topic --bootstrap-server localhost:9092
Send some messages.
Type your messages at the prompt (
>), and hit Return after each one.Your command window will resemble the following:
$ kafka-console-producer --bootstrap-server localhost:9092 --topic cool-topic
>hi cool topic
>did you get this message?
>first
>second
>third
>yes! I love you cool topic
>
Tip
You can use the
--broker-listflag in place of--bootstrap-serverfor the producer, typically used to send data to specific brokers; shown here as an example.In the other command window, run a consumer to read messages from
cool-topic. Specify that you want to start consuming from the beginning, as shown.kafka-console-consumer --topic cool-topic --from-beginning --bootstrap-server localhost:9092
Your output will resemble the following:
$ kafka-console-consumer --bootstrap-server localhost:9092 --from-beginning --topic cool-topic
hi cool topic on origin cluster
is this getting to your replica?
first
second
third
yes! I love you cool topic
When you want to stop the producer and consumer, type Ctl-C in their respective command windows. However, you may want to leave at least the producer running for now, to view the topics with Control Center, which is described in (Optional) Revisit Control Center section.
Produce auto-generated message data to topics
You can use kafka-producer-perf-test in its own command window to generate test data to topics.
For example, open a new command window and type the following command to send data to
hot-topic, with the specified throughput and record size.kafka-producer-perf-test \ --producer-props bootstrap.servers=localhost:9092 \ --topic hot-topic \ --record-size 1000 \ --throughput 1000 \ --num-records 3600000
The command provides status output on messages sent, as shown:
4999 records sent, 999.8 records/sec (0.95 MB/sec), 1.1 ms avg latency, 240.0 ms max latency.
5003 records sent, 1000.2 records/sec (0.95 MB/sec), 0.5 ms avg latency, 4.0 ms max latency.
5003 records sent, 1000.2 records/sec (0.95 MB/sec), 0.6 ms avg latency, 5.0 ms max latency.
5001 records sent, 1000.2 records/sec (0.95 MB/sec), 0.3 ms avg latency, 3.0 ms max latency.
5001 records sent, 1000.0 records/sec (0.95 MB/sec), 0.3 ms avg latency, 4.0 ms max latency.
5000 records sent, 1000.0 records/sec (0.95 MB/sec), 0.8 ms avg latency, 24.0 ms max latency.
5001 records sent, 1000.2 records/sec (0.95 MB/sec), 0.6 ms avg latency, 3.0 ms max latency.
...
Open a new command window to consume the messages from hot-topic as they are sent (not from the beginning).
kafka-console-consumer --topic hot-topic --bootstrap-server localhost:9092
Type Ctl-C to stop the consumer.
Tip
You may want to leave the producer running for a moment, as you are about to revisit Topics on the Control Center.
To learn more, check out Benchmark Commands, Let’s Load test, Kafka!, and How to do Performance testing of Kafka Cluster
(Optional) Revisit Control Center
Now that you have created some topics and produced message data to a topic (both manually and with auto-generated), you can optionally inspect topics using Control Center (if you opted to install it as described in (Optional) Install and configure Confluent Control Center).
Open a web browser and go to http://localhost:9021/, the default URL for Control Center on a local system.
Select the cluster, and click Topics from the menu.
Choose
cool-topic, then select the Messages tab.Select Jump to offset and type
1,2, or3to display previous messages.These messages do not show in the order they were sent because the consumer here is not reading
--from-beginning.Try manually typing some more messages to
cool-topicwith your command line producer, and watch them show up here.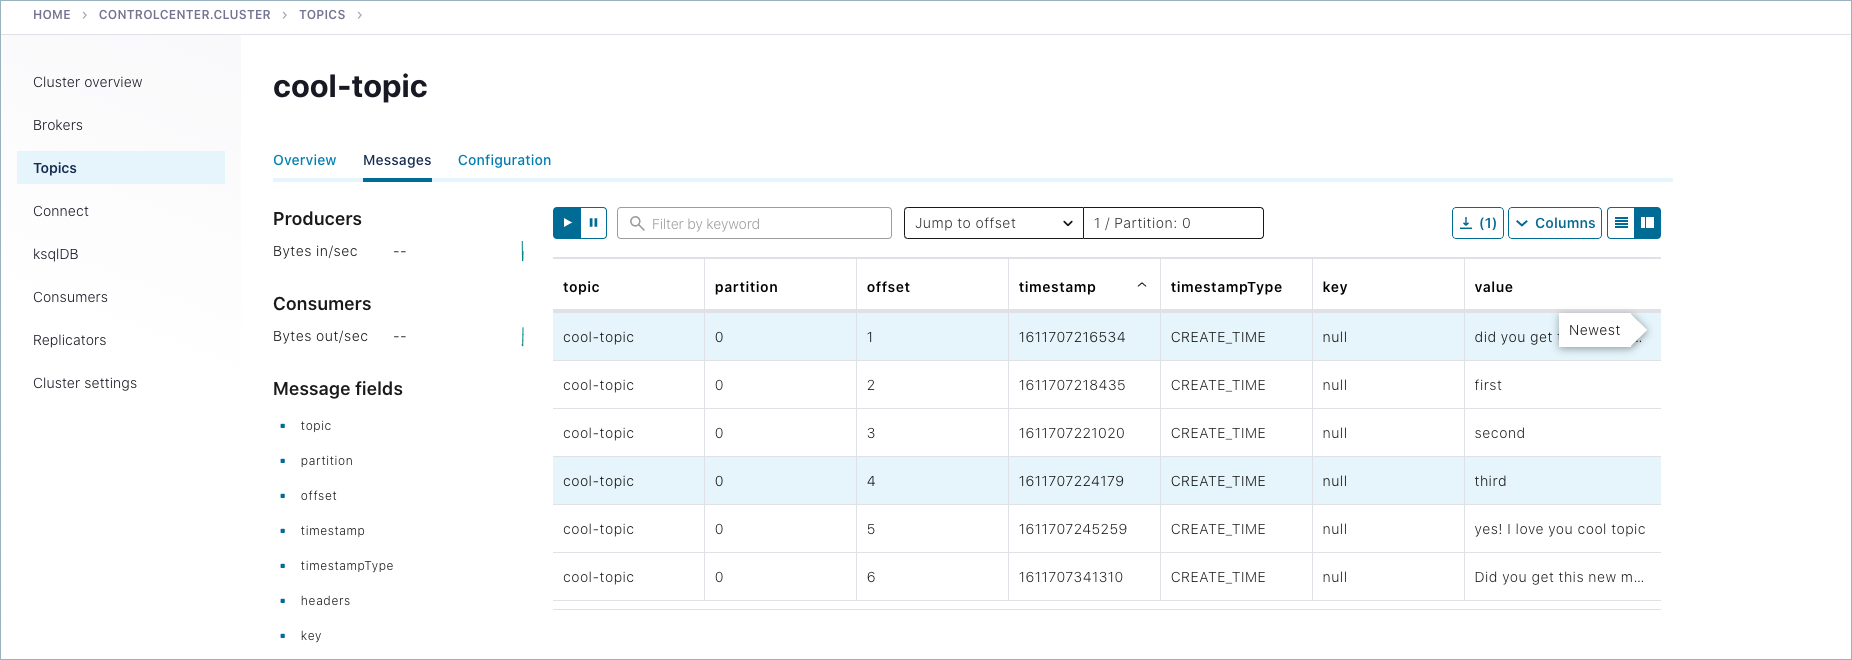
Navigate to Topics >
hot-topic> Messages tab.Auto-generated messages from your
kafka-producer-perf-testare shown here as they arrive.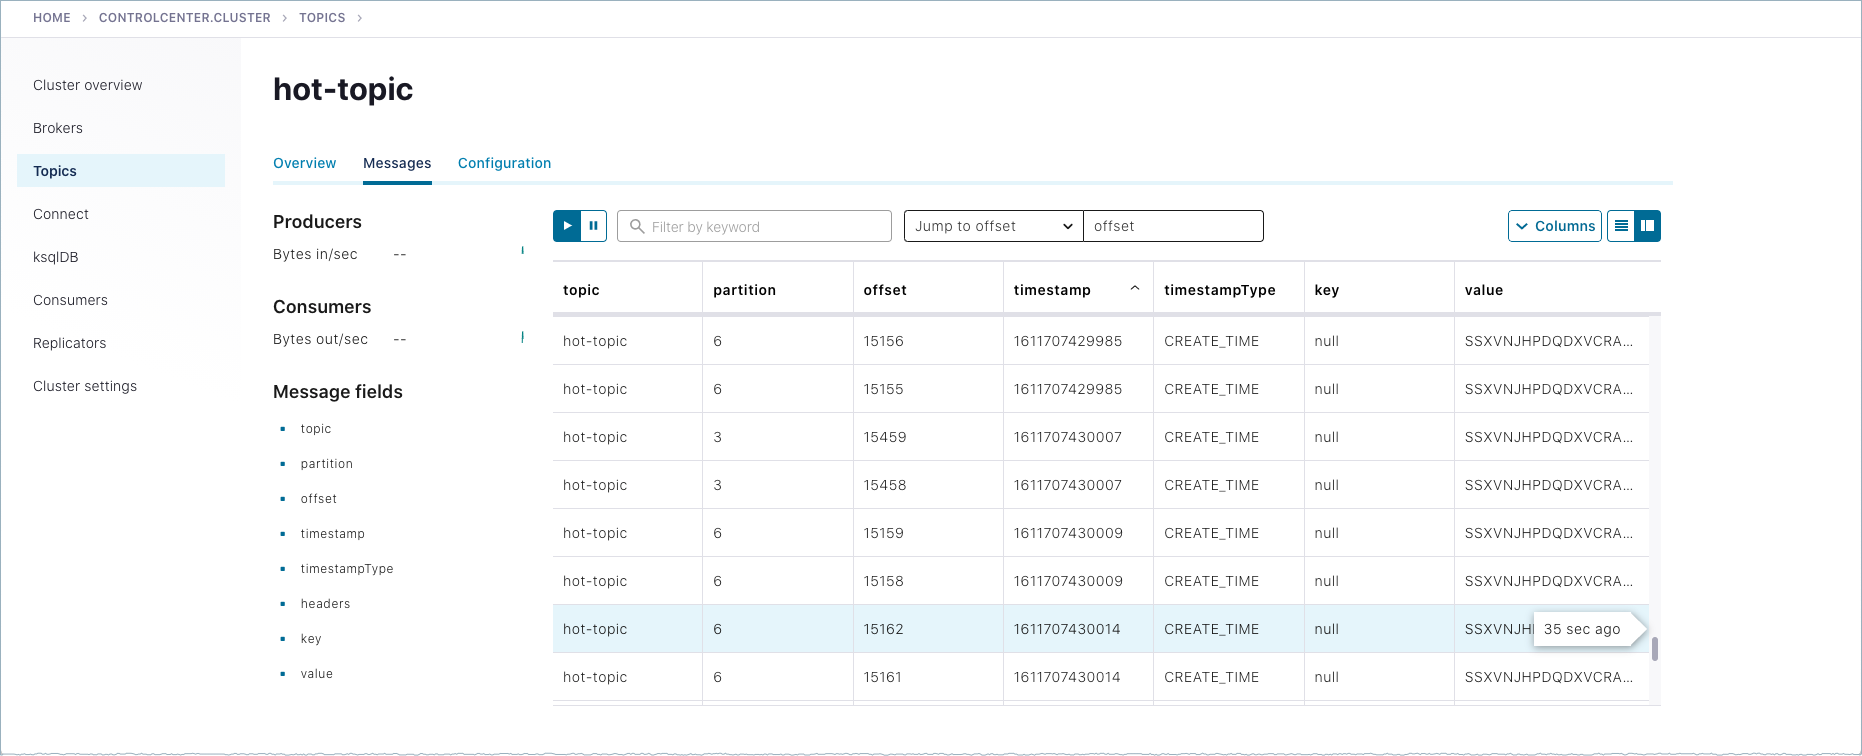
(Optional) Running other components
When you have your controller and brokers running, you can configure and start additional components if desired. These may be useful for experimenting with other aspects of Confluent Platform, and will give you a similar starting point as you get in Quick Start for Confluent Platform. The following sections describe these.
(Optional) Install the Datagen Connector
Install the Kafka Connect Datagen source connector using the confluent connect plugin install command, or by using Confluent Marketplace. This connector generates mock data for demonstration purposes and is not suitable for production.
To install with the confluent connect plugin install command:
confluent connect plugin install confluentinc/kafka-connect-datagen:latest
Confluent Marketplace provides an online library of pre-packaged and ready-to-install extensions or add-ons for Confluent Platform and Kafka. To install with Confluent Marketplace:
confluent-hub install \
   --no-prompt confluentinc/kafka-connect-datagen:latest
(Optional) Start the other components
Start each of these components in separate windows.
Tip
For this example, it is not necessary to start all of these. At a minimum, you will need the controller and the brokers (already started), and Kafka REST. However, it is useful to have all components running if you are just getting started with the platform, and want to explore everything. This gives you a similar starting point as you get in Quick Start for Confluent Platform, and enables you to work through the examples in that Quick Start in addition to the Kafka command examples provided here.
(Optional) Start Kafka REST
kafka-rest-start $CONFLUENT_HOME/etc/kafka-rest/kafka-rest.properties
(Optional) Start Kafka Connect
connect-distributed $CONFLUENT_HOME/etc/kafka/connect-distributed.properties
(Optional) Start ksqlDB
ksql-server-start $CONFLUENT_HOME/etc/ksqldb/ksql-server.properties
(Optional) Start Schema Registry
schema-registry-start $CONFLUENT_HOME/etc/schema-registry/schema-registry.properties
Shutdown and cleanup tasks
Run the following shutdown and cleanup tasks.
Stop the
kafka-producer-perf-testwith Ctl-C in its respective command window.Stop the all of the other components with Ctl-C in their respective command windows, in reverse order in which you started them. For example, stop Control Center first, then Prometheus, any other “optional” components, followed by Kafka brokers, and finally the controller.
Remove log files from
/tmp. For example:ls /tmprm -rf /tmp/kraft-broker-logs*.*
rm -rf /tmp/kraft-controller-logs
Run multiple clusters
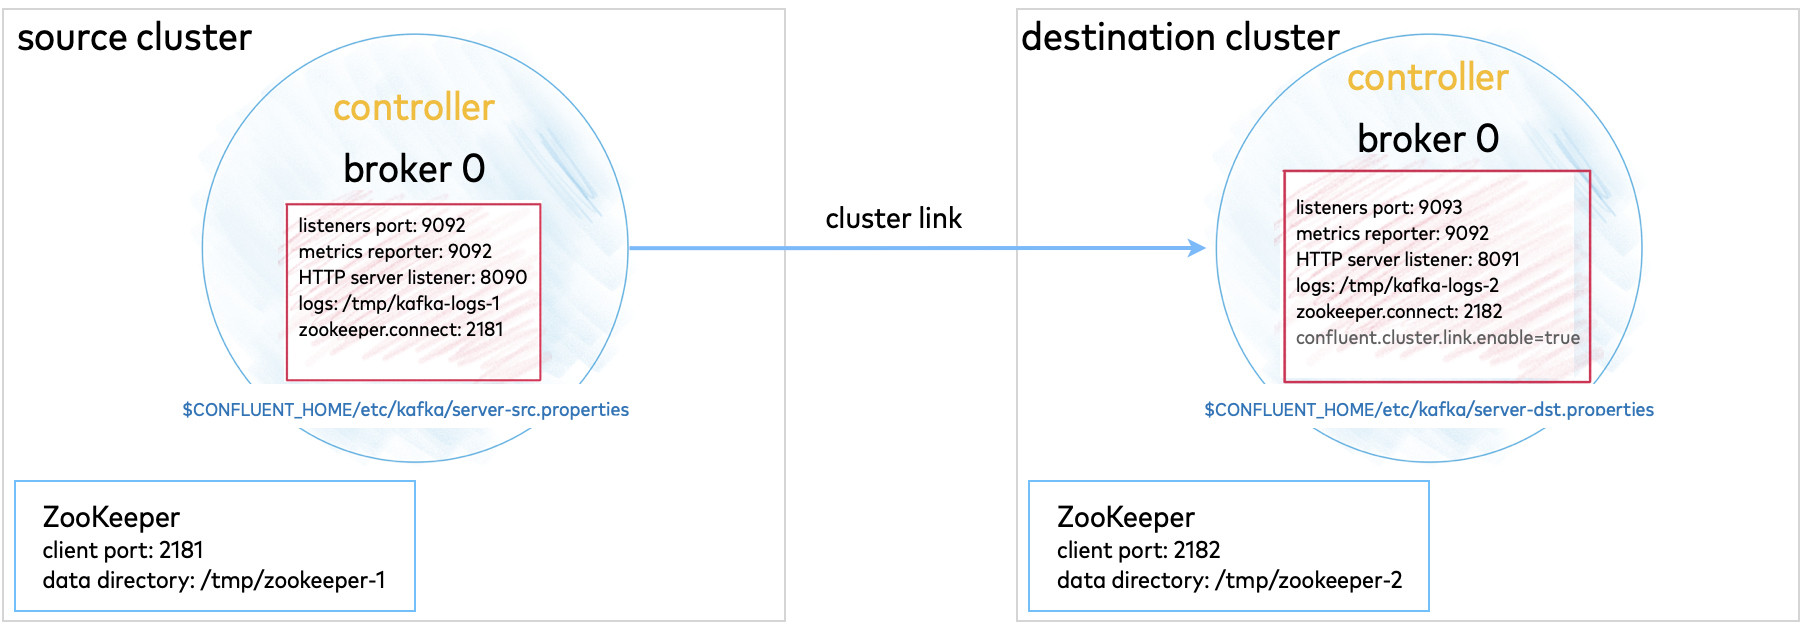
Another option to experiment with is a multi-cluster deployment. This is relevant for trying out features like Replicator, Cluster Linking, and multi-cluster Schema Registry, where you want to share or replicate topic data across two clusters, often modeled as the origin and the destination cluster.
These configurations can be used for data sharing across data centers and regions and are often modeled as source and destination clusters. An example configuration for cluster linking is shown in the diagram below. (A full guide to this setup is available in the Tutorial: Share Data Across Topics Using Cluster Linking for Confluent Platform.)
Multi-cluster configurations are described in context under the relevant use cases. Since these configurations will vary depending on what you want to accomplish, the best way to test out multi-cluster is to choose a use case, and follow the feature-specific tutorial.
Tutorial: Share Data Across Topics Using Cluster Linking for Confluent Platform (requires Confluent Platform 6.0.0 or newer, recommended as the best getting started example)
Tutorial: Replicate Data Across Kafka Clusters in Confluent Platform
Code examples and demo apps
Following are links to examples of Confluent Platform distributed applications that uses Kafka topics, along with producers, and consumers that subscribe to those topics, in an event subscription model. The idea is to complete the picture of how Kafka and Confluent Platform can be used to accomplish a task or provide a service.