Tutorial: Replicate Data Across Kafka Clusters in Confluent Platform
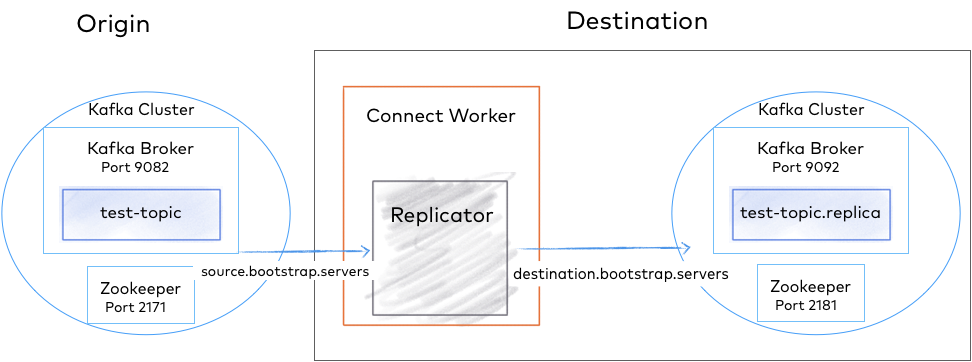
This guide describes how to start two Apache Kafka® clusters and then a Replicator process to replicate data between them. Note that for tutorial purposes, you run both clusters on the same machine. In order to do that, you have some additional steps to make sure each cluster has its own ports and data directories. You will not need to perform these changes on both the controller or broker configurations if you are running in a normal environment, where each cluster has its own servers.
Replicator Quick Start Configuration
Install prerequisites and command examples
These instructions assume you have a local installation of Confluent Platform, the Confluent CLI, and Java 8, 11, or 17 (recommended). For details on Java requirements, see Java in System Requirements for Confluent Platform. If you are new to Confluent Platform, you may want to work through the Quick Start for Confluent Platform first, and then return to this tutorial.
KRaft and ZooKeeper
Important
As of Confluent Platform 8.0, ZooKeeper is no longer available for new deployments. Confluent recommends migrating to KRaft mode for new deployments. To learn more about running Kafka in KRaft mode, see KRaft Overview for Confluent Platform, KRaft Configuration for Confluent Platform, and the KRaft steps in the Platform Quick Start. To learn about migrating from older versions, see Migrate from ZooKeeper to KRaft on Confluent Platform.
This tutorial provides examples for KRaft mode only. Earlier versions of this documentation provide examples for both KRaft and ZooKeeper.
For KRaft, the examples show a combined mode configuration, where for each cluster the broker and controller run on the same server. Currently, combined mode is not intended for production use but is shown here to simplify the tutorial. If you want to run controllers and brokers on separate servers, use KRaft in isolated mode. To learn more, see KRaft Overview for Confluent Platform and Kraft mode under Configure Confluent Platform for production.
Command examples
The commands shown to start servers and Replicator assume you are running from your Confluent Platform home directory or have Confluent Platform in your CLASSPATH. The examples also assume that your properties files are in the default locations on your Confluent Platform installation, except as otherwise noted. This should make it easier to copy/paste example commands directly into your terminal in most cases.
The examples in this section assume you are running commands from
$CONFLUENT_HOMEand usingmy-examples/to store your properties files. If you follow this model, you can use the copy-paste options on the code blocks.$CONFLUENT_HOMErepresents<path-to-confluent>. On Linux systems, you can use this notation to set a shell environment variable.
Ports for Kafka brokers and Confluent Platform components
The examples in this tutorial define the following port configurations.
Origin | Destination | |
|---|---|---|
Kafka brokers | 9082 | 9092 |
KRaft controllers | 9071 | 9093 |
Metadata server listeners (in brokers) | 8091 | 8090 |
Connect Replicator worker | 8083 (copies topics from origin -> destination) | |
Control Center | 9021 |
Start the destination cluster
The destination cluster configurations (ports, data directories, and so on) are based on the defaults for the template properties files.
Change directories to the location where Confluent Platform is installed:
cd $CONFLUENT_HOME
Create a directory to be used for all of your example files:
mkdir my-examplesCopy
etc/kafka/server.propertiesinto the examples directory and rename it to match its purpose:cp etc/kafka/server.properties my-examples/server_destination.properties
Append the following line at the end of
server_destination.propertiesto set the HTTP listener on the destination cluster to8091:echo "confluent.http.server.listeners=http://localhost:8090" >> my-examples/server_destination.properties
Generate a
random-uuidusing the kafka-storage tool:KAFKA_CLUSTER_ID="$(bin/kafka-storage random-uuid)"
Format the log directories for this server:
./bin/kafka-storage format -t $KAFKA_CLUSTER_ID -c my-examples/server_destination.properties --standalone
Tip
The
kafka-storagecommand is run only once per broker/controller. You cannot use this command to update an existing cluster. If you make a mistake in configurations at this point, you must recreate the directories from scratch, and work through the steps again.Start the destination server:
./bin/kafka-server-start my-examples/server_destination.properties
For complete details on getting these services up and running see the quick start instructions for Confluent Platform.
Note
The destination cluster should be running the same (or higher) version of Confluent Platform as the source cluster. Replicator runs within a Connect cluster linked to the destination cluster, and reads messages from the source cluster. Therefore, Replicator will not be able to interpret the message format if the destination is running an older version.
Start the origin cluster
Configure and start the origin cluster in a new terminal window.
While you configured the destination node to run on default ports, you will need to run the origin node on a different port to avoid collisions. The Kafka broker on the origin node is configured on port 9082 and the controller is on port 9071, as shown in the ports mapping. Copy the configuration files to a temporary location and modify them as shown below to prevent conflicts with the destination cluster.
Change directories to the location where Confluent Platform is installed:
cd $CONFLUENT_HOME
Copy
etc/kafka/server.propertiesinto the examples directory and rename it to match its purpose:cp etc/kafka/server.properties my-examples/server_origin.properties
Update the port numbers.
sed -i '' -e "s/9093/9071/g" my-examples/server_origin.properties
sed -i '' -e "s/9092/9082/g" my-examples/server_origin.properties
sed -i '' -e "s/#confluent.metadata.server.listeners/confluent.metadata.server.listeners/g" my-examples/server_origin.properties
sed -i '' -e "s/confluent.metrics.reporter.bootstrap.servers=localhost:9092/confluent.metrics.reporter.bootstrap.servers=localhost:9082/g" my-examples/server_origin.properties
Append the following line at the end of
server_destination.propertiesto set the HTTP listener on the origin cluster to8091:echo "confluent.http.server.listeners=http://localhost:8091" >> my-examples/server_origin.properties
Update data directories.
sed -i '' -e "s/kraft-combined-logs/kraft-combined-logs-origin/g" my-examples/server_origin.properties
Generate a
random-uuidusing the kafka-storage tool:KAFKA_CLUSTER_ID="$(bin/kafka-storage random-uuid)"
Format the log directories for this server:
./bin/kafka-storage format -t $KAFKA_CLUSTER_ID -c my-examples/server_origin.properties --standalone
Next, start a Kafka broker to serve as the single node Kafka cluster for origin.
Start Kafka by running this command in its own terminal.
./bin/kafka-server-start my-examples/server_origin.properties
Create a topic
Bring up a new command window to run Kafka commands.
Create a topic named “test-topic” in the origin cluster with the following command:
kafka-topics --create --topic test-topic --replication-factor 1 --partitions 1 --bootstrap-server localhost:9082
Tip
Depending on your environment, you may have to use the .sh extension (for example, kafka-topics.sh) for Kafka commands.
You can verify that the topic was created as follows:
kafka-topics --list --bootstrap-server localhost:9082
Your output should look similar to this (the _confluent topics are internal topics):
__confluent.support.metrics
_confluent-command
test-topic
When we configure and run Replicator, this “test-topic” will get replicated to the destination cluster (on port 2181) with the exact configuration we defined above. For the sake of this example, the test topic was created with just one partition. Replicator will work with any number of topics and partitions.
Configure and run Replicator
Confluent Replicator can run as an executable or as a Connector in the Kafka Connect framework. For this quick start, start Replicator as an executable.
Create consumer, producer, and replicator configuration files
The Replicator executable script expects three configuration files:
Configuration for the origin cluster
Configuration for the destination cluster
Replicator configuration
Tip
You can place these config files in any directory you choose, but these steps assume a path of $CONFLUENT_HOME/my-examples/, so as not to conflict with the default properties files that ship with Confluent Platform. (The default configs for producer.properties and consumer.properties are in etc/kafka/, and replicator.properties is in etc/kafka-connect-replicator/.)
Create the following files in $CONFLUENT_HOME/my-examples/:
Configure the origin cluster in a new file named
consumer.properties.cp etc/kafka/consumer.properties my-examples/.
Edit the file and make sure it contains the addresses of brokers from the origin cluster. The default broker list will match the origin cluster you started earlier.
# Origin cluster connection configuration
bootstrap.servers=localhost:9082
Configure the destination cluster in a new file named
producer.properties.cp etc/kafka/producer.properties my-examples/.
Edit the file and make sure it contains the addresses of brokers from the destination cluster. The default broker list will match the destination cluster you started earlier.
# Destination cluster connection configuration
bootstrap.servers=localhost:9092
Define the Replicator configuration in a new file named
replication.propertiesfor the Connect worker. This quick start shows a configuration fortopic.rename.formatbut any of the Replicator Configuration Reference for Confluent Platform that are not connection related can be supplied in this file.# Replication configuration topic.rename.format=${topic}.replica replication.factor=1 config.storage.replication.factor=1 offset.storage.replication.factor=1 status.storage.replication.factor=1 confluent.topic.replication.factor=1
Tip
If no port is defined in
replication.properties, this worker runs on its default port8083, which is the desired config for this deployment.The replication factor properties (all set to
1) are used because these test clusters are small. The recommended minimum cluster size in production is3and this is the default for these properties.
Start the replicator
After you have created the necessary configuration files, start Replicator executable in its own terminal with the command below (assuming the properties files are in my-examples).
./bin/replicator --cluster.id replicator --consumer.config my-examples/consumer.properties --producer.config my-examples/producer.properties --replication.config my-examples/replication.properties --whitelist 'test-topic'
Some Replicator executable parameters can be passed on the command line:
--cluster.id- An identifier used to determine which Replicator cluster this executable should join. Multiple Replicator executable instances with the samecluster.idwill work together.--consumer.config- The path to the origin cluster configuration--producer.config- The path to the destination cluster configuration--replication.config- The path to a file containing any non connection specific configuration. Command line arguments will override these configurations.--whitelist- A list of topics to replicate from origin to destination
For a full list of command line options see Command line parameters of Replicator executable.
Look for success messages related to starting the source task and creating the replicated topic that indicate Replicator is up and running, and copying topics.
Verify topic replication across the clusters
When Replicator finishes initialization, it checks the origin cluster for topics that need to be replicated.
In this case, it finds test-topic and creates the corresponding topic in the destination cluster. You can verify this with the following command.
./bin/kafka-topics --describe --topic test-topic.replica --bootstrap-server localhost:9092
Note that you are checking the existence of test-topic.replica because test-topic was renamed when it was replicated to the destination cluster, according to your configuration.
Your output should look similar to this:
./bin/kafka-topics --describe --topic test-topic.replica --bootstrap-server localhost:9092
Topic: test-topic.replica    PartitionCount: 1       ReplicationFactor: 1    Configs: message.timestamp.type=CreateTime,segment.bytes=1073741824
      Topic: test-topic.replica      Partition: 0    Leader: 0       Replicas: 0     Isr: 0  Offline: 0
You can also list and describe the topics on the destination cluster. Replicated topics, like test-topic.replica will be listed.
./bin/kafka-topics --list --bootstrap-server localhost:9092
Tip
To list topics on the origin cluster, run
kafka-topics --listagainstlocalhost:9082.To view a description of the original topic, run
kafka-topics --describebut look fortest-topicand targetlocalhost:9082.
At any time after you’ve created the topic in the origin cluster, you can begin sending data to it using a Kafka producer to write to test-topic in the origin cluster. You can then confirm that the data has been replicated by consuming from test-topic.replica in the destination cluster. For example, to send a sequence of numbers using Kafka’s console producer, run the following command in a new terminal window:
seq 10000 | ./bin/kafka-console-producer --topic test-topic --broker-list localhost:9082
You can confirm delivery in the destination cluster using the console consumer in its own terminal window:
./bin/kafka-console-consumer --from-beginning --topic test-topic.replica --bootstrap-server localhost:9092
If the numbers 1 to 10,000 appear in the consumer output, this indicates that you have successfully created multi-cluster replication.
Press Ctl-C to end the consumer readout and return to the command prompt.
Use Control Center to monitor replicators
You can use Control Center to monitor the replicators in your current deployment:
Stop Replicator and brokers on both the origin and destination clusters.
Press
Ctl-Cin the each command window to stop the processes, but keep the windows open to make it easy to restart each one.Activate the monitoring extension for Replicator by doing the following, as fully described in Replicator monitoring extension.
Add the full path to
replicator-rest-extension-<version>.jarto your CLASSPATH.Add
rest.extension.classes=io.confluent.connect.replicator.monitoring.ReplicatorMonitoringExtensiontomy-examples/replication.properties.
Uncomment or add the following lines to the Kafka configuration files for both the destination and origin,
my-examples/server_destination.propertiesandmy-examples/server_origin.properties, respectively. The configuration forconfluent.metrics.reporter.bootstrap.serversmust point tolocalhoston port9092in both files, so you may need to edit one or both of these port numbers. (Searching onconfluent.metricswill take you to these lines in the files.)confluent.metrics.reporter.topic.replicas=1 metric.reporters=io.confluent.metrics.reporter.ConfluentMetricsReporter confluent.metrics.reporter.bootstrap.servers=localhost:9092
The first line indicates to Control Center that your deployment is in development mode, using a replication factor of
1.The other two lines enable metrics reporting on Control Center, and provide access to the Confluent internal topic that collects and stores the monitoring data.
Tip
For this example, the metrics reporter must point to the cluster that Confluent Control Center bootstraps to, which is the destination cluster. If this is not set properly, metrics on source topics will not show up in Control Center. This is why
my-examples/server_destination.propertiesandmy-examples/server_origin.propertiesmust have the same configuration forconfluent.metrics.reporter.bootstrap.servers=localhost:9092.When adapting these steps to more complex, real-world environments, you may decide to use a different approach. For example, in a deployment with multiple instances of Control Center for source and destination, each monitoring its own respective cluster,
confluent.metrics.reporter.bootstrap.serversshould point to source or destination, as appropriate. To learn more, see the scenarios for Multi-cluster configuration with Control Center, Monitor Replicator for Confluent Platform, and Configure Multi-Region Clusters in Confluent Platform.
Edit
etc/confluent-control-center/control-center-dev.propertiesto add the following two lines that specify origin and destination bootstrap servers for Control Center, as is required for monitoring multiple clusters. (A convenient place to add these lines is near the top of the file under “Control Center Settings”, immediately after the line that specifiesconfluent.controlcenter.id.)# multi-cluster monitoring confluent.controlcenter.kafka.origin.bootstrap.servers=localhost:9082 confluent.controlcenter.kafka.destination.bootstrap.servers=localhost:9092
Tip
Control Center requires the host and port of the Connect REST endpoint to know where to look for Replicator monitoring metrics. In the config file used for this example (
control-center-dev.properties), this is configured for you on the default port, and so works out-of-the-box:# A comma separated list of Connect host names confluent.controlcenter.connect.cluster=http://localhost:8083
The production-ready config file (
control-center-production.properties) has the default commented out. If you use this file instead, have multiple Connectors, or want to configure Connect clusters differently, you must specify the Connect endpoint(s), either by uncommenting the default or specifying hosts for your own Connect clusters. To learn more, see Control Center Configuration Reference <https://docs.confluent.io/control-center/current/installation/configuration.html#c3-connect-cluster-setting>`__ descriptions forconfluent.controlcenter.connect.<connect-cluster-name>.clusterandconfluent.controlcenter.connect.cluster(deprecated).If you are running both Replicator and a Connect cluster in your deployment. You must specify these separately:
Connect
cluster: confluent.controlcenter.connect.<connect-cluster-name>.cluster=http://connect-host-1:8083
Replicator
confluent.controlcenter.connect.<replicator-name>.cluster=http://replicator-host:8083
Restart the brokers on the destination and origin clusters with the same commands used above, for example:
./bin/kafka-server-start my-examples/server_destination.properties
./bin/kafka-server-start my-examples/server_origin.properties
Restart Replicator and the Connect worker with the same command as above. For example:
./bin/replicator --cluster.id replicator --consumer.config my-examples/consumer.properties --producer.config my-examples/producer.properties --replication.config my-examples/replication.properties --whitelist 'test-topic'
Launch Control Center with the following command.
./bin/control-center-start etc/confluent-control-center/control-center-dev.properties
If no port is defined in
control-center-dev.properties, Control Center runs by default on port9021, as described in Control Center for Confluent Platform. This is the desired config for this deployment.Open Control Center at http://localhost:9021/ in your web browser.
The clusters are rendered on Control Center with auto-generated names, based on your configuration.
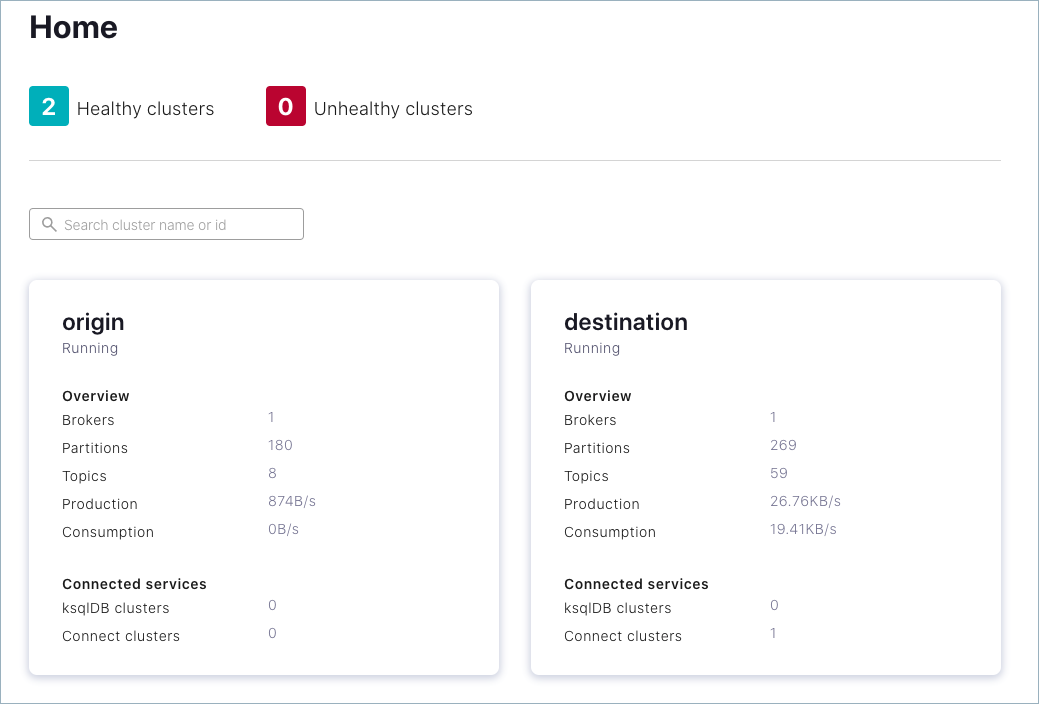
(Optional) On Control Center, edit the cluster names to suit your use case, as described in Origin and Destination clusters in “Replicators” in the Control Center User Guide.
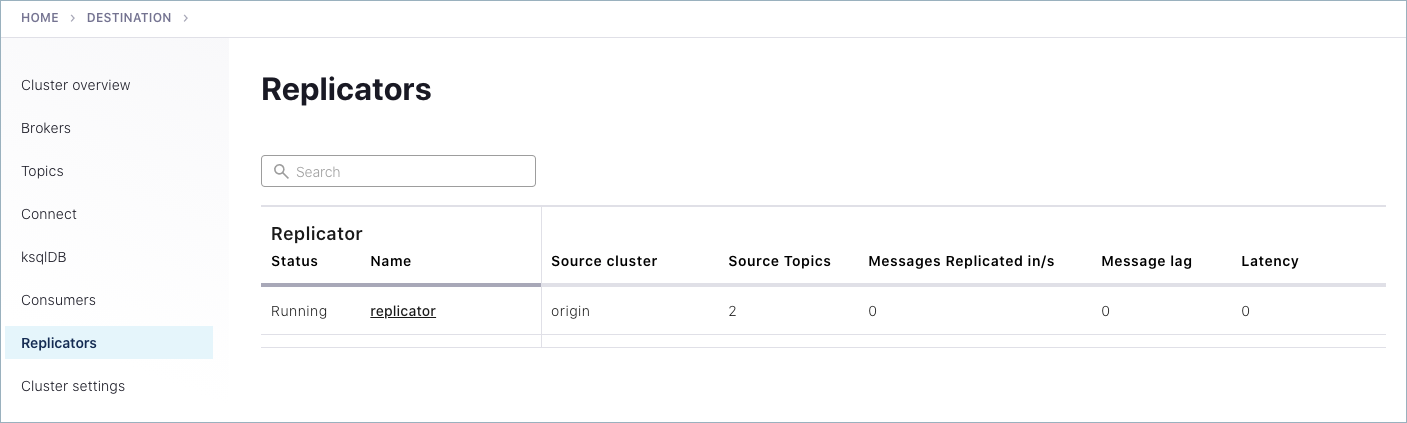
On Control Center, select the destination cluster, click Replicators on the navigation panel, and use Control Center to monitor replication performance and drill down on source and replicated topics.
To see messages produced to both the original and replicated topic on Control Center, try out
kafka-consumer-perf-testin its own command window to auto-generate test data totest-topic.kafka-producer-perf-test \ --producer-props bootstrap.servers=localhost:9082 \ --topic test-topic \ --record-size 1000 \ --throughput 1000 \ --num-records 3600000
The command provides status output on messages sent, as shown:
4999 records sent, 999.8 records/sec (0.95 MB/sec), 1.1 ms avg latency, 240.0 ms max latency.
5003 records sent, 1000.2 records/sec (0.95 MB/sec), 0.5 ms avg latency, 4.0 ms max latency.
5003 records sent, 1000.2 records/sec (0.95 MB/sec), 0.6 ms avg latency, 5.0 ms max latency.
5001 records sent, 1000.2 records/sec (0.95 MB/sec), 0.3 ms avg latency, 3.0 ms max latency.
5001 records sent, 1000.0 records/sec (0.95 MB/sec), 0.3 ms avg latency, 4.0 ms max latency.
5000 records sent, 1000.0 records/sec (0.95 MB/sec), 0.8 ms avg latency, 24.0 ms max latency.
5001 records sent, 1000.2 records/sec (0.95 MB/sec), 0.6 ms avg latency, 3.0 ms max latency.
...
Like before, you can consume these messages from the command line, using kafka-console-consumer to verify that the replica topic is receiving them:
./bin/kafka-console-consumer --from-beginning --topic test-topic.replica --bootstrap-server localhost:9092
You can also verify this on Control Center. Navigate to
test-topicon the origin cluster to view messages on the original topic, and totest-topic.replicaon the destination to view messages on the replicated topic.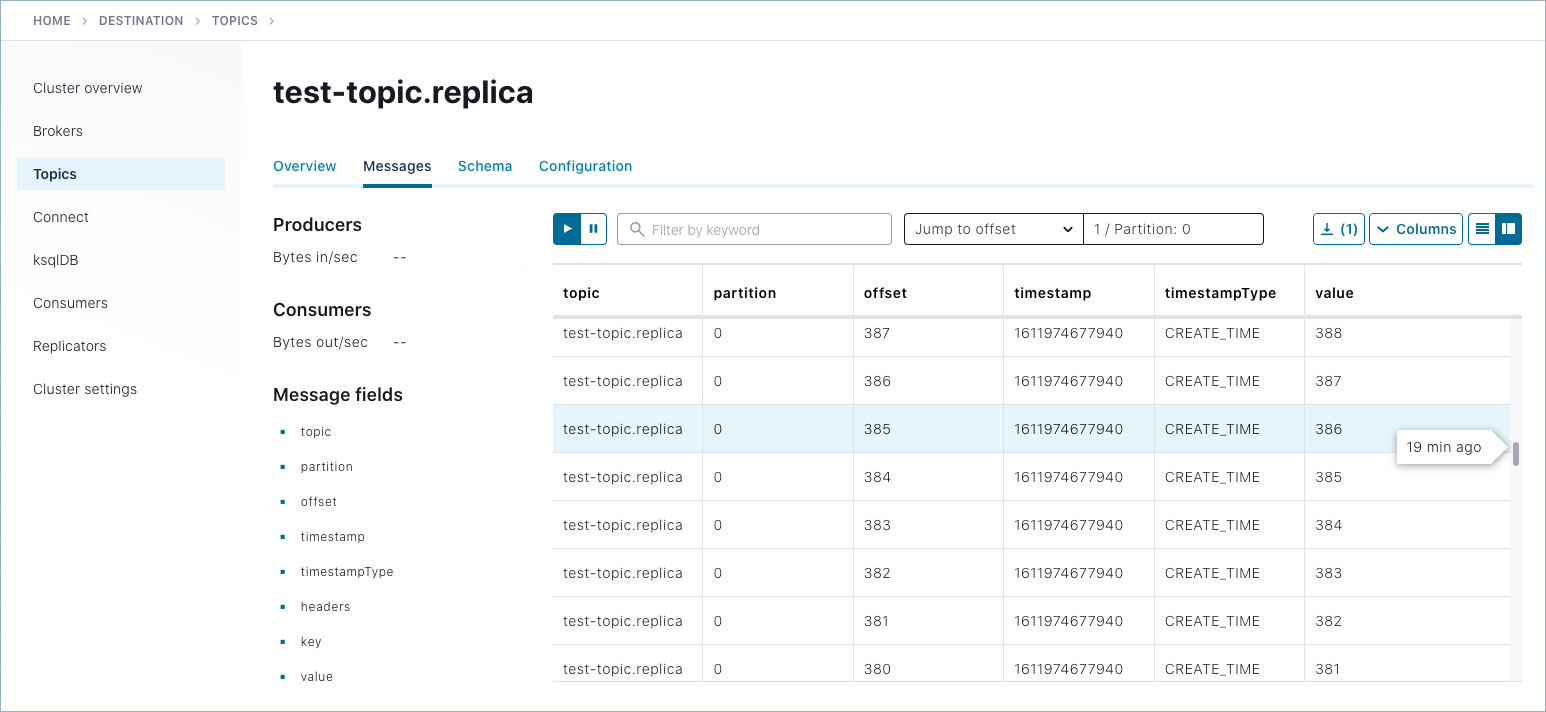
To learn more about monitoring Replicators in Control Center, see “Replicators” in Control Center User Guide.
When you have completed your experiments with the tutorial, be sure to perform clean up as follows:
Stop any producers and consumers using
Ctl-Cin the each command window.Use
Ctl-Cin each command window to stop each service in reverse order to which you started them (stop Control Center first, then Replicator, and finally the Kafka brokers.
Troubleshooting
If you run into trouble at any point with getting things up and running or with Control Center monitoring of replicators, here are some things to check:
Make sure the configurations in all properties files are correct, and port numbers match origin and destination ports as described in Ports for Kafka brokers and Confluent Platform components.
For monitoring with Control Center, make sure that your configurations match the monitoring requirements per the steps in Use Control Center to monitor replicators. If you are using the production-ready Control Center configuration file instead of the “dev” version shown in this example, make sure you have specified the Connect endpoint per the tip in Use Control Center to monitor replicators.
Verify that the monitoring extension is installed per Replicator monitoring extension and is in your CLASSPATH, especially in the shells where you start the Kafka brokers. Check this by running
echo $CLASSPATHin open command windows.If you are using the
systemctlcommand to start the monitoring service, make sure you follow the steps in systemctl command configurations. If you don’t configure the environment variables properly, Connect will fail to start.To retry the tutorial:
Use
Ctl-Cin each command window to stop each service in reverse order to which you started them (stop Control Center first, then Replicator, and finally the Kafka brokers.Delete stale log and data files in
/tmpthat may conflict with a new run of the clusters and topics. For example, remove these files:/tmp/confluent/control-center/,/tmp/kafka-logs,/tmp/kafka-logs-origin,/tmp/control-center-logs.From here, you can start again with your current install of Confluent Platform or even reinstall Confluent Platform and try the entire process from scratch.
Teardown
Run shutdown and cleanup tasks.
Stop Replicator with Ctl-C in its command window.
Stop all of the other components with Ctl-C in their respective command windows, in reverse order in which you started them. Stop the origin server first (the node 2 broker), then stop the destination server (combined controller and node 1 broker).
Delete the log directories from
/tmp.This will clear out the metadata from your system and enable you to configure and run new local deployments with no collisions with the legacy metadata.
Delete the logs for the destination cluster:
rm -rf /tmp/kraft-combined-logs
Delete the logs for the origin cluster:
rm -rf /tmp/kraft-combined-logs-origin