Self-Balancing Tutorial
This example describes how to set up a local, multi-broker cluster with proper configurations for replication factors, and test Self-Balancing by removing a broker and monitoring the rebalance.
Following broker removal, you add a broker to the cluster and monitor the redistribution of data to fill the empty broker.
Most tasks are performed on the command line but Confluent Control Center (Legacy) is used to verify where the controller is running, and as an additional view into the progress of the rebalance.
Tip
You can use this same workflow to set up a cluster on your cloud provider. Simply set the host:port names to represent your cloud nodes as appropriate.
Prerequisites
Before proceeding with the example, verify that you have the following installed on your local machine:
Java 1.8 or 1.11 to run Confluent Platform
Configure Kafka brokers
This example demos a cluster with five brokers. These steps guide you through two passes on the broker properties files, first to configure some basics in the default server.properties file that will apply to all brokers, then to create four additional properties files based on the original and set up a multi-broker cluster. When you have completed the setup, you will have a total of five server properties files, one per broker.
Tip
You can use this same model for a cluster with more or fewer brokers. Using more than 3 brokers simplifies configuration for a scenario where you will remove a broker, since many of the Confluent Platform internal topics default to a replication factor of 3.
In $CONFLUENT_HOME/etc/kafka/server.properties, make the following changes, and save the file.
Enable the Metrics Reporter for Control Center (Legacy)
When the Confluent Metrics Reporter is enabled, it populates the Brokers Overview page in Control Center (Legacy) with metrics on all brokers, along with a clickable list where you can drill down on each individual broker to get a detail view of statistics and an option to remove a broker. If this setting is not enabled, Control Center (Legacy) will not display broker metrics or management options.
Uncomment the following two lines to allow the brokers to send metrics to Control Center (Legacy).
metric.reporters=io.confluent.metrics.reporter.ConfluentMetricsReporter
confluent.metrics.reporter.bootstrap.servers=localhost:9092
Tip
This configuration can apply to all brokers in the cluster. There is no need to change the port numbers for confluent.metrics.reporter.bootstrap.servers to match the listener port for each broker (although that configuration also works).
Configure replication factors for Self-Balancing
For Self-Balancing to work if you delete a broker, replication factors must be less than the number of brokers in the cluster, but enough that replication can take place. For example, you can’t have a topic with a replication factor of 1 because if the topic is on a broker that gets deleted there won’t be a replica to use for the rebalancing. You will get an error when you try to delete a broker:
my-laptop$ ./bin/kafka-remove-brokers --bootstrap-server localhost:9092,localhost:9093,localhost:9094 --broker-id 2 --delete 2>&1 | grep -v SLF4J
Initiating remove broker call...
Error while issuing request
Error while executing broker removal: org.apache.kafka.common.errors.InvalidBrokerRemovalException: The given broker removal operation was invalid for some reason, e.g invalid broker ids or partitions that would become unavailable as a result the removal. See the broker logs for more details.
The following steps show you how to reset replication factors and replicas to 2, and uncomment the properties if needed so that your changes go into effect. At the time of this writing, the list of properties shown below that require an update is comprehensive. If, however, you have other properties in your server files with replication factors or replicas of 1 or more than 2, change them for the purposes of this tutorial. Be judicious about why you are changing these values. For example, this doesn’t apply to a setting like #confluent.balancer.max.replicas=10000, which is simply specifying a maximum number of replicas allowed per broker.
Search in
$CONFLUENT_HOME/etc/kafka/server.propertiesfor all instances ofreplication.factorand set the values for these to a number that is less than the number of brokers but greater than 1. For this cluster, set allreplication.factor’s to 2. Your search throughserver.propertiesshould turn up these properties. If they are commented out, uncomment them:offsets.topic.replication.factor=2 transaction.state.log.replication.factor=2 confluent.license.topic.replication.factor=2 confluent.metadata.topic.replication.factor=2 confluent.balancer.topic.replication.factor=2
If you want to run Connect, change replication factors in that properties file also. Search
$CONFLUENT_HOME/etc/kafka/connect-distributed.propertiesfor all instances ofreplication.factorand set the values for these to a number that is less than the number of brokers but greater than 1. For this cluster, set allreplication.factor’s to 2. Your search throughconnect-distributed.propertiesshould turn up these properties. If they are commented out, uncomment them:offset.storage.replication.factor=2 config.storage.replication.factor=2 status.storage.replication.factor=2
Tip
When you create your topics, make sure that they also have the needed replication factor, depending on the number of brokers. This is described in the next section.
Limiting replicas and replication factors to 2 provides the option to shrink the cluster to as few as 2 brokers and expand back up to 5.
Verify that Self-Balancing is enabled
Under “Confluent Data Balancer Settings” in server.properties, verify that confluent.balancer.enable=true; that is, Self-Balancing is on. The value for this property must be specified as true and the line must be uncommented. Confluent Platform ships with Self-Balancing set to enabled in this example file, so you shouldn’t have to edit this.
Tip
If confluent.balancer.enable is not explicitly specified in the server.properties or if this line is commented out, it will default to false, off.
Save the file
Save this updated version of server.properties.
This server.properties file is for the first of your five brokers, “broker 0”. You can now use this file as the basis for the other files that will correspond to brokers 1, 2, and 3, as described in the next section. You have already updated the replication factors as needed, so you will have minimal changes to make to the other two files.
Create a basic configuration for a five-broker cluster
Start with the server.properties file you updated for Metrics Reporter, replication factors, and Self-Balancing in the previous step, then copy it and modify the configurations as shown below, renaming the new files to represent the other four brokers.
File | Configurations |
|---|---|
server.properties | With replication factors properly set in the previous step, no further changes are needed for this file. Use the defaults for these basics (if a value is commented out, leave it as such):
Add the following listener configuration to specify the REST endpoint for this broker: confluent.http.server.listeners=http://localhost:8090
|
server-1.properties | Update the values for these basic properties to make them unique. (Be sure to uncomment
Provide the listener configuration to specify the REST endpoint unique to this broker: confluent.http.server.listeners=http://localhost:8091
|
server-2.properties | Update the values for these basic properties to make them unique. (Be sure to uncomment
Provide the listener configuration to specify the REST endpoint unique to this broker: confluent.http.server.listeners=http://localhost:8092
|
server-3.properties | Update the values for these basic properties to make them unique. (Be sure to uncomment
Provide the listener configuration to specify the REST endpoint unique to this broker: confluent.http.server.listeners=http://localhost:8093
|
server-4.properties | Update the values for these basic properties to make them unique. (Be sure to uncomment
Provide the listener configuration to specify the REST endpoint unique to this broker: confluent.http.server.listeners=http://localhost:8094
|
Tip
Confluent Platform ships with Self-Balancing enabled. Leave this setting as is:
confluent.balancer.enable=trueThis tutorial does not demonstrate running Self-Balancing Clusters with security protocols enabled. If you want to run Self-Balancing in secure mode, see Security Considerations.
When you have completed this step, you will have five server properties files in $CONFLUENT_HOME/etc/kafka/:
server.propertieswhich corresponds to broker 0server-1.propertieswhich corresponds to broker 1server-2.propertieswhich corresponds to broker 2server-3.propertieswhich corresponds to broker 3server-4.propertieswhich corresponds to broker 4
Configure Control Center (Legacy) with REST endpoints and advertised listeners
Control Center (Legacy) will be useful for verifying your starting configuration and monitoring the progress of the rebalance, in addition to command line output.
You must tell Control Center (Legacy) about the REST endpoints for all brokers in your cluster, and the advertised listeners for the other components you may want to run. Without these configurations, the brokers and components will not show up on Control Center (Legacy).
Make the following changes to $CONFLUENT_HOME/etc/confluent-control-center/control-center.properties and save the file.
Configure REST endpoints for the brokers.
In the appropriate Control Center (Legacy) properties file, use
confluent.controlcenter.streams.cprest.urlto define the REST endpoints forcontrolcenter.cluster.In
$CONFLUENT_HOME/etc/confluent-control-center/control-center.properties, uncomment the default value for the Kafka REST endpoint URL and modify it to match your multi-broker configuration as follows:# Kafka REST endpoint URL confluent.controlcenter.streams.cprest.url=http://localhost:8090,http://localhost:8091,http://localhost:8092,http://localhost:8093,http://localhost:8094
Uncomment the configurations for Kafka Connect, ksqlDB, and Schema Registry to provide Control Center (Legacy) with the default advertised URLs to for the component clusters.
# A comma separated list of Connect host names
confluent.controlcenter.connect.cluster=http://localhost:8083

# KSQL cluster URL
confluent.controlcenter.ksql.ksqlDB.url=http://localhost:8088

# Schema Registry cluster URL
confluent.controlcenter.schema.registry.url=http://localhost:8081
Tip
Self-Balancing doesn’t need embedded REST Proxy, but Control Center (Legacy) depends on it to manage Self-Balancing. To learn more, Required Configurations for Control Center (Legacy) in Self-Balancing Configuration Options and
confluent.controlcenter.streams.cprest.urlin the Control Center Configuration Reference.If you are running Self-Balancing with role-based access control (RBAC) or other security protocols, additional configuration is needed in the Kafka brokers beyond what this tutorial shows. To learn more, see Security Considerations.
Start Confluent Platform, create topics, and generate test data
Follow these steps to start the servers in separate command windows, create topics, and generate data to the topics.
Start ZooKeeper in its own command window:
./bin/zookeeper-server-start etc/kafka/zookeeper.propertiesStart each of the brokers in separate command windows:
./bin/kafka-server-start etc/kafka/server.properties./bin/kafka-server-start etc/kafka/server-1.properties./bin/kafka-server-start etc/kafka/server-2.properties./bin/kafka-server-start etc/kafka/server-3.properties./bin/kafka-server-start etc/kafka/server-4.propertiesStart these other Confluent Platform components in separate windows.
./bin/kafka-rest-start etc/kafka-rest/kafka-rest.properties./bin/control-center-start etc/confluent-control-center/control-center.properties
(Optional) Configure and start these components.
If you want to run the following components, first edit their properties files to search and replace any
replication.factorvalues to either 2 or 3 (to work with your five broker cluster). Ifreplication.factorvalues are set to less than 2 or greater than 4, this will result in system topics with replication factors that prevent graceful broker removal with Self-Balancing, as shown in the next sections.(Optional) Kafka Connect
./bin/connect-distributed etc/kafka/connect-distributed.properties(Optional) ksqlDB
./bin/ksql-server-start etc/ksqldb/ksql-server.properties(Optional) Schema Registry
./bin/schema-registry-start etc/schema-registry/schema-registry.properties
Create one or more topics with 3 partitions and a replication factor of 2.
kafka-topics --create --topic my-sbc-test --partitions 3 --replication-factor 2 --bootstrap-server localhost:9092
You should get a confirmation that the topic was successfully created. Also, you can get a list of existing topics as follows:
kafka-topics --list --bootstrap-server localhost:9092
Get detailed information on a particular topic with the
--describeoption:kafka-topics --describe --topic my-sbc-test --bootstrap-server localhost:9092
Or, get detailed information on all topics with the
--describeoption:kafka-topics --describe --bootstrap-server localhost:9092
Tip
For Self-Balancing to work, topics must have a replication factor that maps properly to the number of brokers in the cluster. The replication factor must be greater than 1, but less than the total number of brokers. A five broker cluster requires a replication factor of between 2 and 4.
Create topics with multiple partitions to distribute the data across all five brokers.
Generate data to topics.
In a separate command window, use the
kafka-producer-perf-testcommand to produce data to the topicmy-sbc-test.kafka-producer-perf-test \ --producer-props bootstrap.servers=localhost:9092 \ --topic my-sbc-test \ --record-size 1000 \ --throughput 1000 \ --num-records 3600000
If you created additional topics, you can use this command to send data to those topics, also.
At this point you are ready to monitor and test Self-Balancing by removing and then adding back in a broker, and monitoring the rebalance during these operations. The following sections provide two different ways of doing so (command line or Control Center (Legacy)). If you want to try both, you can proceed through these steps in order or use Confluent Control Center (Legacy) and the command line interchangeably, but the expectation is that you will prefer either the command line or Control Center (Legacy) as your primary method of working with Self-Balancing.
Use the command line
The following sections describe how to remove a broker and monitor the progress of the rebalance using the command kafka-remove-brokers. If you restart the broker (essentially, “adding” a broker), Self-Balancing redistributes the data again across all nodes.
Verify status of brokers and topic data
Use the command line to verify the current status of the deployment, including topics, topic data distribution, and number of brokers.
Use
kafka-broker-api-versionsandgrepforidto view the brokers online.kafka-broker-api-versions --bootstrap-server localhost:9092 | grep 'id: '
Your output should resemble:
localhost:9095 (id: 3 rack: null) -> (
localhost:9093 (id: 1 rack: null) -> (
localhost:9096 (id: 4 rack: null) -> (
localhost:9094 (id: 2 rack: null) -> (
localhost:9092 (id: 0 rack: null) -> (
Use
kafka-topics --describeto view information about the test topic you created.kafka-topics --bootstrap-server localhost:9092 --topic my-sbc-test --describe
Your output should resemble:
Topic: my-sbc-test        PartitionCount: 3       ReplicationFactor: 2    Configs: segment.bytes=1073741824
      Topic: my-sbc-test  Partition: 0    Leader: 0       Replicas: 0,4   Isr: 0,4        Offline:
      Topic: my-sbc-test  Partition: 1    Leader: 4       Replicas: 4,1   Isr: 4,1        Offline:
      Topic: my-sbc-test  Partition: 2    Leader: 1       Replicas: 1,2   Isr: 1,2        Offline:
Remove a broker
With Self-Balancing enabled, and Confluent Platform up and running, use kafka-remove-brokers to delete a broker and monitor the rebalancing.
Before you start on these steps, make sure that Confluent Platform and Self-Balancing have been running for at least 20 minutes to give Self-Balancing time to initialize. (To learn more, see Broker removal attempt fails during Self-Balancing initialization in Troubleshooting.)
Also, for this example, do not delete the controller which in this case is broker ID 0.
Important
In practice, you can remove a lead broker. It may cause a short delay in cluster balancing, which is why we suggest not doing so for this example. To learn more, What happens if the lead broker (controller) is removed or lost?.
If the broker you attempt to remove contains the only replica for a topic, the broker removal will fail. To learn more, see Limitations.
Starting with Confluent Platform 7.3.0, Self-Balancing Clusters supports Apache Kafka Raft Metadata mode (KRaft) (currently in preview), see KRaft: Apache Kafka without ZooKeeper. If you are using Self-balancing with Confluent for Kubernetes, and using CFK to shut down the broker, there is no further action needed. However, if you are running Confluent Platform outside of CFK on a KRaft-supported version of Confluent Platform, and separately calling kafka-remove-brokers, you must take an additional action to call the
UnregisterBrokerAPI throughkafka-cluster.shafter the broker removal is complete. If you call kafka-remove-brokers withshouldShutdown=false, you must manually remove the broker; if you setshouldShutdown=true, Self-Balancing will shut down the broker for you. In either case, on KRaft mode Confluent Platform deployments, you must callUnregisterBrokerafter broker shutdown is complete. This will cleanly remove all traces of the broker on the cluster. In non-KRaft Confluent Platform, this step is not required; but in KRaft mode, simply calling kafka-remove-brokers is not enough to remove all lingering metadata internally within the controllers. TheUnregisterBrokerAPI does this cleanup.
Remove a broker.
For example, the following command removes broker 1 and moves its data to remaining brokers in the cluster..
./bin/kafka-remove-brokers --bootstrap-server \
localhost:9092,localhost:9093,localhost:9094,localhost:9095,localhost:9096 \
--broker-id 1 --delete 1>&2 | grep -v SLF4J
Self-Balancing acknowledges the command and provides feedback similar to the following.
Initiating remove broker call...
Started remove broker task for broker 1.
You can check its status by calling this command again with the `--describe` option.
Monitor the progress of the rebalance from the command line.
You can track the shutdown and rebalance operation by plugging in the
--describeoption to the above command in place of the--delete:./bin/kafka-remove-brokers --bootstrap-server \ localhost:9092,localhost:9093,localhost:9094,localhost:9095,localhost:9096 \ --broker-id 1 --describe 1>&2 | grep -v SLF4J
On an in-progress rebalance, you will get feedback similar to the following.
Broker 1 removal status:
  Partition Reassignment: IN_PROGRESS
  Broker Shutdown: COMPLETE
When broker removal is complete, the
--describecommand will show the following.Broker 1 removal status: Partition Reassignment: COMPLETE Broker Shutdown: COMPLETE
Note
If you get the following error, it is likely that Self-Balancing is still initializing, which can take up to 30 minutes. If this happens, retry broker removal after several minutes, and it should succeed.
Broker 1 removal status:
  Partition Reassignment: FAILED
  Broker Shutdown: CANCELED
Rerun
kafka-broker-api-versionsto view the brokers online.kafka-broker-api-versions --bootstrap-server localhost:9092 | grep 'id: '
Your output should resemble:
localhost:9092 (id: 0 rack: null) -> (
localhost:9096 (id: 4 rack: null) -> (
localhost:9094 (id: 2 rack: null) -> (
localhost:9095 (id: 3 rack: null) -> (
You can see that broker 1 is now offline.
Tip
You can also rerun
kakfa-topics --describeon all topics or a specific topic with the following commands. These may or may not show changes related to the rebalance, but will verify that topics and topic data are still available.kafka-topics --describe --bootstrap-server localhost:9092 kafka-topics --bootstrap-server localhost:9092 --topic my-sbc-test --describe
Add a broker (restart)
You can restart the broker after the broker removal operation (previous section) is completed. (This provides an example of “adding a broker”, just using the same broker you removed to simplify the walkthrough.)
Restart the broker (for example broker 1) and watch the rebalance.
The easiest way to do this is to return to the command window where you started broker 1. You should see that the broker has been stopped. Hit the up arrow on your keyboard, and then press return to rerun the same command you started this with originally:
./bin/kafka-server-start etc/kafka/server-1.propertiesSelf-Balancing acknowledges the command and provides feedback similar to the following, as the broker reboots.
[2020-06-26 17:45:44,986] INFO BROKER Aggregator rolled out 1 new windows, reset 1 windows, current window range [1593213000000, 1593219000000], abandon 0 samples. (com.linkedin.cruisecontrol.monitor.sampling.aggregator.MetricSampleAggregator)
[2020-06-26 17:46:06,314] INFO DataBalancer: Scheduling DataBalanceEngine broker addition: [1] (io.confluent.databalancer.ConfluentDataBalanceEngine)
[2020-06-26 17:46:06,314] INFO DataBalancer: Starting addBrokers call (io.confluent.databalancer.ConfluentDataBalanceEngine)
When the broker is up, rerun
kafka-broker-api-versionsto view all brokers online.kafka-broker-api-versions --bootstrap-server localhost:9092 | grep 'id: ' Your output should resemble:
localhost:9095 (id: 3 rack: null) -> (
localhost:9093 (id: 1 rack: null) -> (
localhost:9096 (id: 4 rack: null) -> (
localhost:9094 (id: 2 rack: null) -> (
localhost:9092 (id: 0 rack: null) -> (
You can see that broker 1 is back online.
Use Control Center (Legacy)
The following sections describe how to remove a broker and monitor the progress of the rebalance using the Control Center (Legacy). If you restart the broker, Self-Balancing redistributes the data again across all nodes.
Tip
To learn more about working with Self-Balancing on Control Center (Legacy), see Self-balancing in the Control Center guide.
Verify status of brokers and topic data
Use Control Center (Legacy) to verify the current status of the deployment, including Self-Balancing settings, lead broker (controller), topic data, and number of brokers. For a local deployment, Control Center (Legacy) is available at http://localhost:9021/ in your web browser.
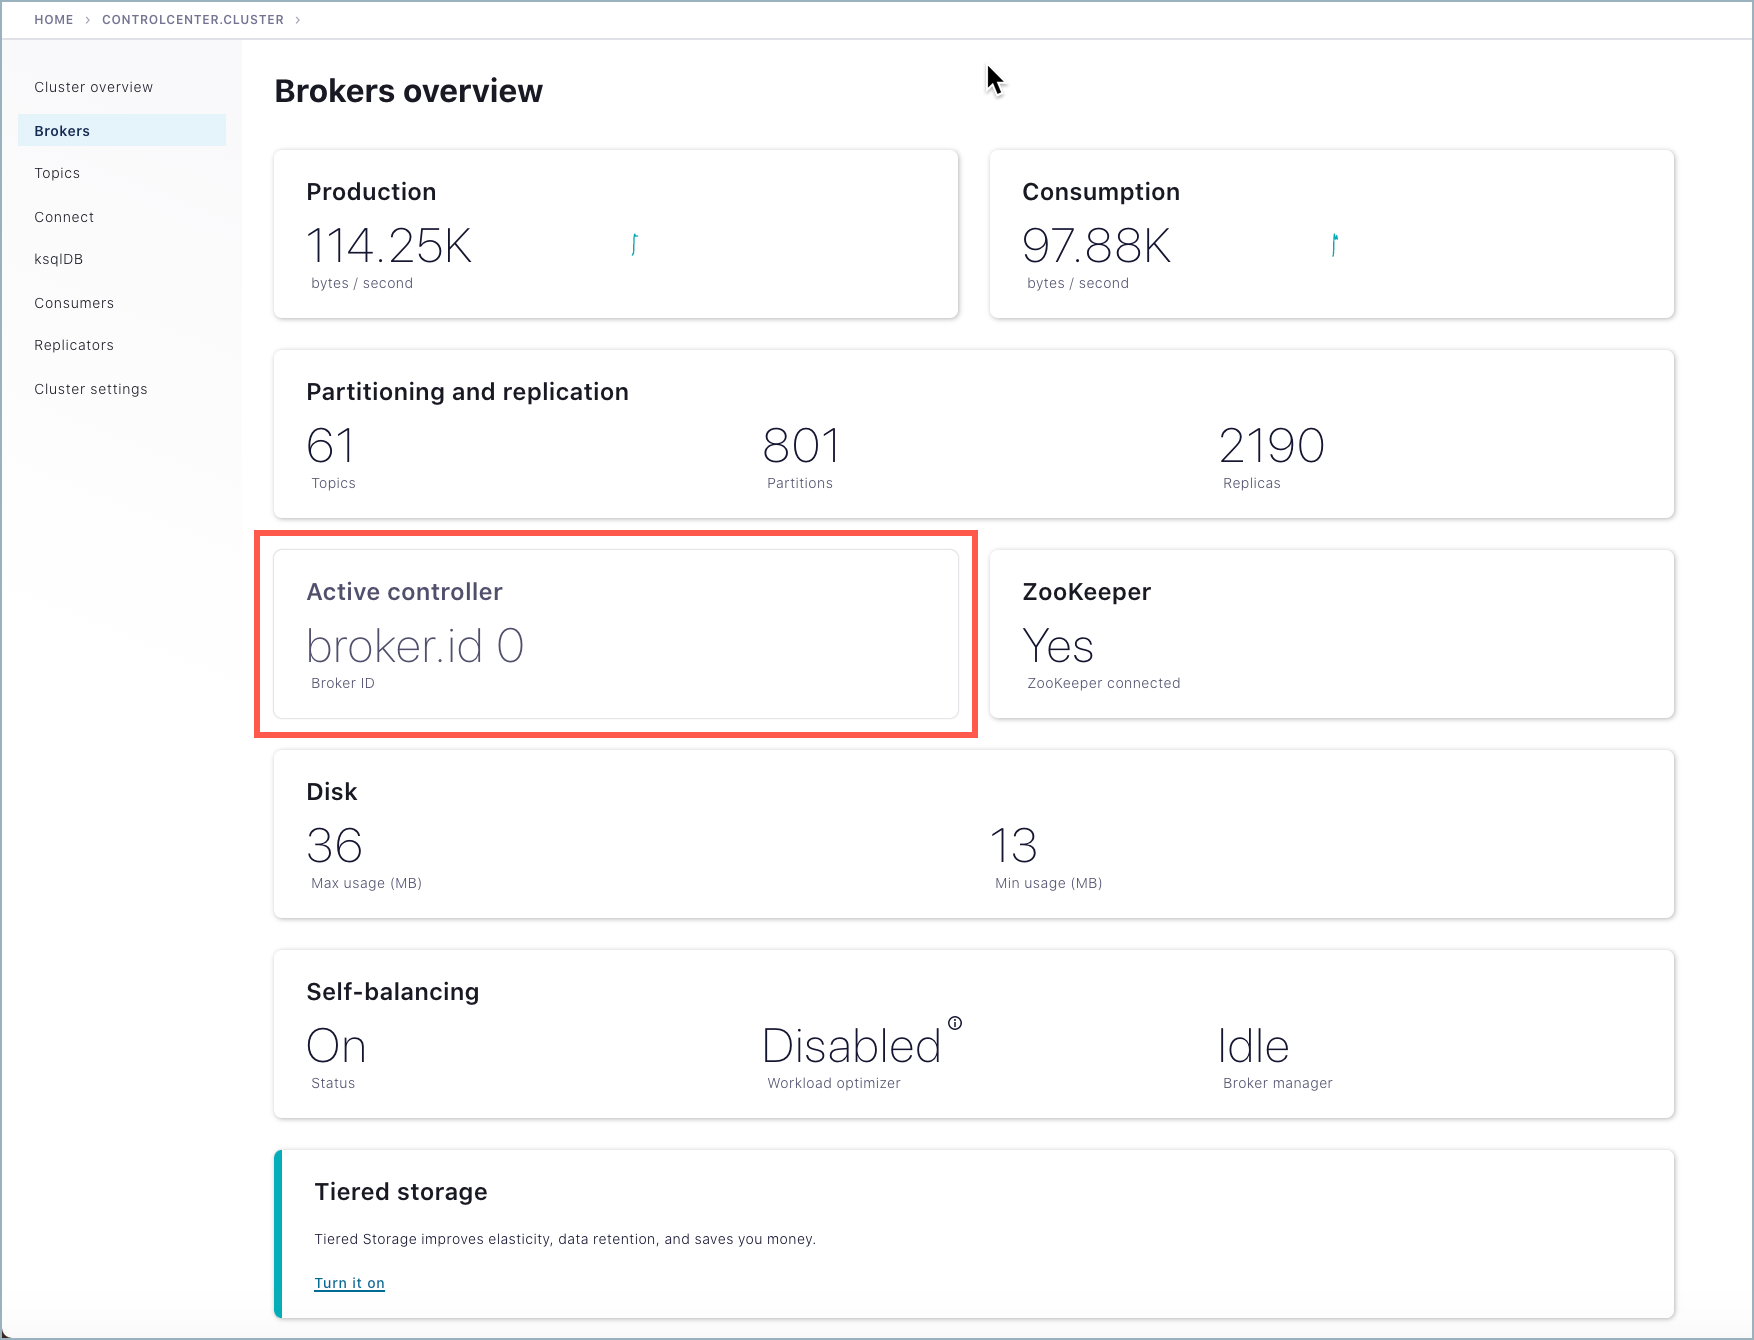
To verify where the controller is running, go to Control Center (Legacy), select the cluster, and click Brokers. In this example, the controller is running on broker 0.
Tip
If broker metrics and the list of brokers are not showing on the Brokers overview page, verify that the Metrics Reporter is enabled, as described in Enable the Metrics Reporter for Control Center (Legacy). If not, stop the brokers, edit the files, and restart.
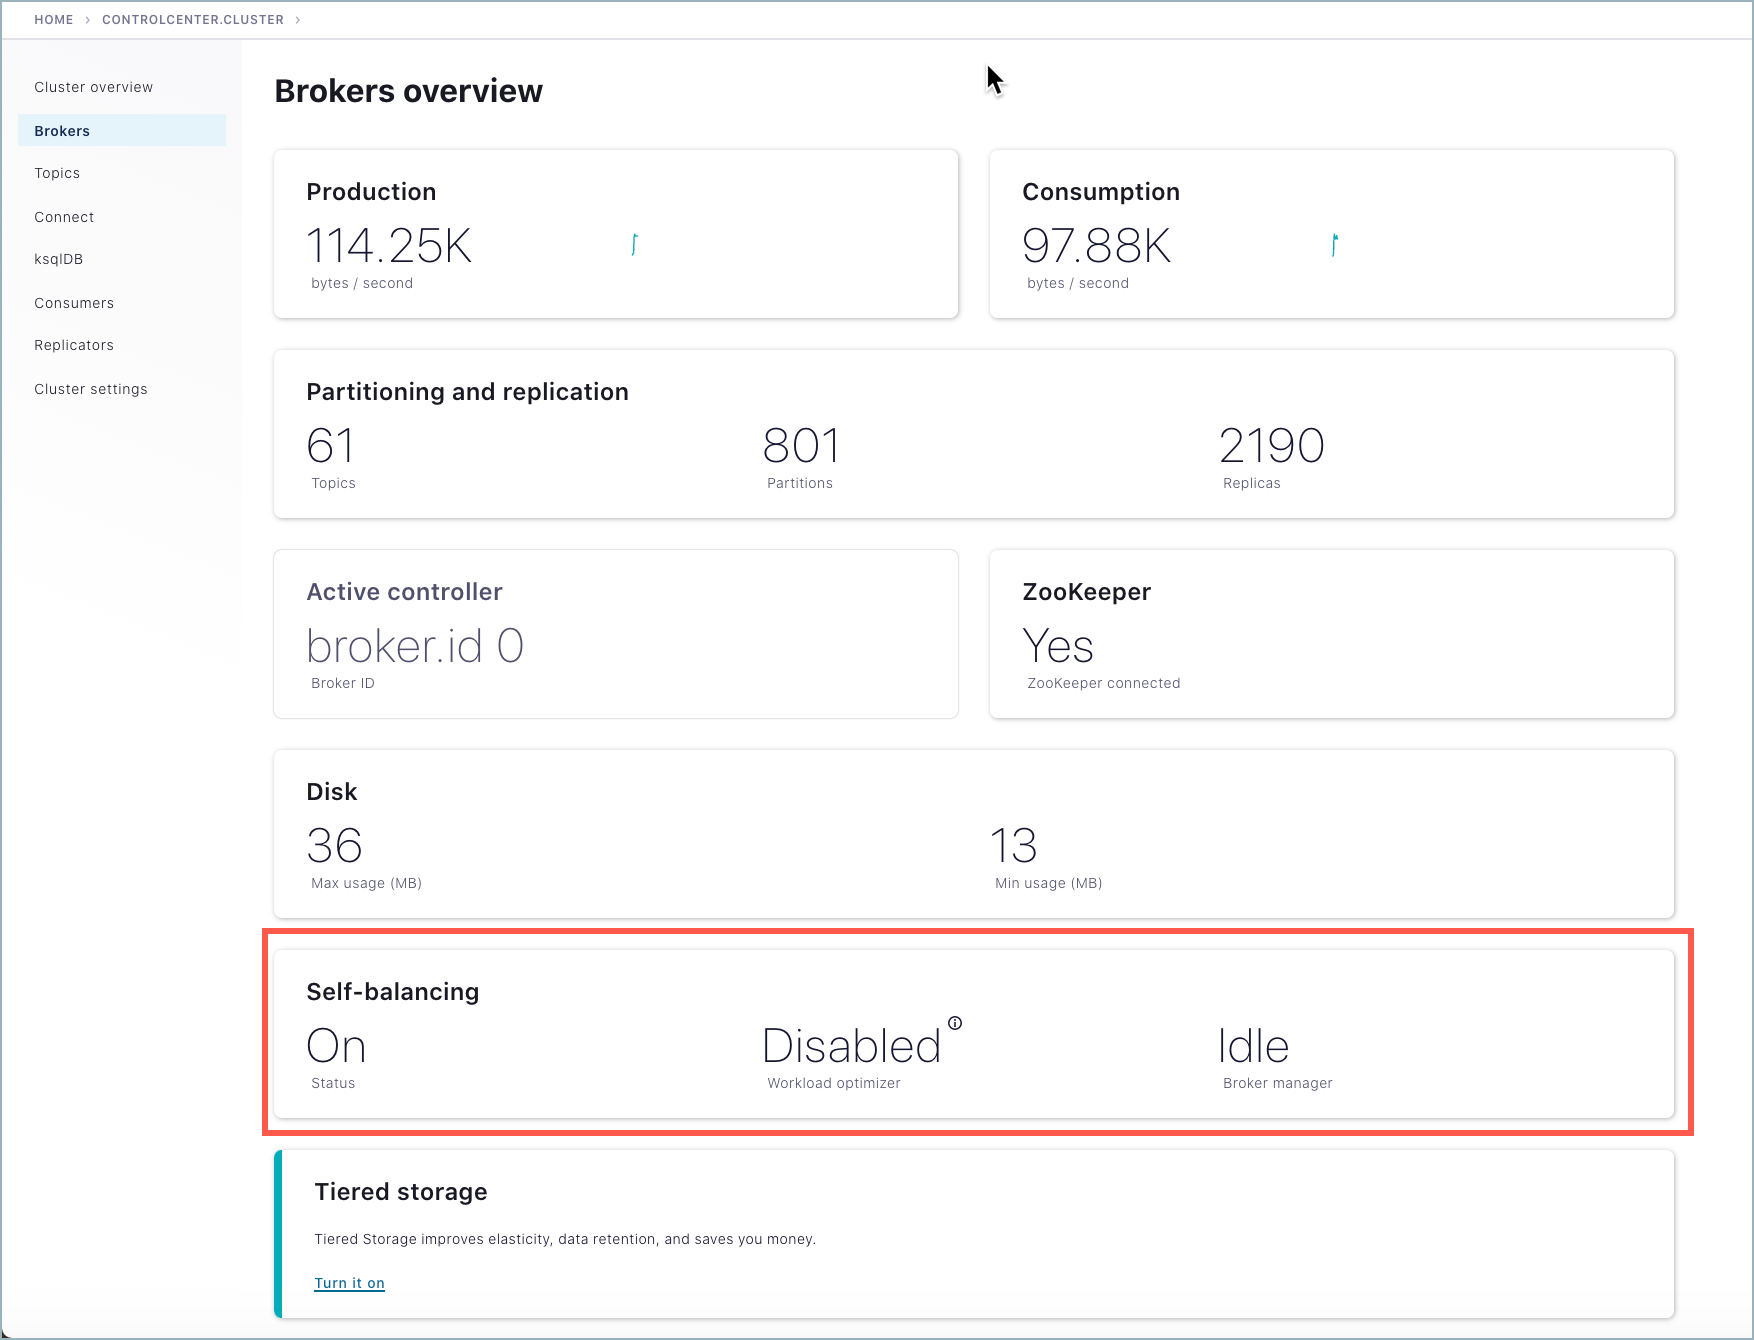
To view the status of Self-Balancing broker tasks, click Brokers, then click the Self-Balancing card.
Tip
The Self-Balancing card on the Brokers overview indicates whether Self-Balancing is on, and also the status of the workload optimizer:
When Self-Balancing is set to trigger Only when brokers are added or removed (the default), the Self-Balancing card shows “Workload optimizer” as “Disabled”.
When Self-Balancing is set to trigger Anytime, the Self-Balancing card shows “Workload optimizer” as “Balanced” if no rebalancing is in progress, or one of the work-in-progress statuses during a rebalance.
To learn more, see Self-balancing in the Control Center guide.
Self-Balancing shows the task status for each broker in the cluster. (You’ll see this in action in the next sections on removing a broker and adding one back in.)

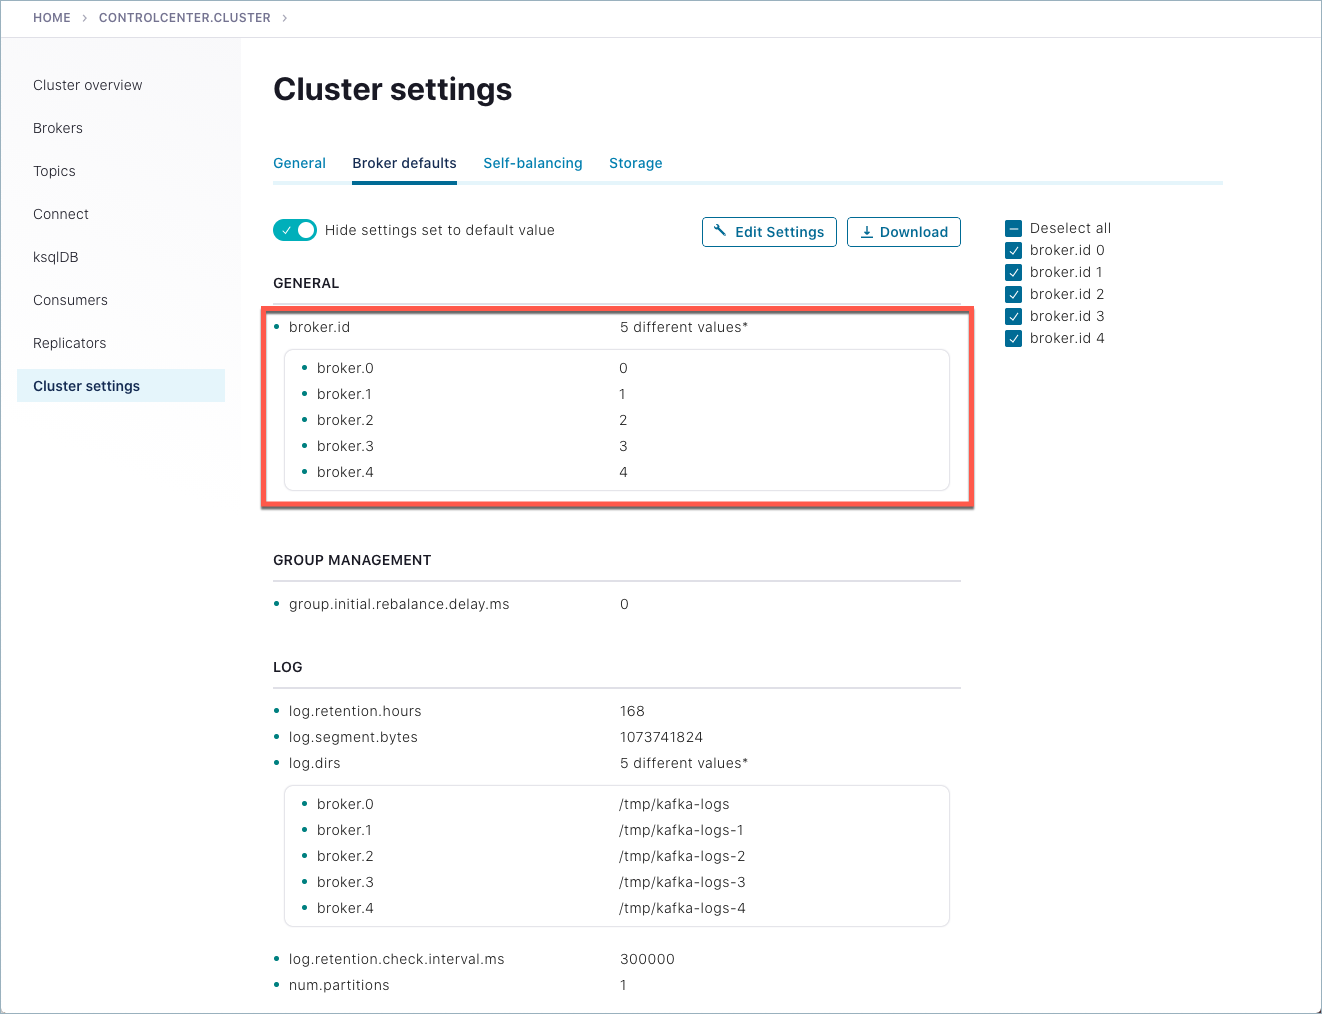
To view all brokers online, scroll to the bottom of the Brokers page to see the broker list, or click Cluster settings > Broker defaults tab.
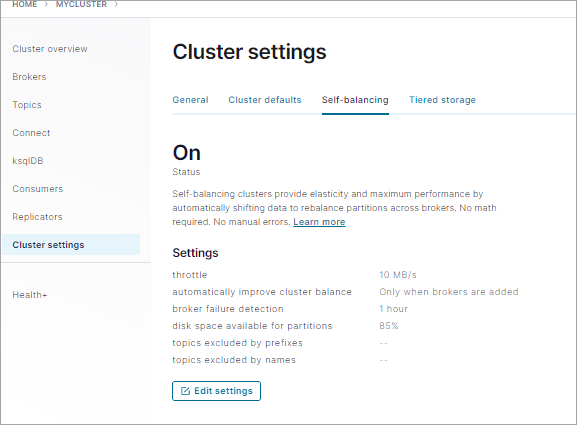
To verify that Self-Balancing is enabled, click Cluster settings > Self-balancing tab.
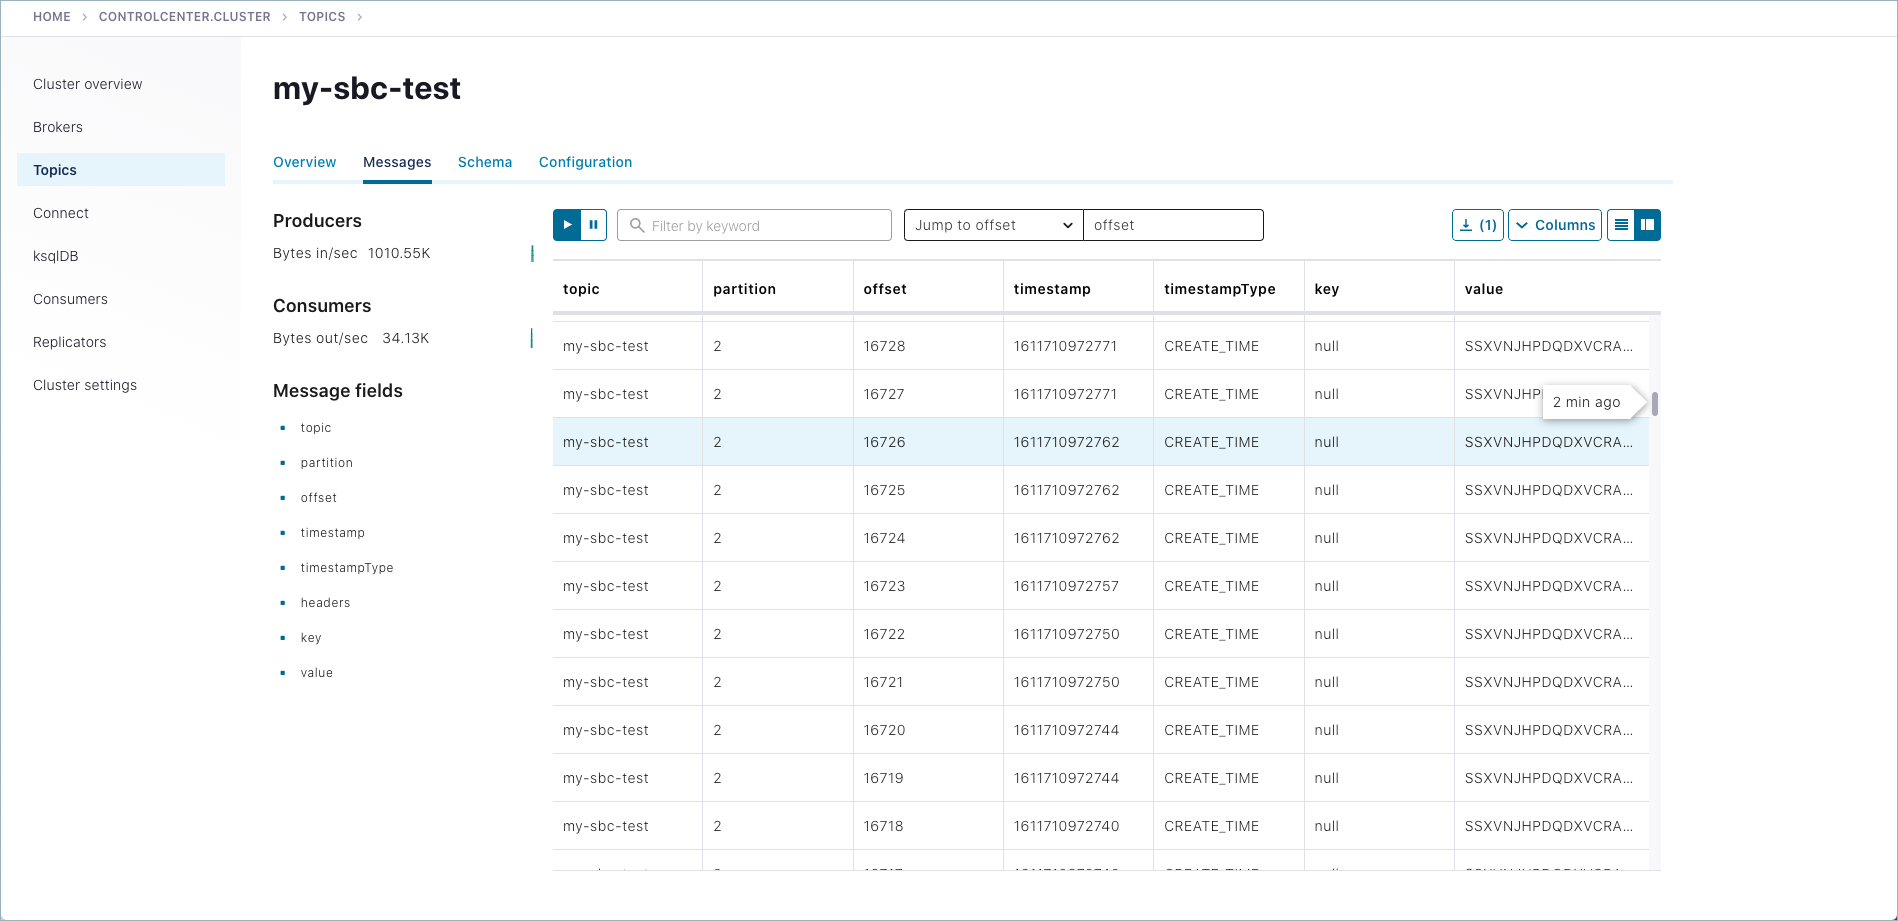
To view the generated messages for a topic, select Topics > my-sbc-test > Messages tab.
Remove a broker
With Self-Balancing enabled, and Confluent Platform up and running, delete a broker and monitor the rebalancing. For this example, make sure that you do not delete the controller, which in example is broker ID 0.
Important
In practice, you can remove a lead broker. It may cause a short delay in cluster balancing, which is why we suggest not doing so for this example. To learn more, What happens if the lead broker (controller) is removed or lost?.
If the broker you attempt to remove contains the only replica for a topic, the broker removal will fail. To learn more, see Limitations.
Starting with Confluent Platform 7.3.0, Self-Balancing Clusters supports Apache Kafka Raft Metadata mode (KRaft) (currently in preview), see KRaft: Apache Kafka without ZooKeeper. If you are using Self-balancing with Confluent for Kubernetes, and using CFK to shut down the broker, there is no further action needed. However, if you are running Confluent Platform outside of CFK on a KRaft-supported version of Confluent Platform, and separately calling kafka-remove-brokers, you must take an additional action to call the
UnregisterBrokerAPI throughkafka-cluster.shafter the broker removal is complete. If you call kafka-remove-brokers withshouldShutdown=false, you must manually remove the broker; if you setshouldShutdown=true, Self-Balancing will shut down the broker for you. In either case, on KRaft mode Confluent Platform deployments, you must callUnregisterBrokerafter broker shutdown is complete. This will cleanly remove all traces of the broker on the cluster. In non-KRaft Confluent Platform, this step is not required; but in KRaft mode, simply calling kafka-remove-brokers is not enough to remove all lingering metadata internally within the controllers. TheUnregisterBrokerAPI does this cleanup.
Remove a broker using the Control Center (Legacy) option on the Brokers overview page.
Select Brokers, scroll to the bottom of the Overview page to view the list of brokers currently online.
Click the broker you want to remove. (Clicking a broker drills down to broker details and also provides a remove option).
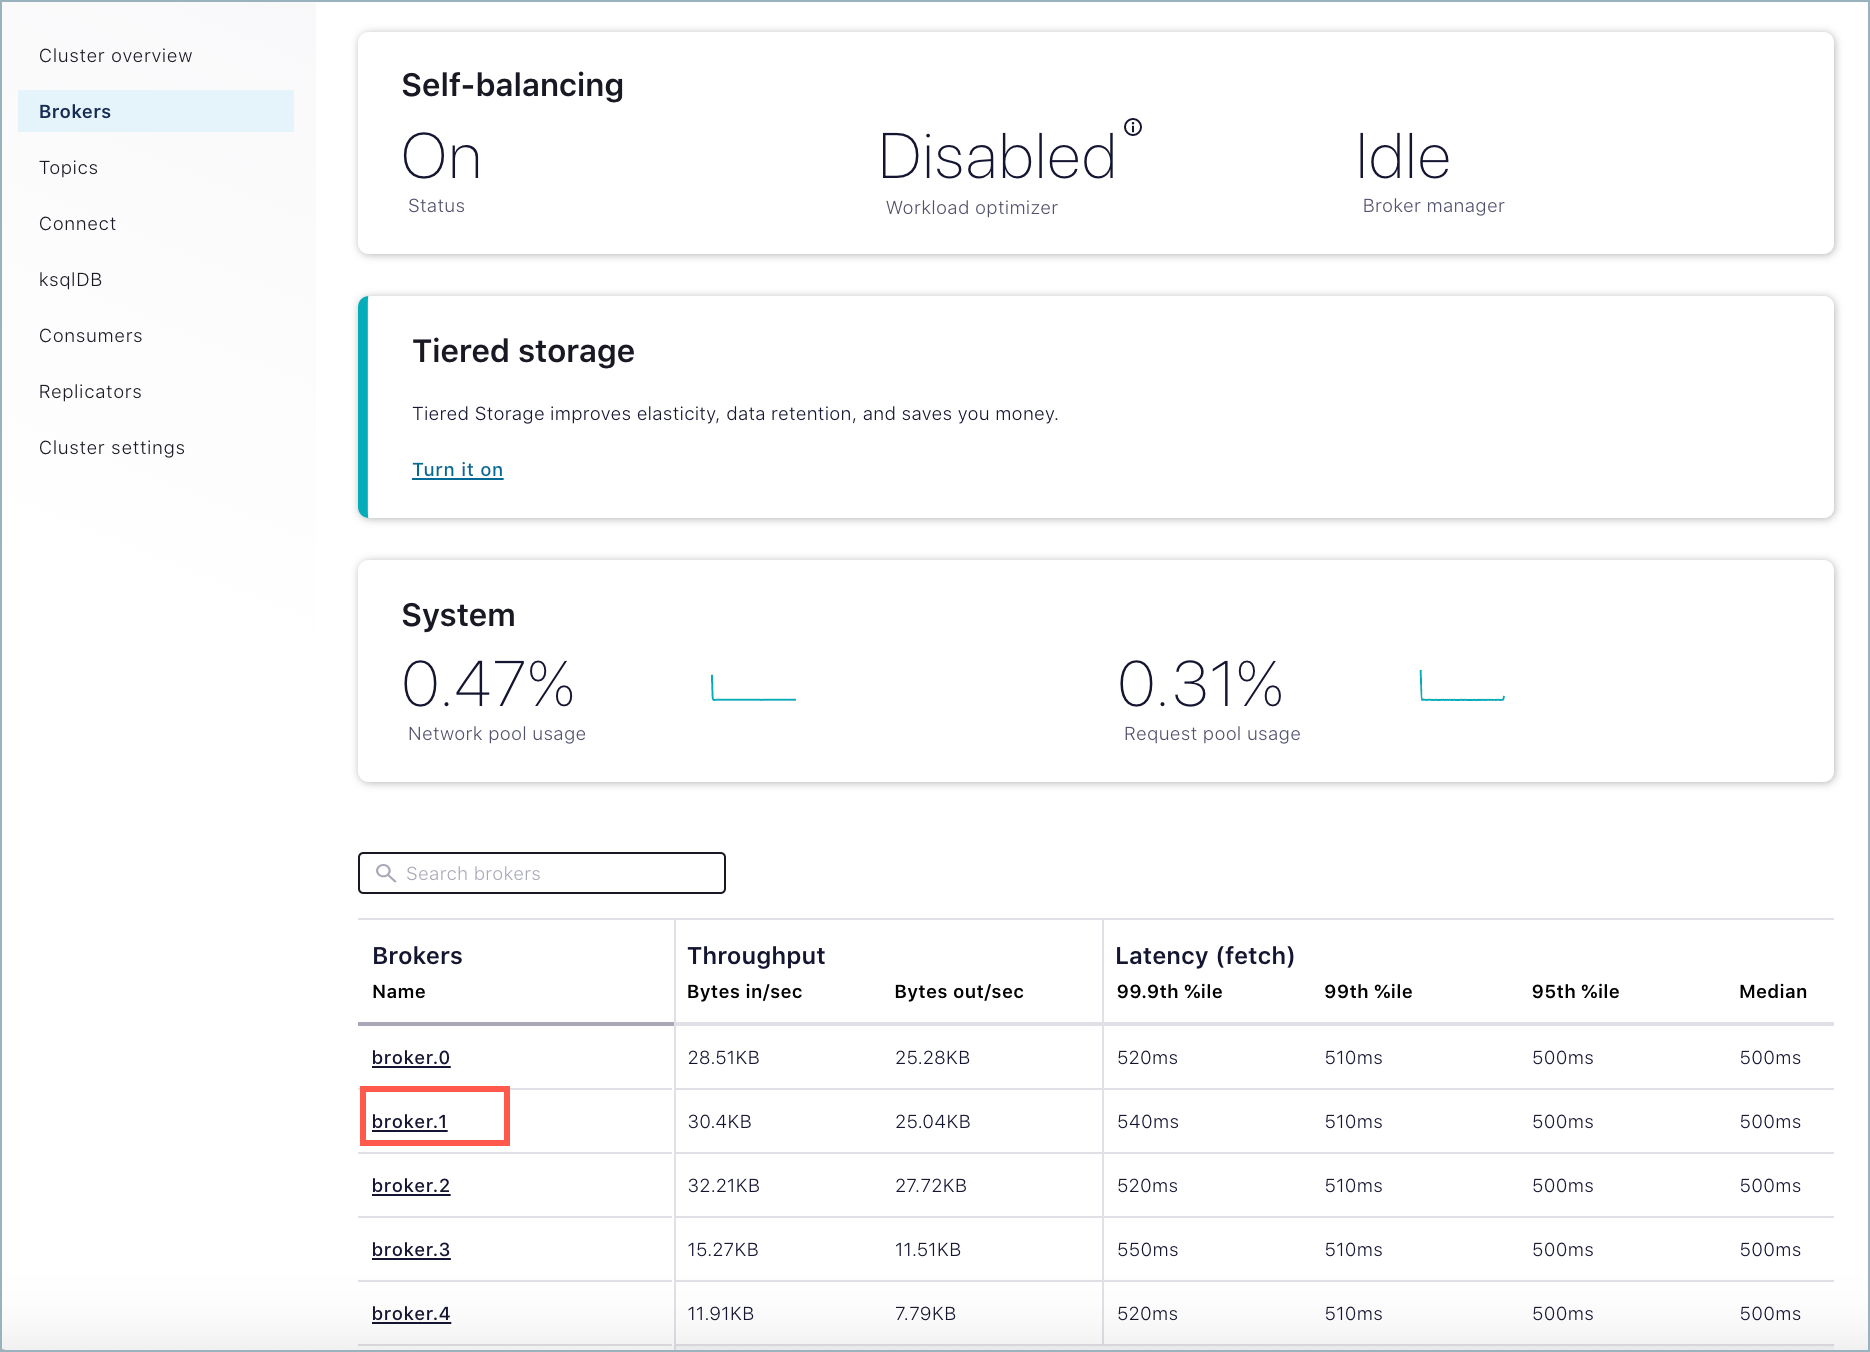
At the bottom of the broker details page, click Remove broker, then type REMOVE in the input field to verify that you want to take this action.

Click Continue to start the remove broker task.
Note
If you get an error message that broker removal failed due to insufficient metrics, Self-Balancing is still initializing, which can take up to 30 minutes. If this happens, retry broker removal after several minutes, and it should succeed.
Use the Control Center (Legacy) to monitor the rebalance.
On Control Center (Legacy), click Brokers > Self-balancing to track the progress.
Self-Balancing shows the detailed status for each broker in the cluster. In this case, broker 1 shows an
in-progressstatus under Remove broker tasks.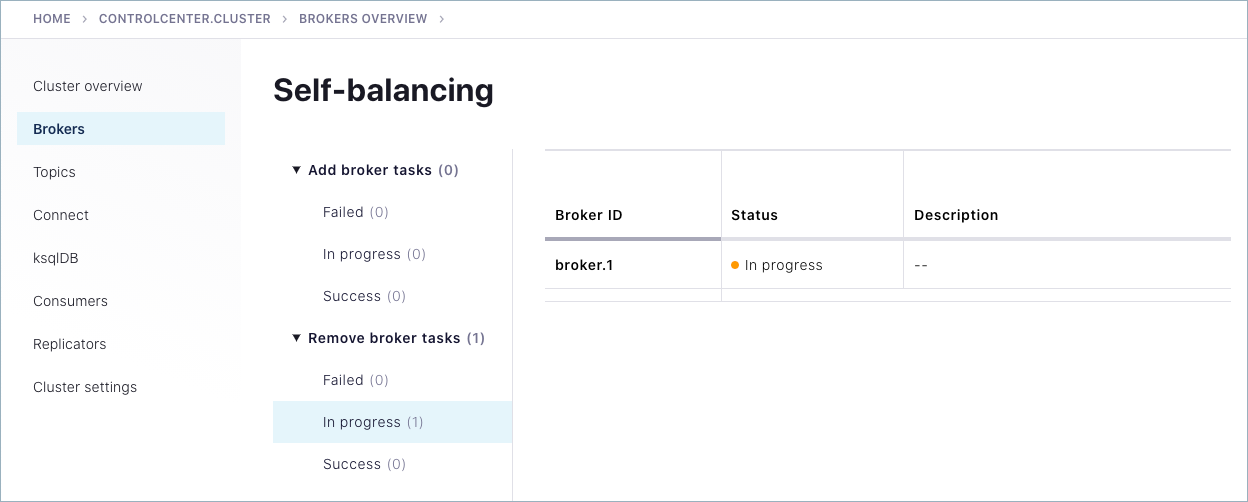
While the remove operation is in progress, the broker being removed shows a red “failed” indicator on the brokers list at the bottom of the Brokers overview page.
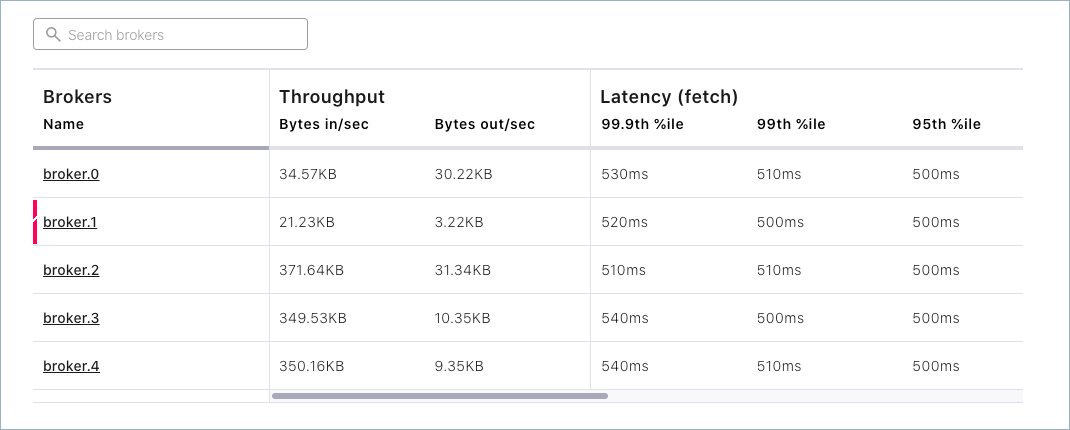
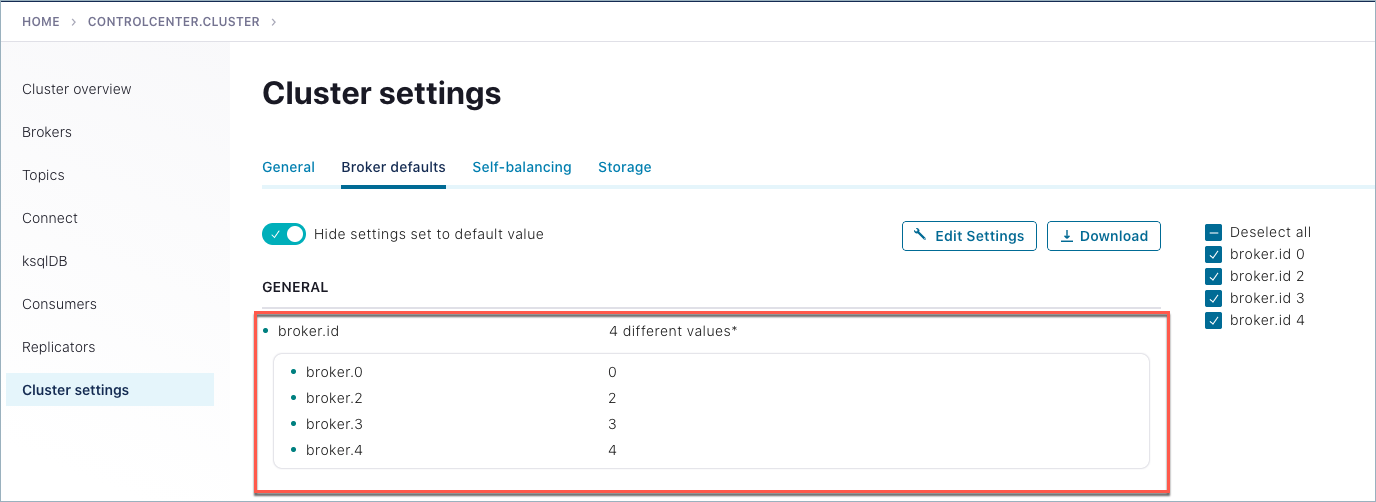
When the rebalance is complete, both the Brokers overview page and Cluster settings > Broker defaults will show only 4 brokers in the list: 0, 2, 3 and 4.

Add a broker (restart)
Restart the broker (for example broker 1) and watch the rebalance. (This provides an example of “adding a broker”, just using the same broker you removed to simplify the walkthrough.)
To restart a broker, you must use the command line. Return to the command window where you started broker 1. You should see that the broker has been stopped. Hit the up arrow on your keyboard, and then press return to rerun the same command you started this with originally:
./bin/kafka-server-start etc/kafka/server-1.propertiesSelf-Balancing acknowledges the command and provides feedback similar to the following.
[2020-06-26 17:45:44,986] INFO BROKER Aggregator rolled out 1 new windows, reset 1 windows, current window range [1593213000000, 1593219000000], abandon 0 samples. (com.linkedin.cruisecontrol.monitor.sampling.aggregator.MetricSampleAggregator)
[2020-06-26 17:46:06,314] INFO DataBalancer: Scheduling DataBalanceEngine broker addition: [1] (io.confluent.databalancer.ConfluentDataBalanceEngine)
[2020-06-26 17:46:06,314] INFO DataBalancer: Starting addBrokers call (io.confluent.databalancer.ConfluentDataBalanceEngine)
Use Control Center (Legacy) to monitor the progress of Self-Balancing (Brokers > Self-balancing).
For example, as the broker is being added back in, you should see an in-progress indicator under Add broker tasks.
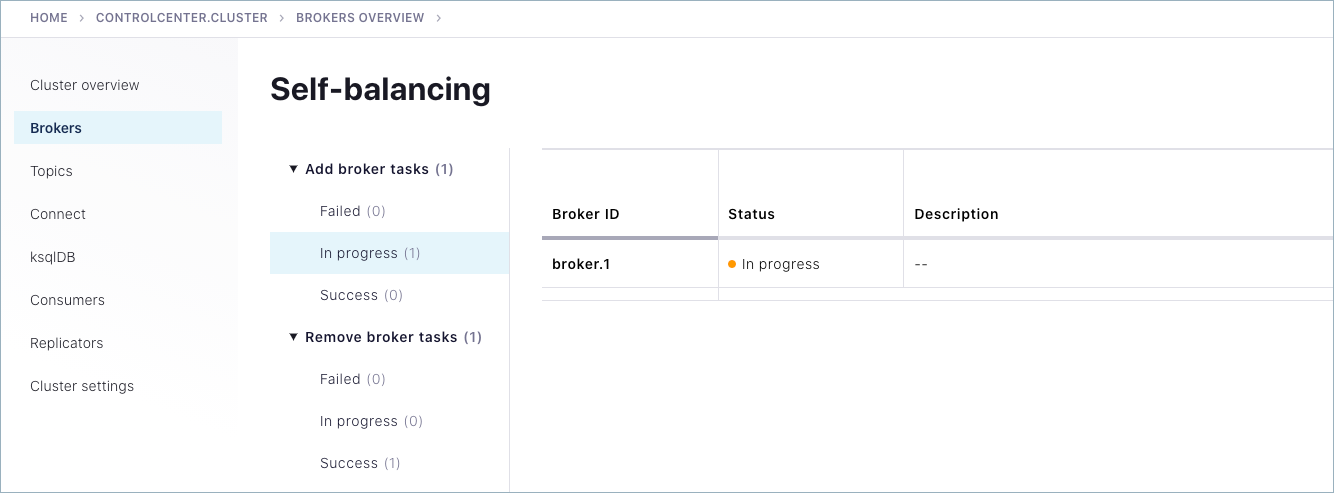
When the rebalance is complete, navigate to the broker list at the bottom of the Brokers page to verify that broker 1 is back online, for a total of five brokers.
Shutdown and Cleanup Tasks
Run the following shutdown and cleanup tasks.
Stop the
kafka-producer-perf-testwith Ctl-C in its respective command window.Stop the all of the other components with Ctl-C in their respective command windows, preferably in reverse order in which you started them. For example, stop Control Center (Legacy) first, then other components, followed by Kafka brokers, and finally ZooKeeper.
Suggested Reading
Self-balancing leverages, as fully described in the Confluent REST Proxy API Reference
Work with Self-Balancing Clusters in the Control Center (Legacy) guide