
Confluent for VS Code with Confluent Platform
Use the Confluent for VS Code extension to enhance your development experience while working with Confluent Platform or other Apache Kafka® clusters.
Confluent for VS Code makes it easy for you to build stream processing applications using Confluent technology. This extension provides a robust, delightful experience for Confluent Cloud and Confluent Platform features from within the Visual Studio Code (VS Code) editor desktop environment.
Confluent for VS Code is open-source and is available in this GitHub repo.
Installation
From the VS Code Extension Marketplace
In your browser, go to the VS Code Marketplace to view, download, and install Confluent for VS Code.
From within VS Code
Open VS Code.
In the Activity Bar, click Extensions (Cmd+Shift+X/Ctrl+Shift+X).
In the Extensions view, search for “Confluent”.
Click Install.
From a VSIX file
Confluent provides these VSIX files via GitHub releases:
MacOS with Apple Silicon:
vscode-confluent-darwin-arm64-x.x.x.vsixMacOS with Intel processors:
vscode-confluent-darwin-x64-x.x.x.vsixLinux on ARM-64 processors:
vscode-confluent-linux-arm64-x.x.x.vsixLinux on x86 processors:
vscode-confluent-linux-x64-x.x.x.vsixWindows on x64 processors:
vscode-confluent-windows-x64-x.x.x.vsix
Replace x.x.x with the actual version number you want to use.
You can install Confluent for VS Code from a VSIX file by using the VS Code UI or by using the code --install-extension command in the terminal.
To install by using the UI, follow these steps:
Download the VSIX file appropriate for your machine.
Open VS Code, and in the Activity Bar, click Extensions.
At the top of the Extensions view, click …, and in the context menu, click Install from VSIX…
Navigate to your downloaded
vscode-confluent-vX.X.X.vsixfile and click Install.
To install in the terminal, run the following command:
code --install-extension /path/to/vscode-confluent-vX.X.X.vsix
Features
Confluent for VS Code provides a number of features for working with Kafka clusters, Schema registries, and Confluent Cloud for Apache Flink®.
Smart Project Templates
Confluent for VS Code offers Smart Project Templates that accelerate project setup by providing ready-to-use templates tailored for common development patterns. Examples include client applications for various programming languages, Kafka Streams applications, and Flink Table API apps. These templates enable you to quickly launch new projects with minimal configuration, significantly reducing setup time.
You can access them through the Command Palette or from the Generate Project from Template action in the Help Center panel.
These templates incorporate best practices to help teams maintain high standards and avoid repetitive setup tasks so you can focus on building and innovating.
Command Palette
The VS Code Command Palette exposes most of the features. Press Cmd+Shift+P/Ctrl+Shift+P and type “confluent” to show the Confluent commands.
Some commands also appear as view actions: simple buttons, usually icons, next to items in the Activity Bar. For example, play (open Message Viewer and start consuming messages), sync (refresh), and ellipsis (extra actions) are all view actions for commands that the Command Palette also exposes.
Activity Bar
In the Activity Bar, click the Confluent logo to open the extension and show the following sections.
Connect to your streams
Confluent for VS Code supports connecting to Confluent Cloud, connecting to any other Kafka cluster using the Kafka native protocol, and working with local Kafka and Schema Registry containers running in Docker:
To connect to Confluent Cloud, click the “Sign in to Confluent Cloud” icon next to Confluent Cloud in the Resources view.
To connect to Kafka clusters or schema registries by using the native APIs, click the + icon in the Resources view.
To run Confluent Platform Docker images, click the “play” icon next to Local in the Resources view.
Resources
The Resources view lists Confluent Cloud environments and associated resources, like Kafka clusters and schema registries, and Flink compute pools. It also provides access to Kafka clusters and schema registries from Local or Direct connections.
Click a Kafka cluster to load the topics created in that cluster in the Topics view.
Click a Schema Registry cluster to load the associated schemas for that registry in the Schemas view.
Click a Flink compute pool to load the Flink SQL statements in that pool in the Flink Statements view.
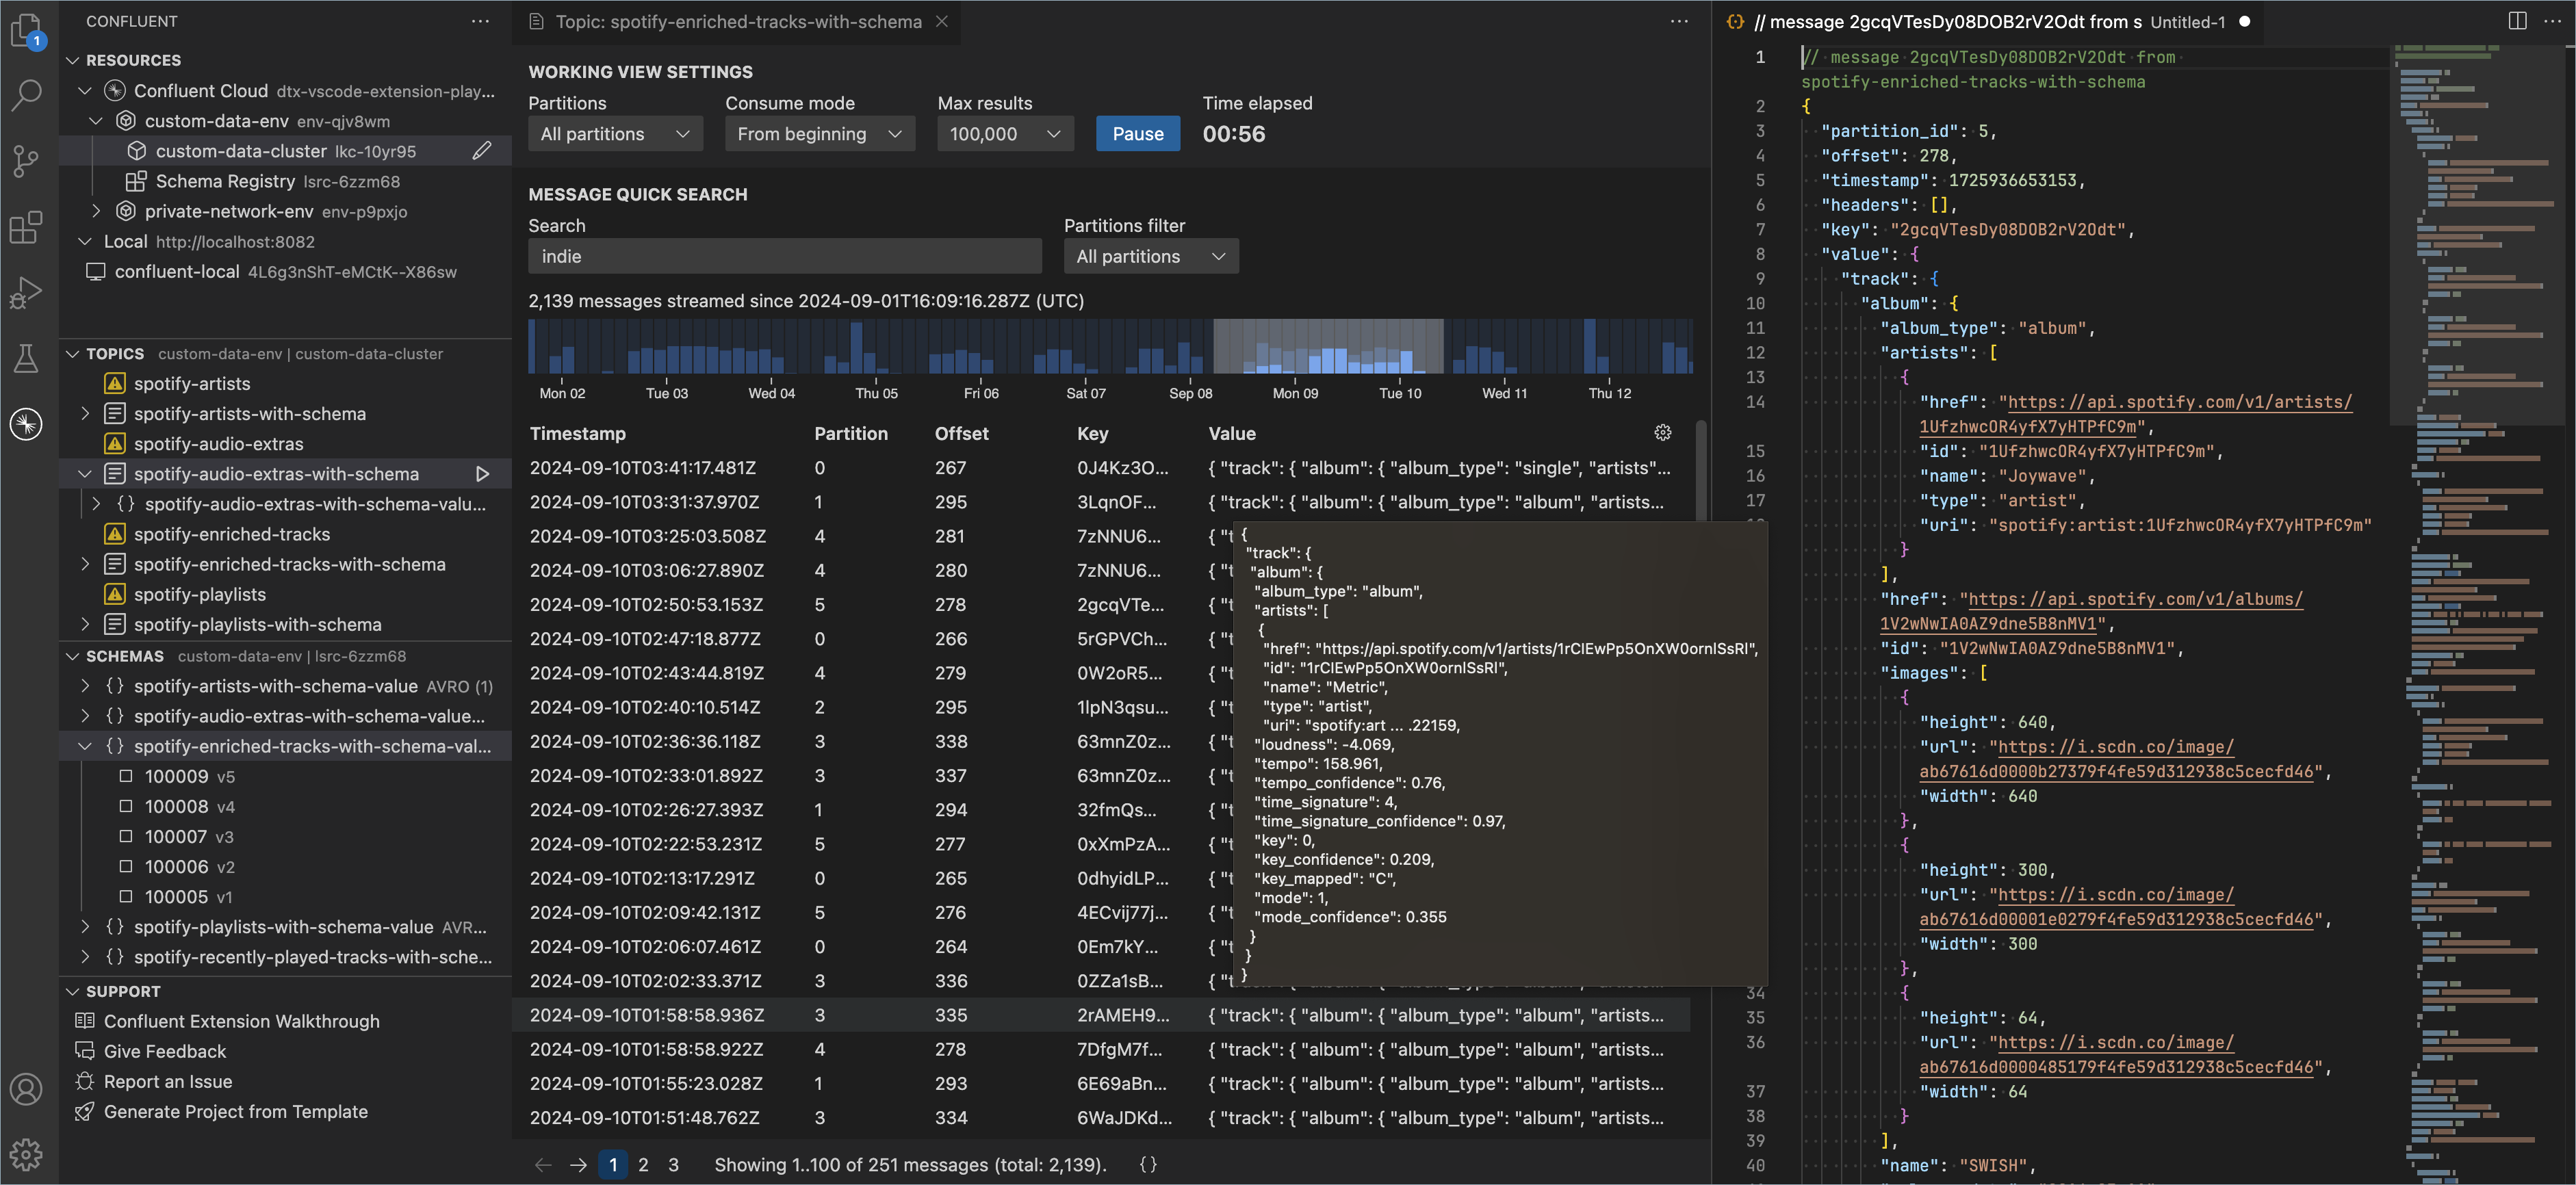
Topics
Click the play icon next to the topic name to open the Message Viewer, which enables searching and exploring messages in a topic. Within Message Viewer, you can:
Page through and search for specific values within the list of all the messages.
Double-click a single message to explore its entire payload encoded in JSON.
Pause and resume consuming at any time.
See aggregate counts of messages over time from the histogram view and brush to filter messages by timestamp.
Toggle partitions on and off to show and hide messages from specific partitions.
Schemas
The Schemas view displays all the schemas available for the current Confluent Cloud environment’s Schema Registry. The Topics view also shows schemas when you expand a topic item, if the schemas match the TopicNameStrategy and you have the appropriate permissions.
You can view schema definitions by expanding the schema subject to see a specific schema version and clicking the View Schema icon.
Flink
The Flink Statements view displays all Flink SQL statements available for the selected Flink compute pool in Confluent Cloud. Click on a Flink statement to view its definition in an editor. View the results of a Flink statement by clicking on the “View Flink Statement Results” icon next to the statement name in the Flink Statements view.
The Flink Database view displays these resources in a selected Flink database (or Kafka cluster):
AI Agents
AI Models
AI Tools
Artifacts
Connections
UDFs
Tables and views
You can also use the Flink Database view to create and upload new artifacts, and to register them as UDFs with a selected Flink database.
Help Center
The Help Center panel provides links to the extension walkthrough, issue reporting, general feedback, and options to generate Kafka projects by using a template.
Outputs
Once Confluent for VS Code is activated, you can view extension logs in these separate Output Channels:
Confluent: logs for the VS Code extension itself
Confluent (Sidecar): logs from the Sidecar process
Confluent Flink SQL Language Server: logs from the Flink SQL language server
Telemetry
Gathering usage and error data helps Confluent develop a more resilient and user-friendly application. Confluent enables telemetry only in official production releases. Confluent respects your preferences for sending telemetry data. If you turned off telemetry in your VS Code settings, the extension doesn’t send any events or data.
Segment for user actions
The extension uses Segment to log extension usage. See telemetry.ts for implementation and how it is used in the codebase. The extension sends events when you perform major actions in the extension, such as using any of the registered commands. This helps Confluent see what commands are popular and helps to answer other questions about how the extension is used, so Confluent can make it even more useful.
Sentry for error tracing
The extension uses Sentry to capture and analyze errors, which enables more robust and friendly error debugging. Sentry is the first item the extension initializes in extension.ts, so Sentry can send any uncaught exceptions globally, and the extension invokes Sentry in certain catch blocks to send specific errors. The Sentry rollup-plugin uploads source maps.
Known limitations
Confluent Cloud connections require reauthenticating after four hours; the extension prompts you to reauthenticate.
Preview links for non-default organizations work only after switching to the non-default organization in the Confluent Cloud Console in your browser.
For open issues and feature ideas, see issues in the repo.
Support
To report an issue, within VS Code, open the Help Center panel in the extension and click Report an issue.
If you have questions, comments, or you run into any issues, feel free to post a message in a GitHub discussion or create an issue.
For general feedback, fill out and submit the survey.
Get started with Confluent for VS Code
To get started with Confluent for VS Code, try the Quick Start.