
Tutorial: Share Data Across Topics Using Cluster Linking for Confluent Platform
This tutorial provides a practical first look at how to use Cluster Linking for a topic data sharing use case.
What the tutorial covers
By the end of this tutorial, you will have configured two clusters and successfully used Cluster Linking to create a mirror topic and share topic data across the clusters. You will also learn how to stop mirroring to make the topic writable, and verify that the two topics have diverged.
About prerequisites and command examples
These instructions assume you have a local installation of Confluent Platform 7.0.0 or later, the Confluent CLI, and Java 8, 11, or 17 (recommended). For details on Java requirements, see Java in System Requirements for Confluent Platform. If you are new to Confluent Platform, you may want to work through the Quick Start for Confluent Platform first, and then return to this tutorial.
The examples assume that your properties files are in the default locations on your Confluent Platform installation, except as otherwise noted. This should make it easier to copy/paste example commands directly into your terminal in most cases.
With Confluent Platform is installed, Confluent CLI commands themselves can be run from any directory (
kafka-topics,kafka-console-producer,kafka-console-consumer), but for commands that access properties files in$CONFLUENT_HOME(kafka-server-start), the examples show running these from within that directory. A reference for these open source utilities is provided in Kafka Command-Line Interface (CLI) Tools. A reference for Confluent premium command line tools and utilities is provided in CLI Tools for Confluent Platform.Confluent CLI commands can specify the bootstrap server at the beginning or end of the command:
kafka-topics --list --bootstrap-server localhost:9092is the same askafka-topics --bootstrap-server localhost:9092 --list. In these tutorials, the target bootstrap server is specified at the end of commands.
The rest of the tutorial refers to $CONFLUENT_HOME to indicate your Confluent Platform install directory. Set this as an environment variable, for example:
export CONFLUENT_HOME=$HOME/confluent-8.3.0
PATH=$CONFLUENT_HOME/bin:$PATH
KRaft and ZooKeeper
Important
As of Confluent Platform 8.0, ZooKeeper is no longer available for new deployments. Confluent recommends migrating to KRaft mode for new deployments. To learn more about running Kafka in KRaft mode, see KRaft Overview for Confluent Platform, KRaft Configuration for Confluent Platform, and the KRaft steps in the Platform Quick Start. To learn about migrating from older versions, see Migrate from ZooKeeper to KRaft on Confluent Platform.
This tutorial provides examples for KRaft mode only. Earlier versions of this documentation provide examples for both KRaft and ZooKeeper.
For KRaft, the examples show a combined mode configuration, where for each cluster the broker and controller run on the same server. Currently, combined mode is for local experimentation only and is not supported by Confluent. It is shown here to simplify the tutorial. If you want to run controllers and brokers on separate servers, use KRaft in isolated mode. To learn more, see KRaft Overview for Confluent Platform the Kafka section under Configure Confluent Platform for production.
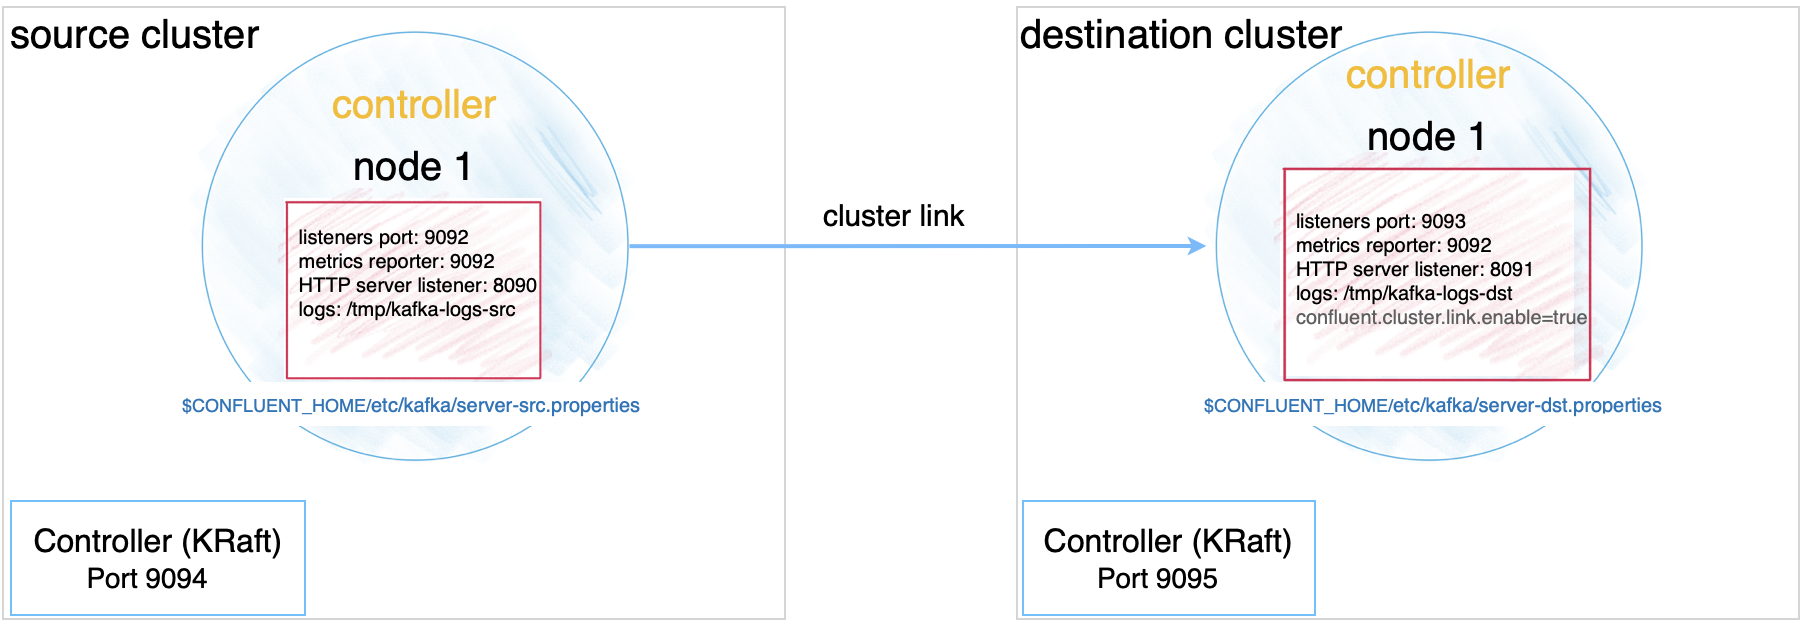
Ports and configuration mapping
The example deployment in this tutorial uses the following port and feature configurations, and assumes that services will run on localhost.
Source | Destination | |
|---|---|---|
Kafka brokers | 9092 (location of original | 9093 (location of |
KRaft controllers | 9094 | 9095 |
HTTP listeners | 8090 | 8091 |
Cluster link | Cluster link is enabled on the destination |
Configure Kafka brokers and controllers
Configure the following files to set up the source and destination clusters. You can copy and modify the existing properties files to use as a starting point.
Tip
Note that you must add
confluent.http.server.listenersand configure it to be unique to each broker.In KRaft mode, you must set
confluent.cluster.link.enable=trueon the destination, as shown in the examples for configuring the destination cluster.
Configure the source cluster
The source cluster configurations (ports, data directories, and so on) are largely based on the defaults for the template properties files, with only a few changes. The source cluster must be Confluent Platform 5.4 or later (Apache Kafka® 2.4).
Change directories to the location where Confluent Platform is installed:
cd $CONFLUENT_HOME
Create a directory to be used for all of your example files:
mkdir my-examplesCopy
etc/kafka/server.propertiesinto the examples directory and rename it to match its purpose:cp etc/kafka/server.properties my-examples/server-src.properties
Update the port numbers.
sed -i '' -e "s/9093/9094/g" my-examples/server-src.properties
Append the following line at the end of
server-src.propertiesto set the HTTP listener on the source cluster to8090:echo "confluent.http.server.listeners=http://localhost:8090" >> my-examples/server-src.properties
Configure the destination cluster
While you configured the source cluster to run on default ports, you must set up the destination cluster on different ports to avoid collisions, as summarized in ports mapping. Copy the configuration files to your examples directory and modify them as shown below.
The destination cluster must be Confluent Platform 7.0.0 or later.
Change directories to the location where Confluent Platform is installed:
cd $CONFLUENT_HOME
Copy
my-examples/server-src.properties(the file you just created) in the examples directory and rename the copy to match its purpose:cp my-examples/server-src.properties my-examples/server-dst.properties
Update the port numbers.
sed -i '' -e "s/9092/9093/g" my-examples/server-dst.properties
sed -i '' -e "s/9094/9095/g" my-examples/server-dst.properties
sed -i '' -e "s/8090/8091/g" my-examples/server-dst.properties
Update data directories.
sed -i '' -e "s/kraft-combined-logs/kraft-combined-logs-dst/g" my-examples/server-dst.properties
Add the following line to
server-dst.propertiesto set the replication factor to1for the cluster link topic metadata. (This configuration is set to simplify this demo. The recommended replication factor in production is3, which is the default.)echo "confluent.cluster.link.metadata.topic.replication.factor=1" >> my-examples/server-dst.properties
Enable Cluster Linking on the destination.
sed -i '' -e "s/confluent.cluster.link.enable=false/confluent.cluster.link.enable=true/g" my-examples/server-dst.properties
Start the source cluster
Run the following commands and start the source cluster from $CONFLUENT_HOME.
Generate a
random-uuidusing the kafka-storage tool:KAFKA_CLUSTER_ID="$(bin/kafka-storage random-uuid)"
Format the log directories for this server:
./bin/kafka-storage format -t $KAFKA_CLUSTER_ID -c my-examples/server-src.properties --standalone
Tip
The
kafka-storagecommand is run only once per broker/controller. You cannot use this command to update an existing cluster. If you make a mistake in configurations at this point, you must recreate the directories from scratch, and work through the steps again.Start the server for the source cluster by running this command in its own terminal.
./bin/kafka-server-start my-examples/server-src.properties
Start the destination cluster
Run the following commands and start the destination cluster from $CONFLUENT_HOME.
Generate a
random-uuidusing the kafka-storage tool:KAFKA_CLUSTER_ID="$(bin/kafka-storage random-uuid)"
Format the log directories for this server:
./bin/kafka-storage format -t $KAFKA_CLUSTER_ID -c my-examples/server-dst.properties --standalone
Start the server for the destination cluster by running this command in its own terminal.
./bin/kafka-server-start my-examples/server-dst.properties
Populate the source cluster
Create a topic on the source cluster.
kafka-topics --create --topic demo --bootstrap-server localhost:9092
You should get confirmation that the topic was successfully created.
Created topic demo.
Tip
You can get a list of existing topics as follows:
kafka-topics --list --bootstrap-server localhost:9092
And get detailed information on a topic with the
--describeoption:kafka-topics --describe --topic demo --bootstrap-server localhost:9092
Run the producer in a new command window to send some messages to the
demotopic on the source cluster, and fill it with data.kafka-console-producer --topic demo --bootstrap-server localhost:9092
When the producer starts, you will get a prompt
>.Type some messages at the prompt. Press return after each message. The producer window will look like this:
>first
>second
>third
Tip
Do not copy-paste the above example into your producer, but rather type the messages and press return after each message.
Consume from the topic on the source cluster.
In a new terminal, run a consumer to consume messages from the
demotopic.kafka-console-consumer --topic demo --from-beginning --bootstrap-server localhost:9092
If the topic successfully consumes the messages, your output will be:
first
second
third
Create the cluster link and the mirror topic
Create the cluster link on the destination cluster.
kafka-cluster-links --bootstrap-server localhost:9093 \
      --create --link demo-link --config bootstrap.servers=localhost:9092
The confirmation message looks like this:
Cluster link 'demo-link' creation successfully completed.
Tip
Cluster Linking must be enabled on the destination cluster (in
/etc/kafka/server-dst.properties), or this will fail. In KRaft mode, you must explicitly enable it, as shown in the example configurations.List cluster links (you should see the one you just created).
kafka-cluster-links --list --bootstrap-server localhost:9093
Your output should resemble:
Link name: 'demo-link', link ID: '<link ID>', remote cluster ID: '<remote-cluster-id>', local cluster ID: '<local-cluster-id>', remote cluster available: 'true', link state: 'ACTIVE
Initialize the mirror topic.
The following command establishes a mirror topic of the source
demotopic, using the cluster linkdemo-link.kafka-mirrors --create --mirror-topic demo --link demo-link \ --bootstrap-server localhost:9093
The confirmation message looks like this:
Created topic demo.
Tip
The mirror topic name must match its source topic name. To learn more, see Mirror Topic Creation
Consume from the mirror topic on the destination cluster to verify it.
In a new terminal, run a consumer to consume messages from the mirror topic.
kafka-console-consumer --topic demo --from-beginning --bootstrap-server localhost:9093
Your output should be:
first
second
third
Check the replica status on the destination
Run the following command to monitor the replicas on the destination cluster.
kafka-replica-status --topics demo --include-linked --bootstrap-server localhost:9093
Your output should resemble the following example.
Topic Partition Replica ClusterLink IsLeader IsObserver IsIsrEligible IsInIsr IsCaughtUp LastCaughtUpLagMs LastFetchLagMs LogStartOffset LogEndOffset
demo  0         0       -           true     false      true          true    true       0                 0              0              3
demo  0         0       demo-link   true     false      true          true    true       2                 2              0              3
The output shows both the source and destination’s replicas as distinguished by the
ClusterLinkfield, where-means local and the link name (demo-linkin this case) indicates the replica(s) over the cluster link.Run the following command to populate values for “MirrorState”, “MirrorLastFetchTimeMs”, “MirrorLastFetchHighWatermark”:
kafka-replica-status --topics demo --include-mirror --bootstrap-server localhost:9093
Your output should resemble the following:
Topic Partition Replica IsLeader IsObserver IsIsrEligible IsInIsr IsCaughtUp LastCaughtUpLagMs LastFetchLagMs LogStartOffset LogEndOffset LeaderEpoch MirrorState MirrorLastFetchTimeMs MirrorLastFetchHighWatermark
demo  0         1       true     false      true          true    true       0                 0              0              3            0           ACTIVE      -1                    -1
Verify that the mirror topic is read-only
Attempt to produce messages to the mirror topic on the destination as a way of verifying that the mirror topic is read-only.
Start a producer, targeting the mirror topic.
kafka-console-producer --topic demo --bootstrap-server localhost:9093
Type a message at the
>prompt, and press return.You should get an error similar to the following example because the mirror topic is not writable.
>hi
2020-08-13 16:55:53,571] ERROR Error when sending message to topic demo with key: null, value: 2 bytes with error: (org.apache.kafka.clients.producer.internals.ErrorLoggingCallback)
Change the Source Topic Configuration
Describe the mirror topic to verify the destination and the mirror topic configs.
kafka-configs --describe --topic demo --bootstrap-server localhost:9093
The output will show parameters that are set for strictly mirrored configs.
Dynamic configs for topic demo are:
compression.type=producer sensitive=false synonyms={DYNAMIC_TOPIC_CONFIG:compression.type=producer, DEFAULT_CONFIG:compression.type=producer}
cleanup.policy=delete sensitive=false synonyms={DYNAMIC_TOPIC_CONFIG:cleanup.policy=delete, DEFAULT_CONFIG:log.cleanup.policy=delete}
segment.bytes=1073741824 sensitive=false synonyms={DYNAMIC_TOPIC_CONFIG:segment.bytes=1073741824, STATIC_BROKER_CONFIG:log.segment.bytes=1073741824, DEFAULT_CONFIG:log.segment.bytes=1073741824}
max.message.bytes=1048588 sensitive=false synonyms={DYNAMIC_TOPIC_CONFIG:max.message.bytes=1048588, DEFAULT_CONFIG:message.max.bytes=1048588}
Modify the source set
retention.ms.This is one of the configurations that will mirror only if it is explicitly set on the source. (Note that
retention.mswas not included in the output for the previous step.)kafka-configs --alter --topic demo --add-config retention.ms=123456890 --bootstrap-server localhost:9092
The confirmation message looks like this:
Completed updating config for topic demo.
Rerun the
kafka-configscommand to verify thatretention.msis now on the mirror topic.kafka-configs --describe --topic demo --bootstrap-server localhost:9093
The dynamic configurations now include
retention.ms.Dynamic configs for topic demo are: compression.type=producer sensitive=false synonyms={DYNAMIC_TOPIC_CONFIG:compression.type=producer, DEFAULT_CONFIG:compression.type=producer} cleanup.policy=delete sensitive=false synonyms={DYNAMIC_TOPIC_CONFIG:cleanup.policy=delete, DEFAULT_CONFIG:log.cleanup.policy=delete} segment.bytes=1073741824 sensitive=false synonyms={DYNAMIC_TOPIC_CONFIG:segment.bytes=1073741824, STATIC_BROKER_CONFIG:log.segment.bytes=1073741824, DEFAULT_CONFIG:log.segment.bytes=1073741824} retention.ms=123456890 sensitive=false synonyms={DYNAMIC_TOPIC_CONFIG:retention.ms=123456890} max.message.bytes=1048588 sensitive=false synonyms={DYNAMIC_TOPIC_CONFIG:max.message.bytes=1048588, DEFAULT_CONFIG:message.max.bytes=1048588}
Tip
It may take up to 5 seconds to propagate the change made in the previous step to set
retention.mson the source topic.
Change the source topic’s partitions
Alter the number of partitions on the source topic.
kafka-topics --alter --topic demo --partitions 8 --bootstrap-server localhost:9092
Verify the change on the source topic.
kafka-topics --describe --topic demo --bootstrap-server localhost:9092
The output will be:
Topic: demo       PartitionCount: 8       ReplicationFactor: 1    Configs: segment.bytes=1073741824,retention.ms=123456890
  Topic: demo     Partition: 0    Leader: 0       Replicas: 0     Isr: 0  Offline:
  Topic: demo     Partition: 1    Leader: 0       Replicas: 0     Isr: 0  Offline:
  Topic: demo     Partition: 2    Leader: 0       Replicas: 0     Isr: 0  Offline:
  Topic: demo     Partition: 3    Leader: 0       Replicas: 0     Isr: 0  Offline:
  Topic: demo     Partition: 4    Leader: 0       Replicas: 0     Isr: 0  Offline:
  Topic: demo     Partition: 5    Leader: 0       Replicas: 0     Isr: 0  Offline:
  Topic: demo     Partition: 6    Leader: 0       Replicas: 0     Isr: 0  Offline:
  Topic: demo     Partition: 7    Leader: 0       Replicas: 0     Isr: 0  Offline:
Verify the change on the mirror topic.
kafka-topics --describe --topic demo --bootstrap-server localhost:9093
The output of this same command for the mirror topic should match the original topic exactly.
Topic: demo       PartitionCount: 8       ReplicationFactor: 1    Configs: segment.bytes=1073741824,retention.ms=123456890
  Topic: demo     Partition: 0    Leader: 0       Replicas: 0     Isr: 0  Offline:
  Topic: demo     Partition: 1    Leader: 0       Replicas: 0     Isr: 0  Offline:
  Topic: demo     Partition: 2    Leader: 0       Replicas: 0     Isr: 0  Offline:
  Topic: demo     Partition: 3    Leader: 0       Replicas: 0     Isr: 0  Offline:
  Topic: demo     Partition: 4    Leader: 0       Replicas: 0     Isr: 0  Offline:
  Topic: demo     Partition: 5    Leader: 0       Replicas: 0     Isr: 0  Offline:
  Topic: demo     Partition: 6    Leader: 0       Replicas: 0     Isr: 0  Offline:
  Topic: demo     Partition: 7    Leader: 0       Replicas: 0     Isr: 0  Offline:
Tip
This change may a few minutes to propagate because the default metadata refresh is at 5 minutes. This can be improved by setting config
metadata.max.age.mswhen creating the cluster link. For example:./bin/kafka-cluster-links --bootstrap-server localhost:9093 --create --link demo-link \ --config bootstrap.servers=localhost:9092,metadata.max.age.ms=5000
List mirror topics
To list mirror topics run kafka-cluster-links --list with the --include-topics option.
kafka-cluster-links --list --link demo-link --include-topics --bootstrap-server localhost:9093
Your output should resemble the following.
Link name: 'demo-link', link ID: '123-some-link-id', remote cluster ID: '123-some-cluster-id', local cluster ID: '456-some-other-cluster-id', remote cluster available: 'true', topics: [demo]
Cut over the mirror topic to make it writable
Stop the mirror topic for the
demotopic on the destination.kafka-mirrors --promote --topics demo --bootstrap-server localhost:9093
You will get the following confirmation.
Calculating max offset and ms lag for mirror topics: [demo]
Finished calculating max offset lag and max lag ms for mirror topics: [demo]
Request for stopping topic inventory.arrivals's mirror was successfully scheduled.
Use the describe command with the --pending-stopped-only option to monitor progress.
Verify that the mirror topic has stopped mirroring.
kafka-mirrors --describe --topics demo --pending-stopped-only --bootstrap-server localhost:9093
You will get the following confirmation that the topic has entered the
STOPPEDstate.Topic: demo LinkName: demo-link LinkId: 123-some-link-id MirrorTopic: demo State: STOPPED StateTime: 2021-11-15 14:06:26
Produce to both topics to verify divergence
Run a producer to send messages to the original topic on the source. (Or switch back to this command window if you still have this producer running.)
kafka-console-producer --topic demo --bootstrap-server localhost:9092
Type the message
oldat the prompt.> oldRun a producer to send messages to the topic on the destination, which is no longer a mirror topic.
kafka-console-producer --topic demo --bootstrap-server localhost:9093
Type the message
newat the prompt.> newRun consumers to read from both topics. Your output will show they have diverged.
Run a consumer to read messages from the original topic on the source. (Or simply view the output on this window, if you still have this consumer running)
kafka-console-consumer --topic demo --from-beginning --bootstrap-server localhost:9092
The output on the source topic now includes the
oldmessage.first second third old
Run a consumer to read messages from the topic on the destination. (Or simply view the output on this window, if you still have this consumer running.)
kafka-console-consumer --topic demo --from-beginning --bootstrap-server localhost:9093
The output on the destination topic includes the
newmessage.first second third new
Delete the link
List cluster links.
kafka-cluster-links --list --bootstrap-server localhost:9093
The output should resemble the following example.
Link name: 'demo-link', link ID: '123-some-link-id', cluster ID: '123-some-cluster-id'
Delete the cluster link.
kafka-cluster-links --bootstrap-server localhost:9093 --delete --link demo-link
If the command is successful, the output is:
Cluster link 'demo-link' deletion successfully completed.
Tip
If there are mirror topics using the link you want to delete, you must either first unlink the topics by stopping the mirror for each one, or use the
--forceoption with thekafka-cluster-links delete --linkcommand.
Teardown
Run shutdown and cleanup tasks.
Stop the consumers and producers if they are still running, in reverse order in which you started them.
Stop the clusters: use Ctl-C in each command window to first stop the destination cluster, then stop the source cluster.
Delete the log directories from
/tmp.This will clear out the metadata from your system and enable you to configure and run new local deployments with no collisions with the legacy metadata.