Important
You are viewing documentation for an older version of Confluent Platform. For the latest, click here.
Google Kubernetes Engine to Confluent Cloud with Confluent Replicator
Overview
This example features a deployment of Confluent Platform on Google Kubernetes Engine (GKE) leveraging Confluent Operator and Confluent Replicator, highlighting a data replication strategy to Confluent Cloud. Upon running this demo, you will have a GKE based Confluent Platform deployment with simulated data replicating to your Confluent Cloud cluster. We will verify the replication by running client applications against the Confluent Cloud cluster to view the simulated data originating in the source GKE cluster.
If you’d like a primer on running Confluent Operator in GKE with lower resource requirements, see the Confluent Platform on Google Kubernetes Engine demo.
This demo is featured in the Conquering Hybrid Cloud with Replicated Event-Driven Architectures blog post which provides more details on use cases for replicated event streaming architectures.
The major components of this demo are:
- A Confluent Cloud Environment and Kafka Cluster
- A Kubernetes cluster running on GKE.
- Confluent Operator which is used to manage the following Confluent Platform components
- A 3 node ZooKeeper cluster
- A 3 node Kafka cluster
- A single node Replicator
- A single node Schema Registry
- A single node Kafka Connect
- Confluent Control Center
- One instance of kafka-connect-datagen to produce mock stock trading data

Demo Prerequisites
The following applications or libraries are required to be installed and available in the system path in order to properly run the demo.
| Application | Tested Version | Info |
|---|---|---|
kubectl |
1.18.0 |
https://kubernetes.io/docs/tasks/tools/install-kubectl/ |
helm |
3.1.2 |
https://github.com/helm/helm/releases/tag/v3.1.2 |
gcloud
GCP sdk core
GKE cluster |
286.0.0
2020.03.24
1.15.11-gke.1 |
https://cloud.google.com/sdk/install |
ccloud |
v1.0.0 |
https://docs.confluent.io/current/cloud/cli/install.html |
Note
As of Confluent Platform 5.4 Helm 3 is required.
Running the Demo
Warning
This demo consumes real cloud resources on both Confluent Cloud and Google Cloud Platform. To avoid unexpected charges, carefully evaluate the cost of resources before launching the demo and ensure all resources are destroyed after you are done evaluating the demonstration. Refer to Confluent Cloud and Google Cloud pricing data for more information. The Operator Sizing Recommendations document contains information on required sizing for Confluent Operator.
Clone the Confluent examples repository and change directories on your terminal into the kubernetes/replicator-gke-cc directory.
git clone https://github.com/confluentinc/examples.git
cd examples/kubernetes/replicator-gke-cc
GKE Setup
In order to properly simulate a realistic replication scenario to Confluent Cloud, the demo requires a GKE Node Pool sufficiently large to support a 3 node clusters for both Kafka and ZooKeeper. In testing of this demonstration, a sufficient cluster consisted of 7 nodes of machine type h1-highmem-2.
Tip
The Variable Reference section can be used to control the size of the deployed resources in this demo.
If you wish to use an existing GKE cluster, and your kubectl client is already configured to operate with it, skip to the Confluent Cloud Setup section of these instructions.
If you wish to create a new GKE cluster for this demo, the Makefile contains a function to assist you in creating a cluster, assuming you have your glcoud SDK properly configured to access your account. If you wish to override the behavior of the create cluster function, see the Advanced Usage section of this document.
To verify which GCP Project your gcloud SDK is currently configured to, run:
gcloud config list --format 'value(core.project)'
To create the standard cluster you can run the following:
make gke-create-cluster
Confluent Cloud Setup
Confluent Cloud Account Setup
This demonstration requires that you have a Confluent Cloud account and a Kafka cluster ready for use. The Confluent Cloud home page can help you get setup with your own account if you do not yet have access.
Note
This demonstration highlights a multi-cloud replication strategy using Confluent Replicator. One benefit of Replicator is that the destination cluster topics and partitions will be identicial in message offsets, timestamps, keys, and values. If you re-use a cluster with an existing stock-trades topic, the messages will be appeneded to the end of the existing topic data and the offsets will not match the source cluster. It’s advised to build a new cluster for each run of this demo, or delete the stock-trades Kafka topic in the destination cluster prior to running. See: ccloud kafka topic delete for instructions on deleting Confluent Cloud topics.
Kafka Cluster Setup
If you are creating a new cluster, it is advised to create it within the same Cloud Provider and region as this demo. This demonstration runs on top of Google Cloud Platform (GCP) and, by default, in the us-central1 region. It is recommended to name your new cluster replicator-gke-cc-demo to match names used later in this demo. The following illustrates the recommended configuration:

Tip
See the Confluent Cloud Quick Start for more information.
Kafka Bootstrap Server Configuration
After you have established the Confluent Cloud cluster you are going to use for the demo you will need the public bootstrap server.
You can use the ccloud CLI to retrieve the bootstrap server value for your cluster.
Tip
You can also view the bootstrap server value on the Confluent Cloud UI under the Cluster settings

If you haven’t already, install the ccloud CLI
Log in to your Confluent Cloud cluster.
ccloud login --url https://confluent.cloud
Your output should resemble:
Enter your Confluent credentials:
Email: jdoe@myemail.io
Password:

Logged in as jdoe@myemail.io
Using environment t118 ("default")
List your available Kafka clusters.
ccloud kafka cluster list
This should produce a list of clusters you have access to:
      Id      |          Name          | Provider |   Region    | Durability | Status
+-------------+------------------------+----------+-------------+------------+--------+
    lkc-xmm5g | abc-test               | gcp      | us-central1 | LOW        | UP
    lkc-kngnv | rjs-gcp-us-central1    | gcp      | us-central1 | LOW        | UP
    lkc-3r3vj | replicator-gke-cc-demo | gcp      | us-central1 | LOW        | UP
Describe the cluster to obtain the bootstrap server
ccloud kafka cluster describe lkc-3r3vj
This will produce a detailed view of the cluster. The
Endpointfield contains the Boostrap Server value+-------------+------------------------------------------------------------+ | Id | lkc-3r3vj | | Name | replicator-gke-cc-demo | | Ingress | 100 | | Egress | 100 | | Storage | 5000 | | Provider | gcp | | Region | us-central1 | | Status | UP | | Endpoint | SASL_SSL://abc-12345.us-central1.gcp.stag.cpdev.cloud:9092 | | ApiEndpoint | https://abc-12345.us-central1.gcp.stag.cpdev.cloud | +-------------+------------------------------------------------------------+
API Key and Secret Configuration
The ccloud CLI allows you to create API Keys to be used with client applications.
Tip
You can also create the API Key using the Confluent Cloud UI.
To create a new API Key:
ccloud api-key create --resource lkc-3r3vj
The tool will display a new Key and secret as below. You will need to save these values elsewhere as they cannot be retrieved later.
Save the API key and secret. The secret is **not** retrievable later.
+---------+------------------------------------------------------------------+
| API Key | LD35EM2YJTCTRQRM                                                 |
| Secret  | 67JImN+9vk+Hj3eaj2/UcwUlbDNlGGC3KAIOy5JNRVSnweumPBUpW31JWZSBeawz |
+---------+------------------------------------------------------------------+
Configure Helm Values
To configure the demo to access your Confluent Cloud account, we are going to create a Helm Chart values file, which the demo looks for in a particular location to pass to helm commands to weave your cloud account details into the configuration of the Confluent Platform configurations.
Create a values file by executing the following command, first replacing the
{{ mustache bracket }}values forbootstrapEndpoint,username, andpasswordwith your relevant values obtained above.cat <<'EOF' > ./cfg/my-values.yaml destinationCluster: &destinationCluster name: replicator-gke-cc-demo tls: enabled: true internal: true authentication: type: plain bootstrapEndpoint: {{ cloud bootstrap server }} username: {{ cloud API key }} password: {{ cloud API secret }} controlcenter: dependencies: monitoringKafkaClusters: - <<: *destinationCluster replicator: replicas: 1 dependencies: kafka: <<: *destinationCluster EOF
You can now verify the values of the file prior to running the demo. The demo Makefile will integrate these values into the Helm deployment.
cat ./cfg/my-values.yaml
Preflight Checks
Prior to running the demo you may want to verify the setup.
To verify your GKE cluster status:
gcloud container clusters list
To verify that your kubectl command is configured with the proper context to control your GKE cluster, run:
kubectl config current-context
The output of the previous command should be a name with the combination of your GKE project, the region, and the value of the Makefile variable GKE_BASE_CLUSTER_ID and your machine username, for example:
kubectl config current-context
gke_gkeproject_us-central1-a_cp-examples-operator-jdoe
Demo Execution
To run the automated demo (estimated running time, 8 minutes):
make demo
The demo will deploy Confluent Platform leverging Confluent Operator. As the various components are deployed, the demonstration will echo the various commands as executing them so you can observe the process. For example, the deployment message for Kafka will look similar to:
+++++++++++++ deploy kafka
helm upgrade --install --namespace operator --wait --timeout=500 -f examples/kubernetes/gke-base/cfg/values.yaml --set global.provider.region=us-central1 --set global.provider.kubernetes.deployment.zones={us-central1-a} -f examples/kubernetes/replicator-gke-cc/cfg/values.yaml -f examples/kubernetes/replicator-gke-cc/cfg/my-values.yaml  --set kafka.replicas=3 --set kafka.enabled=true kafka examples/kubernetes/common/cp/operator/20190912-v0.65.1/helm/confluent-operator
Release "kafka" does not exist. Installing it now.
NAME:   kafka
LAST DEPLOYED: Mon Oct 28 11:42:07 2019
NAMESPACE: operator
STATUS: DEPLOYED
...
✔  ++++++++++ Kafka deployed

+++++++++++++ Wait for Kafka
source examples/kubernetes/common/bin/retry.sh; retry 15 kubectl --context gke_project-name_us-central1-a_cp-examples-operator-jdoe -n operator get sts kafka
NAME    READY   AGE
kafka   0/3     1s
kubectl --context gke_project-name_us-central1-a_cp-examples-operator-jdoe -n operator rollout status statefulset/kafka
Waiting for 3 pods to be ready...
Waiting for 2 pods to be ready...
Waiting for 1 pods to be ready...
statefulset rolling update complete 3 pods at revision kafka-775f97f98b...
✔  ++++++++++ Kafka ready
The last output message you should see is:
✔ Replicator GKE->CC Demo running
Validate
Verify Control Center’s View of Multiple Clusters
In order to view Confluent Control Center, network connectivity will need to be available between your local machine and the Kubernetes pod running the Confluent Control Center service. If you used an existing cluster you may already have external cluster access configured. If you used the demo gke-create-cluster function, you can use the following kubectl command to open a forwarded port connection between your local host and Confluent Control Center.
kubectl -n operator port-forward controlcenter-0 12345:9021
Now open a web-browser to http://localhost:12345, and you should see Confluent Control Center with 2 Healthy Clusters.
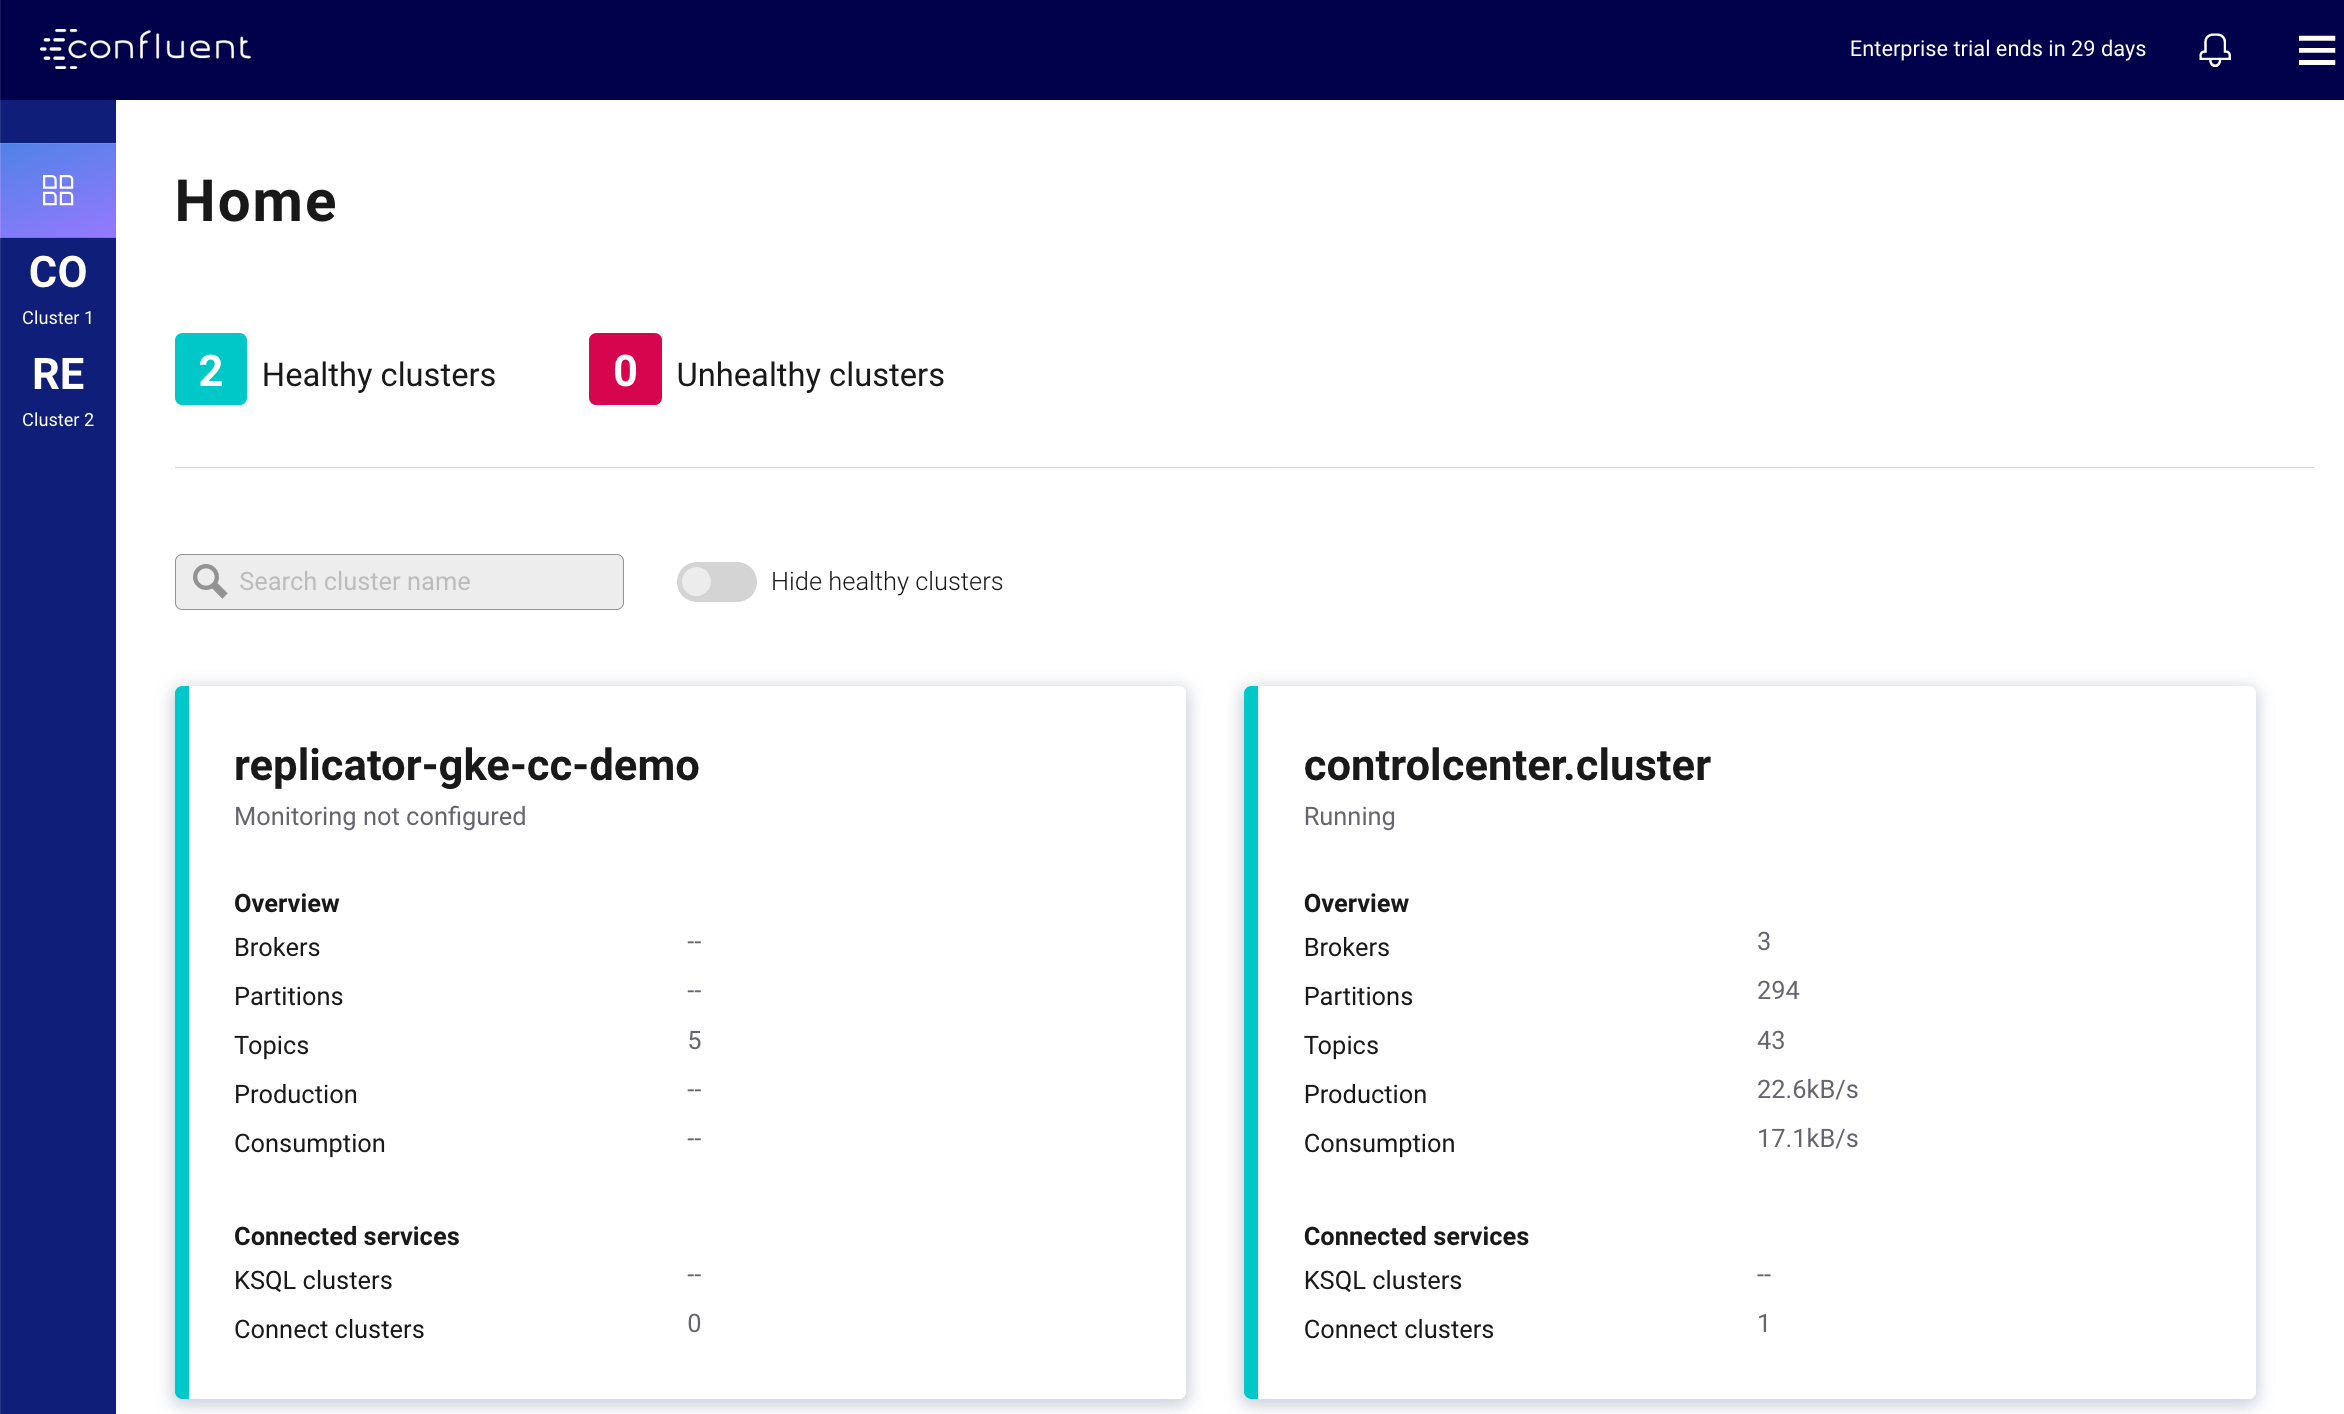
The replicator-gke-cc-demo cluster is the Confluent Cloud cluster and the controlcenter.cluster is the GKE based Confluent Operator managed cluster. At this time, detailed monitoring of Confluent Cloud clusters is not possible from on-premises Confluent Control Center. You will notice that the replicator-gke-cc-demo cluster does not list the number of Brokers as the Confluent Cloud managed Kafka service is serverless and the concept of brokers is abstracted away.
Next click on the controlcenter.cluster and then Consumers, and then replicator. This will give you a view of the Confluent Replicator consumer group as it replicates the stock-trades topics to Confluent Cloud.
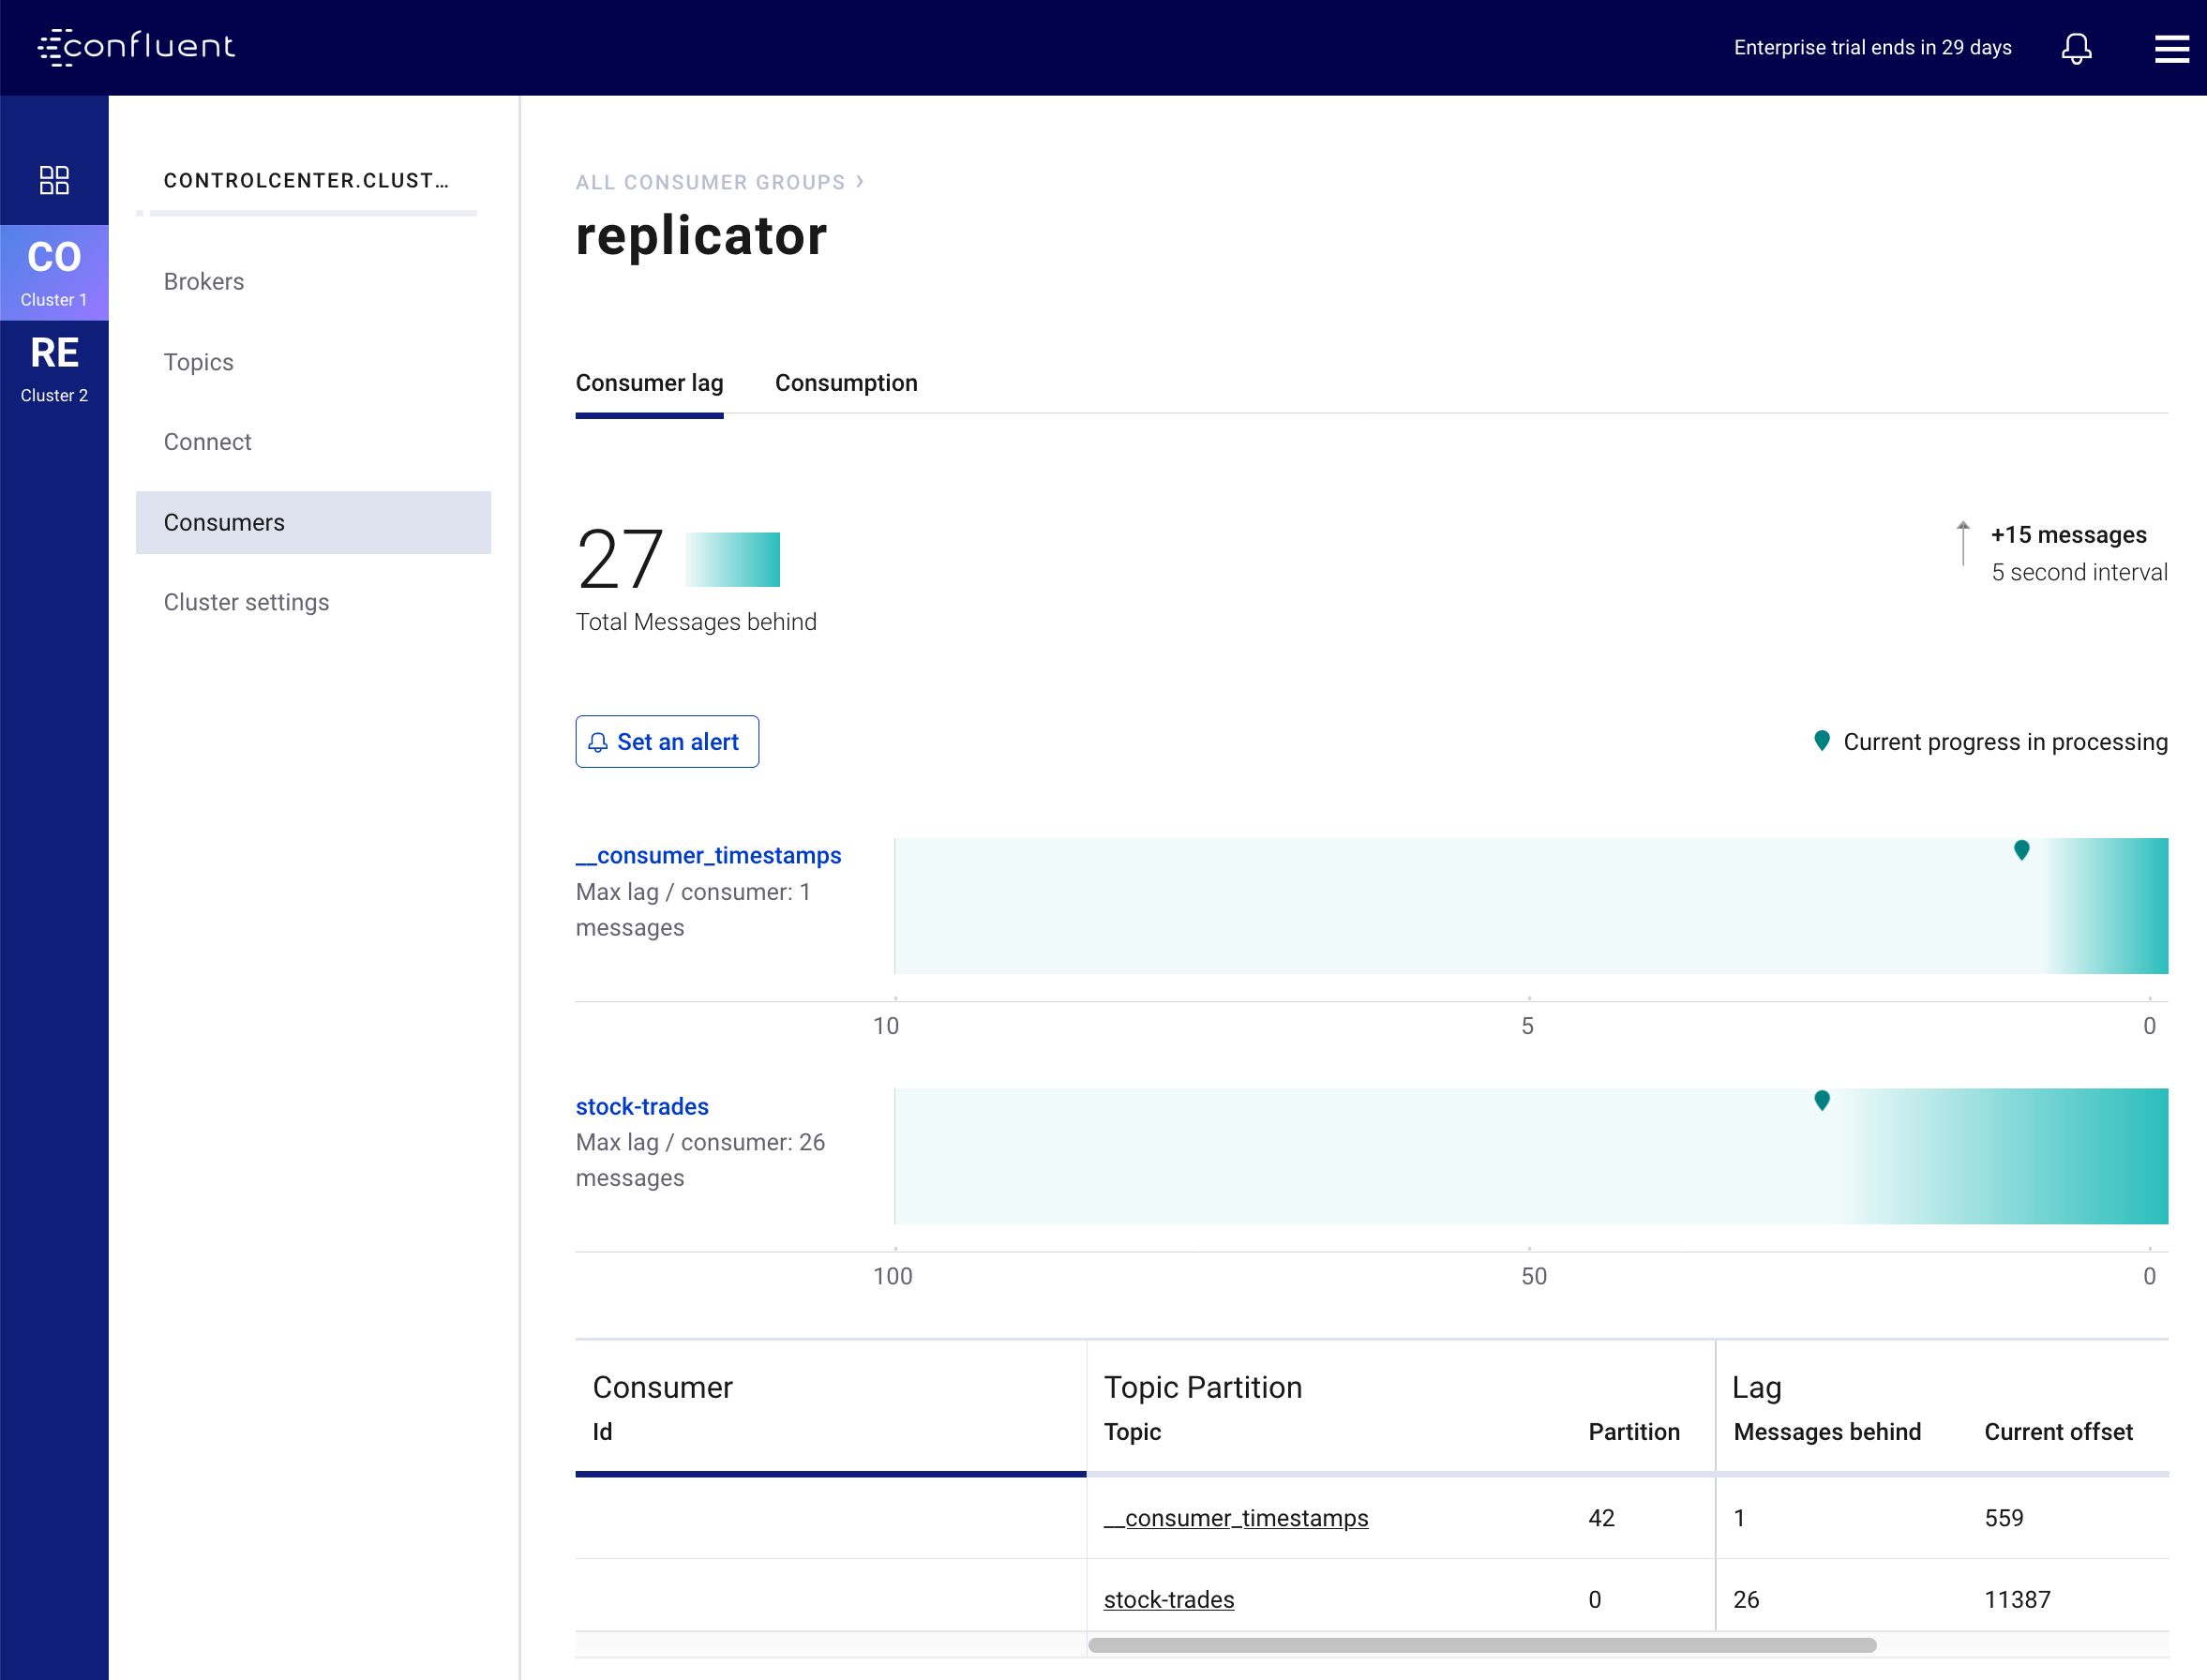
This Control Center screen highlights the consumer group lag for the replicator consumer group. In the above screenshot, Control Center is telling us that the replicator consumer’s total lag across all topics and partitions is 27 messages. As Replicator processes messages, it’s consumer group lag will fluctuate and the chart on this screen will indicate the current value as well as maximum amount of lag over time.
Verify replicated stock-trades topic with clients
To view the stock-trades topic data streaming on both clusters, you can open two terminals and run the following series of commands.
To view the
stock-tradesevents on the source (GKE) cluster, in the first terminal, first open a shell on theclient-consolepod:kubectl -n operator exec -it client-console bash
Then use the
kafka-console-consumerto stream the values from thestock-tradestopic. The required configuraiton is provided in the/etc/kafka-client-properties/kafka-client.propertiesfile already mounted in a volume on the pod:kafka-console-consumer --bootstrap-server kafka:9071 --consumer.config /etc/kafka-client-properties/kafka-client.properties --topic stock-trades --property print.value=false --property print.key=true --property print.timestamp=true
To view the
stock-tradesevents on the destination (Confluent Cloud) cluster, in a second terminal open another shell on theclient-consolepod:kubectl -n operator exec -it client-console bash
Again, use the
kafka-console-consumerto stream the values from thestock-tradestopic, this time from the destination cluster. The required configuration has been mounted in a volume on the pod in the/etc/destination-cluster-client-properties/destination-cluster-client.propertiesfile. Additionally, the bootstrap server value has been added in the/etc/destination-cluster-client-properties/destination-cluster-bootstrapfile. This command will use both of those files to create the connection to the destination cluster:kafka-console-consumer --bootstrap-server $(cat /etc/destination-cluster-client-properties/destination-cluster-bootstrap) --consumer.config /etc/destination-cluster-client-properties/destination-cluster-client.properties --topic stock-trades --property print.value=false --property print.key=true --property print.timestamp=true
These commands will print out the timestamp and key of messages as they arrive in each cluster. You an visually match up the events by these values and observe the replication process, for example, in terminal 1 you might see:
...
CreateTime:1572380698171        ZJZZT
CreateTime:1572380698280        ZWZZT
CreateTime:1572380698351        ZWZZT
CreateTime:1572380698577        ZJZZT
CreateTime:1572380699340        ZVZZT
And in terminal 2 shortly after identicial messages:
...
CreateTime:1572380698171        ZJZZT
CreateTime:1572380698280        ZWZZT
CreateTime:1572380698351        ZWZZT
Destroy Resources
After you are done evaluating the results of the demo, you can destroy all the provisioned Kubernetes resources with:
make destroy-demo
If you used the demo to create your cluster, you can destroy the GKE cluster with:
make gke-destroy-cluster
Highlights
Deploying Kafka Connectors with Helm
The following highlights a simple Helm chart that can be used to deploy Kafka Connect Connector configurations using the standard Kafka Connect REST Interface. This is how this demonstration deploys the Confluent Replicator configuration, however, the same method could be used to deploy any Kafka Connect configuration. In future versions of Confluent Operator, Kafka Connect connectors wil be managed by the Operator Controller.
The Helm chart is located in the helm/replicator-gke-cc folder of this demonstration. The templates/replicator-configmap.yaml file contains a data section with a templated JSON value that conforms to the Kafka Connect connectors API. The Destination and Source cluster configuration values are filled in at runtime by the helm templating system, and are proivded by your my-values.yaml file created in the demo instructions above.
apiVersion: v1
kind: ConfigMap
metadata:
  name: replicator-connector
data:
  replicator-connector.json: '{
    "name":"replicator",
    "config": {
      "connector.class": "io.confluent.connect.replicator.ReplicatorSourceConnector",
      "topic.whitelist": "{{.Values.replicator.topic.whitelist}}",
      "key.converter": "io.confluent.connect.replicator.util.ByteArrayConverter",
      "value.converter": "io.confluent.connect.replicator.util.ByteArrayConverter",
      "dest.kafka.bootstrap.servers": "{{.Values.replicator.dependencies.kafka.bootstrapEndpoint}}",
      "dest.kafka.security.protocol": "{{$destProtocol}}",
      "dest.kafka.sasl.mechanism": "PLAIN",
      "dest.kafka.sasl.jaas.config": "{{$destJaasConfig}}",
      "src.consumer.group.id": "replicator",
      "src.kafka.bootstrap.servers": "kafka:9071",
      "src.kafka.security.protocol": "{{$srcProtocol}}",
      "src.kafka.sasl.mechanism": "PLAIN",
      "src.kafka.sasl.jaas.config": "{{$srcJaasConfig}}",
      "src.consumer.interceptor.classes": "io.confluent.monitoring.clients.interceptor.MonitoringConsumerInterceptor",
      "src.consumer.confluent.monitoring.interceptor.bootstrap.servers": "kafka:9071",
      "src.consumer.confluent.monitoring.interceptor.security.protocol": "{{$srcProtocol}}",
      "src.consumer.confluent.monitoring.interceptor.sasl.mechanism": "PLAIN",
      "src.consumer.confluent.monitoring.interceptor.sasl.jaas.config": "{{$srcJaasConfig}}",
      "src.kafka.timestamps.producer.interceptor.classes": "io.confluent.monitoring.clients.interceptor.MonitoringProducerInterceptor",
      "src.kafka.timestamps.producer.confluent.monitoring.interceptor.bootstrap.servers": "kafka:9071",
      "src.kafka.timestamps.producer.confluent.monitoring.interceptor.security.protocol": "{{$srcProtocol}}",
      "src.kafka.timestamps.producer.confluent.monitoring.interceptor.sasl.mechanism": "PLAIN",
      "src.kafka.timestamps.producer.confluent.monitoring.interceptor.sasl.jaas.config": "{{$srcJaasConfig}}",
      "tasks.max": "1"
    }
  }'
In the same directory as the ConfigMap manifest file is a Kubernetes Job manifest (replicator-connector-deploy-job.yaml). This defines a Kuberenetes Job that will successfully execute a job to completion and terminate. Using a Docker image that contains the curl program, the ConfigMap defined above is mounted to the batch job Pod, and then curl executes a POST to the Kafka Connect REST API to deploy Replicator.
apiVersion: batch/v1
kind: Job
metadata:
  name: replicator-connector-deploy
spec:
  ttlSecondsAfterFinished: 5
  template:
    spec:
      volumes:
      - name: replicator-connector
        configMap:
          name: replicator-connector
      containers:
      - name: replicator-connector-deploy
        image: cnfldemos/alpine-curl:3.10.2_7.65.1
        args: [
          "-s",
          "-X", "POST",
          "-H", "Content-Type: application/json",
          "--data", "@/etc/config/connector/replicator-connector.json",
          "http://replicator:8083/connectors"
        ]
        volumeMounts:
          - name: replicator-connector
            mountPath: /etc/config/connector
      restartPolicy: Never
  backoffLimit: 1
Of note is the way in which the ConfigMap is associated to the Job Pod by name. The value, replicator-connector in the volumes stanza of the Job manifest matches the ConfigMap name in the metadata section of the ConfigMap manifest.
Deploying Connectors with Operator
You can deploy any Kafka connector (or single message transformation (SMT) or converter) in your Kubernetes environment. Search in Confluent Hub, an online library of pre-packaged and ready-to-install connectors, transformations, and converters, to find the one that suits your needs. The Confluent Operator image for Kafka Connect, confluentinc/cp-server-connect-operator, includes a small number of those connectors but may not have the specific connector you want to deploy. Therefore, to deploy a new connector type in your Kubernetes environment, you will need to get the jars onto the Connect image.
The recommended way is to create a custom Docker image that extends the base Connect Docker image with the desired jars. The custom Docker image builds the dependencies into a single artifact, which is more self-sufficient and portable such that it can be run on any pod despite totally ephemeral disk. See the documentation to learn how to use the Confluent Hub client to create a custom Docker image that extends one of Confluent’s Kafka Connect images with a specific set of ready-to-install connectors. As an example, see how the Kafka Connect Datagen connector, which generates mock events, can be pulled from Confluent Hub and bundled into a Docker image using this Dockerfile. Once you build the custom Docker image, Kubernetes will need to pull this image from a Docker Registry to create the Pods.
. note:: It is not recommended to use volumes to place the desired jars onto the Connect image because it is less self-sufficient, less portable, and harder to match up versions between the base image and jars.
For more advanced use cases where you want to use a custom connector instead of a pre-packaged one available at Confluent Hub, you may create a Docker image with a custom connector from a local archive. The demonstration uses this more advanced workflow. We use the Kafka Connect Datagen connector to generate mock events, and this Dockerfile builds the Docker image with a local archive of the Kafka Connect Datagen connector compiled from source code (versus pulling directly from Confluent Hub). We publish this image to Docker Hub, but in your environment, publish to your own Docker Hub repo.
Your Operator Helm values will need to be updated to pull the custom Connect Docker image for your Pods.
This demo accomplishes this by overriding the connect image to instead use the one published to Docker Hub, see value.yaml:
connect:
image:
  repository: cnfldemos/cp-server-connect-operator-datagen
  tag: 0.3.1-5.4.1.0
Advanced Usage
Customize GKE Cluster Creation
There are variables you can override and pass to the make command. The following table shows the variables and their defaults. The variables can be set on the make command, such as:
GKE_BASE_ZONE=us-central1-b make gke-create-cluster
Or they can be exported to the current environment prior to running the make command:
export GKE_BASE_ZONE=us-central1-b
make gke-create-cluster
| Variable | Default |
|---|---|
| GKE_BASE_REGION | us-central1 |
| GKE_BASE_ZONE | us-central1-a |
| GKE_BASE_SUBNET | default |
| GKE_BASE_CLUSTER_VERSION | 1.13.7-gke.24 |
| GKE_BASE_MACHINE_TYPE | n1-highmem-2 |
| GKE_BASE_IMAGE_TYPE | COS |
| GKE_BASE_DISK_TYPE | pd-standard |
| GKE_BASE_DISK_SIZE | 100 |
Troubleshooting
- If you observe that the replicated offsets do not match in the source and destination cluster, the destination cluster may have existed prior to starting the cluster in situations where you may have restarted the demonstration. To see the full demonstration function properly, use a new cluster or delete and recreate the destination topic prior to running the demo.