
Example: Configure Salesforce SObject Sink Connector
The Salesforce SObject sink connector is used to perform CRUD operations (create, update, delete, and upsert) on Salesforce Objects (SObjects). This example uses both Salesforce source (PushTopics) and sink connectors in tandem to move SObjects from one Salesforce organization to a secondary Salesforce organization. The example shows the source connector streaming a Salesforce Lead object creation, updating an event into a Kafka topic, and then using the sink connector to duplicate those changes into a secondary Salesforce organization.
Populate source topic using Source Connector
See Configure the Salesforce PushTopic Source Connector and follow those steps to completion in order to populate Kafka with a
Leadobject. Before checking the topic for theLeadobject record and after creating theLead, edit the name of theLead. Two records should be present when you check the contents of the source connector topic: a record of _EventTypecreatedand another ofupdated.Go back to Configure the Salesforce PushTopic Source Connector and follow the steps for Salesforce Account to create a secondary account in a separate Salesforce organization from the sink connector which is used to configure the sink connector.
Log in to the secondary Salesforce organization and edit the Lead object to add the custom
Idfield. Follow these steps.Goto Salesforce lightning UI and select Setup->Platform Tools->Object Manager->Lead->Fields & Relationships->New->Text Field
Name the field
CustomIdand check theExternal Idcheck box.Exit.
Note
The CustomId field is actually named CustomId__c while the label is CustomId. Use the name when referencing the external id field in the salesforce.custom.id.field.name property of the sink connector.
Configure Sink Connector
- Prerequisites
Confluent CLI (requires separate installation)
Note
You set the following connector configuration properties to enable OAuth JWT bearer token support:
salesforce.usernamesalesforce.consumer.keysalesforce.jwt.keystore.pathsalesforce.jwt.keystore.password
Create a configuration file named
salesforce-sobject-leads-sink-config.jsonwith the following contents. Make sure to enter a real username, password, security token, consumer key, and consumer secret. See Salesforce SObject Sink Connector Configuration Properties for more information on these and the other configuration properties.{ "name" : "SalesforceSObjectSinkConnector1", "config" : { "connector.class" : "io.confluent.salesforce.SalesforceSObjectSinkConnector", "tasks.max" : "1", "topics" : "sfdc-pushtopic-lead", "salesforce.consumer.key" : "< Required Configuration >", "salesforce.consumer.secret" : "< Required Configuration >", "salesforce.object" : "Lead", "salesforce.password" : "< Required Configuration >", "salesforce.password.token" : "< Required Configuration >", "salesforce.username" : "< Required Configuration: secondary organization username >", "salesforce.ignore.fields" : "CleanStatus", "salesforce.ignore.reference.fields" : "true", "salesforce.use.custom.id.field" : "true", "salesforce.custom.id.field.name" : "CustomId__c", "confluent.topic.bootstrap.servers": "localhost:9092", "confluent.topic.replication.factor": "1", "confluent.license": " Omit to enable trial mode " } }Enter the Confluent CLI confluent local services connect connector load command to start the Salesforce source connector.
Caution
You must include a double dash (
--) between the topic name and your flag. For more information, see this post.Tip
The command syntax for the Confluent CLI development commands changed in 5.3.0. These commands have been moved to
confluent local. For example, the syntax forconfluent startis nowconfluent local services start. For more information, see confluent local.confluent local load SalesforceSObjectSinkConnector1 --config salesforce-sobject-leads-sink-config.json
Your output should resemble:
{
   "name": "SalesforceSObjectSinkConnector1",
    "config": {
        "connector.class" : "io.confluent.salesforce.SalesforceSObjectSinkConnector",
        "tasks.max" : "1",
        "topics" : "sfdc-pushtopic-leads",
        "salesforce.object" : "Lead",
        "salesforce.username" : "<Required>"
        "salesforce.password" : "<Required>",
        "salesforce.password.token" : "<Required>",
        "salesforce.consumer.key" : "<Required>",
        "salesforce.consumer.secret" : "<Required>",
        "salesforce.ignore.fields" : "CleanStatus",
        "salesforce.ignore.reference.fields" : "true",
        "salesforce.use.custom.id.field" : "true",
        "salesforce.custom.id.field.name" : "CustomId__c",
        "confluent.topic.bootstrap.servers": "localhost:9092",
        "confluent.topic.replication.factor": "1",
        "confluent.license": " Omit to enable trial mode "
    },
    "tasks": [
        ...
    ],
    "type": null
}
Tip
The
tasksfield may include information about the task
View Leads in Salesforce
Login to the secondary Salesforce organization and verify that the Leads object exists with the correct name. It should match the primary Salesforce organization.
Running both connectors concurrently
Running both the sink connector and the source connector as separate workers allows for synchronizing SOjbect changes in near real time. If running in stand alone mode, add a custom port to one of the workers using the
listenersconfiguration property.Add and change leads as necessary in the primary organization. The source connector captures your changes and writes them to same topic that the sink connector reads from and uses as a source for operations.
Upsert with SObject Sink Connector
The upsert operation can be used when you want to update existing records in Salesforce (located by external_id) or otherwise, insert new records. The following example shows how to upsert records for an Orders object in Salesforce.
Create an
external_idfield in Salesforce.Click your user name and then click Setup.
Under Build, click Customize, and then select Orders.
Click the Add a custom field to orders link.
In the Order Custom Fields and Relationships section, click New.
In the Data Type list, select a data type,
Text, then click Next.Enter the details for the field. For example, Field Label(
extid), Length, Field Name(extid), Description.Check the External ID box, then click Next.
The external ID (
extid) is created and appears in the list under Order Custom Fields and Relationships.
Create a configuration file named
salesforce-sobject-orders-sink-config.jsonwith the following contents. Make sure to enter a real username, password, security token, consumer key, and consumer secret. Additionally, make sure you put the API name (extid__c) for the external ID (extid). See Salesforce SObject Sink Connector Configuration Properties for more information about these and the other configuration properties.{ "name": "upsert-orders", "config": { "connector.class" : "io.confluent.salesforce.SalesforceSObjectSinkConnector", "tasks.max" : "1", "topics" : "orders", "salesforce.object" : "Order", "salesforce.username" : "<Required>", "salesforce.password" : "<Required>", "salesforce.password.token" : "<Required>", "salesforce.consumer.key" : "<Required>", "salesforce.consumer.secret" : "<Required>", "confluent.topic.bootstrap.servers":"localhost:9092", "confluent.topic.replication.factor": "1", "key.converter": "org.apache.kafka.connect.storage.StringConverter", "value.converter": "org.apache.kafka.connect.json.JsonConverter", "value.converter.schemas.enable":true, "behavior.on.api.errors": "fail", "reporter.bootstrap.servers": "localhost:9092", "reporter.error.topic.name": "error-responses", "reporter.error.topic.replication.factor": 1, "reporter.result.topic.name": "success-responses", "reporter.result.topic.replication.factor": 1, "salesforce.sink.object.operation": "upsert", "override.event.type": "true", "request.max.retries.time.ms": 60000, "salesforce.custom.id.field.name": "extid__c", "salesforce.use.custom.id.field": true } }Enter the Confluent CLI confluent local services connect connector load command to start the Salesforce source connector.
Caution
You must include a double dash (
--) between the topic name and your flag. For more information, see this post.Tip
The command syntax for the Confluent CLI development commands changed in 5.3.0. These commands have been moved to
confluent local. For example, the syntax forconfluent startis nowconfluent local services start. For more information, see confluent local.confluent local load upsert-orders --config salesforce-sobject-orders-sink-config.json
Your output should resemble:
{
    "name": "upsert-orders",
    "config": {
        "connector.class" : "io.confluent.salesforce.SalesforceSObjectSinkConnector",
        "tasks.max" : "1",
        "topics" : "orders",
        "salesforce.object" : "Order",
        "salesforce.username" : "<Required>",
        "salesforce.password" : "<Required>",
        "salesforce.password.token" : "<Required>",
        "salesforce.consumer.key" : "<Required>",
        "salesforce.consumer.secret" : "<Required>",
        "confluent.topic.bootstrap.servers":"localhost:9092",
        "confluent.topic.replication.factor": "1",

        "key.converter": "org.apache.kafka.connect.storage.StringConverter",
        "value.converter": "org.apache.kafka.connect.json.JsonConverter",
        "value.converter.schemas.enable":true,
        "behavior.on.api.errors": "fail",

        "reporter.bootstrap.servers": "localhost:9092",
        "reporter.error.topic.name": "error-responses",
        "reporter.error.topic.replication.factor": 1,
        "reporter.result.topic.name": "success-responses",
        "reporter.result.topic.replication.factor": 1,
        "salesforce.sink.object.operation": "upsert",
        "override.event.type": "true",

        "request.max.retries.time.ms": 60000,
        "salesforce.custom.id.field.name": "extid__c",
        "salesforce.use.custom.id.field": true
    },
    "tasks": [
        ...
    ],
    "type": null
}
Tip
The
tasksfield may include information about the one started task.In order to insert an order into Salesforce with a Kafka record, the record should have a valid
AccountID,ContractID,EffectiveDate, andStatus. Please create an Account record and a Contract record in Salesforce. The values used in this example are:"AccountId": "0012L0000176cdVQAQ","ContractId": "8002L000000ANqwQAG"and"EffectiveDate": 1608922098000(the Epoch timestamp for 12/25/2020 in milliseconds).kafka-console-producer \ --broker-list localhost:9092 \ --topic orders {"schema":{"type":"struct","fields":[{"type":"string","optional":false,"field":"Id"},{"type":"string","optional":false,"field":"AccountId"},{"type":"string","optional":false,"field":"ContractId"},{"type":"string","optional":false,"field":"Description"},{"type":"string","optional":false,"field":"Status"},{"type": "int64","optional": false,"field": "EffectiveDate"},{"type":"string","optional":false,"field":"_ObjectType"}, {"type":"string","optional":false,"field":"_EventType"}],"optional":false,"name":"myOrder","version":1},"payload": {"Id": "200", "AccountId": "0012L0000176cdVQAQ", "ContractId": "8002L000000ANqwQAG", "Status": "Draft", "EffectiveDate": 1608922098000, "Description":"Order record has been upserted.", "_ObjectType":"Order", "_EventType":"updated"}}Log in to Salesforce and verify that the
Orderobject exists with the external ID.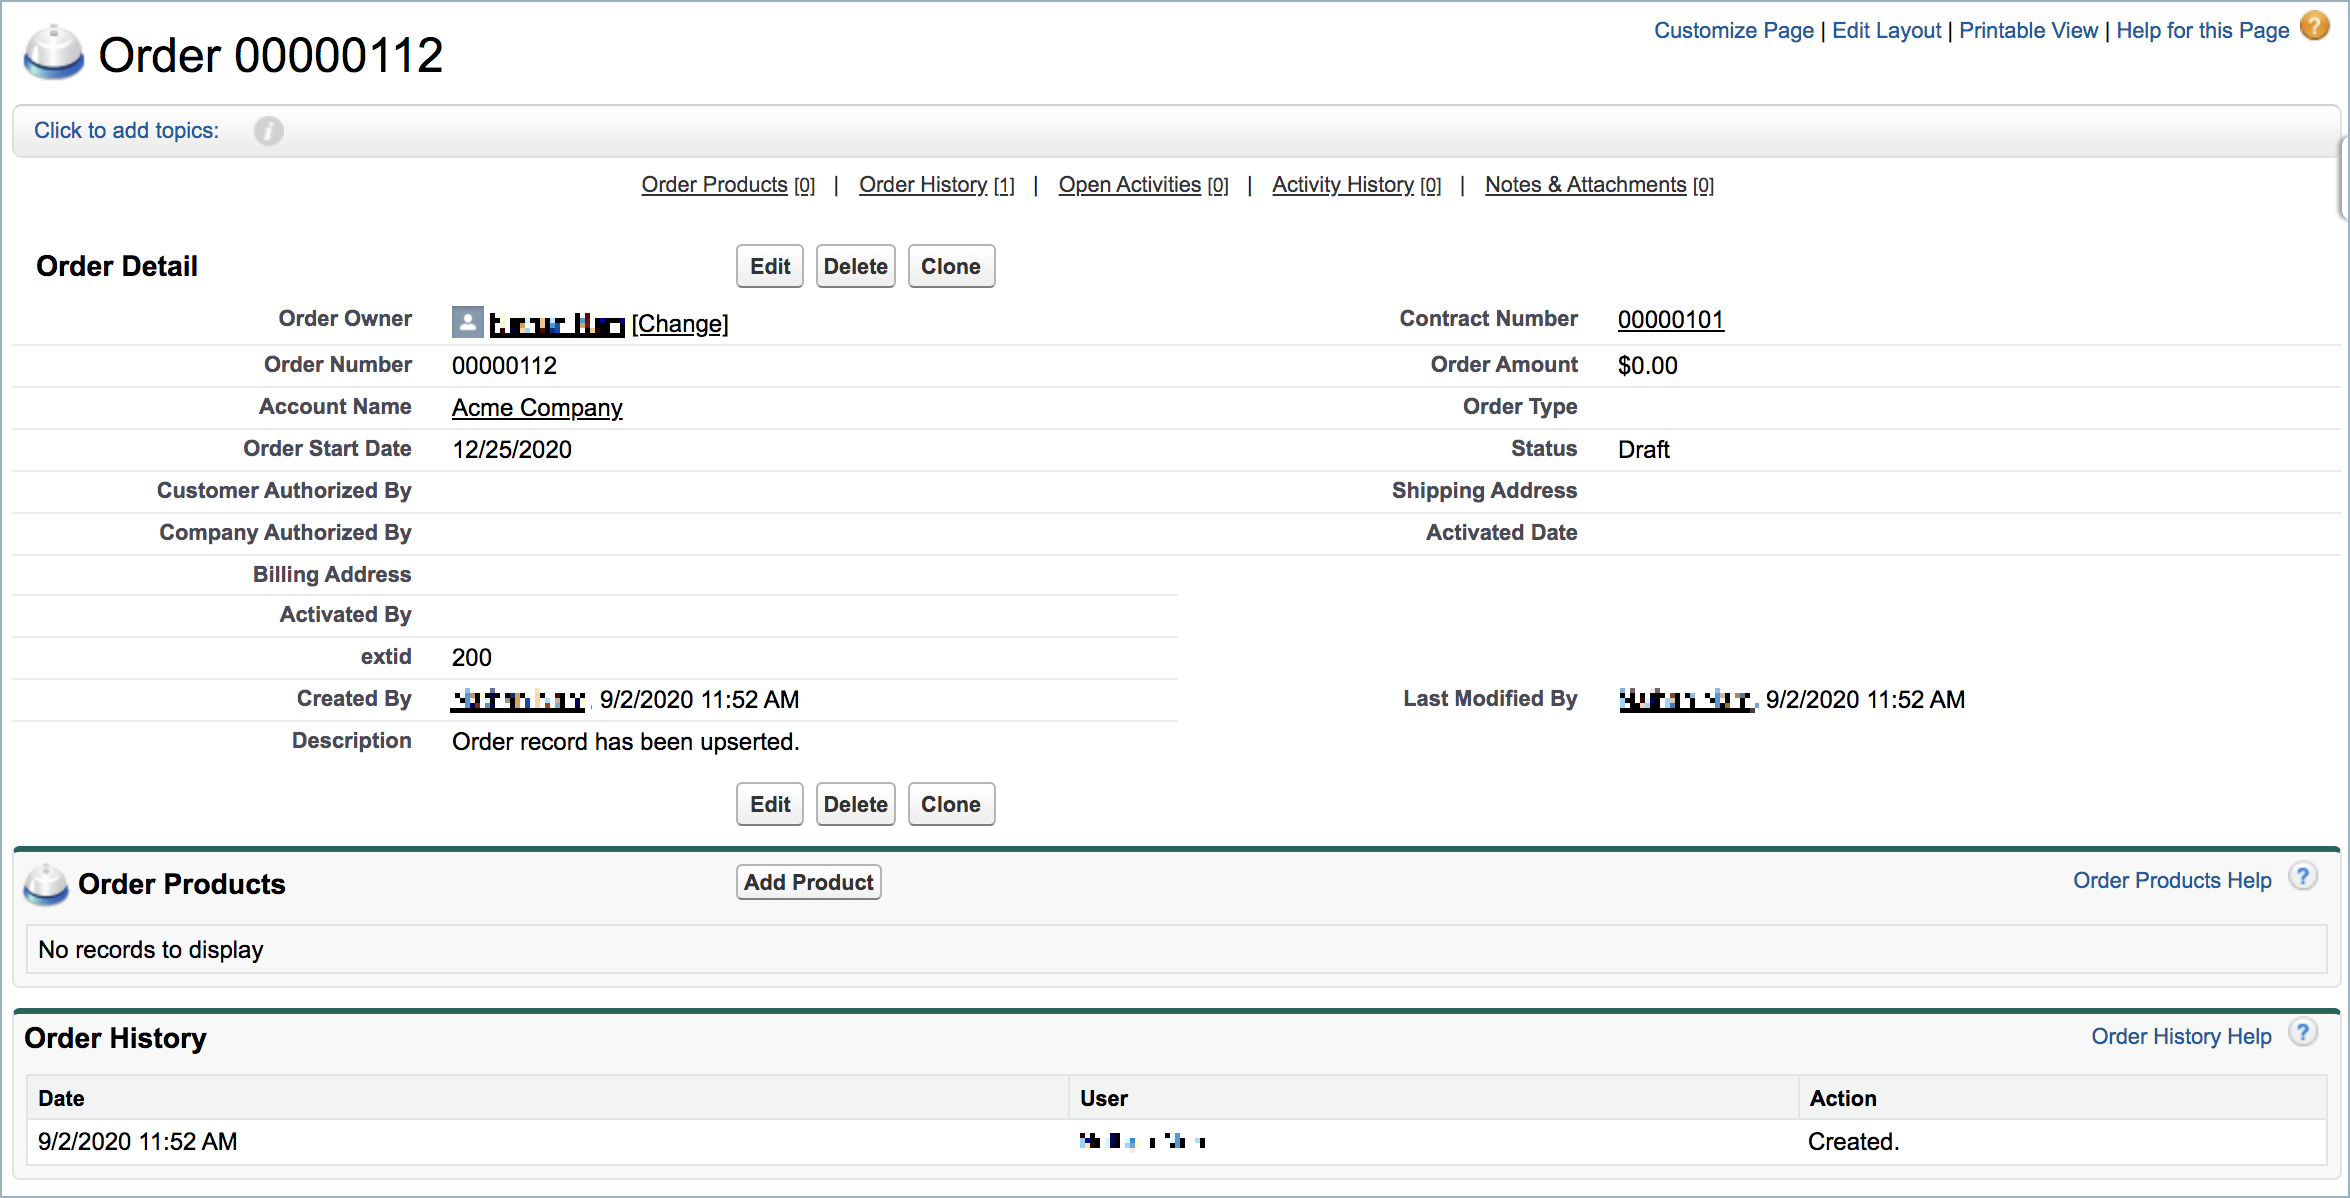
Update the description of the order object the connector just created.
kafka-console-producer \
--broker-list localhost:9092 \
--topic orders
{"schema":{"type":"struct","fields":[{"type":"string","optional":false,"field":"Id"},{"type":"string","optional":false,"field":"AccountId"},{"type":"string","optional":false,"field":"ContractId"},{"type":"string","optional":false,"field":"Description"},{"type":"string","optional":false,"field":"Status"},{"type": "int64","optional": false,"field": "EffectiveDate"},{"type":"string","optional":false,"field":"_ObjectType"}, {"type":"string","optional":false,"field":"_EventType"}],"optional":false,"name":"myOrder","version":1},"payload": {"Id": "200", "AccountId": "0012L0000176cdVQAQ", "ContractId": "8002L000000ANqwQAG", "Status": "Draft", "EffectiveDate": 1608922098000, "Description":"Order record has been updated.", "_ObjectType":"Order", "_EventType":"updated"}}
Login to Salesforce and verify that the
Orderobject has been updated with the external ID.