
Splunk Source Connector for Confluent Platform
The Splunk Source connector provides a way to integrate Splunk with Apache Kafka®. The connector receives data from applications that would normally send data to a Splunk HTTP Event Collector (HEC).
The connector has support for X-Forwarded-For which allows it to be used behind a load balancer.
How to use this connector
The main purpose of the Splunk Source connector is to replace the Splunk HTTP Event Collector (HEC). This allows you to capture events from device and client applications and get these events immediately into Kafka for normal and real-time stream processing.
The following shows the conventional way a Splunk HTTP Event Collector captures events from devices and client applications. The events can be queried, but the events are not available for real-time stream processing.
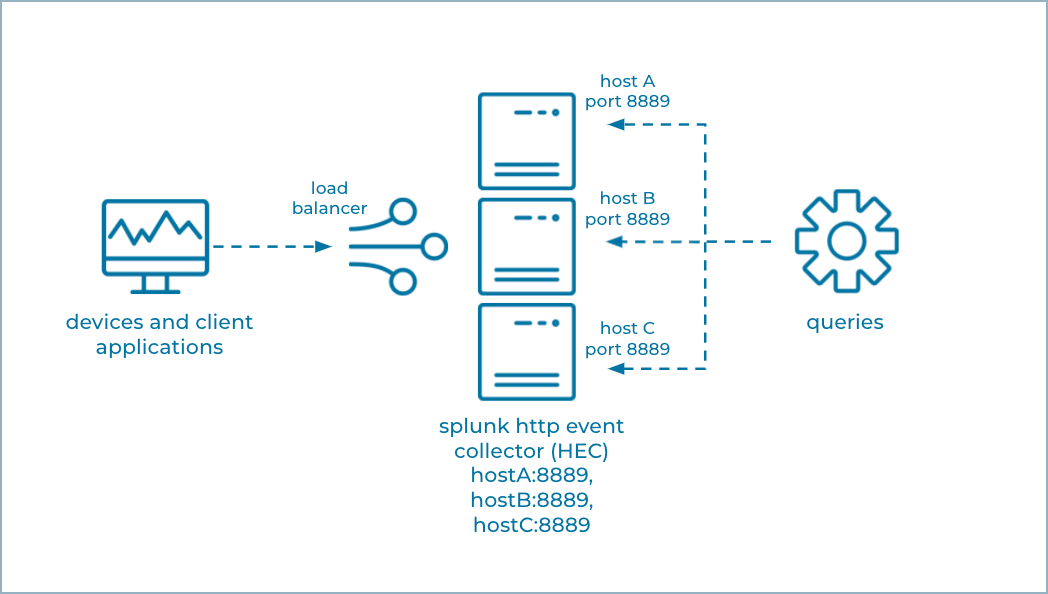
HTTP Event Collector
The following shows three Splunk Source connectors running in Connect Standalone mode. The devices and client applications send their events to an endpoint that looks like Splunk HEC. But, in this case, Splunk HEC is replaced by the Splunk Source connector(s) that can write events directly to Kafka, where they can be further processed and consumed in real time.
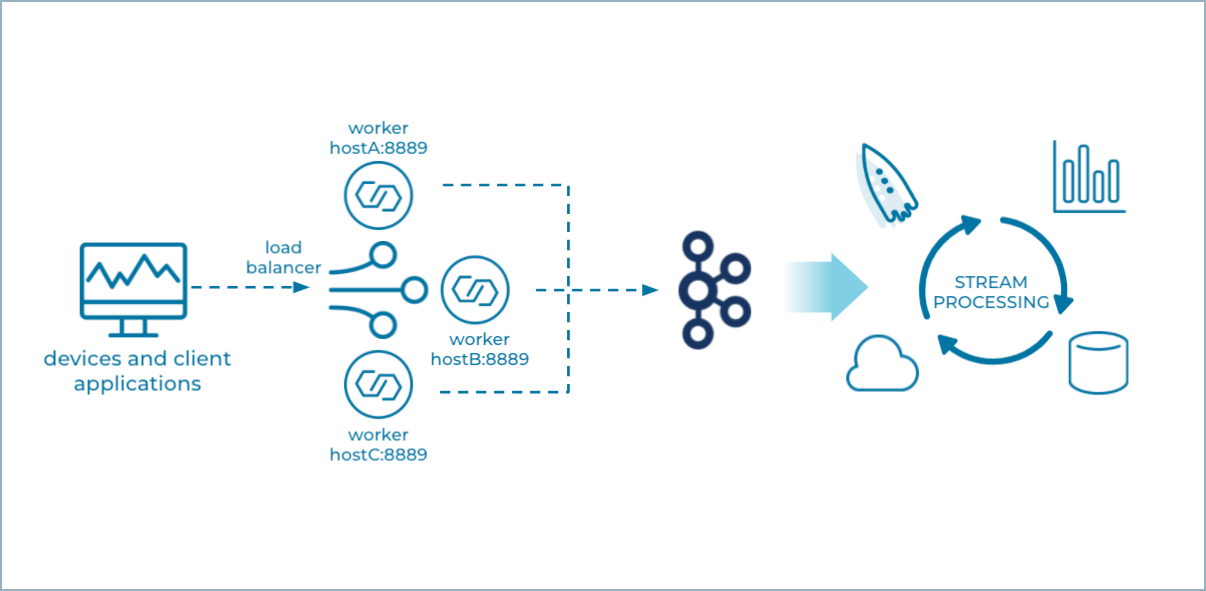
Multiple Splunk Source Standalone Nodes
Standalone mode
For a production environment, Confluent recommends you run the Splunk Source connector in Standalone mode.
A Splunk Source connector always runs one task that listens to a network port you specify in the configuration. The load balancer has to know the hosts and ports where it sends incoming event data, and Standalone is the only Connect mode that allows you to be certain where the connector’s tasks are running.
Note
Additional Splunk Source connectors can run in the same worker, but they have to use different ports.
You can run more than one Standalone worker node on separate machines, where each Standalone worker runs a single Splunk Source connector with the same configuration (shown in the example graphic above). The workers won’t form a cluster, but, when coupled with a load balancer you can achieve cluster-like behavior. This works because the Splunk Source connector produces no source offsets, since it’s just going to produce whatever is sent to its port. And, if any of the Standalone nodes fail, you can simply restart the connector.
Distributed mode
Confluent does not recommend using the Splunk Source connector with a Connect Distributed cluster in a production environment.
The Splunk Source connector does not work with a Connect Distributed cluster with multiple nodes, since the cluster will assign the one task that listens to a specific network port to any of the Connect workers, and may reassign it to another worker at any time. You wouldn’t know on which worker (and host) the task is deployed. It’s also not possible to use this connector with a Distributed Connect cluster and configure the number of connector tasks to be the same as the number of workers in the cluster. The Distributed Connect cluster may assign these tasks to any of the workers, including assigning multiple tasks to a single worker. One task will successfully bind to the configured port, but any other tasks on that same worker will fail.
Note
You can use this connector with a single-node Connect Distributed cluster for development and testing.
Features
The Splunk Source connector includes the following features:
At least once delivery
This connector guarantees that records are delivered at least once to the Kafka topic. If the connector restarts, there may be some duplicate records in the Kafka topic.
Supports one task
The Splunk Source connector supports running only one task.
Authentication tokens
The Splunk Source connector supports access control by way of authentication tokens. To use this feature, add HEC tokens as comma-separated values in the splunk.collector.authentication.tokens configuration property.
Note
There are several ways to authenticate to the connector: by HTTP authentication, basic authentication, or a query string. For more details, see https://docs.splunk.com/Documentation/Splunk/8.2.2/Data/FormateventsforHTTPEventCollector
Client-side encryption
This connector supports Client-Side Field Level Encryption (CSFLE) and Client-Side Payload Encryption (CSPE). For more information, see Manage Client-Side Encryption.
Limitations
The Splunk Source connector does not support extracting data from Splunk Cloud.
The connector does not support extracting data from Splunk Enterprise.
The connector does not support receiving data from a Splunk Universal Forwarder (UF) or Splunk Heavy Forwarder (HF). If you need a connector that supports UF, see the Splunk S2S Source connector and for HF, see the Syslog Source connector.
The Splunk Source connector listens on a network port. Running more than one connector task or running in distributed mode can cause undesirable effects if another task already has the port open. It is recommended you run this connector in Standalone mode.
License
You can use this connector for a 30-day trial period without a license key.
After 30 days, you must purchase a connector subscription which includes Confluent enterprise license keys to subscribers, along with enterprise-level support for Confluent Platform and your connectors. If you are a subscriber, you can contact Confluent Support for more information.
For license properties, see Confluent Platform license and for information about the license topic License topic configuration.
Configuration Properties
For a complete list of configuration properties for this connector, see Configuration Reference for Splunk Source Connector for Confluent Platform.
For an example of how to get Kafka Connect connected to Confluent Cloud, see Connect Self-Managed Kafka Connect to Confluent Cloud.
Install the Splunk Source Connector
You can install this connector by using the confluent connect plugin install command, or by manually downloading the ZIP file.
Prerequisites
You must install the connector on every machine where Connect will run.
Kafka Broker: Confluent Platform 3.3.0 or later
Connect: Confluent Platform 7.7.0 or later
Java 17 or later
An install of the Confluent Hub Client.This is installed by default with Confluent Enterprise.
An install of the latest (
latest) connector version.To install the
latestconnector version, navigate to your Confluent Platform installation directory and run the following command:confluent connect plugin install confluentinc/kafka-connect-splunk-source:latest
You can install a specific version by replacing
latestwith a version number as shown in the following example:confluent connect plugin install confluentinc/kafka-connect-splunk-source:2.0.0
Install the connector manually
Download and extract the ZIP file for your connector and then follow the manual connector installation instructions.
Quick Start
This quick start uses the Splunk Source connector to receive application data ingest it into Kafka.
Install the connector using the Confluent Hub Client.
# run from your CP installation directory
confluent connect plugin install confluentinc/kafka-connect-splunk-source:latest
Start the Confluent Platform.
Tip
The command syntax for the Confluent CLI development commands changed in 5.3.0. These commands have been moved to
confluent local. For example, the syntax forconfluent startis nowconfluent local services start. For more information, see confluent local.confluent local start
Create a
splunk-source.propertiesfile with the following contents:name=splunk-source kafka.topic=splunk-source tasks.max=1 connector.class=io.confluent.connect.SplunkHttpSourceConnector splunk.collector.index.default=default-index splunk.port=8889 splunk.ssl.key.store.path=/path/to/your/keystore.jks splunk.ssl.key.store.password=<keystore password> confluent.topic.bootstrap.servers=localhost:9092 confluent.topic.replication.factor=1
Load the Splunk Source connector.
confluent local load splunk-source --config splunk-source.properties
Important
Don’t use the Confluent CLI in production environments.
Confirm the connector is in a
RUNNINGstate.confluent local status splunk-source
Simulate an application sending data to the connector.
curl -k -X POST https://localhost:8889/services/collector/event -d '{"event":"from curl"}'
Verify the data was ingested into the Kafka topic.
kafka-avro-console-consumer --bootstrap-server localhost:9092 --topic splunk-source --from-beginning
Shut down Confluent Platform.
confluent local destroy