

Use the Confluent Manager for Apache Flink UI
Confluent Manager for Apache Flink® (CMF) includes a web UI. In the UI, you can create and manage environments, applications, compute pools, SQL statements, and the resources they depend on, without calling the REST API or using the Confluent CLI. The UI also shows information that is hard to get from other tools, such as pod logs, events, and the decisions of the Flink autoscaler.
In earlier releases, Confluent Control Center provided the UI for CMF. That integration is deprecated and no longer under active development, but it continues to work with your existing configuration. Migrate to the CMF UI.
This page describes how the UI is organized and what you can do on each page. For the concepts behind each resource, follow the links in each section.
To open the UI and to configure how users log in, see Configure the Confluent Manager for Apache Flink UI.
The UI uses the CMF REST API, so the same authorization rules apply. What you can see and change in the UI depends on your permissions. For the permissions the UI needs, see Permissions that the CMF UI requires.
Navigate the UI
The top bar is the same on every page:
The book icon opens the Confluent Platform for Apache Flink documentation.
If login is enabled, the user menu on the right shows who you are signed in as and has a Log out option.
Global navigation
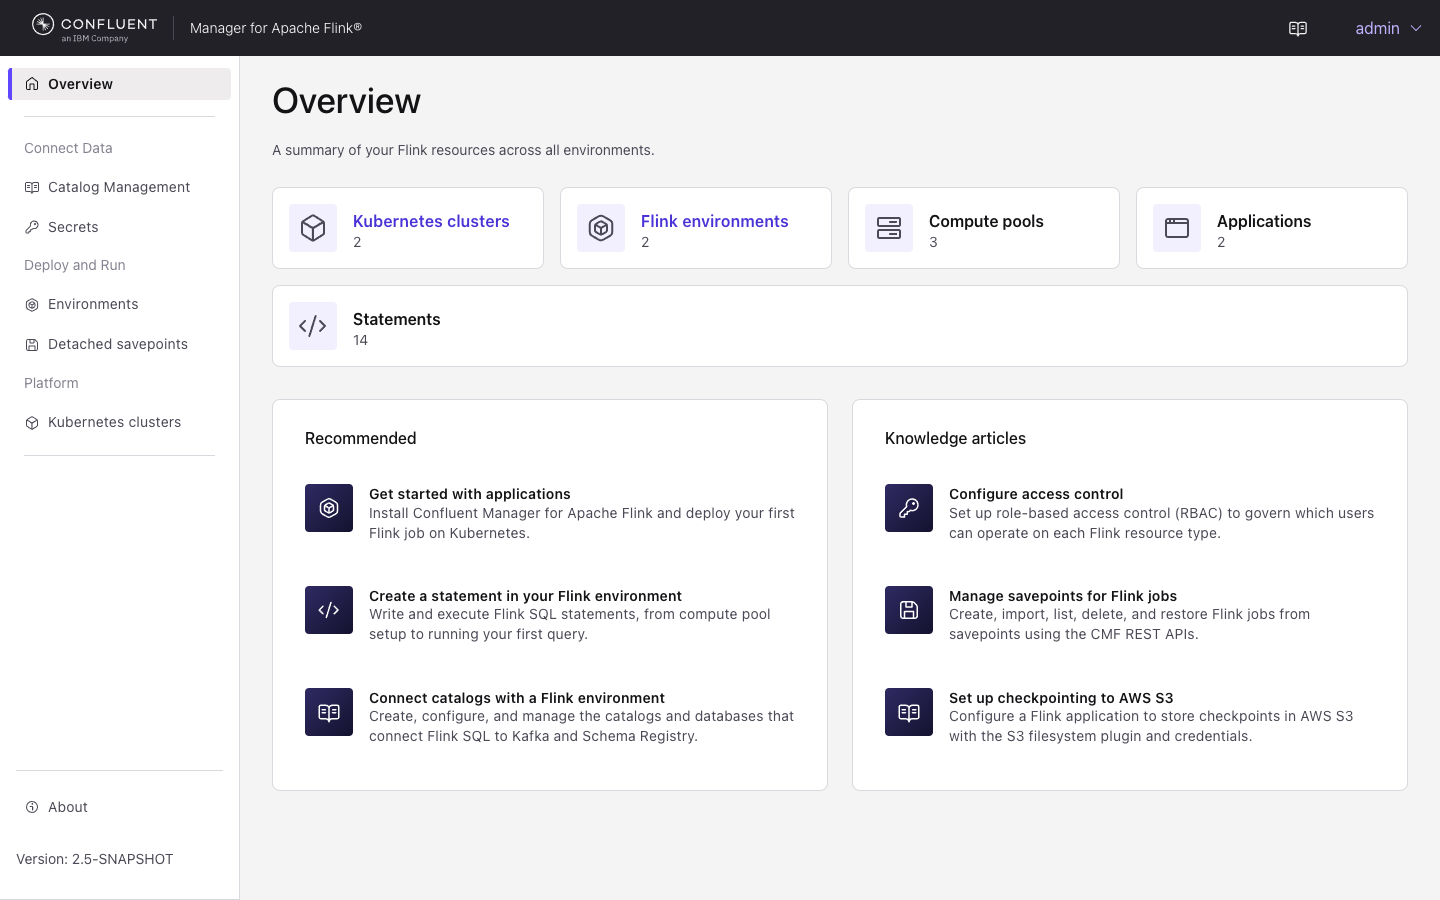
The home page and the pages that apply to all environments show the global sidebar. It has the following entries:
Overview: The home page. It shows how many Kubernetes clusters, environments, compute pools, applications, and statements exist, and links to documentation for common tasks.
Connect Data
Catalog Management: Kafka catalogs and their databases. See Manage catalogs and secrets.
Secrets: Connection credentials for catalogs and databases. See Manage catalogs and secrets.
Deploy and Run
Environments: All environments. Open an environment to manage the resources in it. See Manage environments.
Detached savepoints: Savepoints that don’t belong to an application or a statement or are imported from outside of CMF, e.g. open source Flink. See Manage detached savepoints.
Platform
Kubernetes clusters: The clusters that CMF deploys to. See View Kubernetes clusters.
About: The license and the effective CMF configuration. See View the license and the configuration.
The version of CMF is shown below About.
Environment navigation
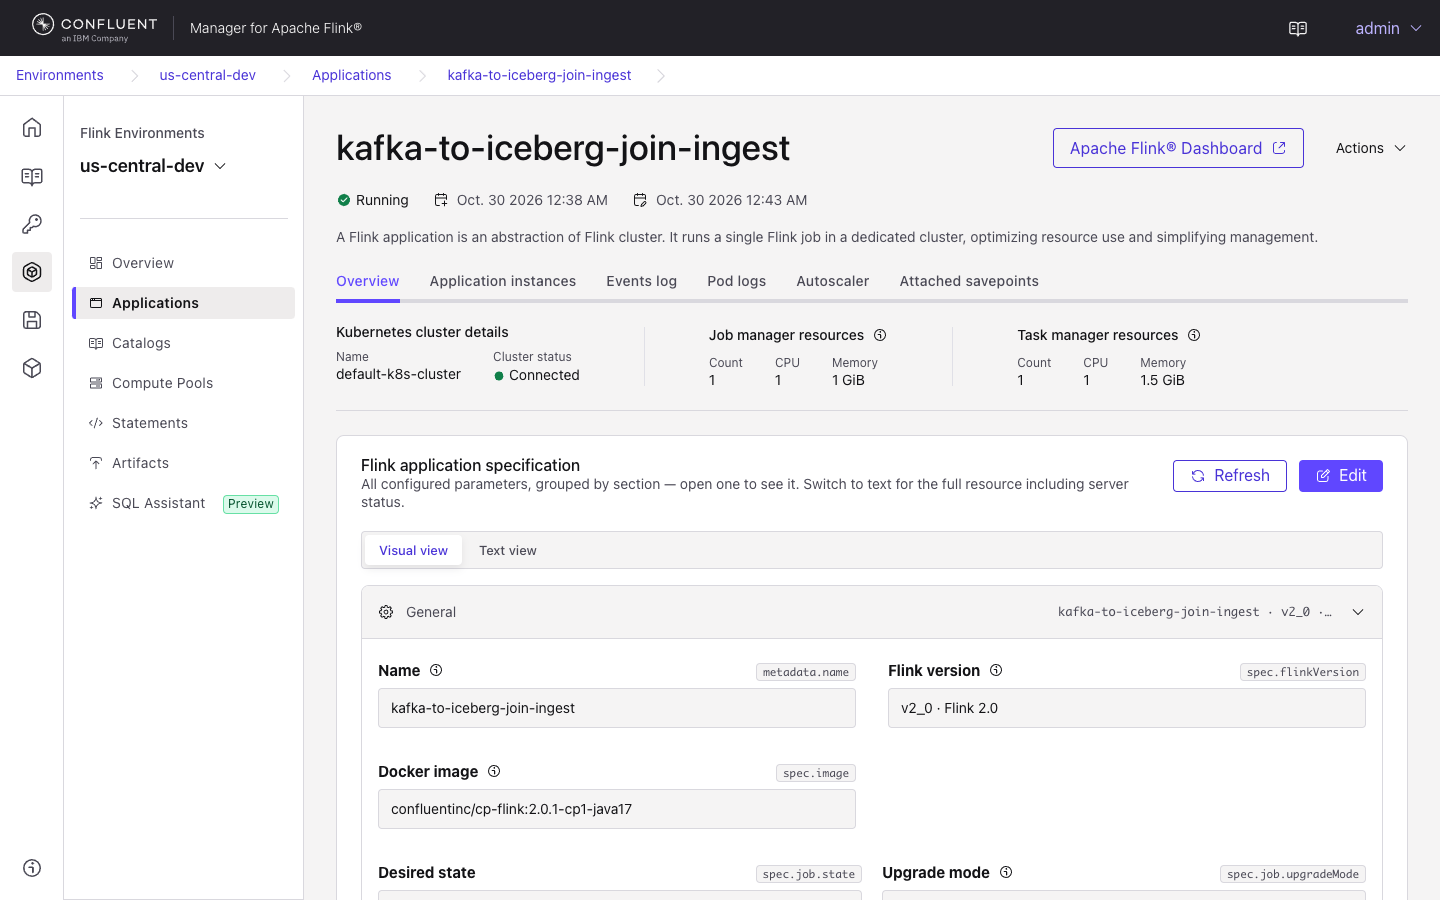
When you open an environment, the global sidebar shrinks to a column of icons, and a second sidebar lists the pages of the environment:
Overview
Applications
Catalogs
Compute Pools
Statements
Artifacts
SQL Assistant, marked Preview. This entry is shown only when the SQL Assistant is enabled.
To switch to another environment, select the environment name at the top of the environment sidebar. You can search the list by name.
Common page elements
Several pages share the following elements.
Visual editor and text editor
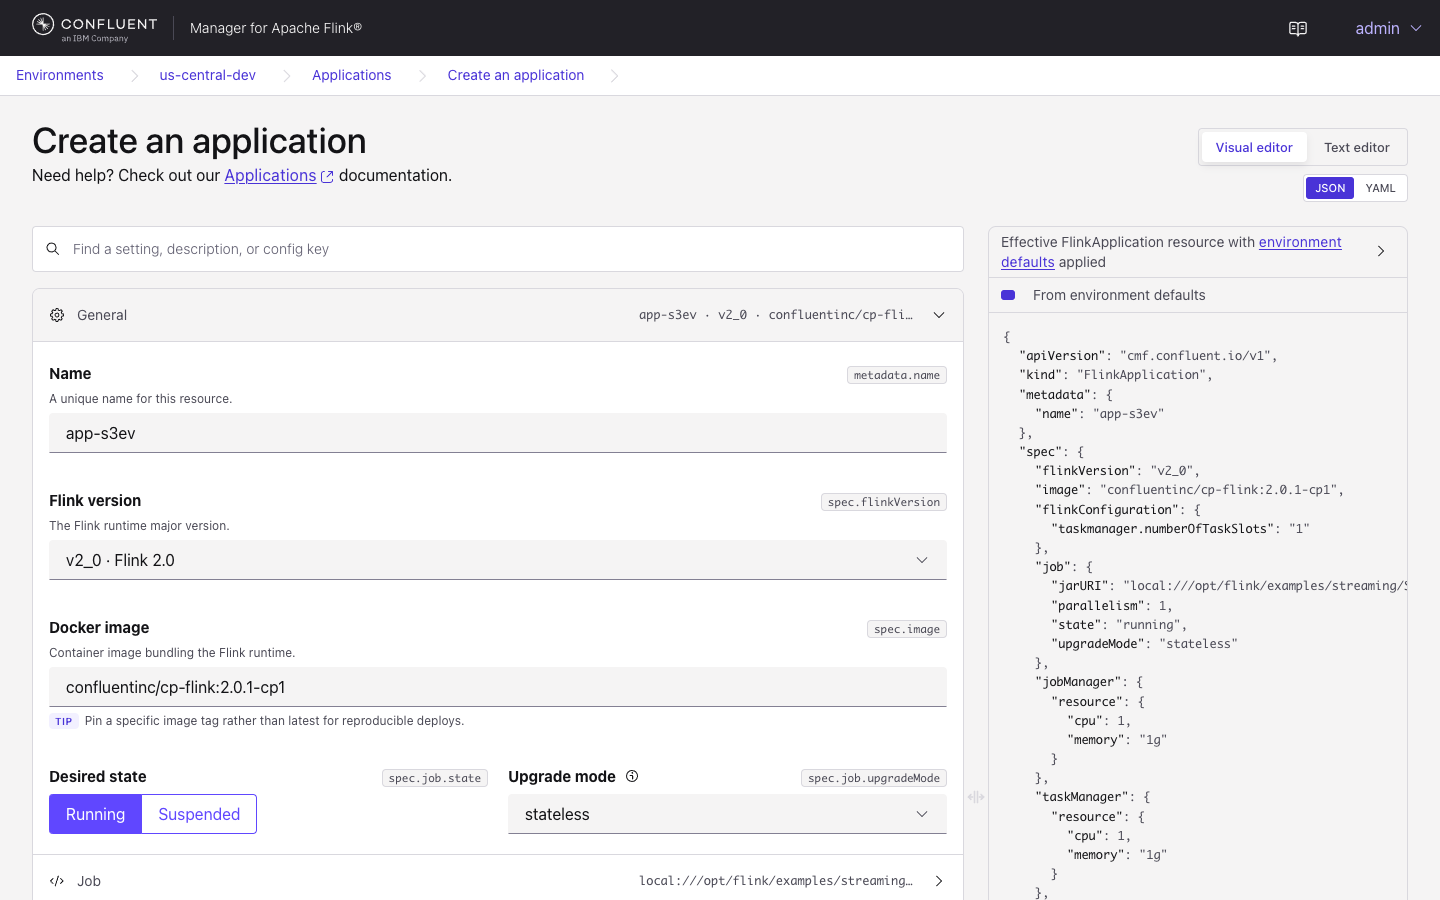
When you create or edit an application, a compute pool, or environment defaults, the UI opens a full-page editor with two modes:
Visual editor: A form, grouped into sections such as General, Job, JobManager resources, TaskManager resources, Checkpointing & state, Savepoints, and Autoscaler. Each field shows the key it sets in the resource, for example
spec.job.parallelism. Use the search box above the sections to find a field by name, description, or configuration key. Settings that have no field of their own go into Advanced Flink configuration as key and value pairs.Text editor: The resource as JSON or YAML. Select JSON or YAML to change the format.
Both modes edit the same resource, so you can switch between them without losing changes.
Next to the form, a panel shows the effective resource, which is your input with the environment defaults applied. Values that come from the environment defaults are highlighted. For more information about environment defaults, see Configure Environments in Confluent Manager for Apache Flink.
On the details page of an application or a compute pool, the specification has two views. Visual view shows the fields as a read-only form. Text view shows the full resource, including the status that CMF reports. Select Edit to open the editor, or Refresh to reload the resource.
Events log
Applications, compute pools, and statements have an Events log tab. It lists events with their reason, message, count, and the times they first and last occurred. Select an event to see its details. You can filter by event type, show only warnings with Warnings only, and search the messages.
For a statement that runs on a shared compute pool, a banner on the statement page warns you when the compute pool has problems, and links to the events of the compute pool.
For more information about events, see Track Events in Confluent Manager for Apache Flink.
Pod logs
The Pod logs tab shows the logs of the JobManager and TaskManager pods of a Flink cluster. You can use it to find out why a job failed, even if you don’t have access to the Kubernetes cluster. The tab is on the following pages:
An application.
A shared compute pool. The logs are those of the session cluster, which runs all statements on the pool.
A statement that runs on a dedicated compute pool.
A statement on a shared compute pool has no pods of its own and no Pod logs tab. Its logs are on the Pod logs tab of the compute pool.
On the tab, select a pod from the list of job manager and task manager pods. For the selected pod, you can:
Search the log lines and filter them by log level.
Turn Following on or off. While it is on, new lines appear as the container writes them.
Turn Wrap on or off for long lines.
Select Download to save the log.
Select Jump to oldest to load older lines.
Read the log of the previous instance of a container that restarted.
To see the pod logs, you need the following permissions:
For an application,
Viewon the application.For a statement,
Viewon the statement.For a shared compute pool,
AccessWebUIon the compute pool.Viewis not enough, because the logs of the session cluster contain the output of every statement on the pool. Of the predefined roles, only ClusterAdmin and SystemAdmin grantAccessWebUI.
If the tab says Pod logs are turned off, an operator disabled pod logs for your CMF deployment. See Pod logs.
Flink web UI
The details pages of applications and shared compute pools have an Apache Flink® Dashboard button. It opens the Flink web UI of the cluster through CMF. The applications list has a View Flink UI link for each application. For more information, see Access the Flink web UI.
Resources managed by Confluent for Kubernetes
If Confluent for Kubernetes (CFK) created a resource, the UI shows the banner
Managed by Confluent for Kubernetes on its page. Actions that change or
delete the resource are disabled. Make changes with kubectl on the CFK
resource that owns it. For more information, see Manage Flink With Confluent for Kubernetes.
Disconnected and decommissioned Kubernetes clusters
If the Kubernetes cluster of an environment is disconnected, the pages of the environment show a banner. Applications and statements might keep running, but their status in the UI might be out of date. Actions that need the cluster are disabled until the connection is back.
If the cluster is decommissioned, CMF no longer deploys new applications, compute pools, or statements to it.
For more information, see Decommission a cluster and Behavior on disconnected or decommissioned clusters.
Manage environments
The Environments page lists all environments with their Kubernetes cluster, namespace, cluster status, creation date, and the number of resources in each environment. For the concepts, see Configure Environments in Confluent Manager for Apache Flink.
To create an environment:
On the Environments page, select Add Flink environment.
Enter the Environment name.
Select the Kubernetes cluster and enter the Kubernetes namespace. You can’t change the cluster and the namespace after you create the environment.
Optional: Turn on Show defaults to set defaults for applications, compute pools, and statements in this environment.
Select Create environment.
The page of an environment has the following tabs:
Overview: The Kubernetes cluster and its status, the resources of the environment, and the health of its applications and statements.
Default Settings: The defaults for applications, compute pools, and statements. Select Edit to change them in the visual editor. Statement defaults have one section for detached statements, such as
INSERT INTO, and one for interactive statements, such asSELECT. CMF picks the section from the SQL of the statement. Only detached statements accept a savepoint schedule.
The Actions menu of an environment has Duplicate and Delete.
Delete an environment
You can delete an environment together with everything in it. The delete dialog lists the resources that are deleted with the environment, and offers two methods:
Delete in the background: Stops all Flink jobs and deletes everything in the environment. Savepoint files are deleted for running jobs and kept for the rest. This method is not available when the Kubernetes cluster is disconnected or decommissioned.
Force delete: Deletes the environment and everything in it from the CMF database. Cleanup on Kubernetes is best effort. Savepoint files are kept.
While the deletion runs, every page of the environment shows a banner with the resources that are still to be deleted. You can’t create or change anything in the environment until the deletion finishes.
If the deletion is stuck, select Delete again. The dialog retries the deletion of the remaining resources, or you can select Skip remaining cleanup and finish deletion now. Skipping the cleanup doesn’t take final savepoints, a statement’s job might keep running, and leftover savepoint files stay in storage. Use it only if the deletion is stuck.
Manage applications
The Applications page of an environment lists its applications with their state, last update, and resources. You can filter the list by state and by error. For the concepts, see Create Confluent Manager for Apache Flink Applications and Describe, Update and Delete Confluent Manager for Apache Flink Applications.
To create an application, select Add application. Fill in the visual editor or paste a resource into the text editor, and select Create application.
The header of an application shows its state, and the Actions menu has the following entries:
Duplicate: Opens the create page with the settings of this application.
Suspend: Suspends the Flink job. For a suspended application, the menu has Start instead. When you start an application, you choose the upgrade strategy and whether to start from a savepoint.
Delete: Deletes the application.
To change the application, select Edit on the Overview tab.
The page of an application has the following tabs:
Overview: The Kubernetes cluster, the job manager and task manager resources, and the specification of the application.
Application instances: The instances of the application. CMF creates an instance every time the specification of the application changes. Select an instance to see its specification. To see what changed between two instances, select both and then select Compare. The comparison is available as Unified and Side by side views. See Application Instances in Confluent Manager for Apache Flink.
Events log: See Common page elements.
Pod logs: See Pod logs.
Autoscaler: See Monitor the autoscaler.
Attached savepoints: The savepoints of the application, and the status of the savepoint schedule. Select Add Savepoint to take a savepoint. You can restore the application from a completed savepoint, and pin a scheduled savepoint to keep it out of automatic cleanup. To add or change a schedule, edit the application and open Savepoints > Periodic savepoints. See Savepoint Management in Confluent Manager for Apache Flink and Schedule periodic savepoints.
Monitor the autoscaler
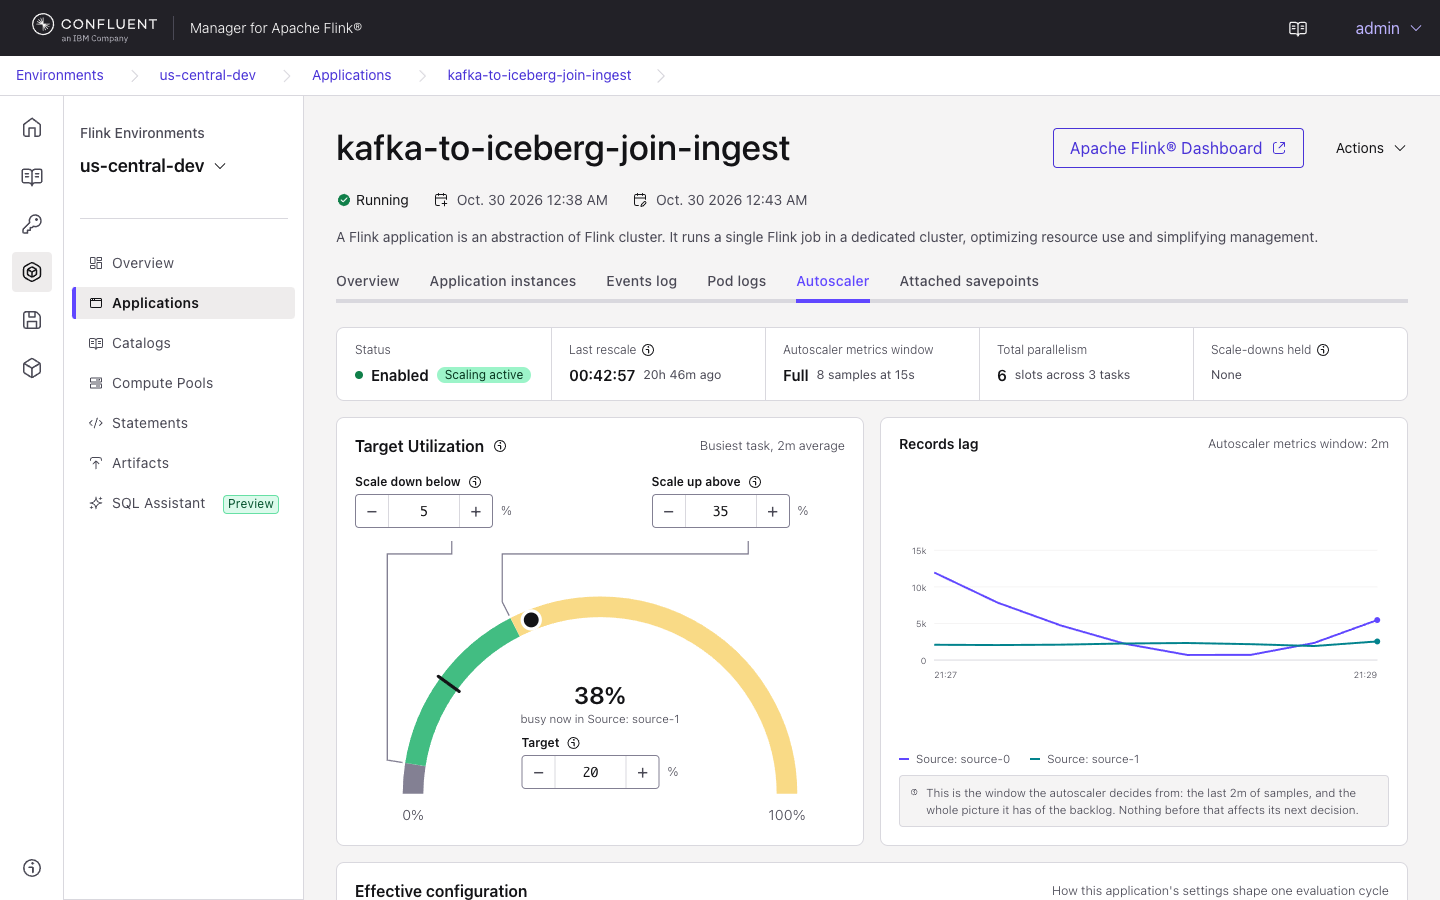
The Autoscaler tab shows what the Flink autoscaler of the application measures and decides. The autoscaler is part of the Confluent Platform for Apache Flink Kubernetes Operator. For how it works and how to configure it, see the autoscaler documentation of the Kubernetes Operator.
If the autoscaler is not enabled for the application, the tab shows Autoscaler is not enabled and the configuration that you can add to the specification to enable it.
If the autoscaler is enabled, the tab shows the following information:
A status row with the autoscaler status, the time of the last rescale, whether the autoscaler metrics window is full, the total parallelism, and the number of scale-downs that are held.
Target Utilization: The utilization of the busiest task, compared with the thresholds for scaling up and down and with the target. You can change the thresholds and the target here, and then select Update Autoscaler spec to save them to the specification.
Records lag: The lag of each source during the metrics window that the autoscaler decides from.
Parallelism per task: How the parallelism of each task changed over time.
Scaling decisions: The decisions that the autoscaler recorded, including the ones that didn’t change the parallelism.
Job tasks: The tasks of the job. Expand a task to compare the current metrics with the metrics from the last decision.
Effective configuration: The autoscaler options that apply to the application, and one evaluation cycle drawn on a time line.
Manage compute pools
The Compute Pools page of an environment lists its compute pools with their status, resources, number of active statements, Flink version, and type. For the concepts, see Manage Compute Pools in Confluent Manager for Apache Flink.
To create a compute pool, select Add compute pool. In the visual editor, choose the Type, either Dedicated or Shared. You can’t change the type after you create the compute pool. Then select Create compute pool.
The Actions menu of a compute pool has Duplicate, Stop or Start, and Delete. To change the compute pool, select Edit on the Overview tab.
The page of a compute pool has the following tabs:
Overview: The type, the Kubernetes cluster, the resources, and the specification of the compute pool.
Events log: See Common page elements.
Statements: The statements that use this compute pool.
Pod logs: Only for shared compute pools. See Pod logs.
Deleting a shared compute pool takes some time, because CMF first removes its session cluster from Kubernetes. If the deletion is stuck, select Delete again and then Finish without cleanup.
Run SQL statements
The Statements page of an environment lists its statements with their SQL, status, compute pool, and start time. You can stop and resume a statement directly from the list. For the concepts, see Create Statements with Confluent Manager for Apache Flink and Manage Statements in Confluent Manager for Apache Flink.
To create a statement:
On the Statements page, select Add statement.
Optional: Change the Statement name. The UI suggests a name that starts with
cmf-ui-.Select the Compute pool, and optionally the Catalog and the Database.
Optional: Select Show advanced settings panel to set the parallelism and the Flink configuration of the statement.
Enter the SQL and select Run.
For a SELECT statement, the results appear below the SQL as they arrive.
The Actions menu of a statement has the following entries:
Run or Stop: Starts or stops the statement. These actions are not available for statements that completed or failed.
Create savepoint: Takes a savepoint of the statement.
Clone: Opens the create page with the SQL and the settings of this statement.
Delete: Deletes the statement.
The page of a statement has the following tabs:
Overview: The Kubernetes cluster, the details of the statement, and its SQL. For a statement on a shared compute pool, the tab links to the compute pool and shows its status.
Events log: See Common page elements.
Exceptions: The exceptions of the Flink job.
Attached Savepoints: The savepoints of the statement. You can restore the statement from a savepoint.
Pod logs: Only for statements on a dedicated compute pool. See Pod logs.
When you delete a statement on a shared compute pool, its status changes to Deleting until CMF removes the Flink job from the session cluster. If the deletion is stuck, select Delete again and then Finish without cleanup.
To write SQL with the help of an AI assistant, use the SQL Assistant.
Manage artifacts
The Artifacts page of an environment lists the artifacts, such as JAR files, that applications and statements in the environment can use. Select Upload artifact to upload a file. You can also upload a new version of an existing artifact and delete artifacts on this page. For the concepts, see Manage Artifacts in Confluent Manager for Apache Flink.
Manage catalogs and secrets
The catalogs and secrets connect Flink SQL to Kafka and Schema Registry.
Catalog Management, in the global sidebar, lists the Kafka catalogs. Select Add catalog to create one. For a catalog, you can edit its databases, choose which environments may update its tables, and link it to an environment. See Manage Kafka Catalogs and Databases for Confluent Manager for Apache Flink.
Catalogs, in the environment sidebar, lists the catalogs that the environment can use. The Kafka catalogs tab shows the Kafka catalogs and their databases. The Environment catalog tab shows the catalog of the environment. See Inspect the environment catalog with the REST API.
Secrets, in the global sidebar, lists the secrets and the environments that use them. Select Add secret to create one. When you update a secret, the UI doesn’t show the previous value. The new value replaces the old one in every environment and catalog that uses the secret. See Secrets and secret mappings.
Manage detached savepoints
The Detached savepoints page lists the savepoints that don’t belong to an application or a statement. Select Import detached savepoint to register an existing savepoint with CMF. Only completed savepoints can be restored. For more information, see Attached versus Detached savepoints.
View Kubernetes clusters
The Kubernetes clusters page lists the clusters that CMF deploys to, with their status, the environments that use them, and the time of their last heartbeat. Select a cluster to see its details.
You can’t add or remove clusters in the UI. A platform administrator registers clusters with kubeconfig files. See Manage Kubernetes clusters.
View the license and the configuration
The About page has two tabs:
License: The license type and its expiry date.
Configuration: The effective configuration of CMF. For each property, the tab shows its value and where the value came from, such as a configuration file, an environment variable, or a default. Secret values are masked. Use this tab to troubleshoot a deployment. An operator can hide this tab, see Configure the Confluent Manager for Apache Flink UI.