Important
You are viewing documentation for an older version of Confluent Platform. For the latest, click here.
Kafka Connect Azure Data Lake Storage Gen1 Sink Connector
You can use the Azure Data Lake Storage Gen1 connector, currently available as a sink, to export data from Apache Kafka® topics to Azure Data Lake Storage Gen1 files in either Avro or JSON formats. Depending on your environment, the Azure Data Lake Storage Gen1 connector can export data by guaranteeing exactly-once delivery semantics to consumers of the Azure Data Lake Storage Gen1 files it produces.
The Azure Data Lake Storage Gen1 sink connector periodically polls data from Kafka and, in turn, uploads it to Azure Data Lake Storage Gen1. A partitioner is used to split the data of every Kafka partition into chunks. Each chunk of data is represented as an Azure Data Lake Storage Gen1 file. The key name encodes the topic, the Kafka partition, and the start offset of this data chunk. If no partitioner is specified in the configuration, the default partitioner which preserves Kafka partitioning is used. The size of each data chunk is determined by the number of records written to Azure Data Lake Storage Gen1 and by schema compatibility.
Features
The Microsoft Azure Data Lake Storage Gen1 connector offers a variety of features:
- Exactly Once Delivery: Records that are exported using a deterministic partitioner are delivered with exactly-once semantics.
- Pluggable Data Format with or without Schema: Out of the box, the connector supports writing data to Azure Data Lake Storage Gen1 in Avro
and JSON format. Besides records with schema, the connector supports exporting plain JSON and as byte array records without schema in
text files, one record per-line. In general, the connector may accept any format that provides an implementation of
the
Formatinterface. - Schema Evolution: When schemas are used, the connector supports schema evolution based on schema compatibility
modes. The available modes are:
NONE,BACKWARD,FORWARDandFULLand a selection can be made by setting the propertyschema.compatibilityin the connector’s configuration. When the connector observes a schema change, it decides whether to roll the file or project the record to the proper schema according to theschema.compatibilityconfiguration in use. - Pluggable Partitioner: The connector comes out of the box with partitioners that support default partitioning
based on Apache Kafka® partitions, field partitioning, and time-based partitioning in days or hours. You may implement your
own partitioners by extending the
Partitionerclass. Additionally, you can customize time-based partitioning by extending theTimeBasedPartitionerclass.
Install Azure Data Lake Storage Gen1 Connector
You can install this connector by using the Confluent Hub client (recommended) or you can manually download the ZIP file.
Install the connector using Confluent Hub
- Prerequisite
- Confluent Hub Client must be installed. This is installed by default with Confluent Enterprise.
Navigate to your Confluent Platform installation directory and run this command to install the latest (latest) connector version.
The connector must be installed on every machine where Connect will be run.
confluent-hub install confluentinc/kafka-connect-azure-data-lake-gen1-storage:latest
You can install a specific version by replacing latest with a version number. For example:
confluent-hub install confluentinc/kafka-connect-azure-data-lake-gen1-storage:1.1.1
Install Connector Manually
Download and extract the ZIP file for your connector and then follow the manual connector installation instructions.
License
You can use this connector for a 30-day trial period without a license key.
After 30 days, this connector is available under a Confluent enterprise license. Confluent issues enterprise license keys to subscribers, along with providing enterprise-level support for Confluent Platform and your connectors. If you are a subscriber, please contact Confluent Support at support@confluent.io for more information.
See Confluent Platform license for license properties and License topic configuration for information about the license topic.
Quick Start
In this quick start, the Azure Data Lake Storage Gen1 connector is used to export data produced by the Avro console producer to Azure Data Lake Storage Gen1.
Note
Before you begin: create an Azure Data Lake Storage Gen1 account and grant write access to the user completing these procedures. See Get started with Azure Data Lake Storage Gen1 using the Azure portal for additional information. Also see Service-to-service authentication with Azure Data Lake Storage Gen1 using Azure Active Directory for information on setting up the account needed for the Azure Data Lake Storage Gen1 connector.
Install the connector through the Confluent Hub Client.
# run from your Confluent Platform installation directory
confluent-hub install confluentinc/kafka-connect-azure-data-lake-gen1-storage:latest
Tip
By default, it will install the plugin into share/confluent-hub-components and add the directory to the plugin path. If this is the first connector you have installed, you may need to restart the connect server for the plugin path change to take effect.
Also see Azure Data Lake Gen1 CLI for setuping up and using the Azure CLI.
Start the services using the Confluent CLI.
confluent start
Every service start in order, printing a message with its status.
Starting zookeeper
zookeeper is [UP]
Starting kafka
kafka is [UP]
Starting schema-registry
schema-registry is [UP]
Starting kafka-rest
kafka-rest is [UP]
Starting connect
connect is [UP]
Starting ksql-server
ksql-server is [UP]
Starting control-center
control-center is [UP]
Note
Make sure the Azure Data Lake Storage Gen1 connector has write access to the Azure Data Lake Storage Gen1 account shown in azure.datalake.account.name and can deploy credentials successfully.
To import a few records with a simple schema in Kafka, start the Avro console producer as follows:
  ./bin/kafka-avro-console-producer --broker-list localhost:9092 --topic datalake_topic \
--property value.schema='{"type":"record","name":"myrecord","fields":[{"name":"f1","type":"string"}]}'
Then, in the console producer, enter the following:
{"f1": "value1"}
{"f1": "value2"}
{"f1": "value3"}
{"f1": "value4"}
{"f1": "value5"}
{"f1": "value6"}
{"f1": "value7"}
{"f1": "value8"}
{"f1": "value9"}
The nine records entered are published to the Kafka topic datalake_topic in Avro format.
Create a datalake.properties file with the following contents:
name=datalake-sink
connector.class=io.confluent.connect.azure.datalake.gen1.AzureDataLakeGen1StorageSinkConnector
tasks.max=1
topics=datalake_topic
flush.size=3
azure.datalake.client.id=<your client id>
azure.datalake.client.key=<your client key>
azure.datalake.account.name=<your account name>
azure.datalake.token.endpoint=<your azure oauth2 token endpoint>
format.class=io.confluent.connect.azure.storage.format.avro.AvroFormat
confluent.topic.bootstrap.servers=localhost:9092
confluent.topic.replication.factor=1
Before starting the connector, make sure that the configurations in datalake.properties are properly set to your configurations of Azure Data Lake Storage Gen1. For this example, make sure that azure.datalake.account.name points to your Data Lake store, azure.datalake.client.id is set to your user id, and azure.datalake.client.key is set to your user’s secret key. The user ID or client ID should have permission to write to the Azure Data Lake Storage Gen1 Account.
Finally, set azure.datalake.token.endpoint to the Oauth 2 endpoint as described here, and use the v1 token endpoint.
Then start the Azure Blob Storage connector by loading its configuration with the following command.
confluent load datalake-sink -d datalake.properties
{
"name": "datalake-sink",
"config": {
"name":"datalake-sink",
"connector.class":"io.confluent.connect.azure.datalake.gen1.AzureDataLakeGen1StorageSinkConnector",
"tasks.max":"1",
"topics":"datalake_topic",
"flush.size":"3",
"azure.datalake.client.id":"<your client id>",
"azure.datalake.client.key":"<your client key>",
"azure.datalake.account.name":"<your account name>",
"azure.datalake.token.endpoint":"<your azure oauth2 token endpoint>",
"format.class":"io.confluent.connect.azure.storage.format.avro.AvroFormat",
"confluent.topic.bootstrap.servers":"localhost:9092",
"confluent.topic.replication.factor":"1"
},
"tasks": []
}
Check that the connector started successfully. Review the Connect worker’s log by entering the following:
confluent log connect
Towards the end of the log you should see that the connector starts, logs a few messages, and then uploads data from Kafka to Azure Data Lake Storage Gen1.
Once the connector has ingested some records, check that the data is available in Azure Data Lake Storage Gen1. Use the following Azure CLI command:
az dls fs list --account <your account name> --path /topics
Once you navigate into the subfolders, you should see three objects with keys.
topics/datalake_topic/partition=0/datalake_topic+0+0000000000.avro
topics/datalake_topic/partition=0/datalake_topic+0+0000000003.avro
topics/datalake_topic/partition=0/datalake_topic+0+0000000006.avro
Each file is encoded as <topic>+<kafkaPartition>+<startOffset>.<format>.
To verify the contents, copy each file from Azure Data Lake Storage Gen1 to your local filesystem. Use the following Azure CLI command changing the destination to what makes sense for you:
az dls fs download --account <your account name> --source-path /topics/datalake_topic/partition=0/datalake_topic+0+0000000000.avro --destination-path "C:\connect\datalake_topic+0+0000000000.avro"
Use avro-tools-1.9.0.jar
(available in Apache mirrors) to
print the records.
java -jar avro-tools-1.8.2.jar tojson datalake_topic+0+0000000000.avro
For the file above, you should see the following output:
{"f1":"value1"}
{"f1":"value2"}
{"f1":"value3"}
The rest of the records are contained in the other two files.
Finally, stop the Connect worker and all other Confluent services by running:
confluent local stop
Your output should resemble:
Stopping control-center
control-center is [DOWN]
Stopping ksql-server
ksql-server is [DOWN]
Stopping connect
connect is [DOWN]
Stopping kafka-rest
kafka-rest is [DOWN]
Stopping schema-registry
schema-registry is [DOWN]
Stopping kafka
kafka is [DOWN]
Stopping zookeeper
zookeeper is [DOWN]
You can stop all services and remove any data generated during this quick start by entering the following command:
confluent destroy
Your output should resemble:
Stopping control-center
control-center is [DOWN]
Stopping ksql-server
ksql-server is [DOWN]
Stopping connect
connect is [DOWN]
Stopping kafka-rest
kafka-rest is [DOWN]
Stopping schema-registry
schema-registry is [DOWN]
Stopping kafka
kafka is [DOWN]
Stopping zookeeper
zookeeper is [DOWN]
Deleting: /var/folders/ty/rqbqmjv54rg_v10ykmrgd1_80000gp/T/confluent.PkQpsKfE
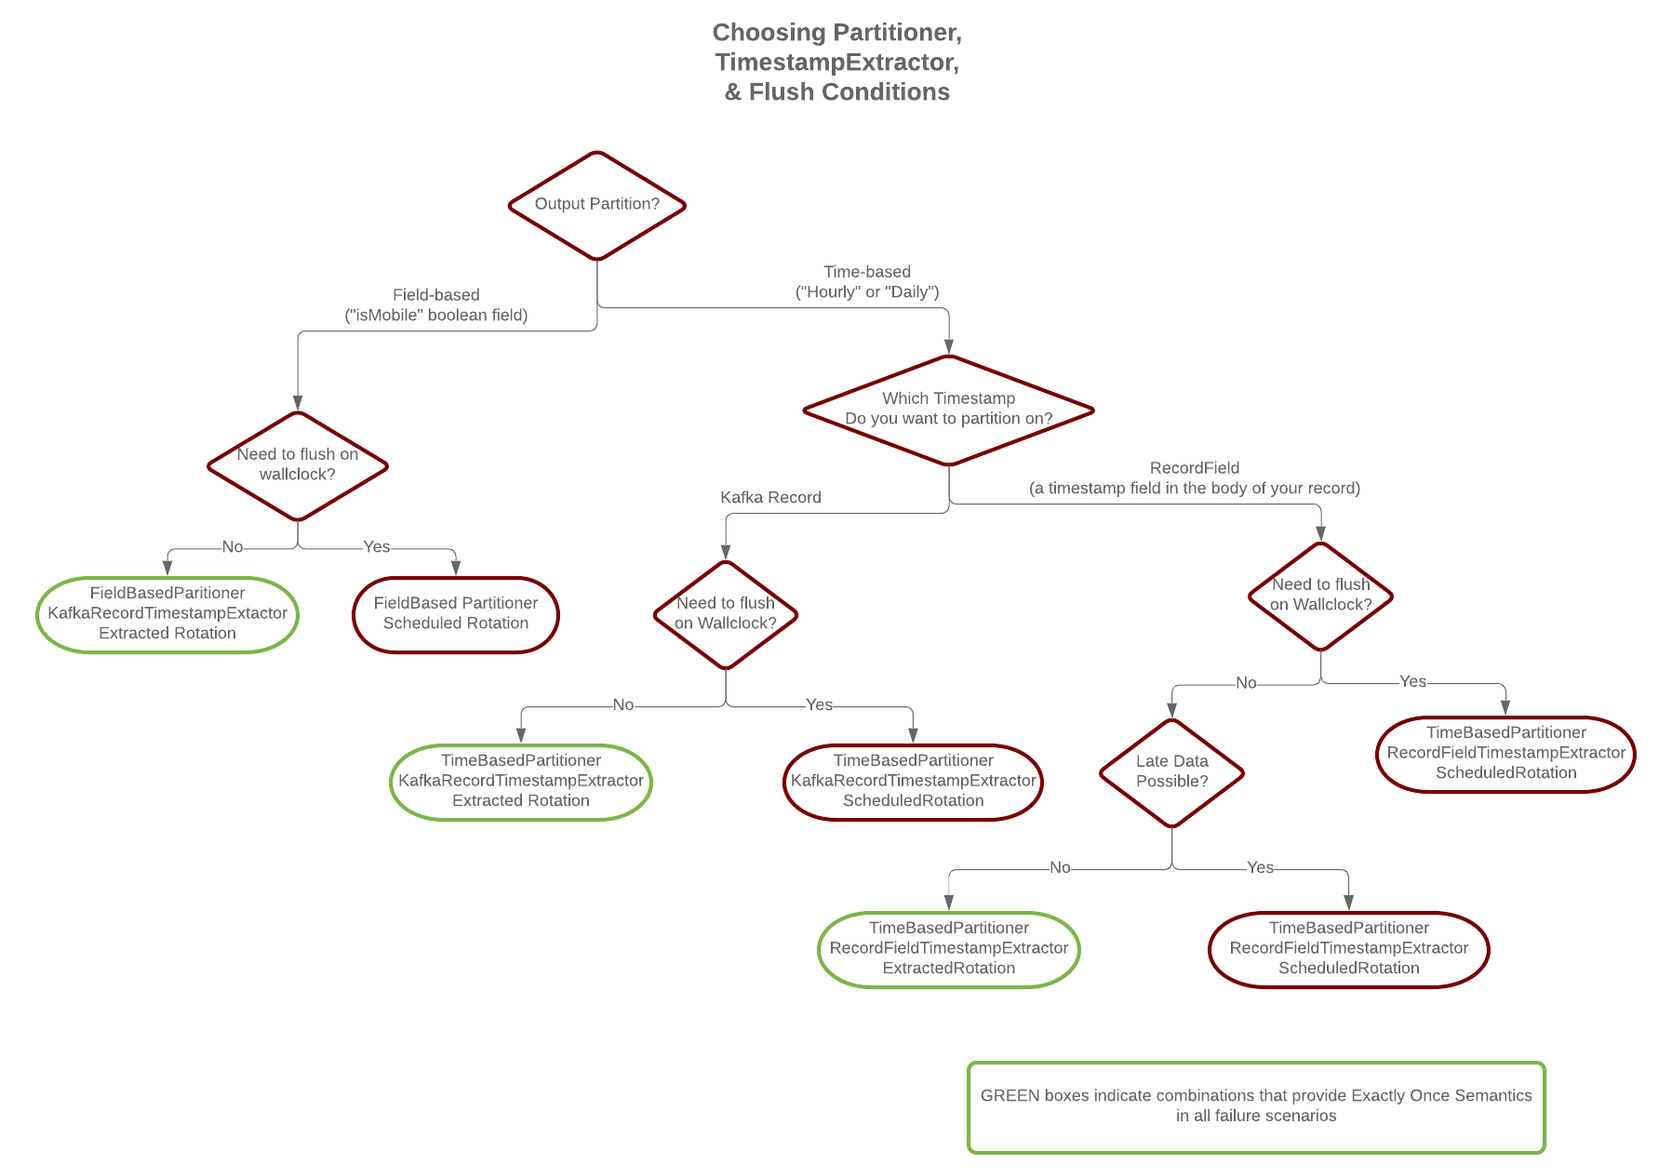
Exactly-once delivery
The Azure Data Lake Storage Gen1 connector is able to provide exactly-once semantics to consumers of the objects it exports to Azure Data Lake Storage Gen1, if the connector is supplied with a deterministic partitioner.
Currently, out of the available partitioners, the default and field partitioners are always deterministic. TimeBasedPartitioner can be deterministic with some configurations as discussed below. This implies that when any of these partitioners is used, file splitting always happens at the same offsets for a given set of Kafka records. These partitioners take into account flush.size and schema.compatibility to decide when to roll and save a new file to Azure Data Lake Storage Gen1.
The connector always delivers files in Azure Data Lake Storage Gen1 that contain the same records, even under the presence of failures. If a connector task fails before an upload completes, the file will be still in the temp/ folder . If, on the other hand, a failure occurs after the upload has completed, but before the corresponding offset is committed to Kafka by the connector, then a re-upload will take place. However, this type of re-upload is transparent to the user of the Azure Data Lake Storage Gen1 folder, who at any time will have access to the same records made eventually available by successful uploads to Azure Data Lake Storage Gen1.
To guarantee exactly-once semantics with the TimeBasedPartitioner, the connector must be configured to use a deterministic implementation of TimestampExtractor and a deterministic rotation strategy.
The deterministic timestamp extractors are Kafka records (timestamp.extractor=Record) or record fields (timestamp.extractor=RecordField).
The deterministic rotation strategy configuration is rotate.interval.ms (setting rotate.schedule.interval.ms is nondeterministic and will invalidate exactly-once guarantees).
Schema Evolution
The Azure Data Lake Storage Gen1 connector supports schema evolution and reacts to schema changes of data according to the
schema.compatibility configuration. This section explains how the
connector reacts to schema evolution under different values of schema.compatibility. The
schema.compatibility can be set to NONE, BACKWARD, FORWARD and FULL, which means
NO compatibility, BACKWARD compatibility, FORWARD compatibility and FULL compatibility respectively.
NO Compatibility: By default, the
schema.compatibilityis set toNONE. In this case, the connector ensures that each file written to Azure Data Lake Storage Gen1 has the proper schema. When the connector observes a schema change in data, it commits the current set of files for the affected topic partitions and writes the data with new schema in new files.BACKWARD Compatibility: If a schema is evolved in a backward compatible way, the connector can always use the latest schema to query all the data uniformly. For example, removing fields is a backward compatible change to a schema, since when the connector encounters records written with the old schema that contain these fields, the connector can just ignore them. Adding a field with a default value is also backward compatible.
If
BACKWARDis specified in theschema.compatibility, the connector keeps track of the latest schema used in writing data to Azure Data Lake Storage Gen1. If a data record with a schema version larger than current latest schema arrives, the connector commits the current set of files and writes the data record with new schema to new files. For data records arriving at a later time that use an earlier schema, the connector projects the data record to the latest schema before writing to the same set of files in Azure Data Lake Storage Gen1.FORWARD Compatibility: If a schema is evolved in a forward compatible way, the connector can always use the oldest schema to query all the data uniformly. Removing a field that had a default value is forward compatible, since the old schema will use the default value when the field is missing.
If
FORWARDis specified in theschema.compatibility, the connector projects the data to the oldest schema before writing to the same set of files in Azure Data Lake Storage Gen1.Full Compatibility: Full compatibility means that old data can be read with the new schema and new data can also be read with the old schema.
If
FULLis specified in theschema.compatibility, the connector performs the same action asBACKWARD.
Schema evolution in the Azure Data Lake Storage Gen1 connector works the same way as Schema Evolution.
Write JSON message values into Azure Data Lake Storage Gen1
The example settings file is shown below:
name=datalake-sink
connector.class=io.confluent.connect.azure.datalake.gen1.AzureDataLakeGen1StorageSinkConnector
tasks.max=1
topics=datalake_topic
flush.size=100

# Required configuration
azure.datalake.client.id=<your client id>
azure.datalake.client.key=<your client key>

# The following define the information used to validate the license stored in Kafka
confluent.license=
confluent.topic.bootstrap.servers=localhost:9092
The first few settings are common to most connectors. topics specifies the topics to export data from, in
this case datalake_topic. The property flush.size specifies the number of records per partition the connector needs
to write to before completing a multiblock upload to Azure Data Lake Storage Gen1.
The azure.datalake.client.id and azure.datalake.client.key are your required Azure credentials.
This is a licensed Confluent connector. Enter the following for testing purposes.
For more on the this look at the |az| Data Lake Storage Gen1 Licensing section.
azure.datalake.account.name=<your account name>
azure.datalake.token.endpoint=<your azure oauth2 token endpoint>
The next settings are specific to Azure Data Lake Storage Gen1. A mandatory setting is the name of your Azure Data Lake Gen1 store/account azure.datalake.account.name to host the exported
Kafka records. Another mandatory configuration setting is azure.datalake.token.endpoint. The connector authenticates access to your data lake using this URL.
format.class=io.confluent.connect.azure.storage.format.json.JsonFormat
partitioner.class=io.confluent.connect.storage.partitioner.DefaultPartitioner
These class settings are required to specify the output file format, which is currently
io.confluent.connect.azure.storage.format.avro.AvroFormat, io.confluent.connect.azure.storage.format.json.JsonFormat or io.confluent.connect.azure.storage.format.bytearray.ByteArrayFormat, and the partitioner
class
schema.compatibility=NONE
Finally, schema evolution is disabled in this example by setting schema.compatibility to NONE, as explained above.
For detailed descriptions for all the available configuration options of the Azure Data Lake Storage Gen1 connector go to Configuration Properties.
Write raw message values into Azure Data Lake Storage Gen1
It is possible to use the Azure Data Lake Storage Gen1 connector to write out the unmodified original message values into newline-separated files in Azure Data Lake Storage Gen1. To accomplish this configure Kafka Connect so it does not deserialize any of the messages, and configure the Azure Data Lake Storage Gen1 connector to store the message values in a binary format in Azure Data Lake Storage Gen1.
The first part of the Azure Data Lake Storage Gen1 connector configuration is similar to other examples.
name=datalake-raw-sink
connector.class=io.confluent.connect.azure.datalake.gen1.AzureDataLakeGen1StorageSinkConnector
tasks.max=1
topics=datalake_topic
flush.size=3
The topics setting specifies the topics you want to export data from, which is datalake_topic in the example.
The property flush.size specifies the number of records per partition the connector needs
to write before completing an upload to Azure Data Lake Storage Gen1.
Next, configure container name, block size, and compression type.
azure.datalake.account.name=myconfluentdatalake
azure.datalake.token.endpoint=https://login.microsoftonline.com/a7d99622-a589-4520-8ce3-c280ed1cb00c/oauth2/token
azure.datalake.client.id=21aaeb79-1956-486a-bc36-baa1f710d567
azure.datalake.client.key=HGw@4@DSkjBRslXA4vuR:-lxQ4H3+PTs
az.compression.type=gzip
The next settings are specific to Azure Data Lake Storage Gen1. A mandatory setting is the account name of your Gen1 Azure Data Lake, azure.datalake.account.name which will host the exported Kafka records. Another mandatory configuration setting is azure.datalake.token.endpoint. The connector authenticates access to your data lake using this URL. The azure.datalake.client.id and azure.datalake.client.key are your required Azure client credentials.
The az.compression.type specifies that the Azure Data Lake Storage Gen1 connector should compress all Azure Data Lake Storage Gen1 files
using GZIP compression, adding the .gz extension to any files (see below).
This example configuration is typical of most Azure Data Lake Storage Gen1 connectors. Now, configure the connector to read the raw message values and write them in binary format:
value.converter=org.apache.kafka.connect.converters.ByteArrayConverter
format.class=io.confluent.connect.azure.storage.format.bytearray.ByteArrayFormat
schema.compatibility=NONE
The value.converter setting overrides the connector default in the Connect
worker configuration. ByteArrayConverter is used to instruct Connect to skip
deserializing the message values and provide the message values in their raw
binary form. The format.class setting is used to instruct the Azure Data Lake Storage Gen1 connector to write these
binary message values as-is into Azure Data Lake Storage Gen1 files. By default the messages written to the same Azure Data Lake Storage Gen1
file are separated by a newline character sequence, but you can control this with the
format.bytearray.separator setting. You may want to consider setting this if your messages might
contain newlines. Also, by default the files written to Azure Data Lake Storage Gen1 have an
extension of .bin (before compression, if enabled), or you can use the
format.bytearray.extension setting to change the pre-compression filename extension.
Next, you need to decide how you want to partition the consumed messages in Azure Data Lake Storage Gen1 files. You have a few options, including the default partitioner that preserves the same partitions as in Kafka:
partitioner.class=io.confluent.connect.storage.partitioner.DefaultPartitioner
Or, you could partition using the timestamp of the Kafka messages.
partitioner.class=io.confluent.connect.storage.partitioner.TimeBasedPartitioner
timestamp.extractor=Record
Or, you can use the timestamp that the Azure Data Lake Storage Gen1 connector processes each message.
partitioner.class=io.confluent.connect.storage.partitioner.TimeBasedPartitioner
timestamp.extractor=Wallclock
Custom partitioners are always an option, too. Just be aware that since the record value is
an opaque binary value, Connect cannot extract timestamps from fields using the RecordField
option.
The Azure Data Lake Storage Gen1 connector configuration outlined above results in newline-delimited gzipped objects in Azure Data Lake Storage Gen1
with .bin.gz.