Important
You are viewing documentation for an older version of Confluent Platform. For the latest, click here.
Migrate Schemas
Starting with Confluent Platform 5.2.0, you can use Confluent Replicator to migrate schemas stored in one Confluent Schema Registry to another cluster, which is either self-managed or in Confluent Cloud.
This page primarily covers migrating schemas on self-managed clusters to Confluent Cloud, but the first short section links to a full demo of how to migrate schemas across self-managed clusters. The “Suggested Reading” links at the end include Schema Registry configuration options and may be useful for both scenarios.
Tip
Currently, when using Confluent Replicator to migrate schemas, Confluent Cloud is not supported as the source cluster. Confluent Cloud can only be the destination cluster. As an alternative, you can migrate schemas using the REST API for Schema Registry to achieve the desired deployments. Specifics regarding Confluent Cloud limits on schemas and managing storage space are described in the APIs reference under Schema Registry in Confluent Cloud.
Note
Newer versions of Replicator cannot be used to replicate data from early version Kafka clusters to Confluent Cloud. Specifically, Replicator version 5.4.0 or later cannot be used to replicate data from clusters Apache Kafka® v0.10.2 or earlier nor from Confluent Platform v3.2.0 or earlier, to Confluent Cloud. If you have clusters on these earlier versions, use Replicator 5.0.x to replicate to Confluent Cloud until you can upgrade. Keep in mind the following, and plan your upgrades accordingly:
- Kafka Connect workers included in Confluent Platform 3.2 and later are compatible with any Kafka broker that is included in Confluent Platform 3.0 and later as documented in Cross-Component Compatibility.
- Confluent Platform 5.0.x has an end-of-support date of July 31, 2020 as documented in Supported Versions and Interoperability.
Migrate Schemas Across Self-Managed Clusters
You can also set up continuous migration or a one-time, lift-and-shift migration of schemas across self-managed (on-premises) clusters.
For a demo showing how to migrate schemas from one self-managed cluster to another, see Replicator Schema Translation Demo.
Migrate Schemas to Confluent Cloud
Confluent Cloud is a fully managed streaming data service based on Confluent Platform. Just as you can “lift and shift” or “extend to cloud” your Kafka applications from self-managed Kafka to Confluent Cloud, you can do the same with Confluent Schema Registry.
If you already use Schema Registry to manage schemas for Kafka applications, and want to move some or all of that data and schema management to the cloud, you can use Confluent Replicator to migrate your existing schemas to Confluent Cloud Schema Registry. (See Confluent Replicator and Run Replicator as an executable.)
You can set up continuous migration of Schema Registry to maintain a hybrid deployment (extend to cloud) or lift and shift all to Confluent Cloud using a one-time migration.
Continuous Migration
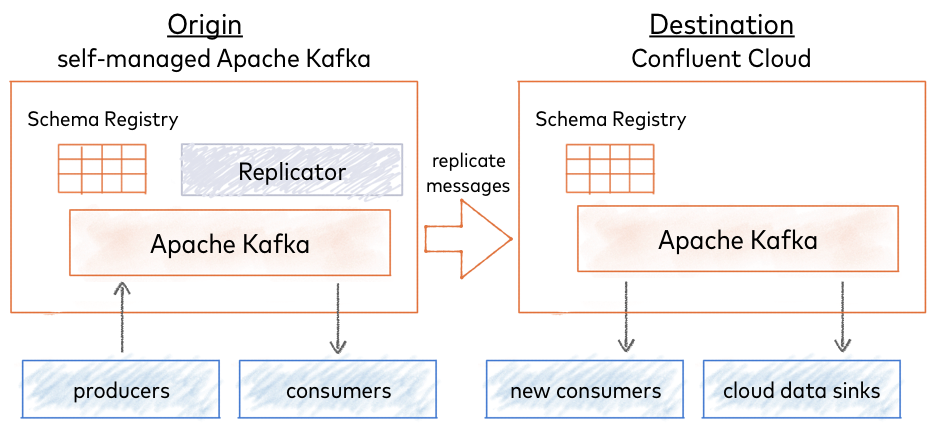
For continuous migration, you can use your self-managed Schema Registry as a primary and Confluent Cloud Schema Registry as a secondary (extend to cloud, also known as bridge to cloud). New schemas will be registered directly to the self-managed Schema Registry (origin), and Confluent Replicator will continuously copy schemas from it to Confluent Cloud Schema Registry (destination), which is set to IMPORT mode.

One-time Migration
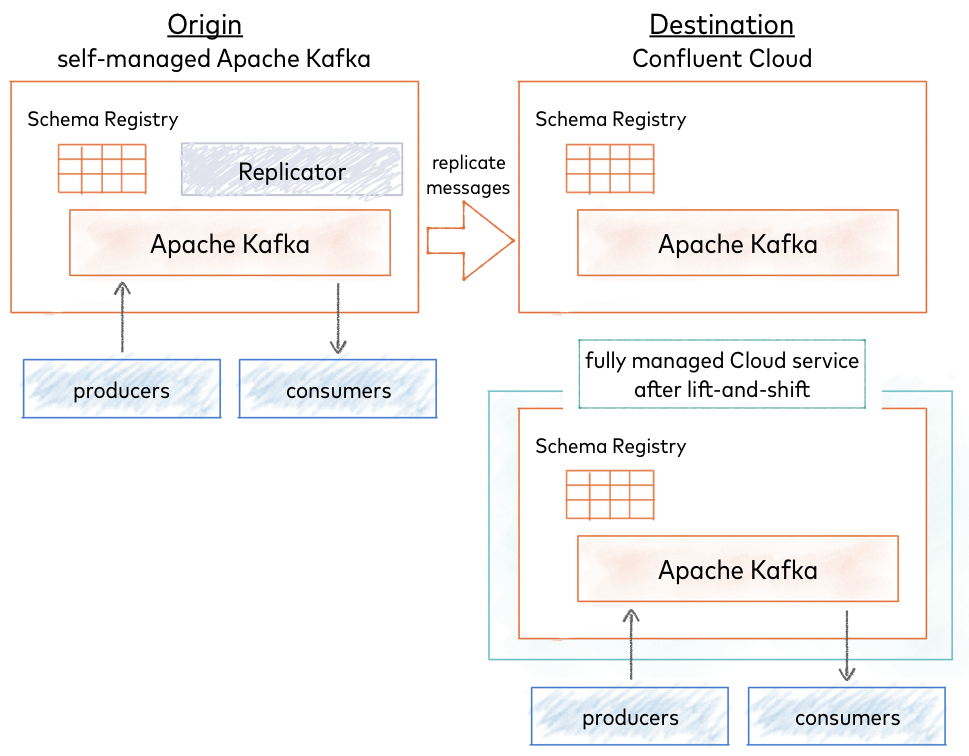
Choose a one-time migration to move all data to a fully-managed Confluent Cloud service (lift and shift). In this case, you migrate your existing self-managed Schema Registry to Confluent Cloud Schema Registry as a primary. All new schemas are registered to Confluent Cloud Schema Registry and stored in the centrialized Kafka cluster. In this scenario, there is no migration from Confluent Cloud Schema Registry back to the self-managed Schema Registry.

Topics and Schemas
Schemas are associated with Kafka topics, organized under subjects in Schema Registry. (See Terminology Review.)
The quick start below describes how to migrate Schema Registry and the schemas it contains, but not Kafka topics.
For a continuous migration (extend to cloud), you need only do a schema migration, since your topics continue to live in the primary, self-managed cluster.
For a one-time migration (lift and shift), you must follow schema migration with topic migration, using Replicator to migrate your topics to the Confluent Cloud cluster, as mentioned in Next Steps after the quick start.
Tip
If you configure Confluent Replicator to use the default subject translator for schemas as follows:
schema.subject.translator.class=io.confluent.connect.replicator.schemas.DefaultSubjectTranslator
then, topic.rename.format is used to rename the subjects in the target
Schema Registry during a schema migration.
For example, if the topic.rename.format is ${topic}-replica, the topic
mytopic-value in the original Schema Registry would be renamed
mytopic-replica-value in the “new”, target registry.
The property topic.rename.format is described in Destination Topics under Confluent Replicator Configuration Properties for Replicator.
Quick Start
The quick start describes how to perform a Schema Registry migration applicable to any type of deployment (from on-premises servers or data centers to Confluent Cloud Schema Registry). The examples also serve as a primer you can use to learn the basics of migrating schemas from a local cluster to Confluent Cloud.
- Prerequisites
- Confluent Platform
- Confluent CLI (requires separate installation)
Before You Begin
If you are new to Confluent Platform, consider first working through these quick starts and tutorials to get a baseline understanding of the platform (including the role of producers, consumers, and brokers), Confluent Cloud, and Schema Registry. Experience with these workflows will give you better context for schema migration.
- Quick Start for Apache Kafka using Confluent Platform (Local)
- Quick Start for Apache Kafka using Confluent Cloud
- Schema Registry Tutorials
Before you begin schema migration, verify that you have:
- Access to Confluent Cloud to serve as the destination Schema Registry
- A local install of Confluent Platform; for example, from a Quick Start for Apache Kafka using Confluent Platform (Local) download, or other cluster to serve as the origin Schema Registry.
Schema migration requires that you configure and run Replicator. If you need more information than is included in the examples here, refer to the replicator tutorial.
Migrate Schemas
To migrate Schema Registry and associated schemas to Confluent Cloud, follow these steps:
Start the origin cluster.
If you are running a local cluster; for example, from a Quick Start for Apache Kafka using Confluent Platform (Local) download, start only Schema Registry for the purposes of this tutorial using the Confluent CLI confluent local commands.
<path-to-confluent>/bin/confluent local start schema-registry
Tip
The examples here show how to use a Replicator worker in standalone mode for schema migration. In this mode, you cannot run Kafka Connect and Replicator at the same time, because Replicator also runs Connect. If you run Replicator in distributed mode, the setup is different and you do not have this limitation (you can use
./bin/confluent local start). For more about configuring and running Connect workers (includig Replicator) in standalone and distributed modes, see Running Workers in the Connect guide.Verify that
schema-registry,kafka, andzookeeperare running.For example, run
<path-to-confluent>/bin/confluent local status:schema-registry is [UP] kafka is [UP] zookeeper is [UP]
Verify that no subjects exist on the destination Schema Registry in Confluent Cloud.
curl -u <schema-registry-api-key>:<schema-registry-api-secret> <schema-registry-url>/subjects
If no subjects exist, your output will be empty (
[]), which is what you want.If subjects exist, delete them. For example:
curl -X DELETE -u <schema-registry-api-key>:<schema-registry-api-secret> <schema-registry-url>/subjects/my-existing-subject
Set the destination Schema Registry to IMPORT mode. For example:
curl -u <schema-registry-api-key>:<schema-registry-api-secret> -X PUT -H "Content-Type: application/json" "https://<destination-schema-registry>/mode" --data '{"mode": "IMPORT"}'Tip
If subjects exist on the destination Schema Registry, the import will fail with a message similar to this:
{"error_code":42205,"message":"Cannot import since found existing subjects"}Configure a Replicator worker to specify the addresses of brokers in the destination cluster, as described in Configure and run Replicator.
Tip
Replicator in Confluent Platform 5.2.0 and newer supports Schema Registry migration.
The worker configuration file is in
<path-to-confluent>/etc/kafka/connect-standalone.properties.# Connect Standalone Worker configuration bootstrap.servers=<path-to-cloud-server>:9092
Configure Replicator with Schema Registry and destination cluster information.
For stand-alone Connect instance, configure the following properties in
<path-to-confluent>etc/kafka-connect-replicator/quickstart-replicator.properties:# basic connector configuration name=replicator-source connector.class=io.confluent.connect.replicator.ReplicatorSourceConnector key.converter=io.confluent.connect.replicator.util.ByteArrayConverter value.converter=io.confluent.connect.replicator.util.ByteArrayConverter header.converter=io.confluent.connect.replicator.util.ByteArrayConverter tasks.max=4 # source cluster connection info src.kafka.bootstrap.servers=localhost:9092 # destination cluster connection info dest.kafka.ssl.endpoint.identification.algorithm=https dest.kafka.sasl.mechanism=PLAIN dest.kafka.request.timeout.ms=20000 dest.kafka.bootstrap.servers=<path-to-cloud-server>:9092 retry.backoff.ms=500 dest.kafka.sasl.jaas.config=org.apache.kafka.common.security.plain.PlainLoginModule required username="<encrypted-username>" password="<encrypted-password>"; dest.kafka.security.protocol=SASL_SSL # Schema Registry migration topics to replicate from source to destination # topic.whitelist indicates which topics are of interest to replicator topic.whitelist=_schemas # schema.registry.topic indicates which of the topics in the ``whitelist`` contains schemas schema.registry.topic=_schemas # Connection settings for destination Confluent Cloud Schema Registry schema.registry.url=https://<path-to-cloud-schema-registry> schema.registry.client.basic.auth.credentials.source=USER_INFO schema.registry.client.basic.auth.user.info=<schema-registry-api-key>:<schema-registry-api-secret>
In
quickstart-replicator.properties, the replication factor is set to1for demo purposes on a development cluster with one broker. For this schema migration tutorial, and in production, change this to at least3:confluent.topic.replication.factor=3
See also
For an example of a JSON configuration for Replicator in distributed mode, see submit_replicator_schema_migration_config.sh on GitHub examples repository.
Start Replicator so that it can perform the schema migration.
For example:
<path-to-confluent>/bin/connect-standalone <path-to-confluent>/etc/kafka/connect-standalone.properties \
<path-to-confluent>/etc/kafka-connect-replicator/quickstart-replicator.properties
The method or commands you use to start Replicator is dependent on your application setup, and may differ from this example. For more information, see Configure and Run Replicator and Configure and run Replicator.
Stop all producers that are producing to Kafka.
Wait until the replication lag is 0.
For more information, see Monitoring Replicator Lag.
Stop Replicator.
Enable mode changes in the self-managed source Schema Registry properties file by adding the following to the configuration and restarting.
mode.mutability=true
Important
Modes are only supported starting with version 5.2 of Schema Registry. This step and the one following (set Schema Registry to READYONLY) are precautionary and not strictly necessary. If using version 5.1 of Schema Registry or earlier, you can skip these two steps if you make certain to stop all producers so that no further schemas are registered in the source Schema Registry.
Set the source Schema Registry to READONLY mode.
curl -u <schema-registry-api-key>:<schema-registry-api-secret> -X PUT -H "Content-Type: application/json" "https://<source-schema-registry>/mode" --data '{"mode": "READONLY"}'Set the destination Schema Registry to READWRITE mode.
curl -u <schema-registry-api-key>:<schema-registry-api-secret> -X PUT -H "Content-Type: application/json" "https://<destination-schema-registry>/mode" --data '{"mode": "READWRITE"}'Stop all consumers.
Configure all consumers to point to the destination Schema Registry in the cloud and restart them.
For example, if you are configuring Schema Registry in a Java client, change Schema Registry URL from source to destination either in the code or in a properties file that specifies the Schema Registry URL, type of authentication USER_INFO, and credentials).
For more examples, see Java Consumers.
Configure all producers to point to the destination Schema Registry in the cloud and restart them.
For more examples, see Java Producers.
(Optional) Stop the source Schema Registry.
Next Steps
- If you are extending to cloud hybrid with continuous migration from a primary self-managed cluster to the cloud, the migration is complete.
- If this is a one-time migration to Confluent Cloud, the next step is to use Replicator to migrate your topics to the cloud cluster.
- For information on how to manage schemas and storage space in Confluent Cloud through the REST API, see Schema Registry in Confluent Cloud in the Developer Guide.
- Looking for a guide on how to configure and use Schema Registry in Confluent Cloud? See Schema Registry and Confluent Cloud and Quick Start for Apache Kafka using Confluent Cloud.
Suggested Reading
- Confluent Cloud
- Replicator Schema Translation Demo
- Schema Registry and Confluent Cloud
- Schema Registry Configuration Options
- Multi-DC Deployment Architectures
- Schema Registry API Reference
See also, these sections in Replicator Configuration Options:
Finally, Replicator Schema Translation Demo shows a demo of migrating schemas across self-managed, on-premises clusters.
