Important
You are viewing documentation for an older version of Confluent Platform. For the latest, click here.
Confluent Platform on Google Kubernetes Engine
Overview
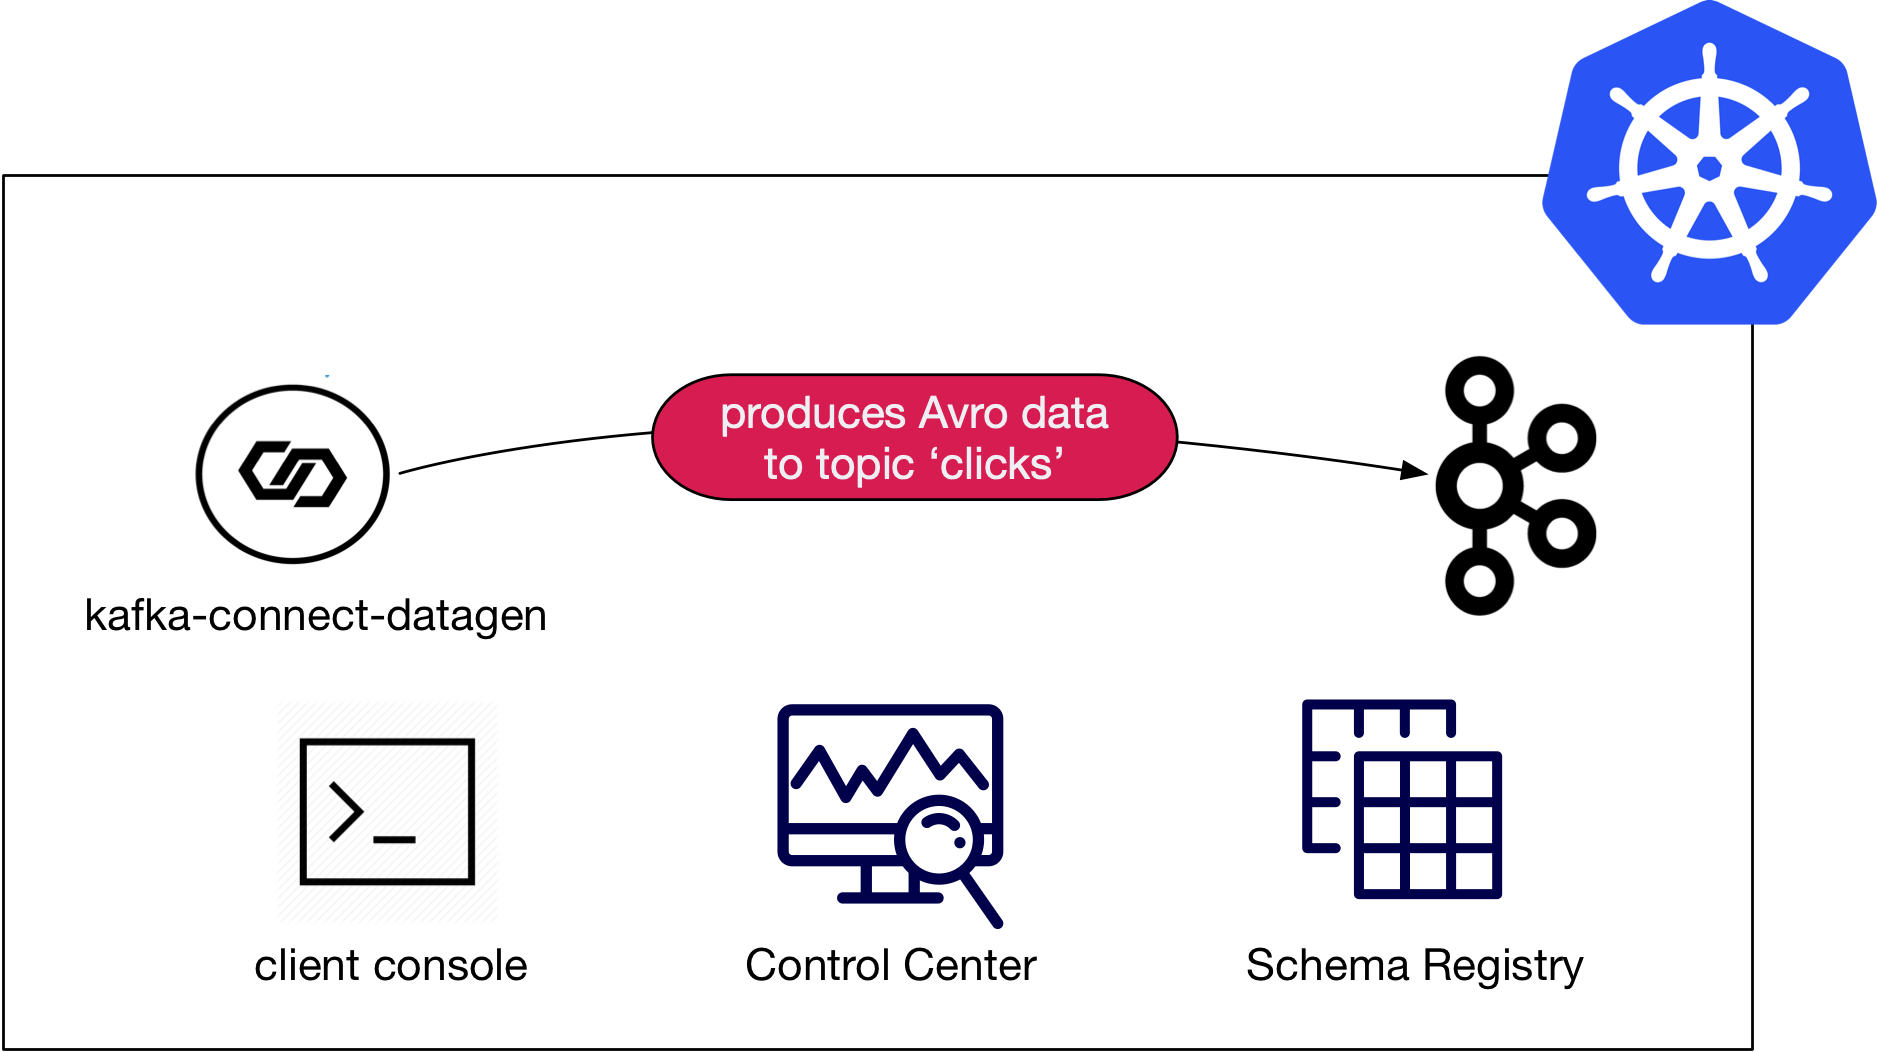
This demo shows a deployment of Confluent Platform on Google Kubernetes Engine (GKE) leveraging Confluent Operator with mock data generation provided via the Kafka Connect Datagen.
The major components of this demo are:
- A Kubernetes cluster running on GKE.
- Confluent Operator which is used to manage the following Confluent Platform components
- A single node ZooKeeper
- A single node Kafka
- A single node Schema Registry
- Confluent Control Center
- A single node Kafka Connect
- One instance of
kafka-connect-datagento produce mock data
Demo Prerequisites
The following applications or libraries are required to be installed and available in the system path in order to properly run the demo.
| Application | Tested Version | Info |
|---|---|---|
kubectl |
1.18.0 |
https://kubernetes.io/docs/tasks/tools/install-kubectl/ |
helm |
3.1.2 |
https://github.com/helm/helm/releases/tag/v3.1.2 |
gcloud
GCP sdk core |
286.0.0
2020.03.24 |
https://cloud.google.com/sdk/install |
Running the Demo
Warning
This demo uses the real GCP SDK to launch real resources. To avoid unexpected charges, carefully evaluate the cost of resources before launching the demo and ensure all resources are destroyed after you are done evaluating the demonstration. Optionally, refer to the Operator Sizing Recommendations document and the Variable Reference section for more information on required resources for running Confluent Platform on Kubernetes.
Setup
Clone the Confluent examples repository and change directories on your terminal into the gke-base directory.
git clone https://github.com/confluentinc/examples.git
cd examples/kubernetes/gke-base
This demo requires a Kubernetes Cluster and kubectl context configured properly to manage it.
The remaining steps in the Setup section of the instructions help you build a Kubernetes cluster on Google Kubernetes Engine (GKE). If you already have a cluster you wish to use for the demo, you can skip to the Validate section of these instructions.
To verify the Google Cloud Platform (GCP) Project in which a new cluster will be created, run the following and verify it is the desired GCP Project ID:
gcloud config list --format 'value(core.project)'
Note
For specific details on how the cluster will be created (size, region, zone, etc…), view the Variable Reference section of these instructions. You may also use these variables to modify the default behavior of the demo create cluster functionality.
To create the cluster, run the following (estimated running time, 4 minutes):
make gke-create-cluster
Verify that gcloud has created the cluster properly:
...
Created [https://container.googleapis.com/v1/projects/<project-id>/zones/us-central1-a/clusters/cp-examples-operator-<username>].
To inspect the contents of your cluster, go to: <link>
kubeconfig entry generated for cp-examples-operator-<username>.
NAME                            LOCATION  MASTER_VERSION  MASTER_IP     MACHINE_TYPE  NODE_VERSION   NUM_NODES  STATUS
cp-examples-operator-<username> <zone>    1.12.8-gke.10   <ip-address>  n1-highmem-2  1.12.8-gke.10  3          RUNNING
✔  ++++++++++ GKE Cluster Created
Validate
The demo uses kubectl to control the cluster. To verify that your local kubectl configured as intended, run:
kubectl config current-context
The context should contain the proper region and cluster name. If you used the demo gke-create-cluster function to create your cluster, the context name should have the format: gke_<google-project-id>_<region>_<cp-examples-operator>-<username>
Run
To deploy Confluent Platform run (estimated running time, 7 minutes):
make demo
The last output message you should see is:
✔ GKE Base Demo running
Verify
Verify the Kubernetes Deployment
You can view the deployed components with:
kubectl -n operator get all
Using the default demo variable values, kubectl should report something like the following
NAME                                        READY   STATUS      RESTARTS   AGE
pod/cc-operator-76c54d65cd-28czd            1/1     Running     0          11m
pod/clicks-datagen-connector-deploy-2vd8q   0/1     Completed   0          8m6s
pod/connectors-0                            1/1     Running     0          9m36s
pod/controlcenter-0                         1/1     Running     0          8m4s
pod/client-console                          1/1     Running     0          10m
pod/kafka-0                                 1/1     Running     0          10m
pod/schemaregistry-0                        1/1     Running     0          9m59s
pod/zookeeper-0                             1/1     Running     0          11m

NAME                                TYPE        CLUSTER-IP    EXTERNAL-IP   PORT(S)                                        AGE
service/connectors                  ClusterIP   None          <none>        8083/TCP,7203/TCP,7777/TCP                     9m36s
service/connectors-0-internal       ClusterIP   10.0.8.147    <none>        8083/TCP,7203/TCP,7777/TCP                     9m36s
service/controlcenter               ClusterIP   None          <none>        9021/TCP,7203/TCP,7777/TCP                     8m5s
service/controlcenter-0-internal    ClusterIP   10.0.14.242   <none>        9021/TCP,7203/TCP,7777/TCP                     8m5s
service/kafka                       ClusterIP   None          <none>        9071/TCP,9072/TCP,9092/TCP,7203/TCP,7777/TCP   10m
service/kafka-0-internal            ClusterIP   10.0.14.239   <none>        9071/TCP,9072/TCP,9092/TCP,7203/TCP,7777/TCP   10m
service/schemaregistry              ClusterIP   None          <none>        8081/TCP,7203/TCP,7777/TCP                     10m
service/schemaregistry-0-internal   ClusterIP   10.0.6.93     <none>        8081/TCP,7203/TCP,7777/TCP                     10m
service/zookeeper                   ClusterIP   None          <none>        3888/TCP,2888/TCP,2181/TCP,7203/TCP,7777/TCP   11m
service/zookeeper-0-internal        ClusterIP   10.0.8.51     <none>        3888/TCP,2888/TCP,2181/TCP,7203/TCP,7777/TCP   11m

NAME                          DESIRED   CURRENT   UP-TO-DATE   AVAILABLE   AGE
deployment.apps/cc-operator   1         1         1            1           11m

NAME                                     DESIRED   CURRENT   READY   AGE
replicaset.apps/cc-operator-76c54d65cd   1         1         1       11m

NAME                              DESIRED   CURRENT   AGE
statefulset.apps/connectors       1         1         9m36s
statefulset.apps/controlcenter    1         1         8m4s
statefulset.apps/kafka            1         1         10m
statefulset.apps/schemaregistry   1         1         9m59s
statefulset.apps/zookeeper        1         1         11m

NAME                                        COMPLETIONS   DURATION   AGE
job.batch/clicks-datagen-connector-deploy   1/1           4s         8m6s

NAME                                               AGE
zookeepercluster.cluster.confluent.com/zookeeper   11m

NAME                                       AGE
kafkacluster.cluster.confluent.com/kafka   10m
Verify Confluent Platform on the CLI
By default the demo is deployed without any Kubernetes Ingress, which means the Confluent Platform resources inside the Kubernetes cluster cannot be reached from external clients. If you used a pre-existing cluster with Ingress enabled, the following validation instructions may not be applicable to your setup.
The demo deploys a client-console pod that can be used to open a terminal inside the cluster with network connectivity to the Confluent Platform services. For example:
kubectl -n operator exec -it client-console -- bash
From here you can execute standard Kafka commands to validate the cluster. You need to provide the commands with the required connectivity and security configurations, which are provided in mapped files on the client-console pod. See the Client Configurations Highlight for more information.
kafka-topics --bootstrap-server kafka:9071 --command-config /etc/kafka-client-properties/kafka-client.properties --list
You could view the output of the mock click data generator with the console consumer:
kafka-console-consumer --bootstrap-server kafka:9071 --consumer.config /etc/kafka-client-properties/kafka-client.properties --topic clicks
Example output might look like:
222.152.45.45F-
16141<GET /images/track.png HTTP/1.1204006-Mozilla/5.0 (Windows NT 10.0; Win64; x64) AppleWebKit/537.36 (KHTML, like Gecko) Chrome/59.0.3071.115 Safari/537.36
122.173.165.203L-
16151FGET /site/user_status.html HTTP/1.1401289-Mozilla/5.0 (compatible; Googlebot/2.1; +http://www.google.com/bot.html)
...
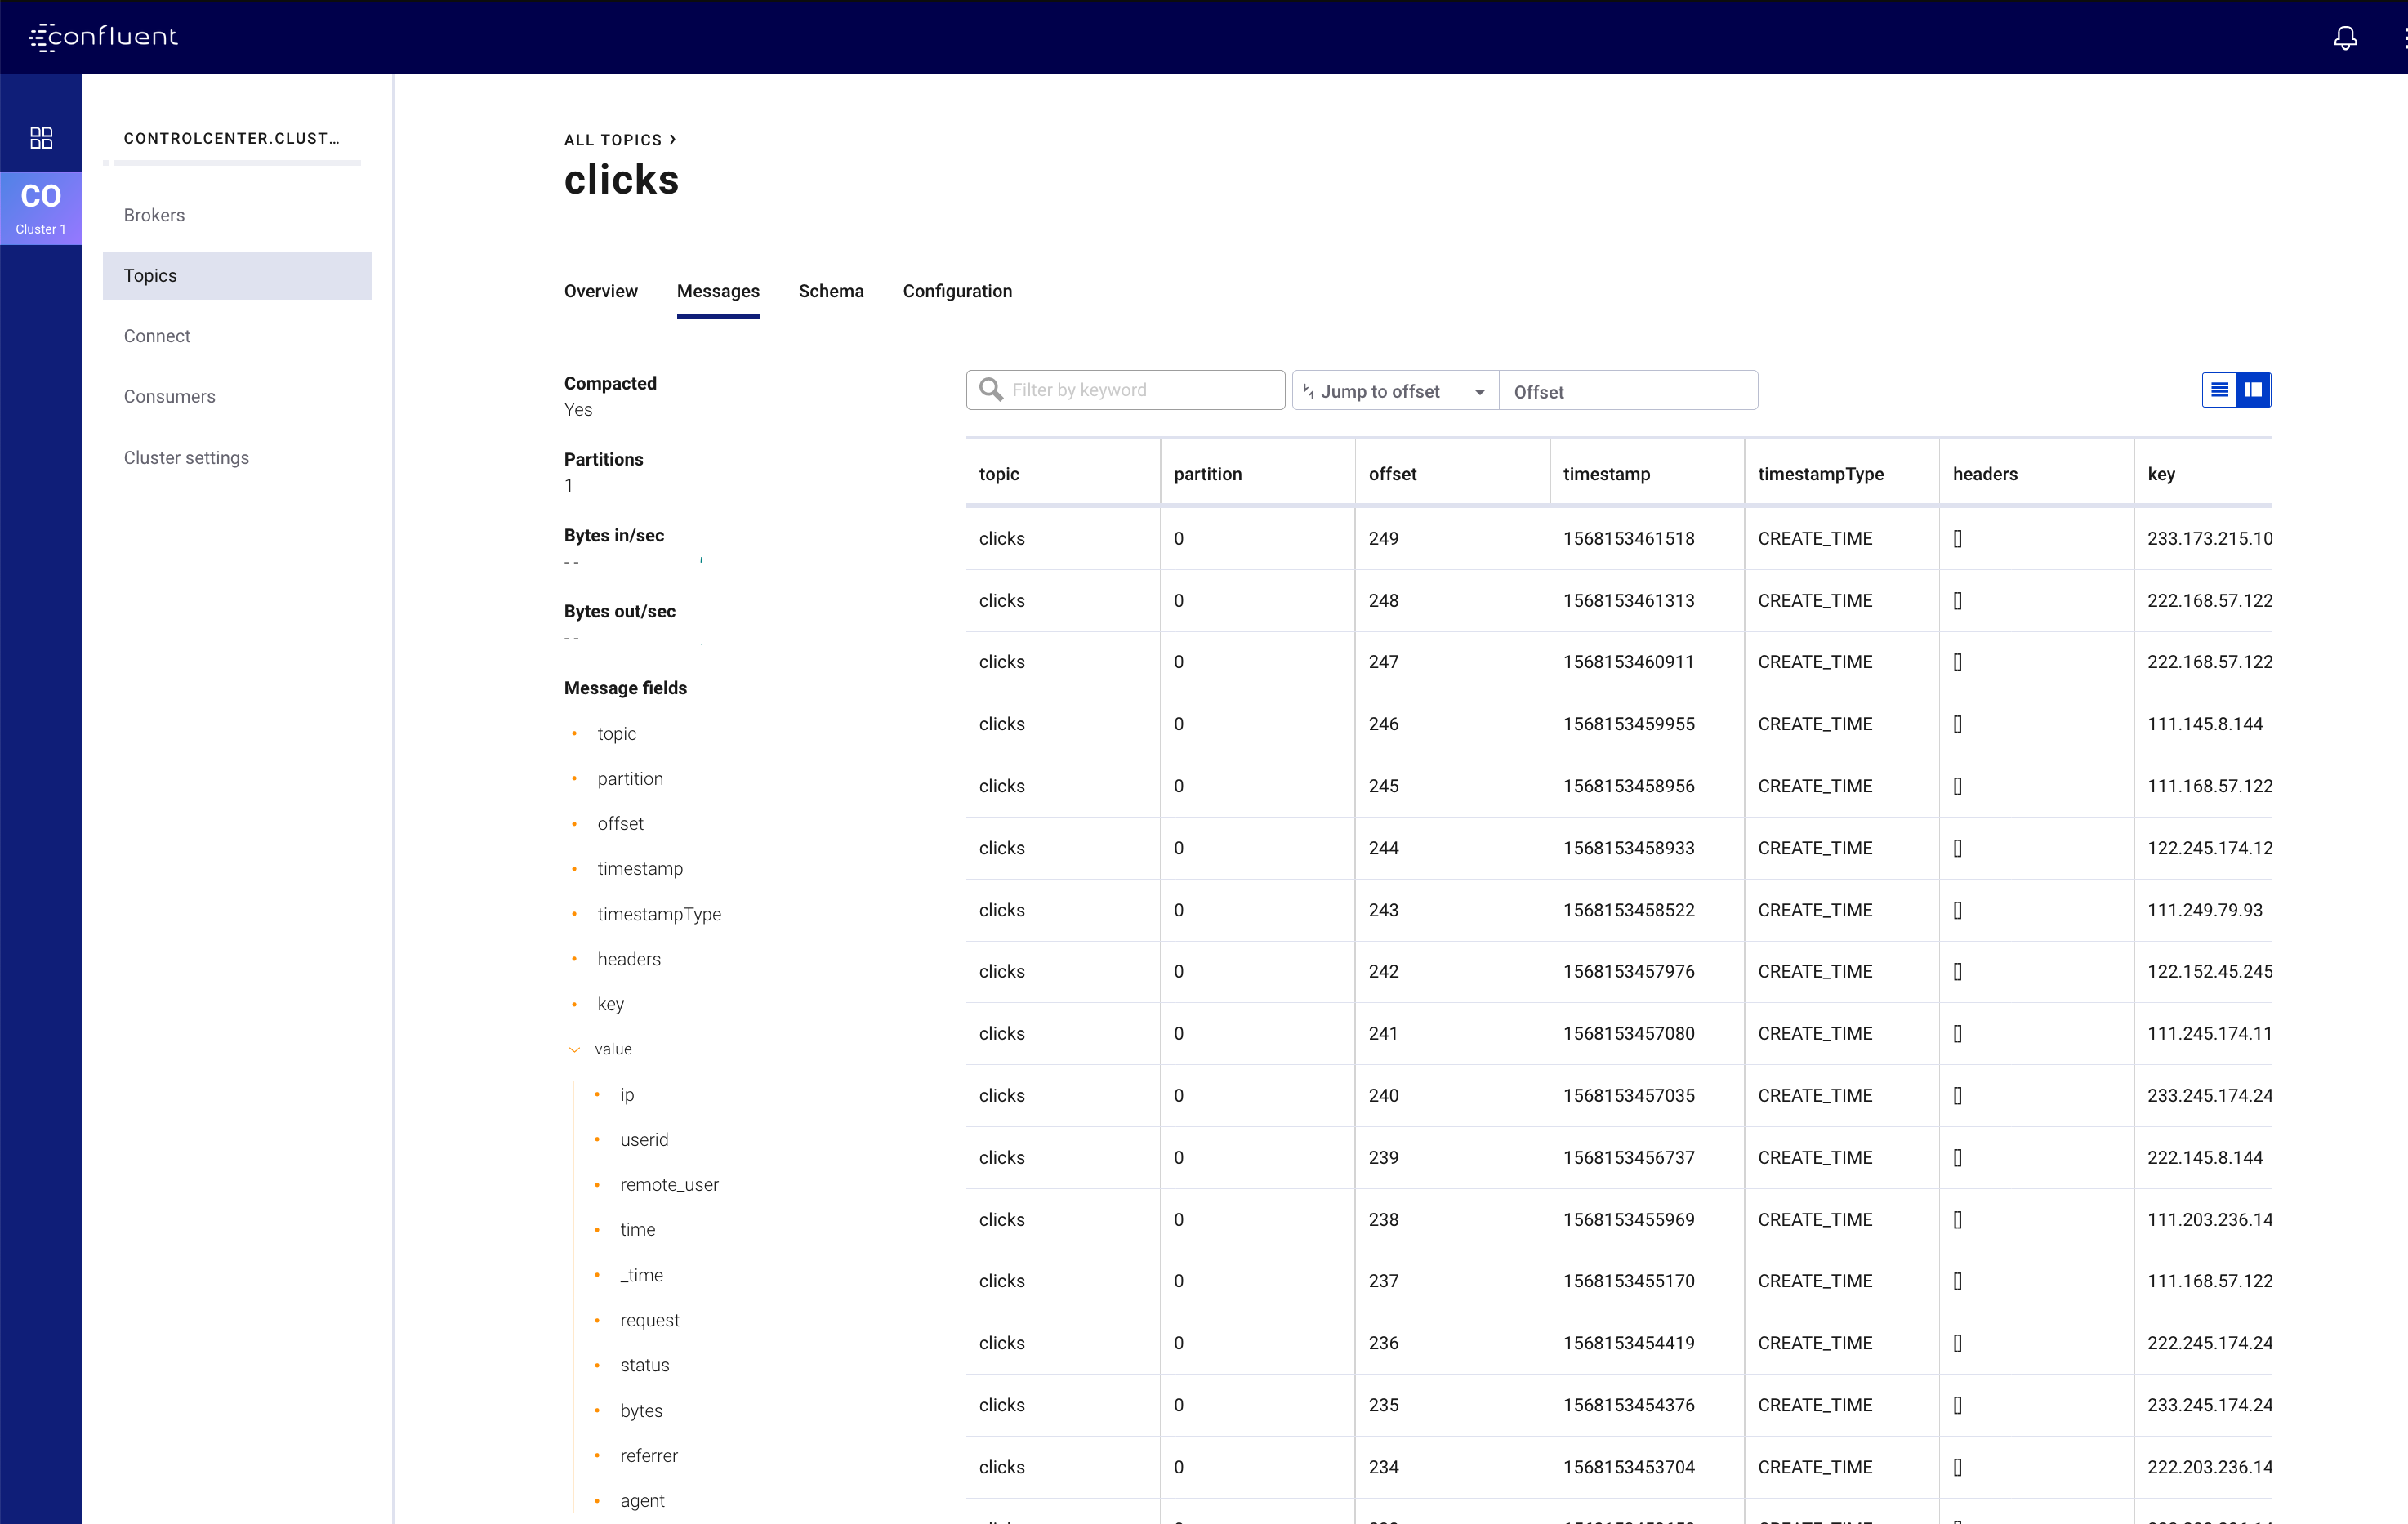
Verify Confluent Platform Control Center
In order to view Confluent Control Center, network connectivity will need to be available between your local machine and the Kubernetes pod running the Confluent Control Center service. If you used an existing cluster you may already have external cluster access configured, otherwise, you can use the following kubectl command to open a forwarded port connection between your local host and Confluent Control Center.
kubectl -n operator port-forward controlcenter-0 12345:9021
Now open a web-browser to http://localhost:12345, and you should see Confluent Control Center with your operational Kafka cluster, Schema Registry, and Kafka Connect with the running clicks connector.
Highlights
Service Configurations
The Confluent Platform Helm Charts deliver a reasonable base configuration for most deployments. What is left to the user is the ‘last mile’ of configuration specific to your environment. For this demo we specify the non-default configuration in the values.yaml file. The YAML file facilitates a declarative infastructure approach, but can also be useful for viewing non-default configuration in a single place, bootstrapping a new environment, or sharing in general.
The following is an example section of the demo’s values.yaml file showing how Kafka server properties (configOverrides) can be configured using Helm Charts. The example also shows a YAML anchor (<<: *cpImage) to promote reuse within the YAML file itself. See the values.yaml for further details.
kafka:
  <<: *cpImage
  resources:
    cpu: 200m
    memory: 1Gi
  loadBalancer:
    enabled: false
  tls:
    enabled: false
  metricReporter:
    enabled: true
  configOverrides:
    server:
    - "auto.create.topics.enabled=true"
Remaining configuration details are specificied in individual helm commands. An example is included below showing the setting to actually enable zookeeper deployment with the --set argument on the helm upgrade command. See the Makefile for the full commands.
helm upgrade --install --namespace operator --set zookeeper.enabled=true ...
Client Configurations
Warning
The default security deployment for the Confluent Platform Helm Charts is to use SASL/PLAIN security. This is useful for demonstration purposes, however, you should use greater security for production environments. See Configuring security for more details.
Using the Confluent Platform Helm Charts, Kafka is deployed with Plaintext SASL security enabled. In order for clients to authenticate, they will require configuration values including SASL credentials. The Kubernetes API supports Secrets and ConfigMap types which can be used to push configuration values into files that applications on Pods can use. This demo uses these mechanisms to launch a client-console Pod preconfigured with the required client properties file. The properties file on the Pod is a mapped version of the centrally stored Secret.
Here is how it works:
The configuration file values, including the SASL secrets, are defined in a Kubernetes Object file, like the following. Note how everything beyond the kafka-client.properties line looks like a typical Java Properties file:
apiVersion: v1
kind: Secret
metadata:
  name: kafka-client.properties
type: Opaque
stringData:
  kafka-client.properties: |-
    bootstrap.servers=kafka:9071
    sasl.jaas.config=org.apache.kafka.common.security.plain.PlainLoginModule required username="test" password="test123";
    sasl.mechanism=PLAIN
    security.protocol=SASL_PLAINTEXT
The demo applies this object to the cluster with the kubectl apply command:
kubectl --context <k8s-context> -n operator apply -f <path-to-examples-repo>kubernetes/common/cfg/kafka-client-secrets.yaml
The client-console is deployed with this Secret Object mapped as a volume to the Pod:
apiVersion: v1
kind: Pod
metadata:
  namespace: operator
  name: client-console
spec:
  containers:
  - name: client-console
    image: docker.io/confluentinc/cp-server-operator:5.3.0.0
    command: [sleep, "86400"]
    volumeMounts:
    - name: kafka-client-properties
      mountPath: /etc/kafka-client-properties/
  volumes:
  - name: kafka-client-properties
    secret:
      secretName: kafka-client.properties
The end result is the Secret object named kafka-client.properties is located on the Pod in the file location /etc/kafka-client-properties/kafka-client.properties:
kubectl -n operator exec -it client-console bash

root@client-console:/opt# cat /etc/kafka-client-properties/kafka-client.properties
bootstrap.servers=kafka:9071
sasl.jaas.config=org.apache.kafka.common.security.plain.PlainLoginModule required username="test" password="test123";
sasl.mechanism=PLAIN
security.protocol=SASL_PLAINTEXT
Connector Deployments
Kafka Connect utilizes a REST endpoint, which accepts JSON objects, for Connector deployments. This demo shows one approach for deploying a connector inside the Kubernetes cluster using Kubernetes ConfigMap objects, a standard Docker image with an overridden command, and the Kubernetes Batch Job API.
First the connector definition is defined inside a ConfigMap object. Notice how everything after the clicks-datagen-connector.json name is a full JSON object:
apiVersion: v1
kind: ConfigMap
metadata:
  name: clicks-datagen-connector
data:
  clicks-datagen-connector.json: '{
    "name":"clicks",
    "config": {
      "connector.class": "io.confluent.kafka.connect.datagen.DatagenConnector",
      "kafka.topic": "clicks",
      "key.converter": "org.apache.kafka.connect.storage.StringConverter",
      "value.converter": "io.confluent.connect.avro.AvroConverter",
      "value.converter.schema.registry.url": "http://schemaregistry:8081",
      "value.converter.schemas.enable": "true",
      "quickstart": "clickstream",
      "max.interval": 1000,
      "iterations": -1,
      "tasks.max": "1"
    }
  }'
This ConfigMap is applied to the cluster with the following command:
kubectl --context <k8s-context> -n operator apply -f <path-to-examples-repo>kubernetes/common/cfg/clicks-datagen-connector-configmap.yaml
Next, a Kubernetes Job Object is defined. Using a docker image with the curl program installed, the Job adds arguments to the curl command in order to deploy the connector configuration. Note how the ConfigMap defined above is mounted to the Job specification and the config file passed into the curl command matches the path of the file mounted:
apiVersion: batch/v1
kind: Job
metadata:
  name: clicks-datagen-connector-deploy
spec:
  ttlSecondsAfterFinished: 5
  template:
    spec:
      volumes:
      - name: clicks-datagen-connector
        configMap:
          name: clicks-datagen-connector
      containers:
      - name: clicks-datagen-connector-deploy
        image: cnfldemos/alpine-curl:3.10.2_7.65.1
        args: [
          "-s",
          "-X", "POST",
          "-H", "Content-Type: application/json",
          "--data", "@/etc/config/connector/clicks-datagen-connector.json",
          "http://connectors:8083/connectors"
        ]
        volumeMounts:
          - name: clicks-datagen-connector
            mountPath: /etc/config/connector
      restartPolicy: Never
  backoffLimit: 1
The job is applied to the cluster, after the Kafka Connect system is deployed with:
kubectl --context <k8s-context> -n operator apply -f <path-to-examples-repo>kubernetes/common/cfg/clicks-datagen-connector-deploy-job.yaml
After the job is applied, the following command shows the deployed connector:
kubectl -n operator exec -it client-console bash
root@client-console:/opt# curl http://connectors:8083/connectors;echo;
["clicks"]
Deploying Connectors with Operator
You can deploy any Kafka connector (or single message transformation (SMT) or converter) in your Kubernetes environment. Search in Confluent Hub, an online library of pre-packaged and ready-to-install connectors, transformations, and converters, to find the one that suits your needs. The Confluent Operator image for Kafka Connect, confluentinc/cp-server-connect-operator, includes a small number of those connectors but may not have the specific connector you want to deploy. Therefore, to deploy a new connector type in your Kubernetes environment, you will need to get the jars onto the Connect image.
The recommended way is to create a custom Docker image that extends the base Connect Docker image with the desired jars. The custom Docker image builds the dependencies into a single artifact, which is more self-sufficient and portable such that it can be run on any pod despite totally ephemeral disk. See the documentation to learn how to use the Confluent Hub client to create a custom Docker image that extends one of Confluent’s Kafka Connect images with a specific set of ready-to-install connectors. As an example, see how the Kafka Connect Datagen connector, which generates mock events, can be pulled from Confluent Hub and bundled into a Docker image using this Dockerfile. Once you build the custom Docker image, Kubernetes will need to pull this image from a Docker Registry to create the Pods.
Note
It is not recommended to use volumes to place the desired jars onto the Connect image because it is less self-sufficient, less portable, and harder to match up versions between the base image and jars.
For more advanced use cases where you want to use a custom connector instead of a pre-packaged one available at Confluent Hub, you may create a Docker image with a custom connector from a local archive. The demonstration uses this more advanced workflow. We use the Kafka Connect Datagen connector to generate mock events, and this Dockerfile builds the Docker image with a local archive of the Kafka Connect Datagen connector compiled from source code (versus pulling directly from Confluent Hub). We publish this image to Docker Hub, but in your environment, publish to your own Docker Hub repo.
Your Operator Helm values will need to be updated to pull the custom Connect Docker image for your Pods. You can accomplish this by overriding the connect image to instead use the one published to Docker Hub in the demo’s value.yaml configuration file.
connect:
image:
  repository: cnfldemos/cp-server-connect-operator-datagen
  tag: 0.3.1-5.4.1.0
Tear down
To tear down the Confluent Platform components inside the cluster, run the following (estimated running time, 4 minutes):
make destroy-demo
You can verify that all resources are removed with:
kubectl -n operator get all
If you used the demo to create the Kubernetes cluster for you, destroy the cluster with (estimated running time, 3 minutes):
make gke-destroy-cluster
Advanced Demo Usage
Variable Reference
The following table documents variables that can be used to configure various demo behaviors. Variables can be exported or set in each individual make command with either sample syntax below:
VARIABLE=value make <make-target>
make <make-target> VARIABLE=value
| Variable | Description | Default |
|---|---|---|
| GCP_PROJECT_ID | Maps to your GCP Project ID.
This is used by the demo to build a new GKE cluster as well as configuring the kubectl context.
If you wish to use a different project id that the current active configuration in glcoud
you should export this value in the current shell where you are running the demo. |
The output of the command gcloud config list --format 'value(core.project) |
| GKE_BASE_CLUSTER_ID | Identifies the GKE Cluster. Substitutes in the current user to help with project uniqueness on GCP. | cp-examples-operator-$USER |
| GKE_BASE_REGION | Used in the --subnetwork flag to define the networking region |
us-central1 |
| GKE_BASE_ZONE | Maps to the --zone flag |
us-central1-a |
| GKE_BASE_SUBNET | Used in the --subnetwork flag to define the subnet |
default |
| GKE_BASE_CLUSTER_VERSION | Maps to the --cluster-version flag |
1.12.8-gke.10 |
| GKE_BASE_MACHINE_TYPE | Maps to the --machine-type flag |
n1-highmem-2 |
| GKE_BASE_IMAGE_TYPE | Maps to the --image-type flag. Verify CPU Platform minimums if changing |
COS |
| GKE_BASE_DISK_TYPE | Maps to the --disk-type flag |
pd-standard |
| GKE_BASE_DISK_SIZE | Maps to the --disksize flag |
100 |
| GKE_BASE_NUM_NODES | Maps to the --num-nodes flag |
3 |
| KUBECTL_CONTEXT | Used to explicitly set the kubectl context within the demo |
gke_$(GCP_PROJECT_ID)_$(GKE_BASE_ZONE)_$(GKE_BASE_CLUSTER_ID) |