

Confluent Cloud Schema Registry Tutorial
Use Confluent Cloud Schema Registry to enable client applications to read and write Avro data and check schema compatibility as schemas evolve. The following steps walk through the full workflow.
Tip
Try out the embedded Confluent Cloud interactive tutorials Want to jump right in? Sign up or sign in to Confluent Cloud, and try out the guided workflows directly in Confluent Cloud.
What the tutorial covers
This tutorial covers defining an Avro schema, writing and reading Avro data with Java producers and consumers, and checking schema compatibility as schemas evolve.
This tutorial runs on Confluent Cloud Schema Registry. If you have a local Confluent Platform install, consult the Confluent Schema Registry tutorial for on-premises deployments at On-Premises Schema Registry Tutorial.
Schema Registry terms: topic, schema, and subject
What is a topic versus a schema versus a subject?
An Apache Kafka® topic contains messages, and each message is a key-value pair. The producer can serialize the message key, the message value, or both, as Avro, JSON Schema, or Protobuf.
A schema defines the structure of the data format. The Kafka topic name can be independent of the schema name.
The schema subject is a Schema Registry-defined scope in which schemas can evolve. The name of the subject depends on the configured subject name strategy, which, by default, derives the subject name from the topic name.
You can change the subject name strategy on a per-topic basis.
As a practical example, consider a retail business streaming
transactions in a Kafka topic called transactions.
A producer is writing data with a schema Payment to that Kafka topic
transactions. If the producer is serializing the message value as
Avro, then Schema Registry has a subject called transactions-value.
If the producer is also serializing the message key as Avro, Schema Registry would
have a subject called transactions-key. For simplicity, this tutorial
considers only the message value.
The subject transactions-value defines the scope in which schemas for
that subject can evolve. Schema Registry checks compatibility within this scope.
The Schema Registry subject transactions-value contains at least one schema
called Payment.
In this scenario, if developers evolve the schema Payment and produce new
messages to the topic transactions, Schema Registry checks that those newly evolved
schemas are compatible with older schemas in the subject
transactions-value. If compatible, Schema Registry adds the new schemas to the
subject.
Set up your Confluent Cloud environment and tools
Prerequisites
Before proceeding with this tutorial, you can optionally review a summary of the Schema Registry concepts in Schema Registry Key Concepts.
Prerequisite setup includes:
An initialized Confluent Cloud cluster. If you don’t have one yet, Quick Start for Confluent Cloud walks you through creating one.
On your local machine:
Confluent CLI v1.7.0 or later.
Java 1.8 or 1.11 to run the Java client.
Maven to compile the client Java code.
Current versions of
slf4j-log4j12andconfluent-log4jlibraries. Otherwise, you might get a missing dependencies error when attempting to runmvn clean compile packagein the steps to Run the producer and Run the consumer.jqtool to nicely format the results from querying the Confluent Cloud Schema Registry REST endpoint.
Environment setup
Run this tutorial in a new Confluent Cloud environment so it doesn’t interfere with your other work.
Tip
You can use the Example: Create Fully Managed Services on Confluent Cloud to provision a new Confluent Cloud stack, which includes:
A new environment
A new service account
A new Kafka cluster and associated credentials
Confluent Cloud Schema Registry and associated credentials
Access control lists (ACLs) with wildcard for the service account
Follow the Usage instructions for ccloud-stack to log in to Confluent Cloud and create a ccloud-stack.

If you used
ccloud-stack, it also generates a configuration file with all the Confluent Cloud and Confluent Cloud Schema Registry connection information. Verify that the auto-generated fileexamples/ccloud/ccloud-stack/stack-configs/java-service-account-<account>.configresembles the following. If you set up your environment manually, create a configuration file with the equivalent values instead:# ------------------------------ # ENVIRONMENT ID: <ENVIRONMENT ID> # SERVICE ACCOUNT ID: <SERVICE ACCOUNT ID> # KAFKA CLUSTER ID: <KAFKA CLUSTER ID> # SCHEMA REGISTRY CLUSTER ID: <SCHEMA REGISTRY CLUSTER ID> # ------------------------------ ssl.endpoint.identification.algorithm=https security.protocol=SASL_SSL sasl.mechanism=PLAIN bootstrap.servers=<BROKER ENDPOINT> sasl.jaas.config=org.apache.kafka.common.security.plain.PlainLoginModule required username='<API KEY>' password='<API SECRET>'; basic.auth.credentials.source=USER_INFO schema.registry.basic.auth.user.info=<SR API KEY>:<SR API SECRET> schema.registry.url=<SR ENDPOINT>
Save this configuration file to
$HOME/.confluent/java.config.Export the variables to your shell. Substitute values for
<SR API KEY>,<SR API SECRET>, and<SR ENDPOINT>so you can copy and paste the commands in the rest of the tutorial.export SCHEMA_REGISTRY_BASIC_AUTH_USER_INFO=<SR API KEY>:<SR API SECRET> export SCHEMA_REGISTRY_URL=<SR ENDPOINT>
Tip
To get the Schema Registry REST endpoint, do one of the following:
From Confluent Cloud, navigate to an environment with a Schema Registry enabled to view the value given for Endpoint under Stream Governance API.
From the Confluent CLI, run confluent schema-registry cluster describe to view the value given for
Endpoint URL.
Clone the Confluent examples repo from GitHub and work in the
clients/avro/subdirectory, which provides the sample code you compile and run in this tutorial.git clone https://github.com/confluentinc/examples.git
cd examples/clients/avro
git checkout master
Create the transactions topic
For the exercises in this tutorial, you produce to and consume from a
topic called transactions. Create this topic in Confluent Cloud Console.
Navigate to the Cloud Console at https://confluent.cloud. Click your environment and Kafka cluster.
Select Topics, and then click Create topic.
Name the topic
transactions, and then click Create with defaults.
The new topic appears.

Schema definition
The first thing developers need to do is agree on a basic schema for data. Client applications form a contract:
Producers write data in a schema
Consumers read that data
Consider the original Payment schema Payment.avsc. To view the schema, run this command:
cat src/main/resources/avro/io/confluent/examples/clients/basicavro/Payment.avsc
Observe the schema definition:
{
 "namespace": "io.confluent.examples.clients.basicavro",
 "type": "record",
 "name": "Payment",
 "fields": [
     {"name": "id", "type": "string"},
     {"name": "amount", "type": "double"}
 ]
}
Here is a breakdown of what this schema defines:
namespace: a fully qualified name that avoids schema naming conflictstype: Avro data type, for example,record,enum,union,array,map, orfixedname: unique schema name in this namespacefields: one or more simple or complex data types for arecord. The first field in this record,id, is typestring. The second,amount, is typedouble.
With the schema in place, set up the client applications that produce and consume this data.
Client applications writing Avro
Maven
This tutorial uses Maven to configure the project and dependencies.
Java applications that have Kafka producers or consumers using Avro require pom.xml files to include, among other things:
Confluent Maven repository
Confluent Maven plugin repository
Dependencies
org.apache.avro.avroandio.confluent.kafka-avro-serializerto serialize data as AvroPlugin
avro-maven-pluginto generate Java class files from the source schema
The pom.xml file may also include:
Plugin
kafka-schema-registry-maven-pluginto check compatibility of evolving schemas
For a full pom.xml example, refer to this pom.xml.
Configuring Avro
Kafka applications using Avro data and Schema Registry need to specify at least two configuration parameters:
Avro serializer or deserializer
Properties to connect to Schema Registry
There are two basic types of Avro records that your application can use:
a specific code-generated class, or
a generic record
The examples in this tutorial demonstrate how to use the specific Payment class.
Using a specific code-generated class requires you to define and compile a Java class for your schema, but it easier to work with in your code.
However, in other scenarios where you need to work dynamically with data of any type and do not have Java classes for your record types, use GenericRecord.
Confluent Platform also provides a serializer and deserializer for writing and reading data in “reflection Avro” format. To learn more, see Reflection Based Avro Serializer and Deserializer.
Java producers
Within the client application, Java producers need to configure the Avro serializer for
the Kafka value (or Kafka key) and URL to Schema Registry. Then the producer can write
records where the Kafka value is of Payment class.
Example producer code
When constructing the producer, configure the message value class to use the
application’s code-generated Payment class. For example:
...
import io.confluent.kafka.serializers.KafkaAvroSerializer;
...
props.put(ProducerConfig.KEY_SERIALIZER_CLASS_CONFIG, StringSerializer.class);
props.put(ProducerConfig.VALUE_SERIALIZER_CLASS_CONFIG, KafkaAvroSerializer.class);
...
KafkaProducer<String, Payment> producer = new KafkaProducer<String, Payment>(props));
final Payment payment = new Payment(orderId, 1000.00d);
final ProducerRecord<String, Payment> record = new ProducerRecord<String, Payment>(TOPIC, payment.getId().toString(), payment);
producer.send(record);
...
Because the pom.xml includes avro-maven-plugin, the Payment class is automatically generated during compile.
In this example, the connection information to the Kafka brokers and Schema Registry is provided by the configuration file that is passed into the code, but if you want to specify the connection information directly in the client application, see this java template.
For a full Java producer example, refer to the producer example.
Run the producer
Run the following commands in a shell from examples/clients/avro.
To run this producer, first compile the project:
mvn clean compile package
If you get a missing dependencies error, see the Prerequisites for the required
slf4j-log4j12andconfluent-log4jlibrary versions.From Cloud Console, select the cluster, and then click Topics.
Next, click the
transactionstopic and go to the Messages tab.You should see no messages because no messages have been produced to this topic yet.
Run
ProducerExample, which produces Avro-formatted messages to thetransactionstopic. Pass in the path to the file you created earlier,$HOME/.confluent/java.config.mvn exec:java -Dexec.mainClass=io.confluent.examples.clients.basicavro.ProducerExample \ -Dexec.args="$HOME/.confluent/java.config"
The command takes a moment to run. When it completes, you should see:
...
Successfully produced 10 messages to a topic called transactions
[INFO] ------------------------------------------------------------------------
[INFO] BUILD SUCCESS
[INFO] ------------------------------------------------------------------------
...
To see messages in Cloud Console, inspect the
transactionstopic, which dynamically shows the newly arriving data.From Cloud Console, select the cluster, then go to Topics >
transactions> Messages.Tip
If you don’t see any data, rerun the producer and verify it completed successfully, and then look at Cloud Console again. The messages don’t persist in the Cloud Console, so you need to view them soon after you run the producer.

Java consumers
Within the client application, Java consumers need to configure the Avro deserializer for the Kafka value (or Kafka key) and URL to Schema Registry.
Then the consumer can read records where the Kafka value is of Payment class.
Example consumer code
By default, each record is deserialized into an Avro GenericRecord, but in this tutorial the record should be deserialized using the application’s code-generated Payment class.
Therefore, configure the deserializer to use Avro SpecificRecord, i.e., SPECIFIC_AVRO_READER_CONFIG should be set to true. For example:
...
import io.confluent.kafka.serializers.KafkaAvroDeserializer;
...
props.put(ConsumerConfig.KEY_DESERIALIZER_CLASS_CONFIG, StringDeserializer.class);
props.put(ConsumerConfig.VALUE_DESERIALIZER_CLASS_CONFIG, KafkaAvroDeserializer.class);
props.put(KafkaAvroDeserializerConfig.SPECIFIC_AVRO_READER_CONFIG, true);
...
KafkaConsumer<String, Payment> consumer = new KafkaConsumer<>(props));
consumer.subscribe(Collections.singletonList(TOPIC));
while (true) {
  ConsumerRecords<String, Payment> records = consumer.poll(100);
  for (ConsumerRecord<String, Payment> record : records) {
    String key = record.key();
    Payment value = record.value();
  }
}
...
Because the pom.xml includes avro-maven-plugin, the Payment class is automatically generated during compile.
In this example, the connection information to the Kafka brokers and Schema Registry is provided by the configuration file that is passed into the code, but if you want to specify the connection information directly in the client application, see this java template.
For a full Java consumer example, refer to the consumer example.
Run the consumer
To run this consumer, first compile the project.
mvn clean compile package
The
BUILD SUCCESSmessage indicates the project built, and the command prompt becomes available again.Then run
ConsumerExample(assuming you already ran theProducerExampleabove). Pass in the path to the file you created earlier,$HOME/.confluent/java.config.mvn exec:java -Dexec.mainClass=io.confluent.examples.clients.basicavro.ConsumerExample \ -Dexec.args="$HOME/.confluent/java.config"
You should see:
...
key = id0, value = {"id": "id0", "amount": 1000.0}
key = id1, value = {"id": "id1", "amount": 1000.0}
key = id2, value = {"id": "id2", "amount": 1000.0}
key = id3, value = {"id": "id3", "amount": 1000.0}
key = id4, value = {"id": "id4", "amount": 1000.0}
key = id5, value = {"id": "id5", "amount": 1000.0}
key = id6, value = {"id": "id6", "amount": 1000.0}
key = id7, value = {"id": "id7", "amount": 1000.0}
key = id8, value = {"id": "id8", "amount": 1000.0}
key = id9, value = {"id": "id9", "amount": 1000.0}
...
Press
Ctrl+Cto stop.
Other Kafka clients
The objective of this tutorial is to learn about Avro and Schema Registry centralized schema management and compatibility checks. To keep examples simple, this tutorial focuses on Java producers and consumers, but other Kafka clients work in similar ways. For examples of other Kafka clients interoperating with Avro and Schema Registry:
Centralized schema management
Viewing schemas in Schema Registry
View the latest schema registered for a topic from Cloud Console’s Schema tab.
From Cloud Console, select the cluster, and then click Topics.
Click the
transactionstopic and go to the Schema tab to retrieve the latest schema from Confluent Cloud Schema Registry for this topic:
The schema is identical to the schema file defined for Java client applications.
Schema IDs in messages
Integration with Schema Registry means producers don’t need to write the entire Avro schema into each Kafka message. Instead, producers write the schema ID into the message. The producers writing the messages and the consumers reading the messages must be using the same Schema Registry to get the same mapping between a schema and schema ID.
Step |
Producer |
Consumer |
|---|---|---|
Sends/reads data |
Sends the new schema ( |
Reads data containing the Avro schema ID ( |
Contacts Confluent Cloud Schema Registry |
Confluent Cloud Schema Registry registers the schema to subject
|
Sends a schema request; Confluent Cloud Schema Registry retrieves the schema for
ID |
Caches mapping |
Caches the schema-to-ID mapping; contacts Confluent Cloud Schema Registry only on the first write |
Caches the schema-to-ID mapping; contacts Confluent Cloud Schema Registry only on the first read |
Using curl to interact with Schema Registry
You can also use curl commands to connect directly to the REST endpoint in Confluent Cloud Schema Registry to view subjects and associated schemas.
To view all the subjects registered in Confluent Cloud Schema Registry, use the following command.
curl --silent -X GET -u $SCHEMA_REGISTRY_BASIC_AUTH_USER_INFO $SCHEMA_REGISTRY_URL/subjects | jq .
Here is the expected output of the above command:
[
  "transactions-value"
]
In this example, the Kafka topic
transactionshas messages whose value (that is, payload) is Avro, and by default the Confluent Cloud Schema Registry subject name istransactions-value.To view the latest schema for this subject in more detail:
curl --silent -X GET -u $SCHEMA_REGISTRY_BASIC_AUTH_USER_INFO $SCHEMA_REGISTRY_URL/subjects/transactions-value/versions/latest | jq .
Here is the expected output of the above command:
{
  "subject": "transactions-value",
  "version": 1,
  "id": 100001,
  "schema": "{\"type\":\"record\",\"name\":\"Payment\",\"namespace\":\"io.confluent.examples.clients.basicavro\",\"fields\":[{\"name\":\"id\",\"type\":\"string\"},{\"name\":\"amount\",\"type\":\"double\"}]}"
}
Here is a breakdown of what this version of the schema defines:
subject: the scope in which schemas for the messages in the topictransactionscan evolveversion: the schema version for this subject, which starts at 1 for each subjectid: the globally unique schema version ID, unique across all schemas in all subjectsschema: the structure that defines the schema format
Notice that in the output to the preceding
curlcommand, the schema is escaped JSON. The double quotes are preceded by backslashes.Based on the schema ID, you can also retrieve the associated schema by querying Confluent Cloud Schema Registry REST endpoint as follows:
curl --silent -X GET -u $SCHEMA_REGISTRY_BASIC_AUTH_USER_INFO $SCHEMA_REGISTRY_URL/schemas/ids/100001 | jq .
Here is the expected output:
{
  "schema": "{\"type\":\"record\",\"name\":\"Payment\",\"namespace\":\"io.confluent.examples.clients.basicavro\",\"fields\":[{\"name\":\"id\",\"type\":\"string\"},{\"name\":\"amount\",\"type\":\"double\"}]}"
}
Auto schema registration
By default, client applications automatically register new schemas. If they produce new messages to a new topic, then they will automatically try to register new schemas. This is convenient in development environments, but in production environments it’s recommended that client applications do not automatically register new schemas. Best practice is to register schemas outside of the client application to control when schemas are registered with Schema Registry and how they evolve.
Within the application, you can disable automatic schema registration by setting the configuration parameter auto.register.schemas=false, as shown in the following example.
props.put(AbstractKafkaAvroSerDeConfig.AUTO_REGISTER_SCHEMAS, false);
Tip
If you want to enable
use.latest.versionfor producers, you must disable auto schema registration by settingauto.register.schemasto false, anduse.latest.versionto true. (The opposite of their defaults.) The optionauto.register.schemasmust be set to false in order foruse.latest.versionto work.Setting
auto.register.schemasto false disables auto-registration of the event type, so that it does not override the latest schema in the subject. Settinguse.latest.versionto true causes the serializer to look up the latest schema version in the subject and use that for serialization. Ifuse.latest.versionis set to false (which is the default), the serializer will look for the event type in the subject and fail to find it.You can also set
use.latest.versionon consumers, which causes the consumer to look up the latest schema version in the subject and use that as the target schema during deserialization.See also, Schema Registry Configuration Options for Kafka Connect.
The configuration option
auto.register.schemasis a Confluent Platform feature; not available in Apache Kafka®.
To manually register the schema outside of the application, you can use Cloud Console.
First, create a new topic called test in the same way that you created a new topic called transactions earlier in the tutorial.
Then from the Schema tab, click Set a schema to define the new schema.
Specify values for:
namespace: a fully qualified name that avoids schema naming conflictstype: Avro data type, one ofrecord,enum,union,array,map,fixedname: unique schema name in this namespacefields: one or more simple or complex data types for arecord. The first field in this record is calledid, and it is of typestring. The second field in this record is calledamount, and it is of typedouble.
If you were to define the same schema as used earlier, you would enter the following in the schema editor:
{
  "type": "record",
  "name": "Payment",
  "namespace": "io.confluent.examples.clients.basicavro",
  "fields": [
    {
      "name": "id",
      "type": "string"
    },
    {
      "name": "amount",
      "type": "double"
    }
  ]
}
If you prefer to connect directly to the REST endpoint in Schema Registry, run the
following command to define a schema for a new subject for the topic
test. This test topic and its test-value subject are only a
throwaway example for this command, distinct from the transactions
topic used throughout the rest of this tutorial.
curl -X POST -H "Content-Type: application/vnd.schemaregistry.v1+json" \
  --data '{"schema": "{\"type\":\"record\",\"name\":\"Payment\",\"namespace\":\"io.confluent.examples.clients.basicavro\",\"fields\":[{\"name\":\"id\",\"type\":\"string\"},{\"name\":\"amount\",\"type\":\"double\"}]}"}' \
  -u $SCHEMA_REGISTRY_BASIC_AUTH_USER_INFO \
  $SCHEMA_REGISTRY_URL/subjects/test-value/versions
This sample output creates a schema with an ID of 100001:
{"id":100001}
Schema evolution and compatibility
Evolving schemas
So far in this tutorial, you have seen the benefit of Schema Registry as being centralized schema management that enables client applications to register and retrieve globally unique schema ids. The main value of Schema Registry, however, is in enabling schema evolution. Similar to how APIs evolve and need to be compatible for all applications that rely on old and new versions of the API, schemas also evolve and likewise need to be compatible for all applications that rely on old and new versions of a schema. This schema evolution is a natural behavior of how applications and data develop over time.
Schema Registry allows for schema evolution and provides compatibility checks to ensure that the contract between producers and consumers is not broken. This allows producers and consumers to update independently and evolve their schemas independently, with assurances that they can read new and legacy data. This is especially important in Kafka because producers and consumers are decoupled applications that are sometimes developed by different teams.
Transitive compatibility checking is important once you have more than two versions of a schema for a given subject. If compatibility is configured as transitive, then it checks compatibility of a new schema against all previously registered schemas; otherwise, it checks compatibility of a new schema only against the latest schema.
For example, if there are three schemas for a subject that change in order X-2, X-1, and X then:
transitive: ensures compatibility between X-2 <==> X-1 and X-1 <==> X and X-2 <==> X
non-transitive: ensures compatibility between X-2 <==> X-1 and X-1 <==> X, but not necessarily X-2 <==> X
Refer to an example of schema changes which are incrementally compatible, but not transitively so.
The Confluent Schema Registry default compatibility type BACKWARD is non-transitive, which means that it’s not BACKWARD_TRANSITIVE.
As a result, new schemas are checked for compatibility only against the latest schema.
These are the compatibility types:
BACKWARD: (default) consumers using the new schema can read data written by producers using the latest registered schemaBACKWARD_TRANSITIVE: consumers using the new schema can read data written by producers using all previously registered schemasFORWARD: consumers using the latest registered schema can read data written by producers using the new schemaFORWARD_TRANSITIVE: consumers using all previously registered schemas can read data written by producers using the new schemaFULL: the new schema is forward and backward compatible with the latest registered schemaFULL_TRANSITIVE: the new schema is forward and backward compatible with all previously registered schemasNONE: schema compatibility checks are disabled
Refer to Schema Evolution and Compatibility for a more in-depth explanation on the compatibility types.
Failing compatibility checks
Schema Registry checks compatibility as schemas evolve to uphold the producer-consumer contract. Without Schema Registry checking compatibility, your applications could break on schema changes.
In the Payment schema example, assume the business now tracks more
information for each payment. For example, a field region that
represents the place of sale.
Consider the Payment2a schema which includes this extra field region:
cat src/main/resources/avro/io/confluent/examples/clients/basicavro/Payment2a.avsc
{
 "namespace": "io.confluent.examples.clients.basicavro",
 "type": "record",
 "name": "Payment",
 "fields": [
     {"name": "id", "type": "string"},
     {"name": "amount", "type": "double"},
     {"name": "region", "type": "string"}
 ]
}
This schema is not backward compatible. A consumer using the new schema
can’t read data written by producers using the older schema, because the
older data lacks the region field.
Before proceeding with any schema change, check whether the default Schema Registry backward compatibility type holds, meaning whether a consumer using the new schema can read data written with the older schema.
Confluent offers a Schema Registry Maven Plugin, which you can use to check compatibility in development or integrate into your continuous integration/continuous delivery (CI/CD) pipeline.
The sample pom.xml includes this plugin to enable compatibility checks.
...
<properties>
  <schemaRegistryUrl>http://localhost:8081</schemaRegistryUrl>
  <schemaRegistryBasicAuthUserInfo></schemaRegistryBasicAuthUserInfo>
</properties>
...
<build>
  <plugins>
  ...
    <plugin>
        <groupId>io.confluent</groupId>
        <artifactId>kafka-schema-registry-maven-plugin</artifactId>
        <version>${confluent.version}</version>
        <configuration>
            <schemaRegistryUrls>
                <param>${schemaRegistryUrl}</param>
            </schemaRegistryUrls>
            <userInfoConfig>${schemaRegistryBasicAuthUserInfo}</userInfoConfig>
            <subjects>
                <transactions-value>src/main/resources/avro/io/confluent/examples/clients/basicavro/Payment2a.avsc</transactions-value>
            </subjects>
        </configuration>
        <goals>
            <goal>test-compatibility</goal>
        </goals>
    </plugin>
...
  </plugins>
</build>
This configuration checks compatibility of the new Payment2a
schema for the transactions-value subject in Schema Registry.
Run the compatibility check.
mvn io.confluent:kafka-schema-registry-maven-plugin:test-compatibility \
    "-DschemaRegistryUrl=$SCHEMA_REGISTRY_URL" \
    "-DschemaRegistryBasicAuthUserInfo=$SCHEMA_REGISTRY_BASIC_AUTH_USER_INFO" \
    "-DschemaLocal=src/main/resources/avro/io/confluent/examples/clients/basicavro/Payment2a.avsc"
Verify that the compatibility check fails, which causes this error message:
...
[ERROR] Schema examples/clients/avro/src/main/resources/avro/io/confluent/examples/clients/basicavro/Payment2a.avsc is not compatible with subject(transactions-value)
...
Try to register the new schema
Payment2amanually to Schema Registry, which is a useful way for non-Java clients to check compatibility from the command line:curl -X POST -H "Content-Type: application/vnd.schemaregistry.v1+json" \ --data '{"schema": "{\"type\":\"record\",\"name\":\"Payment\",\"namespace\":\"io.confluent.examples.clients.basicavro\",\"fields\":[{\"name\":\"id\",\"type\":\"string\"},{\"name\":\"amount\",\"type\":\"double\"},{\"name\":\"region\",\"type\":\"string\"}]}"}' \ -u $SCHEMA_REGISTRY_BASIC_AUTH_USER_INFO \ $SCHEMA_REGISTRY_URL/subjects/transactions-value/versions
Verify that Confluent Cloud Schema Registry rejects the schema with an error message that it is incompatible:
{"error_code":409,"message":"Schema being registered is incompatible with an earlier schema"}
Passing compatibility checks
To maintain backward compatibility, a new schema must assume default values for the new field when it’s missing.
Consider an updated Payment2b schema that has a default value for
region. To view the schema, run this command:cat src/main/resources/avro/io/confluent/examples/clients/basicavro/Payment2b.avscYou should see the following output.
{
 "namespace": "io.confluent.examples.clients.basicavro",
 "type": "record",
 "name": "Payment",
 "fields": [
     {"name": "id", "type": "string"},
     {"name": "amount", "type": "double"},
     {"name": "region", "type": "string", "default": ""}
 ]
}
From the Confluent Cloud Console, click the
transactionstopic and go to the Schema tab to retrieve thetransactionstopic’s latest schema from Schema Registry.Click Edit Schema.
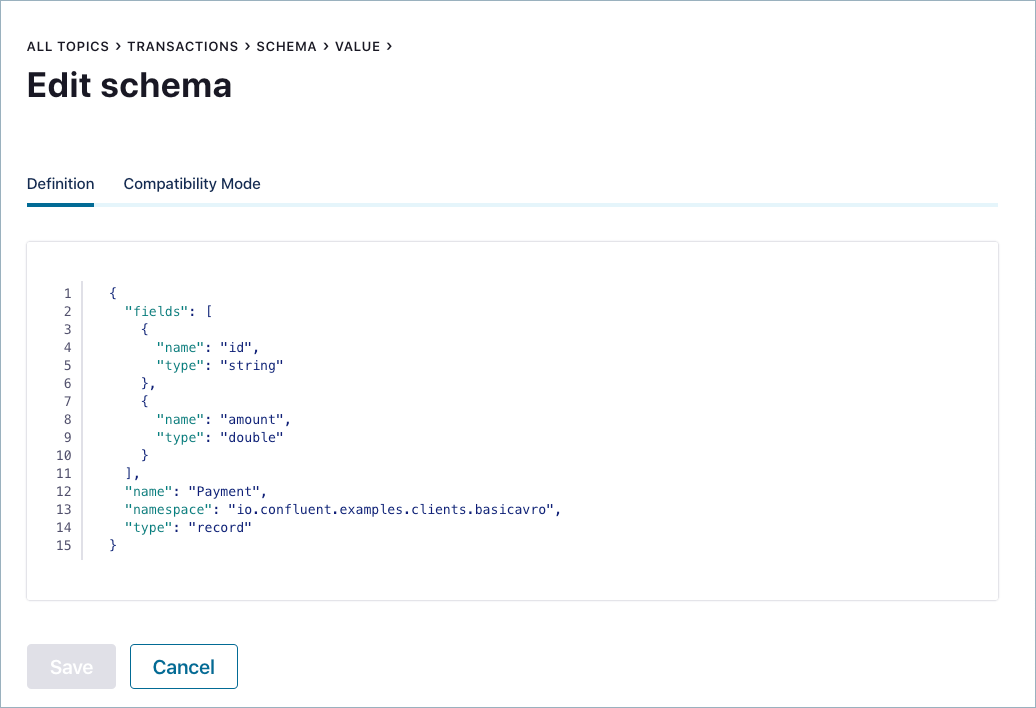
Add the new field
regionagain with the default value, and then click Save:{ "name": "region", "type": "string", "default": "" }
Verify that Confluent Cloud Schema Registry accepts the new schema.
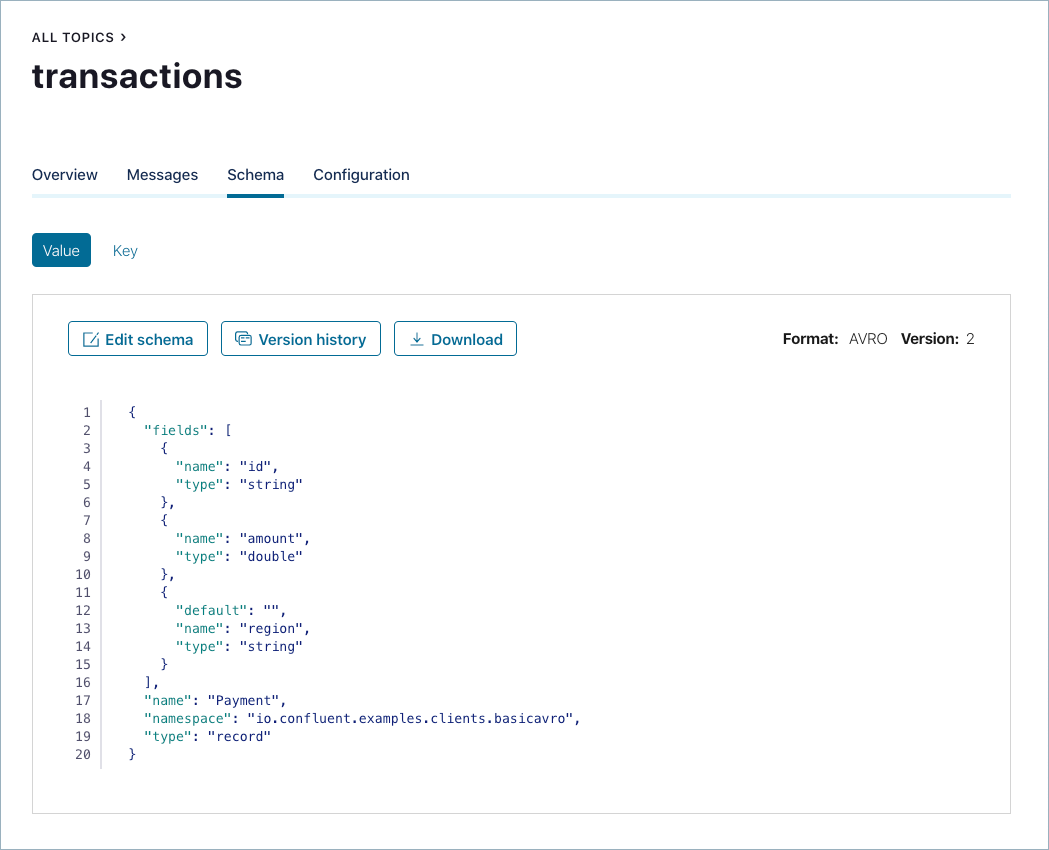
Note
If you get error messages about invalid Avro, check syntax. For example, check quotes and colons, enclosing brackets, comma-separated from the previous field, and so on.
Review the registered schema versions. The Schema Registry subject
transactions-valuefor the topictransactionshas two schemas:Version 1 is
Payment.avsc.Version 2 is
Payment2b.avsc, which adds theregionfield with a default empty value.
To compare the two versions in Cloud Console, on the Schema tab for the topic
transactions, click Version history, and then select Turn on version diff: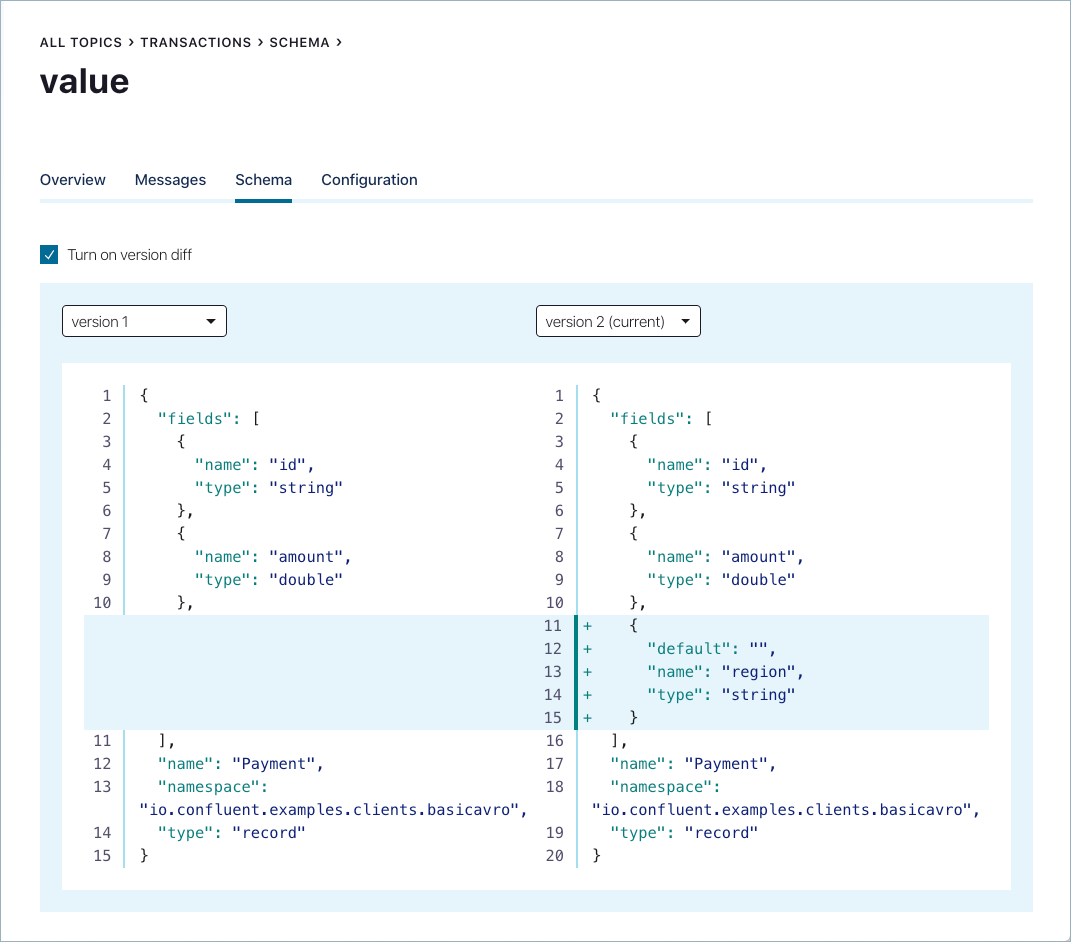
At the command line, go back to the Schema Registry Maven Plugin. Update the pom.xml to refer to
Payment2b.avscinstead ofPayment2a.avsc.Re-run the compatibility check and verify that it passes:
mvn io.confluent:kafka-schema-registry-maven-plugin:test-compatibilityVerify the schema passed the compatibility check with this message:
...
[INFO] Schema examples/clients/avro/src/main/resources/avro/io/confluent/examples/clients/basicavro/Payment2b.avsc is compatible with subject(transactions-value)
...
If you prefer to connect directly to the REST endpoint in Schema Registry, then to register the new schema
Payment2b, run the following command:curl -X POST -H "Content-Type: application/vnd.schemaregistry.v1+json" \ --data '{"schema": "{\"type\":\"record\",\"name\":\"Payment\",\"namespace\":\"io.confluent.examples.clients.basicavro\",\"fields\":[{\"name\":\"id\",\"type\":\"string\"},{\"name\":\"amount\",\"type\":\"double\"},{\"name\":\"region\",\"type\":\"string\",\"default\":\"\"}]}"}' \ -u $SCHEMA_REGISTRY_BASIC_AUTH_USER_INFO \ $SCHEMA_REGISTRY_URL/subjects/transactions-value/versions
If successful, the preceding
curlcommand returns theidof the newly registered schema:{"id":100002}
View the latest subject for
transactions-valuein Confluent Cloud Schema Registry:curl --silent -X GET -u $SCHEMA_REGISTRY_BASIC_AUTH_USER_INFO $SCHEMA_REGISTRY_URL/subjects/transactions-value/versions/latest | jq .
This command returns the latest Confluent Cloud Schema Registry subject for the
transactions-valuetopic, including version number, id, and a description of the schema in JSON:{ "subject": "transactions-value", "version": 2, "id": 100002, "schema": "{\"type\":\"record\",\"name\":\"Payment\",\"namespace\":\"io.confluent.examples.clients.basicavro\",\"fields\":[{\"name\":\"id\",\"type\":\"string\"},{\"name\":\"amount\",\"type\":\"double\"},{\"name\":\"region\",\"type\":\"string\",\"default\":\"\"}]}" }
Notice the changes:
version: changed from1to2id: changed from100001to100002schema: updated with the new fieldregionthat has a default value
Changing compatibility type
The default compatibility type is backward, but you may change it globally or per subject.
To change the compatibility type per subject from the UI, click the
transactions topic and go to the Schema tab to retrieve the
transactions topic’s latest schema from Schema Registry. Click Edit Schema and then
click Compatibility Mode.
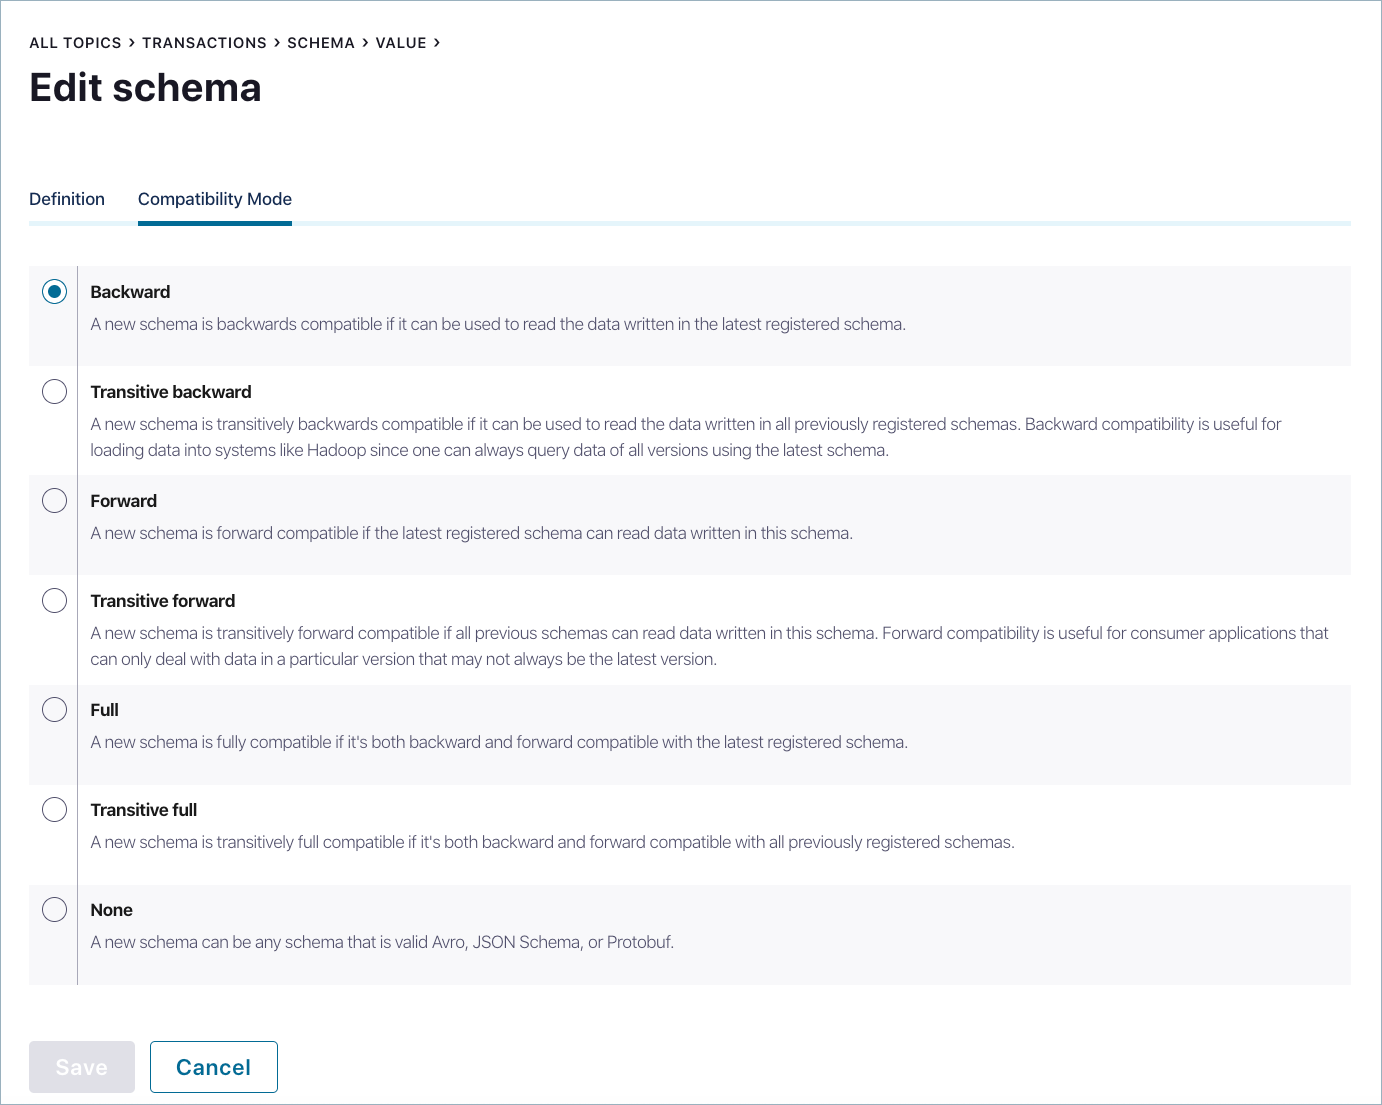
Notice that the compatibility for this topic is set to the default backward, but you may change this as needed.
If you prefer to connect directly to the REST endpoint in
Confluent Cloud Schema Registry, then change the compatibility type for the topic
transactions. Use transactions-value for the subject. Run
the following example command:
curl -X PUT -H "Content-Type: application/vnd.schemaregistry.v1+json" \
       --data '{"compatibility": "BACKWARD_TRANSITIVE"}' \
       -u $SCHEMA_REGISTRY_BASIC_AUTH_USER_INFO $SCHEMA_REGISTRY_URL/config/transactions-value
Destroy the ccloud-stack
When you finish the tutorial, destroy the resources you created in Confluent Cloud.
If you used a ccloud-stack for this tutorial, call the bash script
ccloud_stack_destroy.sh
and pass in the properties file auto-generated when you created the
ccloud-stack.
# Change directory if needed
cd <path to examples>/ccloud/ccloud-stack/

./ccloud_stack_destroy.sh stack-configs/java-service-account-<account>.config
If you didn’t use a ccloud-stack, manually delete the topic, Schema Registry
subjects, and any other resources you created for this tutorial from
the Cloud Console.
Important
Always verify that no resources remain in Confluent Cloud.
Next steps
Schema Registry on Confluent Cloud basics
Deep dive on working with schemas
Blog post: Why Avro For Kafka Data
Blog post: Yes, Virginia, You Really Do Need a Schema Registry
Apache Avro® official site: How to get started with Apache Avro using Java Clients
How to produce and consume (Avro) messages via console tools with Confluent Cloud (Confluent Support)
Confluent supported schema formats, and how to configure clients using Avro, Protobuf, or JSON Schema: Formats, Serializers, and Deserializers
Try it out: Schema Registry API Usage Examples, showing more curl commands over HTTP and HTTPS