
Manage Schemas and Data Contracts in Confluent Cloud
Schema Registry is fully supported on Confluent Cloud with the per-environment hosted Schema Registry and is a key element of Stream Governance on Confluent Cloud.
Tip
Try out the embedded Confluent Cloud interactive tutorials! Want to jump right in? Take this link to sign up or sign in to Confluent Cloud and try out the guided workflows directly in Confluent Cloud.
Work with schemas and data contracts
A schema defines the structure of the data and forms the basis of a topics.">data contract. The most basic data contract is a schema. Therefore, the terms schema and data contract can be used interchangeably when referring to navigation paths on the Confluent Cloud Console.
Schemas are grouped under schema subjects. The Kafka topic name can be independent of the schema name. Schema Registry defines a scope in which schemas can evolve and that scope is the subject. The name of the subject depends on the configured subject name strategy, which by default is set to derive subject name from topic name.
A data contract can be extended to include more than just the schema, such as data quality rules, metadata, and tags. You can manage schemas and the additional elements of data contracts for topics in Confluent Cloud.
The following sections assume you have Schema Registry enabled. If you are just getting started with schemas, first see Quick Start for Schema Management on Confluent Cloud to learn how to enable Schema Registry and try out example workflows for basic tasks.
Change subject level (per topic) compatibility mode of a schema
Supported features and limits for Confluent Cloud Schema Registry
Note
Only single-zone Dedicated Kafka clusters are available in Jio Cloud regions. Stream Governance packages purchased in Jio Cloud regions support a maximum SLA of 99.95%. For more information, see Jio Cloud.
View a schema
View the schema details for a specific topic.
Navigate to a schema from a topic
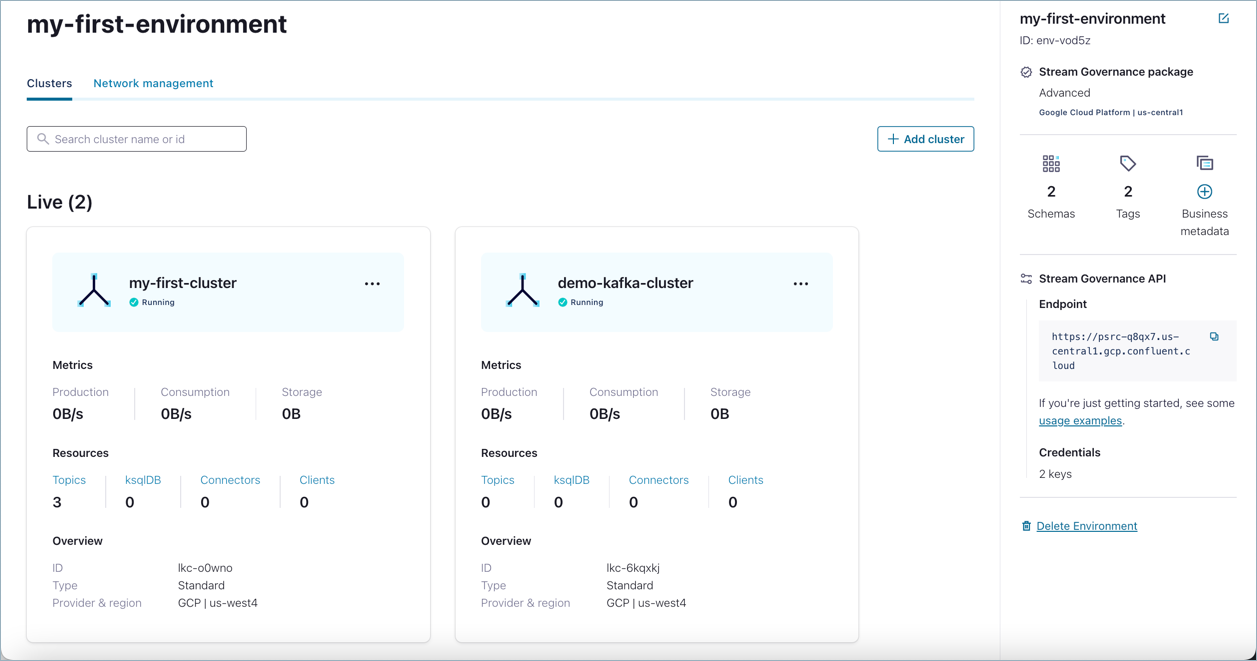
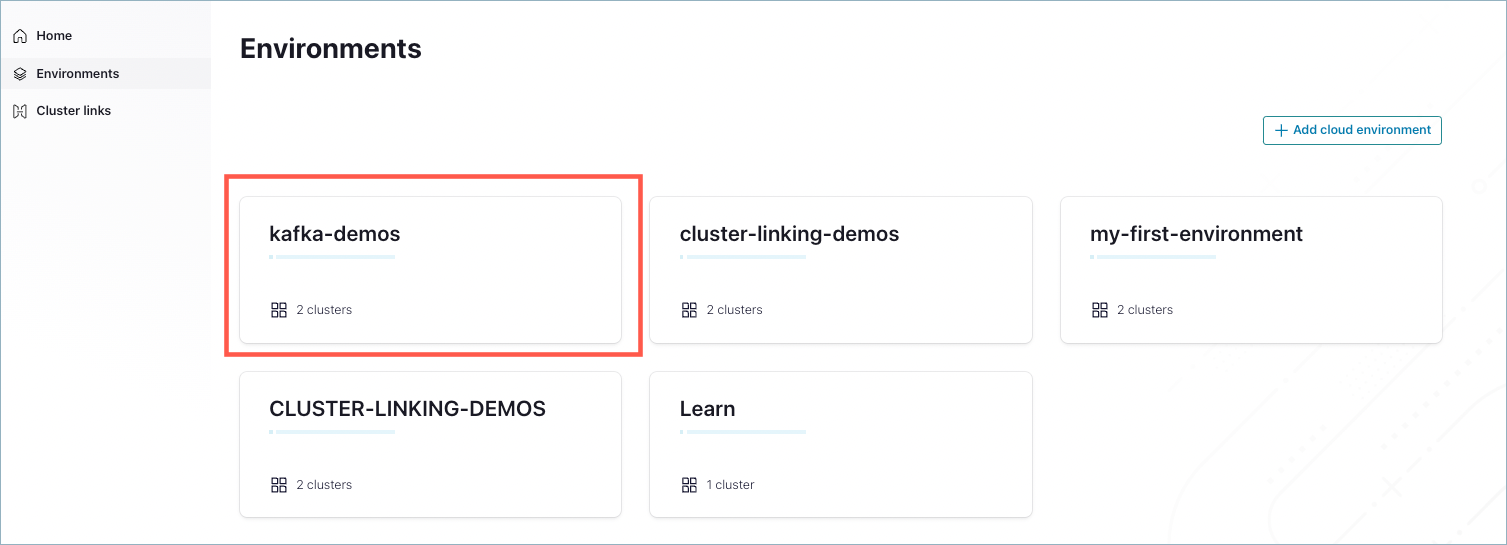
Navigate to Environments and select an environment.
If you have not explicitly created any new environments, the default environment is automatically selected and the starting page is the cluster list (next step).
To view environments, click the hamburger menu top left and select Environments.
From the Clusters page, click the cluster you want to work with.
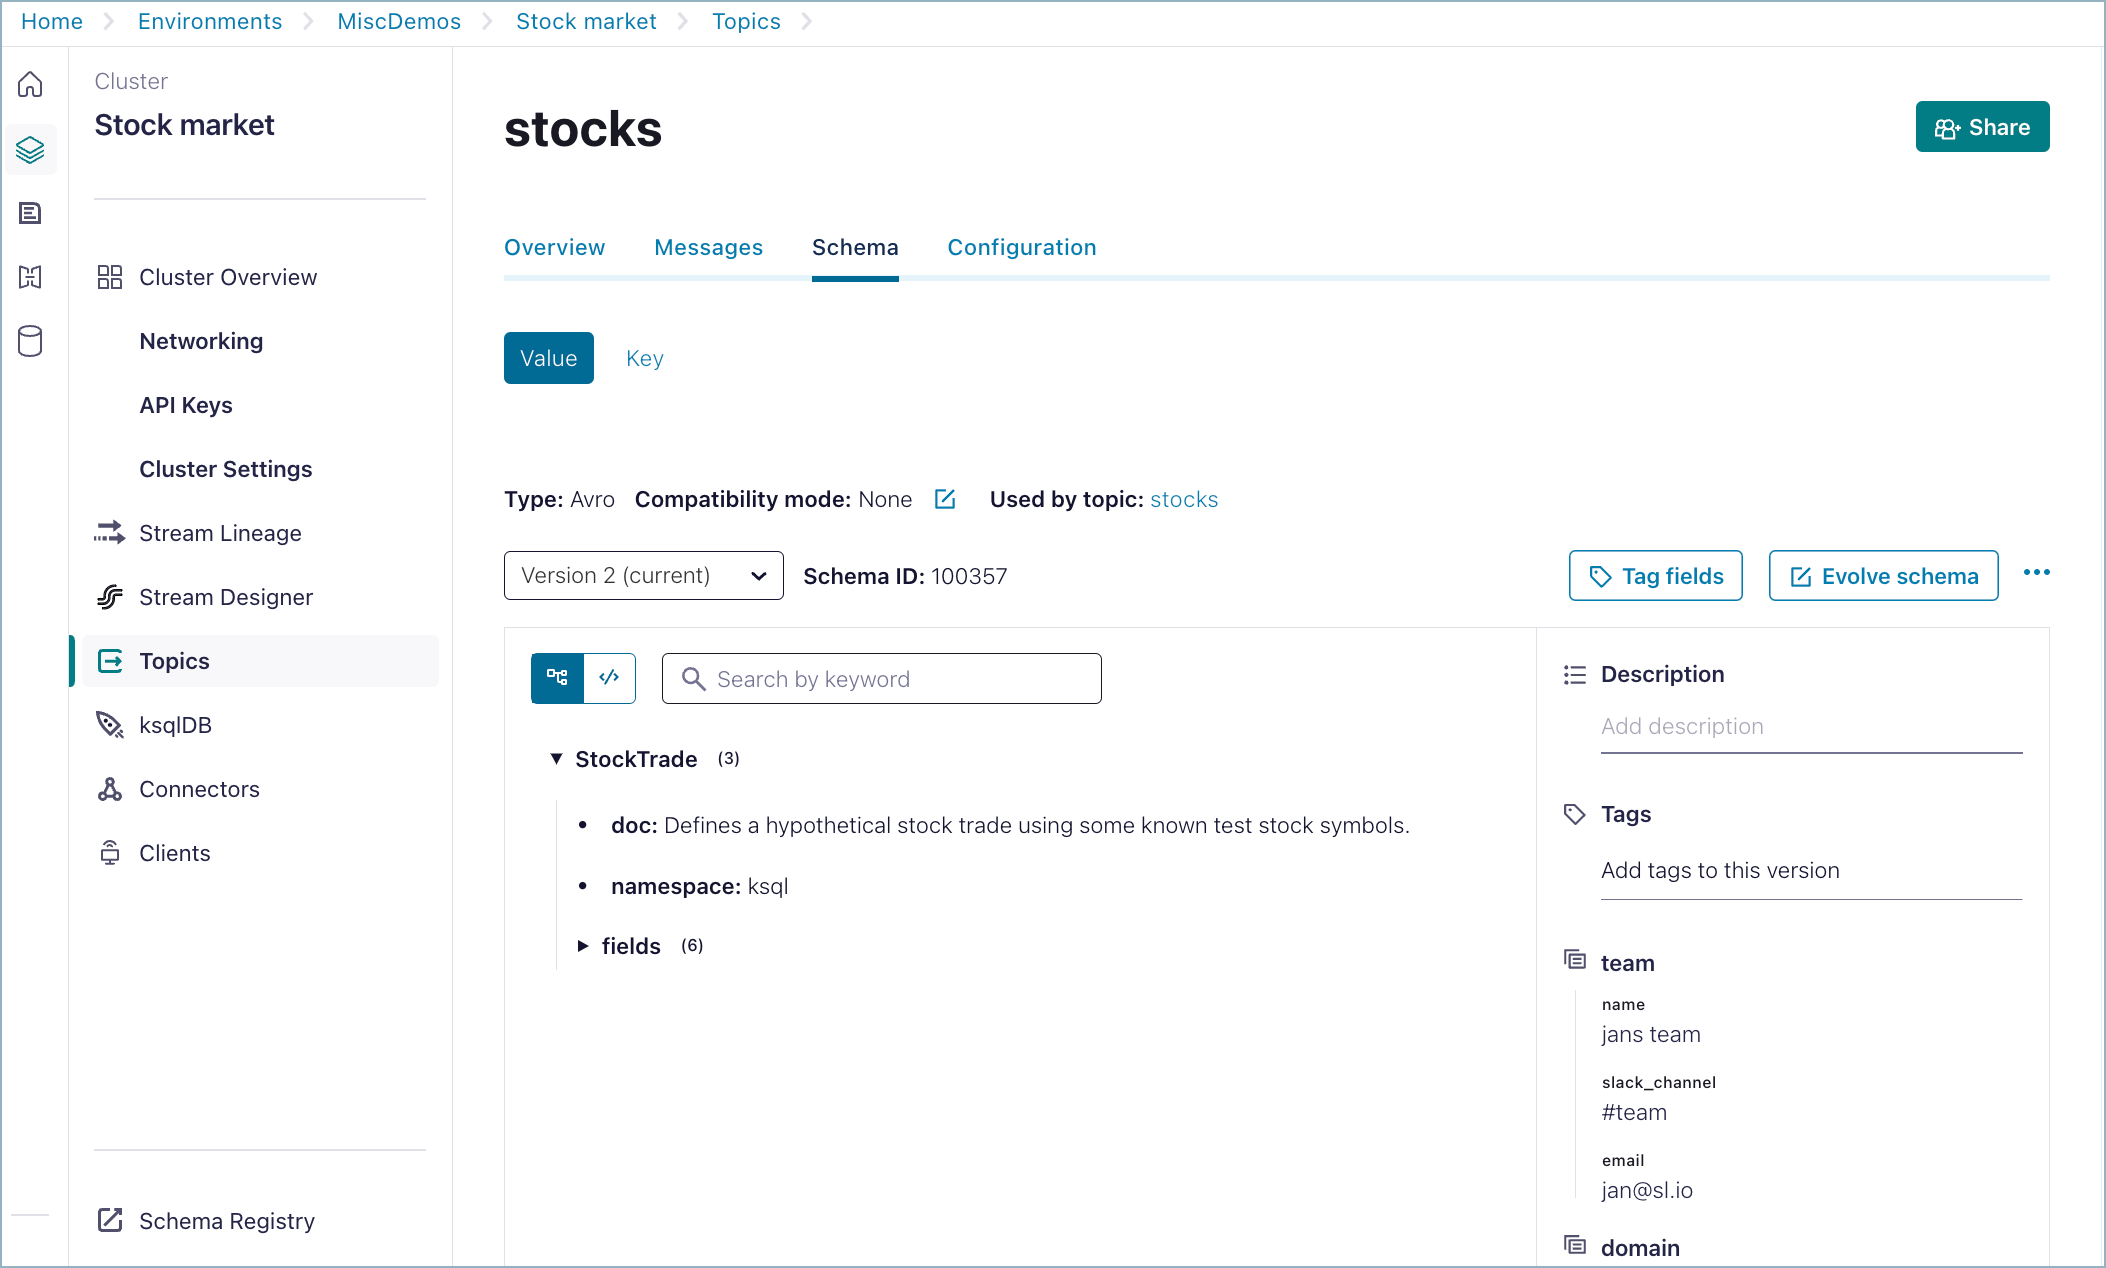
From the navigation menu, click Topics, then click a topic to select it.

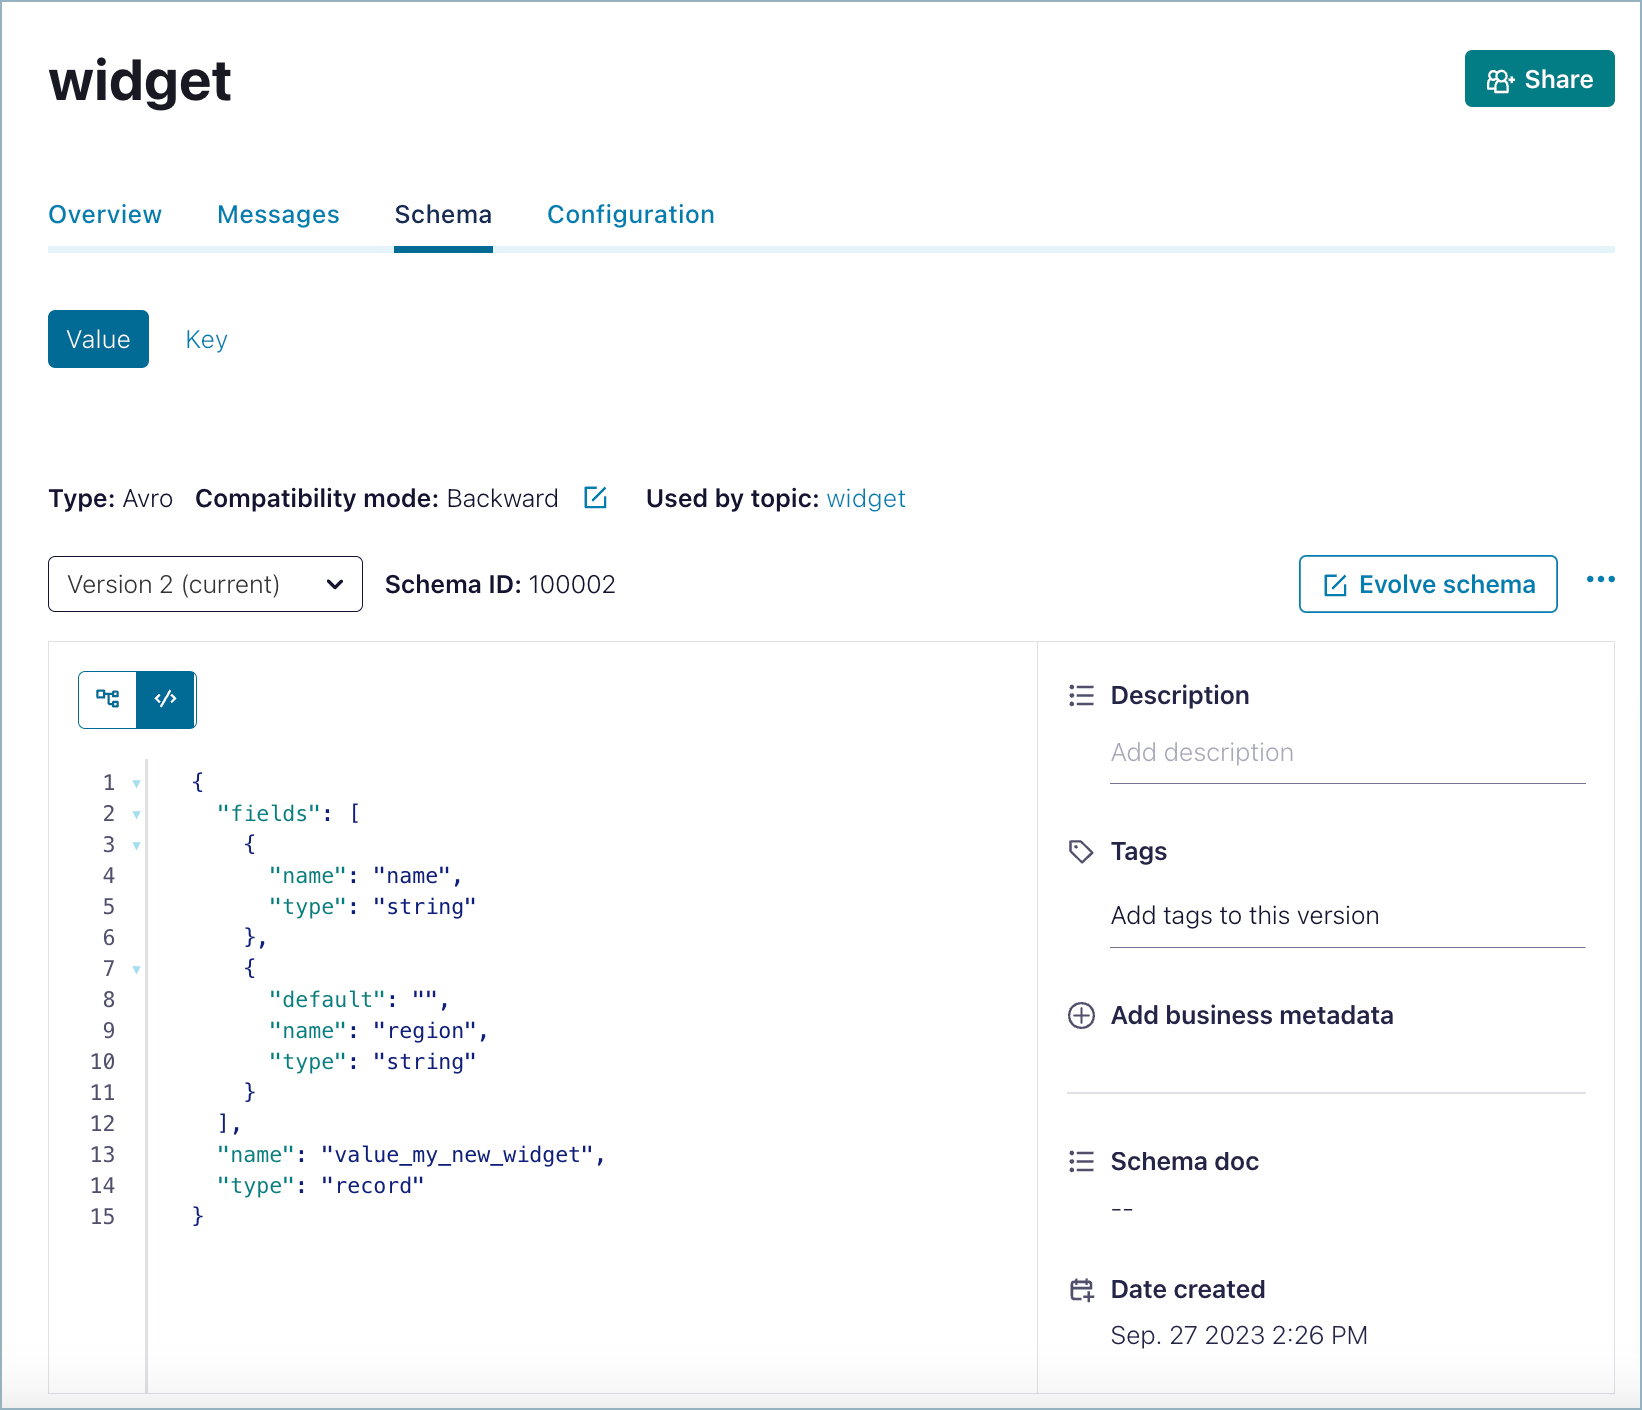
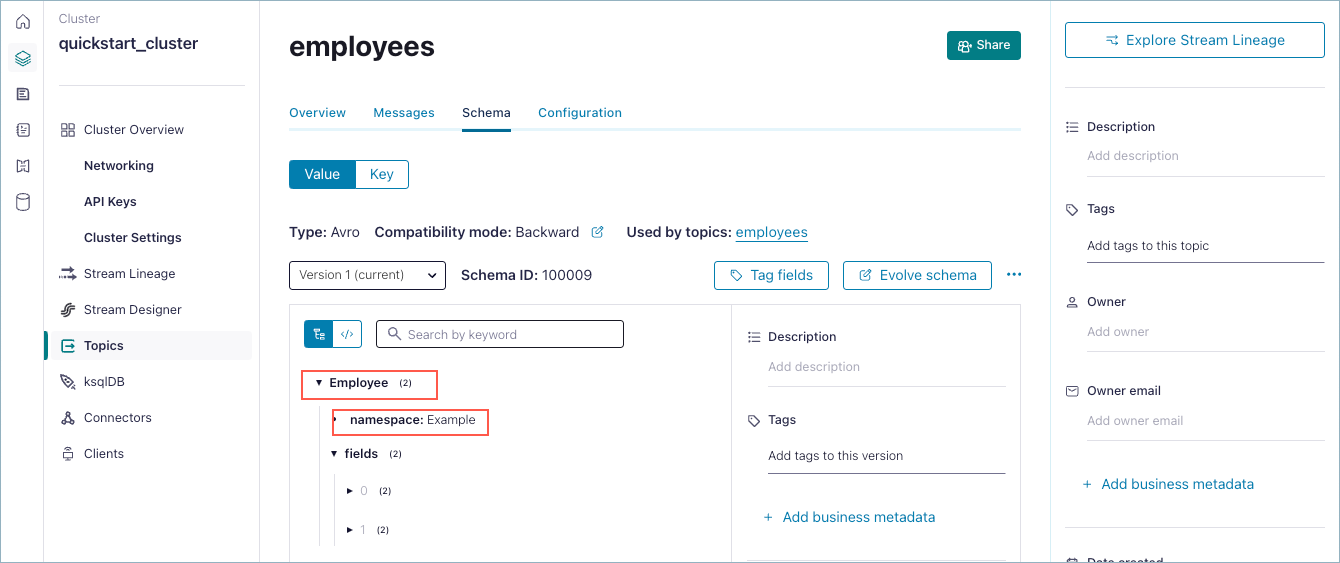
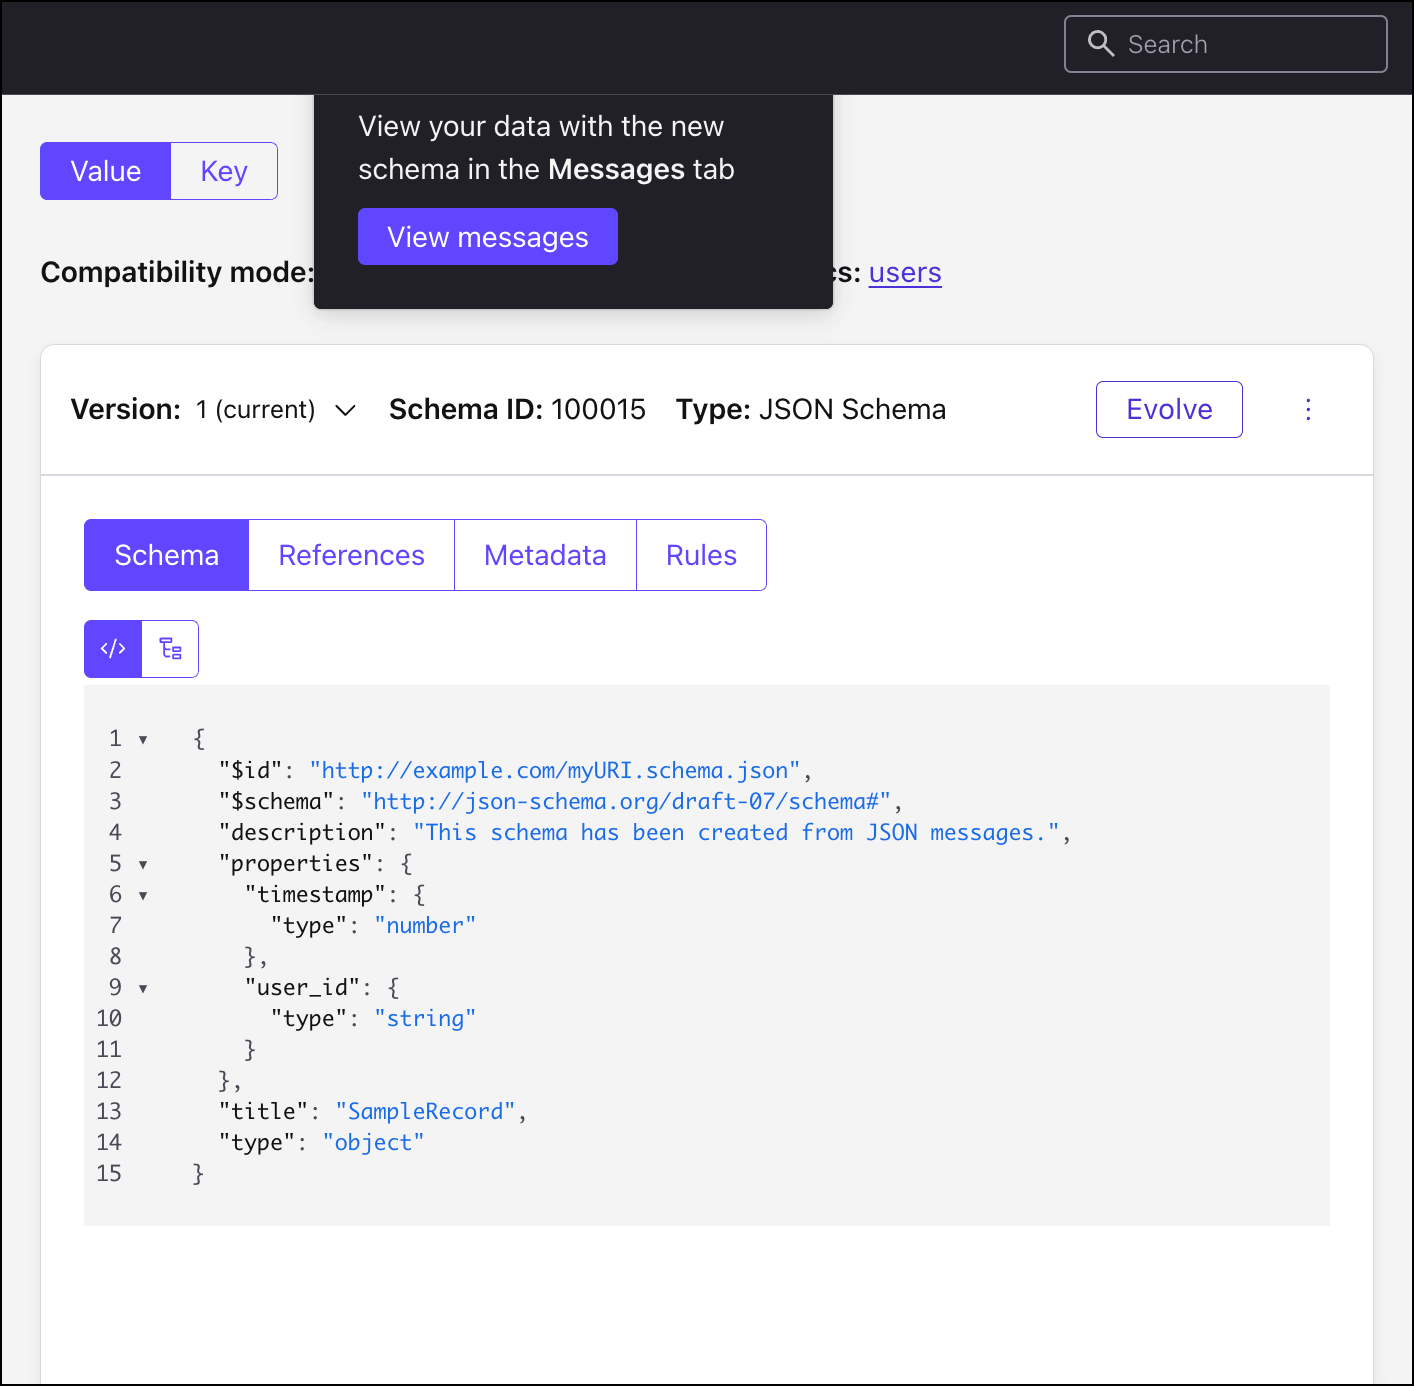
Click the Schema tab.
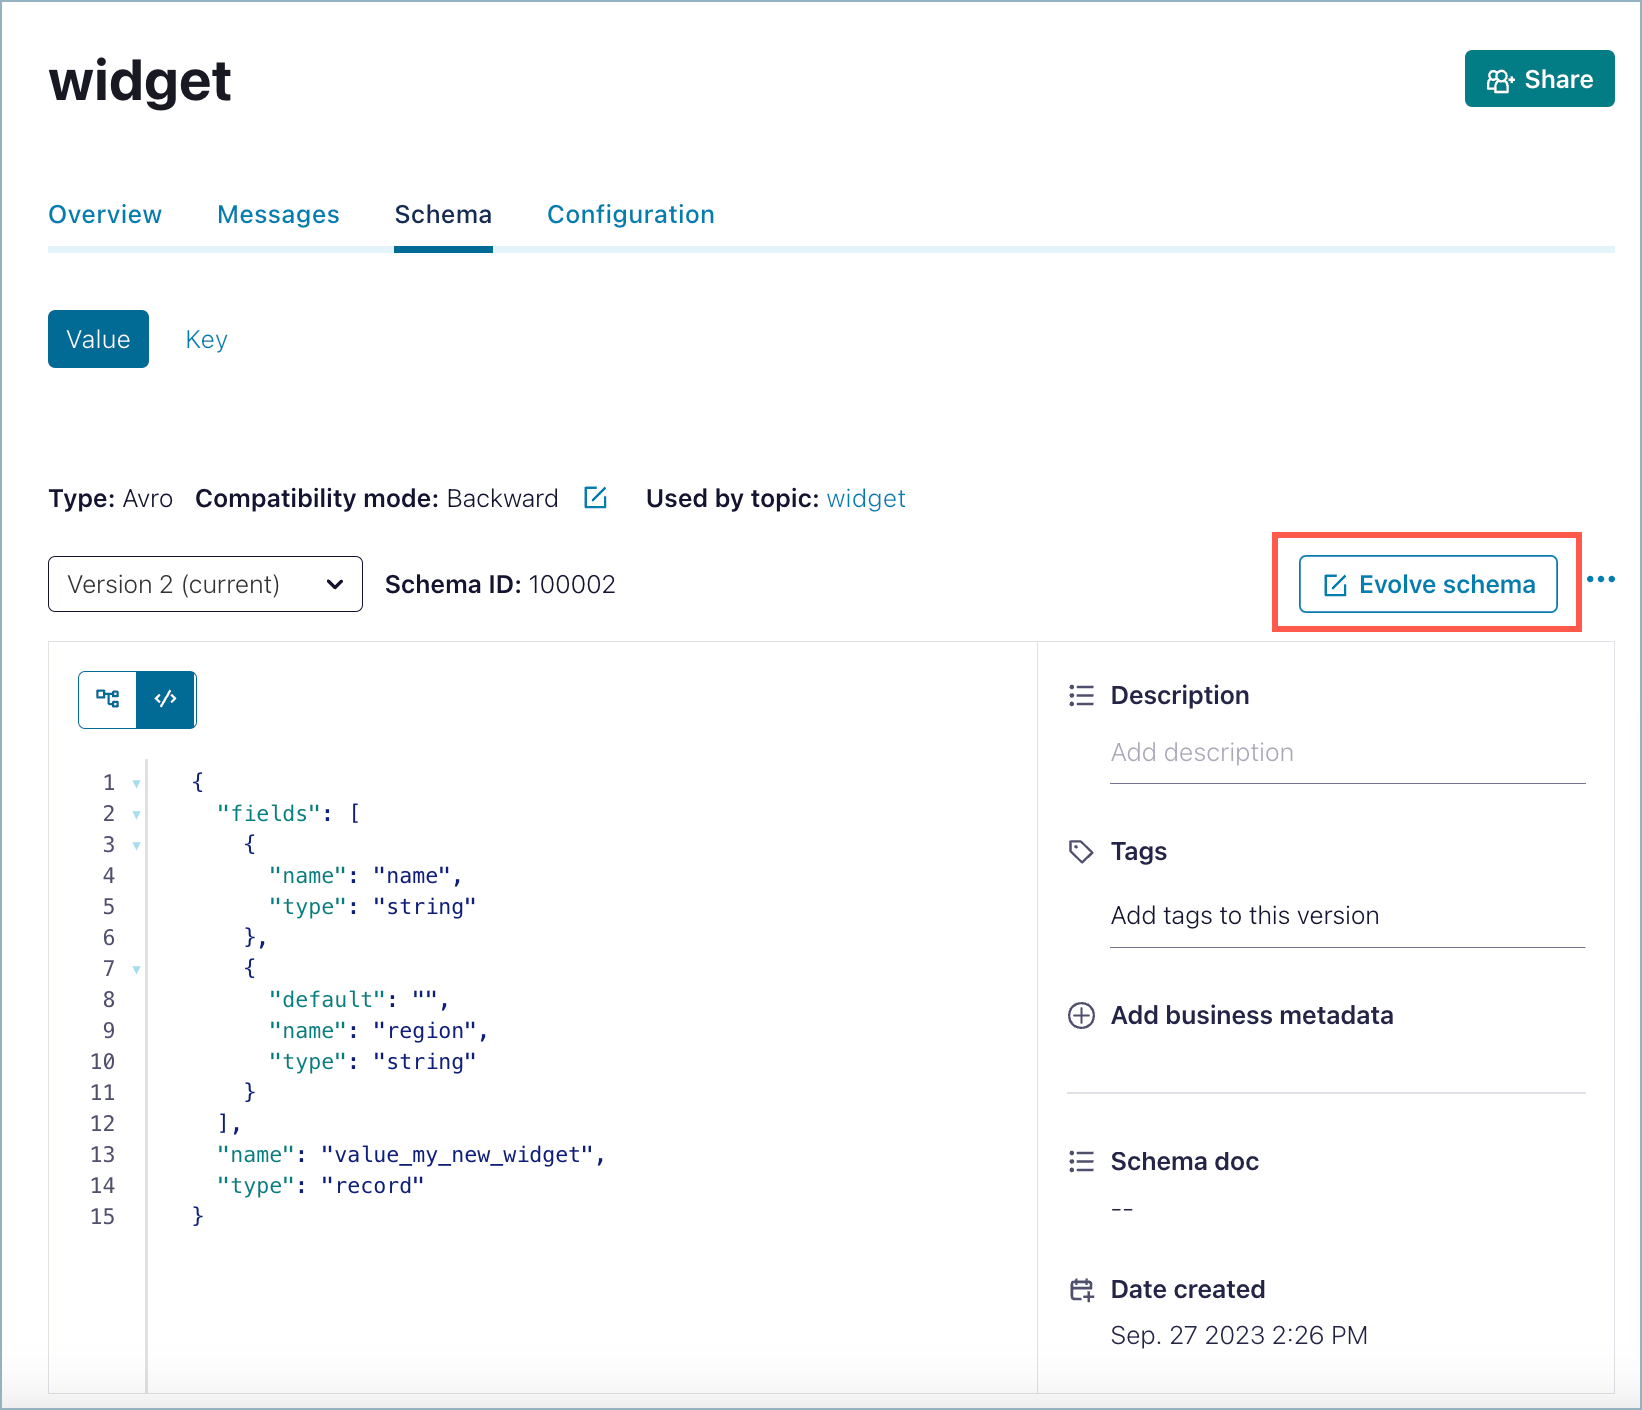
The Value schema is displayed in the raw or “code” view by default. You can switch it to a tree view with the buttons on the top left of the schema. Click the arrows next to fields to expand the elements in the tree view.
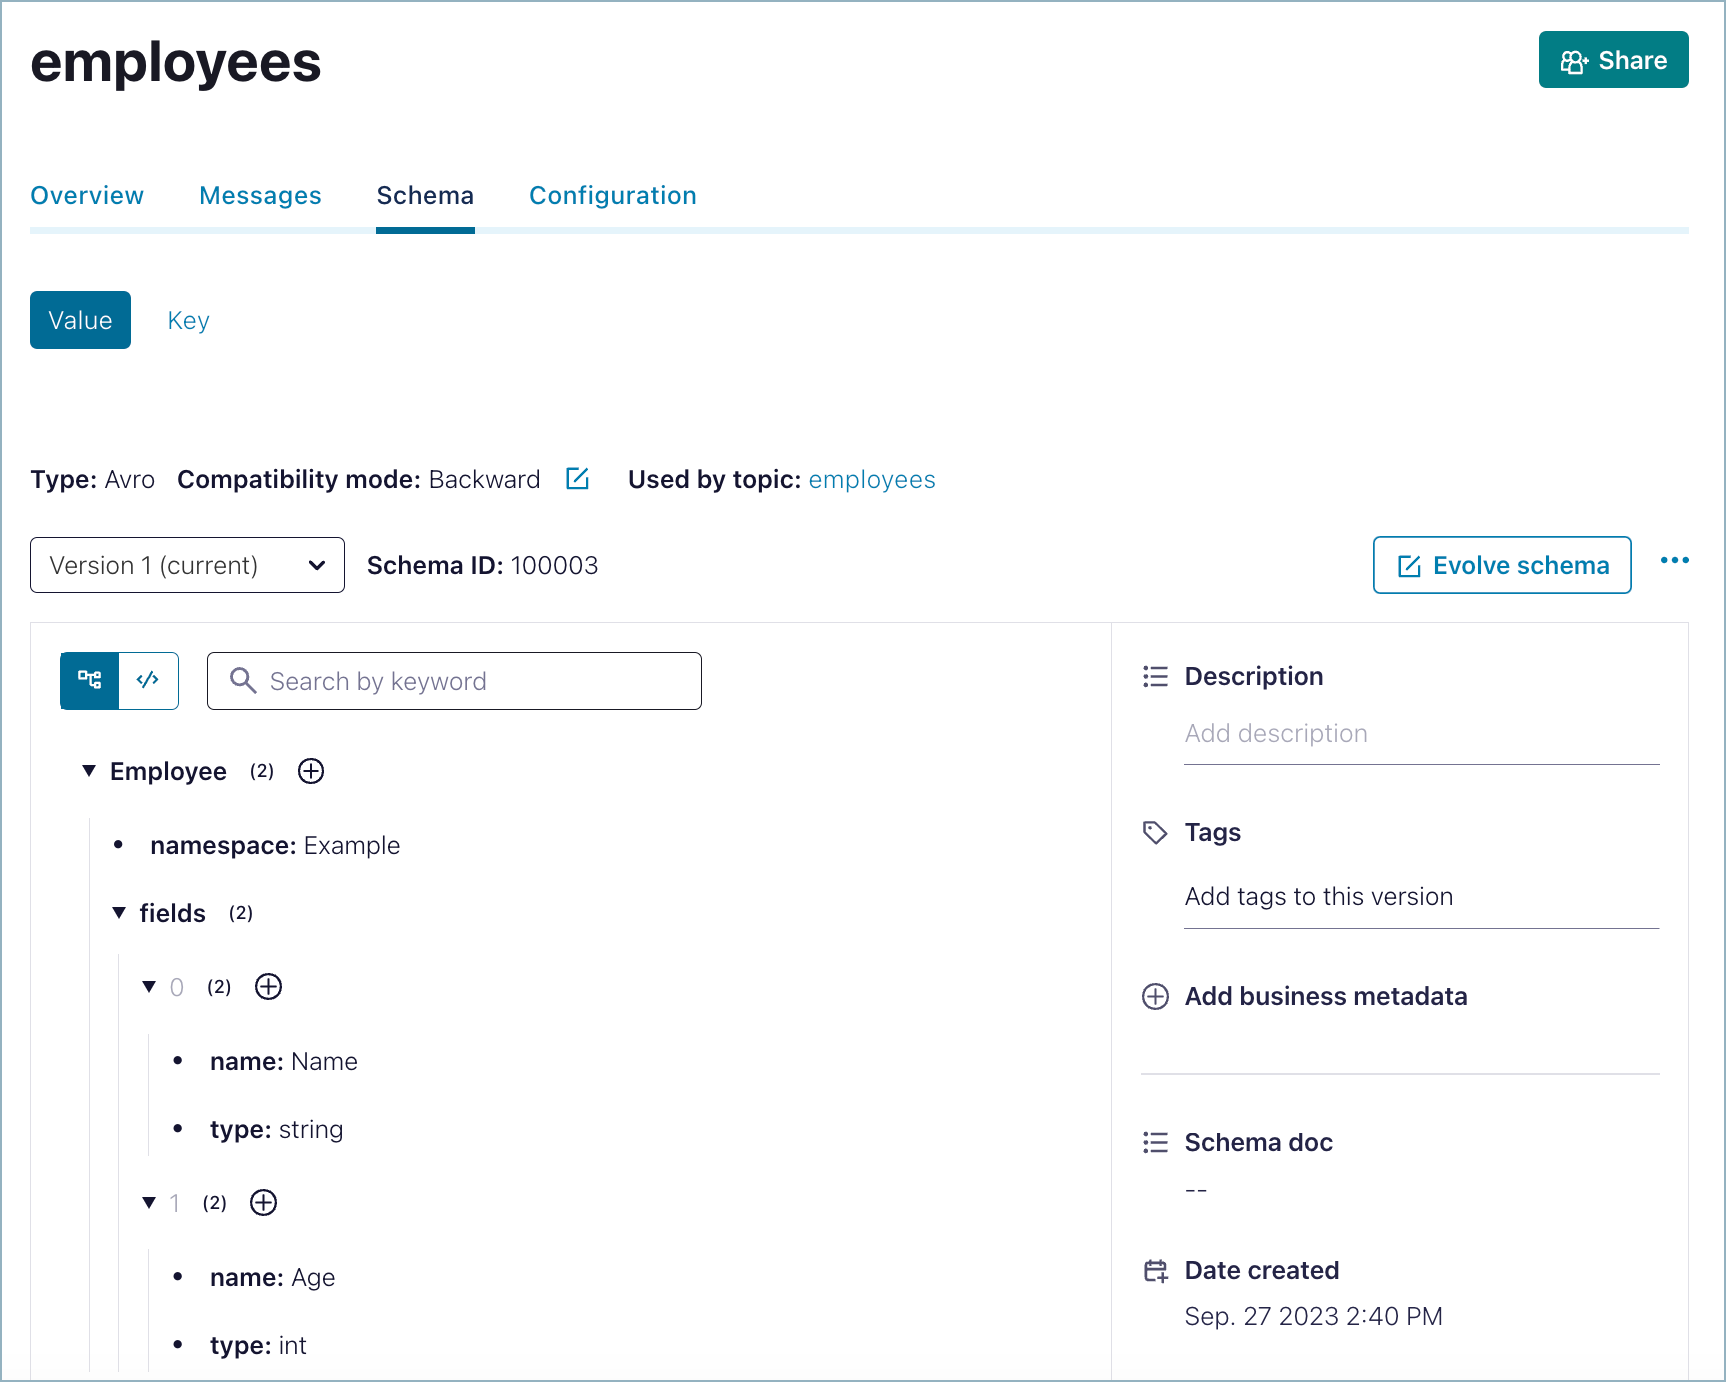
The schema type, Compatibility mode, and topic the schema is used by are indicated, along with the schema version and ID.
Typically, a schema will be used by only one topic. The exception to this is if you have multiple clusters in the same environment, which have topics with the same name and that name matches a schema subject name based on
TopicNameStrategy. In that case, the same schema will be used by all of those matching topics.Schema types are described in detail in Supported formats.
Schema subject naming strategies, including the default
TopicNameStrategy, are described in the Subject Name Strategy.Click Key to view the key schema if present.
Search for schemas
You can also find and view schemas by searching for them. Searches are global; that is, they span across environments and clusters.
Start typing the name of a schema subject, data record, or data field name into the search bar at the top. You will get results as you type, including for other entities like topics.
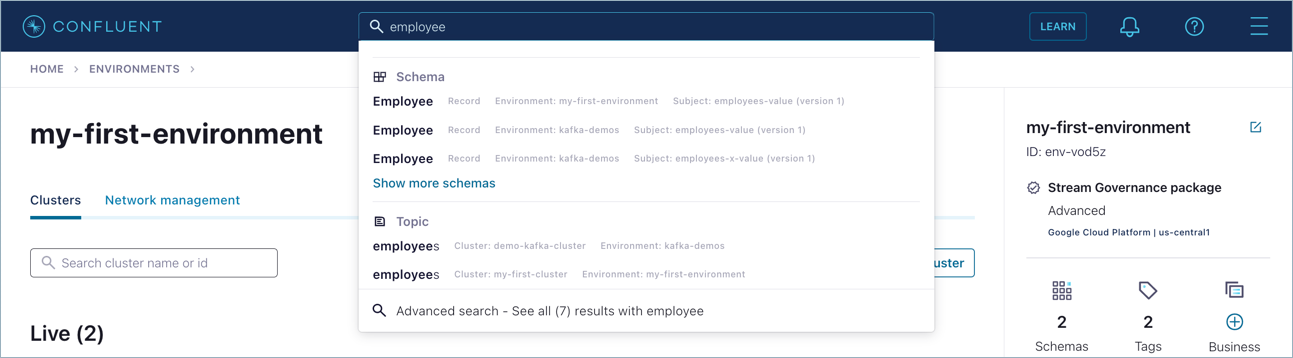
Hit enter to select an entity like a schema.

To learn more, see Search entities and tags.
View data contracts for Confluent Platform with USM
After you register a Confluent Platform cluster with Unified Stream Manager, you can view data contracts and manage your schemas directly in the Confluent Cloud Console. A data contract defines the schema and rules for data published to a topic, which ensures data quality and compatibility.
To view the data contracts for a Confluent Platform topic, follow these steps:
In the Confluent Cloud Console, navigate to the Environments page and select your Confluent Platform environment.
From the Clusters page, select your cluster.
In the navigation menu, click Topics and then select a topic.
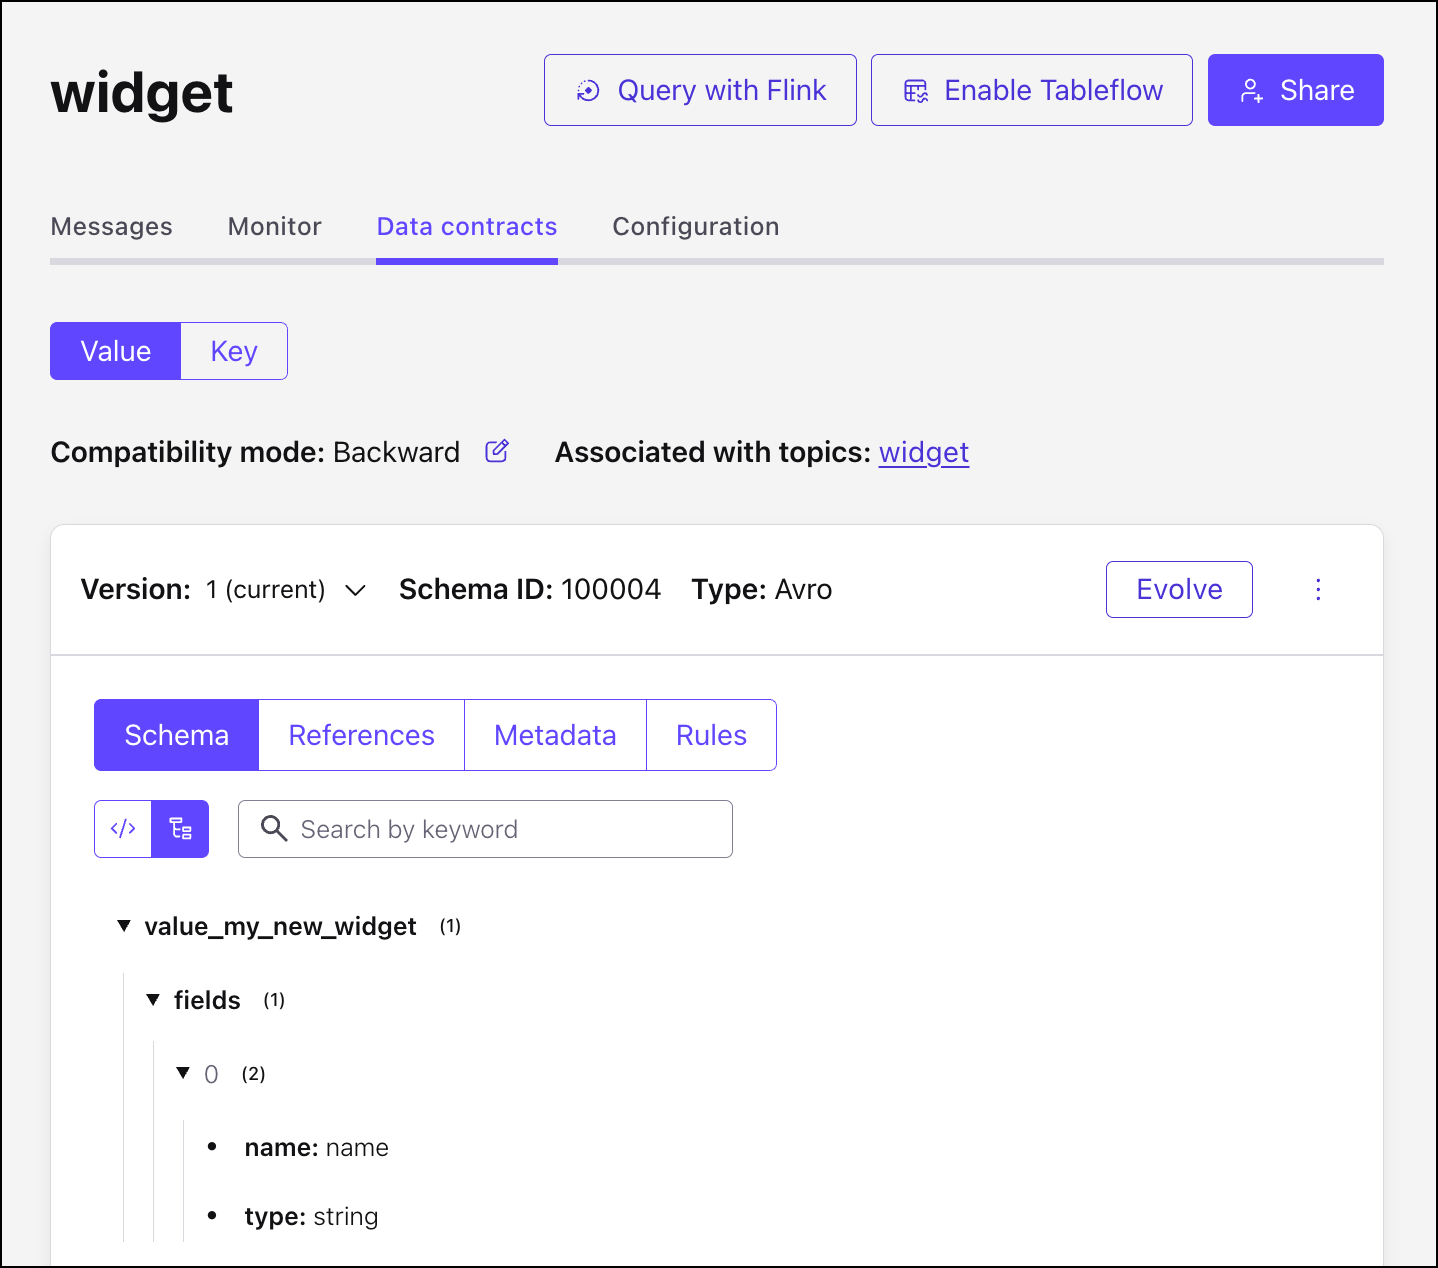
Click the Data Contract tab to view its details.
Note
If the tab is empty, you can click Create Data Contract to add a data contract. For instructions, see Create a schema (data contract).
You can also view the data contracts for all topics in the environment by navigating to the Schema Registry page and clicking the Data Contracts tab. You can click a data contract in the list to view its details.
If you are using schema context to manage Confluent Platform data contracts, you need to the select the specific schema context associated with your Confluent Platform Schema Registry when adding a new subject.
List all schemas from the Environment view
Navigate to an environment you want to work with and click to select it as the current environment.
Click Schema Registry on the left panel and then the Data contracts tab to get a list of all schemas (data contracts) in the environment.
Browse the list to find the schema you want to view.
Click a schema in the list to view it.
By default, the schema is shown in tree view. To learn more, see Tree view and code view.
Tree view and code view
Two different types of views are available for schemas:
tree view
editable raw (code) view
To switch between the views, click the buttons to the left of the schema level search box:
By default, schemas are displayed in a raw (code) view which allows you edit the schema as you would in a code editor. In edit mode (the “code view”), you can create and edit schemas as described in the sections below.

In the tree view you can:
More easily understand the structure of the schema and navigate the hierarchy of elements and sub-elements.
Use the arrows to the left of an element to expand it and view sub-elements.
Apply and manage available tags as described in Tag entities, data, and schemas.

Create a schema (data contract)
You can create schemas for keys and and values associated with a topic. Value schemas are typically created more frequently than key schemas. Schemas are the basis for data contracts, which are used to enforce and evolve structured data in your Kafka topics. At its most basic level, a data contract is a schema associated with a topic. Additional rules, metadata, and parameters can be added to a data contract to further describe and structure the data
Best practices:
Provide default values for fields to facilitate backward-compatibility if pertinent to your schema.
Document at least the more obscure fields for human-readability of a schema.
Tip
You can also create schemas from the Confluent CLI, as described in the Create a schema section in the Quick Start. A handy commands reference is here.
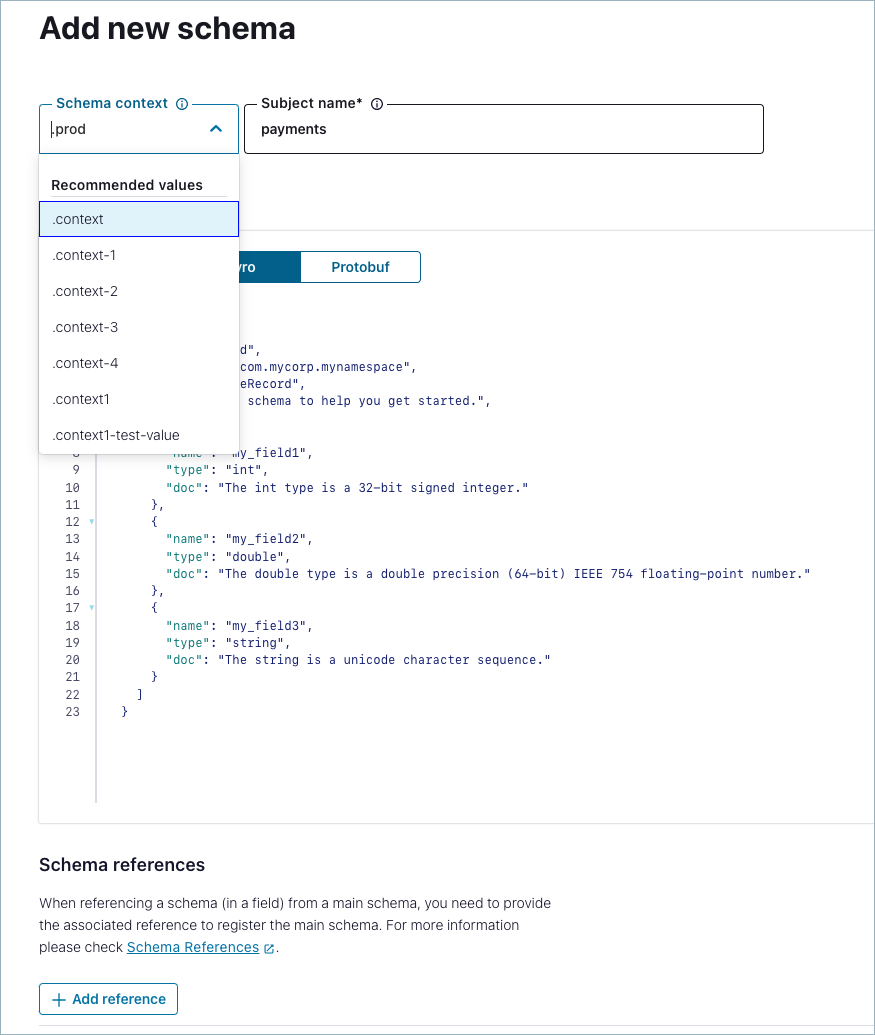
Create a schema associated with a topic value
From the navigation menu in a cluster, click Topics, then click a topic to select it (or create a new one).
Click the Data contracts tab.
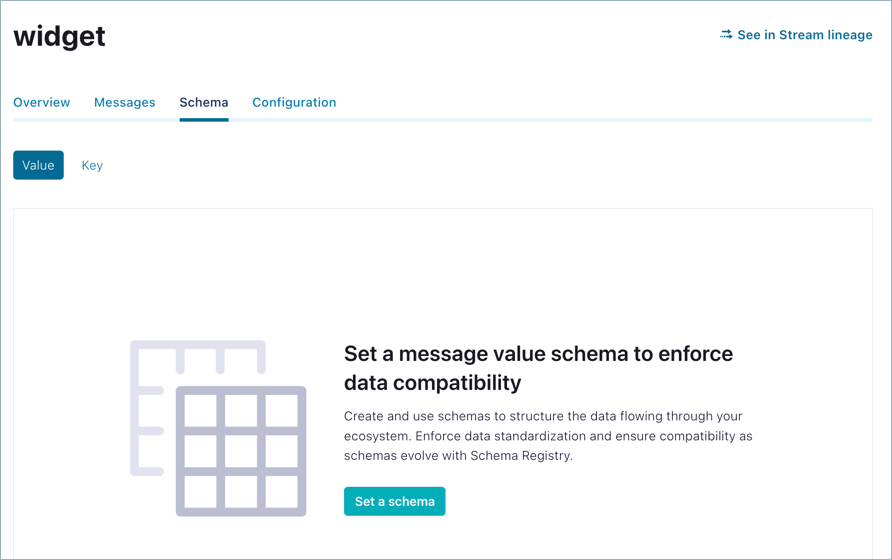
Click Add data contract. The Schema editor appears.
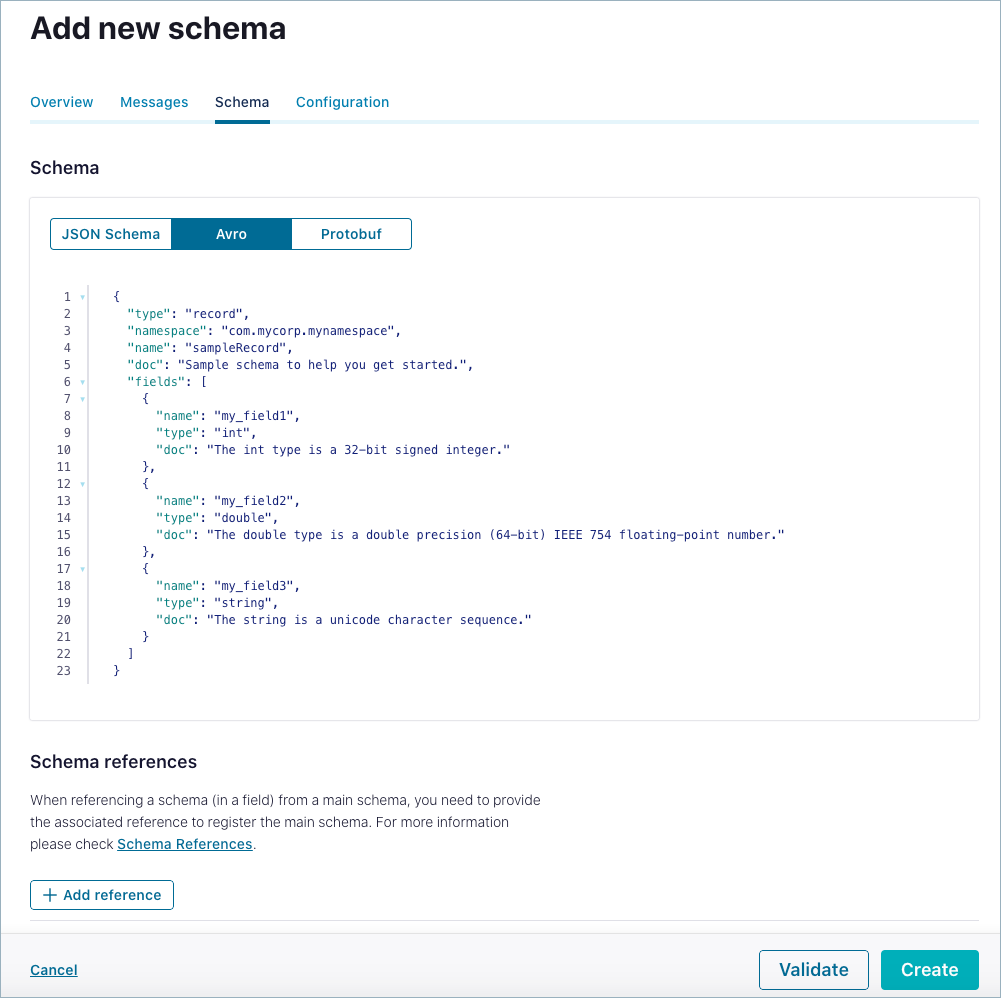
Use the drop-down menu under the schema to select a schema type: JSON, Avro, or Protobuf. (The default is Avro.)
The basic structure of a schema appears prepopulated in the editor as a starting point. Enter the schema in the editor:
name: Enter a name for the schema if you do not want to accept the default, which is determined by the subject name strategy. The default isschema_type_topic_name. Required.type: Eitherrecord,enum,union,array,map, orfixed. (The typerecordis specified at the schema’s top level and can include multiple fields of different data types.) Required.namespace: Fully-qualified name to prevent schema naming conflicts. String that qualifies the schemaname. Optional but recommended.fields: JSON array listing one or more fields for a record. Required.Each field can have the following attributes:
name: Name of the field. Required.type: Data type for the field. Required.doc: Field metadata. Optional but recommended.default: Default value for a field. Optional but recommended.order: Sorting order for a field. Valid values are ascending, descending, or ignore. Default: Ascending. Optional.aliases: Alternative names for a field. Optional.
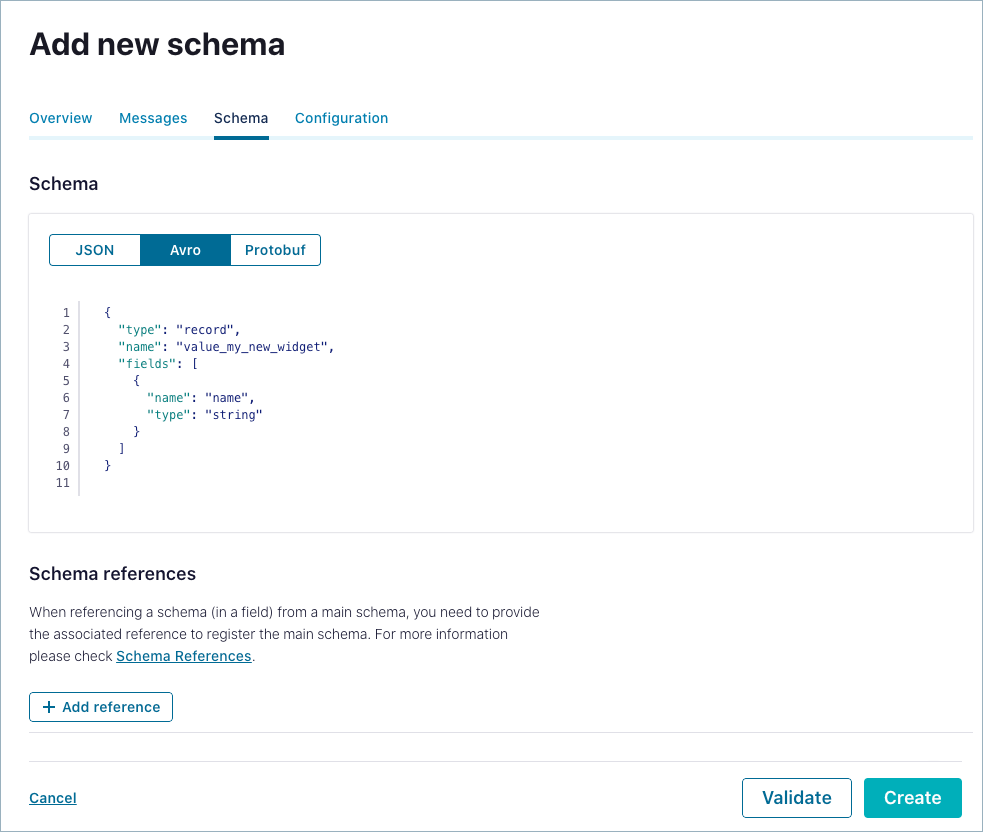
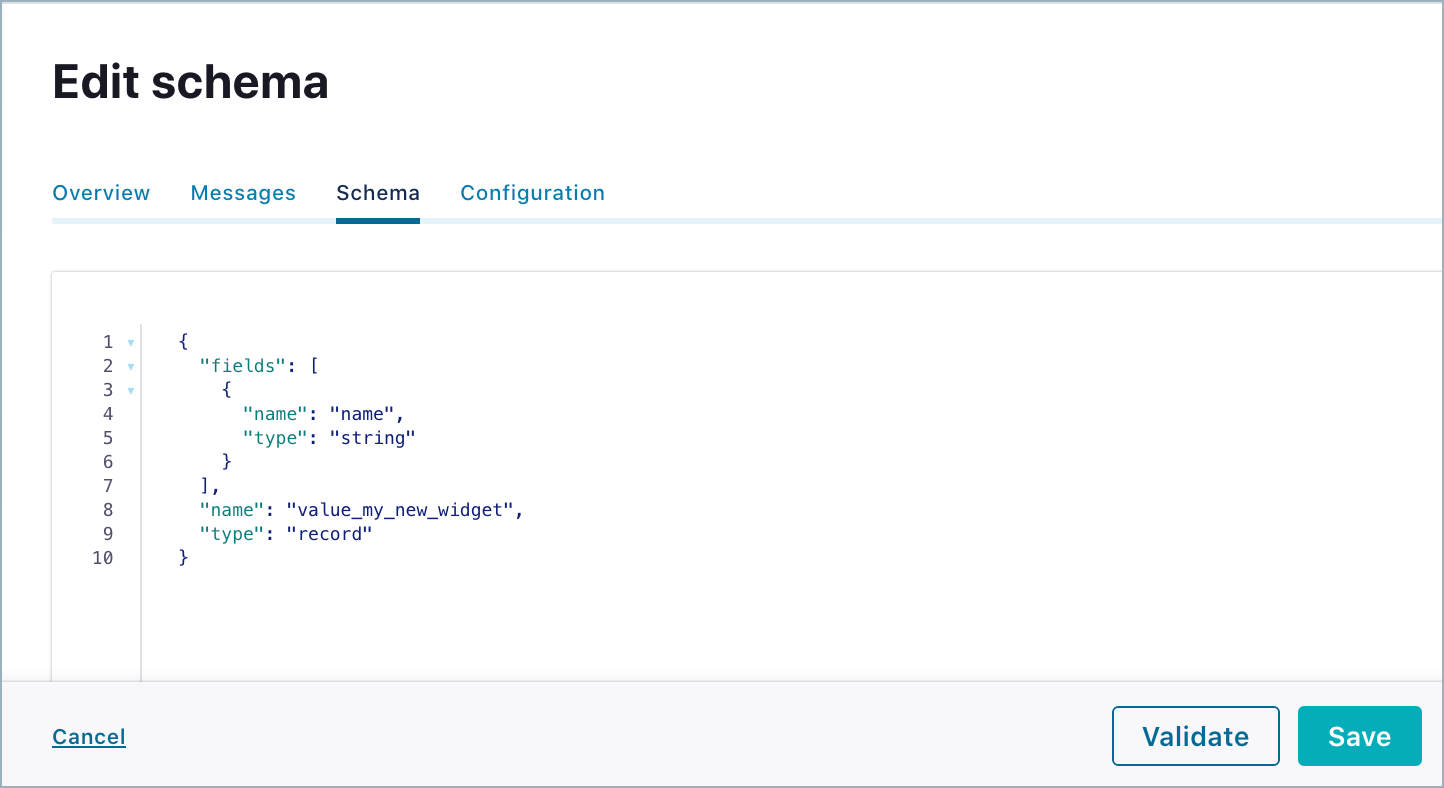
For example, you could add the following simple schema.
{
  "type": "record",
  "name": "value_my_new_widget",
  "fields": [
    {
      "name": "name",
      "type": "string"
    }
  ]
}
This will display in Confluent Cloud as shown below.
In edit mode, you have options to:
Validate the schema for syntax and structure before you create it.
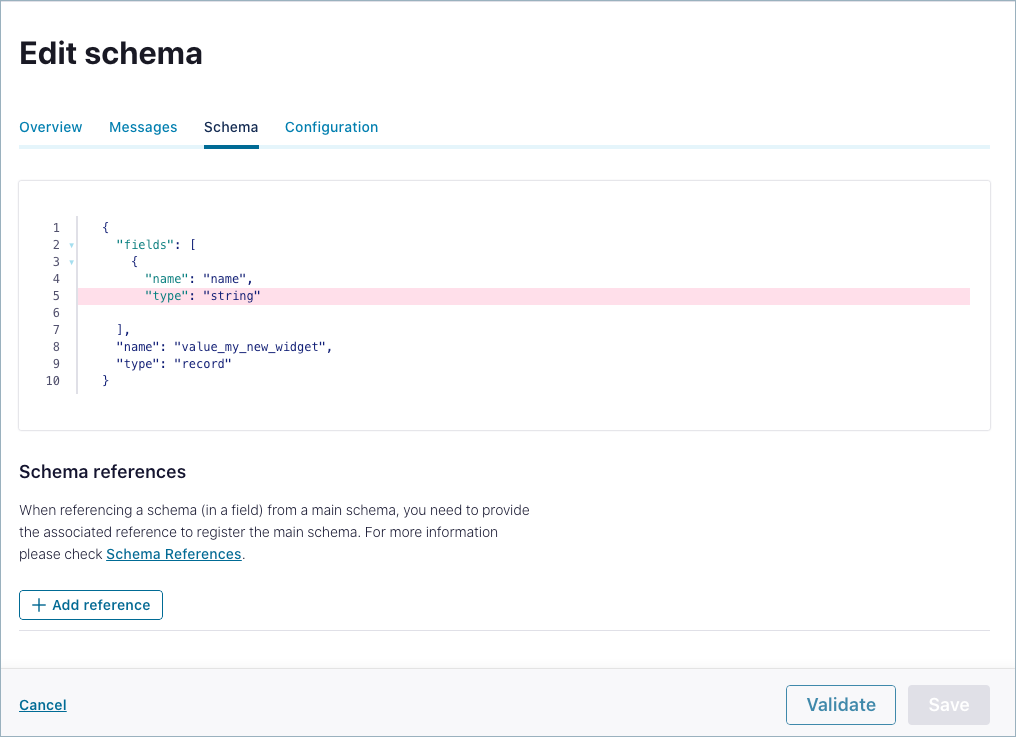
Add schema references with a guided wizard.
Click Create.
If the entered schema is valid, you can successfully save it and a Schema updated message is briefly displayed in the banner area. The schema is saved and shown in raw (code) view.
You now have the option to switch to tree view if desired.
If the entered schema is invalid, parse errors are highlighted in the editor (as in this example where a curly bracket was left off). If parse errors aren’t auto-highlighted, click the See error messages link on the warning banner to enable them.

If applicable, repeat the procedure as appropriate for the topic key schema.
Work with schema references
You can add a reference to another schema, using the wizard to help locate available schemas and versions.
The Reference name you provide must match the target schema, based on guidelines for the schema format you are using:
In JSON Schema, the name is the value on the
$reffield of the referenced schema.In Avro, the name is the full name of the referenced schema; this is the value in the
namefield of the referenced schema.In Protobuf, the name is the value on the
Importstatement referenced schema
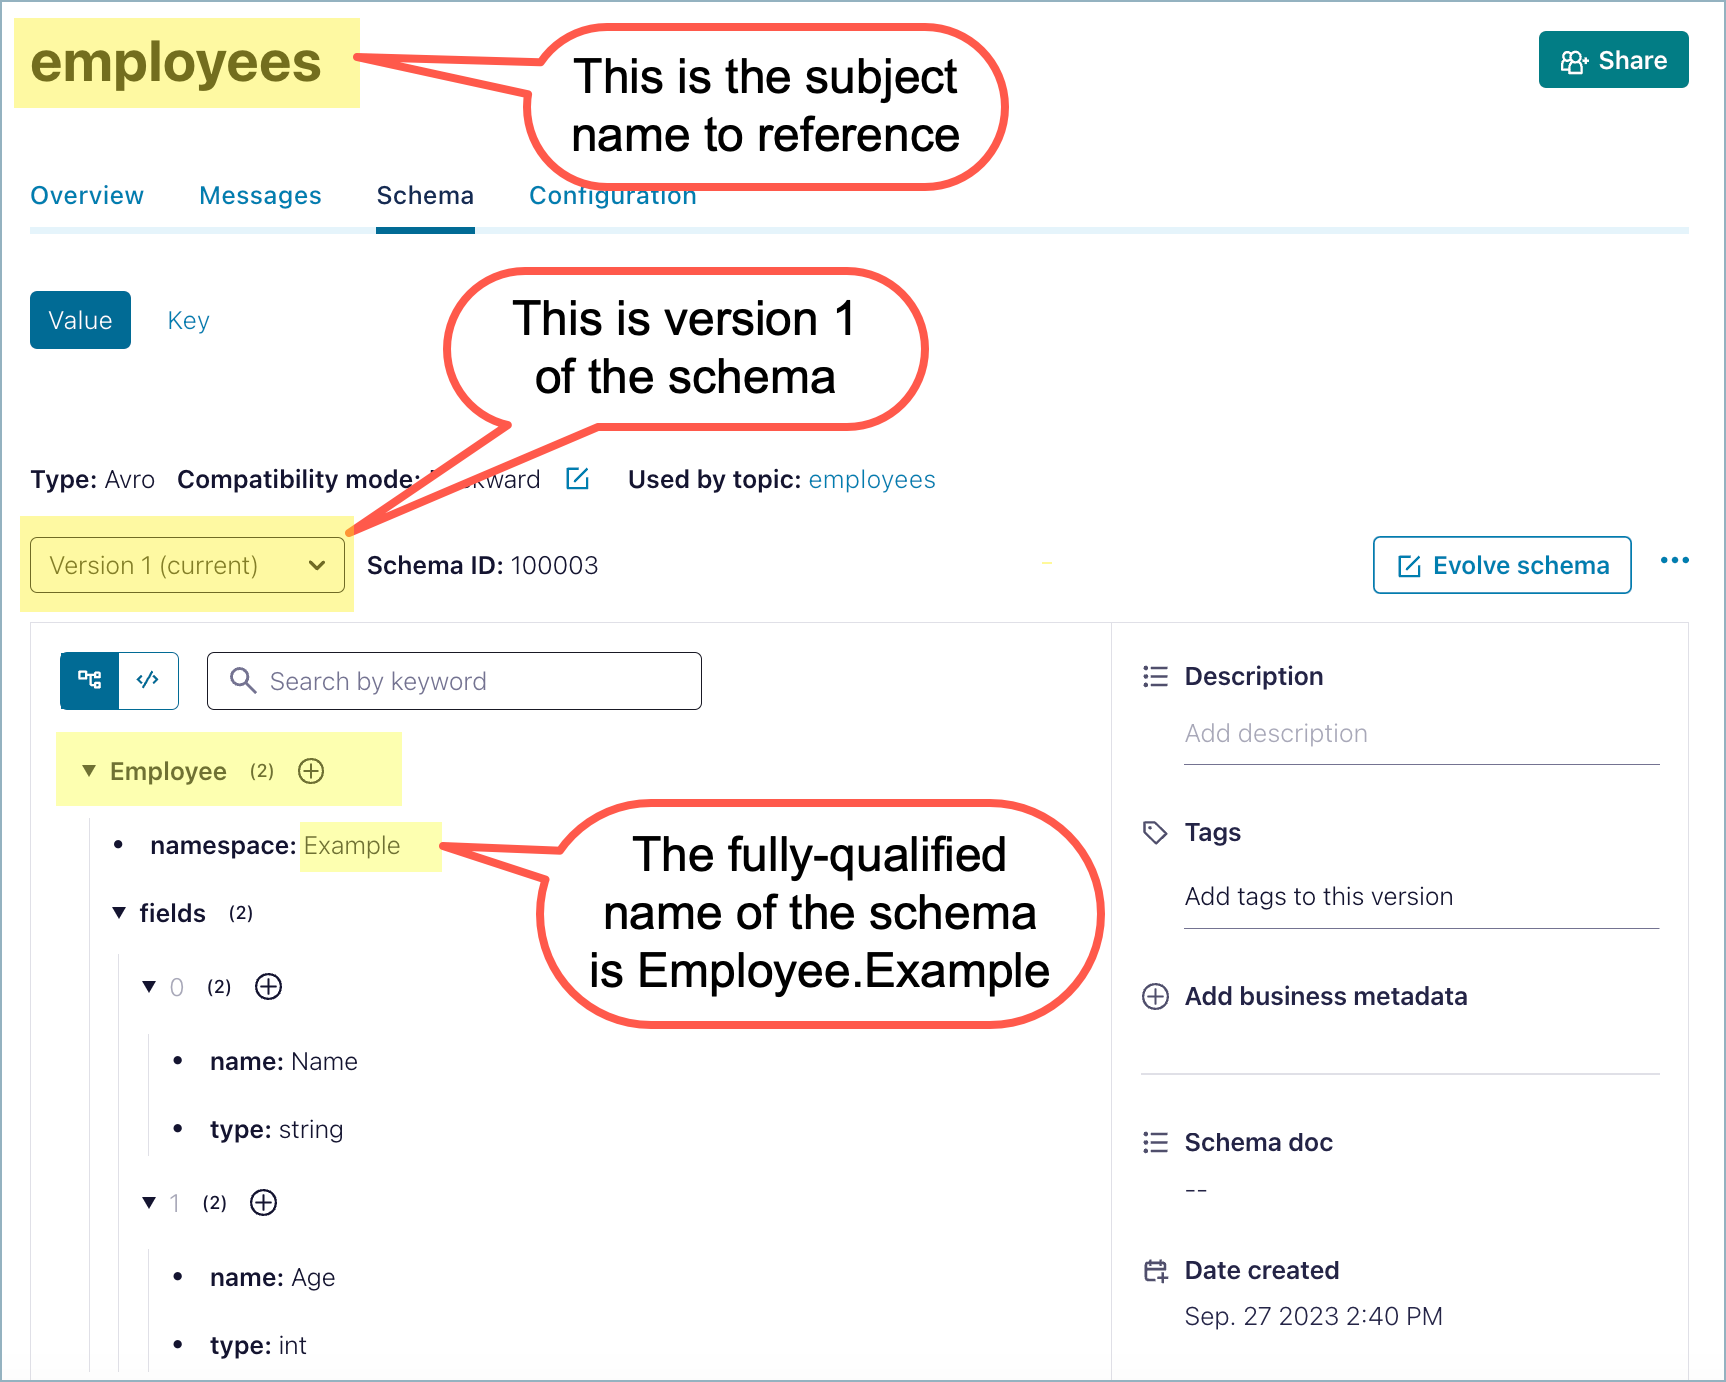
First, locate the schema you want to reference and get the reference name for it. The reference name is made up of the record name and namespace. For example, given the following schema you might want to reference, the reference name would be Example.Employee.
Then, navigate to the schema to which you want to add the reference. For example, to add a reference to the “widget-value” schema, navigate to the widget topic, click the Data contracts tab, click Evolve and follow the steps below.
Important
For JSON Schema, the referenced schema is called by using the $ref keyword, followed by a URL or address for the schema you want to refer to:
{ "$ref": "<URL path to referenced schema>" }
$ref must reference only “internally-mapped“ URLs; that is, the URL being referenced must match the name of another schema reference. External references are not supported. To learn more, see Schema references in JSON Schemas.
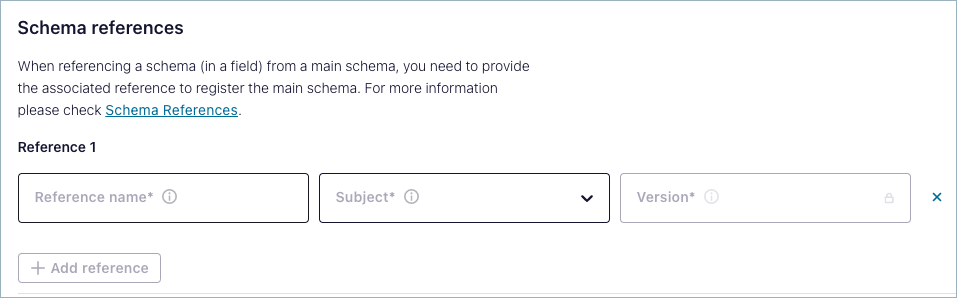
Add a schema reference to the current schema in the editor
Click Evolve (if you have not done so already).
Click Add references.
Provide a Reference name per the rules described above.
Select the schema from the Subject list.
Select the Version of the schema you want to use.
Click Validate to check if the reference will pass.
Click Save to save the reference.
For example, to create a reference to the Avro schema for the value schema for the employees topic (Schema name employees-value) from the widget schema, you can configure a reference to Example.Employee as shown. This is an example of a reference configured on the “widget” topic to the “employees” topic.
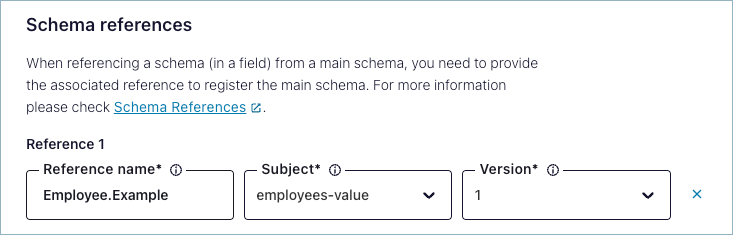
If you look at the referenced schema, employees-value, you can see that this reference was created by using:
The fully qualified name of the referenced schema as the Reference name (in this case
Example.Employee)Subject name shown in the referenced schema:
employees-valueVersion of the referenced schema that you want to use
To learn more, see Schema references. An example of an API call to list schemas referencing a given schema is shown in List schemas referencing a schema.
View, edit, or delete schema references for a topic
Existing schema references show up on editable versions of the schema where they are configured.
Navigate to a topic in a cluster; for example, the
widget-valueschema associated with thewidgettopic in the previous example.Click the Data contracts tab.
Click References and click Evolve. If there are references to other Schemas configured in this schema, they will display in the Schema references list below the editor.
- To modify an existing schema reference:
Click the 3 dots to the right of the reference you want to edit, then choose Edit to edit the reference or Delete to delete it.
- To add more schema references:
Click Add references from this view and follow the steps as described earlier in this section.
Create a schema associated with a topic key
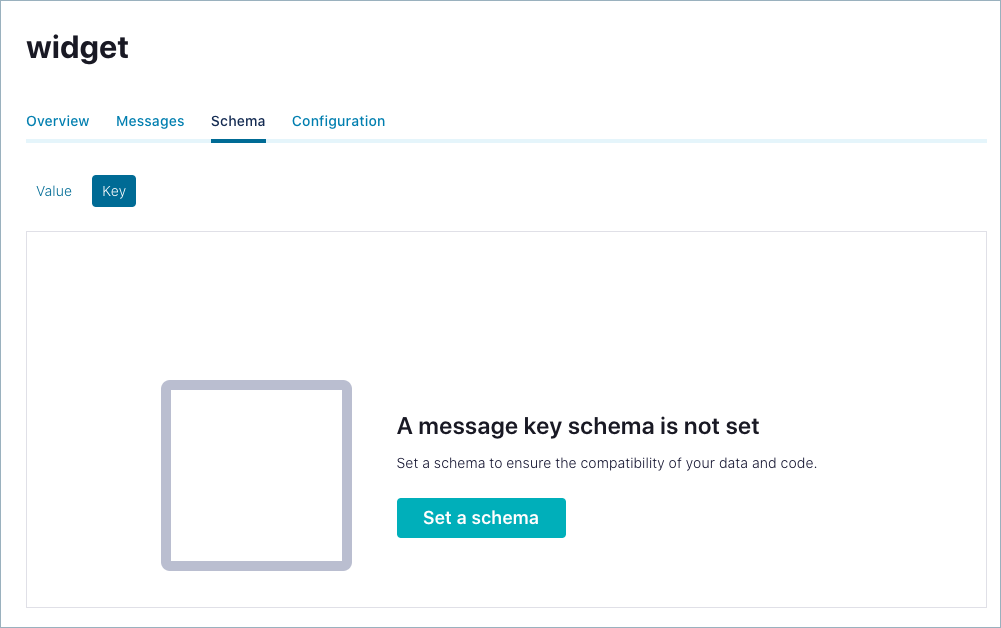
Click the Key option. You are prompted to set a message key schema.
Click Add data contract.
Choose Avro format and/or delete the sample formatting and simply paste in a string UUID.
Enter the schema into the editor and click Save.
Here is an example of a schema appropriate for a key value.
{
  "namespace": "io.confluent.examples.clients.basicavro",
  "name": "key_widget",
  "type": "string"
}
Best practices and pitfalls for key values
Kafka messages are key-value pairs. Message keys and message values can be serialized independently. For example, the value may be using an Avro record, while the key may be a primitive (string, integer, and so forth). Typically message keys, if used, are primitives. How you set the key is up to you and the requirements of your implementation.
As a best practice, keep key value schema complexity to a minimum. Use either a simple, non-serialized data type such as a string UUID or long ID, or an Avro record that does not use maps or arrays as fields, as shown in the example below. Do not use Protobuf messages and JSON objects for key values. Avro does not guarantee deterministic serialization for maps or arrays and Protobuf and JSON schema formats do not guarantee deterministic serialization for any object. Using these formats for key values will break topic partitioning. To learn more, see Partitioning gotchas in the Confluent Community Forum.
For detailed examples of key and value schemas, see the discussion under Formats, Serializers, and Deserializers in the Schema Registry documentation.
Infer a schema from messages
As an alternative to manually creating a schema, you can generate or “infer” a new schema from a given set of messages. Confluent Cloud can infer a schema by analyzing existing JSON message data being produced to a topic or by using a single message payload, enabling you to save development time, leverage stream processing services like Flink SQL, and ensure reliable data synchronization with Tableflow. This capability can act as a bridge, allowing topics that were initially created without formal structure to be integrated into a governed, high-performance data streaming architecture.
The feature supports two distinct workflows tailored to different development needs:
Proactive Generation: For new data pipelines or applications, it can generate a new Avro, Protobuf, or JSON Schema from a single, representative sample of a JSON message.
Retroactive Application: For existing topics containing schemaless JSON data, it can automatically generate an Avro, Protobuf, and JSON Schema by analyzing the structure of at least one and up to 10 messages in the topic.
This functionality is cloud-agnostic and available across all Confluent Cloud deployments on different cloud service providers. The following table provides a high-level comparison of the two inference methods.
Method | Primary use case | Input | Supported output formats | Key considerations |
|---|---|---|---|---|
Infer new schema | Creating a schema from scratch for a new topic or application. | A single, representative JSON message. | Avro, Protobuf, JSON Schema | Provides a robust starting point, but its quality depends entirely on the single sample |
Infer for an existing topic | Applying a schema to a topic that already contains schemaless JSON data. | At least one and up to 10 messages in the topic’s value. | Avro, Protobuf, JSON Schema | An automated way to enable features like Flink, but the resulting schema is a union of all structures found and may require refinement. |
Prerequisites
Access Permissions: Users must have the necessary Role-Based Access Control (RBAC) permissions to create schemas within the target environment Schema Registry. To infer a schema for an existing topic, permissions to view messages in that topic are also required.
Data Availability: For the “Infer for Existing Topic” workflow, the target topic must contain valid JSON messages. The inference process reads from the end of the topic log; at least one and up to 10 messages must have been produced to the topic to be included in the sample.
Limitations
Inference Source for Existing Topics: The inference process for an existing topic analyzes the message value only. The structure and content of the message key are ignored during this process.
Sampling Size for Existing Topics: The automated inference for an existing topic is based on a sample of at least one and up to 10 messages present in the topic. It does not scan the entire topic history. This design choice prioritizes a fast response time in the UI but means the generated schema may not capture structural variations present in older data.
Data Validity: The tool assumes that the messages it samples are well-formed JSON. The presence of malformed, truncated, or non-JSON data within the 10-message sample can lead to inference failure or an incorrect result.
Tutorial: Infer a new schema from a sample message
This tutorial shows you how to create a new Avro, Protobuf, or JSON Schema from a single sample JSON message. This method is ideal for defining a data contract before a topic is actively used.
From the Cloud Console, navigate to the desired environment.
From the left-hand navigation menu, select Schema Registry.
Go to the Data Contracts tab and click Add Data Contract on the top-right.
In the creation view, select the tab or option labeled Infer from message.
In the provided text area, paste a single, representative JSON message. For the most accurate and complete schema, this sample should include all possible fields including optional ones, nested objects, and arrays.
Following is an example of a comprehensive sample message.
{
  "orderId": "ord-12345",
  "customerId": "cust-67890",
  "orderTimestamp": "2023-10-27T10:00:00Z",
  "totalAmount": 150.75,
  "isExpedited": true,
  "shippingAddress": {
    "street": "123 Confluent Lane",
    "city": "Palo Alto",
    "state": "CA",
    "zipCode": "94301"
  },
  "items": [
    {
      "productId": "prod-a",
      "quantity": 2,
      "unitPrice": 50.00
    },
    {
      "productId": "prod-b",
      "quantity": 1,
      "unitPrice": 50.75
    }
  ],
  "promoCode": null
}
Tutorial: Infer a schema for an existing topic
This tutorial describes how to automatically generate and apply a JSON Schema to an existing topic that contains schemaless JSON data.
Overview of the workflow
From the Cloud Console, navigate to the desired environment.
From the left-hand navigation menu, select Topics.
From the list of topics, click the name of the target topic that contains schemaless JSON data.
In the topic details view, navigate to the Data contracts > Schema tab.
If no schema is associated with the topic value, the UI will display a message indicating this.
From the Schema Format dropdown menu, select the desired output format: Avro, Protobuf, or JSON Schema.
Click Infer a schema from messages.
The system will process the JSON and display the inferred schema in the editor.
Review the generated schema carefully. This provides you with a strong starting point, but may require manual refinement. For guidance, see, Review and edit an inferred schema.
When you are satisfied with the review, provide a subject name for the schema and click Import schema to register it as associated with the topic (
<topic-name>-value).
You can use the following guidelines to generate sample data and test this strategy.
Generate sample schemaless messages as raw JSON
This example assumes you have an existing, schema-less topic called users. If you don’t already have such a topic, create one. Do not add a schema.
On the Cloud Console, click Connectors on the left panel, click Add Connector on the top right, and search for “Datagen”.
Select the Datagen Source connector (Sample Data) and then select Advanced Configuration on the dialog.
On the “Topic selection” dialog, select the users topic and click Continue.
On the Kafka credentials, choose a credentials solution such as “My account”, simply for test purposes (not recommended for production), then click Continue.
On the “Configuration” dialog, select Provide your own schema and provide an Avro schema to the connector to define the structure of the JSON messages you want it to create. For example:
{
  "type": "record",
  "name": "UserEvent",
  "fields": [
    { "name": "user_id", "type": "string" },
    { "name": "timestamp", "type": "long" }
  ]
}
Click Show advanced configurations and verify that
value.converter.schemas.enableis set tofalse. With this setting, the connector will send the JSON messages to the topic as raw JSON without the schema metadata, effectively making them “schema-less” from the perspective of the topic itself.Click Continue.
Step through the remaining dialogs for “Sizing” and “Review and launch”, taking the defaults, with the exception of renaming the Connector, if you want to do so.
Finally, click Continue to create the connector and start generating sample messages.
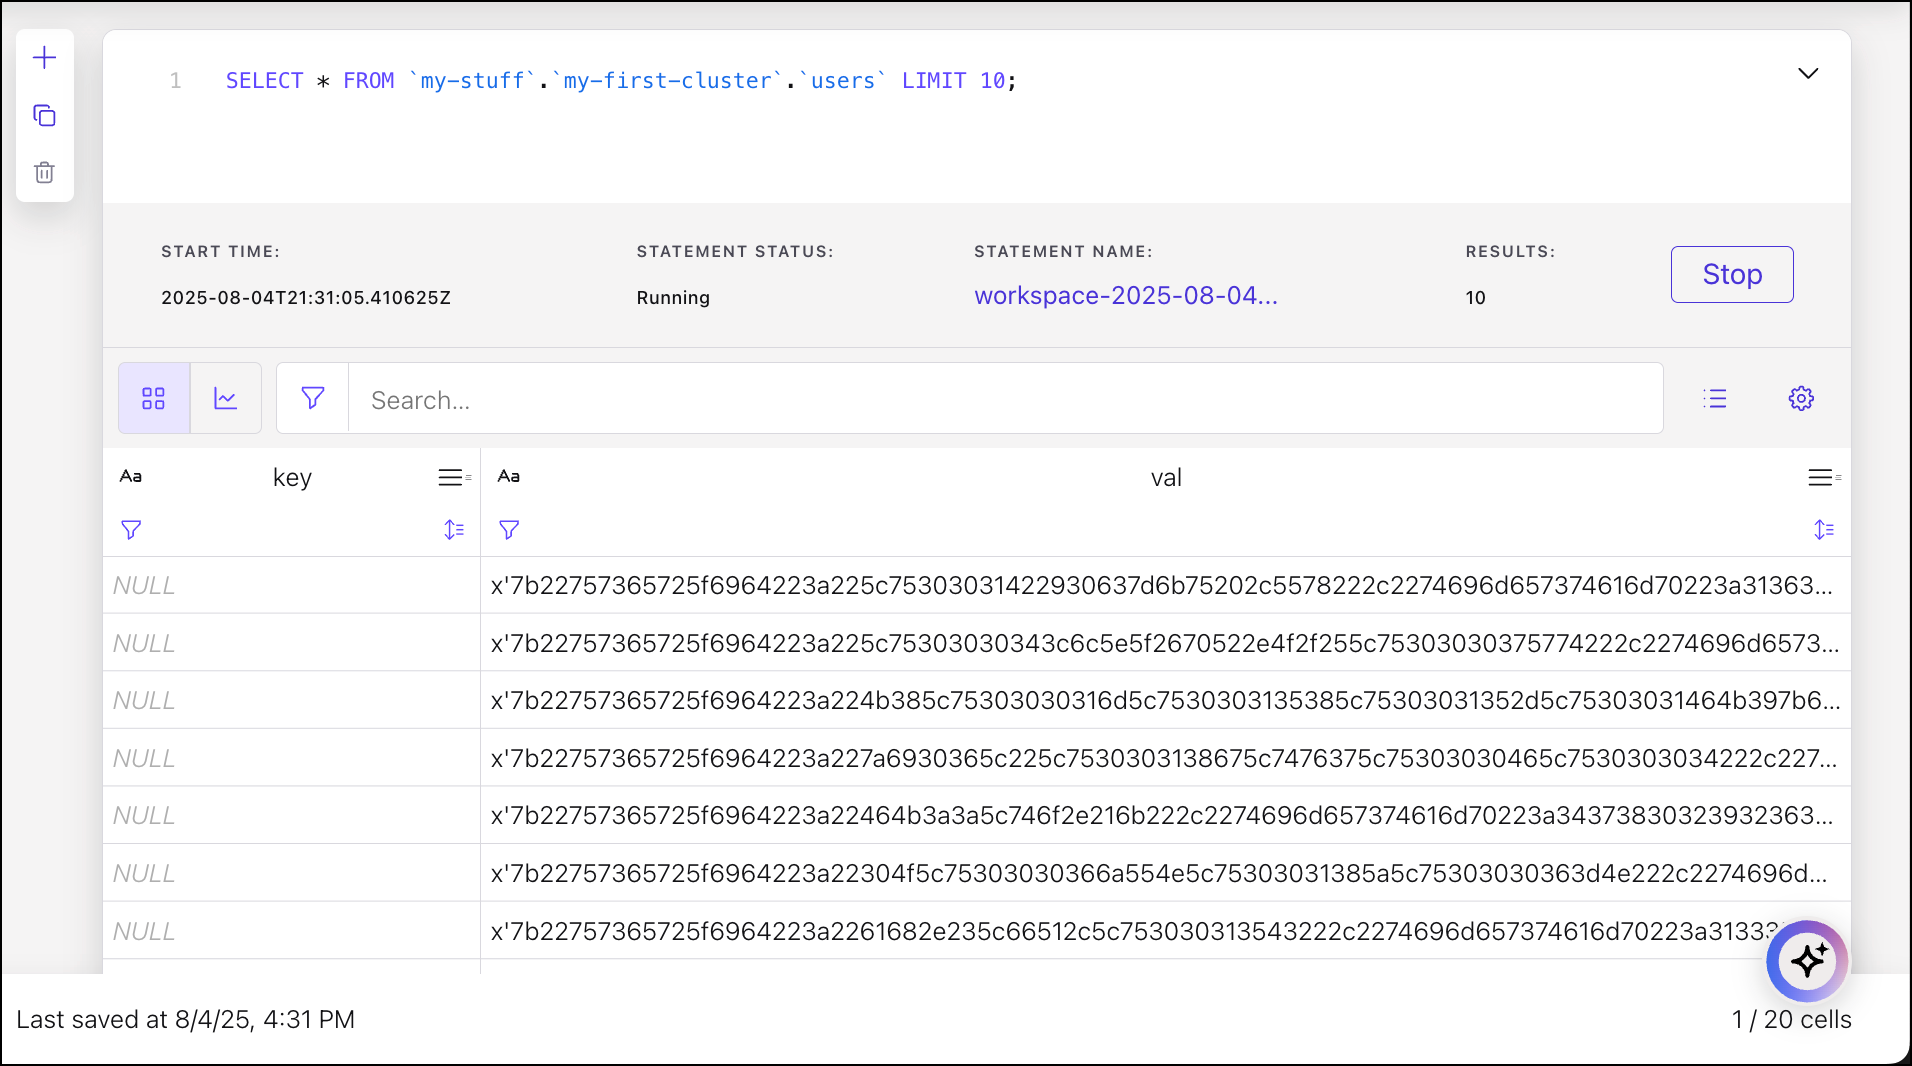
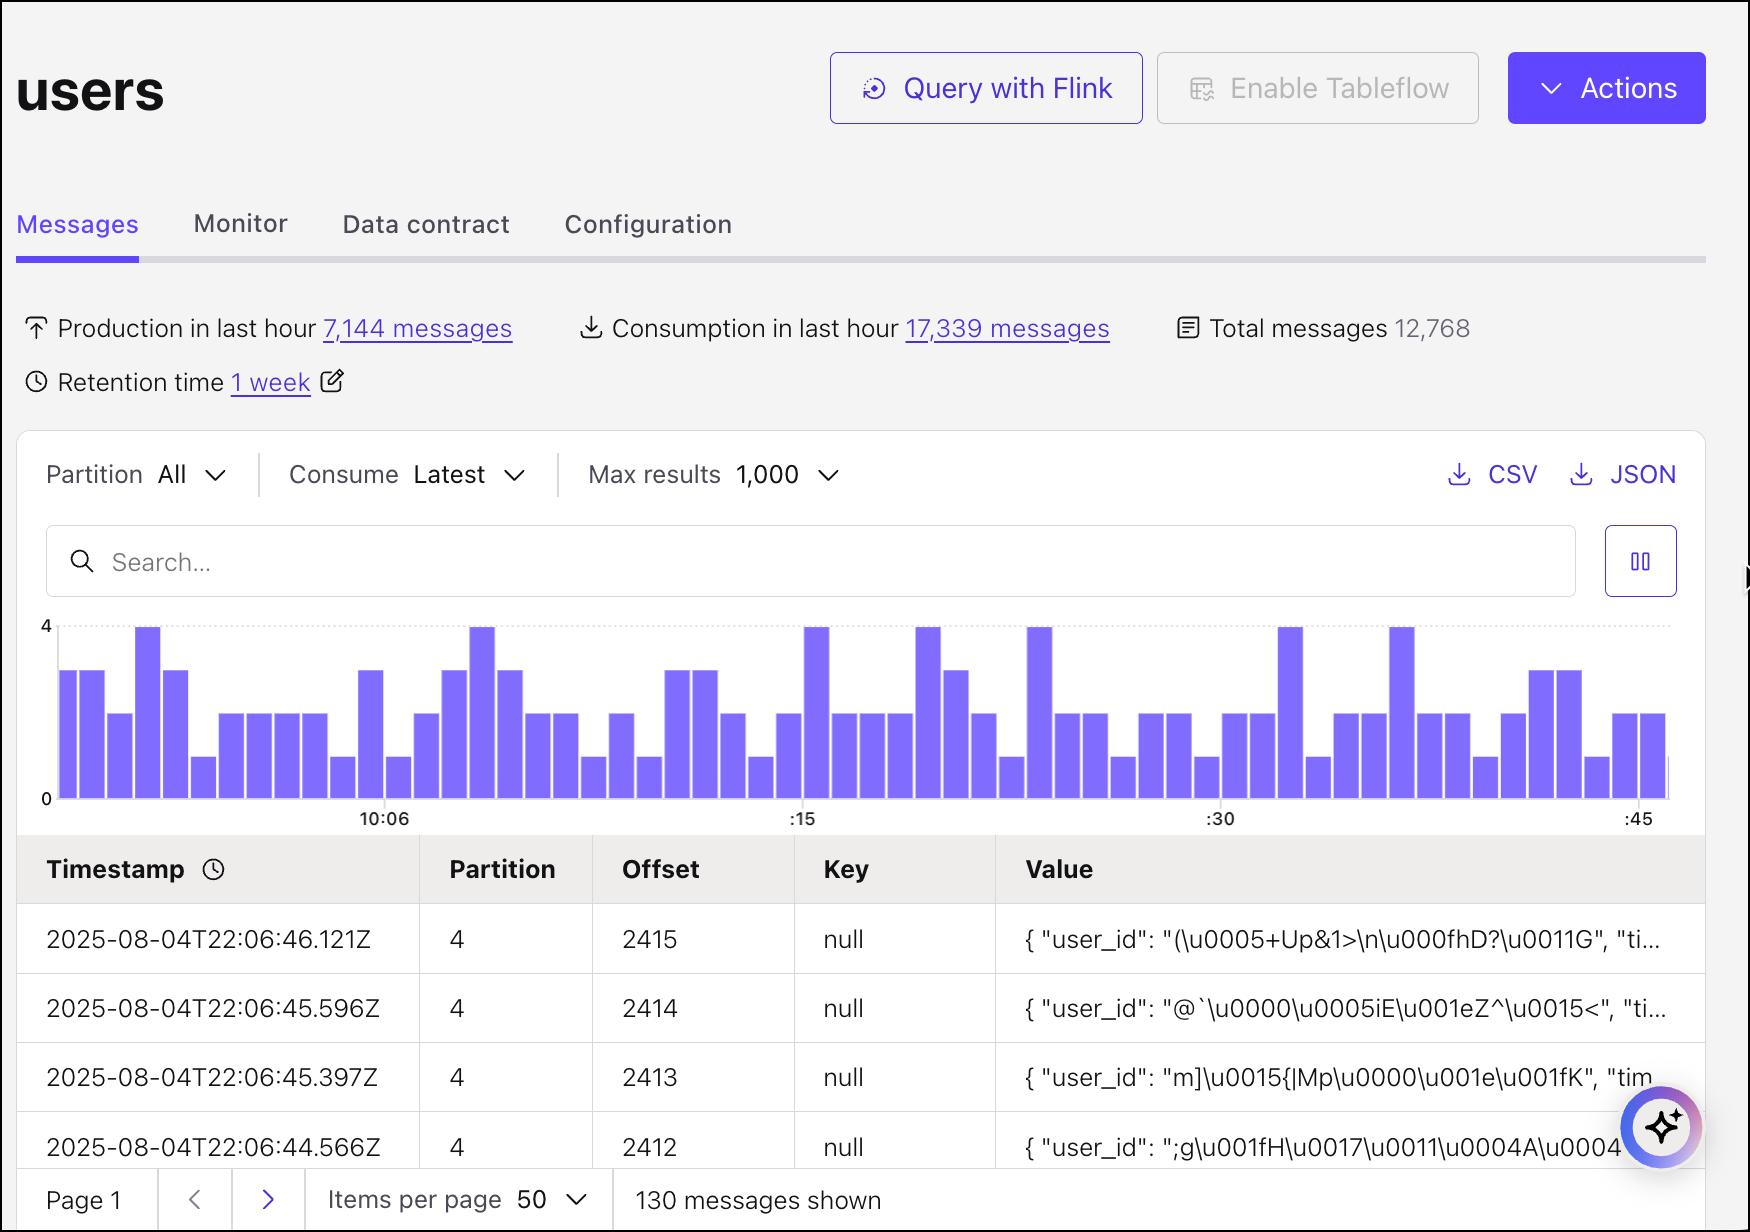
View the messages and attempt to query with Flink SQL
Navigate to the “users” topic to view the messages being produced to the topic. These are being produced are raw JSON messages.

Now, attempt to process these messages using Flink.
At the top of the screen, choose Query with Flink, then click Run.
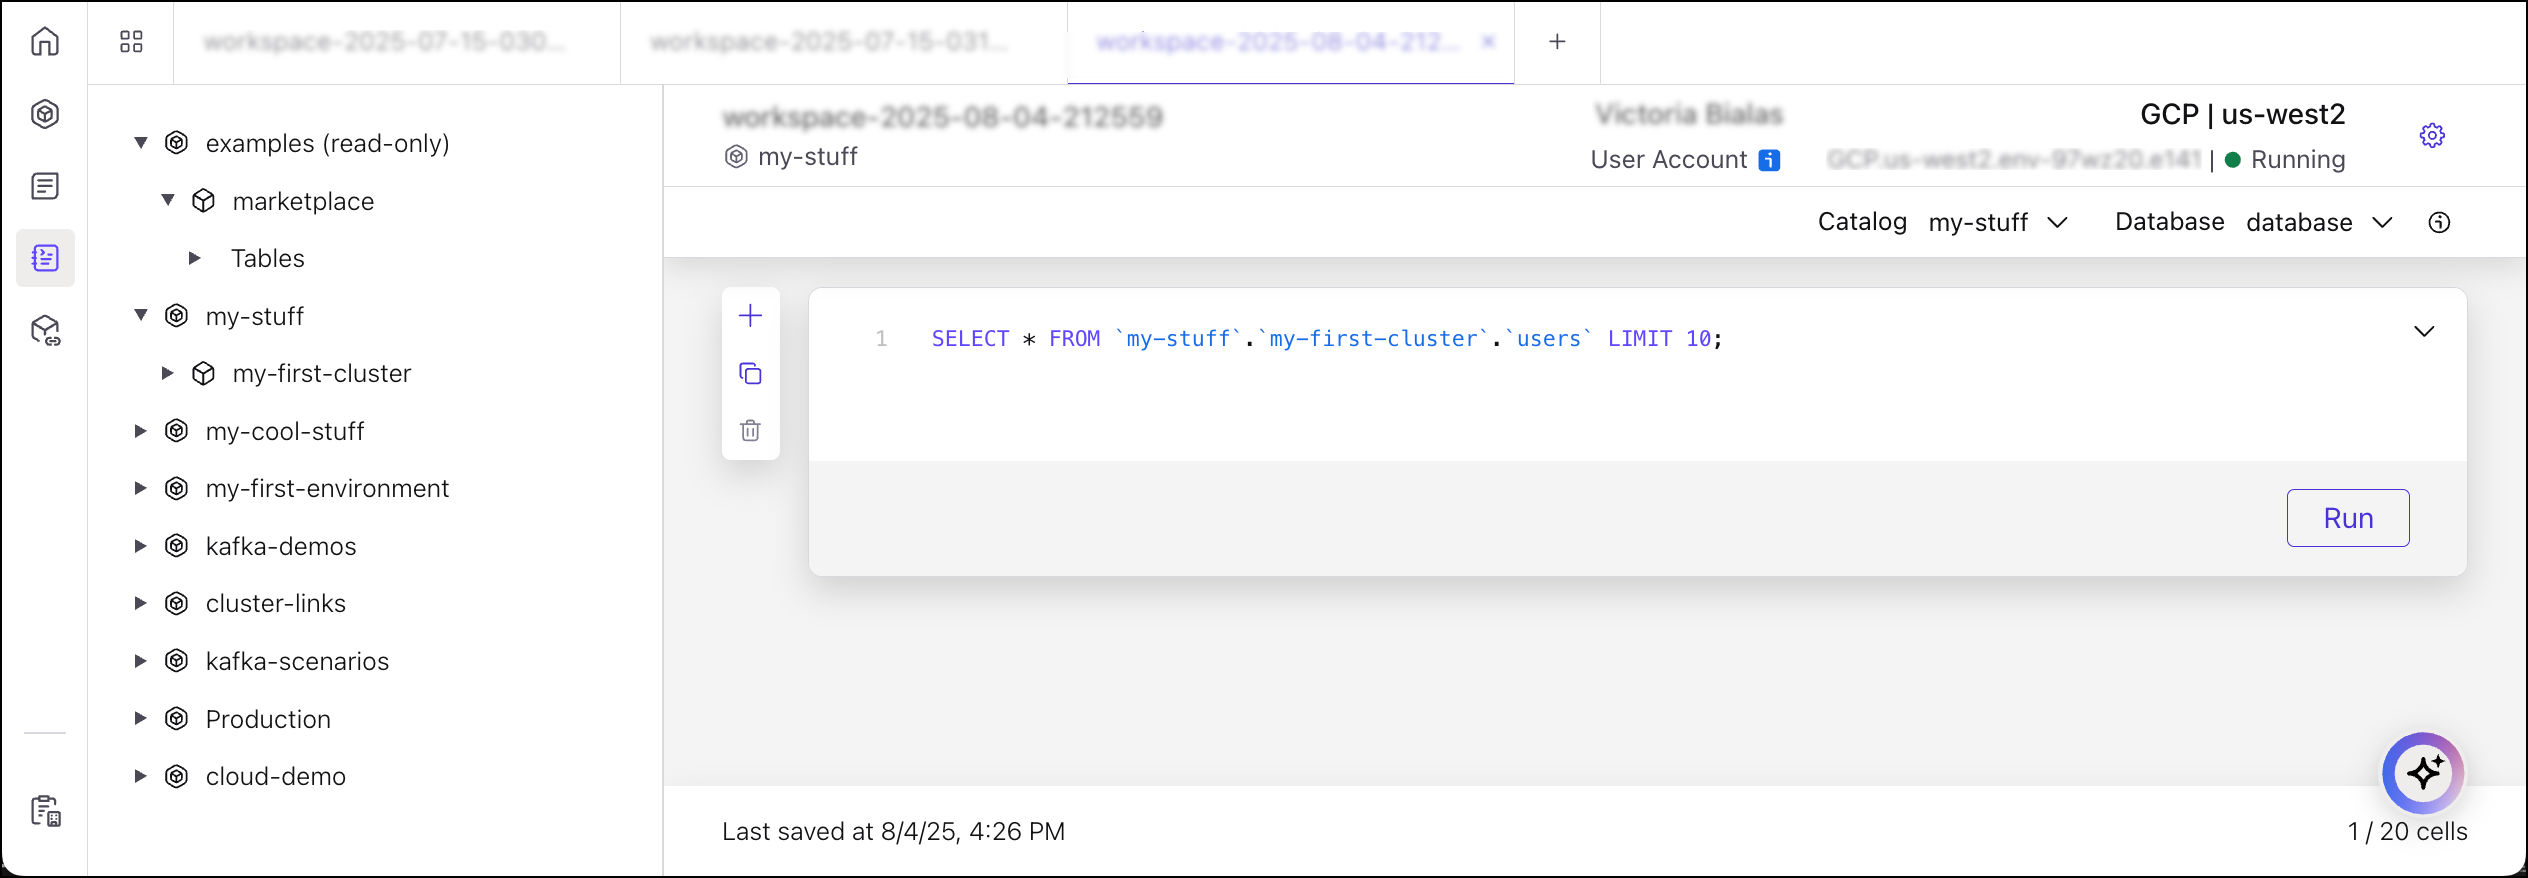
Flink shows the messages in raw byte format, even though the messages are in JSON format. The system cannot process data that does not have a schema associated with it.
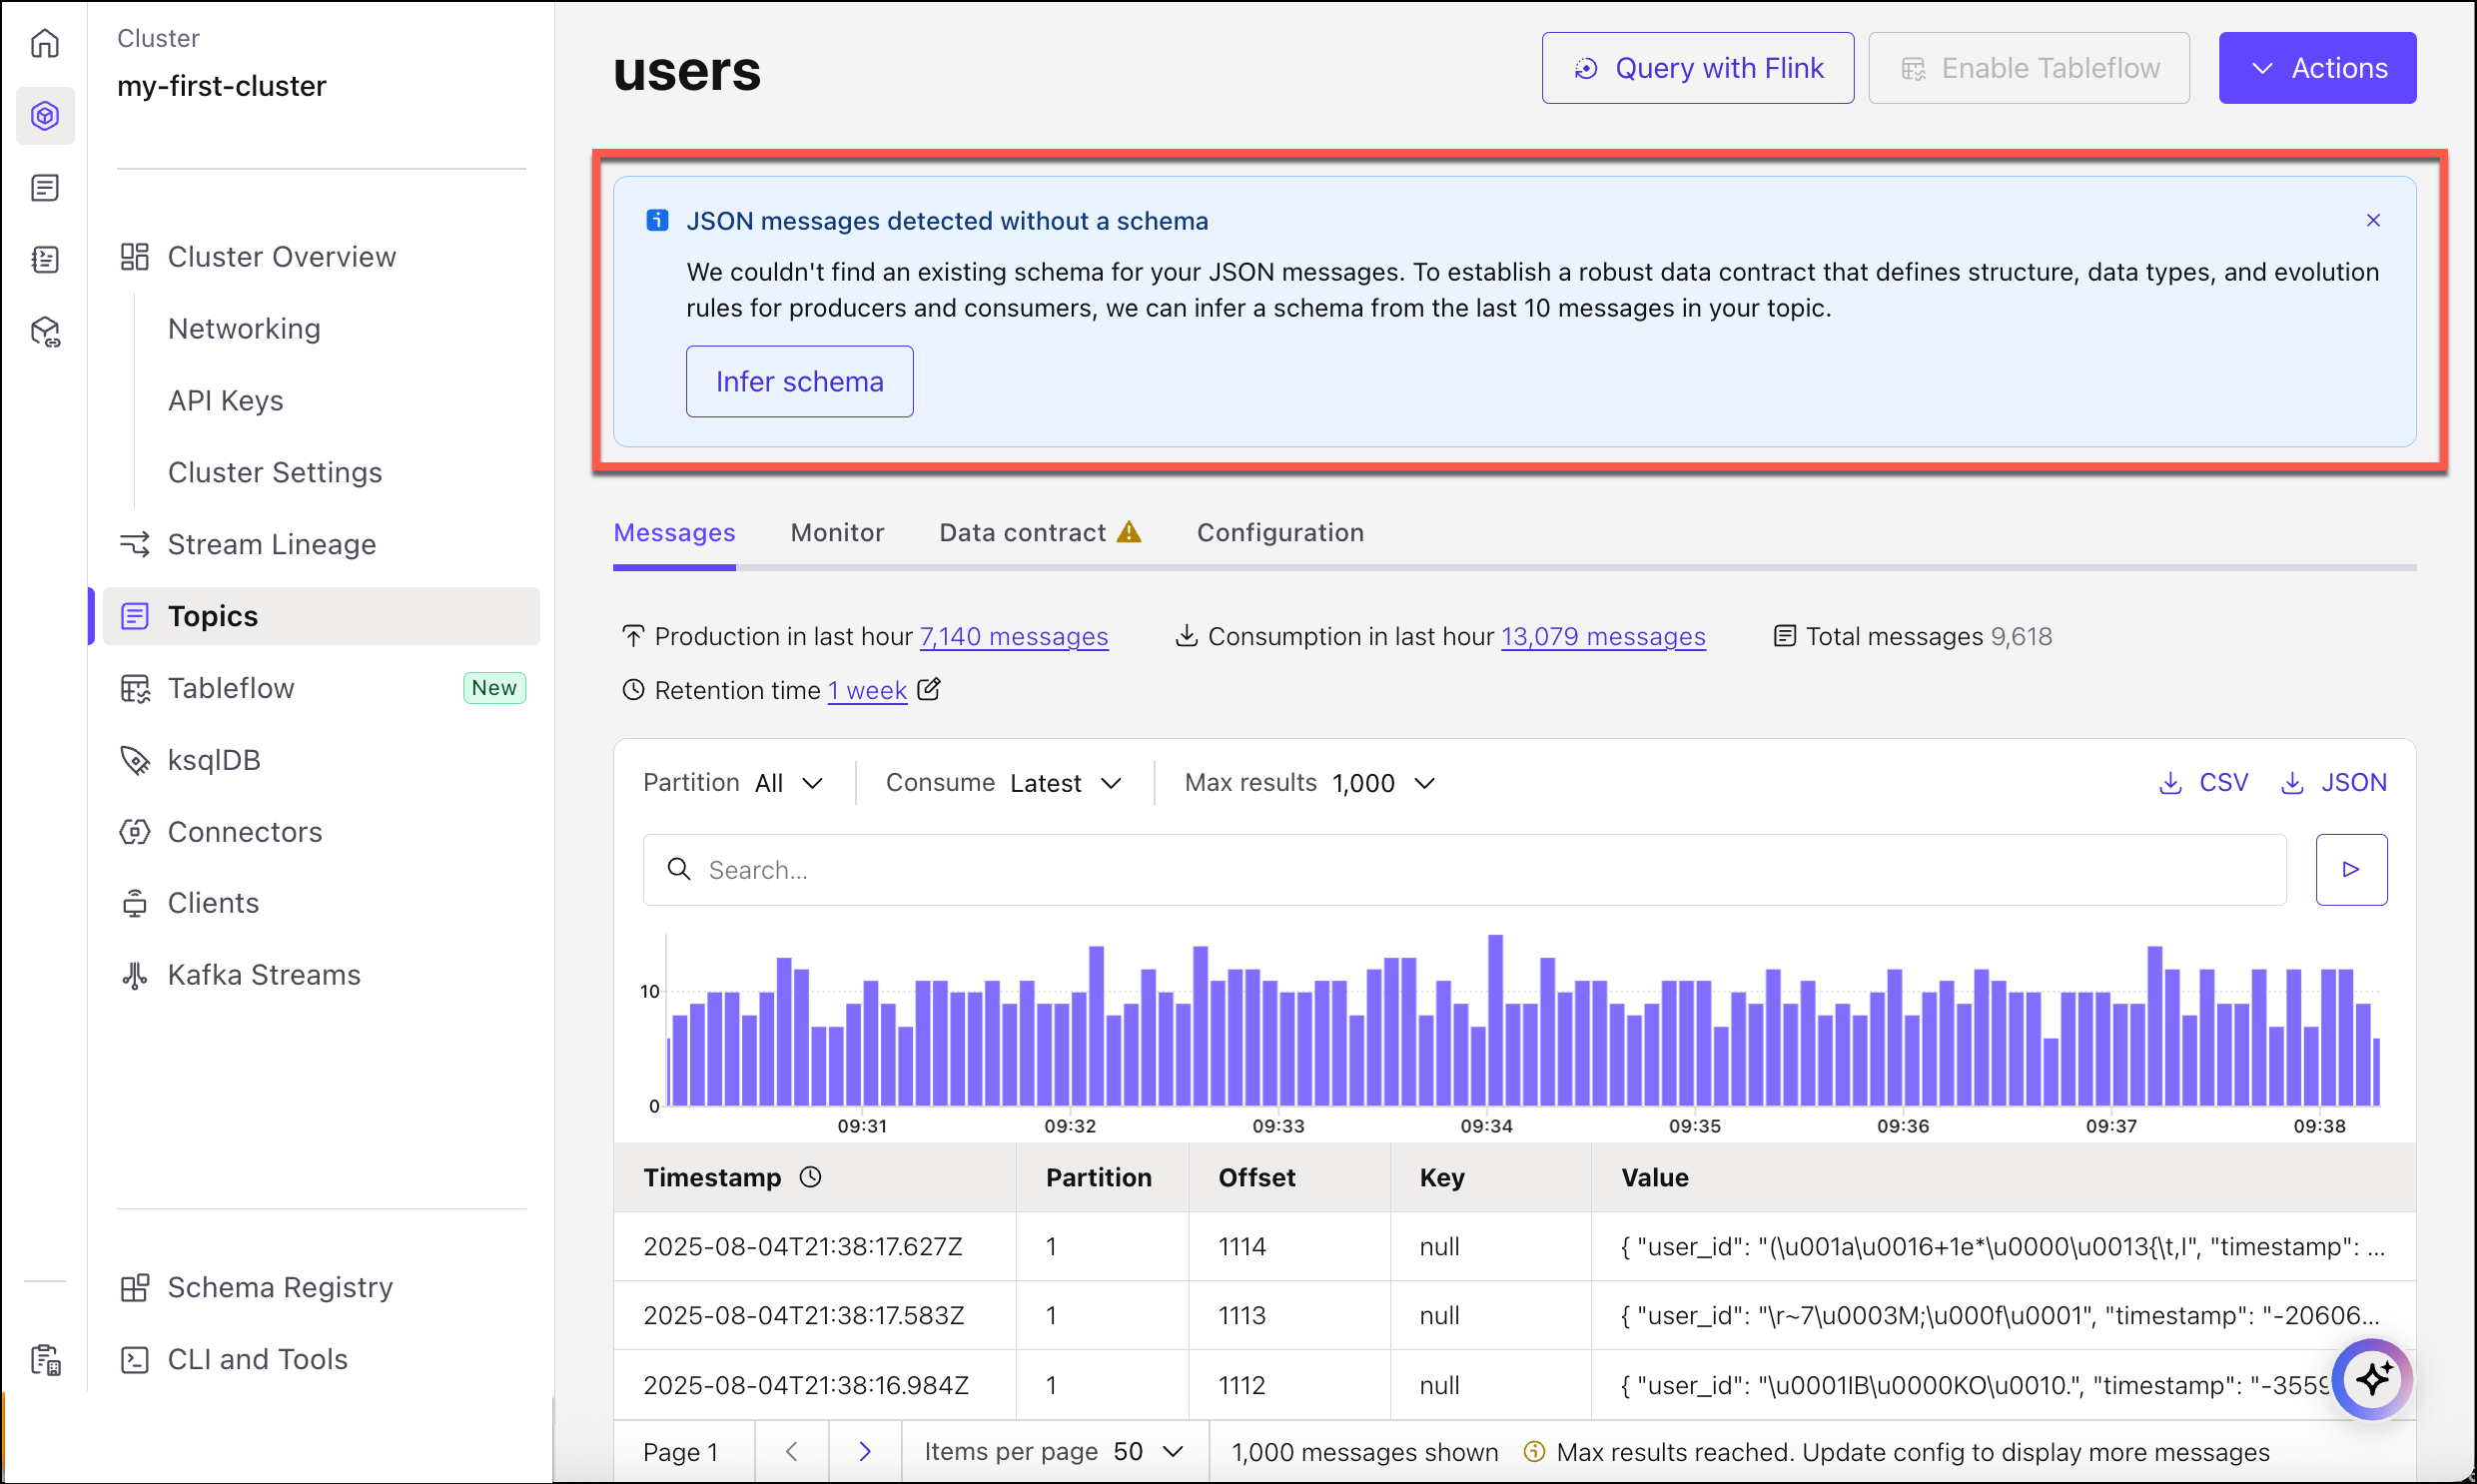
Infer a schema from the messages
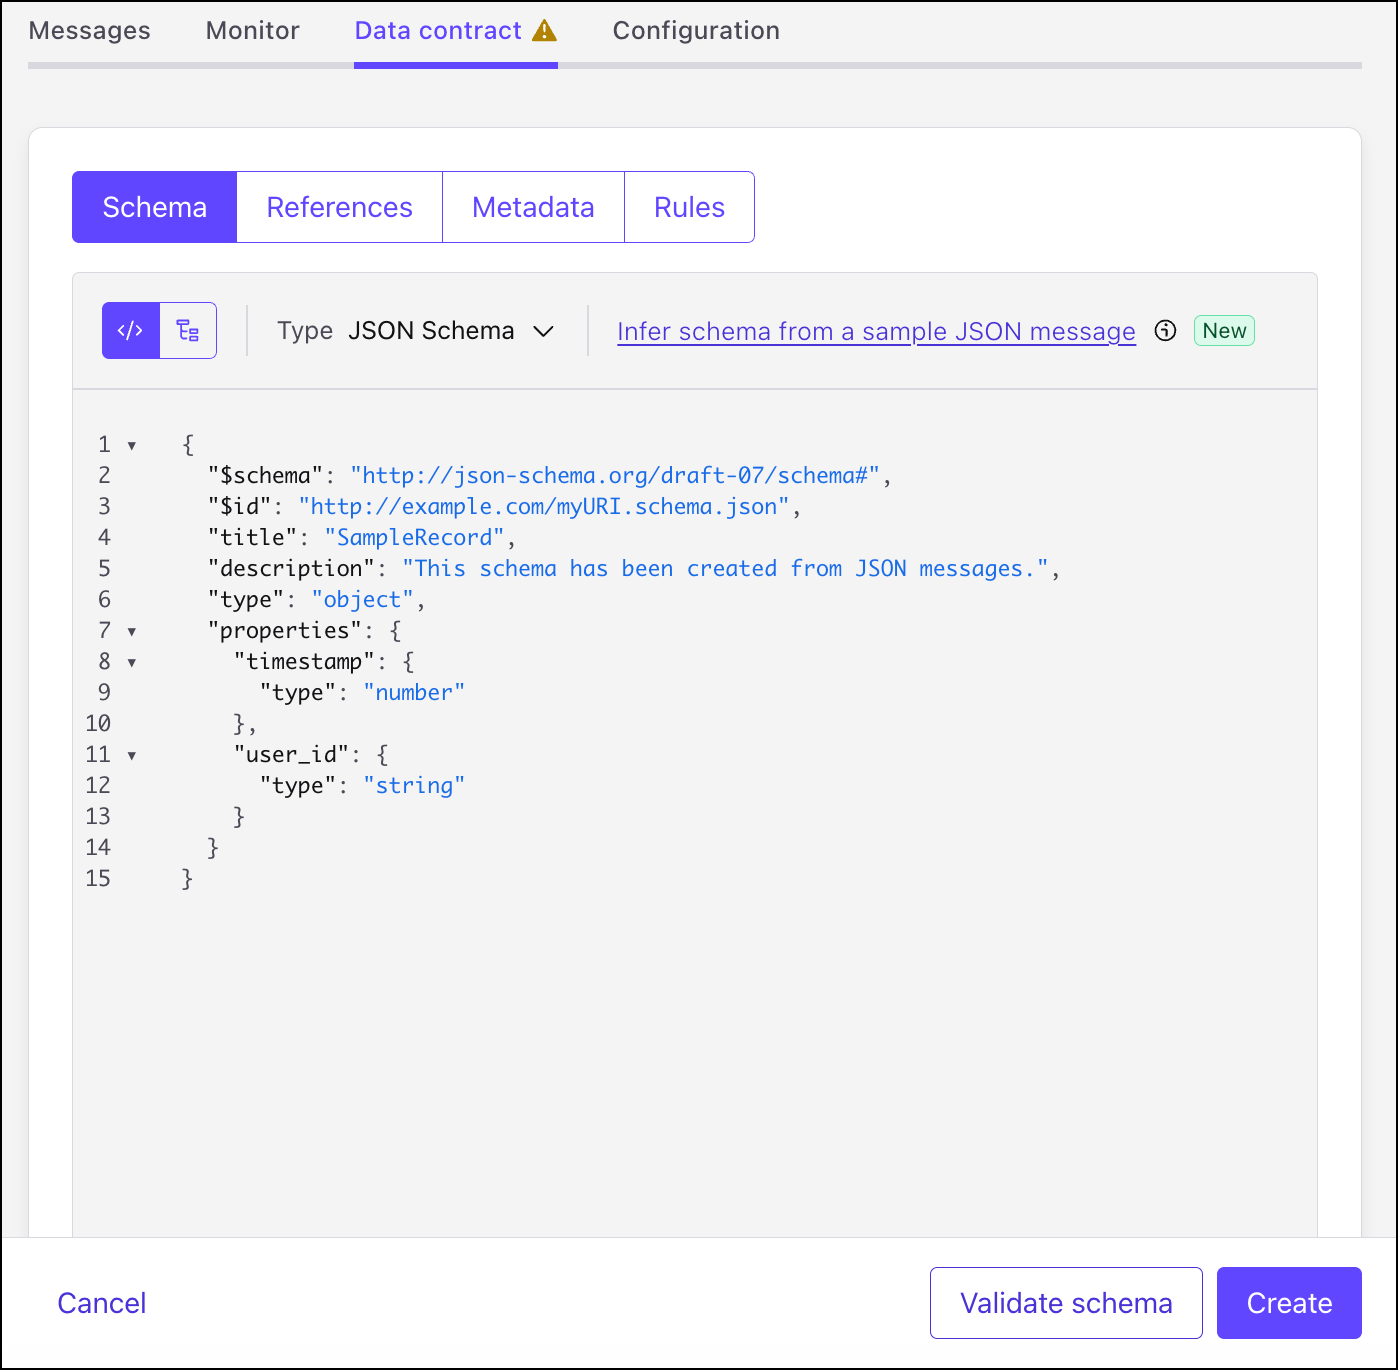
On the messages view for the topic, note the banner which appears for topics which have one or more messages and no associated schema. Click Infer schema from messages to derive a schema that matches at least one and up to 10 messages produced to the topic.
The fields in the schema match the name and type of fields in the JSON message. Click Import schema. You have the option to validate the schema and to edit the schema before you register it. To learn more, see Review and edit an inferred schema.

When you are satisfied with the schema, click Create.
The schema is created and associated with the topic. The schema is registered using the TopicNameStrategy.
Click View messages.
The messages now mapped to the schema appear in a readable format.
Query with the message stream with Flink
Now that you have a schema associated with the topic, attempt to process the data again, using Flink.
Click Query with Flink, then click Run.
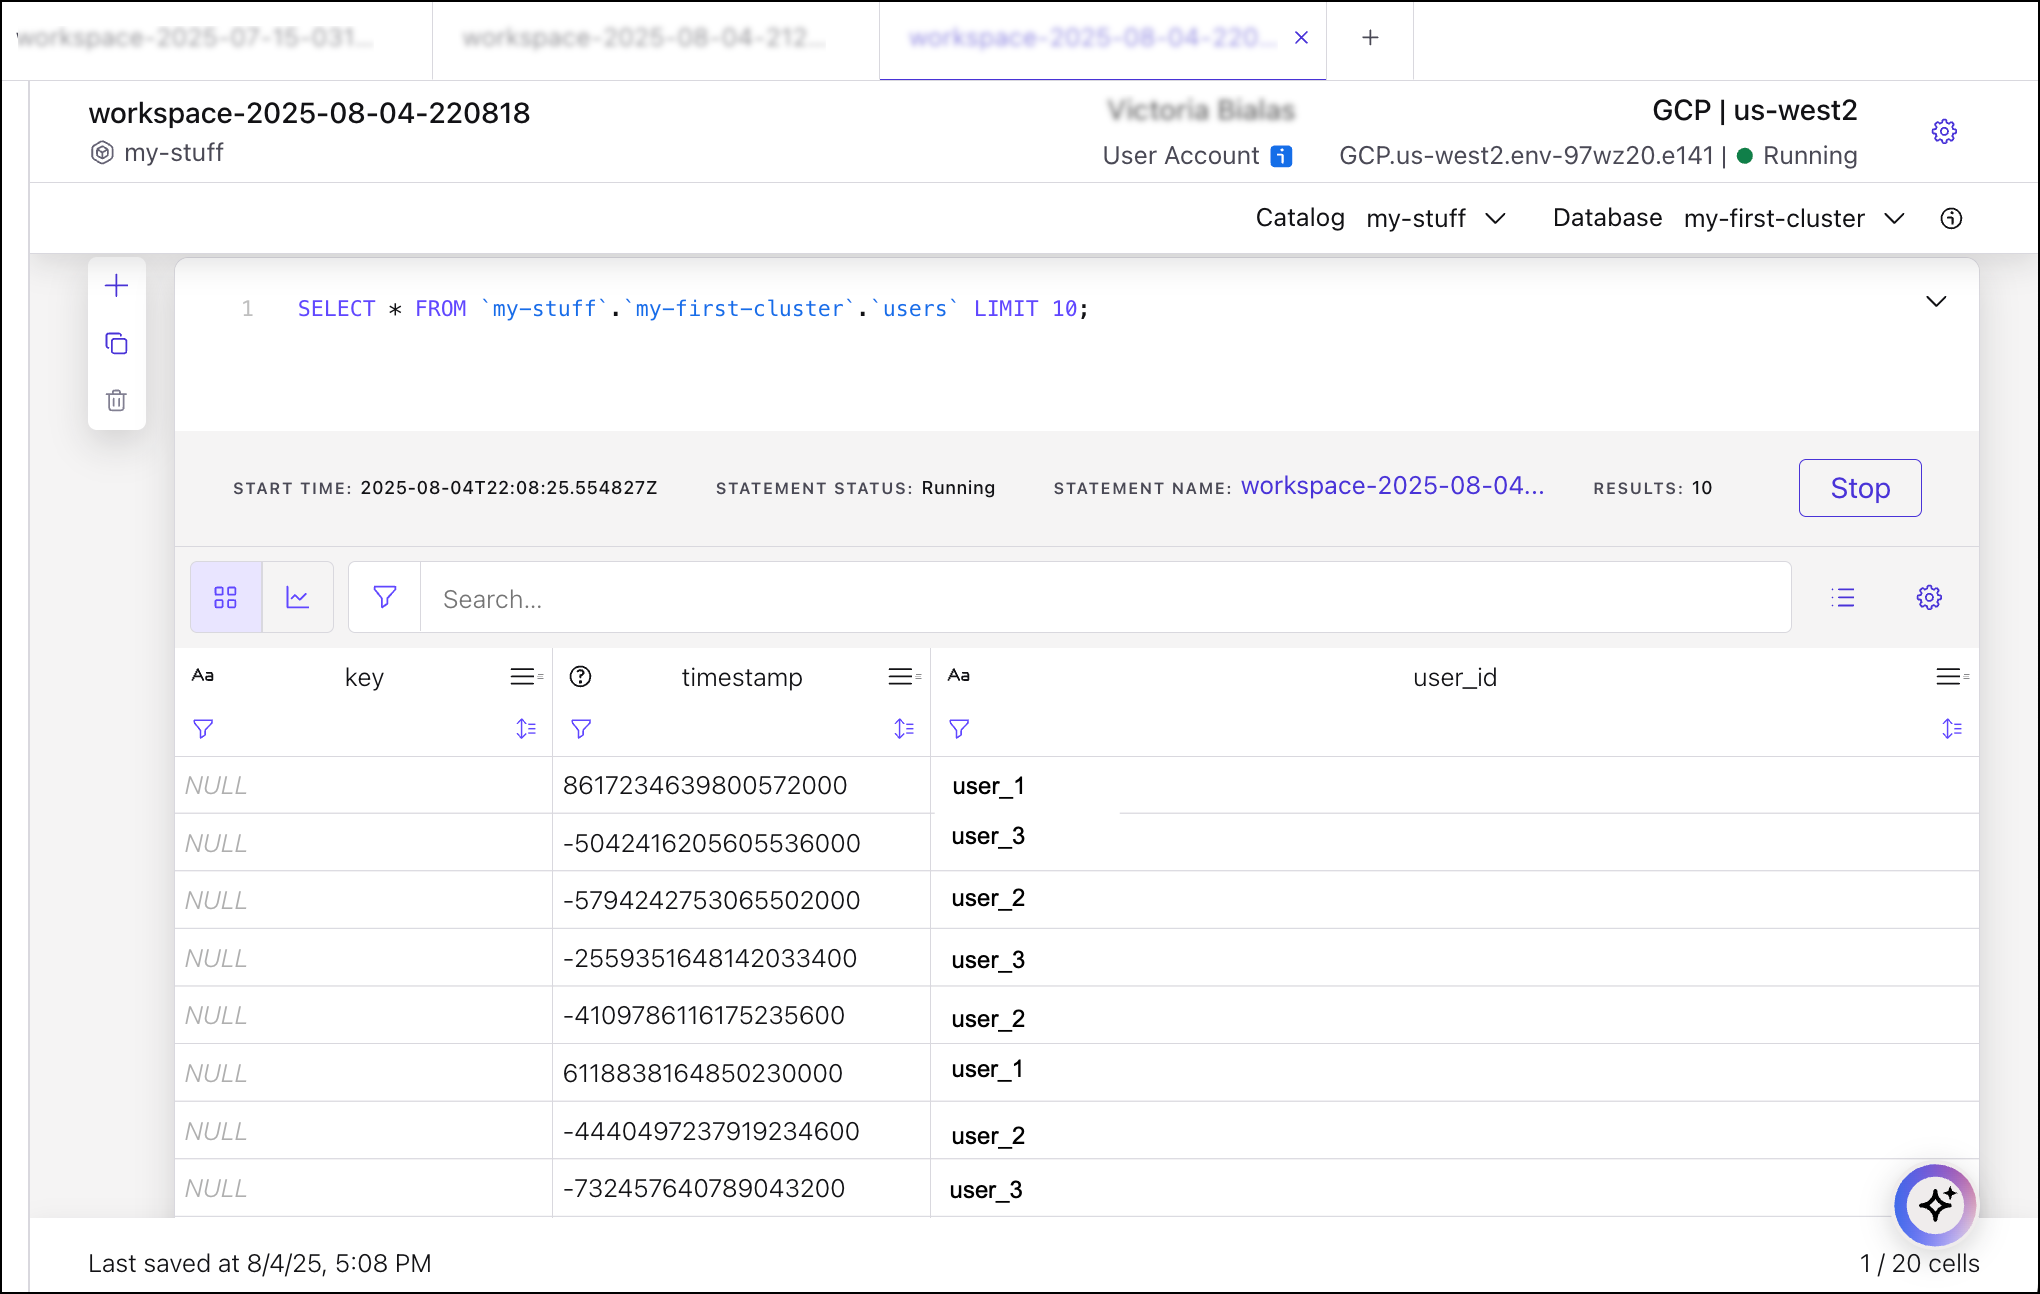
Now that the topic has an associated schema, Flink can process the messages and display the results in a human-readable table format.
Review and edit an inferred schema
The schema inference tool provides a powerful and accurate first draft, but it should not be considered a final product without human oversight. The generated schema is a starting point that captures the structure of the sample data. For production systems, a thorough review and refinement are essential to create a robust and precise data contract. The product team anticipates that users will perform edits and has even instrumented metrics to track how often schemas are accepted without modification.
Consider the following common refinements after generating a schema:
Improve Data Type Specificity: The inference engine may identify a numeric field as a generic number. A developer should refine this to a more specific type like integer, long, float, or double based on the actual domain of the data.
Add Documentation: The inferred schema will not contain any comments or descriptions. It is a best practice to add doc fields (in Avro) or description fields (in JSON Schema) to explain the business purpose of each field. This documentation is invaluable for future developers and data consumers.
Enforce Constraints: To tighten data quality guarantees, add validation constraints. For example, use a pattern for strings that must match a specific format (like a UUID), or set maximum and minimum values for numeric fields.
Define Default Values: For fields that were inferred as optional, consider defining a sensible default value. This can make consuming applications more resilient by preventing null pointer exceptions.
Review Nullable Fields: The inference process will mark a field as optional (nullable) if it was missing from any of the sampled messages. Review these decisions. Should a field truly be optional, or was its absence in the sample an anomaly? Making a field required when appropriate is a key part of creating a strict contract.
How it works
Understanding the underlying logic of the inference engine will help you interpret its output and troubleshoot potential issues. The process differs slightly between the two main workflows.
Single Message Inference (New Schema)
When generating a schema from a single sample JSON message, the engine performs a recursive traversal of the JSON object tree. It maps the JSON data types to their equivalents in the selected target schema format (Avro, Protobuf, or JSON Schema).
A JSON string becomes a schema string.
A JSON number becomes a schema number (which can be refined).
A JSON boolean becomes a schema boolean.
A JSON object becomes a nested record (Avro) or message (Protobuf).
A JSON array becomes a schema array. The type of the array’s elements is determined by inspecting the first element of the array in the sample.
Multi-Message Inference (Existing Topic)
The process for inferring a schema from messages in a topic is more complex, as it must reconcile potentially different structures into a single, valid JSON Schema. The system uses at least one and optimally 10 messages to infer a schema.
Field Merging: The engine inspects all 10 messages and constructs a composite schema that includes any field present in at least one of the messages. This ensures that fields that appear intermittently are not lost.
Type Conflict Resolution: If a field exists with different data types across the sampled messages (for example,
{"id": 123}in one and{"id": "id-123"}in another), the engine resolves the conflict by creating a union type. In JSON Schema, this would result in{"type": ["number", "string"]}. This makes the schema more permissive to accommodate the observed data variations.Optional Fields: If a field is present in some of the 10 messages but absent in others, it will be defined as an optional field in the final schema. In JSON Schema, this is typically achieved by adding “null” to its type definition (for example,
{"type": ["string", "null"]}).
This automated logic is designed for convenience and robustness, but it explains why the resulting schema may be more permissive than a hand-authored one and why a manual review is a critical final step.
Data type mapping used for schema inference
Actual input | Avro Datatype | JSON Datatype | Protobuf Datatype |
|---|---|---|---|
Long | long | number | int64 |
Short/integer | int | number | int32 |
Null | null | null | google.protobuf.Any |
BigInteger/BigDecimal | double | number | double |
Float/Double | double | number | double |
Boolean | boolean | boolean | boolean |
String | string | string | string |
Troubleshooting
Following are some common problems that may arise when using the schema inference feature and how to solve them.
Scenario 2: The inferred schema is missing an expected field
Possible Cause: The field in question was not present in the single sample message provided (for the new schema workflow) or was not present in any of the 10 messages sampled from the topic (for the existing topic workflow).
Solution: For new schemas, ensure the sample JSON provided is comprehensive and includes all necessary fields. For existing topics, produce a new message to the topic that contains the missing field, then re-run the inference process. Alternatively, manually edit the generated schema to add the missing field.
Scenario 3: The inferred schema has an incorrect or overly permissive data type
Possible Cause: This is the expected behavior when the inference engine detects inconsistent data types for the same field across the 10-message sample. For example, if userID is a number in some messages and a string in others, the engine will correctly infer a union type of
["number", "string"].Solution: This situation highlights a data quality issue in a producer application. The immediate solution is to manually edit the inferred schema to enforce the single, correct data type. The long-term solution is to investigate and fix the upstream producer application to ensure it consistently produces data with the correct type.
Edit schemas
Edit an existing schema for a topic.
From the navigation menu, click Topics, then click a topic to select it.
Click the Data contracts tab.
Select the Key or Value option for the schema.
The raw view is shown by default.
Click Evolve.
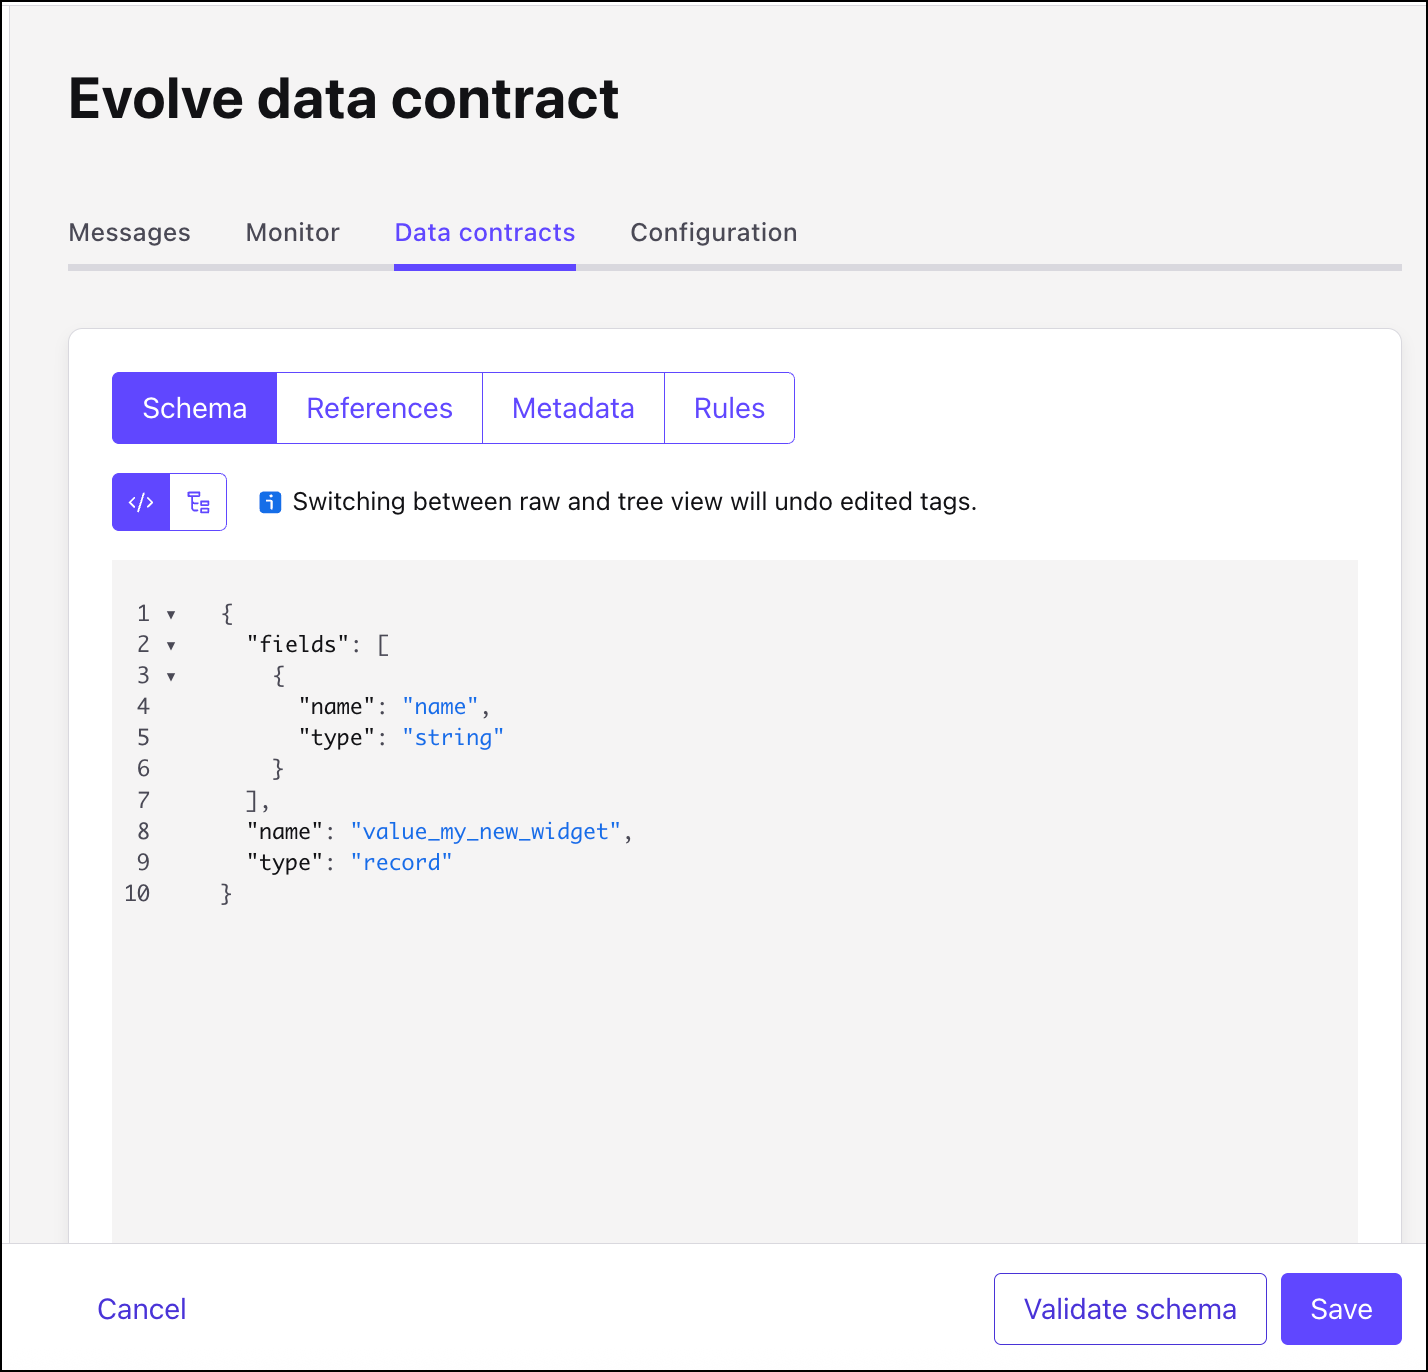
Make the changes in the schema editor.
For example, you could edit the previous schema by adding a new field called
region.{ "fields": [ { "name": "name", "type": "string" }, { "name": "region", "type": "string", "default": "" } ], "name": "value_widgets", "type": "record" }
In edit mode, you have options to:
Validate the schema for syntax and structure before you save it.
Tip
When the compatibility mode is set to Backward Compatibility, you must provide a default for the new field. This ensures that consumer applications can read both older messages written to the Version 1 schema (with only a
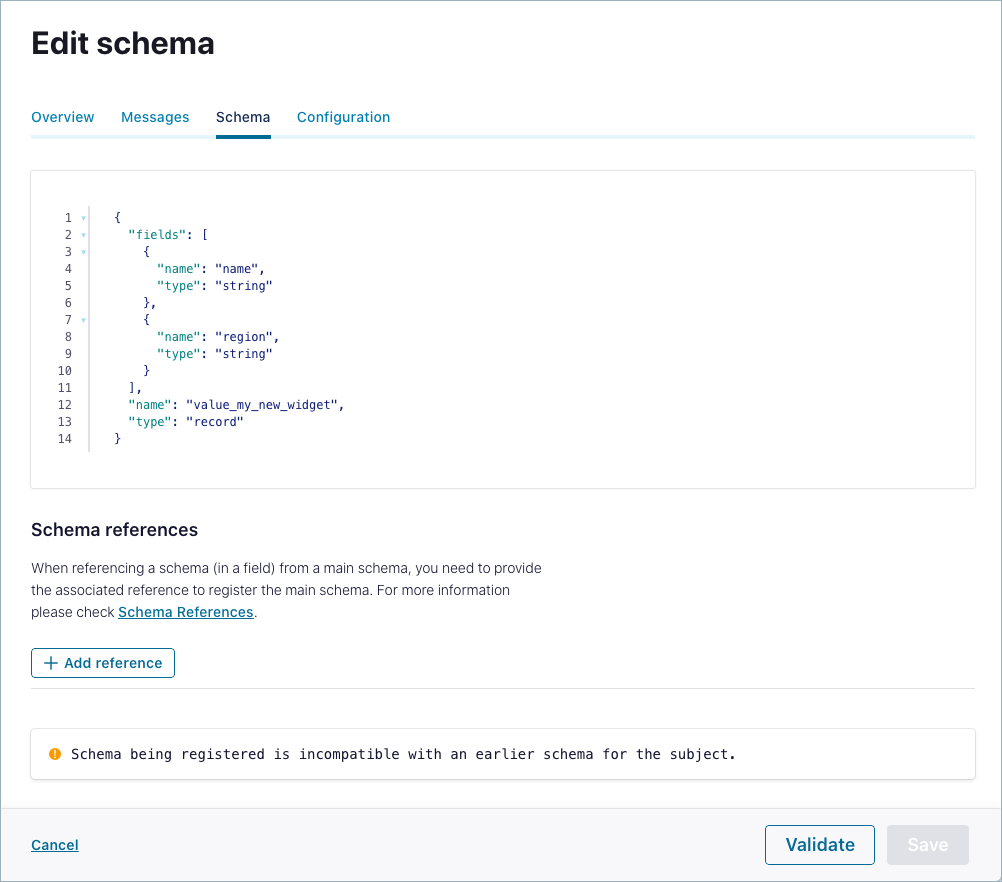
namefield) and new messages constructed per the Version 2 schema (withnameandregionfields). For messages that match the Version 1 schema and only have values forname,regionis left empty. To learn more, see Passing compatibility checks in the Confluent Cloud Schema Registry Tutorial Tutorial.Click Save.
If the schema update is valid and compatible with its prior versions (assuming a backward-compatible mode), the schema is updated and the version count is incremented. You can compare the different versions of a schema.
If the schema update is invalid or incompatible with an earlier schema version, parse errors are highlighted in the editor. If parse errors aren’t auto-highlighted, click the See error messages link on the warning banner to enable them.
For example, if you add a new field but do not include a default value as described in the previous step, you will get an incompatibility error. You can fix this by adding a default value for “region”.
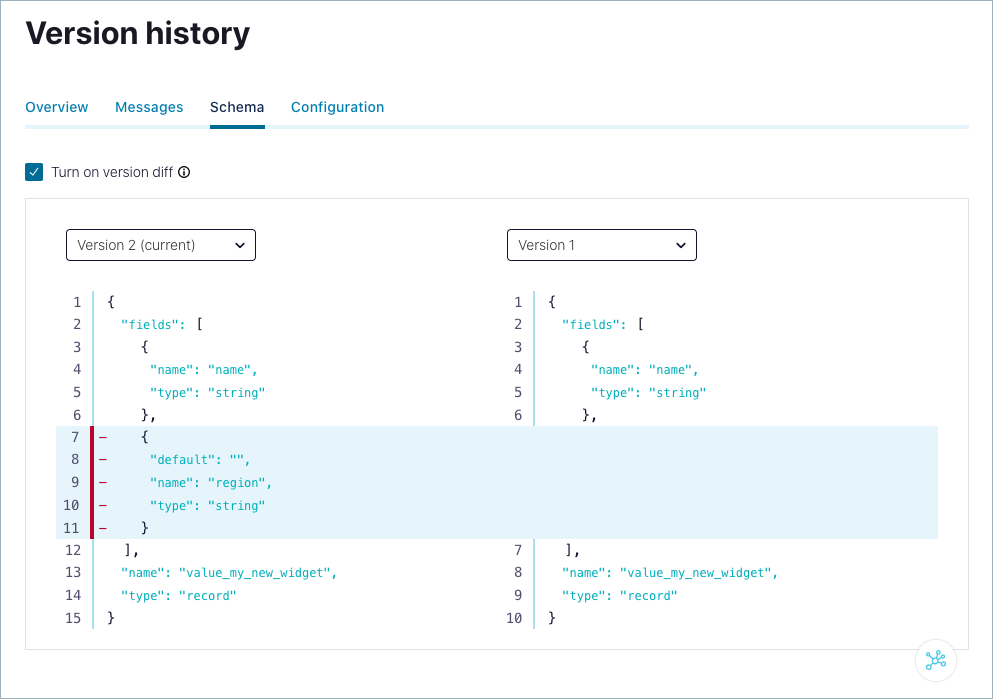
Compare schema versions
Compare versions of a schema to view its evolutionary differences.
From the navigation menu, click Topics, then click a topic to select it.
Click the Data contracts tab.
Select the Key or Value option for the schema. (The schema Value is displayed by default.)
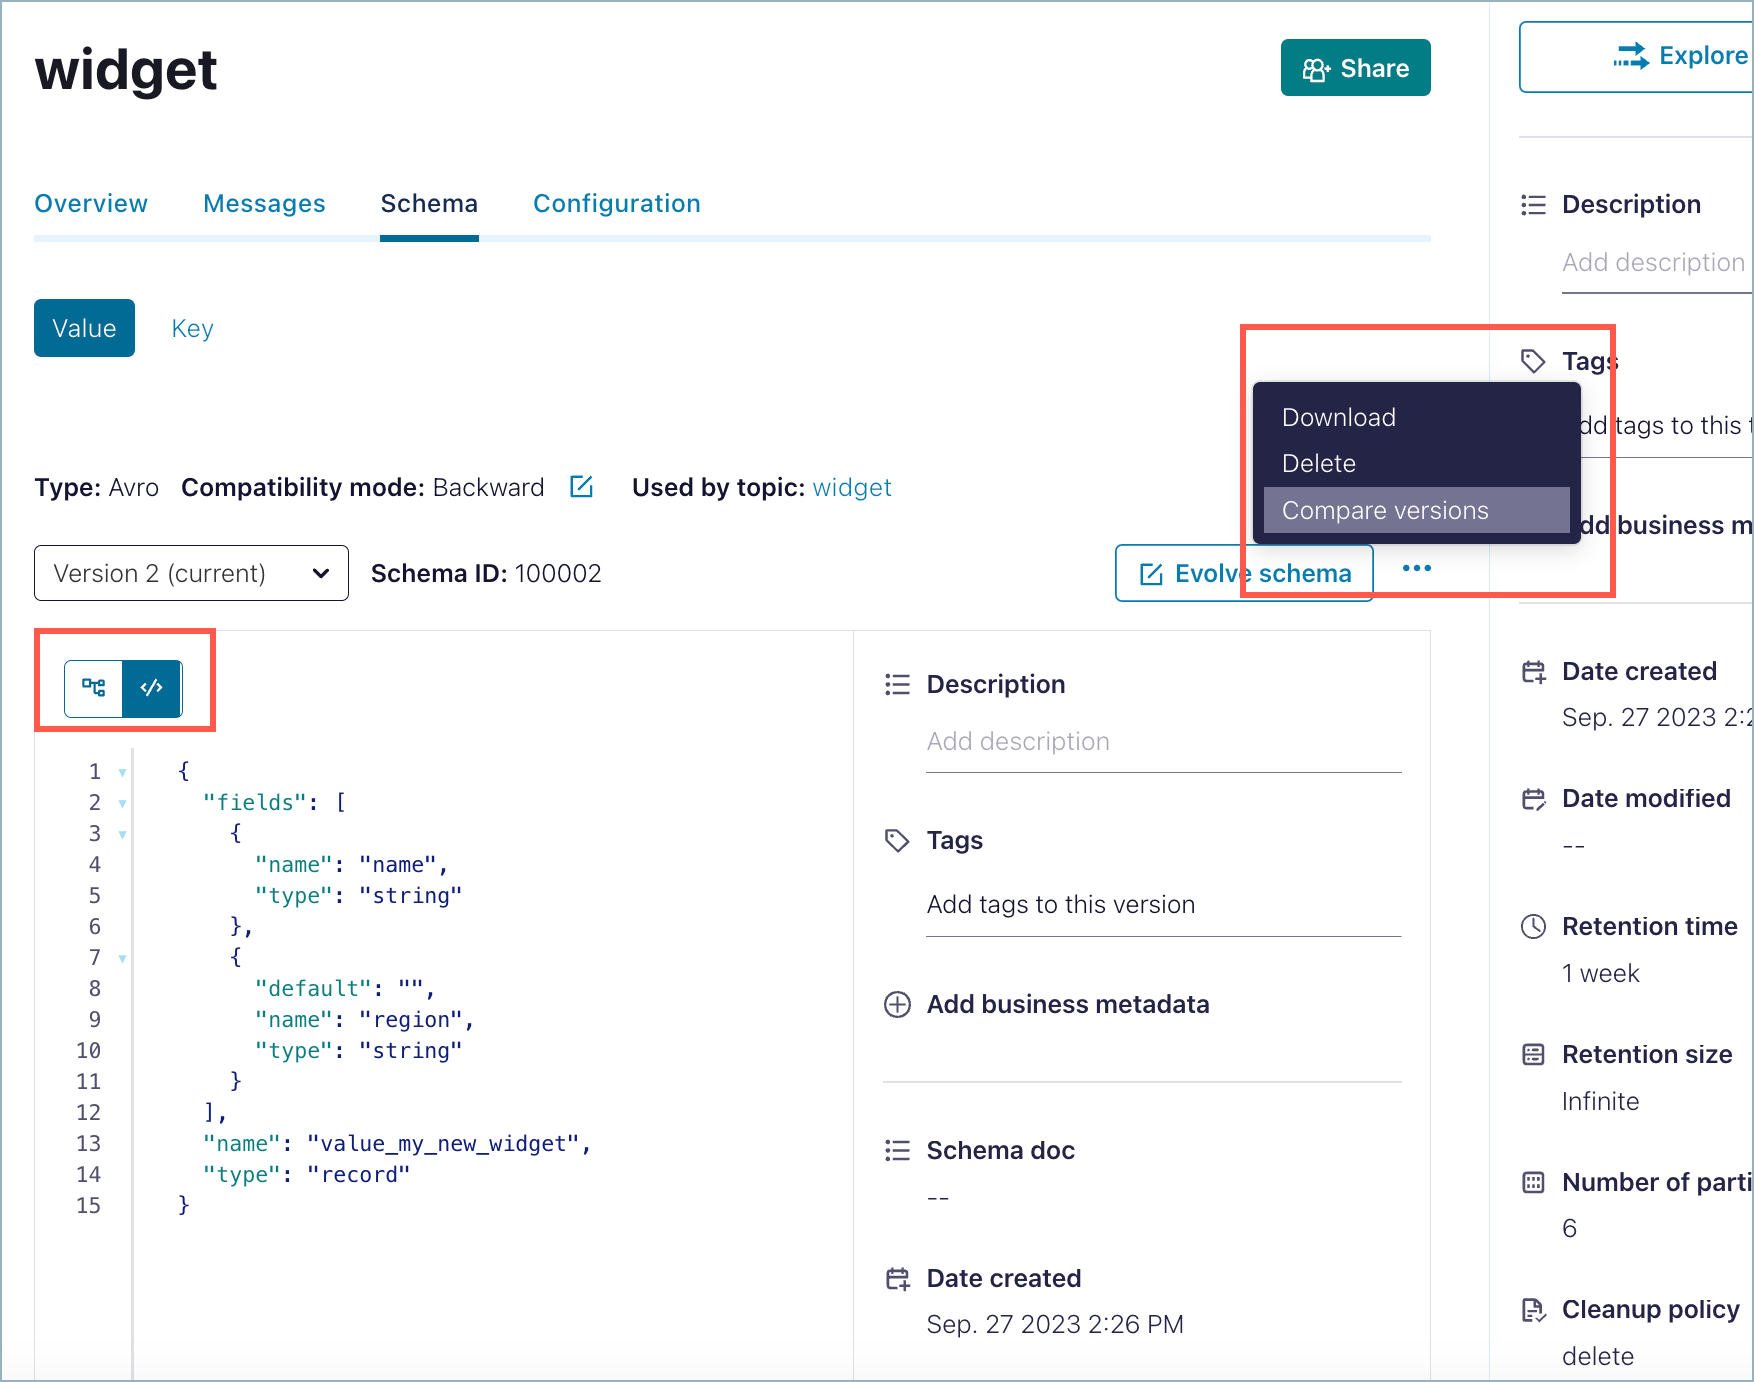
Click the ellipses (3 dots) to get the popup menu and select Compare versions .
The current version number of the schema is indicated on the version menu.
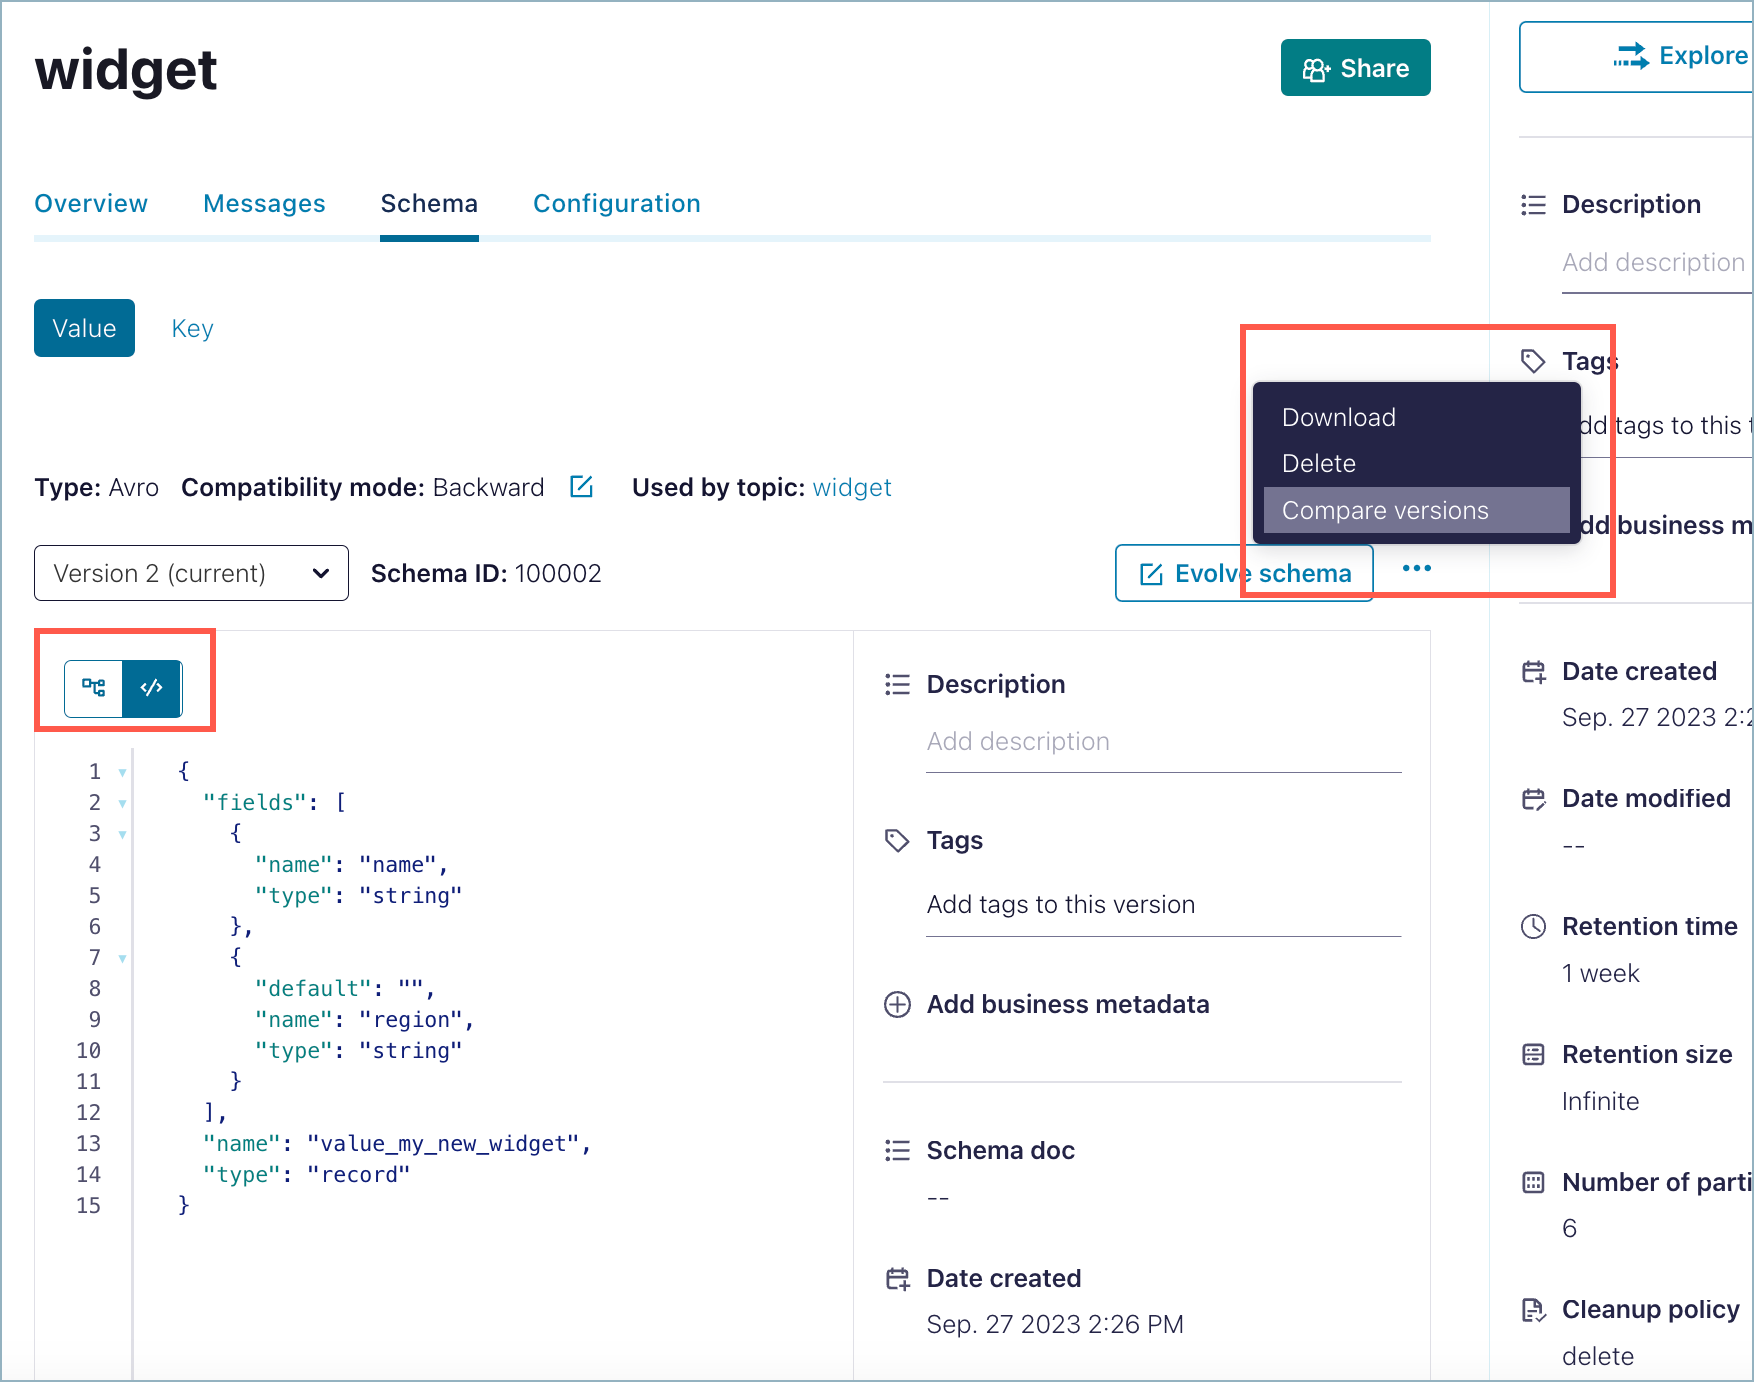
Select the Turn on version diff check box.
Select the versions to compare from each version menu. The differences are highlighted for comparison.
Change subject level (per topic) compatibility mode of a schema
The default compatibility mode is Backward. The mode can be changed for the schema of any topic if necessary.
Caution
If you change the compatibility mode of an existing schema already in production use, be aware of any possible breaking changes to your applications.
This section describes how to change the compatibility mode at the subject level. You can also set compatibility globally for all schemas in an environment. However, the subject-level compatibility settings described below override those global settings.
Select an environment.
Select a cluster.
From the navigation menu, click Topics, then click a topic to select it.
Click the Data contracts tab for the topic.
Select the Key or Value option for the schema.
Click the edit icon (
 ) next to the Compatibility mode indicator.
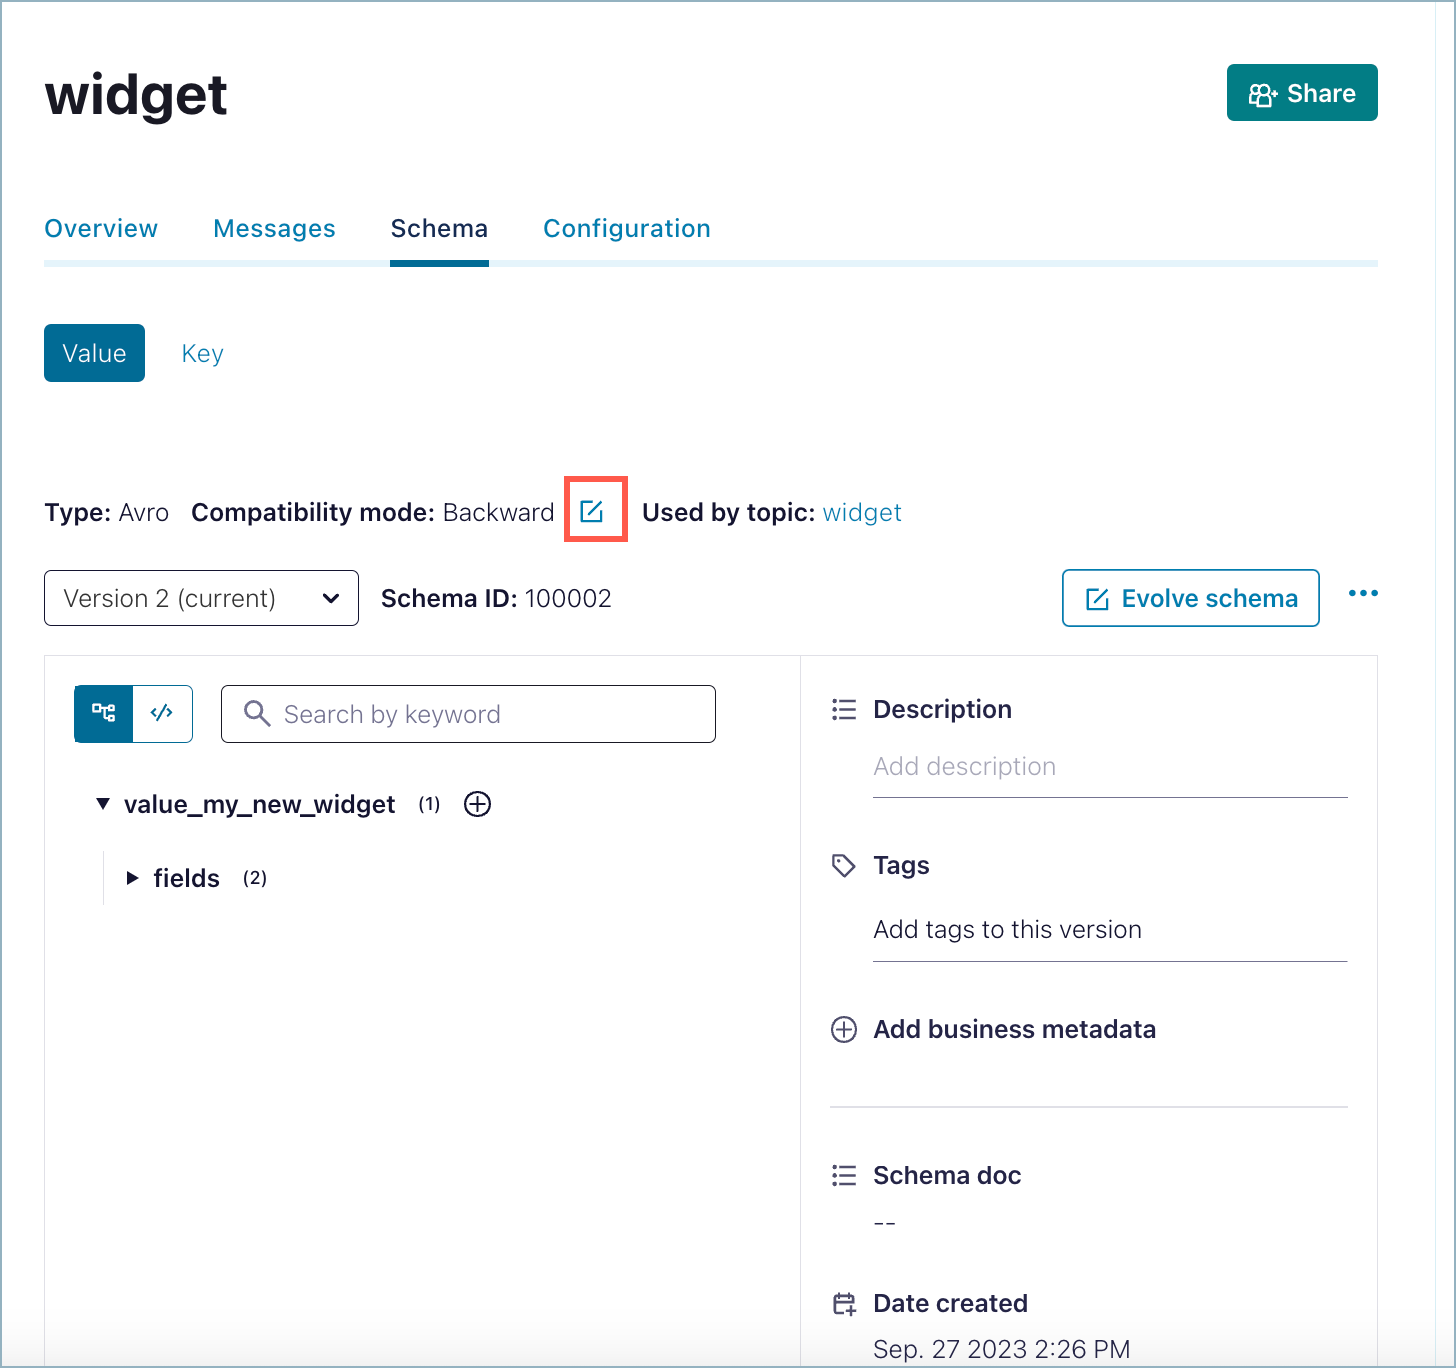
The Compatibility settings are displayed.
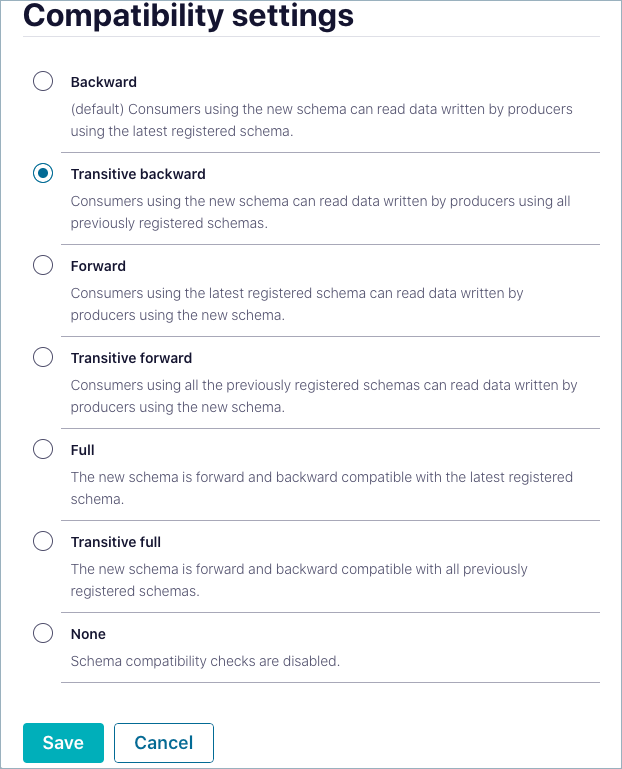
Select a mode option:
Descriptions indicate the compatibility behavior for each option. For more information, including the changes allowed for each option, see Schema Evolution and Compatibility.
Click Save.
Search for schemas and fields
Confluent Cloud offers global search across environments and clusters for various entity types now including schemas and related metadata. To learn more, see Search entities and tags in Stream Catalog.
Tag schemas and fields
Confluent Cloud provides the ability to tag schema versions and fields within schemas as a means of organizing and cataloging data based on both custom and commonly used tag names. To learn about tagging, see Tag entities, data, and schemas in Data Discovery.
Work with schema contexts
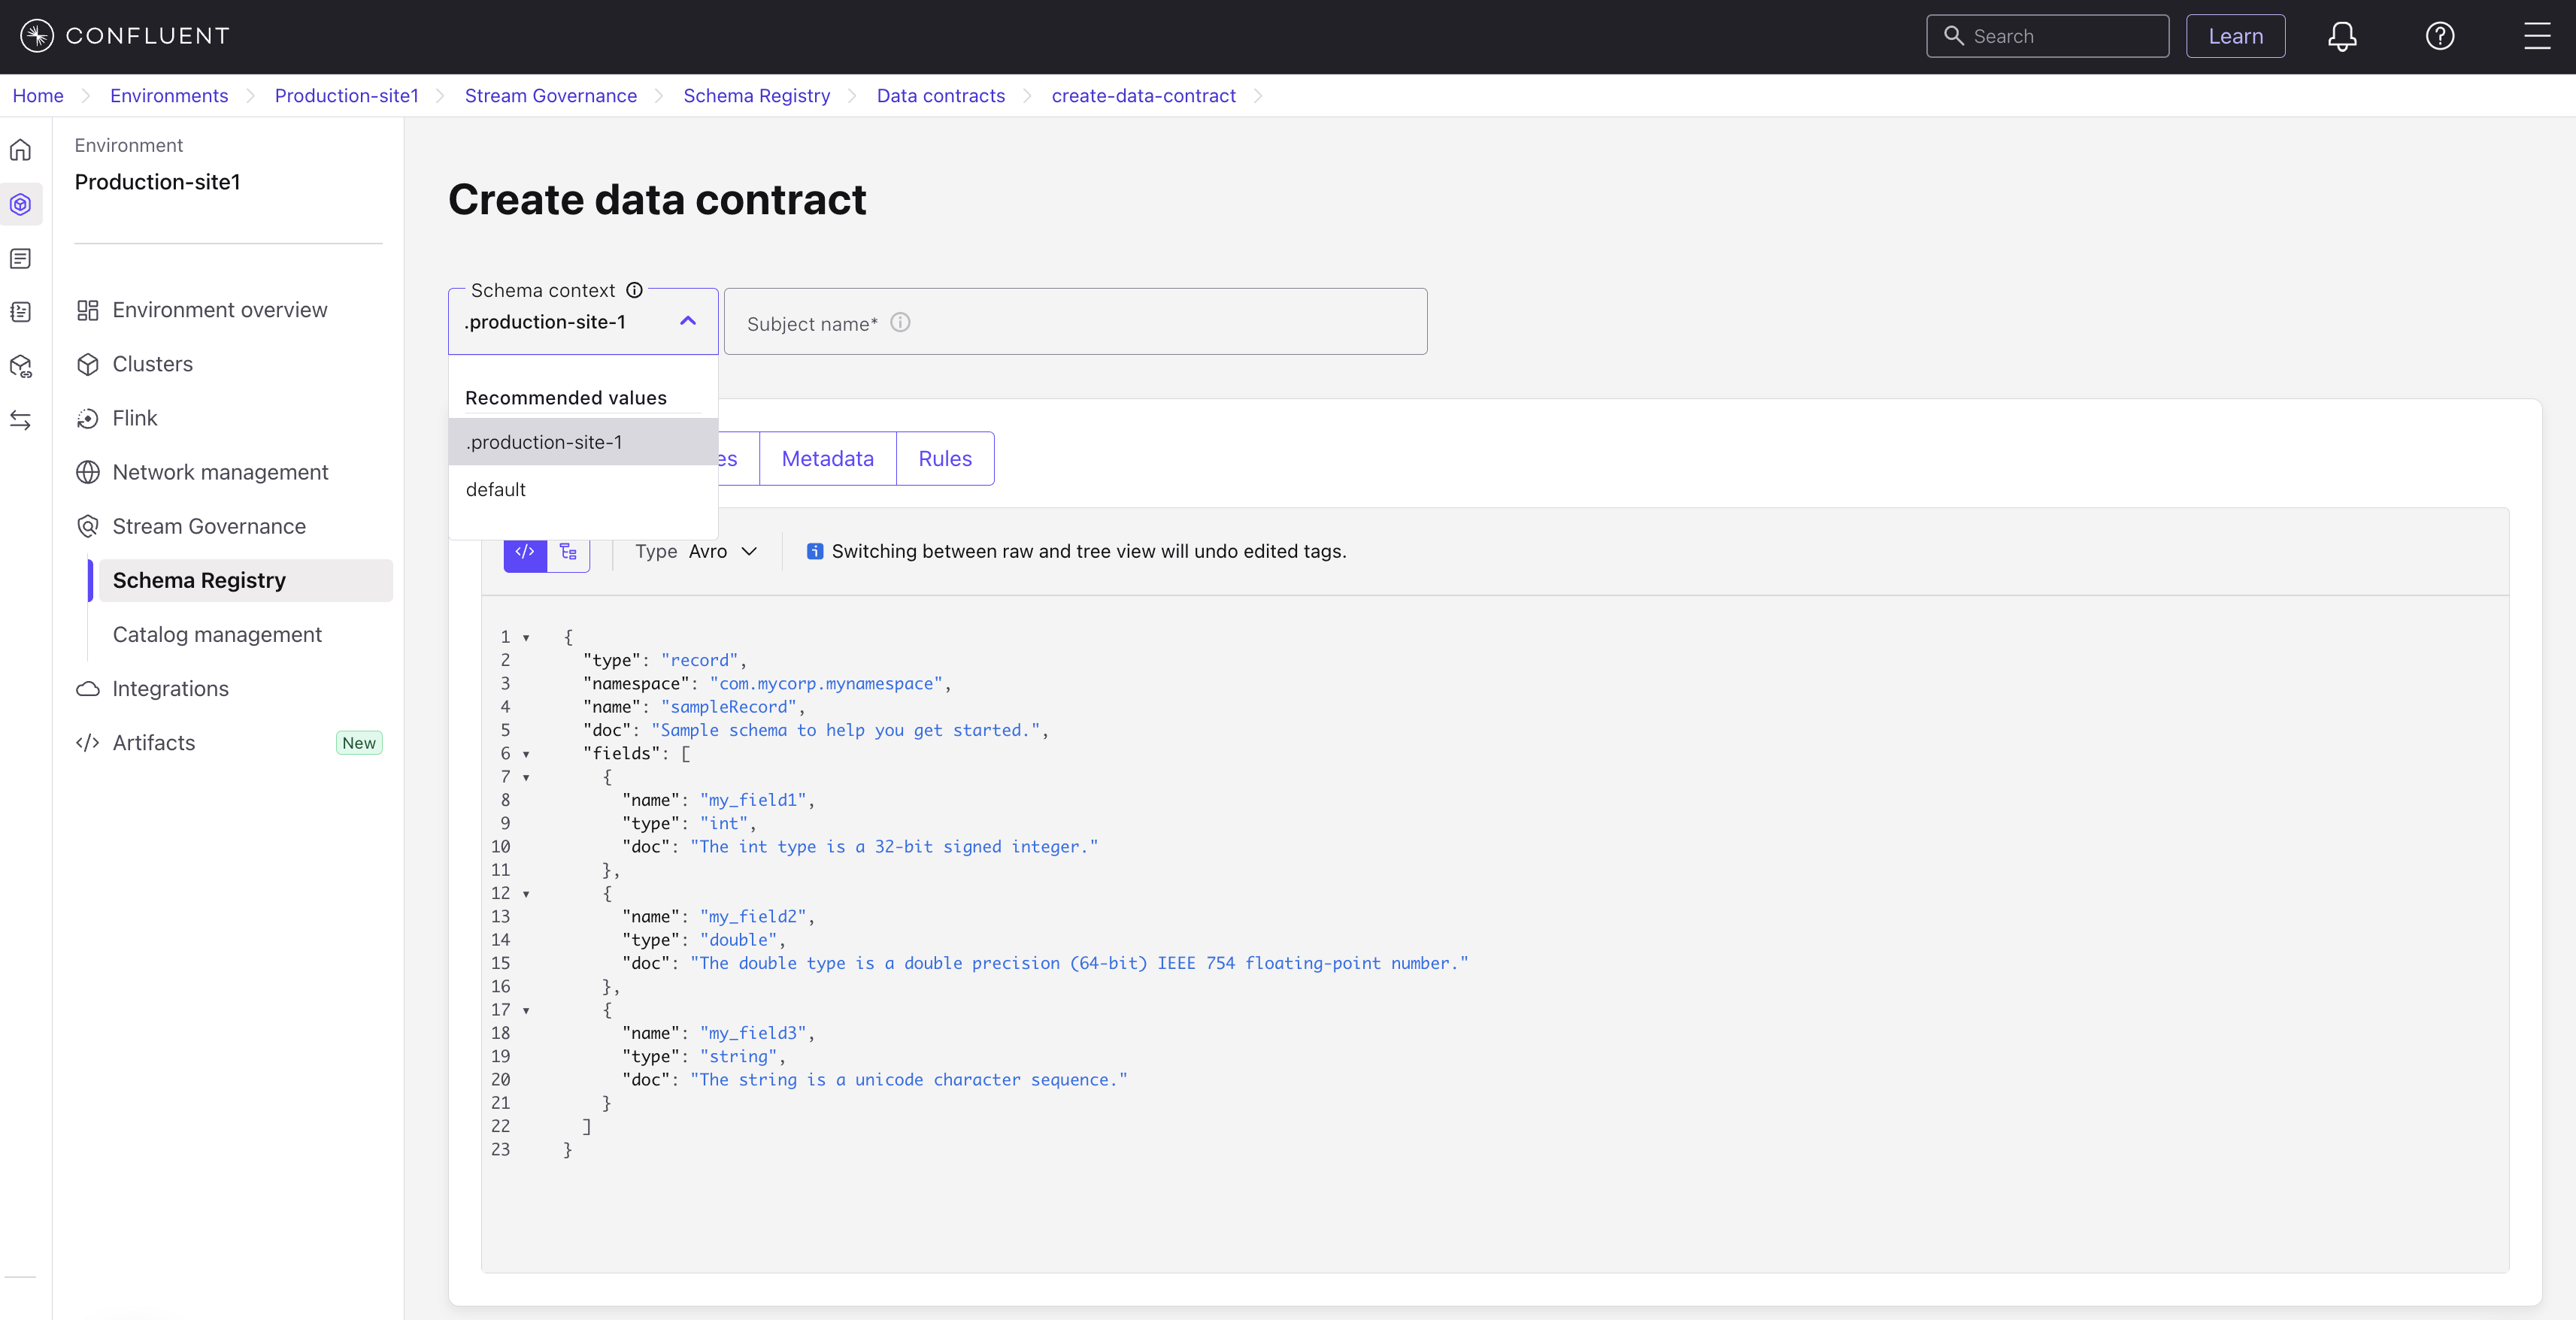
A schema context is a grouping of subject names and schema IDs, and can be used to create any number of separate “sub-registries” within one Schema Registry. Contexts provide more flexibility with regard to subject naming, schema IDs, and how clients can reference schemas.
Specify schema contexts
Schema Registry provides the option to logically group schemas by specifying schema contexts. By default, schemas live in the default context. By providing qualified names for schemas, you group them into what are essentially sub-registries with context-specific paths. This gives you the ability to have multiple schemas with the same subject names and IDs existing as unique entities within their different contexts. There are several advantages to this, including the ability to provide specific contexts for different clients. Schema contexts are used extensively for Schema Linking, but can also be used independently of that feature as needed.
Why use schema contexts?
You can logically group schemas by specifying schema contexts. By default, schemas live in the default context. By providing qualified names for schemas, you can group them into sub-registries with context-specific paths. This gives you the ability to have multiple schemas with the same subject names and IDs existing as unique entities within their different contexts. There are several advantages to this, including the ability to provide specific contexts for different clients. Schema contexts are typically used in Schema Linking, where they provide mechanisms and flexibility for sharing schemas across registries.
Default context
Any schema ID or subject name without an explicit context lives in the default context, which is represented as a single dot ..
There is no “global” compatibility across all contexts, only per context. To learn more, see Schema Evolution and Compatibility for Schema Registry on Confluent Cloud.
All APIs that specify an unqualified subject operate in the default context. Besides passing a qualified subject wherever a subject name is expected, a second way to pass the context is by using a base context path. A base context path takes the form /contexts/{context} and can be prepended to any existing Schema Registry path. Therefore, to look up a schema ID in a specific context, you could also use the URL /contexts/.mycontext/schemas/ids/{id}.
A base context path can also be used to operate with the default context. In this case, the base context path takes the form “/contexts/:.:/”. For example, /contexts/:.:/schemas/ids/{id}. A single dot cannot be used because it is omitted by some URL parsers.
Here is an example using curl:
curl -u <user>:<pass> \
-X POST -H "Content-Type: application/json" \
--url "https://psrc-gn6wr.us-east-2.aws.confluent.cloud/contexts/.TestContext/subjects/aContext2-value/versions" \
--data '{"schemaType": "AVRO", "schema":"{\"type\":\"record\",\"name\":\"test\",\"fields\":[{\"name\":\"field1\",\"type\":\"string\"},{\"name\":\"field2\",\"type\":\"int\"}]}"}'
To learn more about schema contexts, see Contexts within Schema Linking. Also, the Schema Linking Quick Start includes examples of working with both subjects in the default context (unqualified subjects) and named contexts (qualified subjects).
Filter schema subjects by context
When using contexts, you can:
Filter subjects by context on the list page.
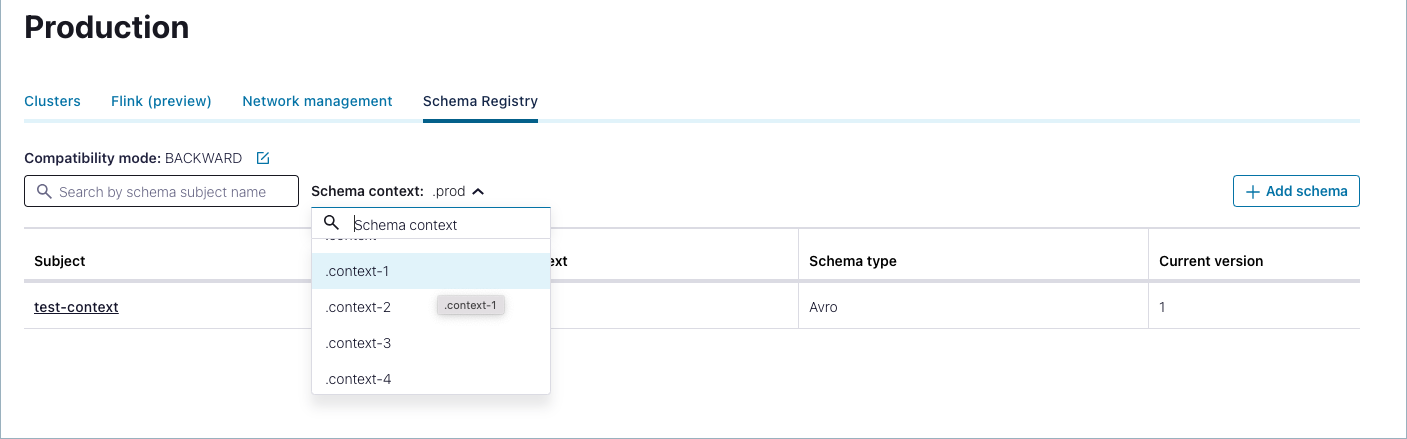
Create a new subject under an existing or new context.
Browse messages for a subject under a specific context.

Download a schema from Confluent Cloud
From the navigation menu, click Topics, then click a topic to select it.
Click the Data contracts tab.
Select the Key or Value option for the schema.
Click the ellipses (3 dots) on the upper right to get the menu, then select Download.

A schema JSON file for the topic is downloaded into your Downloads directory.
For example, if you download the version 1 schema for the employees topic from the Quick Start, you get a file called
schema-employees-value-v1.avscwith the following contents.{ "fields": [ { "name": "Name", "type": "string" }, { "name": "Age", "type": "int" } ], "name": "Employee", "namespace": "Example", "type": "record" }
Tip
The file extension indicates the schema format. For Avro schema the file extension is .avsc; for Protobuf schema, .proto; and for JSON Schema, .json.
Delete a schema from Confluent Cloud
From the navigation menu, click Topics, then click a topic to select it.
Click the Data contracts tab.
Select the Key or Value option for the schema.
Click the ellipses (3 dots) on the upper right to get the menu, then select Delete.

On the dialog, select whether to delete only a particular version of the schema or the entire subject (all versions).
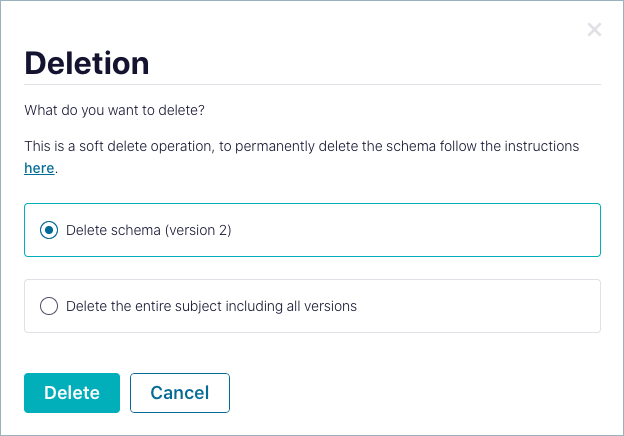
Select Delete to carry out the action.
To learn more about shard and soft deletes of schemas, schema limits, and how to free up space for more schemas, see Delete Schemas and Manage Storage Space on Confluent Cloud.
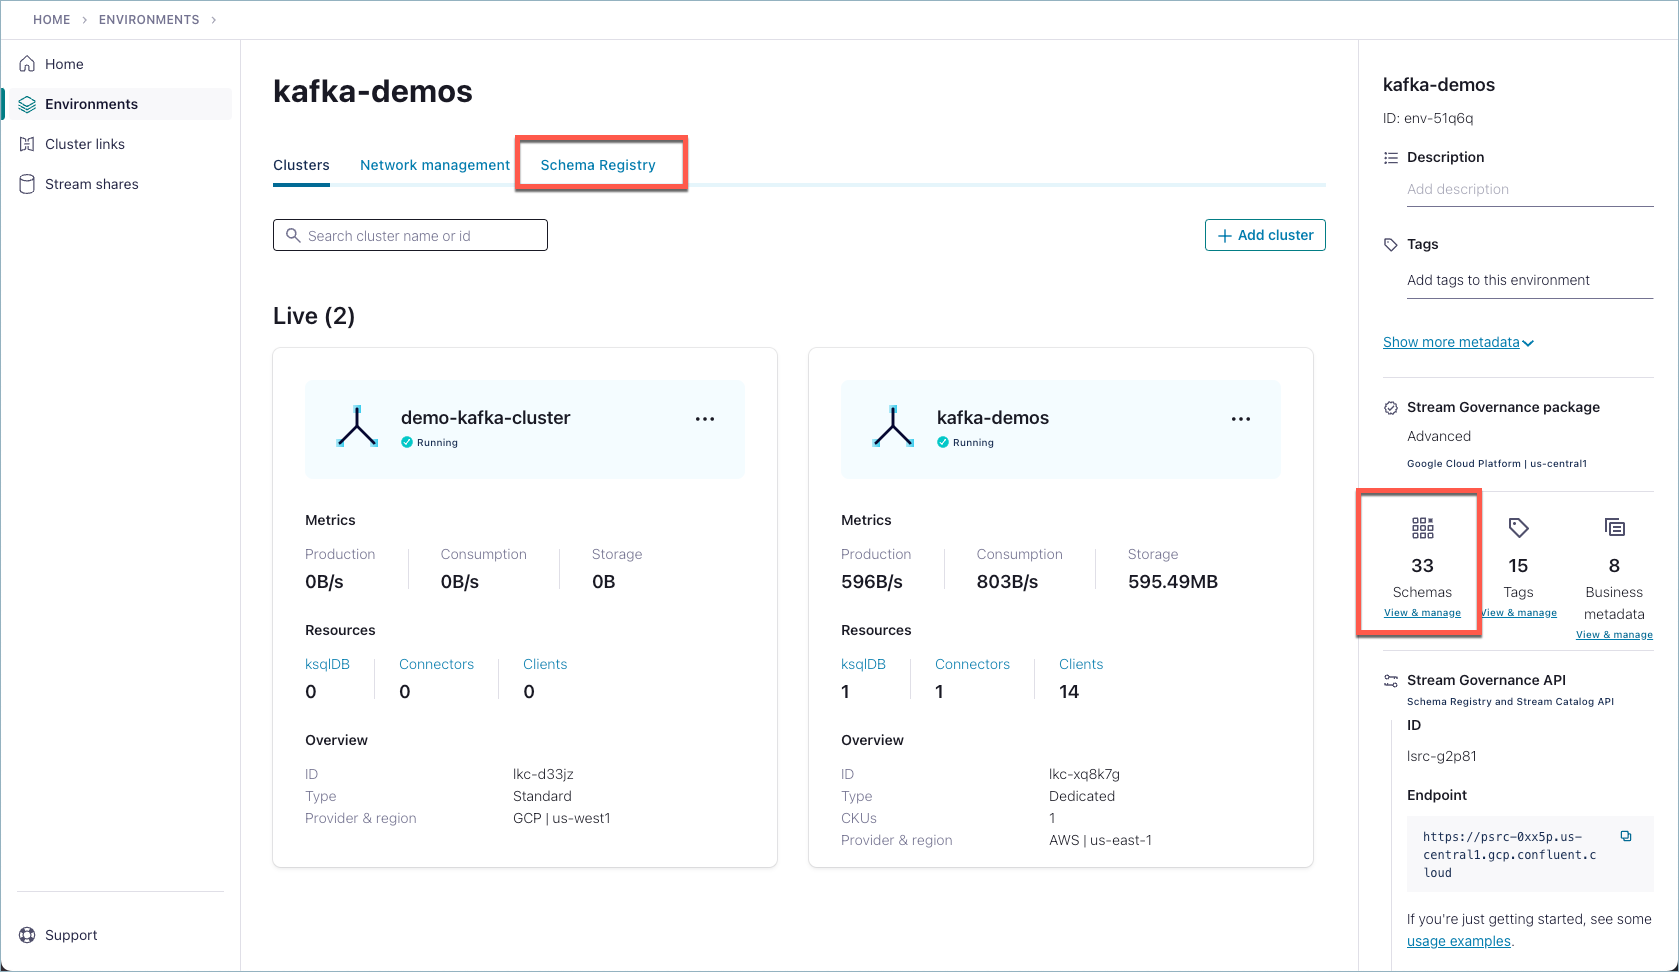
Manage schemas for a Confluent Cloud environment
Schema Registry itself sits at the environment level and serves all clusters in an environment, therefore several tasks related to schemas are managed through the registry at this level.
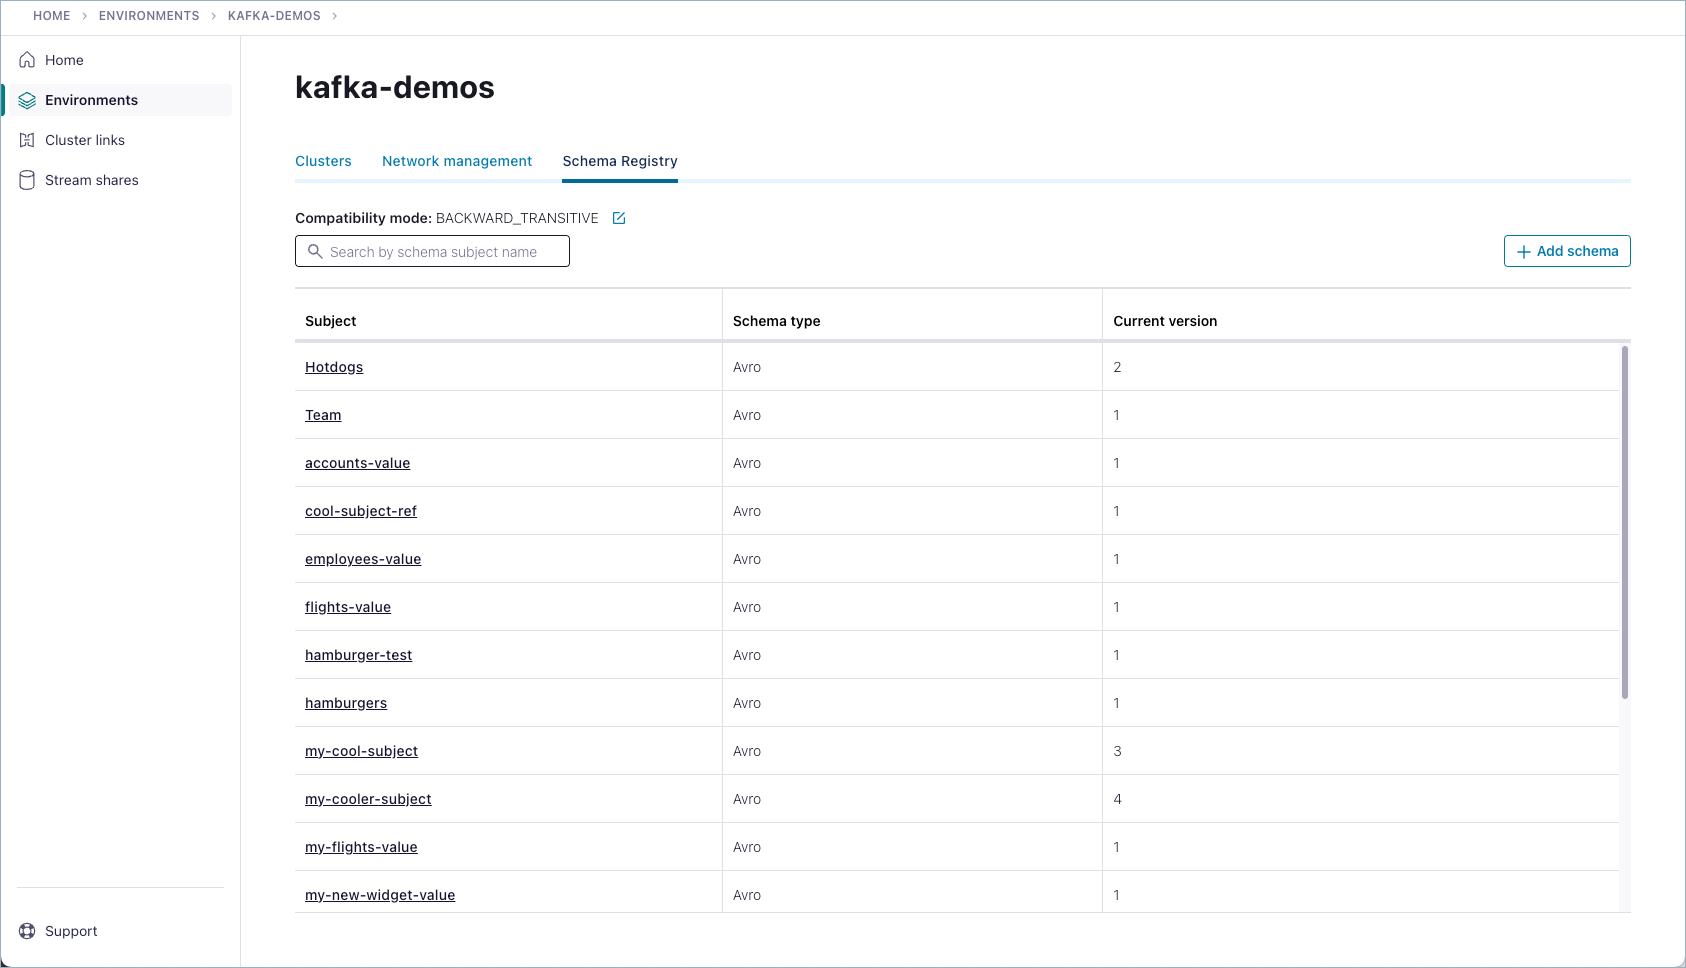
To view and manage Schema Registry for a Confluent Cloud environment:
Select an environment from the Home page. (An environment list is available from the top right menu.)
Click the Schema Registry tab.
See Add a cloud environment and Manage Stream Governance Packages in Confluent Cloud to learn about Stream Governance package options.
See Configure and manage schemas for an environment to learn how to:
Access control (RBAC) for Confluent Cloud Schema Registry
Role-Based Access Control (RBAC) enables administrators to set up and manage user access to Schema Registry subjects and topics. This allows for multiple users to collaborate on with different access levels to various resources.
The following table describes how RBAC roles map to Schema Registry resources. For details on how to manage RBAC for these resources, see List the role bindings for a principal, Predefined RBAC Roles in Confluent Cloud, and List the role bindings for a principal. For more schema related RBAC information, see also Access control (RBAC) for Stream Lineage and Role-Based Access Control (RBAC) for Schema Linking.
Role | Scope | Read subject | Write subject | Delete subject | Read subject compatibility | Write subject compatibility | Grant permissions |
|---|---|---|---|---|---|---|---|
Organization | ✔ | ✔ | ✔ | ✔ | ✔ | ✔ | |
Environment | ✔ | ✔ | ✔ | ✔ | ✔ | ✔ | |
Cluster | |||||||
Organization, Environment, Cluster | |||||||
Organization, Environment, Cluster | |||||||
Schema Subject | ✔ | ✔ | ✔ | ✔ | ✔ | ✔ | |
Schema Subject | ✔ | ✔ | |||||
Schema Subject | ✔ | ✔ | |||||
Schema Subject | ✔ | ✔ | ✔ | ||||
Organization, Environment | ✔ | ✔ | |||||
Organization, Environment | ✔ | ✔ | ✔ | ✔ | ✔ |
Table Legend:
✔ = Yes
Blank space = No
Tip
“Global compatibility” does not apply to roles. To grant permission to a user to manage global compatibility, grant the
DeveloperManagerole on a subject resource named__GLOBAL.When RBAC was first made available for Confluent Cloud Schema Registry (December 2022), ResourceOwner privileges on Schema Registry were automatically granted to all user and service accounts with existing API keys for Schema Registry clusters or existing CloudClusterAdmin privileges on any cluster in the same environment as Schema Registry. This auto-grant of privileges to existing accounts was exclusive to the feature rollout. For all new user and service accounts, you must explicitly configure access, per the details in the table above.
Supported features and limits for Confluent Cloud Schema Registry
A single Schema Registry is available per Environment.
Access Control to Schema Registry is based on API key and secret.
Your VPC must be able to communicate with the Confluent Cloud Schema Registry public internet endpoint. For more information, see Use Confluent Cloud Schema Registry to Connect to a Public Endpoint in a Private Networking Environment.
Available on Amazon Web Services (AWS), Azure (Microsoft Azure), and Google Cloud for cloud provider geographies located in the US, Europe, and APAC. For each cloud provider, geographies are mapped under the hood to specific regions, as described in Add a cloud environment.
High availability (HA) is achieved by having multiple nodes within a cluster always in running state, with each node running in a different availability zone (AZ).
Maximum number of characters allowed for tag and business metadata definition names. Tag and business metadata definition names must be no more than 8192 characters each. To learn more, see Tag entities, data, and schemas.
Maximum number of tag definitions allowed per environment. A maximum of 1000 tag definitions (
TagDef) is allowed per environment. To learn more, see Tag entities, data, and schemas.A size limit of 1MB is imposed on individual schemas in Confluent Cloud. Schemas larger than 1MB are not supported on Confluent Cloud. To solve for this, you can use schema references to distribute fields and data specifications across multiple schemas that would otherwise hit this limit.
Confluent Cloud Schema Registry limits the number of schema versions supported in the registry for Basic, Standard, and Dedicated cluster types, as described in Kafka Cluster Types in Confluent Cloud. You can view per-package limits on schemas as described in Manage Stream Governance Packages in Confluent Cloud. You can free up space by identifying and deleting unused schemas.
Rate limits on number of API requests is 25 Write requests per second or 75 Read requests across all API keys pointing to a particular LSRC. Requests are identified using an API key that points to a tenant (LSRC). Requests from different API keys from the same tenant are still counted to the same limit for the tenant. So, with many API keys on the same LSRC (Schema Registry logical cluster ID) you still have the same limit of 25 Write requests per second or 75 Read requests mutualized on all keys. To learn more about multi-tenancy on Confluent Cloud, see Multi-Tenancy and Client Quotas on Confluent Cloud. To view the Confluent Cloud metrics for the Schema Registry, see the Metrics API documentation.