

Use Schema Registry in a Hybrid Setup with Confluent Unified Stream Manager
In a hybrid Schema Registry setup with Confluent Unified Stream Manager (USM), Confluent Cloud Schema Registry serves as the primary registry of record and Schema Registry on Confluent Platform acts as a forwarding read replica that synchronizes from Confluent Cloud. This centralizes schema governance in Confluent Cloud while preserving fast, resilient schema reads on Confluent Platform.
How the hybrid Schema Registry setup works
The hybrid setup uses a primary or replica pattern. Confluent Cloud Schema Registry acts as the central, authoritative source of truth for all schemas. Your Confluent Platform acts as high-performance replicas that provide fast, local access while staying synchronized with Confluent Cloud.
When you write a new schema, the request goes to your Confluent Platform Schema Registry. Configured in
FORWARD mode, this Schema Registry does not register the schema itself but instead
redirects the write request to Confluent Cloud Schema Registry. Confluent Cloud Schema Registry then acts as the primary
registry for validation and registration. The new schema ID is returned to your
application. This process ensures Confluent Cloud centrally governs all schemas.
When you read an existing schema, your local Confluent Platform Schema Registry handles the request directly and efficiently. It serves the schema from its local cache, which provides the speed and resilience of Confluent Platform deployment without needing to contact Confluent Cloud for every read.
To keep the registries synchronized, the schema importer on your Confluent Platform pulls schemas from primary Confluent Cloud Schema Registry. This ensures your local cache is always current and has the latest versions available for your Confluent Platform applications.
Key principles of the hybrid setup
The hybrid setup relies on the following key principles:
Confluent Cloud as primary: When you configure a hybrid setup, the Confluent Cloud Schema Registry serves as the primary registry and can serve read and write requests independently. Existing Schema Registry on Confluent Platform become read-only replicas. Any write requests they receive are transparently forwarded to Confluent Cloud, ensuring no changes or downtime for client applications.
Seamless and secure integration: The Schema Registry on Confluent Platform securely connects to the Confluent Cloud Schema Registry over private network connections. This private networking ensures that all communication is isolated and secure.
Schema synchronization and contexts: To prevent schema ID collisions and manage different schema sets, USM uses schema contexts. This helps you flexibly manage and synchronize schemas across different domains. You can use contexts to create an exact replica of your entire Confluent Platform Schema Registry or to synchronize specific sets of schemas from multiple environments without conflicts.
Non-disruptive client experience: Your applications continue to communicate with the Schema Registry endpoint on Confluent Platform without any required changes. The forwarding and migration logic remain transparent to your clients.
Governance features in the hybrid setup
The hybrid setup provides the following governance features:
Unified metadata management: You can view and manage all schemas from a single interface in the Confluent Cloud UI, where you can apply tags, descriptions, and owners.
Role-based access and audit logs: Each environment maintains its audit logs independently in Confluent Platform and Confluent Cloud, providing transparency and compliance guarantees for all schema actions.
Important
RBAC and ACLs are not synchronized between environments. Permissions are checked in the environment where the request is processed. For a schema read, your Schema Registry on Confluent Platform handles the request and validates only Confluent Platform permissions.
For a schema write, you first send the request to your Schema Registry on Confluent Platform, which forwards it to Confluent Cloud Schema Registry. Each layer then checks its own permissions: first Confluent Platform, then Confluent Cloud.
You must manage permissions separately for the Confluent Platform and Confluent Cloud environment. A user with access in one environment does not automatically get access in the other.
Bidirectional schema deletion: The deletion process is transparent across your environments.
If an administrator deletes a schema from a Confluent Platform cluster, the Confluent Platform cluster forwards the delete request to Confluent Cloud Schema Registry. The cloud audit log records the action as performed by the service account on behalf of the Confluent Platform administrator.
If an administrator deletes a schema directly in Confluent Cloud, Confluent Cloud propagates the deletion to all connected Confluent Platform clusters during their next sync. The Confluent Platform audit log records the action as being performed by the service account on behalf of the Confluent Cloud administrator.
Disaster recovery support
The hybrid setup supports disaster recovery in the following ways:
Multiple replicas: In a disaster recovery architecture, you can configure secondary Schema Registry on Confluent Platform as read-only replicas. In case of service interruption, your clients can fail over to these replicas for continued schema availability.
Failover flexibility: If Confluent Cloud Schema Registry is unavailable, you can switch Confluent Platform Schema Registry to read-write mode. To keep schemas synchronized after the switch, you must also reconfigure exporters.
For details on managing disaster recovery, see Disaster recovery scenarios.
Configuration prerequisites
Before you configure the hybrid setup, ensure the following:
Your Confluent Cloud organization has the Advanced Governance package.
You have registered at least one Confluent Platform cluster with Confluent Cloud so it is visible in the Confluent Cloud UI.
Your Schema Registry on Confluent Platform has its mode set to
READWRITEat the global (:__GLOBAL:) context. Ensure no mode overrides exist at the subject or custom context level. You can remove any specific overrides by using theDELETEmode API against all relevant subjects and custom contexts.You have the necessary credentials and endpoints for both your Confluent Platform and Confluent Cloud Schema Registry instances. You can obtain the private endpoints by logging into Confluent Cloud Console and navigating to Environment > Schema Registry > Endpoints. You must use the Schema Registry private endpoints that end with
private.confluent.cloud. Confluent Cloud network endpoints are not valid for this configuration.You have created an API key that uses a service account assigned the
DataStewardrole. This ensures the service account has the permissions that it needs to manage schemas and enforce governance policies across both Confluent Platform and Confluent Cloud environments. For instructions, see Add an API key.If the target Confluent Cloud environment already contains existing schemas, run the schema-compatibility-check script before exporting schemas from Confluent Platform to Confluent Cloud. This script verifies that the schemas in both environments are compatible.
Note
This export process is only recommended when your Confluent Cloud and Confluent Platform environments are replicas, or when your Confluent Cloud environment is a direct subset of your Confluent Platform environment.
Enable USM on Confluent Platform Schema Registry
Before you configure the exporter or importer, you must enable USM on
your Confluent Platform Schema Registry by adding the following properties to the Schema Registry
schema-registry.properties file. These properties register the USM
extension and provide the Confluent Cloud Schema Registry endpoint and credentials that the Confluent Platform
Schema Registry uses to forward write requests and pull schema updates.
resource.extension.class=io.confluent.schema.registry.usm.UsmSchemaRegistryExtension
usm.schema.registry.remote.endpoint=<CCLOUD_SCHEMA_REGISTRY_ENDPOINT>
usm.schema.registry.remote.api.key=<CCLOUD_API_KEY>
usm.schema.registry.remote.api.secret=<CCLOUD_API_SECRET>
usm.schema.registry.remote.context.prefix=<OPTIONAL_CONTEXT_PREFIX>
Replace the following placeholder values:
<CCLOUD_SCHEMA_REGISTRY_ENDPOINT>: The Confluent Cloud Schema Registry endpoint. You can obtain the private endpoint in the Confluent Cloud Console under Environment > Schema Registry > Endpoints. Specify this endpoint by using theusm.schema.registry.remote.endpointproperty. This property is a required string with a high importance level and no default value.<CCLOUD_API_KEY>and<CCLOUD_API_SECRET>: The API key and secret for a service account with theDataStewardrole. Specify these values by using theusm.schema.registry.remote.api.keyandusm.schema.registry.remote.api.secretproperties. Both properties are required password-type settings with a high importance level and no default value.<OPTIONAL_CONTEXT_PREFIX>: An optional prefix that specifies the Confluent Cloud schema context where schemas from the Confluent Platform cluster are registered in hybrid mode. Use this property to keep schemas from different Confluent Platform clusters in separate contexts. Specify this value by using theusm.schema.registry.remote.context.prefixproperty. This property is a string with a high importance level and no default value.
Note
If the resource.extension.class property is already set to other
extensions, append
io.confluent.schema.registry.usm.UsmSchemaRegistryExtension as a
comma-separated value.
Earlier releases required usm.schema.registry.remote.endpoint to
end with private.confluent.cloud and rejected other private endpoint
formats, such as access-point endpoints. The restriction no longer
applies by default. If you are using an earlier release and the endpoint
validation rejects a valid private endpoint, set
usm.schema.registry.remote.endpoint.validation.enabled to false.
After you update the properties, restart the Schema Registry.
If you deploy Schema Registry using Confluent for Kubernetes or Confluent Ansible, set these properties through your deployment tool’s configuration instead of editing the properties file directly.
Configuration scenarios
You can perform this configuration using Confluent for Kubernetes, Confluent Ansible, or by making calls directly to the Confluent REST API. The subsequent workflows provide separate instructions for each approach.
Choose the scenario that matches your environment.
Scenario 1: Mirror schemas with Confluent Cloud as the primary registry
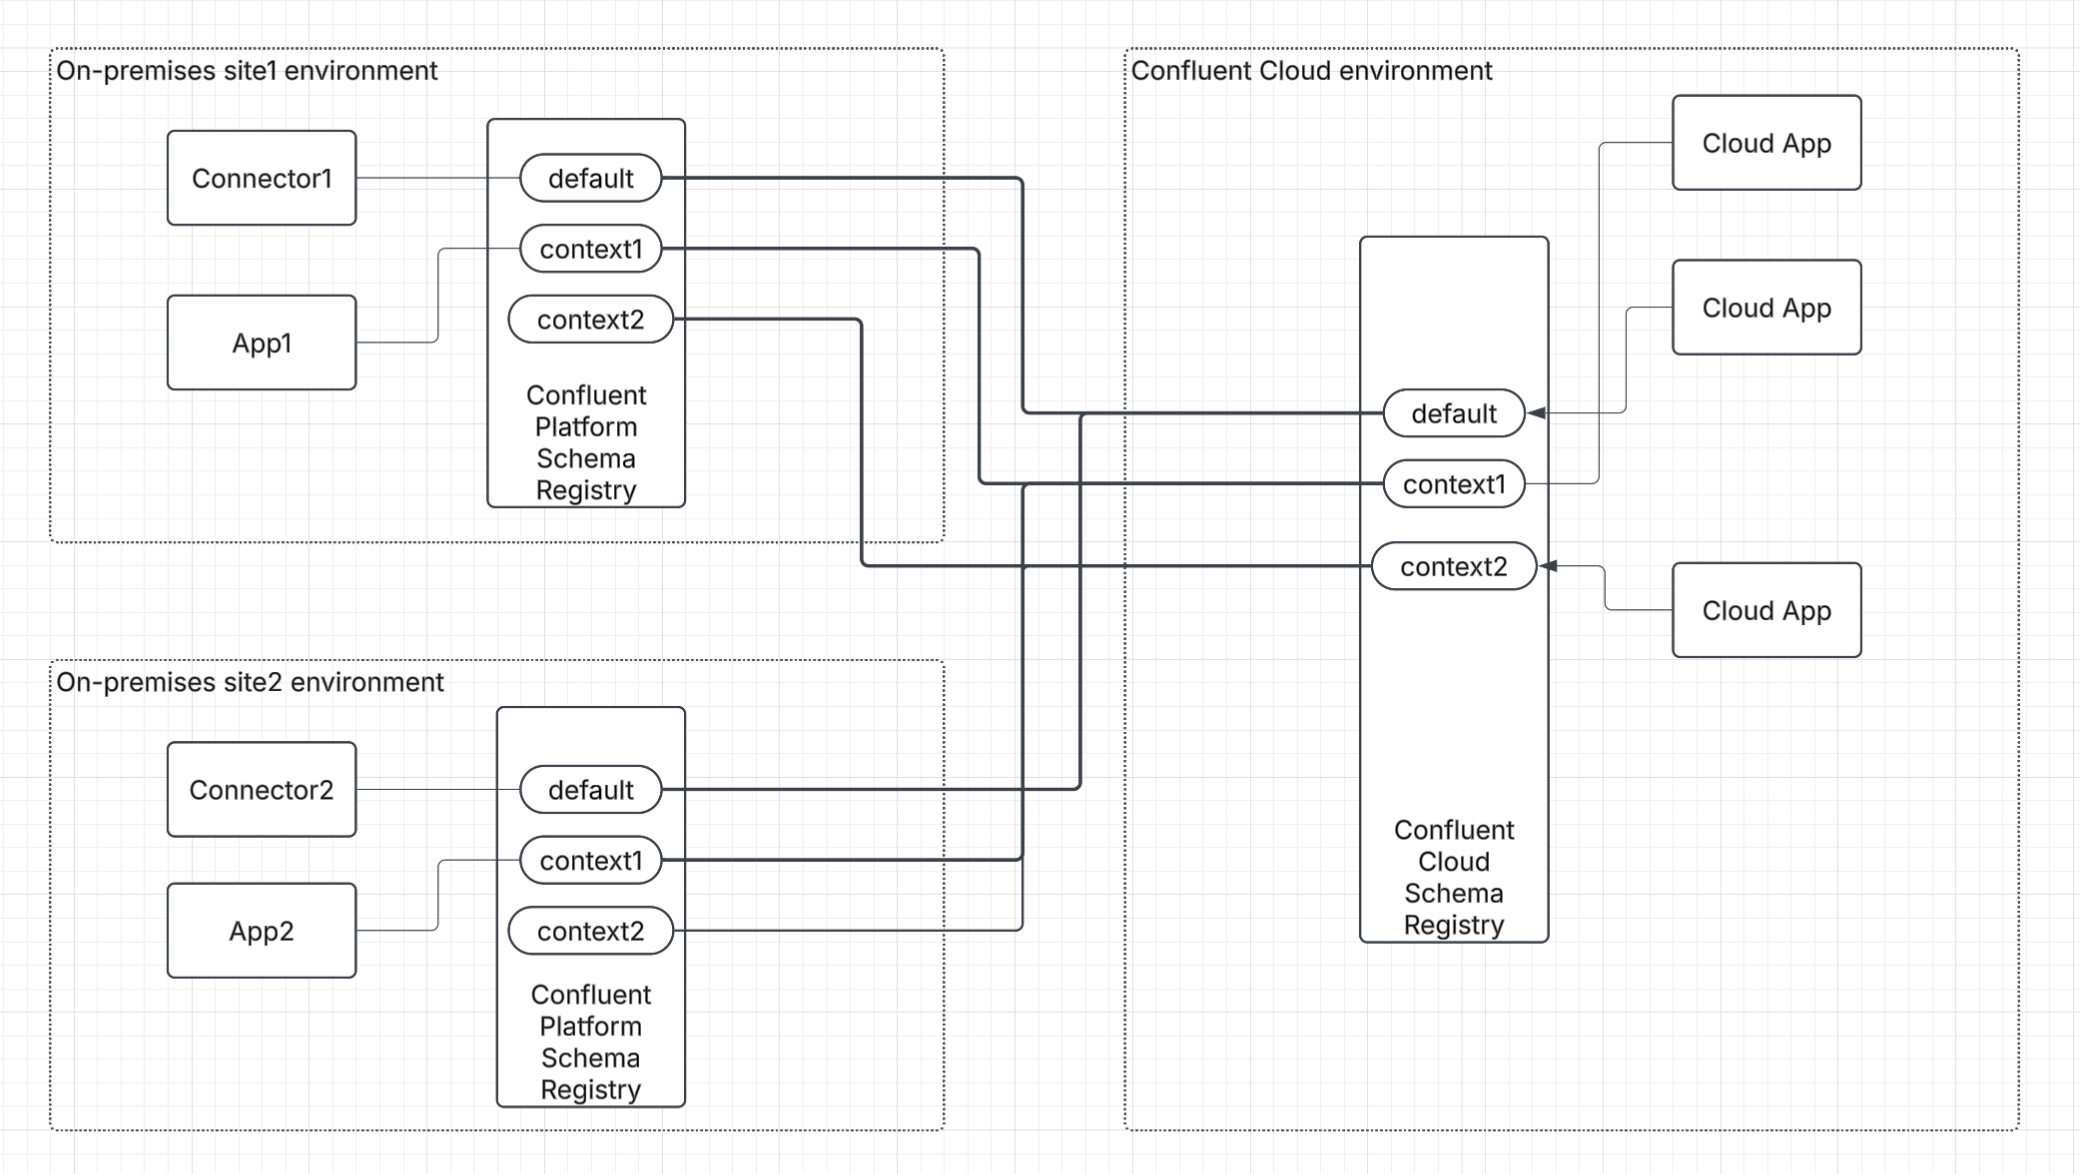
Choose this path to ensure your Schema Registry on Confluent Platform environments have exact replicas of the schemas in your Confluent Cloud Schema Registry. This approach is ideal for maintaining identical schema sets across both environments. To avoid schema ID collisions, ensure the Confluent Cloud Schema Registry either has no schemas to start with or already contains the same set of schemas as your Confluent Platform Schema Registry.
The following diagram illustrates the schema mirroring configuration.
Scenario 2: Use distinct schemas and contexts across platforms
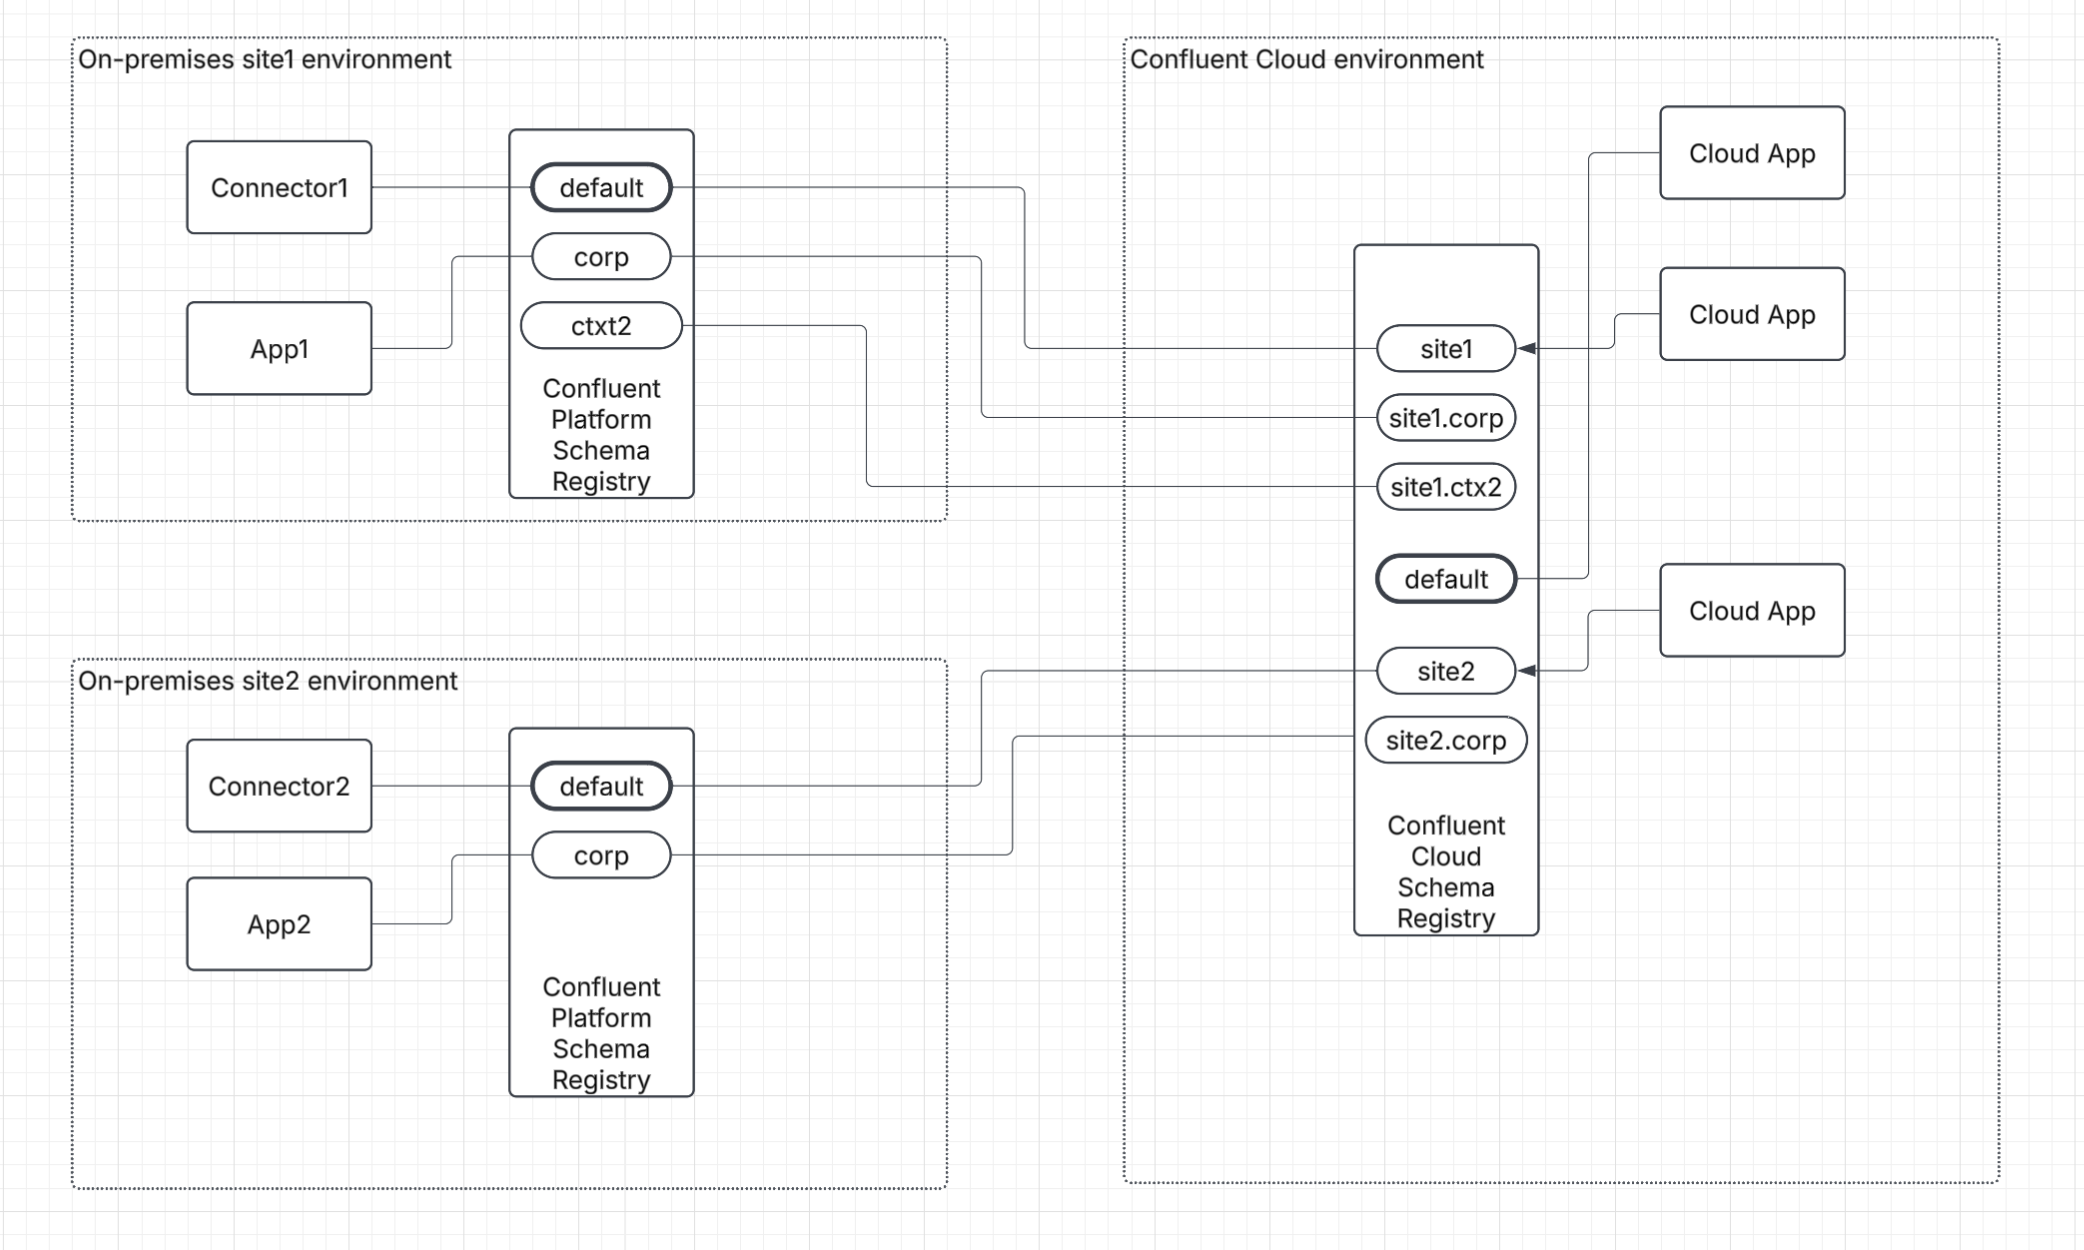
If you have multiple, separate Confluent Platform environments and you want to sync them all to the same Confluent Cloud instance, choose this path. Using a distinct schema context for each Confluent Platform environment prevents schema ID collisions and is ideal for centralizing governance across a multi-cluster estate.
The following diagram illustrates using distinct contexts to sync multiple Schema Registry instances to Confluent Cloud.
Workflow for scenario 1: mirror schemas
To make your Schema Registry on Confluent Platform an identical replica of Confluent Cloud Schema Registry, choose a method below and follow the instructions.
You can automate the schema switchover process by declaratively managing the configuration in your Confluent for Kubernetes or Confluent Ansible. This approach simplifies the setup and ensures consistency across your environments.
For configuration specifications and instructions, see the documentation for your tool:
Confluent for Kubernetes: Confluent for Kubernetes Schema Registry Switchover.
Confluent Ansible: Ansible Playbooks for Confluent Platform Schema Registry.
Initiate schema copy. Configure and run a schema exporter on your Confluent Platform Schema Registry to perform a one-time copy of all existing schemas to Confluent Cloud. For detailed instructions, see Export schemas from Confluent Platform to Confluent Cloud.
Enable forwarding on the Confluent Platform registry. After the copy is complete, set your Confluent Platform Schema Registry to
FORWARDmode for the__GLOBALcontext. This ensures that all new write requests are automatically sent to Confluent Cloud Schema Registry.curl --request PUT \ -H "Content-Type: application/vnd.schemaregistry.v1+json" \ --data '{"mode": "FORWARD"}' \ <CP_SCHEMA_REGISTRY_HOST>/mode/:.__GLOBAL:
Enable writes on the Confluent Cloud registry. Change the Confluent Cloud Schema Registry to
READWRITEmode. You must do this for both the global configuration and for each subject that was migrated from Schema Registry on Confluent Platform.Set the global mode to
READWRITE:curl --request PUT \ -u <CCLOUD_API_KEY>:<CCLOUD_API_SECRET> \ -H "Content-Type: application/vnd.schemaregistry.v1+json" \ --data '{"mode": "READWRITE"}' \ <CCLOUD_SCHEMA_REGISTRY_HOST>/mode
For each migrated subject, send a
PUTrequest to update its mode. For example, for a subject namedmy-subject:curl --request PUT \ -u <CCLOUD_API_KEY>:<CCLOUD_API_SECRET> \ -H "Content-Type: application/vnd.schemaregistry.v1+json" \ --data '{"mode": "READWRITE"}' \ <CCLOUD_SCHEMA_REGISTRY_HOST>/mode/my-subject
Enable synchronization to the Confluent Platform registry. Configure a schema importer on your Confluent Platform Schema Registry to continuously pull the latest schema versions from Confluent Cloud Schema Registry. This ensures your schemas are in sync. For instructions, see Import schemas from Confluent Cloud Schema Registry to Confluent Platform Schema Registry.
Update replica registries. You can now pause or delete the schema exporter from the first step. If you have other Confluent Platform environments, configure importers on their Schema Registry to pull updates directly from Confluent Cloud Schema Registry.
Workflow for scenario 2: use distinct schemas and contexts to avoid conflicts
To manage distinct sets of schemas in separate contexts while centralizing governance, choose a method below and follow the instructions.
You can automate the schema switchover process by declaratively managing the configuration in your Confluent for Kubernetes or Confluent Ansible. This approach simplifies the setup and ensures consistency across your environments.
For configuration specifications and instructions, see the documentation for your tool:
Confluent for Kubernetes: Confluent for Kubernetes Schema Registry Switchover.
Confluent Ansible: Ansible Playbooks for Confluent Platform Schema Registry.
Initiate the context copy. Copy all schemas that match a subject pattern to a specific context in Confluent Cloud by configuring and running an exporter with the appropriate context and subject filters. For instructions, see Export schemas from Confluent Platform to Confluent Cloud.
Enable forwarding for the context. Set your Confluent Platform Schema Registry to
FORWARDmode for the specific context by sending aPUTrequest. For example,.site1.curl --request PUT \ -H "Content-Type: application/vnd.schemaregistry.v1+json" \ --data '{"mode": "FORWARD"}' \ <CP_SCHEMA_REGISTRY_HOST>/mode/:.site1:
Enable writes for Confluent Cloud context. Change the mode to
READWRITEfor the corresponding schema context in Confluent Cloud. You must do this for the context itself and for each subject within that context.Set the context’s mode to
READWRITE:curl --request PUT \ -u <CCLOUD_API_KEY>:<CCLOUD_API_SECRET> \ -H "Content-Type: application/vnd.schemaregistry.v1+json" \ --data '{"mode": "READWRITE"}' \ <CCLOUD_SCHEMA_REGISTRY_HOST>/mode/site1
For each subject within that context, send a
PUTrequest to update its mode. For example, formy-subjectin thesite1context:curl --request PUT \ -u <CCLOUD_API_KEY>:<CCLOUD_API_SECRET> \ -H "Content-Type: application/vnd.schemaregistry.v1+json" \ --data '{"mode": "READWRITE"}' \ <CCLOUD_SCHEMA_REGISTRY_HOST>/mode/site1:my-subject
Enable sync-back for context. Configure a schema importer on your Confluent Platform Schema Registry to pull schema updates from the specific cloud context. To sync all schemas from the
site1context, setcontextNametosite1. For detailed instructions, see Import schemas from Confluent Cloud Schema Registry to Confluent Platform Schema Registry.
Important
If the Confluent Platform instance has subjects in a context other than the default, configure a separate schema exporter and importer for each context and sub-context to synchronize the entire hierarchy. When using schema contexts, use the same context on the destination Confluent Platform Schema Registry for each Confluent Platform Schema Registry being configured.
Configure synchronization with the Confluent REST API
The following end-to-end workflow migrates schemas from a source Confluent Platform Schema Registry to a destination Confluent Cloud Schema Registry using Confluent REST API calls.
Export schemas from Confluent Platform to Confluent Cloud
An exporter on the source Confluent Platform Schema Registry connects to and pushes schemas to the destination Confluent Cloud Schema Registry. Use this procedure for the initial one-time copy of schemas to Confluent Cloud Schema Registry.
Create the exporter configuration
The exporter reads local schemas from your source registry and writes them to the destination registry. The configuration requires the destination registry’s endpoint and API credentials.
schema.registry.url=https://<DESTINATION_SCHEMA_REGISTRY_ENDPOINT>
basic.auth.credentials.source=USER_INFO
basic.auth.user.info=<DEST_API_KEY>:<DEST_API_SECRET>
Replace the placeholder values with your destination registry’s actual endpoint and API credentials.
Create the exporter
Send a POST request to the source Schema Registry {{srEndpoint}} to create the
exporter. The configuration differs depending on your goal.
Scenario 1: mirror all schemas
To create an exact mirror of your Schema Registry on Confluent Platform without using contexts, set
contextType to NONE. This is ideal for a full, one-to-one
synchronization.
Request
curl --request POST \
-u <API_KEY>:<API_SECRET> \
-H "Content-Type: application/vnd.schemaregistry.v1+json" \
'{
"name": "usm-exporter-mirror",
"contextType": "NONE",
"subjects": [":*:"],
"config": {
"schema.registry.url": "CCLOUD SR ENDPOINT",
"basic.auth.credentials.source": "USER_INFO",
"basic.auth.user.info": "CCLOUD SR APIKEY:SECRET"
}
}'
Response
HTTP/1.1 200 OK
Content-Type: application/vnd.schemaregistry.v1+json
{
"name": "usm-exporter-mirror"
}
Scenario 2: sync schemas into a specific context
To sync Confluent Platform schemas into a named context in Confluent Cloud, for example, site1,
set contextType to CUSTOM and specify the context name.
Request
curl --request POST \
-u <API_KEY>:<API_SECRET> \
-H "Content-Type: application/vnd.schemaregistry.v1+json" \
'{
"name": "usm-exporter-sync",
"contextType": "CUSTOM",
"context": "site1",
"subjects": [":*:"],
"config": {
"schema.registry.url": "CCLOUD SR ENDPOINT",
"basic.auth.credentials.source": "USER_INFO",
"basic.auth.user.info": "CCLOUD SR APIKEY:SECRET"
}
}'
Response
HTTP/1.1 200 OK
Content-Type: application/vnd.schemaregistry.v1+json
{
"name": "usm-exporter-sync"
}
Verify exporter status
To confirm that the exporter is active, send a GET request to check its
status on the Confluent Platform Schema Registry.
Request
GET {{srEndpoint}}/exporters/usm-exporter/status
Response
{
"name": "usm-exporter",
"state": "RUNNING",
"offset": 9,
"ts": 1635890864106
}
A state of RUNNING indicates the exporter is active. The offset shows the
number of records processed.
Verify the schema export
To verify that the schemas were successfully exported, list the subjects on the destination Confluent Cloud Schema Registry.
Request
GET {{cloudSrEndpoint}}/subjects?deleted=true&subjectPrefix=:*:
The output should list the subjects the exporter exported from the source registry.
Pause or delete the exporter
After the initial one-time copy of schemas is complete, you must pause and then delete the exporter. This step prevents it from running continuously before you enable the sync-back importer.
You can pause or delete the exporter using the following commands:
To pause the exporter:
PUT {{srEndpoint}}/exporters/usm-exporter/pause
To delete the exporter:
DELETE {{srEndpoint}}/exporters/usm-exporter
Update registry modes
After the initial schema export is complete and you delete the exporter, you must update the modes for both registries before configuring the importer. This is a critical step that makes the Confluent Cloud registry the primary for writes and configures the Confluent Platform registry to forward new schemas to it.
Step 1: Enable writes in Confluent Cloud
Change your Confluent Cloud Schema Registry mode to READWRITE. This allows it to accept new
schema registrations forwarded from your Confluent Platform environment.
Command
curl --request PUT \
-u <CCLOUD_API_KEY>:<CCLOUD_API_SECRET> \
-H "Content-Type: application/vnd.schemaregistry.v1+json" \
--data '{"mode": "READWRITE"}' \
<CCLOUD_SCHEMA_REGISTRY_HOST>/mode
Step 2: Enable forwarding to Confluent Platform
Set your Confluent Platform Schema Registry to FORWARD mode. This tells the registry to transparently
send any new schema write requests it receives to the primary Confluent Cloud registry.
Command
curl --request PUT \
  -H "Content-Type: application/vnd.schemaregistry.v1+json" \
  --data '{"mode": "FORWARD"}' \
  <CP_SCHEMA_REGISTRY_HOST>/mode/:.__GLOBAL:
After you complete these steps, you are ready to configure the schema importer for continuous synchronization.
Import schemas from Confluent Cloud Schema Registry to Confluent Platform Schema Registry
An importer on the Confluent Platform Schema Registry continuously pulls schema updates from Confluent Cloud Schema Registry, keeping your local registry synchronized with the primary Confluent Cloud Schema Registry.
Create an importer configuration file using the Confluent REST API
The importer pulls schemas from the source registry into the registry where you configured the importer.
Sample importer configuration file
schema.registry.url=https://<CCLOUD_SCHEMA_REGISTRY_ENDPOINT>
basic.auth.credentials.source=USER_INFO
basic.auth.user.info=<CCLOUD_API_KEY>:<CCLOUD_API_SECRET>
Replace the placeholders with your Confluent Cloud Schema Registry endpoint and API credentials.
Create the importer
Send a POST request to your Confluent Platform Schema Registry to create the importer. The importer
uses the credentials in the request body to connect to Confluent Cloud Schema Registry and pull
schemas from it.
Request
curl --request POST \
  -u <CP_API_KEY>:<CP_API_SECRET> \
  -H "Content-Type: application/vnd.schemaregistry.v1+json" \
  --data '{
    "name": "usm-importer",
    "subjects": [":*:"],
    "config": {
      "schema.registry.url": "<CCLOUD_SCHEMA_REGISTRY_ENDPOINT>",
      "basic.auth.credentials.source": "USER_INFO",
      "basic.auth.user.info": "<CCLOUD_API_KEY>:<CCLOUD_API_SECRET>"
    }
  }' \
  <CP_SCHEMA_REGISTRY_HOST>/importers
Response
HTTP/1.1 200 OK
Content-Type: application/vnd.schemaregistry.v1+json

{
"name": "usm-importer"
}
Verify the importer status
Check that the importer is running successfully.
Request
GET {{srEndpoint}}/importers/usm-importer/status
Response
{
  "name": "usm-importer",
  "state": "RUNNING",
  "ts": 0,
  "retriable": false
}
A state of RUNNING indicates that the importer is working correctly.
Verify the schema import
To verify that the schemas were successfully imported, list the subjects on the Confluent Cloud Schema Registry.
Request
GET {{cloudSrEndpoint}}/subjects?deleted=true&subjectPrefix=:*:
The output should list the subjects the importer imported from the source registry.
Pause or delete the importer
Unlike the one-time exporter, the importer must remain RUNNING to
continuously synchronize schema updates from Confluent Cloud Schema Registry back to your Confluent Platform
cluster. Only pause or delete it if you intend to stop the synchronization.
You can pause or delete the importer using the following commands:
To pause the importer:
PUT {{srEndpoint}}/importers/usm-importer/pause
To delete the importer:
DELETE {{srEndpoint}}/importers/usm-importer
Disaster recovery scenarios
Common disaster recovery scenarios for a hybrid Schema Registry deployment include primary and secondary failover, and stretched-cluster configurations.
Disaster recovery scenario: primary or secondary Confluent Platform deployment
If you have one primary Confluent Platform Schema Registry and one or more secondary, read-only Schema Registry instances in different datacenters, use this scenario.
Prepare for disaster recovery
Migrate your primary Confluent Platform Schema Registry to become a replica of the Confluent Cloud Schema Registry by following the steps in Workflow for scenario 1: mirror schemas.
For each secondary read-only Schema Registry, follow these steps:
Stop any existing schema exporter that replicates from your primary Confluent Platform Schema Registry.
Configure the secondary Schema Registry in
FORWARDmode.Configure the secondary Schema Registry’s schema importer to pull updates directly from the primary Confluent Cloud Schema Registry.
Handle a Confluent Platform service interruption
If your Confluent Platform environment is unavailable due to datacenter outage or other reasons, follow these steps:
Update your client applications to connect to a secondary Schema Registry in a different datacenter.
After the primary datacenter recovers, ensure the recovered primary Confluent Platform Schema Registry’s schema importer is fully synchronized with Confluent Cloud.
Switch your client applications back to the primary Confluent Platform Schema Registry.
Handle a Confluent Cloud service interruption
If the Confluent Cloud environment is unavailable, follow these steps:
Switch your primary Confluent Platform Schema Registry from
FORWARDmode toREADWRITEmode.Configure a schema exporter from your newly promoted primary Confluent Platform Schema Registry to your secondary Confluent Platform Schema Registry instances to maintain replication.
When Confluent Cloud becomes available again, revert to the original hybrid configuration to re-establish Confluent Cloud Schema Registry as the primary.
Disaster recovery scenario: stretched cluster across datacenters
In this scenario, you have a single Schema Registry cluster stretched across multiple datacenters. The correct steady-state configuration is to connect Schema Registry instances in both your primary and secondary datacenters to Confluent Cloud during the initial setup.
This proactive setup ensures that if an outage occurs in your primary datacenter, the active instances in the secondary datacenter are already connected. This maintains the hybrid model without requiring manual reconfiguration during a failover.