
Set up Databricks Delta Lake (AWS) Sink Connector for Confluent Platform
To support exactly-once semantics, you must create a separate Amazon S3 bucket where data can be staged before delivery into Databricks Delta Lake. The following steps show how to create a new Databricks workspace and add the S3 staging bucket you need. These steps assume you have working knowledge of Databricks and AWS CloudFormation. For detailed information about Databricks Delta Lake, see the Databricks documentation.
Note
The following steps are derived from information provided in the Databricks documentation.
Step 1: Create the Databricks workspace
Complete the following steps to create the workspace.
Important
Be sure to create the Databricks Delta Lake workspace resources in the same region where your Kafka cluster is running.
Check the box I have data in S3… and click Start Quickstart.
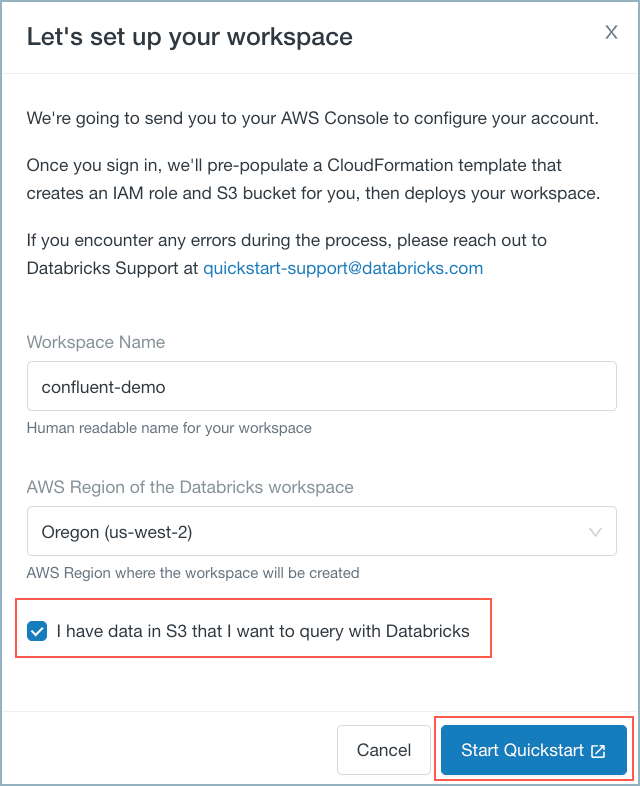
Databricks workspace quickstart
Databricks launches AWS CloudFormation with a pre-populated template.
Complete the Quick create stack web form. Databricks pre-populates most of the required fields. Be sure to enter a Data bucket name. You will use this name when creating the S3 bucket in AWS.
Tip
You do not need to use the pre-populated IAM and S3 root bucket names. However, using these names ensures that no duplicate resources are created.
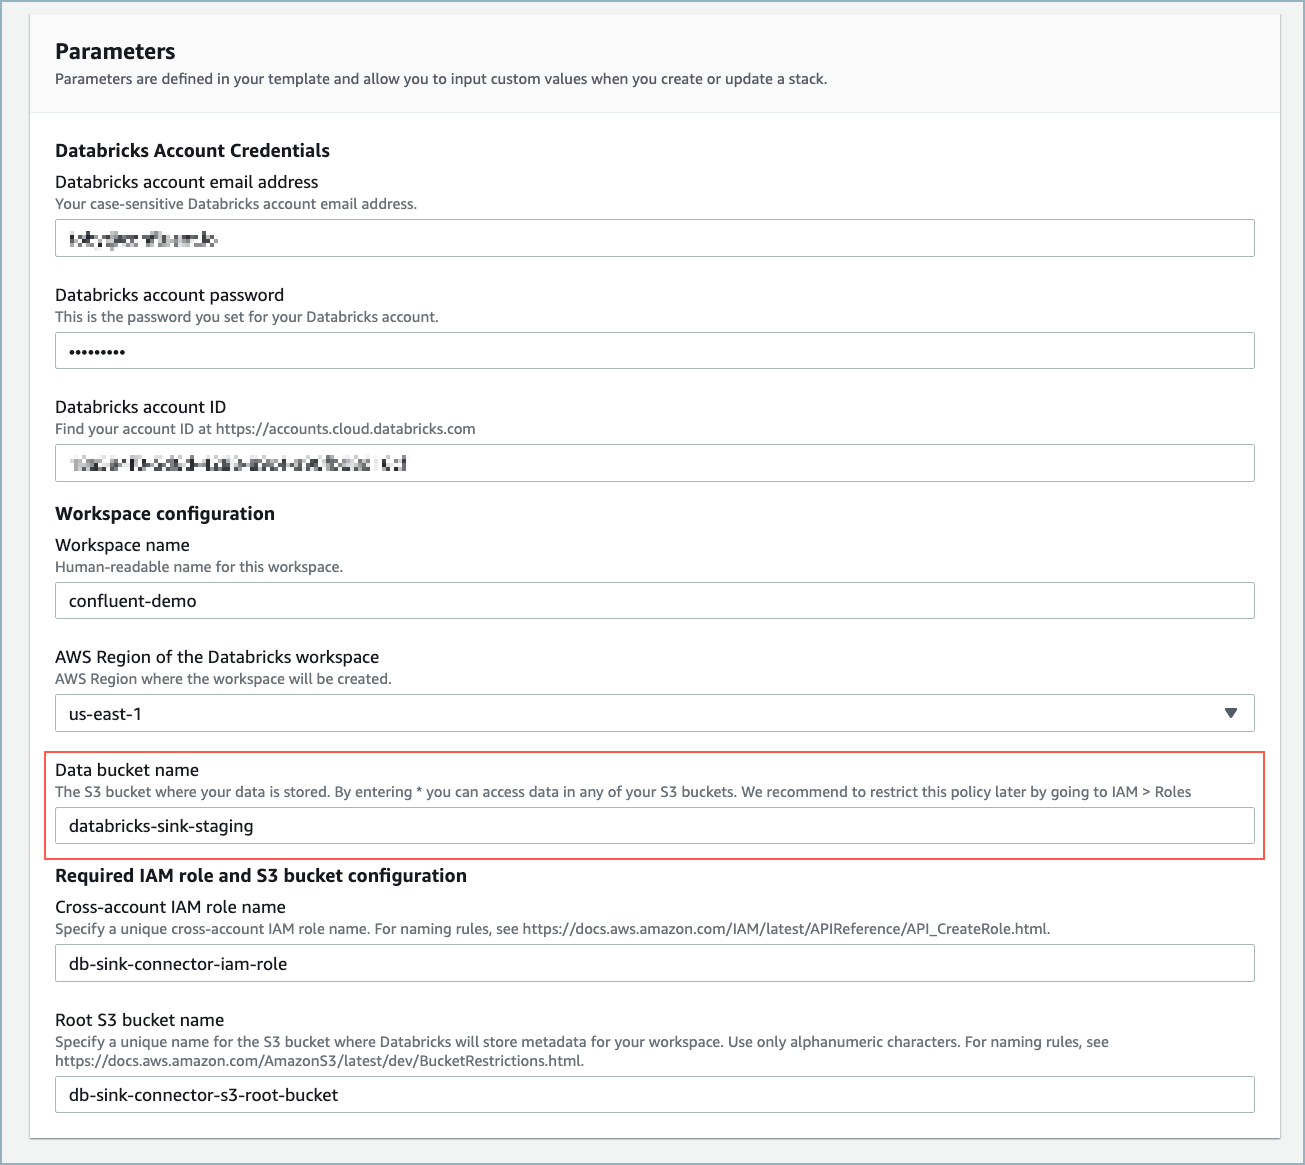
AWS CloudFormation web form
Once the resources are created, the workspace is available on the Databricks console.

Workspace
Tip
The Databricks dialog box does not close automatically. You may need to press Cancel to close it and refresh your browser.
Click Open on the Databricks console.

Open the workspace
Keep the Databricks console open and go to Amazon Web Services.
Step 2: Create the S3 staging bucket and policies
Complete the following steps to create the S3 staging bucket, verify the IAM role in AWS, and create the bucket policy.
Create the S3 staging bucket using the Data bucket name you specified in the previous step. Use the default settings when creating the S3 bucket.
Find the data bucket access IAM role in the AWS IAM dashboard. Look for the role with the naming convention
<workspace-name>-access-data-buckets.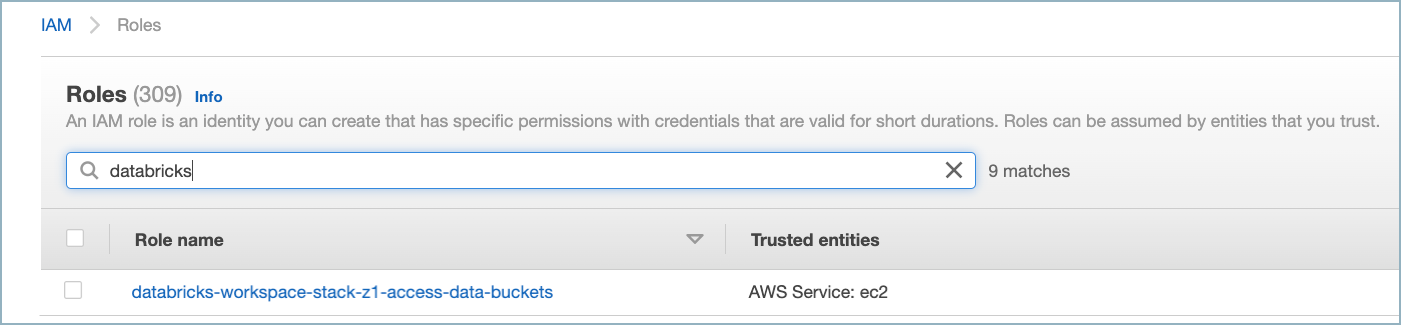
S3 bucket IAM role
Check the policy for the IAM role. It should be similar to the following example:
{
    "Statement": [
        {
            "Action": [
                "s3:ListBucket",
                "s3:PutObject",
                "s3:GetObject",
                "s3:DeleteObject",
                "s3:PutObjectAcl"
            ],
            "Resource": [
                "arn:aws:s3:::<data-bucket-name>/*",
                "arn:aws:s3:::<data-bucket-name>"
            ],
            "Effect": "Allow"
        }
    ]
}
Create a bucket policy for the target data bucket. Add an inline policy using the following JSON.
{
  "Version": "2012-10-17",
  "Statement": [
    {
      "Sid": "Example permissions",
      "Effect": "Allow",
      "Principal": {
        "AWS": "arn:aws:iam::<aws-account-id-databricks>:role/<iam-role-for-data-bucket-access>"
      },
      "Action": [
        "s3:GetBucketLocation",
        "s3:ListBucket"
      ],
      "Resource": "arn:aws:s3:::<data-bucket-name>"
    },
    {
      "Effect": "Allow",
      "Principal": {
        "AWS": "arn:aws:iam::<aws-account-id-databricks>:role/<iam-role-for-data-bucket-access>"
      },
      "Action": [
        "s3:PutObject",
        "s3:GetObject",
        "s3:DeleteObject",
        "s3:PutObjectAcl"
      ],
      "Resource": "arn:aws:s3:::<data-bucket-name>/*"
    }
  ]
}
See the Databricks AWS documentation for additional details.
Step 3: Verify the workspace configuration role policy
Locate the IAM role used to create the Databricks deployment. To locate the role, click on the Databricks workspace name.
Workspace name
Get the Role ARN to verify in the next step.
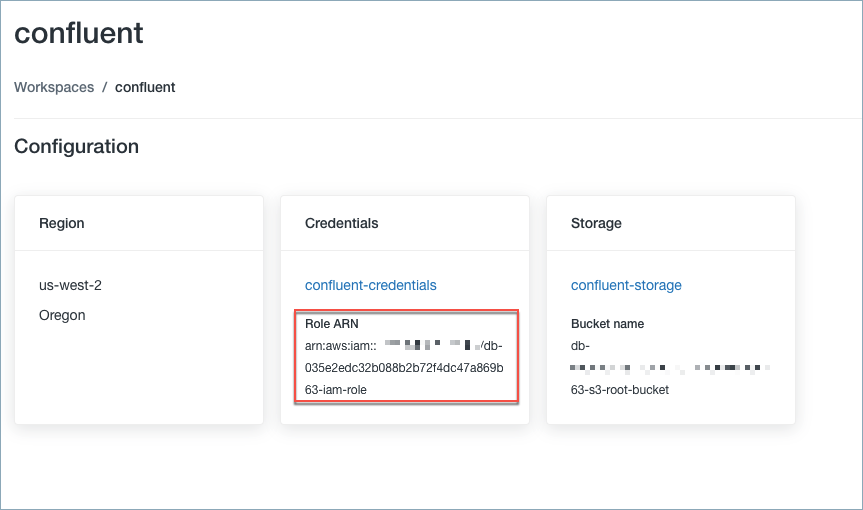
Role ARN
Go to the AWS IAM dashboard and verify that the policy looks similar to the following example.
{
    "Version": "2012-10-17",
    "Statement": [
        {
            "Action": [
                "ec2:AllocateAddress",
                "ec2:AssociateDhcpOptions",
                "ec2:AssociateIamInstanceProfile",
                "ec2:AssociateRouteTable",
                "ec2:AttachInternetGateway",
                "ec2:AttachVolume",
                "ec2:AuthorizeSecurityGroupEgress",
                "ec2:AuthorizeSecurityGroupIngress",
                "ec2:CancelSpotInstanceRequests",
                "ec2:CreateDhcpOptions",
                "ec2:CreateInternetGateway",
                "ec2:CreateKeyPair",
                "ec2:CreateNatGateway",
                "ec2:CreatePlacementGroup",
                "ec2:CreateRoute",
                "ec2:CreateRouteTable",
                "ec2:CreateSecurityGroup",
                "ec2:CreateSubnet",
                "ec2:CreateTags",
                "ec2:CreateVolume",
                "ec2:CreateVpc",
                "ec2:CreateVpcEndpoint",
                "ec2:DeleteDhcpOptions",
                "ec2:DeleteInternetGateway",
                "ec2:DeleteKeyPair",
                "ec2:DeleteNatGateway",
                "ec2:DeletePlacementGroup",
                "ec2:DeleteRoute",
                "ec2:DeleteRouteTable",
                "ec2:DeleteSecurityGroup",
                "ec2:DeleteSubnet",
                "ec2:DeleteTags",
                "ec2:DeleteVolume",
                "ec2:DeleteVpc",
                "ec2:DeleteVpcEndpoints",
                "ec2:DescribeAvailabilityZones",
                "ec2:DescribeIamInstanceProfileAssociations",
                "ec2:DescribeInstanceStatus",
                "ec2:DescribeInstances",
                "ec2:DescribeInternetGateways",
                "ec2:DescribeNatGateways",
                "ec2:DescribePlacementGroups",
                "ec2:DescribePrefixLists",
                "ec2:DescribeReservedInstancesOfferings",
                "ec2:DescribeRouteTables",
                "ec2:DescribeSecurityGroups",
                "ec2:DescribeSpotInstanceRequests",
                "ec2:DescribeSpotPriceHistory",
                "ec2:DescribeSubnets",
                "ec2:DescribeVolumes",
                "ec2:DescribeVpcs",
                "ec2:DetachInternetGateway",
                "ec2:DisassociateIamInstanceProfile",
                "ec2:DisassociateRouteTable",
                "ec2:ModifyVpcAttribute",
                "ec2:ReleaseAddress",
                "ec2:ReplaceIamInstanceProfileAssociation",
                "ec2:ReplaceRoute",
                "ec2:RequestSpotInstances",
                "ec2:RevokeSecurityGroupEgress",
                "ec2:RevokeSecurityGroupIngress",
                "ec2:RunInstances",
                "ec2:TerminateInstances"
            ],
            "Resource": [
                "*"
            ],
            "Effect": "Allow",
            "Sid": "Stmt1403287045000"
        },
        {
            "Action": "iam:PassRole",
            "Resource": "arn:aws:iam::<aws-account-id-databricks>:role/<iam-role-for-s3-access>",
            "Effect": "Allow"
        },
        {
            "Condition": {
                "StringLike": {
                    "iam:AWSServiceName": "spot.amazonaws.com"
                }
            },
            "Action": [
                "iam:CreateServiceLinkedRole",
                "iam:PutRolePolicy"
            ],
            "Resource": [
                "arn:aws:iam::*:role/aws-service-role/spot.amazonaws.com/AWSServiceRoleForEC2Spot"
            ],
            "Effect": "Allow"
        }
    ]
}
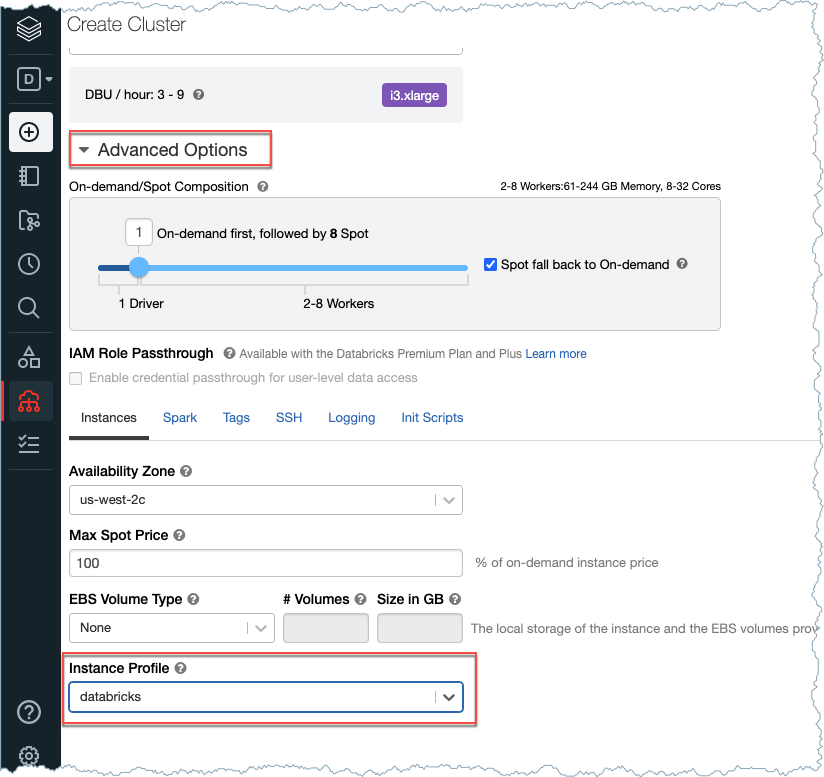
Step 4: Create a cluster and a new user on AWS
Create a cluster in Databricks using the Instance Profile created by AWS CloudFormations. To get the Instance Profile name, go to Settings > Instance Profiles in Databricks.
Create Cluster
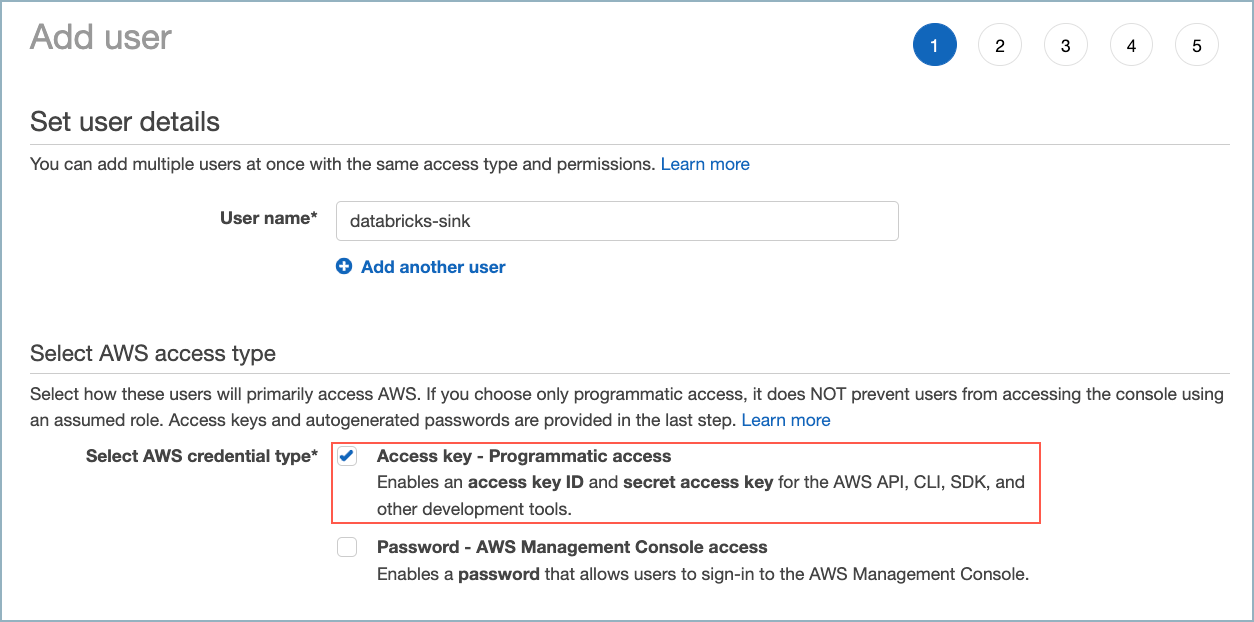
Create a new AWS user. Be sure to give the user (the connector) programmatic access.
Create new AWS user
On the Set permissions dialog, select Attach existing policies directly.
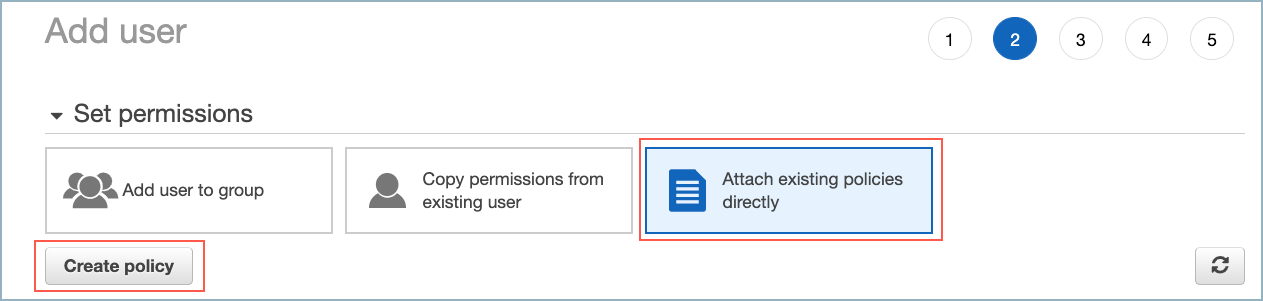
Add user policy
This policy is the same as the one used for the Amazon S3 sink connector with the addition of "s3:PutObjectTagging", "s3:GetObjectTagging", and "s3:DeleteObject". The connector requires DeleteObject so it can delete files in the staging S3 bucket once they are copied to the Delta Lake table.
{
       "Version": "2012-10-17",
       "Statement": [
           {
               "Effect": "Allow",
               "Action": [
                   "s3:ListAllMyBuckets"
               ],
               "Resource": "arn:aws:s3:::*"
           },
           {
               "Effect": "Allow",
               "Action": [
                   "s3:ListBucket",
                   "s3:GetBucketLocation"
               ],
               "Resource": "arn:aws:s3:::<bucket-name>"
           },
           {
               "Effect": "Allow",
               "Action": [
                   "s3:PutObject",
                   "s3:GetObject",
                   "s3:AbortMultipartUpload",
                   "s3:ListMultipartUploadParts",
                   "s3:ListBucketMultipartUploads",
                   "s3:PutObjectTagging",
                   "s3:GetObjectTagging",
                   "s3:DeleteObject"
               ],
               "Resource": "arn:aws:s3:::<bucket-name>/*"
           }
       ]
}
Step 5: Create a table
Create a table using a Databricks Notebook. Use the following example to create the table. The example shows the pageviews Kafka topic and example schema from the Datagen Source Connector for Confluent Cloud.
{
  "connect.name": "ksql.pageviews",
  "fields": [
    {
      "name": "viewtime",
      "type": "long"
    },
    {
      "name": "userid",
      "type": "string"
    },
    {
      "name": "pageid",
      "type": "string"
    }
  ],
  "name": "pageviews",
  "namespace": "ksql",
  "type": "record"
}
%sql

CREATE TABLE pageviews (viewtime LONG, userid STRING, pageid STRING, partition INT) USING DELTA
Since the Databricks Delta Lake Sink connector adds a field called partition, make sure you include partition INT when you define the table.
Step 6: Gather connector configuration information
Important
You must have the following information to complete the connector configuration using the Confluent Cloud Console or CLI.
Databricks server hostname: For example,
dbc-12345df33-0e53.cloud.databricks.com. The hostname is available on the Databricks Create Cluster page.HTTP path: For example,
sql/protocolv1/o/123456789101112/1004-123456-voice40. The path available on the Databricks Create Cluster page.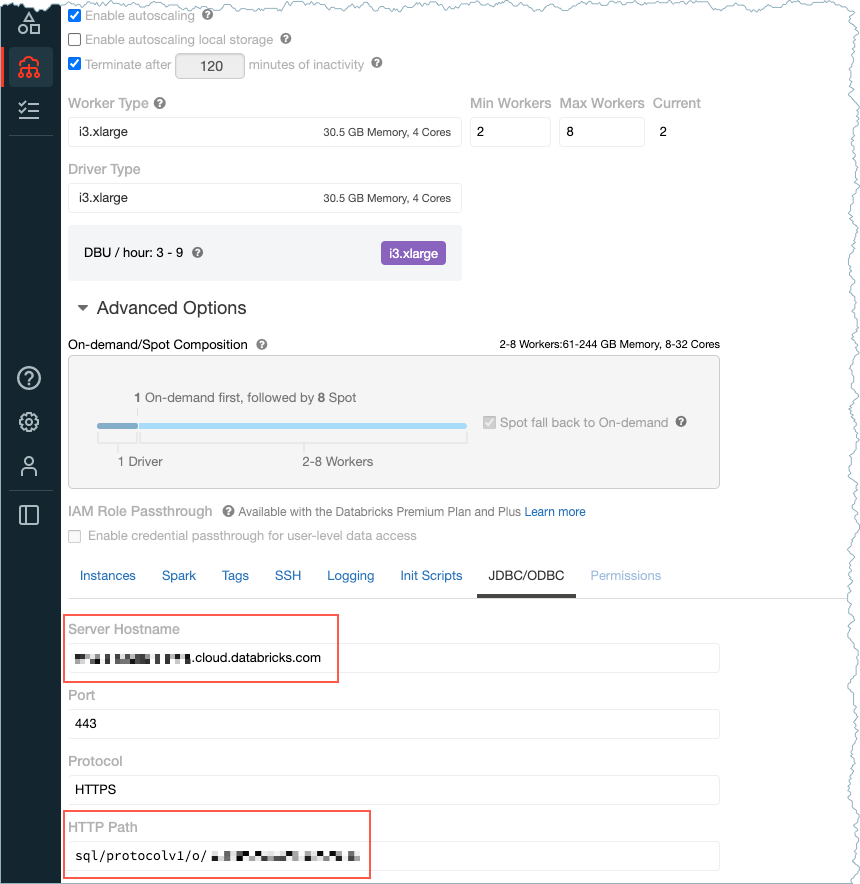
Hostname and HTTP path
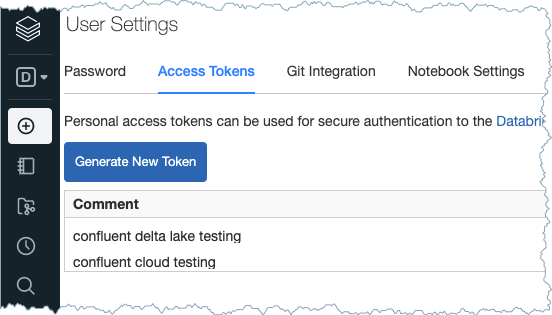
Delta Lake token: You can find the token or generate a new access token. Go to Settings > User Settings > Access Tokens.
Access Token
Delta Lake table name:
pageviewsis used for the steps in this example.User AWS access key ID and secret access key. For details, see the AWS documentation.
Staging S3 bucket name: For example,
confluent-databricks.