Important
You are viewing documentation for an older version of Confluent Platform. For the latest, click here.
Confluent Platform Quick Start (Local)
This quick start shows you how to get up and running with Confluent Platform and its main components. This quick start demonstrates both the basic and most powerful capabilities of Confluent Platform, including using Control Center for topic management and event stream processing using KSQL. In this quick start you create Apache Kafka® topics, use Kafka Connect to generate mock data to those topics, and create KSQL streaming queries on those topics. You then go to Control Center to monitor and analyze the streaming queries.
You can also run an automated version of this quick start designed for Confluent Platform local installs.
Important
Java 1.8 is supported in this version of Confluent Platform (Java 1.9 and 1.10 are currently not supported). For more information, see Java supported versions.
- Prerequisites:
- Internet connectivity.
- Ensure you are on an Operating System currently supported by Confluent Platform.
Step 1: Download and Start Confluent Platform
Go to the downloads page and choose Confluent Platform.
Tip
Download a previous version from Previous Versions.
Provide your name and email if applicable for the version and select Download.
Decompress the file. You should have these directories:
Folder Description /bin/ Driver scripts for starting and stopping services /etc/ Configuration files /lib/ Systemd services /logs/ Log files /share/ Jars and licenses /src/ Source files that require a platform-dependent build Add the install location of the Confluent bin directory to your PATH:
export PATH=<path-to-confluent>/bin:$PATHInstall the Kafka Connect Datagen source connector using the Confluent Hub client. This connector generates mock data for demonstration purposes and is not suitable for production. Confluent Hub is an online library of pre-packaged and ready-to-install extensions or add-ons for Confluent Platform and Kafka.
<path-to-confluent>/bin/confluent-hub install \
--no-prompt confluentinc/kafka-connect-datagen:0.1.0
Your output should resemble:
Running in a "--no-prompt" mode
...
Completed
Start Confluent Platform using the Confluent CLI
startcommand.<path-to-confluent>/bin/confluent start
This command starts all of the Confluent Platform components; including Kafka, ZooKeeper, Schema Registry, HTTP REST Proxy for Kafka, Kafka Connect, KSQL, and Control Center.
Important
The Confluent CLI is meant for development purposes only and is not suitable for a production environment. The data that are produced are transient and are intended to be temporary. For production-ready workflows, see Install and Upgrade.
Your output should resemble:
Starting zookeeper
zookeeper is [UP]
Starting kafka
kafka is [UP]
Starting schema-registry
schema-registry is [UP]
Starting kafka-rest
kafka-rest is [UP]
Starting connect
connect is [UP]
Starting ksql-server
ksql-server is [UP]
Starting control-center
control-center is [UP]
Step 2: Create Kafka Topics
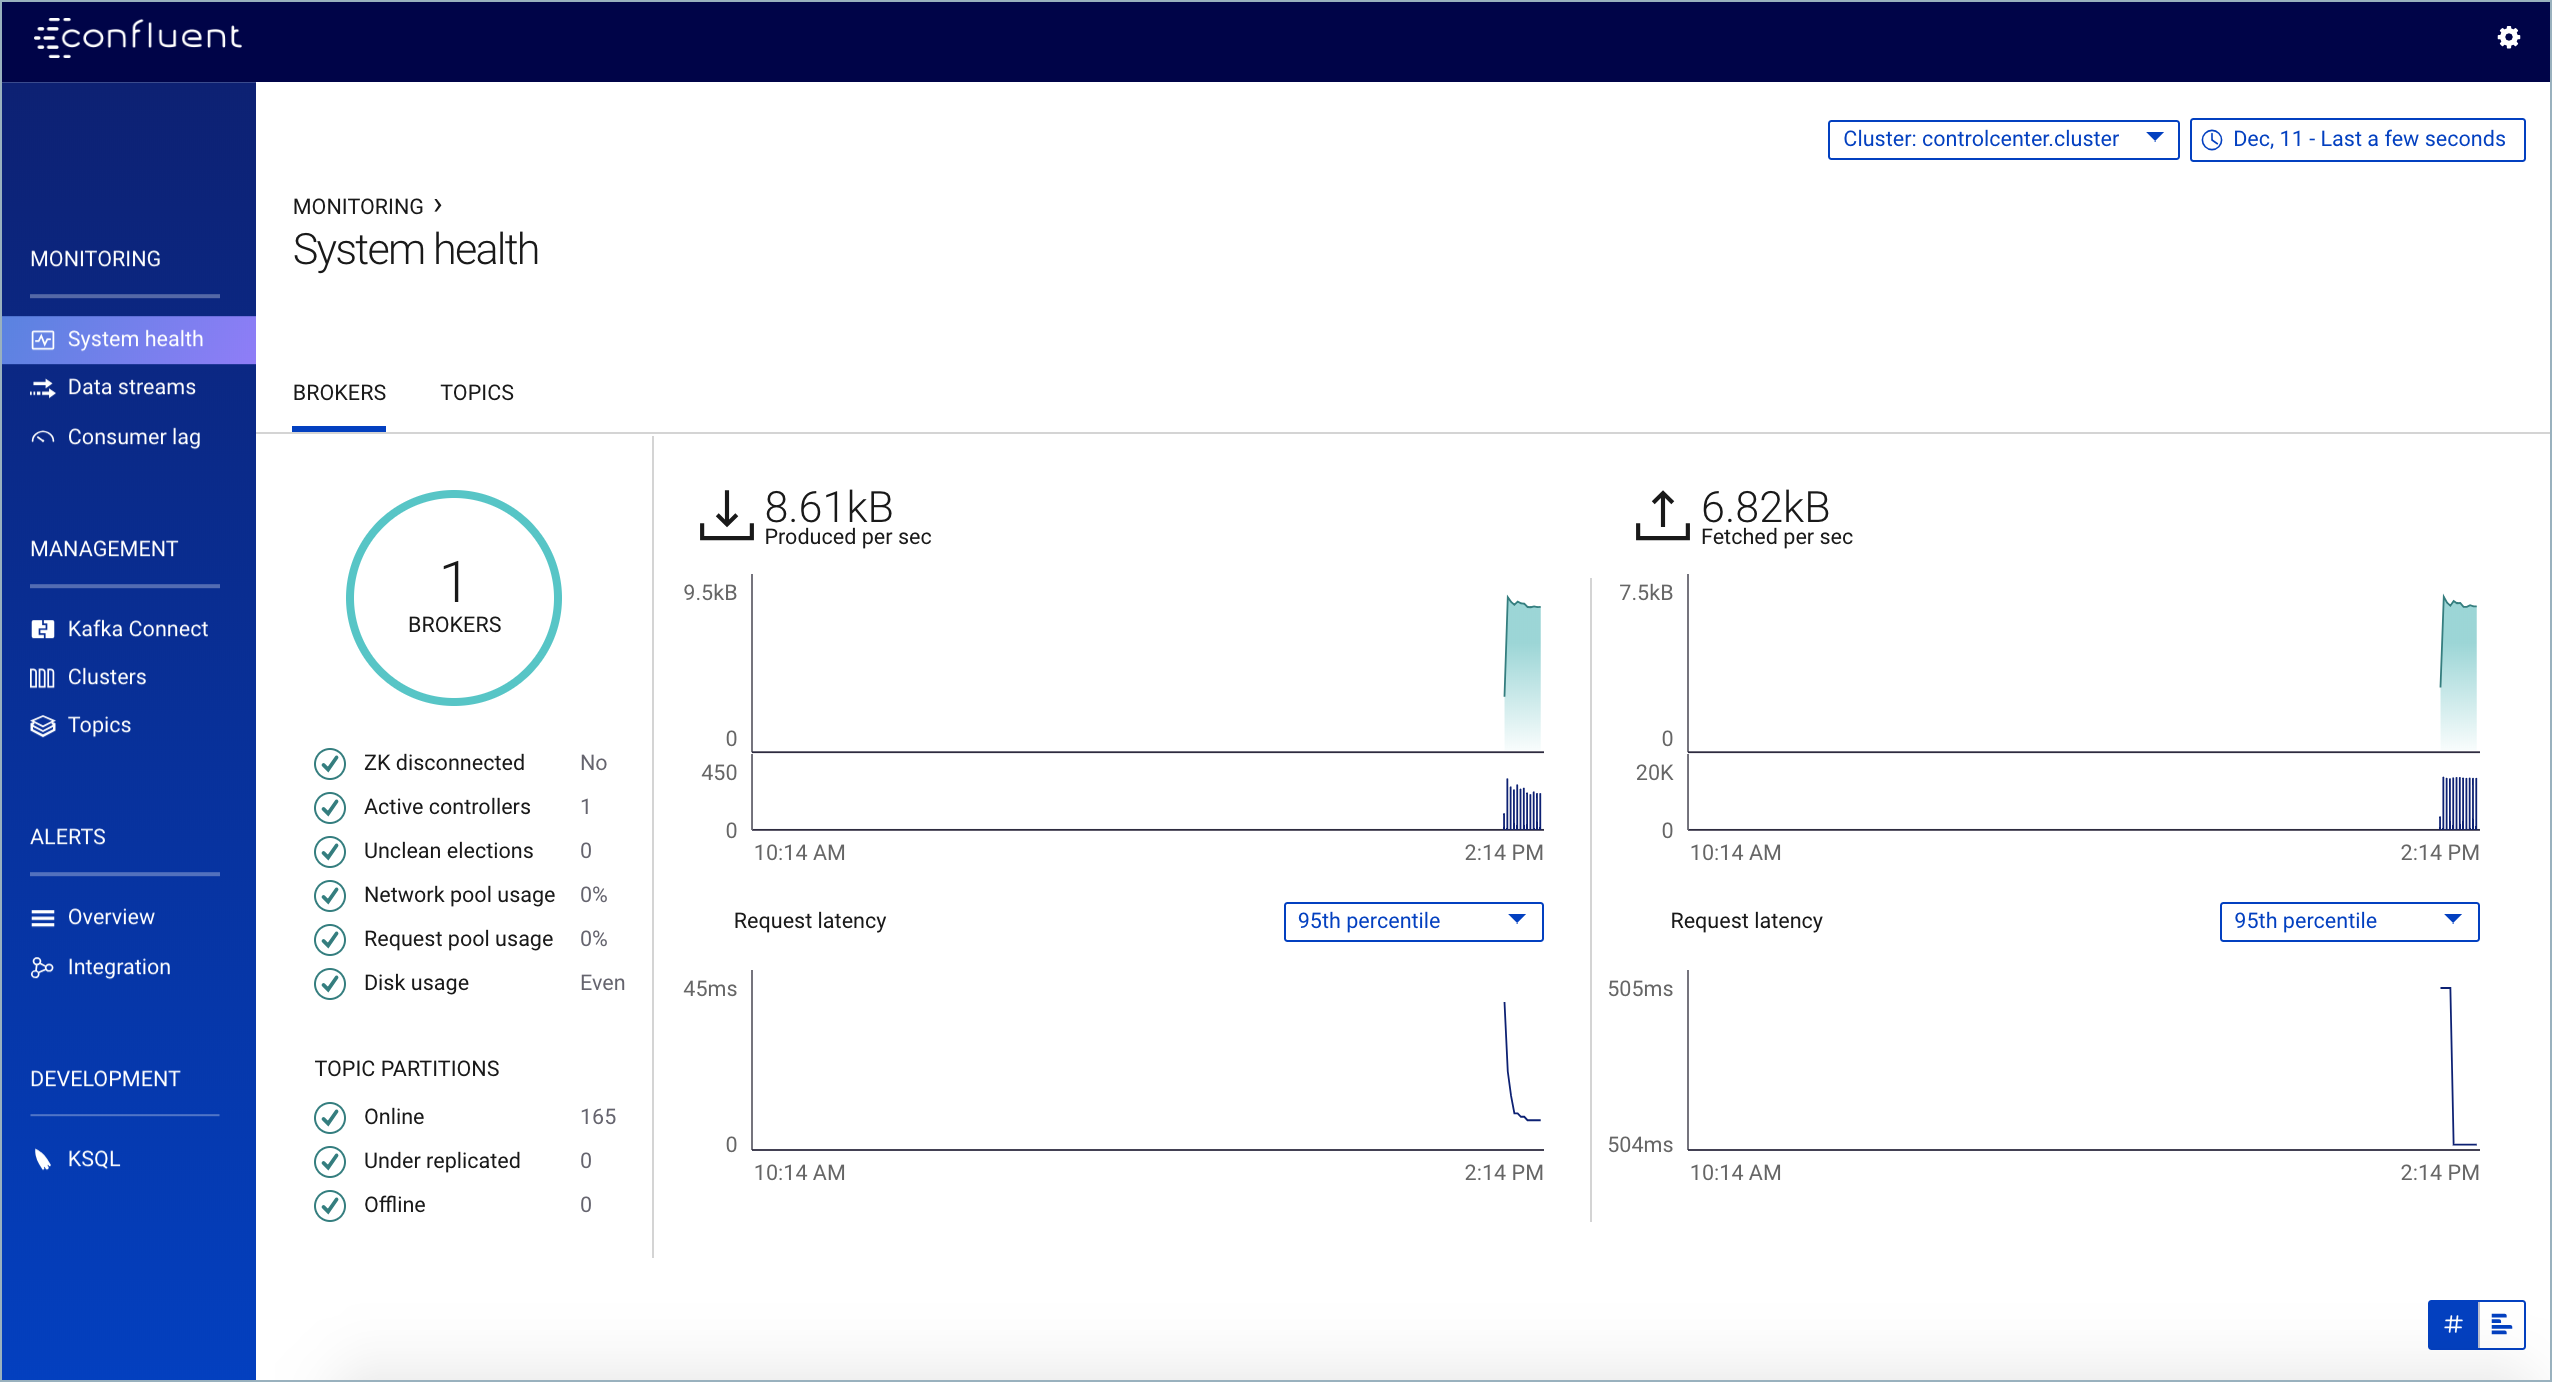
In this step, you create Kafka topics by using the Confluent Control Center. Confluent Control Center provides the functionality for building and monitoring production data pipelines and event streaming applications.
Navigate to the Control Center web interface at http://localhost:9021/.
Important
It may take a minute or two for Control Center to come online.
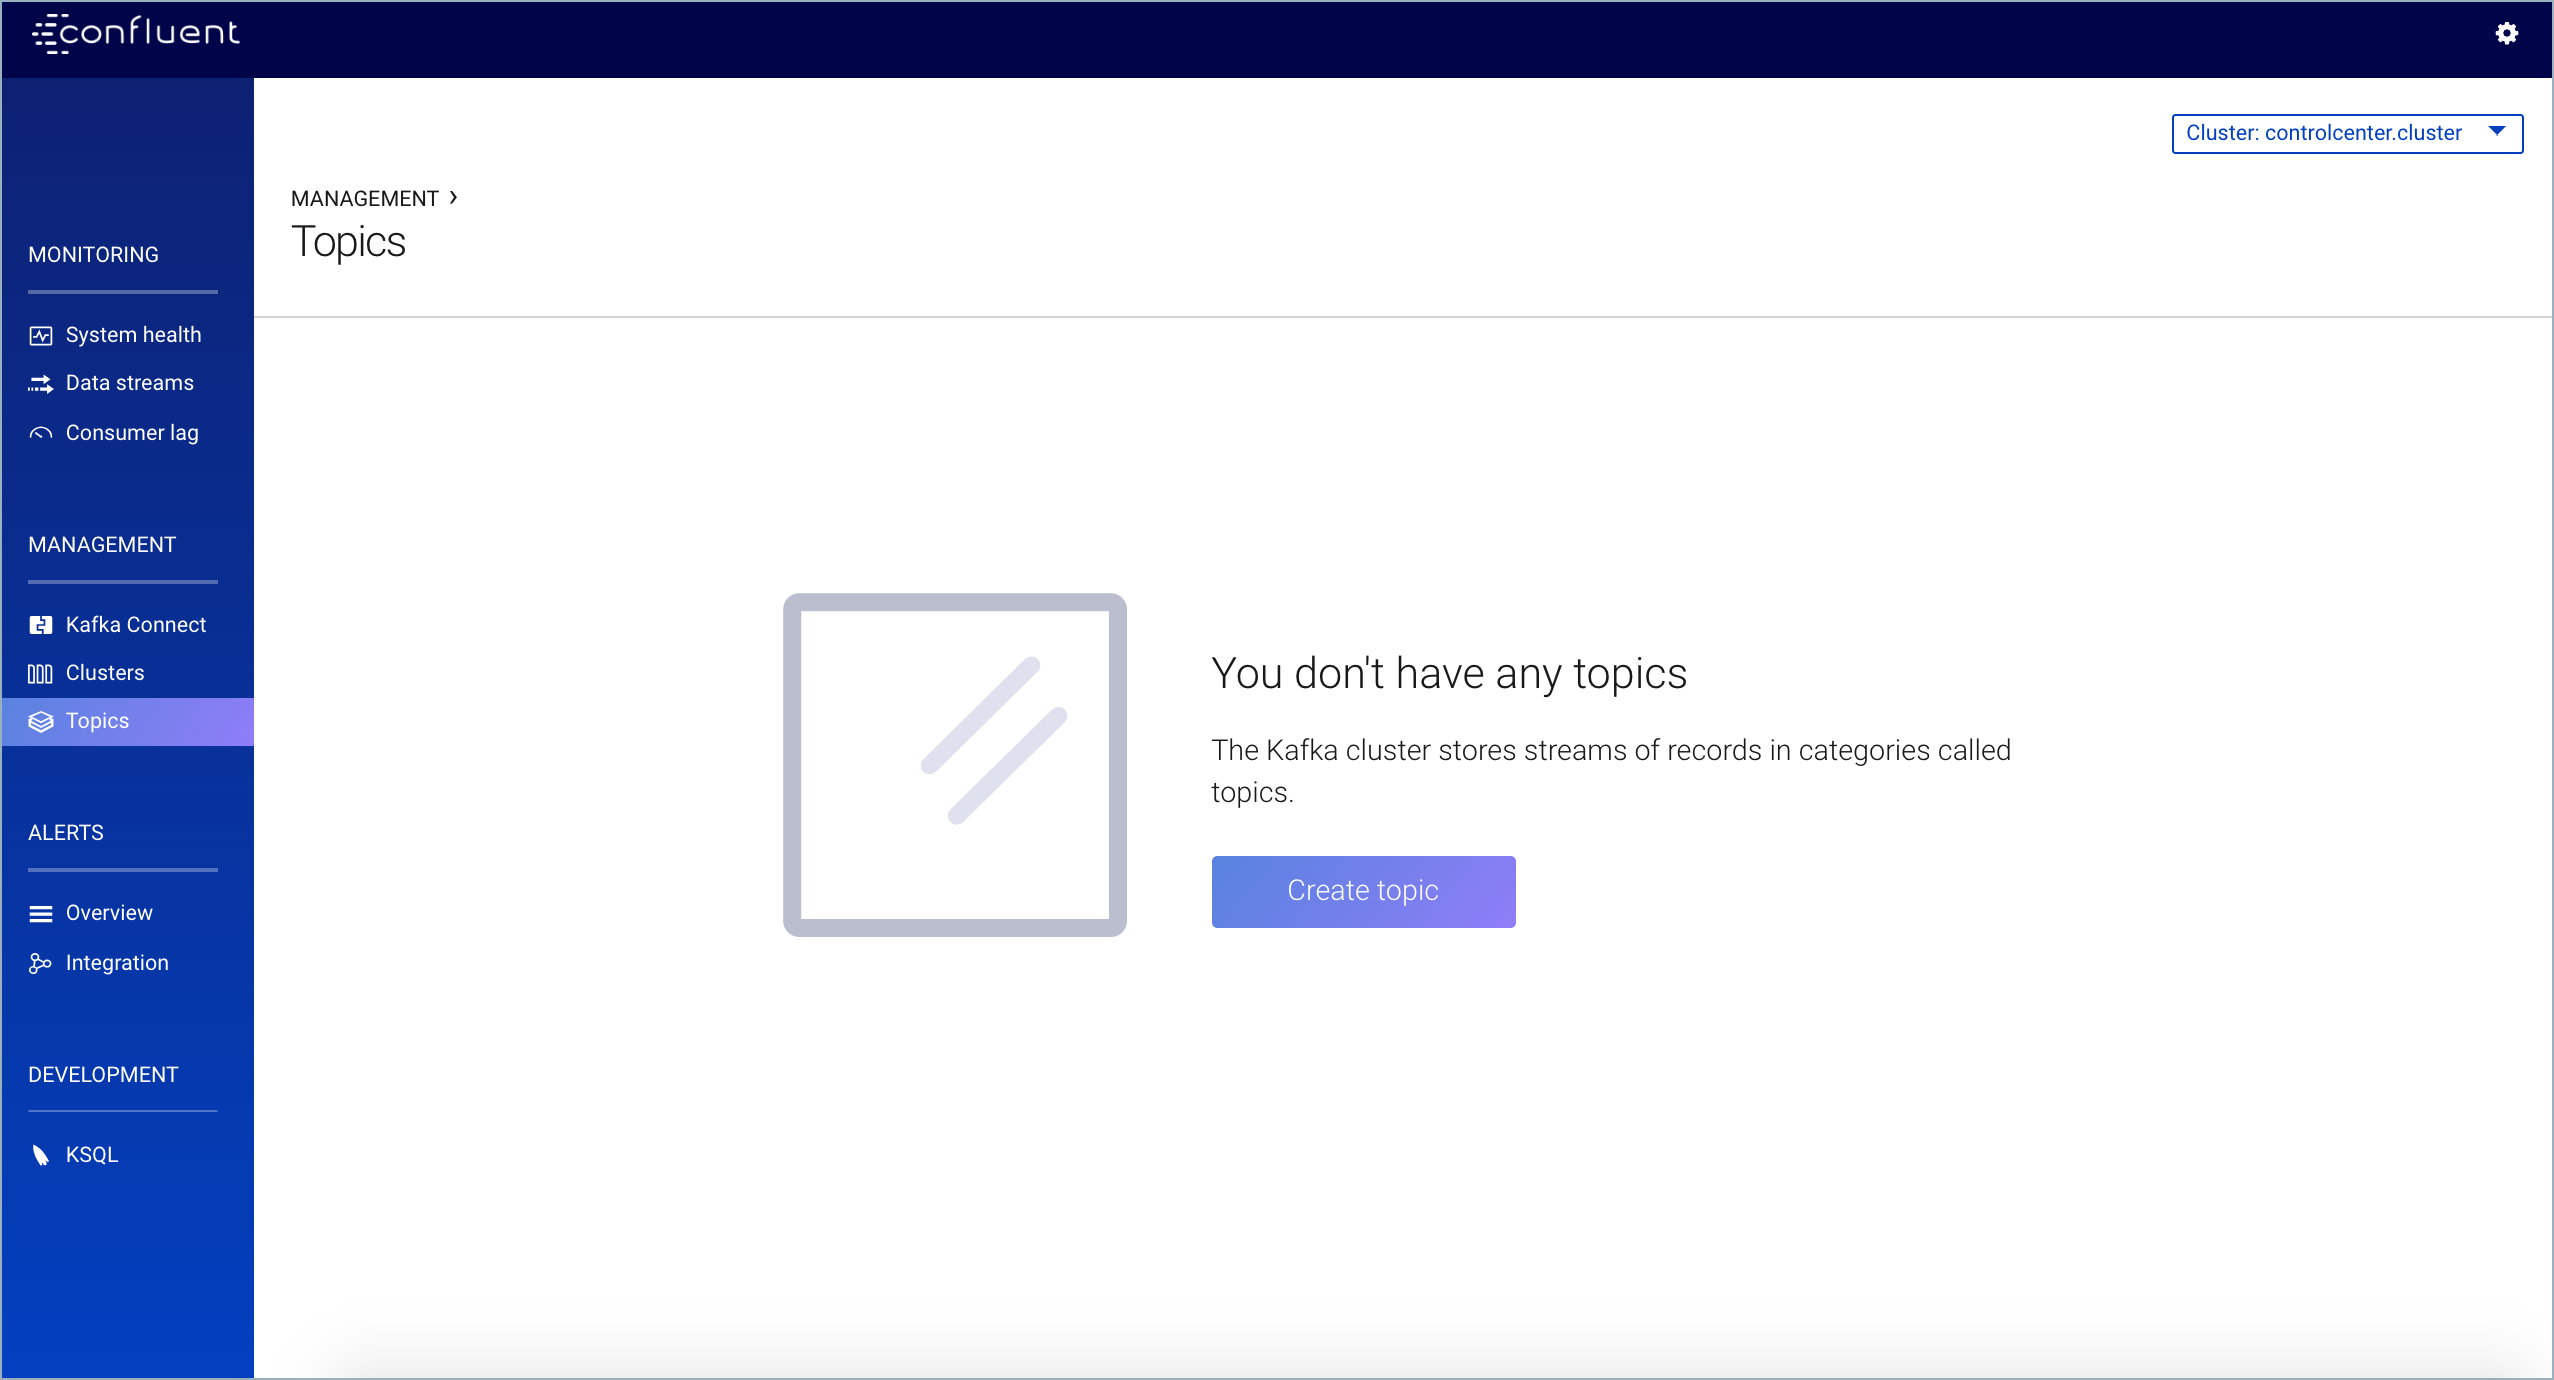
Select Management -> Topics and click Create topic.
Create a topic named
pageviewsand click Create with defaults.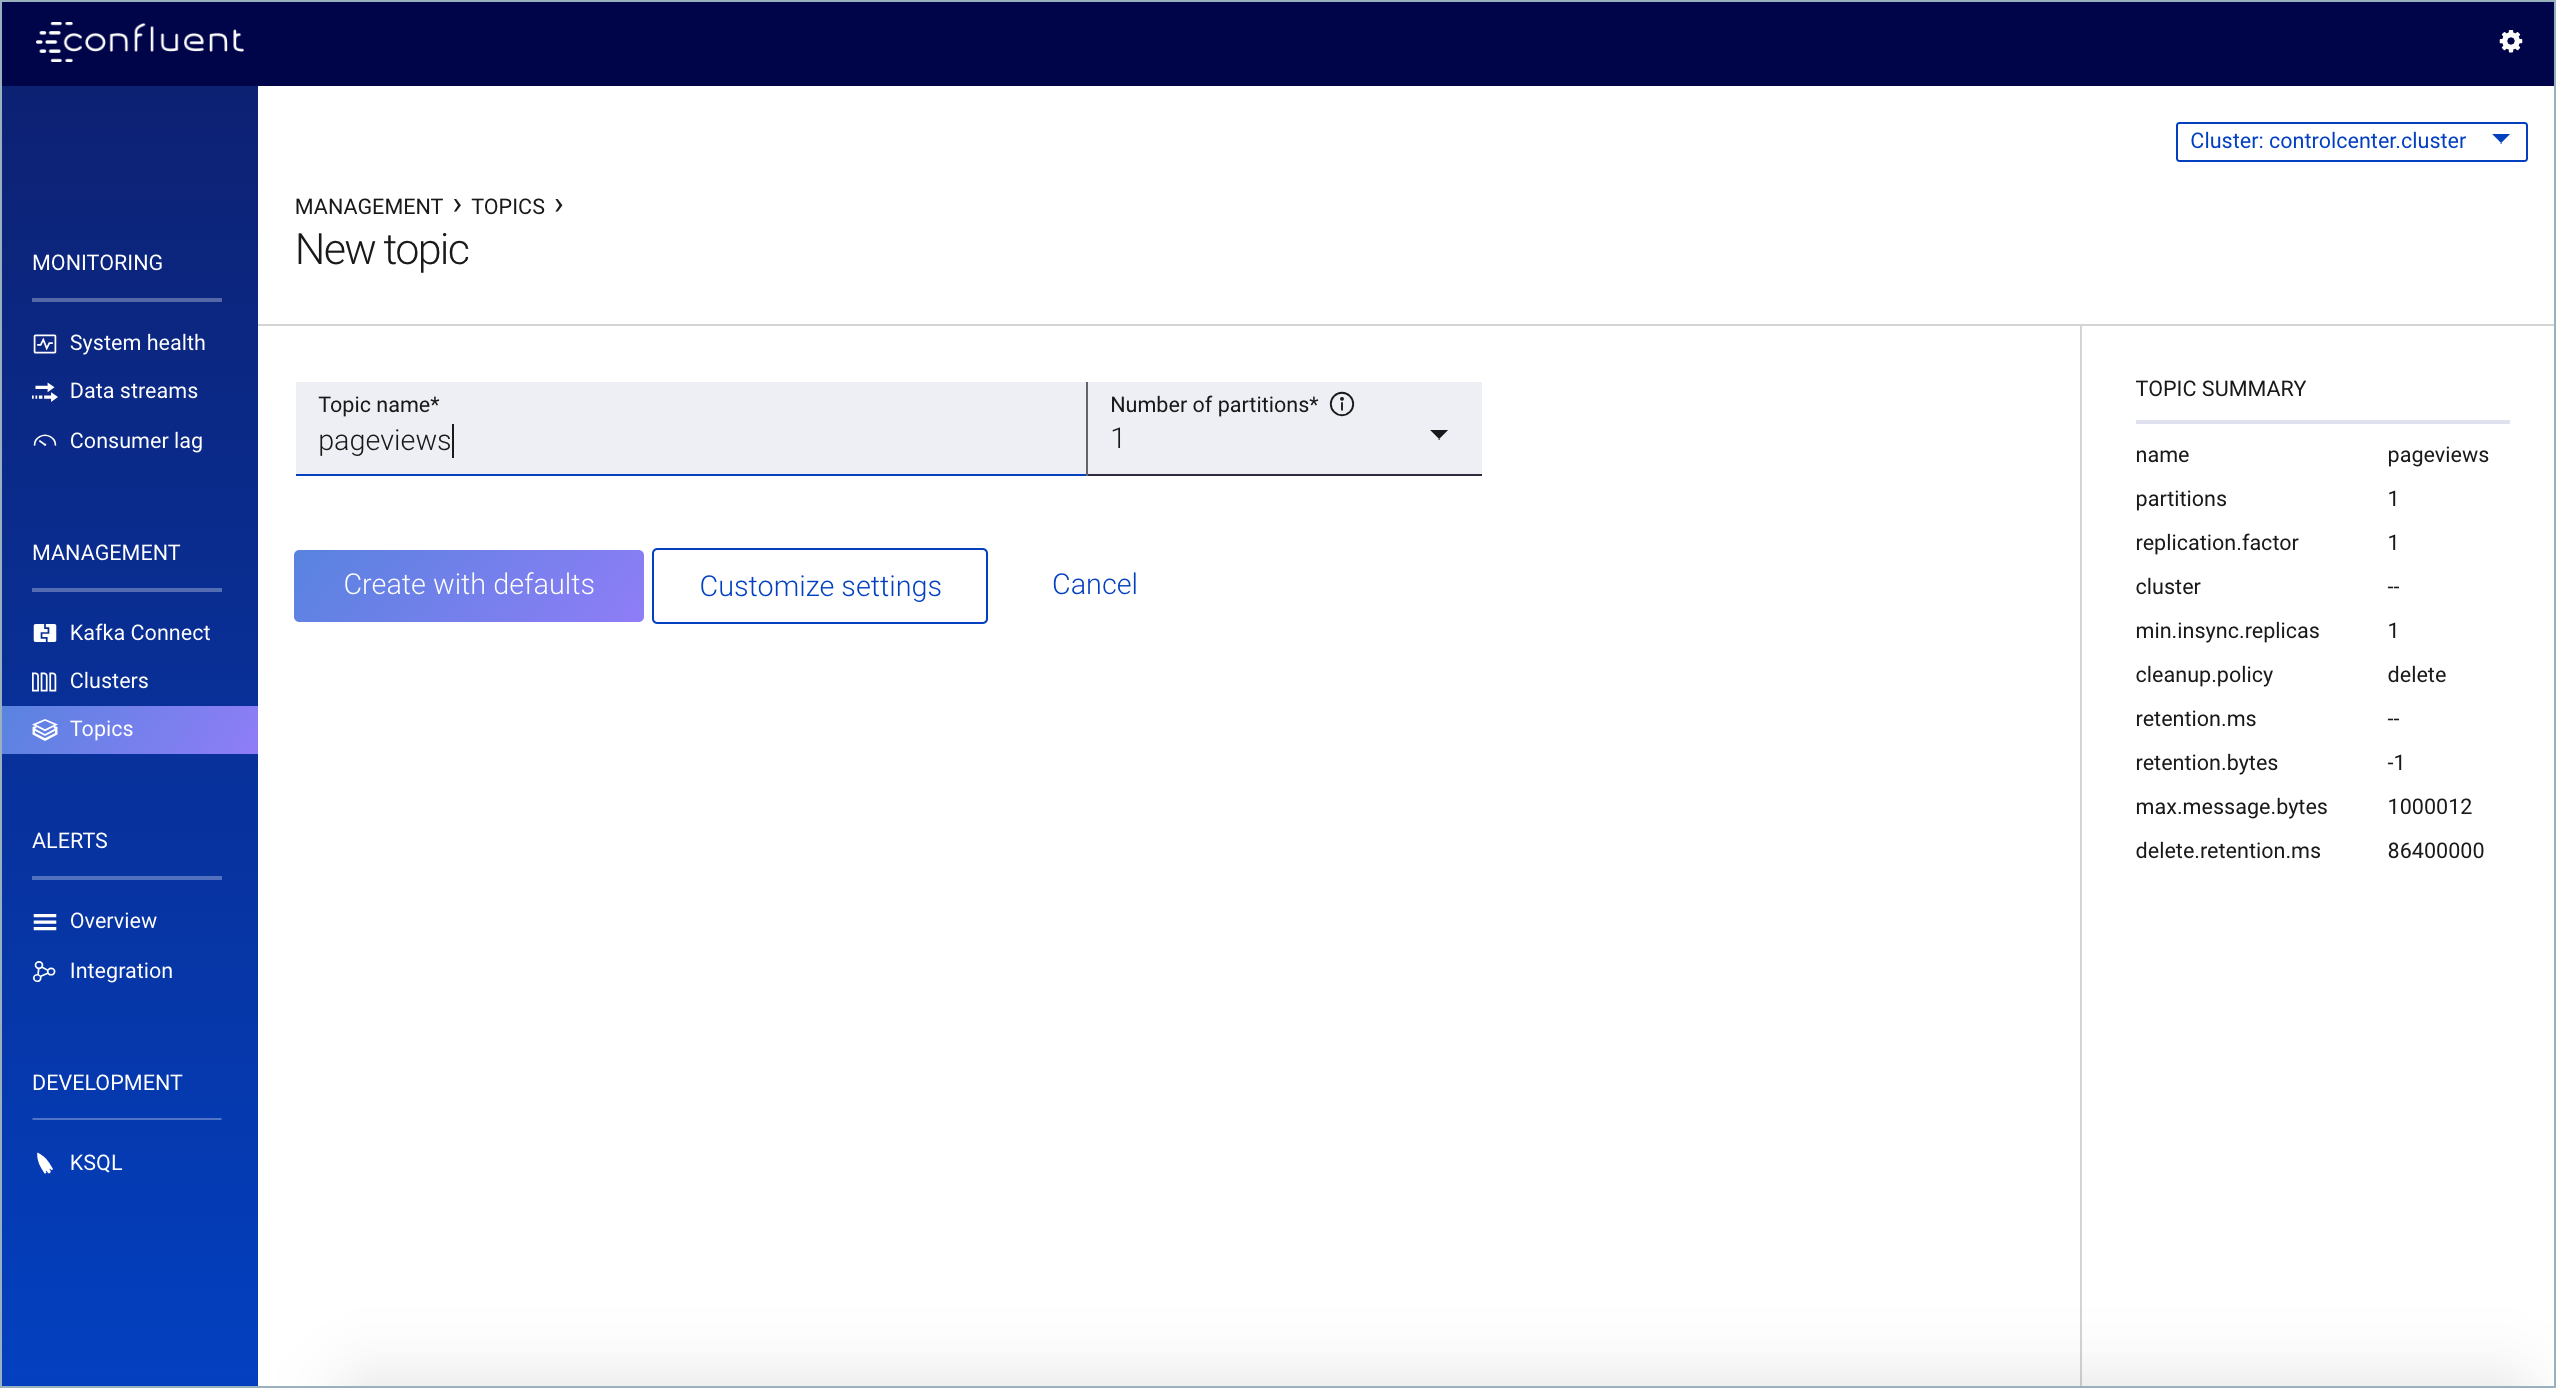
Select Management -> Topics, create a topic named
users, and click Create with defaults.
Step 3: Install a Kafka Connector and Generate Sample Data
In this step, you use Kafka Connect to run a demo source connector called kafka-connect-datagen that creates sample data for the Kafka topics pageviews and users.
Tip
The Kafka Connect Datagen connector was installed manually in Step 1: Download and Start Confluent Platform. If you encounter issues locating the Datagen Connector, refer to the Issue: Cannot locate the Datagen Connector in the Troubleshooting section.
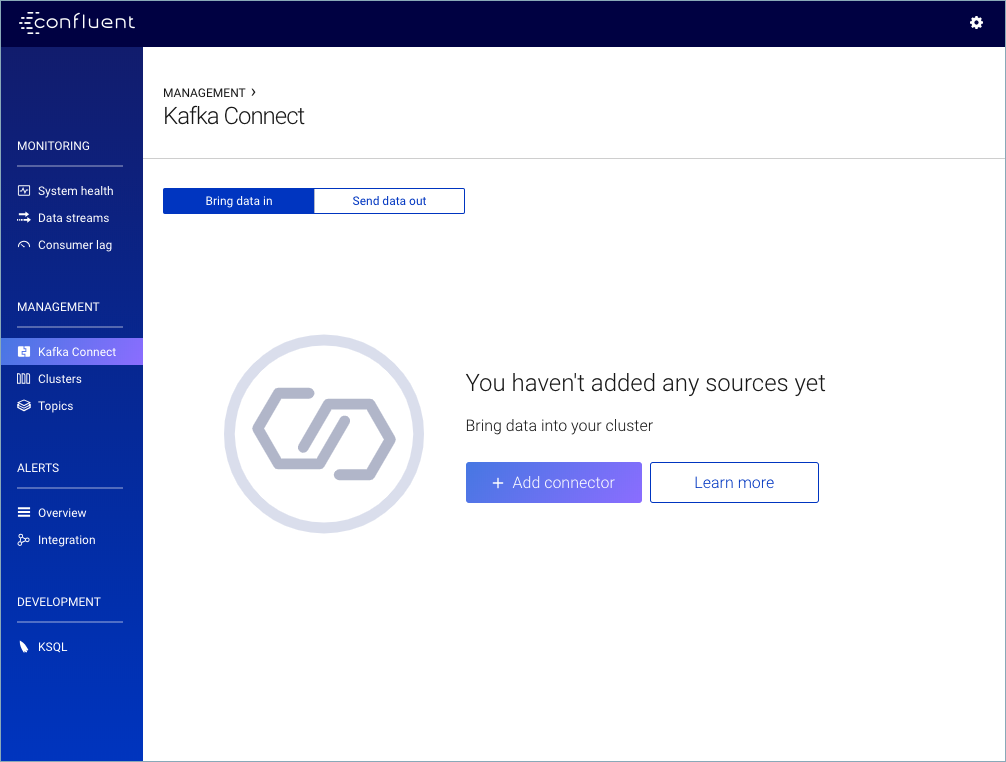
Run one instance of the Kafka Connect Datagen connector to produce Kafka data to the
pageviewstopic in AVRO format.From the Control Center navigation menu, click Management -> Kafka Connect.
Click Add connector.
Scroll down to select DatagenConnector from the Connector class list.
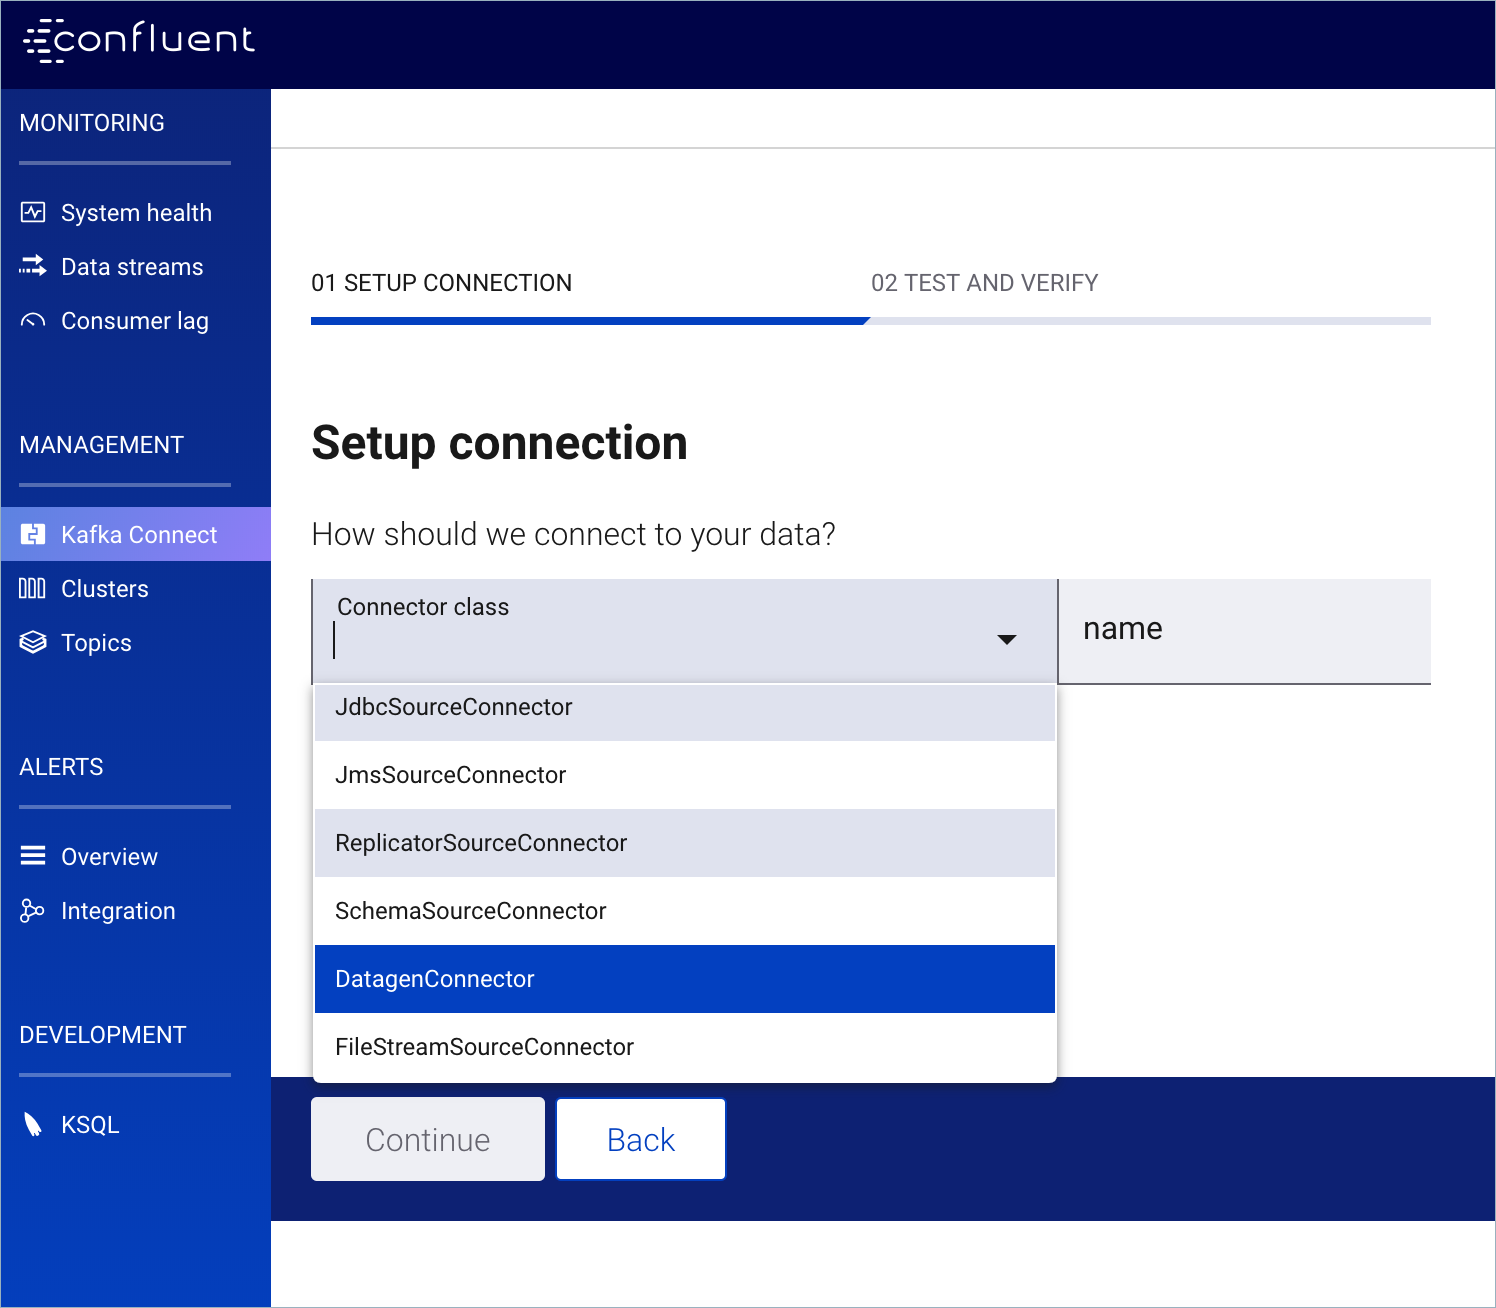
Name the connector
datagen-pageviews. After naming the connector, new fields appear. Scroll down and specify the following configuration values:- In the Key converter class field, type
org.apache.kafka.connect.storage.StringConverter. - In the kafka.topic field, type
pageviews. - In the max.interval field, type
100. - In the iterations field, type
1000000000. - In the quickstart field, type
pageviews.
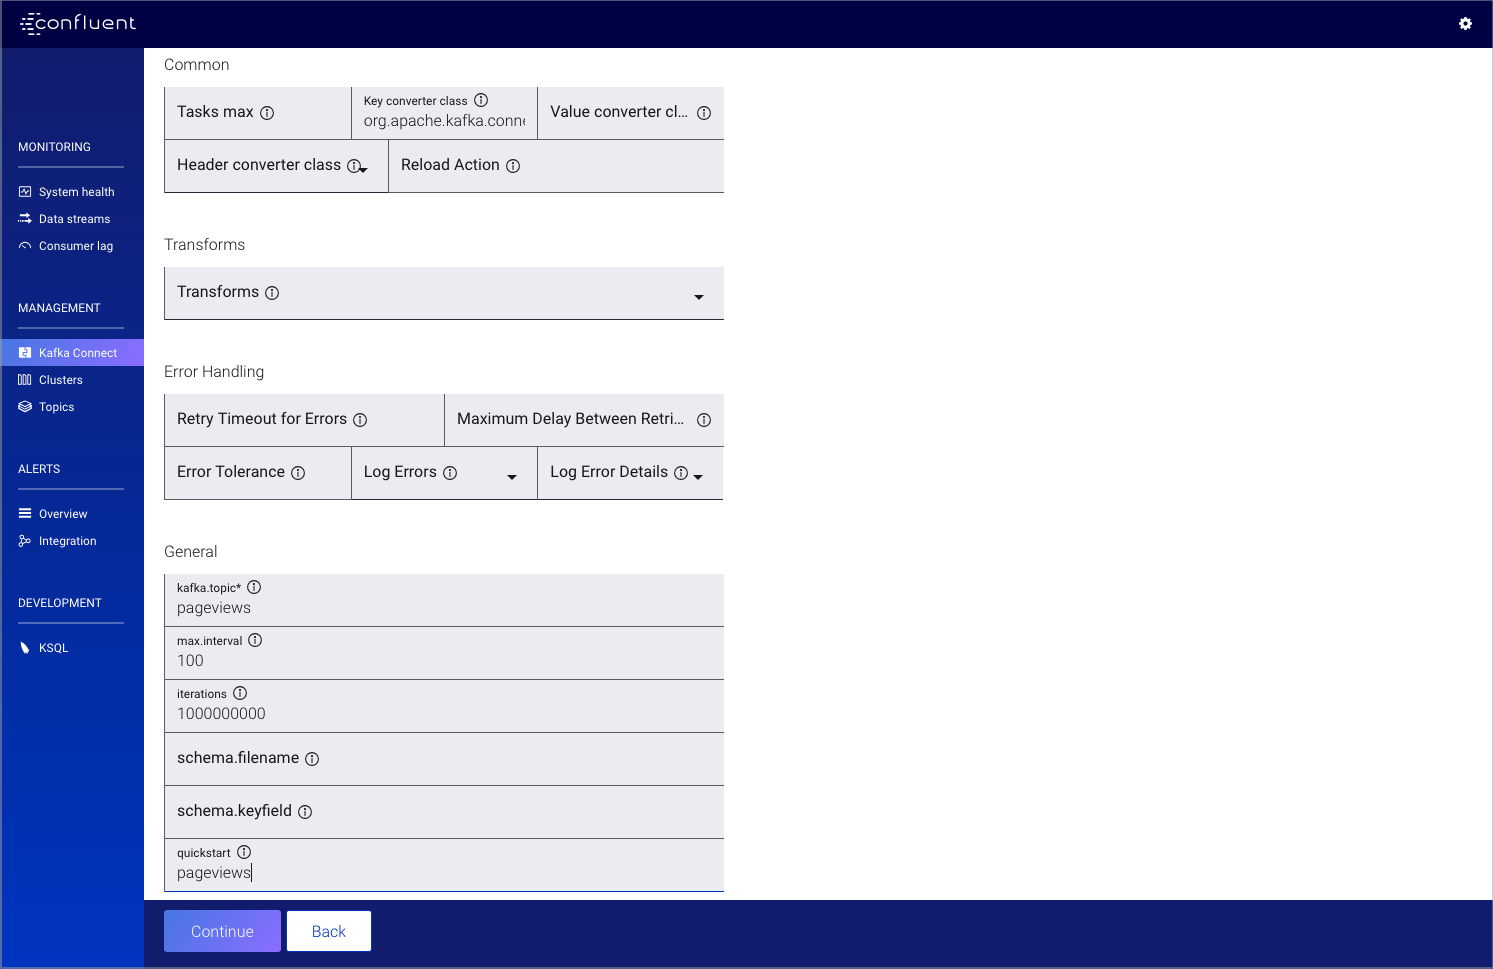
- In the Key converter class field, type
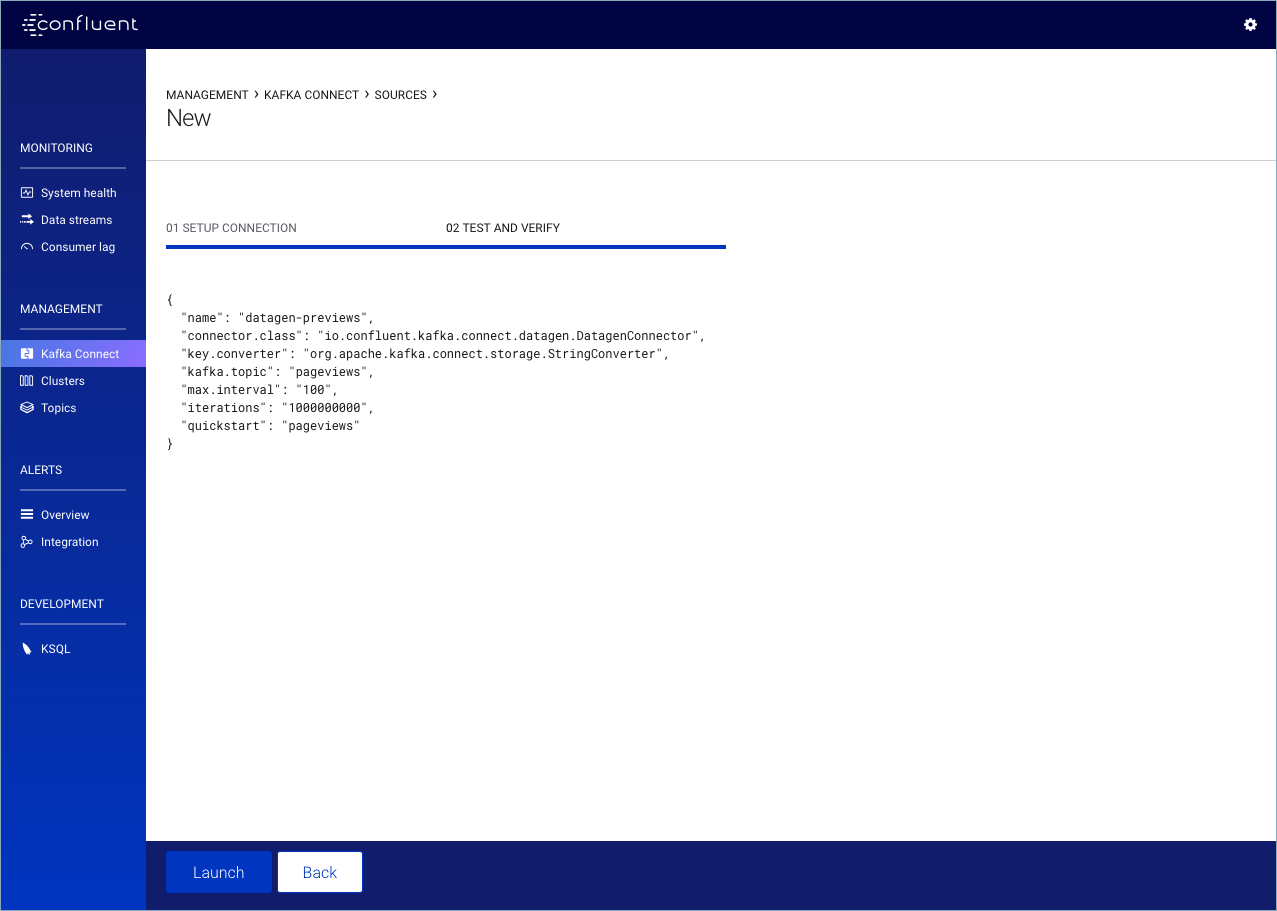
Click Continue.
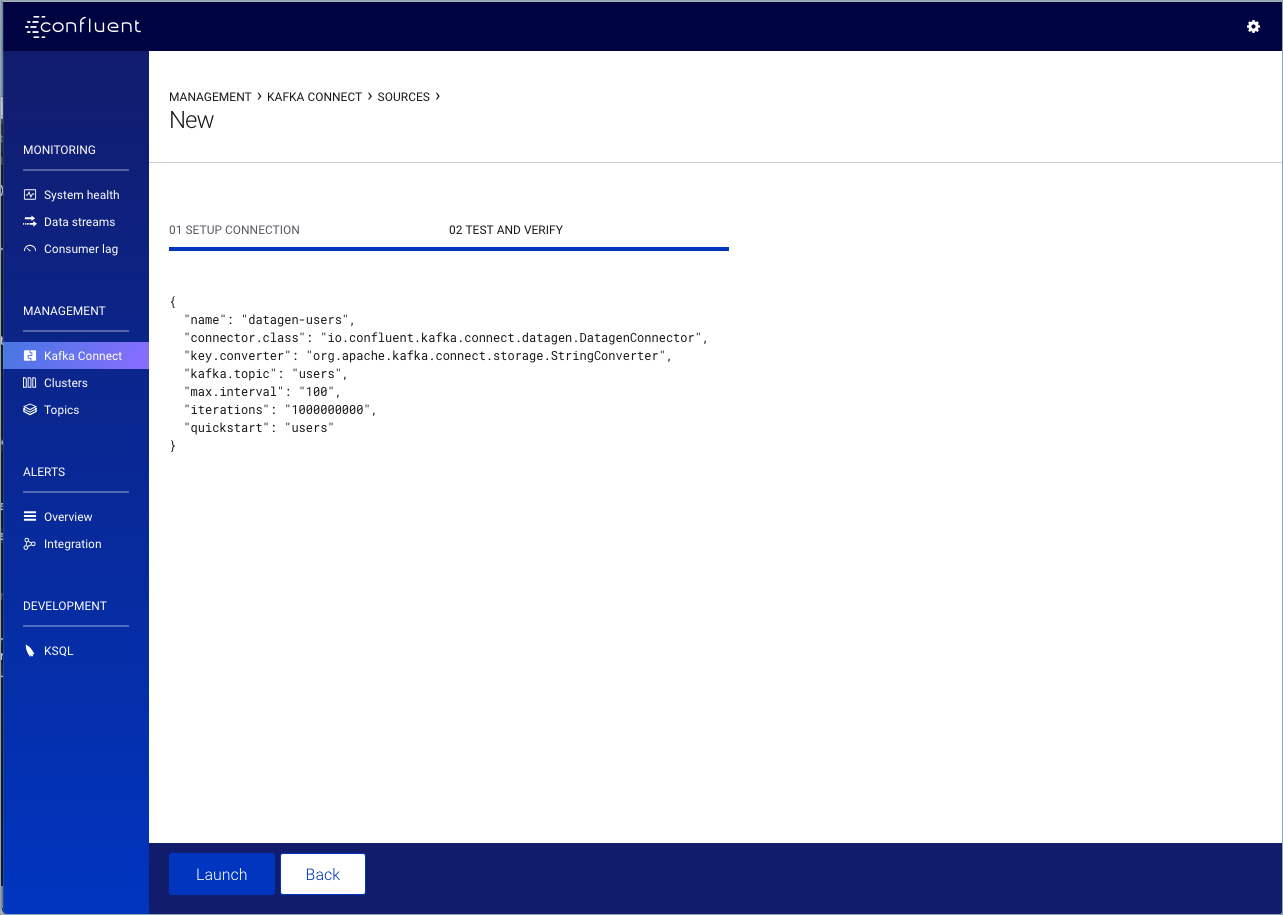
Review the connector configuration and click Launch.
Run another instance of the Kafka Connect Datagen connector to produce Kafka data to the
userstopic in AVRO format.Click Add connector.

Scroll down to select DatagenConnector from the Connector class list.
Name the connector
datagen-users. After naming the connector, new fields appear. Scroll down and specify the following configuration values:- In the Key converter class field, type
org.apache.kafka.connect.storage.StringConverter. - In the kafka.topic field, type
users. - In the max.interval field, type
1000. - In the iterations field, type
1000000000. - In the quickstart field, type
users.
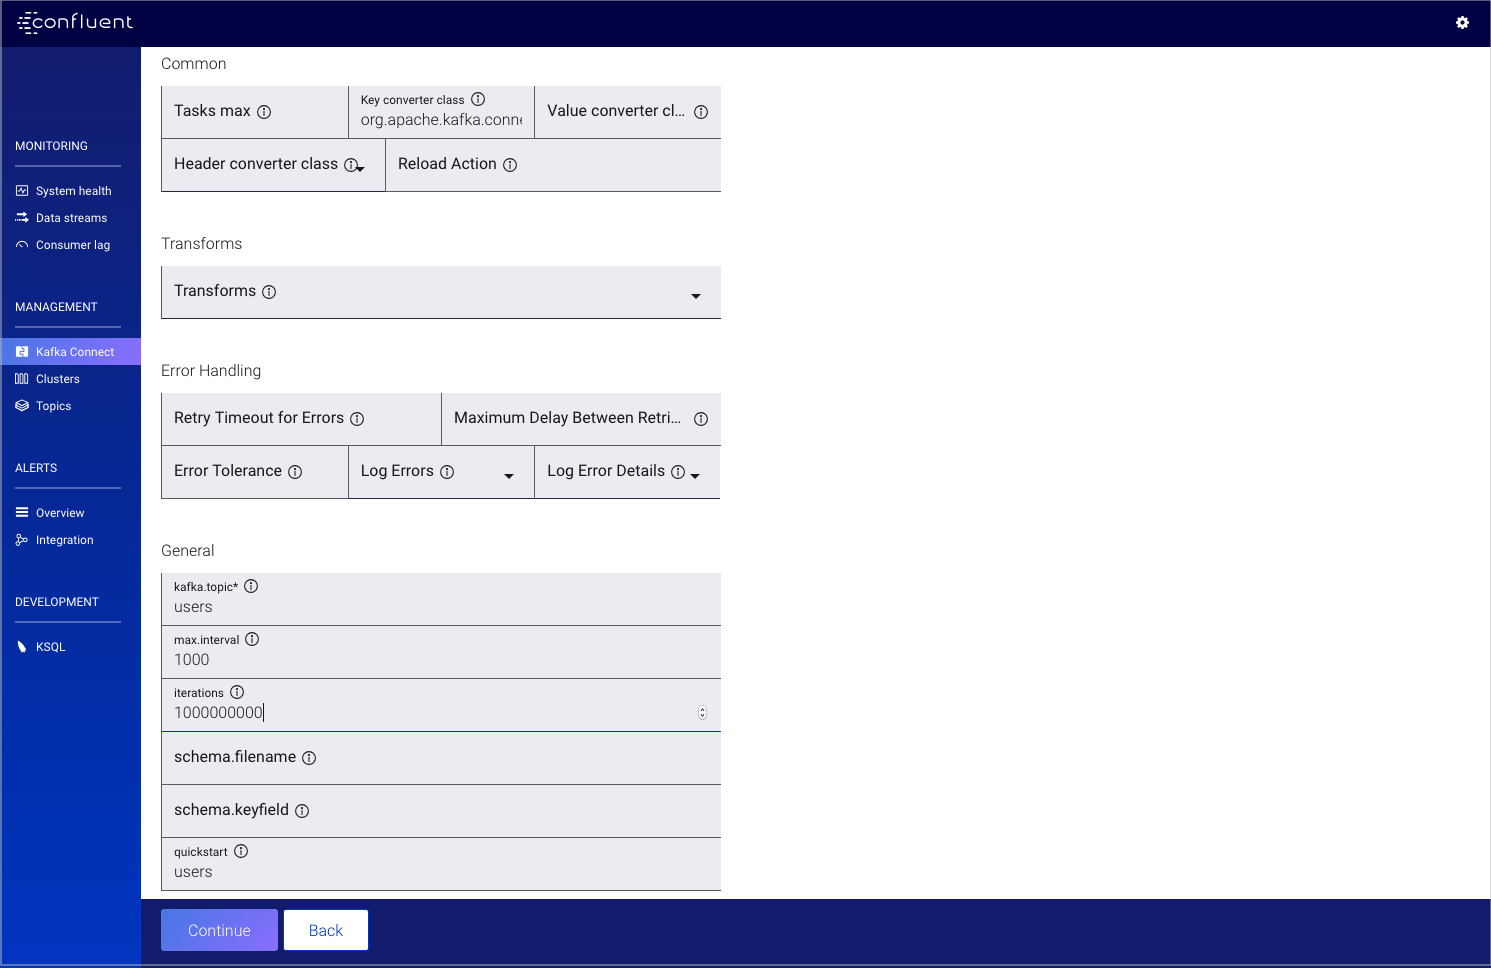
- In the Key converter class field, type
Click Continue.
Review the connector configuration and click Launch.
Step 4: Create and Write to a Stream and Table using KSQL
In this step, KSQL queries are run on the pageviews and users topics that were created in the previous step. The
KSQL commands are run using the KSQL tab in Control Center.
Tip
You can also run these commands using the KSQL CLI from your terminal
with this command: <path-to-confluent>/bin/ksql http://localhost:8088.
Create Streams and Tables
In this step, KSQL is used to create a stream for the pageviews topic, and a table for the users topic.
From the Control Center navigation menu, click Development -> KSQL. By default, you are on the KSQL EDITOR page.
Click the STREAMS tab -> Add a Stream and select the
pageviewstopic.
Choose your stream options:
- In the How are your messages encoded? field, select
AVRO. - In the Field(s) you’d like to include in your STREAM field, ensure fields are set as follows:
viewtimewith typeBIGINTuseridwith typeVARCHARpageidwith typeVARCHAR
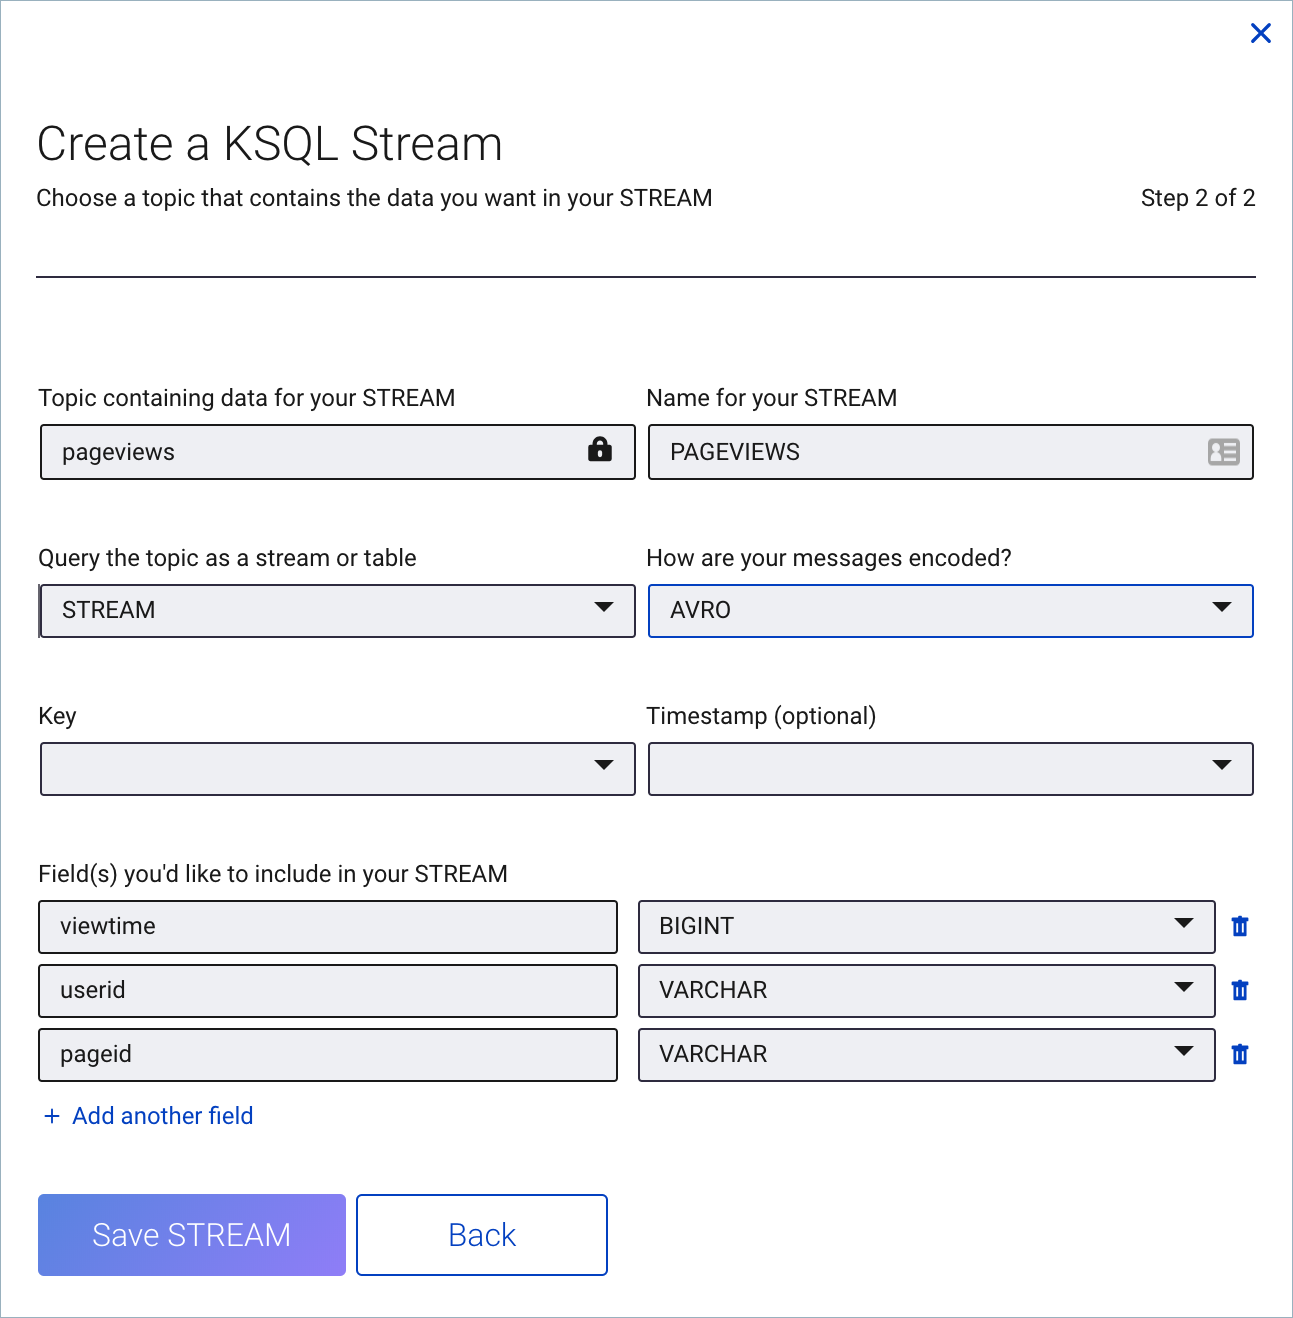
- In the How are your messages encoded? field, select
Click Save STREAM.
Click the TABLES tab -> Add a Table and select the
userstopic.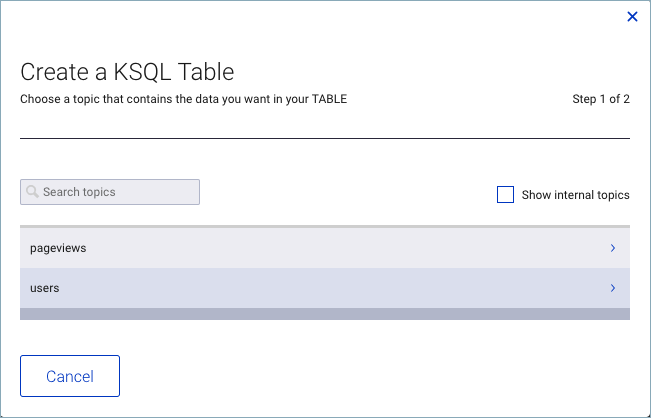
Choose your table options:
- In the How are your messages encoded? field, select
AVRO. - In the Key field, select
userid. - In the Field(s) you’d like to include in your TABLE field, ensure fields are set as follows:
registertimewith typeBIGINTuseridwith typeVARCHARregionidwith typeVARCHARgenderwith typeVARCHAR
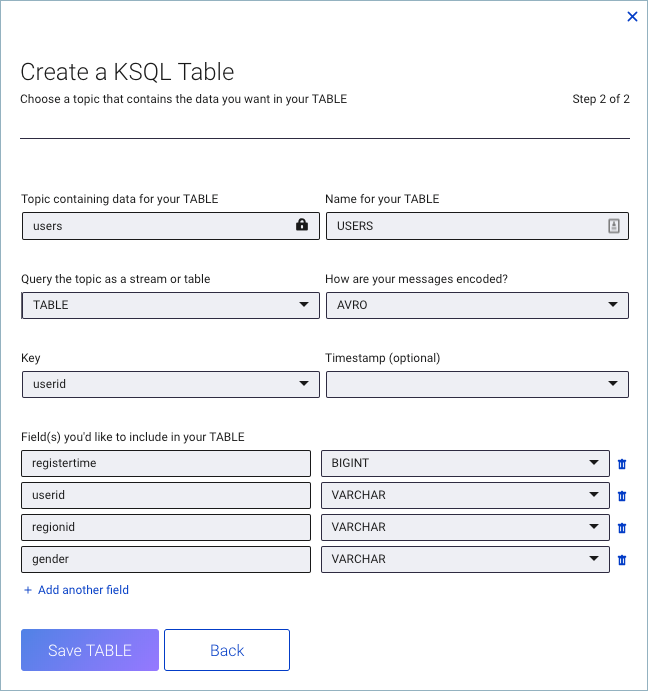
- In the How are your messages encoded? field, select
Click Save TABLE.
Write Queries
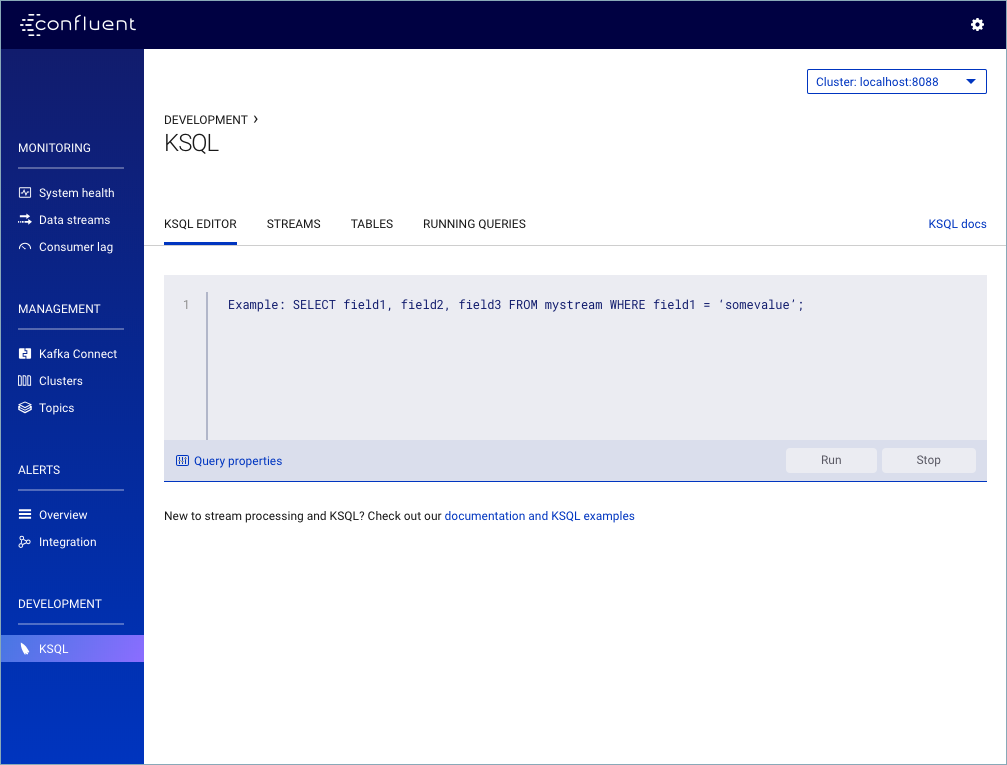
These examples write queries using the KSQL tab in Control Center.
From the Control Center navigation menu, click Development -> KSQL. By default, you are on the KSQL EDITOR page.
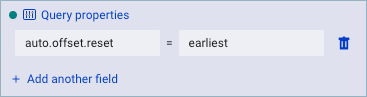
Click Query properties to add a custom query property. Set the
auto.offset.resetparameter toearliest.This instructs KSQL queries to read all available topic data from the beginning. This configuration is used for each subsequent query. For more information, see the KSQL Configuration Parameter Reference.
Run the following queries.
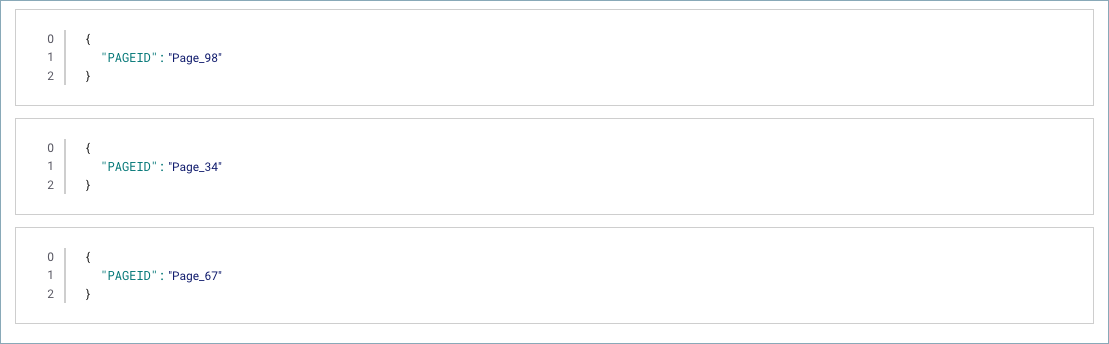
Create a query that returns data from a stream with the results limited to three rows.
SELECT pageid FROM pageviews LIMIT 3;
Your output should resemble:
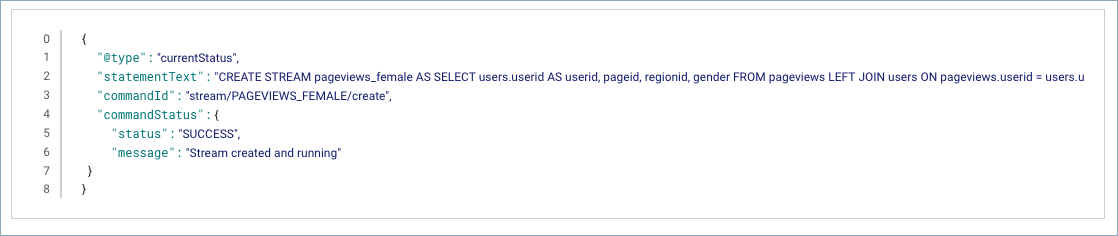
Create a persistent query that filters for female users. The results from this query are written to the Kafka
PAGEVIEWS_FEMALEtopic. This query enriches thepageviewsSTREAM by doing aLEFT JOINwith theusersTABLE on the user ID, where a condition (gender = 'FEMALE') is met.CREATE STREAM pageviews_female AS SELECT users.userid AS userid, pageid, regionid, gender FROM pageviews LEFT JOIN users ON pageviews.userid = users.userid WHERE gender = 'FEMALE';
Your output should resemble:
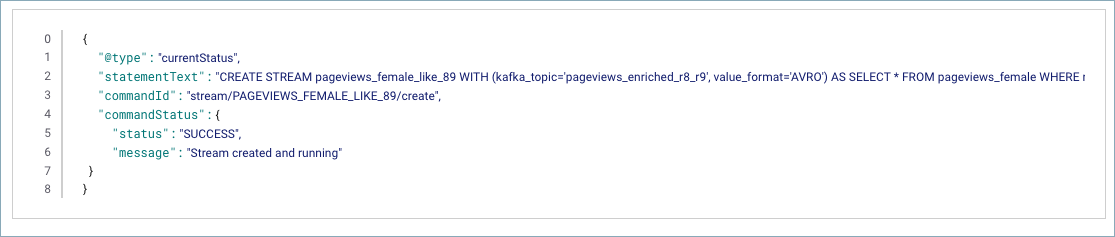
Create a persistent query where a condition (
regionid) is met, usingLIKE. Results from this query are written to a Kafka topic namedpageviews_enriched_r8_r9.CREATE STREAM pageviews_female_like_89 WITH (kafka_topic='pageviews_enriched_r8_r9', value_format='AVRO') AS SELECT * FROM pageviews_female WHERE regionid LIKE '%_8' OR regionid LIKE '%_9';
Your output should resemble:
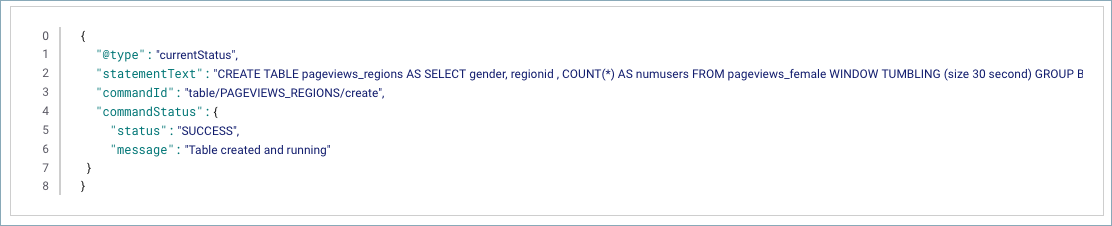
Create a persistent query that counts the pageviews for each region and gender combination in a tumbling window of 30 seconds when the count is greater than 1. Because the procedure is grouping and counting, the result is now a table, rather than a stream. Results from this query are written to a Kafka topic called
PAGEVIEWS_REGIONS.CREATE TABLE pageviews_regions AS SELECT gender, regionid , COUNT(*) AS numusers FROM pageviews_female WINDOW TUMBLING (size 30 second) GROUP BY gender, regionid HAVING COUNT(*) > 1;
Your output should resemble:
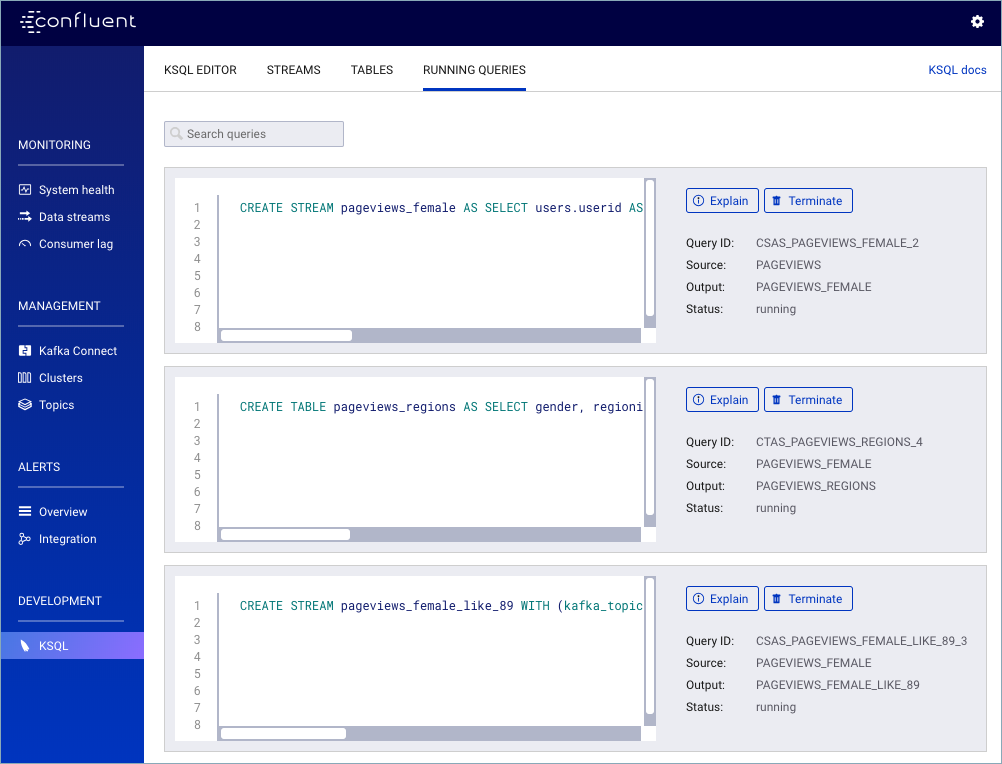
Click RUNNING QUERIES and you should see the following persisted queries:
Step 5: View Your Stream in Control Center
From the Control Center interface you can view all of your streaming KSQL queries.
Navigate to the Control Center web interface Monitoring -> Data streams tab at http://localhost:9021/monitoring/streams. The monitoring page shows the total number of messages produced and consumed on the cluster. You can scroll down to see more details on the consumer groups for your queries.
Tip
Depending on your machine, these charts may take a few minutes to populate and you might need to refresh your browser.
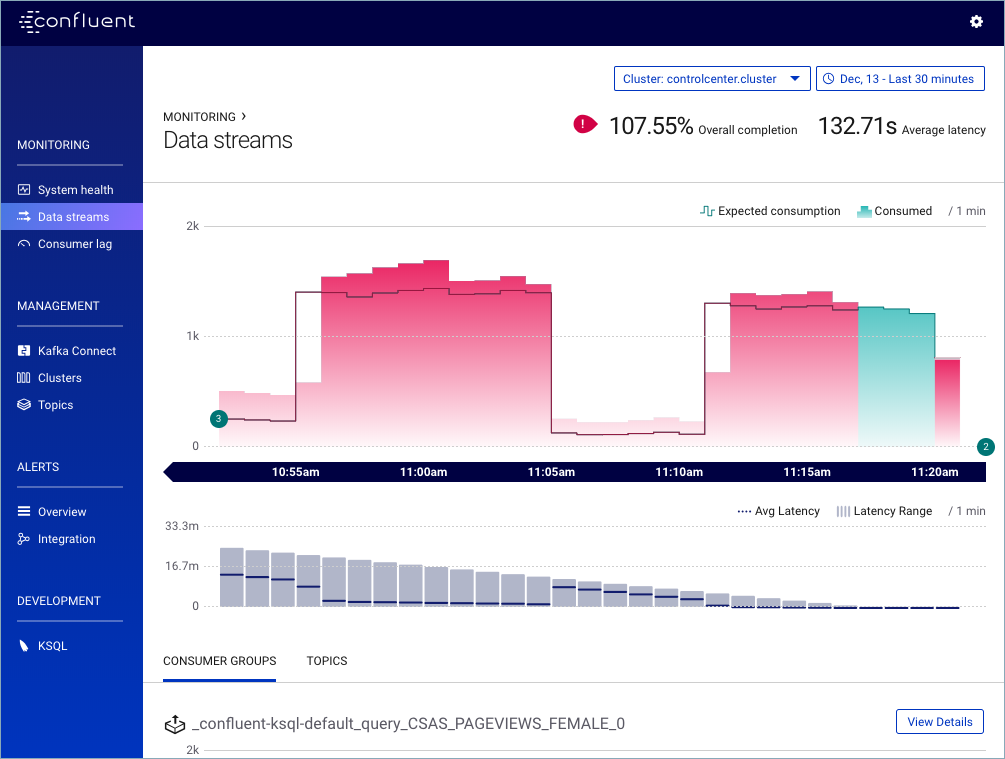
Now that your streams are running you can monitor them.
- View the consumers that have been created by KSQL
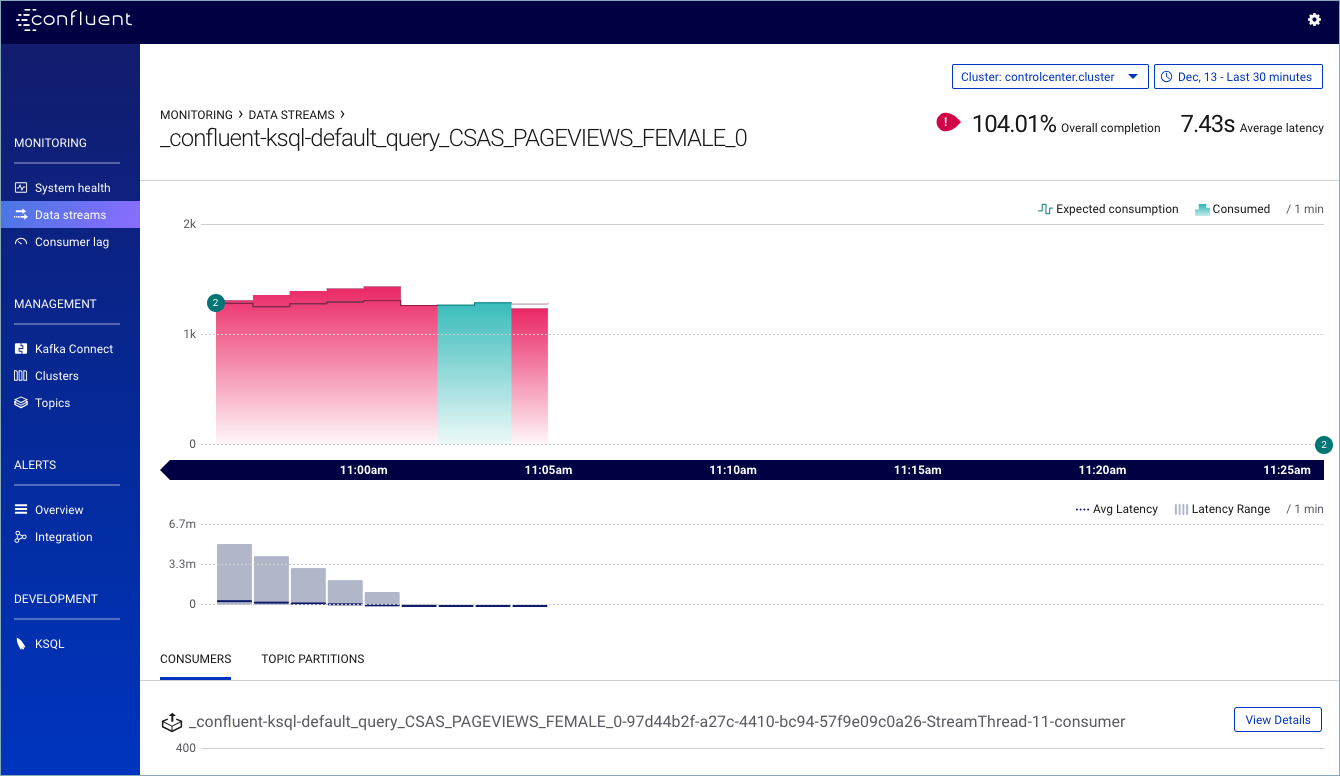
Click the CONSUMER GROUPS tab and then View Details for the
_confluent-ksql-default_query_CSAS_PAGEVIEWS_FEMALE_0consumer group.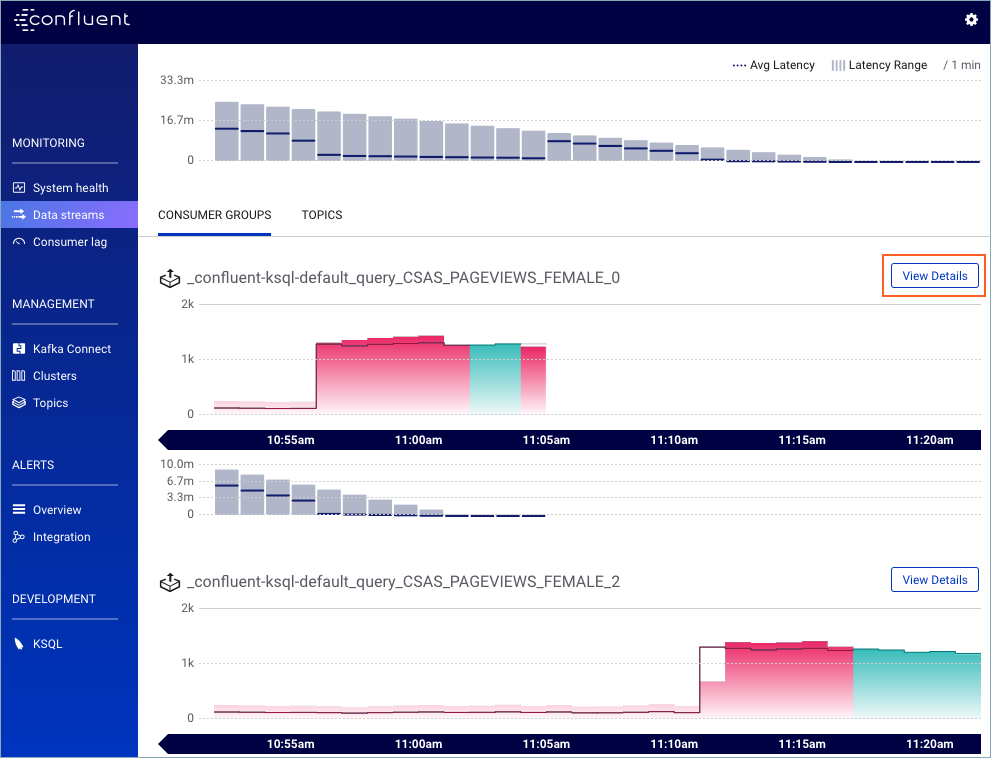
This graph shows the messages being consumed by the stream query.
Step 6: Stop Confluent Platform
When you are done working with the local install, you can stop Confluent Platform.
Stop Confluent Platform using the Confluent CLI
stopcommand.<path-to-confluent>/bin/confluent stop
Destroy the data in the Confluent Platform instance with the
destroycommand.<path-to-confluent>/bin/confluent destroy
You can start the local install of Confluent Platform again with the start command.
Troubleshooting
If you encountered any issues, review the following resolutions before trying the steps again.
Issue: Cannot locate the Datagen Connector
Resolution: Verify that you have added the location of the Confluent Platform bin directory to your PATH
as described in Step 1: Download and Start Confluent Platform:
export PATH=<path-to-confluent>/bin:$PATH
Resolution: Verify the DataGen Connector is installed and running.
Ensure that the kafka-connect-datagen is installed and running as described in Step 1: Download and Start Confluent Platform.
<path-to-confluent>/bin/confluent-hub install --no-prompt confluentinc/kafka-connect-datagen:0.1.0
Your output should resemble:
Running in a "--no-prompt" mode
...
Completed
Resolution: Check the connect logs for Datagen.
<path-to-confluent>/bin/confluent log connect | grep -i Datagen
Your output should resemble:
[2019-04-18 14:21:08,840] INFO Loading plugin from: /Users/user.name/Confluent/confluent-version/share/confluent-hub-components/confluentinc-kafka-connect-datagen (org.apache.kafka.connect.runtime.isolation.DelegatingClassLoader:215)
[2019-04-18 14:21:08,894] INFO Registered loader: PluginClassLoader{pluginLocation=file:/Users/user.name/Confluent/confluent-version/share/confluent-hub-components/confluentinc-kafka-connect-datagen/} (org.apache.kafka.connect.runtime.isolation.DelegatingClassLoader:238)
[2019-04-18 14:21:08,894] INFO Added plugin 'io.confluent.kafka.connect.datagen.DatagenConnector' (org.apache.kafka.connect.runtime.isolation.DelegatingClassLoader:167)
[2019-04-18 14:21:09,882] INFO Added aliases 'DatagenConnector' and 'Datagen' to plugin 'io.confluent.kafka.connect.datagen.DatagenConnector' (org.apache.kafka.connect.runtime.isolation.DelegatingClassLoader:386)
Resolution: Verify the .jar file for kafka-connect-datagen has been added and is present in the lib subfolder.
ls <path-to-confluent>/share/confluent-hub-components/confluentinc-kafka-connect-datagen/lib/
Your output should resemble:
...
kafka-connect-datagen-0.1.0.jar
...
Resolution: Verify the plugin exists in the connector path.
When you installed the kafka-connect-datagen file from Confluent hub, the installation directory
is added to the plugin path of several properties files:
 Adding installation directory to plugin path in the following files:
/Users/user.name/Confluent/confluent-version/etc/kafka/connect-distributed.properties
/Users/user.name/Confluent/confluent-version/etc/kafka/connect-standalone.properties
/Users/user.name/Confluent/confluent-version/etc/schema-registry/connect-avro-distributed.properties
/Users/user.name/Confluent/confluent-version/etc/schema-registry/connect-avro-standalone.properties
...
You can use any of them to check the
connector path. This example uses the connect-avro-distributed.properties file.
grep plugin.path <path-to-confluent>/etc/schema-registry/connect-avro-distributed.properties
Your output should resemble:
plugin.path=share/java,/Users/user.name/Confluent/confluent-version/share/confluent-hub-components
Confirm its contents are present:
ls <path-to-confluent>/share/confluent-hub-components/confluentinc-kafka-connect-datagen
Your output should resemble:
assets doc lib manifest.json
Resolution: In Kakfa Connect > Setup Connection, scroll down through the list of connectors to locate DatagenConnector; there are multiple connectors in the menu.
Issue: Stream-Stream joins error
An error states Stream-Stream joins must have a WITHIN clause specified. This error can occur if you created streams
for both pageviews and users by mistake.
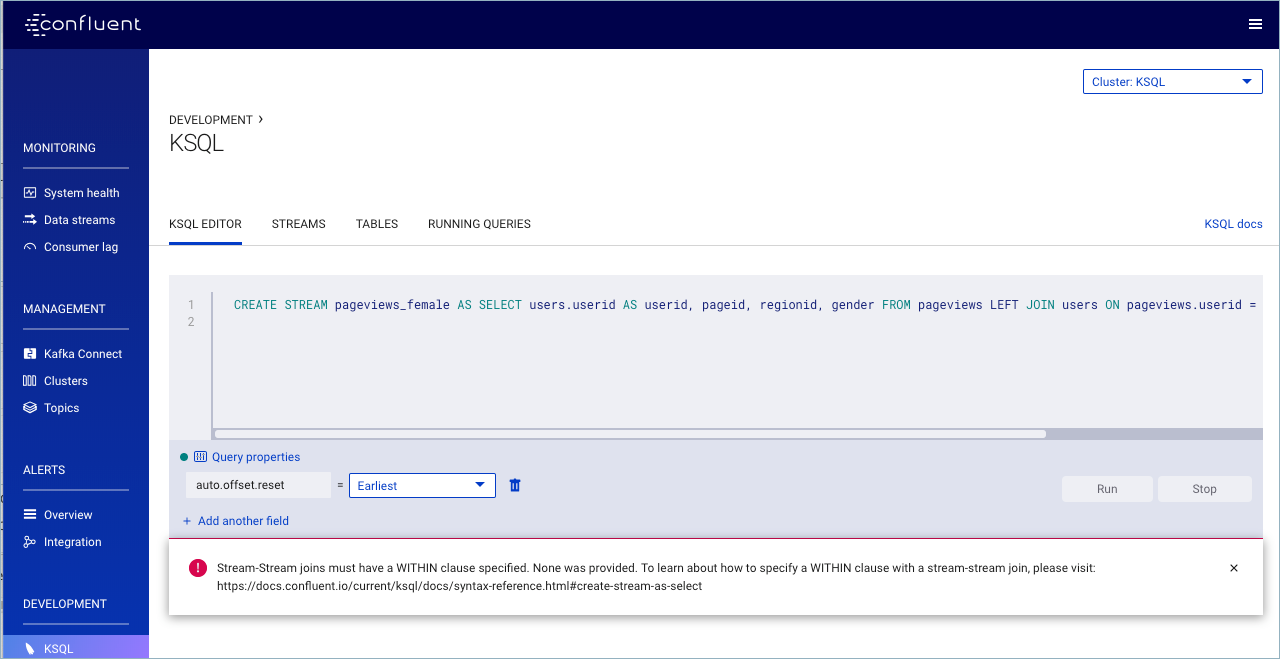
Resolution: Ensure that you created a stream for pageviews, and a table for users in Step 4: Create and Write to a Stream and Table using KSQL.
Issue: Unable to successfully complete KSQL query steps
Java errors or other severe errors were encountered.
Resolution: Ensure you are on an Operating System currently supported by Confluent Platform.
Next Steps
Learn more about the components shown in this quick start:
- KSQL documentation Learn about processing your data with KSQL for use cases such as streaming ETL, real-time monitoring, and anomaly detection. You can also learn how to use KSQL with this collection of scripted demos.
- Stream Processing Cookbook Try out in-depth KSQL tutorials and recommended deployment scenarios.
- Kafka Streams documentation Learn how to build stream processing applications in Java or Scala.
- Kafka Connect documentation Learn how to integrate Kafka with other systems and download ready-to-use connectors to easily ingest data in and out of Kafka in real-time.
- Kafka Clients documentation Learn how to read and write data to and from Kafka using programming languages such as Go, Python, .NET, C/C++.
- Tutorials and Demos Try out the Confluent Platform tutorials and examples, watch demos and screencasts, and learn with white papers and blogs.