

Tutorial: Link Confluent Platform and Confluent Cloud Clusters
This tutorial shows how to use Cluster Linking for hybrid use cases that link Confluent Platform and Confluent Cloud clusters.
What the tutorial covers
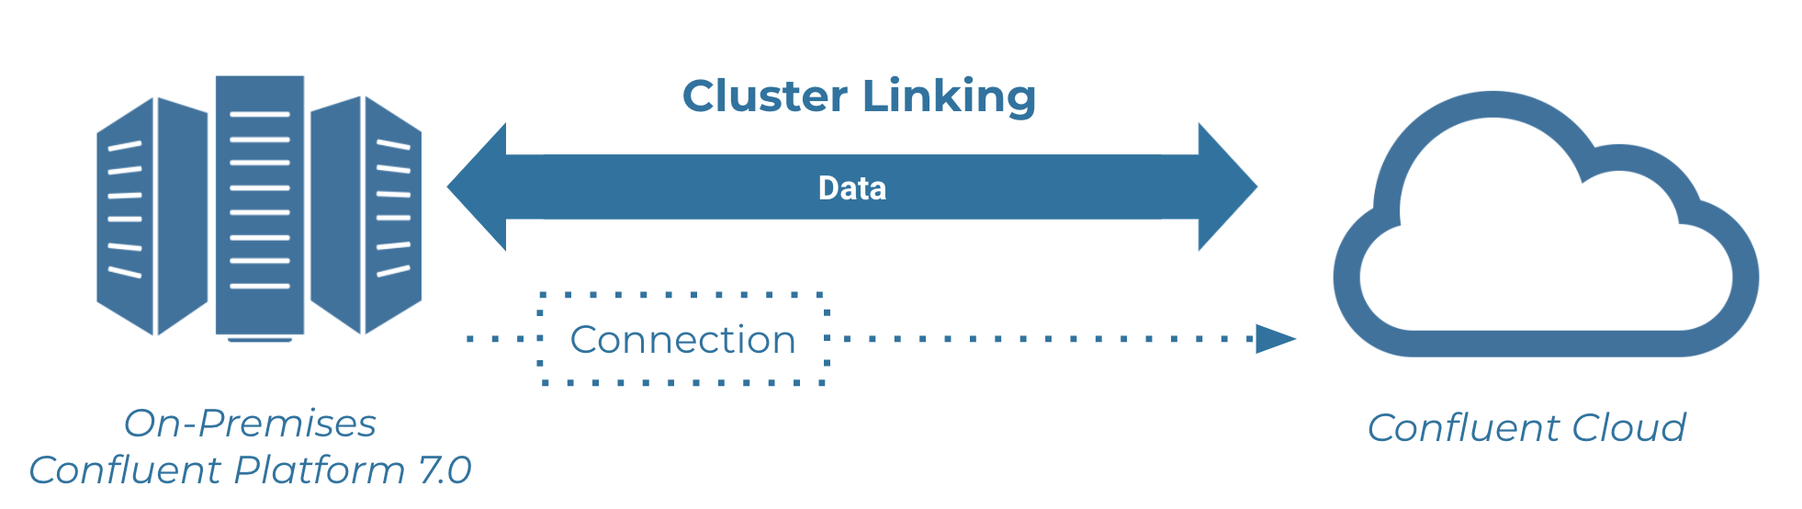
By the end of this tutorial, you have configured two clusters, one on Confluent Platform and one on Confluent Cloud, and used Cluster Linking to share topic data bidirectionally across the clusters, without opening your firewall to Confluent Cloud.
You create a deployment with data flowing in both directions:
From Confluent Cloud to Confluent Platform.
From Confluent Platform to Confluent Cloud.
If you mirror from Confluent Platform to Confluent Cloud, you need a source-initiated cluster link: a cluster link where Confluent Platform initiates the connection to Confluent Cloud, so you don’t have to open your firewall to Confluent Cloud. Source-initiated links require Confluent Platform 7.1.0 or later.
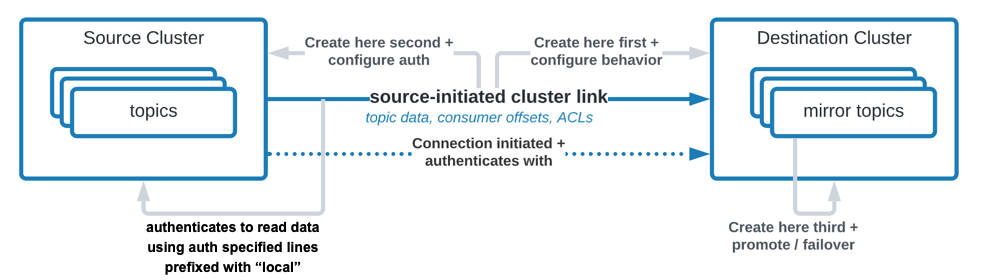
In both cases, Confluent Platform brokers initiate the connection to Confluent Cloud brokers, so you don’t have to open your firewall to let Confluent Cloud connect to your Confluent Platform brokers.
In the process, you create security credentials and configuration files to use with the Confluent Platform and Confluent Cloud commands. For a list of these, see the Configuration summary at the end of this tutorial.
To see what clusters can use Cluster Linking, see Supported Cluster Types.
Install Confluent Platform and configure environment variables
Download and extract Confluent Platform version 7.1.0 or later. For install options, see Install instructions for self-managed deployments.
Configure environment variables.
The rest of the tutorial uses the following environment variables for KRaft mode:
export CONFLUENT_HOME=<cp_installation_directory>
export CONFLUENT_CONFIG=$CONFLUENT_HOME/etc/kafka
Important
Add the preceding two exports to your
.bashrcor.bash_profilefile so that your shell runs them whenever you open a new terminal window.
About prerequisites and command examples
Note
As a general guideline that applies beyond this tutorial, any customer-owned firewall that allows the cluster link connection from source cluster brokers to destination cluster brokers must allow the Transmission Control Protocol (TCP) connection to persist for Cluster Linking to work.
Before you start, make sure that you meet the following requirements:
These instructions assume you have a local installation of Confluent Platform 7.1.0 or later. Confluent Platform requires Java 8, 11, or 17. Java 17 is the recommended version. The documentation provides Install instructions for self-managed deployments. If you are new to Confluent Platform, first work through the Quick Start for Apache Kafka using Confluent Platform or the basic Cluster Linking tutorial, and then return to this tutorial.
This tutorial and the source-initiated link feature require Confluent Enterprise, and are not supported in Confluent Community or Apache Kafka®.
With a default installation of Confluent Platform, the Confluent CLI and Cluster Linking commands are available in
$CONFLUENT_HOME/bin, and properties files are in the$CONFLUENT_CONFIGdirectory ($CONFLUENT_HOME/etc/kafka/). You must have Confluent Platform running to access these commands. After you configure and start Confluent Platform, you can type any command with no arguments to get help (for example,kafka-cluster-links).This tutorial requires a Confluent Cloud login and the Confluent CLI. To learn more, see Get the latest version of Confluent Cloud in the Confluent Cloud Cluster Linking Quick Start and Migrate Confluent CLI. If you are new to Confluent Cloud, walk through that quick start first, and then return to this tutorial.
This tutorial requires that you run a Dedicated cluster in Confluent Cloud, which incurs Confluent Cloud charges.
The parameter
password.encoder.secretencrypts the credentials that Confluent Platform stores in the cluster link. ZooKeeper, as supported on Confluent Platform versions earlier than 8.0, requires this parameter, as does migrating from ZooKeeper to KRaft, as described in What’s supported. To learn more about this parameter, see Multi-Region Clusters.
KRaft and ZooKeeper support in this tutorial
The metadata mode you can run depends on your Confluent Platform version.
Important
As of Confluent Platform 8.0, ZooKeeper is no longer available for new deployments. As a best practice, migrate to KRaft mode for new deployments. To learn more about running Kafka in KRaft mode, see KRaft Overview and the KRaft steps in the Platform Quick Start. To learn about migrating from older versions, see Migrate from ZooKeeper to KRaft on Confluent Platform. This tutorial covers KRaft mode only.
Earlier versions of this documentation provide examples for both KRaft and ZooKeeper.
For KRaft, the examples show a combined mode configuration, where for each cluster the broker and controller run on the same server. Combined mode is not intended for production use, but this tutorial uses it for simplicity. If you want to run controllers and brokers on separate servers, use KRaft in isolated mode. To learn more, see KRaft Overview and KRaft mode under Configure Confluent Platform for production.
Configure Kafka brokers and controllers
Create and update the following configuration files. A summary of server configurations and files appears at the end of this topic.
Make sure you have set the environment variables as described in Install Confluent Platform and configure environment variables. The rest of the tutorial uses these variables.
Port mapping
The example deployment in this tutorial uses the following default port and
feature configurations, and assumes that services run on localhost.
Component |
Confluent Platform |
|---|---|
Kafka broker |
9092 |
KRaft controller |
9093 |
This tutorial uses these example ports. Cluster Linking does not require you to use these ports. Confluent Cloud assigns its own endpoints.
If you have other processes using these ports, either quit the other processes or change the tutorial steps to use different ports.
Configure ports, data directories, authentication, and cluster links
The following steps describe how to set up your Kafka brokers and controllers for
KRaft mode. Configure the following files in $CONFLUENT_CONFIG to set up
the Confluent Platform cluster.
Copy
$CONFLUENT_CONFIG/server.propertiesto use as a basis forserver-clusterlinking.properties:cp $CONFLUENT_CONFIG/server.properties $CONFLUENT_CONFIG/server-clusterlinking.properties
Change the
listenersandadvertised.listenersconfigurations to useSASL_PLAINTEXTinstead of the defaultPLAINTEXT. You can update both of these configurations simultaneously with the following command:sed -i '' -e "s/listeners=PLAINTEXT/listeners=SASL_PLAINTEXT/g" $CONFLUENT_CONFIG/server-clusterlinking.properties
Change the
inter.broker.listener.nameconfiguration to useSASL_PLAINTEXTinstead of the defaultPLAINTEXT:sed -i '' -e "s/inter.broker.listener.name=PLAINTEXT/inter.broker.listener.name=SASL_PLAINTEXT/g" $CONFLUENT_CONFIG/server-clusterlinking.properties
Make the following update to the
advertised.listenersport configuration:sed -i '' -e "s/your.host.name:9092/:9092/g" $CONFLUENT_CONFIG/server-clusterlinking.properties
Update Kafka data directories:
sed -i '' -e "s/kraft-combined-logs/kraft-combined-logs-1/g" $CONFLUENT_CONFIG/server-clusterlinking.properties
Append the following lines to the end of the server properties file to set the configurations specific to Cluster Linking.
The last configuration option,
password.encoder.secret, is required only for the ZooKeeper mode that earlier versions of Confluent Platform support. KRaft does not need it, as explained in What’s supported.echo "sasl.enabled.mechanisms=SCRAM-SHA-512" >> $CONFLUENT_CONFIG/server-clusterlinking.properties
echo "sasl.mechanism.inter.broker.protocol=SCRAM-SHA-512" >> $CONFLUENT_CONFIG/server-clusterlinking.properties
echo "listener.name.sasl_plaintext.scram-sha-512.sasl.jaas.config=org.apache.kafka.common.security.scram.ScramLoginModule required username="kafka" password="kafka-secret";" >> $CONFLUENT_CONFIG/server-clusterlinking.properties
echo "confluent.reporters.telemetry.auto.enable=false" >> $CONFLUENT_CONFIG/server-clusterlinking.properties
echo "confluent.cluster.link.metadata.topic.replication.factor=1" >> $CONFLUENT_CONFIG/server-clusterlinking.properties
echo "confluent.cluster.link.enable=true" >> $CONFLUENT_CONFIG/server-clusterlinking.properties
echo "password.encoder.secret=encoder-secret" >> $CONFLUENT_CONFIG/server-clusterlinking.properties
Tip
If you check your
server-clusterlinking.propertiesfile after these edits, you should see the preceding lines indicating security protocols at the end of the file, and the other configurations updated per the previous steps.This example configures only one Confluent Server broker, secured with SASL/SCRAM authentication, along with one KRaft controller. The local listener uses
SASL_PLAINTEXT, so traffic to it is authenticated but not encrypted. This configuration works for local testing. In a production setting, use more brokers and the requisite KRaft controllers, spread across different machines for fault tolerance and high availability. Secure all of them with authentication and encryption.This example sets the replication factors for the internal topics that the tutorial creates to
1, because this is a testing setup with only one broker. For production deployments, do not set the replication factor of these topics to1. Set the replication factor to three or more, depending on the number of brokers.On Confluent Platform versions earlier than 8.0 that use ZooKeeper, the parameter
password.encoder.secretencrypts the credentials that Confluent Platform stores in the cluster link. The ZooKeeper mode that these earlier versions support requires this parameter, as does migrating from ZooKeeper to KRaft, as described in What’s supported. KRaft mode in Confluent Platform 8.0 or later does not require it. To learn more, see Multi-Region Clusters.
Format storage and create cluster credentials
This section formats the log directories for the server, creates SASL/SCRAM
credentials on the Confluent Platform cluster, and creates the CP-command.config file that
authenticates the commands you run against the cluster. To learn more about
authenticating to Confluent Platform clusters, see
Configure SASL/SCRAM authentication for Confluent Platform.
Change directories to
$CONFLUENT_HOME, the top of your Confluent Platform installation directory. You must run thekafka-storagecommands in the following steps from this directory.cd $CONFLUENT_HOME
Generate a
random-uuidusing thekafka-storagetool:KAFKA_CLUSTER_ID="$(bin/kafka-storage random-uuid)"
Format log directories for this server and create SASL/SCRAM credentials on the cluster: a
kafkauser for the Kafka cluster itself and anadminuser for running commands against the cluster. For KRaft, you must apply both credentials together in a single command.bin/kafka-storage format -t $KAFKA_CLUSTER_ID -c $CONFLUENT_CONFIG/server-clusterlinking.properties -S 'SCRAM-SHA-512=[name=kafka,iterations=8192,password=kafka-secret]' -S 'SCRAM-SHA-512=[name=admin,iterations=8192,password=admin-secret]' --ignore-formatted --standalone
Tip
The
kafka-storagecommand runs only once per broker or controller. You cannot use this command to update an existing cluster. If you configure something incorrectly here, you must recreate the directories from scratch and work through the steps again.Create a file with the
admincredentials to authenticate when you run commands against the Confluent Platform cluster.Open a text editor, create a file called
$CONFLUENT_CONFIG/CP-command.config, and paste the following content:sasl.mechanism=SCRAM-SHA-512 security.protocol=SASL_PLAINTEXT sasl.jaas.config=org.apache.kafka.common.security.scram.ScramLoginModule required \ username="admin" \ password="admin-secret";
Start the Confluent Platform cluster
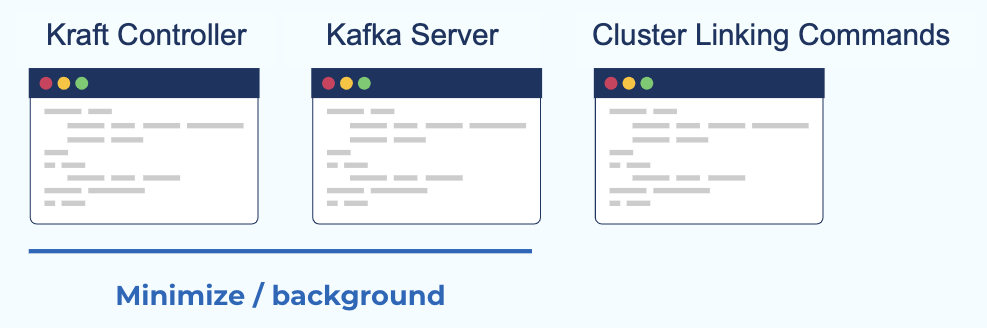
Run the following commands in separate command windows.
The commands that run the KRaft controller and Kafka brokers do not complete until you stop them, so these windows must stay open while the applications are running.
Use another command window as your main terminal, in which you run commands that
you expect to complete. Examples of these commands are kafka-configs,
kafka-topics, and kafka-cluster-links, and in some cases
kafka-console-producer and kafka-console-consumer, although you can leave
those last two running.
In a new command window, start a Confluent Server broker for the Confluent Platform cluster, passing the credentials as part of the command:
kafka-server-start $CONFLUENT_CONFIG/server-clusterlinking.properties
Get the Confluent Platform cluster ID:
kafka-cluster cluster-id --bootstrap-server localhost:9092 --config $CONFLUENT_CONFIG/CP-command.config
Your output should resemble the following:
Cluster ID: G1pnOMOxSjWYIX8xuR2cfQ
In this case,
G1pnOMOxSjWYIX8xuR2cfQis the Confluent Platform cluster ID, referred to in these examples as$CP_CLUSTER_ID.Optionally, set an environment variable in the local shell or in a zsh or bash profile so you can copy and paste commands in later steps:
export CP_CLUSTER_ID=<cp_cluster_id>
Create or select a Confluent Cloud cluster
As noted in About prerequisites and command examples, this tutorial requires a Dedicated Confluent Cloud cluster with public internet access, which incurs charges. You can create one for this tutorial and then delete it when you finish the tutorial.
Log in to Confluent Cloud with the Confluent CLI:
confluent loginView environments and select the one you want to use by environment ID:
confluent environment list
An asterisk in the list indicates the currently selected environment. You can select a different environment as follows:
confluent environment use <environment_id>
Use an existing Dedicated cluster in Confluent Cloud, or create a new one either in the Confluent Cloud Console (log in to Confluent Cloud) or directly with the Confluent CLI, as shown in the following command:
confluent kafka cluster create CLOUD-DEMO --type dedicated --cloud aws --region us-east-1 --cku 1 --availability single-zone
Your output should resemble the following:
It may take up to 5 minutes for the Kafka cluster to be ready.
+--------------+---------------+
| Id           | lkc-59oyn     |
| Name         | CLOUD-DEMO    |
| Type         | DEDICATED     |
| Ingress      |            50 |
| Egress       |           150 |
| Storage      | Infinite      |
| Provider     | aws           |
| Availability | single-zone   |
| Region       | us-east-1     |
| Status       | PROVISIONING  |
| Endpoint     |               |
| ApiEndpoint  |               |
| RestEndpoint |               |
| ClusterSize  |             1 |
+--------------+---------------+
If you created a new Confluent Cloud cluster, wait for Confluent Cloud to provision the cluster. Provisioning typically takes a few minutes, but can take longer. Confluent notifies you by email when the cluster is ready to use.
View your clusters:
confluent kafka cluster list
An asterisk indicates the currently selected cluster. You can select a different cluster as follows:
confluent kafka cluster use <cc_cluster_id>
Tip
To act on a cluster that is not currently selected, specify its cluster ID. For example,
confluent kafka cluster describe <cluster_id>.Note the cluster ID for your Dedicated cluster, referred to as
$CC_CLUSTER_IDin this tutorial.Optionally, set an environment variable in the local shell or in a zsh or bash profile so you can copy and paste commands in later steps:
export CC_CLUSTER_ID=<cc_cluster_id>
Populate the Confluent Platform cluster
With both clusters running, this section creates a topic on the Confluent Platform cluster, produces sample messages to it, and consumes them to verify data flow. These steps use the Kafka command-line tools bundled with Confluent Platform.
Create a topic on the Confluent Platform cluster with a single partition so ordering is easier to see:
kafka-topics --create --topic from-on-prem --partitions 1 --replication-factor 1 --bootstrap-server localhost:9092 --command-config $CONFLUENT_CONFIG/CP-command.config
You should get confirmation that the topic was created.
Created topic from-on-prem.
You can get a list of existing topics as follows:
kafka-topics --list --bootstrap-server localhost:9092 --command-config $CONFLUENT_CONFIG/CP-command.config
To get detailed information about a topic, use the
--describeoption:kafka-topics --describe --topic from-on-prem --bootstrap-server localhost:9092 --command-config $CONFLUENT_CONFIG/CP-command.config
Produce messages to the
from-on-premtopic on the source cluster:seq 1 5 | kafka-console-producer --topic from-on-prem --bootstrap-server localhost:9092 --producer.config $CONFLUENT_CONFIG/CP-command.config
The command should terminate without any output.
Consume from the topic on the source cluster.
Run a consumer to read messages from the
from-on-premtopic:kafka-console-consumer --topic from-on-prem --from-beginning --bootstrap-server localhost:9092 --consumer.config $CONFLUENT_CONFIG/CP-command.config
If the consumer reads the messages, your output resembles the following:
1
2
3
4
5
Press Ctrl+C to return to the prompt.
Create an API key for the Confluent Cloud cluster
Create an API key so that Confluent Platform can authenticate to your Confluent Cloud cluster when it mirrors data to it.
Create a user API key for the Confluent Cloud cluster that acts as the destination for Confluent Platform to Confluent Cloud topic data mirroring:
confluent api-key create --resource $CC_CLUSTER_ID
Save the resulting API key and secret in a safe place. This tutorial refers to these as
<cc_link_api_key>and<cc_link_api_secret>. Use this API key and secret, which belong to the Confluent Cloud cluster, to create the Confluent Platform to Confluent Cloud link. You add these to a configuration file in the next step.Important
If you are setting this up in production, use a service account API key instead of a user-associated key.
The topic data sharing tutorial explains how to set up privileges to access Confluent Cloud clusters with a service account. For source-initiated links, the only access control list (ACL) your service account needs is ALTER on the destination cluster (Cluster: Alter ACL). To learn more about ACLs for cluster linking, see Security for Cluster Linking on Confluent Platform and Security for Cluster Linking on Confluent Cloud.
Mirror data from Confluent Platform to Confluent Cloud
The following sections set up and test a cluster link that mirrors data from Confluent Platform to Confluent Cloud.
Tip
To mirror consumer group offsets, you must enable consumer offset sync and pass in a JSON file that identifies which groups to sync, excluding any groups already used on the destination. This tutorial does not show that configuration.
Create the Confluent Platform to Confluent Cloud link
Set up the cluster link that mirrors data from Confluent Platform to Confluent Cloud.
Tip
This tutorial shows how to create a cluster link from Confluent Platform to Confluent Cloud. You can use the same general configuration if the destination is Confluent Platform 7.0 or later. You would create the cluster link in the same way.
This is a source-initiated link, meaning that its connection comes from Confluent Platform and goes to Confluent Cloud, so you don’t have to open your on-premises firewall.
To create this source-initiated link, you must create both halves of the cluster link: the first half on Confluent Cloud and the second half on Confluent Platform.
Create a cluster link on the Confluent Cloud cluster.
Create a link configuration file
$CONFLUENT_CONFIG/clusterlink-hybrid-dst.configwith the following entries:link.mode=DESTINATION connection.mode=INBOUND
The combination of the configurations
link.mode=DESTINATIONandconnection.mode=INBOUNDtells the cluster link that it is the destination half of a source-initiated cluster link. You must use these two configurations together.This example assumes a single listener. If you configure multiple listeners (for example,
INTERNAL,REPLICATION, andEXTERNAL) and want to switch to a listener other than the default, add one more parameter to the configuration:local.listener.name=EXTERNAL. To learn more, see the Confluent Platform documentation on Configuration Options and Understanding Listeners in Cluster Linking.If you want to add any configurations to your cluster link, such as consumer offset sync or auto-create mirror topics, add them to
clusterlink-hybrid-dst.config. Cluster link configurations are always set on the destination cluster link, not the source cluster link.Create the destination cluster link on Confluent Cloud:
confluent kafka link create from-on-prem-link --cluster $CC_CLUSTER_ID \
  --source-cluster $CP_CLUSTER_ID \
  --config-file $CONFLUENT_CONFIG/clusterlink-hybrid-dst.config
Tip
--source-cluster-idwas replaced with--source-clusterin version 3 of confluent CLI, as described in the command reference for confluent kafka link create.The output from this command should indicate that the link was created.
Created cluster link "from-on-prem-link".
Tip
You can list the cluster links and their configurations on Confluent Cloud with the following commands:
confluent kafka link list --cluster $CC_CLUSTER_ID
confluent kafka --cluster $CC_CLUSTER_ID link configuration list <link_name>
Create a security credential for the cluster link on Confluent Platform. Confluent Platform uses this credential to read topic data and metadata from the source cluster.
kafka-configs --bootstrap-server localhost:9092 --alter --add-config \
  'SCRAM-SHA-512=[iterations=8192,password=1LINK2RUL3TH3MALL]' \
  --entity-type users --entity-name cp-to-cloud-link \
  --command-config $CONFLUENT_CONFIG/CP-command.config
Your output should resemble the following:
Completed updating config for user cp-to-cloud-link.
Create a link configuration file
$CONFLUENT_CONFIG/clusterlink-CP-src.configfor the source cluster link on Confluent Platform with the following entries:link.mode=SOURCE connection.mode=OUTBOUND bootstrap.servers=<cc_bootstrap_server> ssl.endpoint.identification.algorithm=https security.protocol=SASL_SSL sasl.mechanism=PLAIN sasl.jaas.config=org.apache.kafka.common.security.plain.PlainLoginModule required username='<cc_link_api_key>' password='<cc_link_api_secret>'; local.listener.name=SASL_PLAINTEXT local.security.protocol=SASL_PLAINTEXT local.sasl.mechanism=SCRAM-SHA-512 local.sasl.jaas.config=org.apache.kafka.common.security.scram.ScramLoginModule required username="cp-to-cloud-link" password="1LINK2RUL3TH3MALL";
The combination of the configurations
link.mode=SOURCEandconnection.mode=OUTBOUNDtells the cluster link that it is the source half of a source-initiated cluster link. You must use these configurations together.The middle section tells the cluster link the
bootstrap.serversof the Confluent Cloud destination cluster to reach out to, and the authentication credentials to use. Cluster Linking to Confluent Cloud uses TLS andSASL_PLAIN. The Confluent Cloud cluster requires these credentials to accept the incoming request. The Confluent Cloud bootstrap server appears as the Endpoint in the output ofconfluent kafka cluster describe $CC_CLUSTER_ID, or in the cluster settings in the Confluent Cloud Console. If you use the Endpoint from the Confluent CLI output, remove the protocol prefix. For example, if the endpoint shows asSASL_SSL://pkc-r2ymk.us-east-1.aws.confluent.cloud:9092, your entry in$CONFLUENT_CONFIG/clusterlink-CP-src.configisbootstrap.servers=pkc-r2ymk.us-east-1.aws.confluent.cloud:9092.The last section, where each line starts with
local, contains the security credentials that the source Confluent Platform cluster uses to read data.The authentication mechanisms and security protocols for Confluent Platform map to what you define for the brokers and controllers. Those for Confluent Cloud map to what you define in a file called
clusterlink-cloud-to-CP.configin a later step (see Create the Confluent Cloud to Confluent Platform link). To learn more about the authentication and security protocols used, see Configure SASL/SCRAM authentication for Confluent Platform, and the JAAS section in particular.
Caution
Do not add cluster link configurations, such as consumer offset sync or auto-create mirror topics, to
clusterlink-CP-src.config. Set these configurations on the destination cluster link, not the source cluster link.Create the source cluster link on Confluent Platform by running the following command with the configuration file from the previous step:
kafka-cluster-links --bootstrap-server localhost:9092 \
     --create --link from-on-prem-link \
     --config-file $CONFLUENT_CONFIG/clusterlink-CP-src.config \
     --cluster-id $CC_CLUSTER_ID --command-config $CONFLUENT_CONFIG/CP-command.config
Your output should resemble the following:
Cluster link 'from-on-prem-link' creation successfully completed.
Tip
You can list cluster links on Confluent Platform with this command:
kafka-cluster-links --list --bootstrap-server localhost:9092 --command-config $CONFLUENT_CONFIG/CP-command.config
To create the cluster link on Confluent Platform, you use the kafka-cluster-links tool rather than the Confluent CLI that you used for Confluent Cloud.
Create a mirror topic and verify data on Confluent Cloud
While logged in to Confluent Cloud, create a mirror topic of the Confluent Platform from-on-prem
topic, and then verify that the mirrored data arrives.
Note
When you use Schema Linking with a mirror topic that has a schema, and you want to use that topic with Confluent Cloud ksqlDB, broker-side schema ID validation, or the topic viewer, make sure that Schema Linking puts the schema in the default context of the Confluent Cloud Schema Registry. To learn more, see How Schemas work with Mirror Topics.
Before you run the first command in the following steps, make sure that you are still logged in to Confluent Cloud and have the appropriate environment and cluster selected. To list and select these resources, use the commands
confluent environment list,confluent environment use,confluent kafka cluster list, andconfluent kafka cluster use. An asterisk in the output of the list commands indicates the selected environment or cluster. If you select no resources, or the wrong ones, the commands don’t work.
Create a mirror topic.
A mirror topic is a read-only copy of a source topic that a cluster link keeps continuously in sync. The following command establishes a mirror of the original
from-on-premtopic, using the cluster linkfrom-on-prem-link:confluent kafka mirror create from-on-prem --link from-on-prem-link
Your output should resemble the following:
Created mirror topic "from-on-prem".
The mirror topic name must match the original topic name. To learn more, see Known Limitations.
A mirror topic must specify the link to its source topic at creation time. Specifying the link at creation time ensures that the mirror topic starts as a clean slate, with no conflicting data or metadata.
List the mirror topics on the link:
confluent kafka mirror list --cluster $CC_CLUSTER_ID
Your output should resemble the following:
      Link Name     | Mirror Topic Name | Num Partition | Max Per Partition Mirror Lag | Source Topic Name | Mirror Status | Status Time Ms
+-------------------+-------------------+---------------+------------------------------+-------------------+---------------+----------------+
  from-on-prem-link | from-on-prem      |             1 |                            0 | from-on-prem      | ACTIVE        |  1633640214250
Consume from the mirror topic on the destination cluster to verify that mirroring works.
Still on Confluent Cloud, run a consumer on the mirror topic to read the messages you originally produced to the Confluent Platform topic:
confluent kafka topic consume from-on-prem --from-beginning
Your output should resemble the following:
1
2
3
4
5
Note
If you get a
no API key selected for resourceerror when you run the consumer, run the following command to specify the<cc_api_key>for the Confluent Cloud destination cluster, and then run the consumer command again:confluent api-key use <cc_api_key> --resource $CC_CLUSTER_ID. You can also follow the instructions that the Confluent CLI provides with the error message.
Mirror data from Confluent Cloud to Confluent Platform
The following sections set up and test a cluster link that mirrors data from Confluent Cloud to Confluent Platform.
Tip
To mirror consumer group offsets, you must enable consumer offset sync and pass in a JSON file that identifies which groups to sync, excluding any groups already used on the destination. This tutorial does not show that configuration.
Create the Confluent Cloud to Confluent Platform link
Create another user API key for this cluster link on your Confluent Cloud cluster:
confluent api-key create --resource $CC_CLUSTER_ID
The same cluster that served as the destination in the previous steps serves as the source cluster in the following steps, so you create a different API key and secret for the same cluster to serve in this new role.
Save the resulting API key and secret in a safe place. This tutorial refers to these as
<cc_src_api_key>and<cc_src_api_secret>. You add these to a configuration file in the next step.Important
If you are setting this up in production, use a service account API key instead of a user-associated key. To do this, create a service account for your cluster link, give the service account the requisite ACLs, and then create an API key for the service account. As a best practice, give each cluster link its own API key and service account. The topic data sharing tutorial explains how to set up privileges to access Confluent Cloud clusters with a service account.
Use
confluent kafka cluster describeto get the Confluent Cloud cluster endpoint URL:confluent kafka cluster describe $CC_CLUSTER_ID
The following steps refer to this endpoint URL as
<cc_bootstrap_server>.Open a text editor and save your API key and secret, along with the following configuration entries, in a file called
$CONFLUENT_CONFIG/clusterlink-cloud-to-CP.configthat the Confluent Platform commands use to authenticate to Confluent Cloud.Add the following configuration entries:
bootstrap.servers=<cc_bootstrap_server>
security.protocol=SASL_SSL
sasl.mechanism=PLAIN
sasl.jaas.config=org.apache.kafka.common.security.plain.PlainLoginModule required username='<cc_src_api_key>' password='<cc_src_api_secret>';
Tip
When you paste this content into a text editor, keep each statement on a single line. The last line, which starts with
sasl.jaas.config=, must appear on a single line, as must the others. Supply values for your Confluent Cloud bootstrap server, API key, and secret, and then save the file.The values for
security.protocolandsasl.mechanismmap to what you defined for Confluent Cloud inclusterlink-CP-src.config.
Create the cluster link to Confluent Platform.
If you want to follow this example exactly, name the cluster link
from-cloud-link, although you can use any name. You use the cluster link name to create and manipulate mirror topics. You cannot rename a cluster link after you create it.The following command passes the Confluent Platform admin credentials with
--command-config, as described in Setting Properties on a Cluster Link.kafka-cluster-links --bootstrap-server localhost:9092 \ --create --link from-cloud-link \ --config-file $CONFLUENT_CONFIG/clusterlink-cloud-to-CP.config \ --cluster-id $CC_CLUSTER_ID --command-config $CONFLUENT_CONFIG/CP-command.config
Your output should resemble the following:
Cluster link 'from-cloud-link' creation successfully completed.
Check that the link exists with the
kafka-cluster-links --listcommand:kafka-cluster-links --list --bootstrap-server localhost:9092 --command-config $CONFLUENT_CONFIG/CP-command.config
Your output should resemble the following, showing the
from-on-prem-linklink you created earlier along with the newfrom-cloud-linklink:Link name: 'from-on-prem-link', link ID: '7eb4304e-b513-41d2-903e-147dea62a01c', remote cluster ID: 'lkc-1vgo6', local cluster ID: 'G1pnOMOxSjWYIX8xuR2cfQ' Link name: 'from-cloud-link', link ID: 'b1a56076-4d6f-45e0-9013-ff305abd0e54', remote cluster ID: 'lkc-1vgo6', local cluster ID: 'G1pnOMOxSjWYIX8xuR2cfQ'
Create topics and mirror data to Confluent Platform
In Confluent Cloud, use the Confluent CLI to create a topic named
cloud-topicwith one partition:confluent kafka topic create cloud-topic --partitions 1
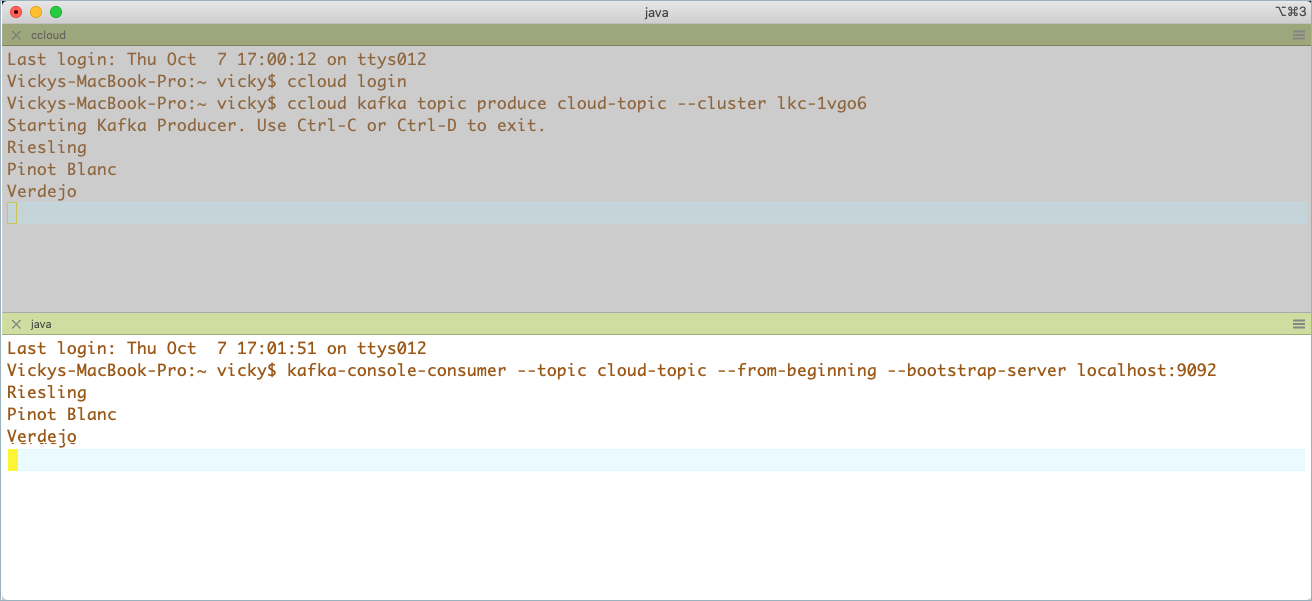
In another command window on Confluent Cloud, start a producer that sends data to the
cloud-topictopic:confluent kafka topic produce cloud-topic --cluster $CC_CLUSTER_ID
Verify that the producer has started. The following output indicates that the producer is ready:
confluent kafka topic produce cloud-topic --cluster lkc-1vgo6
Starting Kafka Producer. Use Ctrl-C or Ctrl-D to exit.
Type entries into the producer window and press Enter after each one:
Riesling
Pinot Blanc
Verdejo
Mirror the
cloud-topictopic on Confluent Platform with the commandkafka-mirrors --create --mirror-topic <topic_name>.The following command establishes a mirror of the original
cloud-topictopic, using the cluster linkfrom-cloud-link:kafka-mirrors --create --mirror-topic cloud-topic --link from-cloud-link --bootstrap-server localhost:9092 --command-config $CONFLUENT_CONFIG/CP-command.config
You should get confirmation that the mirror topic was created.
Created topic cloud-topic.
On Confluent Platform, check the mirror topic status by running
kafka-mirrors --describeon thefrom-cloud-linklink:kafka-mirrors --describe --link from-cloud-link --bootstrap-server localhost:9092 --command-config $CONFLUENT_CONFIG/CP-command.config
The output shows the status of any mirror topics on the specified link.
Topic: cloud-topic        LinkName: from-cloud-link       LinkId: b1a56076-4d6f-45e0-9013-ff305abd0e54    MirrorTopic: cloud-topic        State: ACTIVE   StateTime: 2021-10-07 16:36:20
          Partition: 0    State: ACTIVE   DestLogEndOffset: 2     LastFetchSourceHighWatermark: 2 Lag: 0  TimeSinceLastFetchMs: 384566
Consume the data from the on-premises mirror topic:
kafka-console-consumer --topic cloud-topic --from-beginning --bootstrap-server localhost:9092 --consumer.config $CONFLUENT_CONFIG/CP-command.config
Your output should match the entries you typed into the Confluent Cloud producer.
View the configuration of your cluster link:
kafka-configs --describe --cluster-link from-cloud-link --bootstrap-server localhost:9092 --command-config $CONFLUENT_CONFIG/CP-command.config
The command lists the cluster link configurations. The following example shows part of the output.
Dynamic configs for cluster-link from-cloud-link are:
metadata.max.age.ms=300000 sensitive=false synonyms={}
reconnect.backoff.max.ms=1000 sensitive=false synonyms={}
auto.create.mirror.topics.filters= sensitive=false synonyms={}
ssl.engine.factory.class=null sensitive=false synonyms={}
sasl.kerberos.ticket.renew.window.factor=0.8 sensitive=false synonyms={}
reconnect.backoff.ms=50 sensitive=false synonyms={}
consumer.offset.sync.ms=30000 sensitive=false synonyms={}

...

link.mode=DESTINATION sensitive=false synonyms={}
security.protocol=SASL_SSL sensitive=false synonyms={}
acl.sync.ms=5000 sensitive=false synonyms={}
ssl.keymanager.algorithm=SunX509 sensitive=false synonyms={}
sasl.login.callback.handler.class=null sensitive=false synonyms={}
replica.fetch.max.bytes=5242880 sensitive=false synonyms={}
availability.check.consecutive.failure.threshold=5 sensitive=false synonyms={}
sasl.login.refresh.window.jitter=0.05 sensitive=false synonyms={}
Tear down the tutorial environment
When you finish the tutorial, clean up the environment in this order: stop the clients, promote the mirror topics, delete the topics, delete the cluster links, and stop Confluent Platform.
Stop consumers and producers
Stop consumers and producers with Ctrl+C in their command windows.
Promote mirror topics
Promote the mirror topics to regular topics.
On Confluent Cloud, promote the mirror topic called
from-on-prem:confluent kafka mirror promote from-on-prem --link from-on-prem-link --cluster $CC_CLUSTER_ID
Your output should resemble the following:
 Mirror Topic Name | Partition | Partition Mirror Lag | Error Message | Error Code | Last Source Fetch Offset
+-------------------+-----------+----------------------+---------------+------------+--------------------------+
 from-on-prem      |         0 |                    0 |               |            |                        9
To verify that the mirroring stopped, run the preceding command again. You should get a message in the Error Message column saying that
Topic 'from-on-prem' has already stopped its mirror from 'from-on-prem-link'.On Confluent Platform, promote the mirror topic called
cloud-topic:kafka-mirrors --promote --topics cloud-topic --bootstrap-server localhost:9092 --command-config $CONFLUENT_CONFIG/CP-command.config
Your output should resemble the following:
Calculating max offset and ms lag for mirror topics: [cloud-topic]
Finished calculating max offset lag and max lag ms for mirror topics: [cloud-topic]
Request for stopping topic cloud-topics mirror was successfully scheduled. Please use the describe command with the --pending-stopped-only option to monitor progress.
If you retry this command, you get an error indicating that the
Topic 'cloud-topic' has already stopped its mirror 'from-cloud-link'.
Delete the source and mirror topics
Delete the topics that you created on both clusters.
Tip
To list the topics on Confluent Cloud:
confluent kafka topic listTo list the topics on Confluent Platform:
kafka-topics --list --bootstrap-server localhost:9092 --command-config $CONFLUENT_CONFIG/CP-command.config
Delete the topics on Confluent Cloud:
confluent kafka topic delete cloud-topic
confluent kafka topic delete from-on-prem
Delete the topics on Confluent Platform:
kafka-topics --delete --topic cloud-topic --bootstrap-server localhost:9092 --command-config $CONFLUENT_CONFIG/CP-command.config
kafka-topics --delete --topic from-on-prem --bootstrap-server localhost:9092 --command-config $CONFLUENT_CONFIG/CP-command.config
Delete the cluster links
Delete the cluster links on Confluent Platform.
List the cluster links on Confluent Platform:
kafka-cluster-links --list --bootstrap-server localhost:9092 --command-config $CONFLUENT_CONFIG/CP-command.config
The output lists two links: one for the source-initiated link and one that acts as the destination for Confluent Cloud data:
Link name: 'from-on-prem-link', link ID: '7eb4304e-b513-41d2-903e-147dea62a01c', remote cluster ID: 'lkc-1vgo6' local cluster ID: ', local cluster ID: 'G1pnOMOxSjWYIX8xuR2cfQ'' remote cluster available: 'true'
Link name: 'from-cloud-link', link ID: 'b1a56076-4d6f-45e0-9013-ff305abd0e54', remote cluster ID: 'lkc-1vgo6' local cluster ID: ', local cluster ID: 'G1pnOMOxSjWYIX8xuR2cfQ'' remote cluster available: 'true'
Delete the cluster links on Confluent Platform with
kafka-cluster-links --delete <link_name>:kafka-cluster-links --delete --link from-on-prem-link --bootstrap-server localhost:9092 --command-config $CONFLUENT_CONFIG/CP-command.config
kafka-cluster-links --delete --link from-cloud-link --bootstrap-server localhost:9092 --command-config $CONFLUENT_CONFIG/CP-command.config
Each command outputs confirmation that the link is deleted.
Delete the cluster link on Confluent Cloud. Confluent Cloud holds only the destination half of the source-initiated link, so only one link appears here.
List the cluster links on Confluent Cloud:
confluent kafka link list
Your output should resemble the following:
      Link Name     |   Source Cluster Id
+-------------------+------------------------+
  from-on-prem-link | G1pnOMOxSjWYIX8xuR2cfQ
Delete the cluster link on Confluent Cloud with
confluent kafka link delete <link_name>:confluent kafka link delete from-on-prem-link
The Confluent CLI confirms that the link is deleted.
Stop Confluent Platform
Stop the remaining components with Ctrl+C in their command windows, in the reverse order in which you started them. Stop the Kafka broker last. In KRaft combined mode, that completes the cleanup.
Configuration summary
Configure the following environment variables in every terminal window so that the tutorial works with KRaft mode. For more information, see Install Confluent Platform and configure environment variables.
CONFLUENT_HOME=<cp_installation_directory>CONFLUENT_CONFIG=$CONFLUENT_HOME/etc/kafka
The tutorial also directs you to export CP_CLUSTER_ID and
CC_CLUSTER_ID. These two variables are optional conveniences that let you
copy and paste the later commands without editing them.
File |
Purpose |
|---|---|
|
Configuration file used for the Confluent Platform cluster startup, as described in Configure Kafka brokers and controllers |
|
|
|
|
|
|
|
|
For a step-by-step guide to configuring all server properties, see Configure Kafka brokers and controllers.
Add the following configurations to the Kafka server properties file:
inter.broker.listener.name=SASL_PLAINTEXTsasl.enabled.mechanisms=SCRAM-SHA-512sasl.mechanism.inter.broker.protocol=SCRAM-SHA-512listener.name.sasl_plaintext.scram-sha-512.sasl.jaas.config=org.apache.kafka.common.security.scram.ScramLoginModule required username="kafka" password="kafka-secret";confluent.reporters.telemetry.auto.enable=falseconfluent.cluster.link.enable=truepassword.encoder.secret=encoder-secret— required when you use ZooKeeper on earlier versions of Confluent Platform where ZooKeeper is supported. Confluent Platform 8.0 and later running in KRaft mode does not require this configuration. To learn more, see What’s supported.confluent.cluster.link.metadata.topic.replication.factor=1— KRaft mode requires this explicit configuration.
Change the following configurations from their defaults in the Kafka server properties file:
listeners=SASL_PLAINTEXT://:9092advertised.listeners=SASL_PLAINTEXT://:9092log.dirs=/tmp/kafka-logs-1