
Share Data Across Clusters, Regions, and Clouds using Confluent Cloud
The steps below guide you through a basic topic data sharing scenario. By the end of this tutorial, you will have configured two clusters and successfully used Cluster Linking to create a mirror topic and share topic data across the clusters. You will also learn how to stop mirroring to make the topic writable, and verify that the two topics have diverged.
Prerequisites
Got Confluent CLI? Make sure it’s up-to-date. If you already have the CLI installed, make sure you have the latest version with new Cluster Linking commands and tools. Run
confluent updateto get the latest version. For details, see Get the latest version of the Confluent CLI in the quick start prerequisites.Make sure you have followed the steps under Commands and prerequisites in the overview. These steps tell you the easiest way to get an up-to-date version of Confluent Cloud if you don’t already have it, and provide a quick overview of Cluster Linking commands.
Your destination cluster must be a Dedicated or Enterprise Confluent Cloud cluster with secure public endpoints.
Your source cluster can be a Basic, Standard, Dedicated, or Enterprise Confluent Cloud cluster with public networking. If you do not have these clusters already, you can create them in the Confluent Cloud Console or in the Confluent CLI.
To learn more about supported cluster types and combinations, see Supported cluster types and supported cluster combinations for private networking.
What the tutorial covers
For this tutorial, you will:
Create two clusters; one of which will serve as the source and the other as the destination cluster. The destination cluster must be a Dedicated cluster.
Set up a cluster link.
Create a mirror topic based on a topic on the source cluster.
Produce data to the source topic.
Consume data on the mirror topic (destination) over the link.
Promote the mirror topic, which will change it from read-only to read/write.
Let’s get started!
Set up two clusters
If you already have two Confluent Cloud clusters set up, one of which is a Dedicated cluster to use as the destination, you can skip to the next task.
Otherwise, set up your clusters as follows.
Tip
If you need more guidance than given below, see Create a Kafka Cluster in Confluent Cloud and Step 1: Create a Kafka cluster in Confluent Cloud in the Getting Started guide.
Log on to the Confluent Cloud Console.
Create two clusters in the same environment, as described in Create a Kafka Cluster in Confluent Cloud.
At least one of these must be a Dedicated cluster, which will serve as the destination cluster.
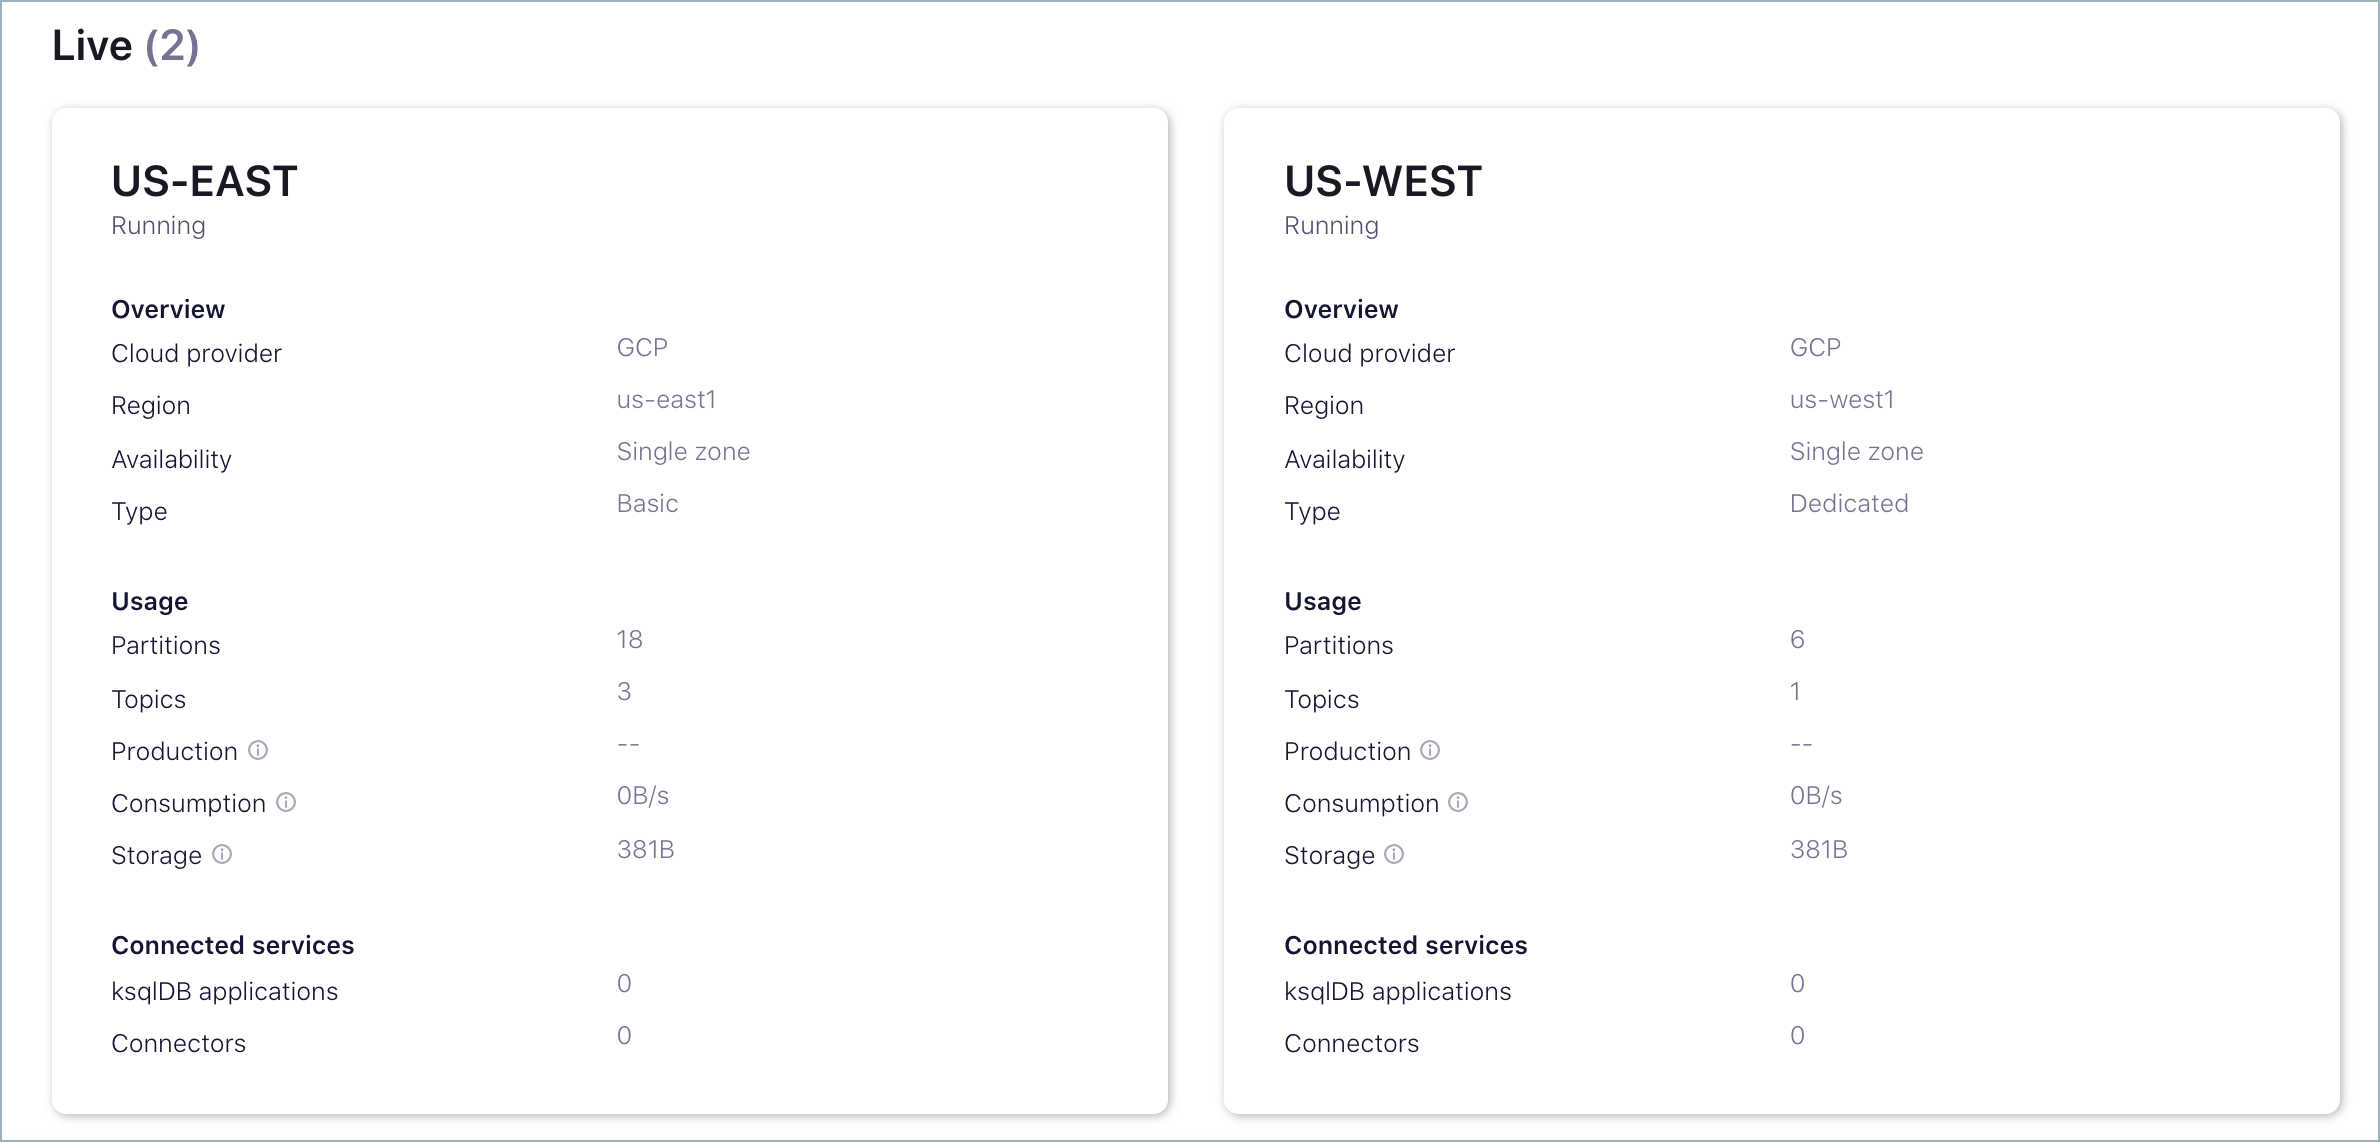
For example, you could create a Basic cluster called US-EAST to use as the source, and a Dedicated cluster called US-WEST to use as the destination.
When you have completed these steps, you should have two clusters, similar to the following.
Populate the source cluster
Create a topic on the source cluster.
For example, create a topic called tasting-menu on US-EAST (the Basic cluster that will act as the source).
To add a topic from the Cloud Console, navigate to the source cluster’s Topics page, US-EAST > Topics, click Create topic, fill in the topic name, and click Create with defaults.
To add a topic from the Confluent CLI, log in to the CLI (
confluent login), select the environment and cluster you want to use, and enter the commandconfluent kafka topic create <topic>. For example:confluent kafka topic create tasting-menu
More detail about working with the Confluent CLI is provided in the next tasks, so if you don’t yet know how to select an environment or cluster on the CLI, this is explained below.
Identify source and destination clusters
Log on to the Confluent CLI.
confluent loginView environments, and select the one you want to use by ID.
confluent environment list
An asterisk indicates the currently selected environment in the list. You can select a different environment as follows.
confluent environment use <environment-ID>
View your clusters.
confluent kafka cluster list
Your output should resemble:
$ confluent kafka cluster list
      Id      |  Name   |   Type    | Cloud    |  Region  | Availability | Status
+-------------+---------+-----------+----------+----------+--------------+--------+
  * lkc-161v5 | US-WEST | DEDICATED | gcp      | us-west1 | single-zone  | UP
    lkc-7k6kj | US-EAST | BASIC     | gcp      | us-east1 | single-zone  | UP
Decide which cluster to use as the Destination cluster and which to use as the Source cluster, and note down the cluster IDs, as you will need them later. For example, using the IDs shown above:
My Destination Cluster ID: lkc-161v5 (DEDICATED)
My Source Cluster ID: lkc-7k6kj (BASIC)
In the examples for this tutorial,
<dst-cluster-id>and<src-cluster-id>indicate your source and destination IDs, respectively.Data will be mirrored from a topic on the source cluster to a topic on the destination cluster.
The destination cluster must be a Dedicated cluster.
The source cluster must be one of the following cluster types:
BASIC
BASIC_LEGACY
STANDARD
DEDICATED-with-secure-public-endpoints
Note
If, instead of a Confluent Cloud cluster, your source cluster is a Confluent Platform or open-source Apache Kafka® cluster, you will need to know your source cluster’s bootstrap server and cluster ID in order to use it. You can find the source cluster ID via the command-line tool
kafka-cluster cluster-idthat comes with Confluent Platform and Apache Kafka®. Your cluster’s administrator will know its bootstrap server.Describe the source cluster.
confluent kafka cluster describe <src-cluster-id>
Your output will resemble:
$ confluent kafka cluster describe lkc-7k6kj
+--------------+--------------------------------------------------------+
| Id           | lkc-7k6kj                                              |
| Name         | US-EAST                                                |
| Type         | BASIC                                                  |
| Ingress      |                                                    100 |
| Egress       |                                                    100 |
| Storage      |                                                   5000 |
| Cloud        | gcp                                                    |
| Availability | single-zone                                            |
| Region       | us-east1                                               |
| Status       | UP                                                     |
| Endpoint     | SASL_SSL://pkc-4yyd6.us-east1.gcp.confluent.cloud:9092 |
| ApiEndpoint  | https://pkac-ew1dj.us-east1.gcp.confluent.cloud        |
+--------------+--------------------------------------------------------+
Note the source cluster Endpoint, as you will need this later on. In this tutorial, this is called the
<src-endpoint>.For example, the Endpoint from the above cluster description is:
SASL_SSL://pkc-4yyd6.us-east1.gcp.confluent.cloud:9092.You will need two sets of API keys and secrets; an API key and secret for the destination cluster, and another set for the source cluster.
You can use API keys you’ve already created (even ones associated with a service account), or create new ones now from the CLI with this command, using the cluster ID as the value for the
--resourceflag.confluent api-key create --resource <cluster-id>
This tutorial refers to the destination’s set
<dst-api-key>and<dst-api-secret>and the source’s set<src-api-key>and<src-api-secret>. Keep these in a safe place, as you cannot retrieve your secrets from the CLI, and you will need both sets of API keys and secrets later on.Tip
The source’s set of API key and secret will be stored on the cluster link and used to fetch data. If you revoke that API key’s permissions, your link will stop working. In that case, you would have to edit the cluster link and give it a different API key and secret.
To learn more about specifying ACLs for resources and operations, see Authorization (ACLs) in the Confluent Platform documentation.
Set up privileges for the cluster link to access topics on the source cluster
Your cluster link will need privileges to read the appropriate topics on your source cluster. To give it these privileges, you create two mechanisms:
A service account for the cluster link. Service accounts are used in Confluent Cloud to group together applications and entities that need access to your Confluent Cloud resources.
An API key and secret that is associated with the cluster link’s service account and the source cluster. The link will use this API key to authenticate with the source cluster when it is fetching topic information and messages. A service account can have many API keys, but for this tutorial, you need only one.
To create these resources, do the following:
Create a service account for this cluster link.
confluent iam service-account create Cluster-Linking-Demo --description "For the cluster link created for the topic data sharing tutorial"
Your output will resemble the following.
+-------------+-----------+
| Id          |    234567 |
| Resource ID | sa-lmno11 |
| Name        | ...       |
| Description | ...       |
+-------------+-----------+
Save the ID field (
<service-account-id>for the purposes of this tutorial).Create the API key and secret.
confluent api-key create --resource <source-cluster-id> --service-account <service-account-id>
Note
Store this key and secret somewhere safe. When you create the cluster link, you must supply it with this API key and secret, which will be stored on the cluster link itself.
Allow the cluster link to read topics on the source cluster. Give the cluster link’s service account the ACLs to be able to READ and DESCRIBE-CONFIGS for all topics.
confluent kafka acl create --allow --service-account <service-account-id> --operations read,describe-configs --topic "*" --cluster <src-cluster-id>
Tip
The example above allows read access to all topics by using the asterisk (
--topic "*") instead of specifying particular topics. If you wish, you can narrow this down to a specific set of topics to mirror. For example, to allow the cluster link to read all topics that begin with a “clicks” prefix, you can do this:confluent kafka acl create --allow --service-account <service-account-id> --operations read,describe-configs --topic "clicks" --prefix --cluster <src-cluster-id>
(Optional) If you want to sync the ACLs you have stored on the source cluster over to the destination cluster, then you must give the cluster link’s service account an ACL to describe the source cluster.
confluent kafka acl create --allow --service-account <service-account-id> --operations describe --cluster-scope --cluster <src-cluster-id>
(Optional) If you want to sync consumer group offsets for mirror topics over this cluster link, then you must give the cluster link’s service account the appropriate ACLs to DESCRIBE topics, and to READ and DESCRIBE consumer groups on the source cluster.
confluent kafka acl create --allow --service-account <service-account-id> --operations describe --topic "*" --cluster <src-cluster-id>
confluent kafka acl create --allow --service-account <service-account-id> --operations read,describe --consumer-group "*" --cluster <src-cluster-id>
Create a cluster link
Create a link from the destination cluster to the source cluster. (The link itself will reside on the destination cluster.)
If you do not have a
.configfile, simply pass the API key and secret at the command line. Your command will look similar to the following:confluent kafka link create <link-name> --cluster <dst-cluster-id> \ --source-cluster <src-cluster-id> \ --source-bootstrap-server <src-bootstrap-url> \ --source-api-key <src-api-key> \ --source-api-secret <src-api-secret>
Tip
--source-cluster-idwas replaced with--source-clusterin version 3 of confluent CLI, as described in the command reference for confluent kafka link create.Replace
<link-name>with whatever you would like to name your link. You will use this name whenever you perform actions on the link.For example, the following creates a cluster link called
usa-east-weston the DEDICATED cluster (lkc-161v5) used for our destination. Note that you specify the cluster ID for the destination (where the link will be created), and the bootstrap URL and config file for the source cluster.confluent kafka link create usa-east-west \ --cluster lkc-161v5 --source-cluster lkc-7k6kj \ --source-bootstrap-server "SASL_SSL://pkc-4yyd6.us-east1.gcp.confluent.cloud:9092" \ --source-api-key keykeykeykeykeyk \ --source-api-secret secretsecretsecretsecretsecretsecretsecretsecretsecretsecretsec
Tip
If you used a
.configfile, your command will look similar to this:confluent kafka link create <link-name> --cluster <dst-cluster-id> --source-bootstrap-server <src-bootstrap-url> --config <source.config>
Describe a given cluster link to get full details.
confluent kafka --cluster <destination-cluster-id> link configuration list <link-name>
Tip
If the destination cluster ID is already set as the active cluster, there is no need to include
--cluster <destination-cluster-id>in the above command. To set the active cluster, first get cluster IDs withconfluent kafka cluster list, then specify the active cluster withconfluent kafka cluster use <cluster-ID>.For example, here is the output describing the usa-east-west link. On newer versions of the Confluent CLI, the output will include more detail than shown here, such as permissions, source, and synonyms:
$ confluent kafka --cluster lkc-161v5 link configuration list usa-east-west

                   Config Name           |                    Config Value
+----------------------------------------+---------------------------------------------+
  connections.max.idle.ms                |                                      600000
  ssl.endpoint.identification.algorithm  | https
  num.cluster.link.fetchers              |                                           1
  sasl.mechanism                         | PLAIN
  replica.socket.timeout.ms              |                                       30000
  socket.connection.setup.timeout.ms     |                                       10000
  consumer.offset.sync.enable            | false
  acl.sync.enable                        | false
  consumer.offset.group.filters          |
  acl.filters                            |
  request.timeout.ms                     |                                       30000
  replica.fetch.wait.max.ms              |                                         500
  cluster.link.retry.timeout.ms          |                                      300000
  ssl.protocol                           | TLSv1.3
  ssl.cipher.suites                      |
  ssl.enabled.protocols                  | TLSv1.2,TLSv1.3
  security.protocol                      | SASL_SSL
  replica.fetch.max.bytes                |                                     1048576
  consumer.offset.sync.ms                |                                       30000
  topic.config.sync.ms                   |                                        5000
  acl.sync.ms                            |                                        5000
  replica.fetch.response.max.bytes       |                                    10485760
  metadata.max.age.ms                    |                                      300000
  replica.socket.receive.buffer.bytes    |                                       65536
  bootstrap.servers                      | pkc-4yyd6.us-east1.gcp.confluent.cloud:9092
  retry.backoff.ms                       |                                         100
  sasl.jaas.config                       |
  replica.fetch.backoff.ms               |                                        1000
  socket.connection.setup.timeout.max.ms |                                      127000
  replica.fetch.min.bytes                |                                           1
  client.dns.lookup                      | use_all_dns_ips
Sync Consumer Group Offsets and ACLs.
You can sync consumer group offsets for mirror topics from the source cluster to the destination. You can also sync ACLs from the source to the destination. To do this, you will need to create a file with these properties, each on its own line, and in the format
[property name]=[property value].consumer.offset.sync.enableWhether or not to sync consumer offsets from the source to the destination.
Type: boolean
Default: false
consumer.offset.group.filtersJSON representation of a regex pattern-matching scheme to specify the consumer groups whose offsets you want to mirror from the source to the destination. Make sure you do not have the same consumer group running on the source and the destination because the consumer offsets will overwrite one another. See below for an example of syncing consumer group offsets for each mirror topic, and also the first step of creating a cluster link in the Disaster Recovery and Failover walkthrough.
Type: string
Default: “”
acl.sync.enableWhether or not to sync ACLs from the source to the destination. Examples are here
Type: boolean
Default: false
acl.filters.jsonJSON representation of a regex pattern-matching scheme to select the ACLs that should be synced.
Type: string
Default: “”
Here is an example that syncs all consumer group offsets for each mirror topic.
consumer.offset.sync.enable=true
consumer.offset.group.filters={"groupFilters": [{"name": "*","patternType": "LITERAL","filterType": "INCLUDE"}]}
Tip
To learn more about setting up .config files, see (Usually optional) Use a config File.
Mirror a topic
Now that you have a cluster link, you can mirror topics across it; from source to destination.
List the topics on the source cluster.
confluent kafka topic list --cluster <src-cluster-id>
For example:
$ confluent kafka topic list --cluster lkc-7k6kj
      Name
+--------------+
  stocks
  tasting-menu
  transactions
Create a mirror topic.
Choose a source topic to mirror and use your cluster link to mirror it.
Tip
If you don’t already have a topic in mind, create one on the source cluster now with
confluent kafka topic create <topic-name> --cluster <src-cluster-id>. If you’ve been following along, usetasting-menu.You create mirror topics on the destination cluster just as you would create a normal topic, but with a few extra parameters.
confluent kafka mirror create <topic-name> --link <link-name> --cluster <dst-cluster-id>
For example:
$ confluent kafka mirror create tasting-menu --link usa-east-west --cluster lkc-161v5
Created topic "tasting-menu".
Note
The mirror topic name (on the Destination) must be the same as the Source topic name. (The mirror topic automatically takes its name from the original topic it’s based on.) Topic renaming is not yet supported.
Make sure that you use the Destination cluster ID in the command to create the mirror topic.
When using Schema Linking: To use a mirror topic that has a schema with Confluent Cloud ksqlDB, broker-side schema ID validation, or the topic viewer, make sure that Schema Linking puts the schema in the default context of the Confluent Cloud Schema Registry. To learn more, see How Schemas work with Mirror Topics.
List cluster links and mirror topics
At various points in a workflow, it may be useful to get lists of cluster linking resources such as links or mirror topics. You might want to do this for the purposes of monitoring, or before starting a failover or migration.
To list the cluster links on the active cluster:
confluent kafka link list
You can get a list mirror topics on a link, or on a cluster.
To list the mirror topics on a specified cluster link:
confluent kafka mirror list --link <link-name> --cluster <cluster-id>
To list all mirror topics on a particular cluster:
confluent kafka mirror list --cluster <cluster-id>
Test the mirror topic by sending data
To test that the cluster link is mirroring data, use the Confluent CLI to produce some data to the topic on the source cluster, and consume it from the mirror topic on the destination cluster.
To do this, you must associate your CLI with an API key for each cluster. These should be different API keys than the one used for the cluster link. These do not have to be associated with a service account.
For example, to create the API key for one of the clusters (if you’ve not already done so): confluent api-key create --resource <src-or-dst-cluster-id>
To tell the CLI to use the API key associated with one or the other cluster: confluent api-key use <api-key> --resource <src-or-dst-cluster-id>
Tell the CLI to use your destination API key for the destination cluster:
confluent api-key use <dst-api-key> --resource <dst-cluster-id>
You will get a verification that the API key is set as the active key for the given cluster ID.
Note
This is a one-time action that will persist forever. This API key will be used whenever you perform one-time actions on your destination cluster. It will not be stored on the cluster link. If you create a cluster link with this API key, then it will continue to run even if you later disable this API key.
Open two new command windows for a producer and consumer.
In each of them, log on to Confluent Cloud, and make sure you are using the environment that contains both your Source and Destination clusters.
As before, use the commands
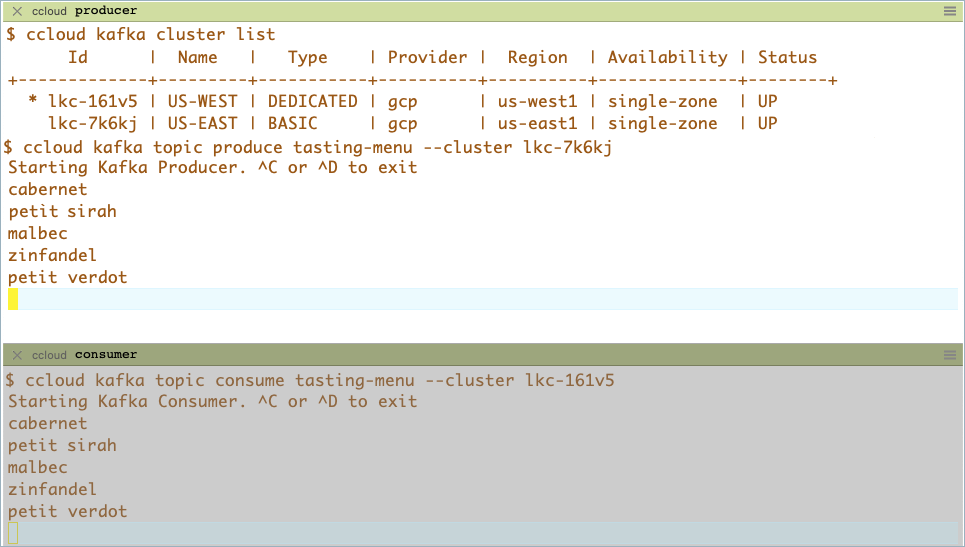
confluent environment list,confluent environment use <environment-ID>, andconfluent kafka cluster listto navigate and verify where you are.In one of the windows, start a producer to produce to your source topic.
confluent kafka topic produce <topic-name> --cluster <src-cluster-id>
In the other window, start a consumer to read from your mirror topic.
confluent kafka topic consume <topic-name> --cluster <dst-cluster-id>
Type entries to produce in the first terminal on your source and watch the messages appear in your second terminal on the mirror topic on the destination.
You can even open another command window and start a consumer for the source cluster to verify that you are producing directly to the source topic. Both the source and mirror topic consumers will match, showing the same data consumed.
Tip
The consumer command example shown above reads data from a topic in real time. To consume from the beginning:
confluent kafka topic consume --from-beginning <topic> --cluster <cluster-id>
Stop the mirror topic
There may come a point when you want to stop mirroring your topic. For example, if you complete a cluster migration, or need to failover to your destination cluster in a disaster event, you may need to stop mirroring topics on the destination.
You can stop mirroring on a per-topic basis. The destination’s mirror topic will stop receiving new data from the source, and become a standard, writable topic into which your producers can send data. No topics or data will be deleted, and this will not affect the source cluster.
To stop mirroring a specific mirror topic on the destination cluster, use the following command:
confluent kafka mirror promote <mirror-topic-name> --link <link-name> --cluster <dst-cluster-id>
To stop mirroring the topic tasting-menu using the destination cluster ID from the examples:
$ confluent kafka mirror promote tasting-menu --link usa-east-west --cluster lkc-161v5
MirrorTopicName | Partition | PartitionMirrorLag | ErrorMessage | ErrorCode
-------------------------------------------------------------------------
tasting-menu    |         0 |                  0 |              |
tasting-menu    |         1 |                  0 |              |
tasting-menu    |         2 |                  0 |              |
tasting-menu    |         3 |                  0 |              |
tasting-menu    |         4 |                  0 |              |
tasting-menu    |         5 |                  0 |              |
The fact that there are no Error messages or error codes means this operation succeeded for all topics.
What happens when you stop mirroring a topic
The mirror promote command stops new data mirroring from the source to the destination for the specified topic(s), and promotes the destination topic to a regular, writable topic.
This action is not reversible. Once you change your mirror topic to a regular topic, you cannot change it back to a mirror topic. If you want it to be a mirror topic once again, you will need to delete it and recreate it as a mirror topic.
If consumer.offset.sync.enable is on, consumer offsets syncing is also stopped for those topic(s).
The command does not affect ACL syncing. (See (Usually optional) Use a config File.)
How to restart mirroring for a topic
To restart mirroring for that topic, you will need to delete the destination topic, and then recreate the destination topic as a mirror.
Migrate a consumer group
To migrate a consumer group called <consumer-group-name> from one cluster to another, stop the consumers and update the cluster link to stop mirroring the consumer offsets:
confluent kafka link configuration update <link-name> --cluster <src-cluster-id> --config \
consumer.offset.group.filters="consumer.offset.group.filters={\"groupFilters\": \
[{\"name\": \"*\",\"patternType\": \"LITERAL\",\"filterType\": \"INCLUDE\"},\
{\"name\":\"<consumer-group-name>\",\"patternType\":\"LITERAL\",\"filterType\":\"EXCLUDE\"}]}"
Then, point your consumers at the destination, and they will restart at the offsets where they left off.
Migrate a producer
To migrate a producer:
Stop the producer.
Make the destination topic writable:
$ confluent kafka mirror promote <mirror-topic-name> --link <link-name> --cluster <dst-cluster-id>
Point your producer at the destination cluster.
Update a cluster link configuration
To dynamically update a configuration parameter of a cluster link:
confluent kafka link configuration update --config "<config-name>=<value>" --cluster <dst-cluster-id>
Delete the link
List cluster links and find the name of the link you want to delete.
confluent kafka link list
Delete the cluster link.
confluent kafka link delete <link-name> --cluster <dst-cluster-id>
If the command is successful, the output is:
Cluster link '<link-name>' deletion successfully completed.
Tip
The system prevents you from deleting a cluster link that is in use. Therefore, if there are mirror topics using the link you want to delete, you must first either delete or promote/failover those topics.
(Usually optional) Use a config File
You have the option to set up a .config file, which can be useful for any of the following scenarios. This file must have a .config extension. Use your favorite text editor to add the file to your working directory.
A configuration file is an alternate way to pass an API key and secret to a Confluent Cloud cluster. If you store your API key and secret in a
.configfile, don’t have to enter your credentials each time on the command line. Instead, use the.configfile to authenticate into the source cluster.If you want to add optional configuration settings to the link (like consumer group sync) then you must pass in a
.configfile with those properties. Note that you might still want to use the command line to specify your API key and secret, and use the configuration file simply for these additional link properties. In that case, you need only specify the link properties in the file, not the key and secret.If the other cluster is not Confluent Cloud, you must use the
.configfile to pass in the security credentials. This is the one case where a config file is not optional.
An example of using this file to sync consumer group offsets and ACLs is provided as the last step (3) under Create a cluster link.
To use a config file to store credentials, copy this starter text into source.config and replace <src-api-key> and <src-api-secret> with the values for your source cluster.
security.protocol=SASL_SSL
sasl.mechanism=PLAIN
sasl.jaas.config=org.apache.kafka.common.security.plain.PlainLoginModule required username='<src-api-key>' password='<src-api-secret>';
Important
The last entry must be all on one line, from
sasl.jaas.configall the way topassword='<src-api-secret>';. Do not add returns, as this will cause the configs to break.The configuration options are case-sensitive. Be sure to use upper and lower case as shown in the example.
Use punctuation marks such as single quotes and semicolon exactly as shown.
To protect your credentials, delete the config file after the link is created.