

Connect Self-Managed REST Proxy to Confluent Cloud
You can configure a local Confluent REST Proxy to produce to and consume from an Apache Kafka® topic in a Kafka cluster in Confluent Cloud.
See also
To see a hands-on example that uses Confluent REST Proxy to produce and consume data from a Kafka cluster, see the Confluent REST Proxy tutorial.
To connect REST Proxy to Confluent Cloud, you must download the Confluent Platform tarball and then start REST Proxy by using a customized properties file.
- Prerequisites
Access to Confluent Cloud.
Authentication options
Authenticating a self-managed REST Proxy with Confluent Cloud involves two independent authentication flows:
REST Proxy to Confluent Cloud, which is how REST Proxy authenticates to the Kafka cluster.
REST clients to REST Proxy, which is how applications authenticate to the REST Proxy endpoint.
The following methods are available for each flow.
Authentication flow |
Method |
Where to configure it |
|---|---|---|
REST Proxy to Confluent Cloud |
API key and secret ( |
|
REST Proxy to Confluent Cloud |
OAuth ( |
|
REST clients to REST Proxy |
OAuth (bearer token) |
The procedure that follows uses an API key and secret. To authenticate with OAuth instead, replace the security properties as shown in the OAuth sections.
Procedure
Download Confluent Platform and extract the contents.
Create a topic named
rest-proxy-testby using the Confluent CLI:confluent kafka topic create --partitions 4 rest-proxy-test
Create a properties file.
Find the client settings for your cluster by clicking CLI & client configuration from the Cloud Console interface.
Click the Clients tab.
Click the Java client selection. This example uses the Java client.
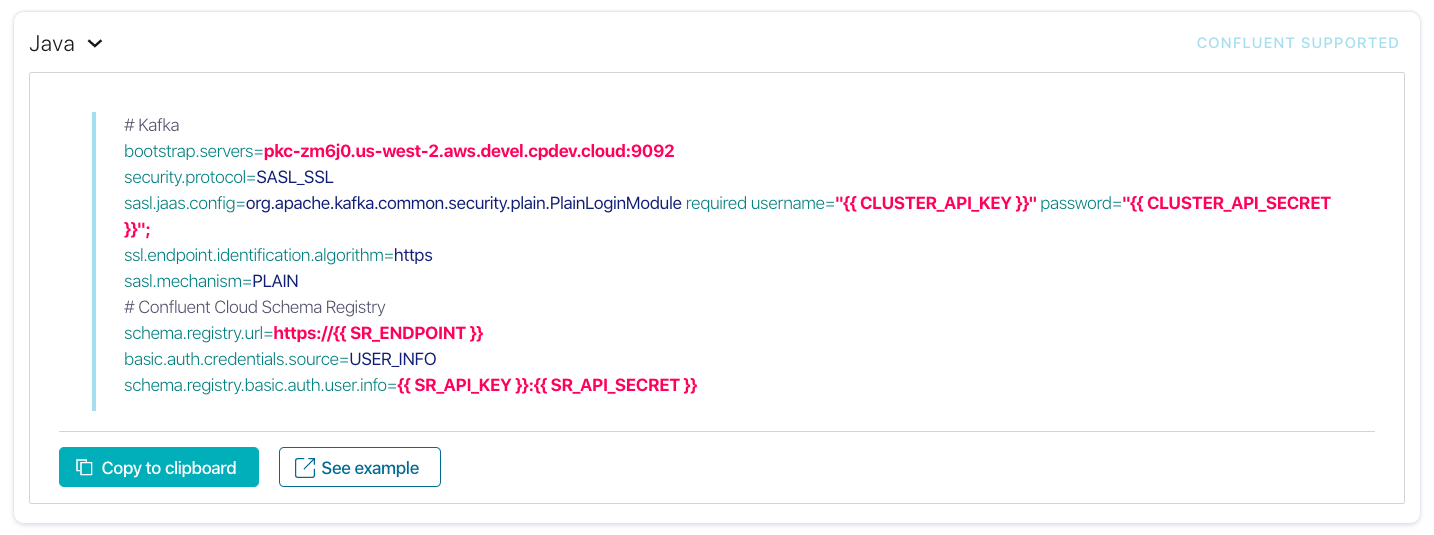
Java client configuration properties
Create a properties file named
ccloud-kafka-rest.propertieswhere the Confluent Platform files are location.cd <path-to-confluent>
touch ccloud-kafka-rest.properties
Copy and paste the Java client configuration properties into the file. Add the
client.prefix to each of security properties. For example:# Kafka bootstrap.servers=<myproject>.cloud:9092 security.protocol=SASL_SSL sasl.jaas.config=org.apache.kafka.common.security.plain.PlainLoginModule \ required username="<kafka-cluster-api-key>" password="<kafka-cluster-api-secret>"; ssl.endpoint.identification.algorithm=https sasl.mechanism=PLAIN client.bootstrap.servers=<myproject>.cloud:9092 client.security.protocol=SASL_SSL client.sasl.jaas.config=org.apache.kafka.common.security.plain.PlainLoginModule \ required username="<kafka-cluster-api-key>" password="<kafka-cluster-api-secret>"; client.ssl.endpoint.identification.algorithm=https client.sasl.mechanism=PLAIN # Confluent Cloud Schema Registry schema.registry.url=<schema-registry-endpoint> client.basic.auth.credentials.source=USER_INFO client.schema.registry.basic.auth.user.info=<schema-registry-api-key>:<schema-registry-api-secret>
Producers, consumers, and the admin client share the
client.properties. Refer to the following table to specify additional properties for the producer, consumer, or admin client.Component
Prefix
Example
Admin Client
admin.admin.request.timeout.ms
Consumer
consumer.consumer.request.timeout.ms
Producer
producer.producer.acks
An example of adding these properties is shown below:
# Kafka
bootstrap.servers=<myproject>.cloud:9092
security.protocol=SASL_SSL
client.security.protocol=SASL_SSL
client.sasl.jaas.config=org.apache.kafka.common.security.plain.PlainLoginModule required username="<kafka-cluster-api-key>" password="<kafka-cluster-api-secret>";
client.ssl.endpoint.identification.algorithm=https
sasl.mechanism=PLAIN
client.sasl.mechanism=PLAIN
# Confluent Cloud Schema Registry
schema.registry.url=<schema-registry-endpoint>
client.basic.auth.credentials.source=USER_INFO
client.schema.registry.basic.auth.user.info=<schema-registry-api-key>:<schema-registry-api-secret>

# consumer only properties must be prefixed with consumer.
consumer.retry.backoff.ms=600
consumer.request.timeout.ms=25000

# producer only properties must be prefixed with producer.
producer.acks=1

# admin client only properties must be prefixed with admin.
admin.request.timeout.ms=50000
For details about how to create a Confluent Cloud API key and API secret so that you can communicate with the REST API, refer to Create credentials to access the Kafka cluster resources.
Start the REST Proxy.
./bin/kafka-rest-start ccloud-kafka-rest.properties
Make REST calls using REST API v2. Do not use API v1. API v1 has a ZooKeeper dependency that does not work in Confluent Cloud.
Example request:
GET /topics/test HTTP/1.1
Accept: application/vnd.kafka.v2+json
Important
When you consume records (
GET /consumers/(string:group_name)/instances/(string:instance)/records) from the self-managed REST Proxy with Confluent Cloud, you must make repeated calls to consume successfully.
Authenticate REST Proxy to Confluent Cloud with OAuth
REST Proxy can authenticate to the Kafka cluster in Confluent Cloud as an OAuth client as an alternative to an API key and secret. This requires an OAuth/OIDC identity provider and identity pool in Confluent Cloud.
In the properties file, replace the API key security properties with the
following OAUTHBEARER properties. As in the API key example, add each
property both with and without the client. prefix.
# Kafka (OAuth to Confluent Cloud)
bootstrap.servers=<myproject>.cloud:9092
security.protocol=SASL_SSL
sasl.mechanism=OAUTHBEARER
sasl.login.callback.handler.class=io.confluent.kafka.clients.oauth.OauthLoginCallbackHandler
sasl.oauthbearer.token.endpoint.url=<idp-token-endpoint-url>
sasl.oauthbearer.client.id=<oauth-client-id>
sasl.oauthbearer.client.secret=<oauth-client-secret>
sasl.oauthbearer.scope=<scope>
sasl.oauthbearer.extensions=logical_cluster=<lkc-id>,identity_pool_id=<pool-id>
# Repeat each property above with the client. prefix
# (for example, client.sasl.mechanism=OAUTHBEARER)
To get the token endpoint, client ID, scope, and identity pool ID, see OAuth/OIDC for client applications.
Authenticate REST clients with OAuth
REST Proxy can require REST clients to present an OAuth bearer token. To enable OAuth on the REST Proxy endpoint, add the following properties to the REST Proxy properties file.
rest.servlet.initializor.classes=io.confluent.common.security.jetty.initializer.AuthenticationHandler
oauthbearer.jwks.endpoint.url=<idp-keys-url>
oauthbearer.expected.issuer=<idp-issuer>
oauthbearer.expected.audience=<audience>
oauthbearer.sub.claim.name=sub
oauthbearer.groups.claim.name=groups
A REST client then includes the bearer token in the Authorization header.
For example:
curl --header 'Authorization: Bearer <idp-token>' \
http://localhost:8082/topics
For the complete REST Proxy OAuth reference, including RBAC and embedded REST Proxy setups, see Configure REST Proxy for OAuth.
Docker environment
You can run a mix of fully managed services in Confluent Cloud and self-managed components running in Docker. For a Docker environment that connects any Confluent Platform component to Confluent Cloud, see cp-all-in-one-cloud.