
Schema Linking on Confluent Cloud
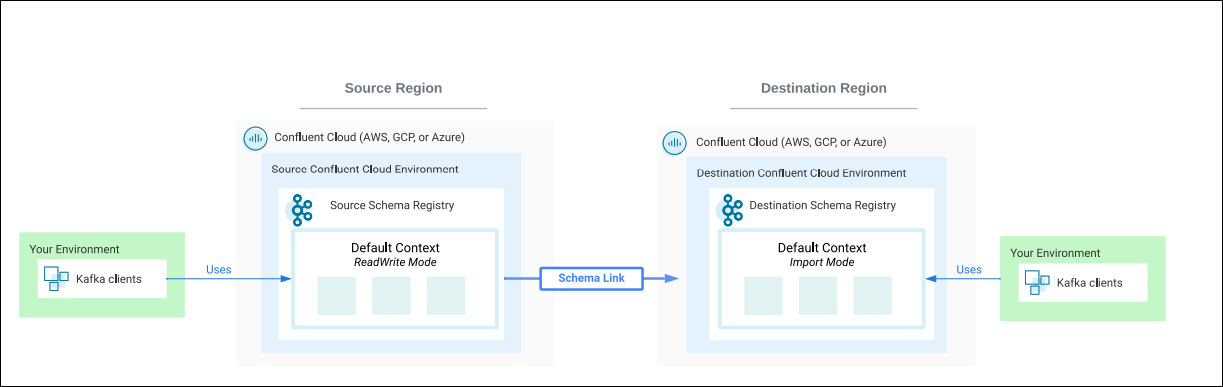
Use Schema Linking to keep schemas in sync across two Schema Registry clusters, typically alongside Cluster Linking for full data synchronization. The quick start below walks through creating and using exporters for Schema Linking on your clusters, followed by reference material for schema contexts and exporters. Contexts are also useful outside of Schema Linking to organize schemas into purpose-specific groups and create virtual “sub-registries.”
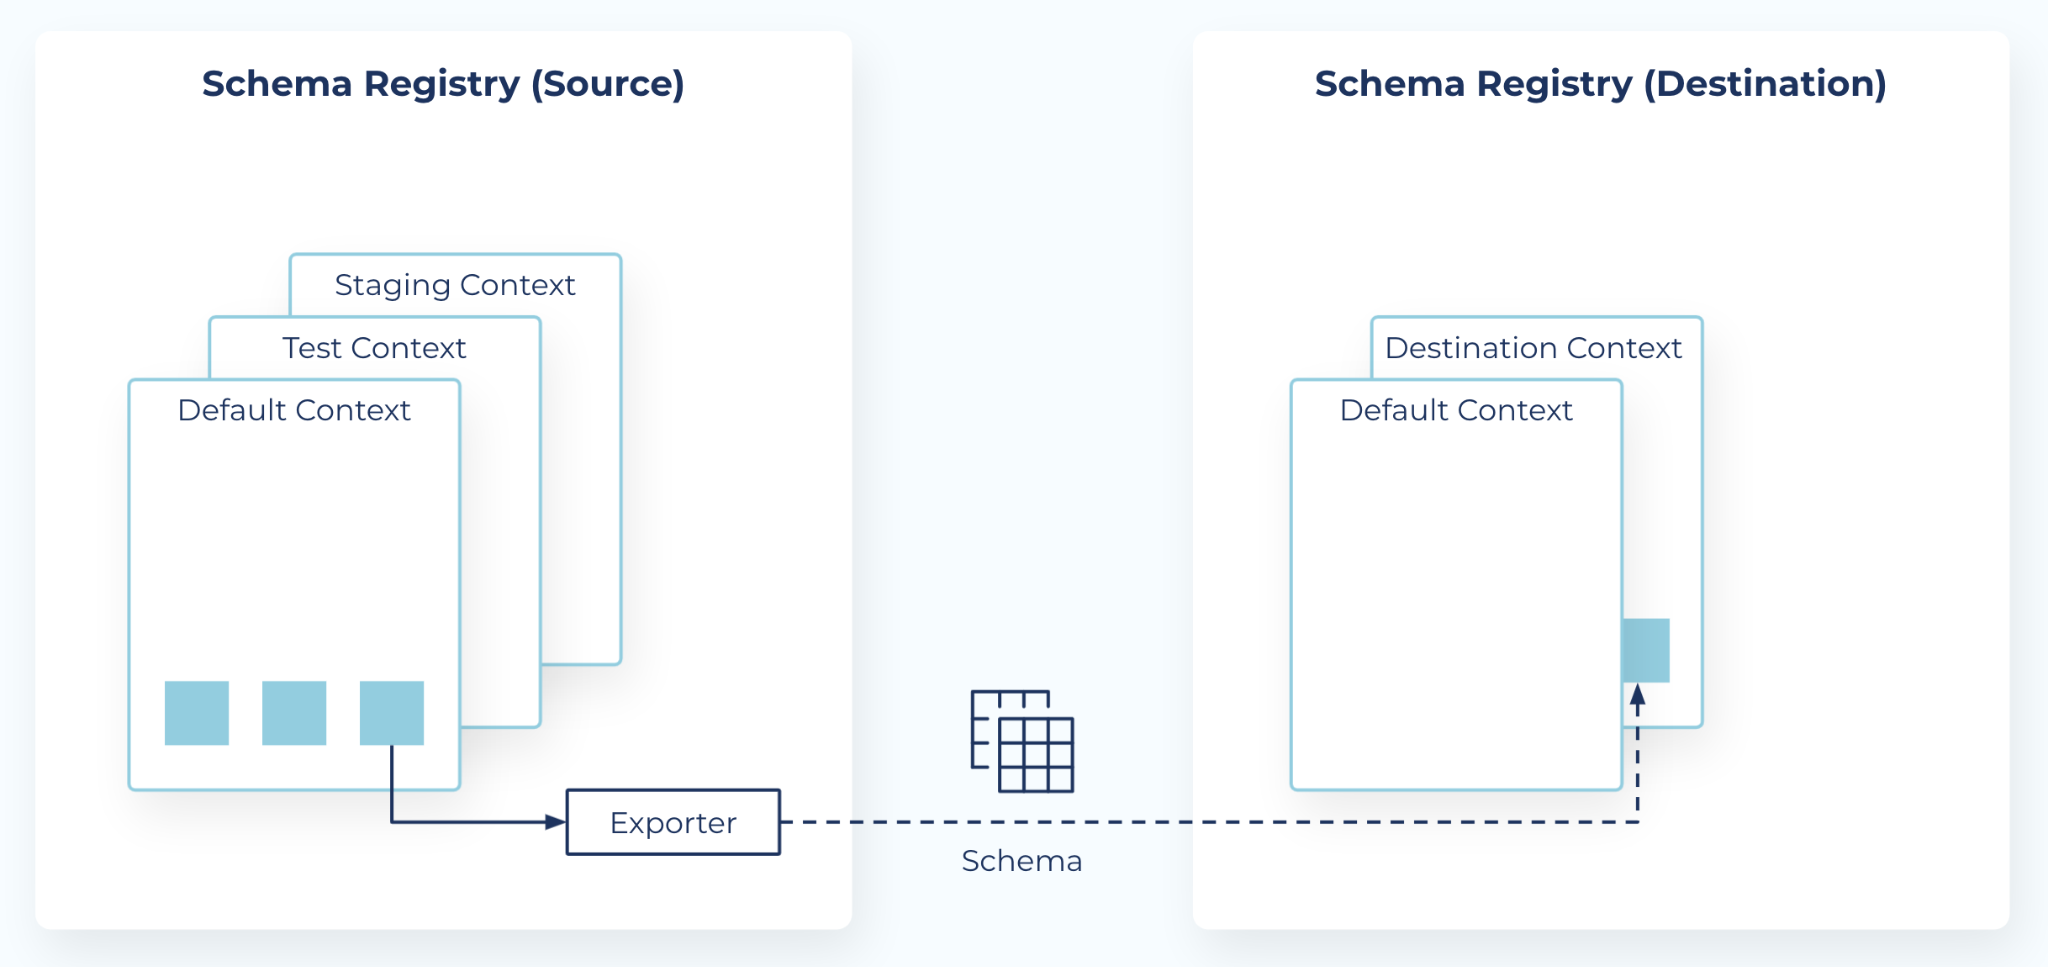
Schema Linking syncs schemas between two Schema Registry clusters.
Contexts and exporters
Schema Linking uses two Schema Registry concepts, schema contexts and schema exporters:
Contexts - A context is an independent scope in Schema Registry. Use contexts to create separate “sub-registries” within one Schema Registry cluster, each with its own schema IDs and subject names. The same schema ID in different contexts can represent different schemas.
A single dot,
., represents the default context. An explicit context starts with a dot and uses more dots as separators, such as.mycontext.subcontext, like absolute Unix paths. Two contexts that share a prefix have no implicit relationship.Exporters - A schema exporter runs inside Schema Registry and exports schemas from one Schema Registry cluster to another. Use the Schema Registry REST API to create, pause, resume, and destroy exporters. An exporter acts like a “mini-connector” that performs change data capture for schemas.
Limitations and considerations
On Confluent Cloud, the exporter limit per environment is 10 with the Essentials package and 100 with the Advanced package. Refer to the Packages documentation.
A single exporter can transfer any number of schemas; there is no upper limit on schemas per exporter.
Quick start
Before you begin, install the Confluent CLI.
Set up two clusters in source and destination environments
For this Quick Start, you set up a source and destination Kafka cluster, each in its own environment. Because Schema Registry automatically provisions one cluster per environment, this gives you two registries for testing Schema Linking across subjects.
Log on to Confluent Cloud with your user account, and create two new environments: one named “SOURCE” and the other named “DESTINATION”.
Navigate to Environments (top right menu), click Add cloud environment, and follow the steps.
When you create an environment, you must choose a Stream Governance package. For Schema Linking, both Essentials and Advanced work.
Add a Kafka cluster to each environment. These can be any cluster type. For example, name them
my-source-clusterandmy-destination-cluster.Note the Schema Registry cluster ID and API endpoint for each environment, using either the Confluent Cloud Console or the Confluent CLI. You will need these in the next steps.
On the Confluent Cloud Console, navigate to an environment and select the cluster. The Schema Registry cluster ID and API endpoint are shown on the right panel of the environment level display under Stream Governance API.
On the Confluent CLI, log in, then select an environment with confluent environment list and confluent environment use <environment-id>. Run confluent schema-registry cluster describe to get details for the Schema Registry cluster in that environment.
For example, navigate to each environment and run
confluent schema-registry cluster describeto see output similar to the following:my-laptop:~ me$ confluent env use env-src Using environment "env-src". my-laptop:~ me$ confluent schema-registry cluster describe +-------------------------+--------------------------------------------------+ | Name | Always On Stream Governance | | | Package | | Cluster | lsrc-x6612x | | Endpoint URL | https://psrc-22y2ny.us-west2.gcp.confluent.cloud | | Used Schemas | 0 | | Available Schemas | 100 | | Free Schemas Limit | 100 | | Global Compatibility | BACKWARD | | Mode | READWRITE | | Cloud | GCP | | Region | us-west2 | | Package | ESSENTIALS | +-------------------------+--------------------------------------------------+
my-laptop:~ me$ confluent env use <env-dest>
Using environment "env-dest".

my-laptop:~ me$ confluent schema-registry cluster describe
+-------------------------+--------------------------------------------------+
| Name                    | Always On Stream Governance                      |
|                         | Package                                          |
| Cluster                 | lsrc-jzzx6w                                      |
| Endpoint URL            | https://psrc-22y2ny.us-west2.gcp.confluent.cloud |
| Used Schemas            | 0                                                |
| Available Schemas       | 100                                              |
| Free Schemas Limit      | 100                                              |
| Global Compatibility    | BACKWARD                                         |
| Mode                    | READWRITE                                        |
| Cloud                   | GCP                                              |
| Region                  | us-west2                                         |
| Package                 | ESSENTIALS                                       |
+-------------------------+--------------------------------------------------+
Configure credentials on source and destination
In the next steps, you will set up permissions to allow access to the source and destination registries in support of Schema Linking.
Configure credentials on the source
Follow the steps in this section to create an API key and secret to authenticate your user account to the source Schema Registry.
In this section, you will:
Create an API key and secret to authenticate the user account to the Schema Registry on the source.
Give the user account “ResourceOwner” permissions (RBAC roles) on all Schema Registry subjects on the source. These are the permissions needed to create an exporter on the source, for the purposes of the examples in this Quick Start. In general, you only need permissions for the subjects you want to export; this will vary per each use case.
Navigate to the SOURCE environment and create an API key associated with the Schema Registry on the SOURCE. For example:
confluent api-key create --resource <cluster-ID>
Save the SOURCE API key and secret in a secure location. The secret cannot be retrieved later.
Review source access information.
By now you should have a triplet of Schema Registry access details for the source cluster:
Schema Registry URL (the API endpoint)
API key
API secret
Assign the RBAC role “ResourceOwner” on the Schema Registry on the source as follows to give the user account permissions on all schema subjects under all contexts:
--subjects ":*:". (For a broader scope, you could also use “OrganizationAdmin” which is applicable to the organization level, or “EnvironmentAdmin” or “DataSteward” roles, which are scoped to the environment level.)confluent iam rbac role-binding create --principal User:<u-123abc> --role ResourceOwner --environment <env-source> --schema-registry-cluster <cluster-ID> --resource "Subject:*"
Your output should resemble:
+---------------+----------------+
| Principal     | User:u-qqddpm  |
| Role          | ResourceOwner  |
| Resource Type | Subject        |
| Name          | *              |
| Pattern Type  | LITERAL        |
+---------------+----------------+
Configure credentials on the destination
Important
These are the credentials the exporter will use to access the destination.
For Schema Linking exporters in production, always use API keys tied to service accounts, not users. For now, you must use the CLI to create API keys tied to service accounts, as the Confluent Cloud Console does not currently support service accounts for Schema Linking. To learn more, see Add an API key and Best Practices for Using API Keys on Confluent Cloud.
In this section, you will:
Create a service account on the destination.
Create an API key and secret to authenticate the service account to the Schema Registry on the destination.
Give the service account permissions (RBAC roles) on Schema Registry subjects on the destination. These are the permissions needed to copy from SOURCE to DESTINATION.
Navigate to the DESTINATION environment and run the command confluent iam service-account create. For example:
confluent iam service-account create schema-link-destination --description "Service account for Schema Registry on the Destination cluster"
Your output should resemble:
+-------------+--------------------------------+
| ID          | sa-123abc                      |
| Name        | sr-desintation-demo            |
| Description | Service account for Schema     |
|             | Registry on the Destination    |
|             | cluster                        |
+-------------+--------------------------------+
Create an API key and secret, and associate it with the service account you just created to authenticate to the destination Schema Registry.
You will need the resource ID for the DESTINATION Schema Registry, which you can find on the Confluent Cloud UI in the destination environment on the right panel under “Stream Governance API”, or on the Confluent CLI with the command
confluent schema-registry cluster describe.For example:
confluent api-key create --service-account sa-123abc --resource <cluster-ID> --description "Destination Schema Registry API Key"
Save the DESTINATION API key and secret in a secure location. The secret cannot be retrieved later.
Review destination access information.
By now you should have the following Schema Registry access details for the destination Schema Registry:
Schema Registry URL (the API endpoint)
Schema Registry cluster ID (resource ID)
Service account ID
API key
API secret
Assign the RBAC role “ResourceOwner” on the Schema Registry as follows to give the service account permissions on all schema subjects.
confluent iam rbac role-binding create --principal User:<sa-123abc> --role ResourceOwner --environment <env-dest> --schema-registry-cluster <cluster-ID> --resource "Subject:*"
Your output should resemble:
+---------------+----------------+
| Principal     | User:sa-qqddpm |
| Role          | ResourceOwner  |
| Resource Type | Subject        |
| Name          | *              |
| Pattern Type  | LITERAL        |
+---------------+----------------+
Create credentials for the exporter
Create a config.txt file with the URL and credentials your exporter uses to access the destination cluster. The exporter copies schemas from the source and writes linked copies to the destination, so it needs destination credentials. The config gives the exporter the service account and RBAC roles you set up in Configure credentials on the destination.
schema.registry.url=<destination sr url>
basic.auth.credentials.source=USER_INFO
basic.auth.user.info=<destination api key>:<destination api secret>
You can find the Destination Schema Registry URL (endpoint) either on the Cloud Console right panel of the DESTINATION environment under “Stream Governance API” or on the Confluent CLI by running the following command:
confluent schema-registry cluster describe --environment <environment ID>
With the CLI command, your output should resemble the following:
+-------------------------+--------------------------------------------------+
| Name                    | Always On Stream Governance                      |
|                         | Package                                          |
| Cluster                 | lsrc-jzzx6w                                      |
| Endpoint URL            | https://psrc-22y2ny.us-west2.gcp.confluent.cloud |
| Used Schemas            | 0                                                |
| Available Schemas       | 100                                              |
| Free Schemas Limit      | 100                                              |
| Global Compatibility    | BACKWARD                                         |
| Mode                    | READWRITE                                        |
| Cloud                   | GCP                                              |
| Region                  | us-west2                                         |
| Package                 | ESSENTIALS                                       |
+-------------------------+--------------------------------------------------+
- Security considerations:
Exporters continue running even if the creator’s access is revoked, suspended, or deleted. The system does not perform continuous authorization checks after creation.
- Recommended action:
Monitor your centralized audit logs for Schema Registry management events to detect unauthorized exporter creation or changes. To learn more, see audit logs.
Create schemas on the source
Create at least three schemas in the source environment; at least one of which has a qualified subject name.
To create each schema from the Cloud Console, follow these steps:
From the Schema Registry tab in the SOURCE environment, Click Schemas on the right panel for an environment, then Add schema.
Fill in the subject name.
To create a schema with an unqualified subject name, simply provide a name such as
coffeeordonuts.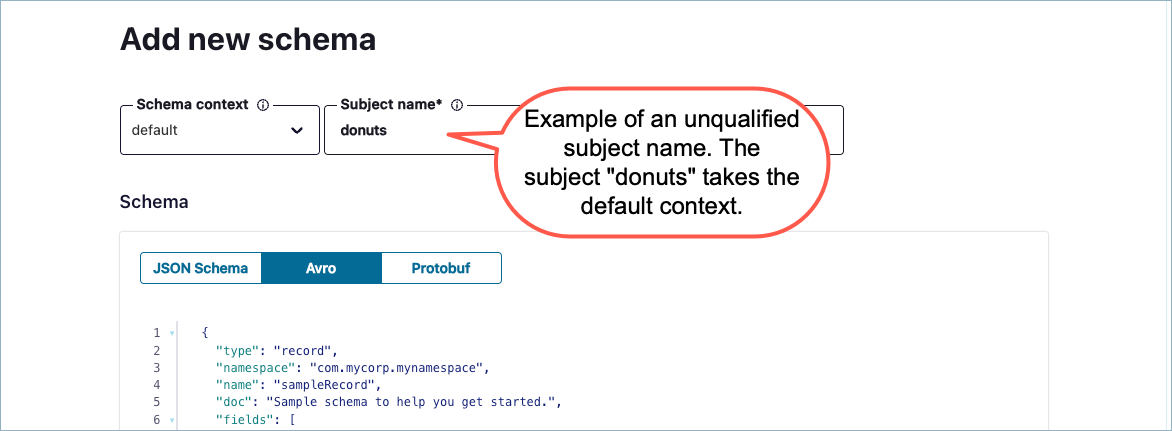
To create a schema with a qualified subject name in a specified context, use the syntax:
:.<context-name>:<subject-name>. For example::.snowcones:salesor:.burgers:locations.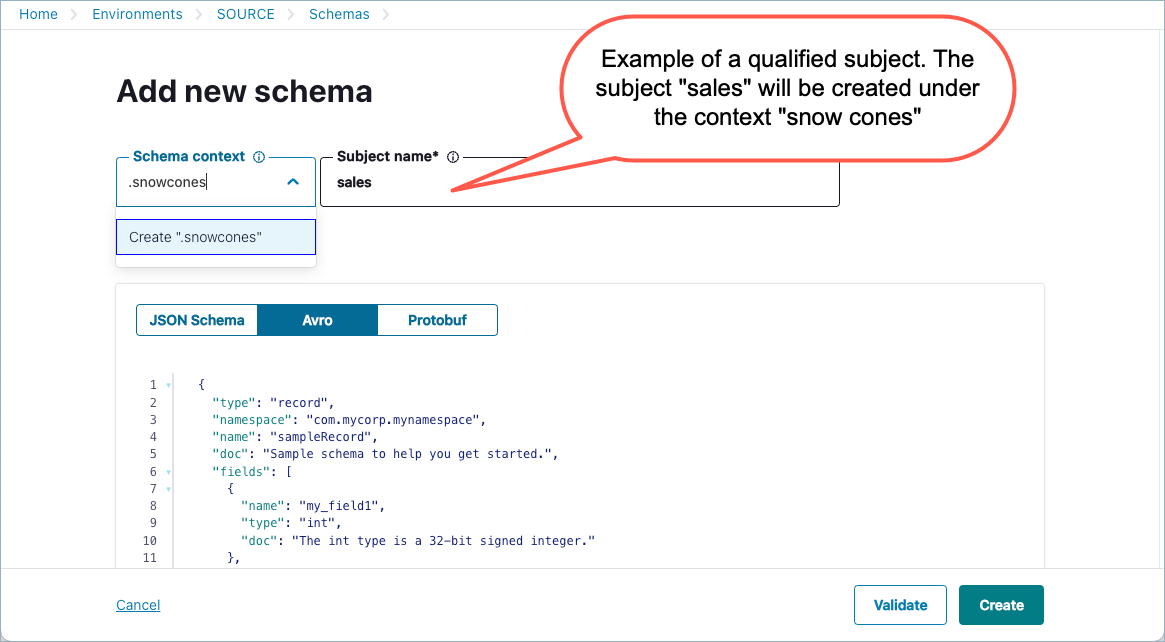
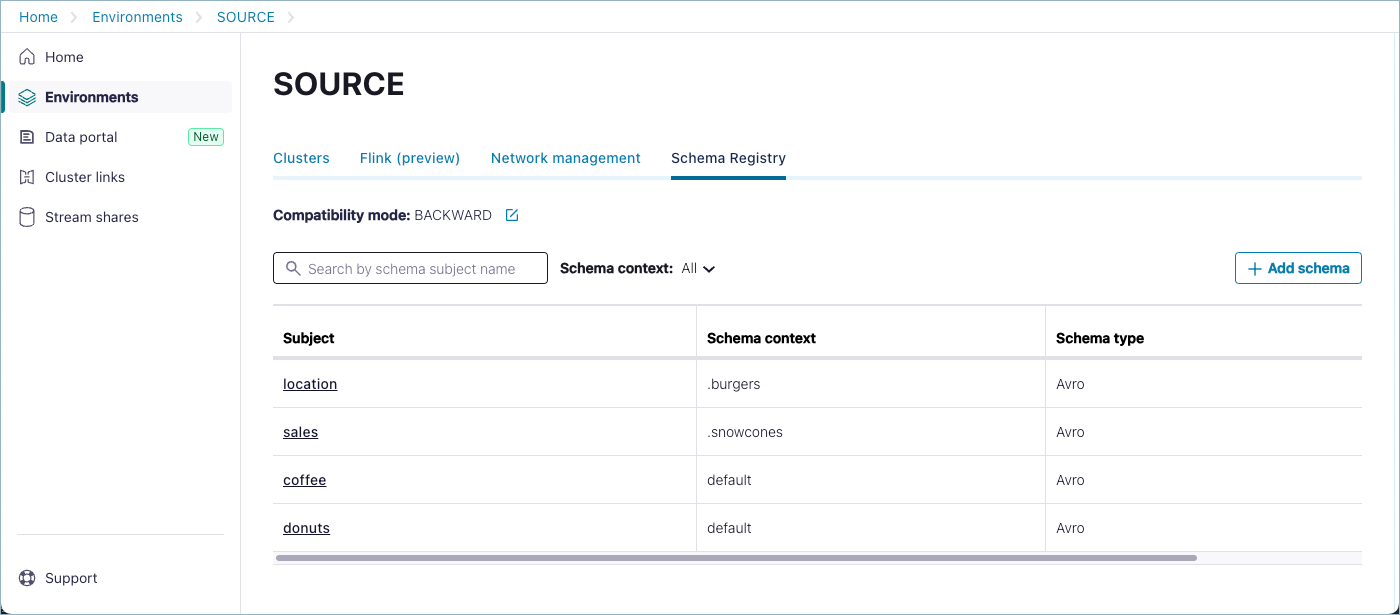
On the Cloud Console, enter the following to create four subject names, two in the default context, and two qualified in custom contexts. Note that the qualified context names are prefixed by a dot (”.”):
Schema Context
Subject Name
default
coffee
default
donuts
.snowcones
sales
.burgers
locations
Use the following example for your Avro content for each of the schemas.
The goal of this Quick Start is to learn how to organize schemas under subject names and contexts, not to design schemas. You can use the default schema, schemas you already have, or the example below.
Tip
To make the subject-schema match more visible, add a field for
coffee,donuts,sales, orlocationsto each schema.Example Schema
{
    "type": "record",
    "namespace": "com.mycorp.mynamespace",
    "name": "sampleRecord",
    "fields": [
        {
        "name": "item",
        "type": "string"
        },
        {
        "name": "location",
        "type": "string"
        },
        {
        "name": "cost",
        "type": "double"
        },
        {
        "name": "code",
        "type": "int"
        }
    ]
}
Click Create.
When you have created your subjects, review the list on the Schema Registry tab on the SOURCE, which should look similar to the following.
Create the exporter on the source
Switch to the SOURCE environment using
confluent environment listandconfluent environment use <environment-id>.Create a new exporter using the confluent schema-registry exporter create command.
For this demo, you want the exporter to copy all schemas, including those in specific contexts (other than the default), so include the
--subjectsflag with the context wildcard to denote subjects under all contexts:--subjects ":*:"confluent schema-registry exporter create <exporter-name> --subjects ":*:" --config <path-to-file>/config.txt
For example, this command creates an exporter called “my-first-exporter” that will export all schemas, including those in specific contexts as well as those in the default context. (The
config.txtfor this example lives in the user’s home directory.):confluent schema-registry exporter create my-first-exporter --subjects ":*:" --config ~/config.txt
You should get output verifying that the exporter was created:
Created schema exporter "my-first-exporter".
You can list exporters with confluent schema-registry exporter list and check the status of an exporter with confluent confluent schema-registry exporter status describe <exporter-name>.
More options for exporters
To create exporters that target specific subjects and contexts, customize the following parameters when you run confluent schema-registry exporter create:
Parameter | Default | Description |
|---|---|---|
|
| Comma-separated list of subjects to export (for example, |
|
| Context-handling mode. Set to |
| (none) | Destination context name. Required when |
| (none) | Template for renaming subjects on the destination. Use |
Example with custom subjects and context:
confluent schema-registry exporter create <exporterName> --subjects <subjectName1>,<subjectName2> \
--context-type CUSTOM --context-name <contextName> \
--config ~/config.txt
You can create and run multiple exporters at once, so feel free to circle back at the end of the Quick Start to create and test more exporters with different parameters.
For complete details, refer to Configuration options.
Verify the exporter is running and view information about it
Still in the SOURCE environment, run the following commands.
List available exporters.
confluent schema-registry exporter list
Your exporter will show in the list.
Describe the exporter.
confluent schema-registry exporter describe <exporterName>
For example, fill in
my-first-exporterfor<exporterName>:confluent schema-registry exporter describe my-first-exporter
Your output should resemble:
confluent schema-registry exporter describe my-first-exporter
+----------------+------------------------------------------------------------------------+
| Name           | my-first-exporter                                                      |
| Subjects       | *                                                                      |
| Subject Format | ${subject}                                                             |
| Context Type   | AUTO                                                                   |
| Context        | .lsrc-x6612x                                                           |
| Config         | basic.auth.credentials.source="USER_INFO"                              |
|                | basic.auth.user.info="[hidden]"                                        |
|                | schema.registry.url="https://psrc-22y2ny.us-west2.gcp.confluent.cloud" |
+----------------+------------------------------------------------------------------------+
Get configurations for the exporter.
confluent schema-registry exporter configuration describe my-first-exporter
Get the status of exporter.
confluent schema-registry exporter status describe my-first-exporter
Your output should resemble:
confluent schema-registry exporter status describe my-first-exporter
+-------------+-------------------+
| Name        | my-first-exporter |
| State       | RUNNING           |
| Offset      | 218567            |
| Timestamp   | 1711598116280     |
+-------------+-------------------+
Tip
If you get an error at this point and the exporter is in a PAUSED state, verify that you have assigned all the needed RBAC roles to the service account as described in Configure credentials on the destination.
Finally, as a check, get a list of schemas on the source.
Use the prefix wildcard to list all schemas:
confluent schema-registry subject list --prefix ":*:"
With the wildcard, this is effectively the same as the command:
confluent schema-registry subject listThe command will return the list of subjects you’ve created on the source, for example:Subject ----------------------- :.burgers:locations :.snowcones:sales coffee donuts
Check that the schemas were exported
Switch to the DESTINATION environment and verify that your source schemas appear there.
Switch to the DESTINATION.
Use
confluent environment listandconfluent environment use <environment-id> to navigate.Run the following command to view all schemas.
confluent schema-registry subject list --prefix ":*:"
Your output list of schemas on the DESTINATION should match those on the SOURCE.
              Subject
----------------------------------
  :.lsrc-jzzx6w.burgers:locations
  :.lsrc-jzzx6w.snowcones:sales
  :.lsrc-jzzx6w:coffee
  :.lsrc-jzzx6w:donuts
List only schemas in particular contexts.
One you have a list of all subjects on the destination with the prefixes (as in the above example), you can pass only the context name to see a narrowed list of subjects in a particular context.
For example, to list schemas in the
burgerscontext, wherelsrc-jzzx6wis the destination Schema Registry cluster ID:confluent schema-registry subject list --prefix ":.lsrc-jzzx6w.burgers:"
The output will be:
             Subject
----------------------------------
  :.lsrc-jzzx6w.burgers:locations
To list schemas in the
snowconescontext:confluent schema-registry subject list --prefix ":.lsrc-jzzx6w.snowcones:"
The output will be:
             Subject
--------------------------------
  :.lsrc-jzzx6w.snowcones:sales
Tip
If you used the optional parameter
--subject-formatwhen you created the exporter on the source, check to see that the exported subjects on the destination map to the subject rename format you specified.You use the same curl commands to call the APIs. Here is an example:
curl -u <destination api key>:<destination api secret> '<destination sr url>/subjects?subjectPrefix=:.context1:foo'
Pause the exporter and make changes
Pause the exporter.
Switch back to the SOURCE, and run the following command to pause the exporter.
confluent schema-registry exporter pause <exporterName>
You should get output verifying that the command was successful. For example:
Paused schema exporter "my-first-exporter".Check the status, just to be sure.
confluent schema-registry exporter status describe <exporterName>
Your output should resemble:
confluent schema-registry exporter status describe my-first-exporter
+--------------------+-------------------+
| Name               | my-first-exporter |
| Exporter State     | PAUSED            |
| Exporter Offset    |          10011386 |
| Exporter Timestamp |     1631107710822 |
+--------------------+-------------------+
Reset the schema exporter offset back to
schema.id=1.A reset will restart the incremental iteration through the source schemas.
confluent schema-registry exporter reset <exporterName>
After the reset, you can verify by getting the status of the exporter.
confluent schema-registry exporter status describe <exporterName>
The status will show that the offset is reset. For example:
confluent schema-registry exporter status describe my-first-exporter
+--------------------+-------------------+
| Name               | my-first-exporter |
| Exporter State     | PAUSED            |
| Exporter Offset    |                -1 |
| Exporter Timestamp |                 0 |
+--------------------+-------------------+
Important
In order to process all schemas with the new configurations, you must either reset the exporter offset (as described above), or delete and recreate the exporter.
Update exporter configurations or information.
You can choose to update any of
subjects,context-type,context-name, orconfig. For example:confluent schema-registry exporter update <exporterName> --context-name <newContextName>
Resume schema exporter.
confluent schema-registry exporter resume <exporterName>
Delete the exporter
When you are ready to wrap up your testing, pause and then delete the exporter(s) as follows.
Pause the exporter.
confluent schema-registry exporter pause <exporterName>
Delete the exporter.
confluent schema-registry exporter delete <exporterName>
This concludes the Quick Start. The remaining sections describe Schema Linking concepts, monitoring, RBAC, and OAuth configuration in detail.
Contexts
What is a context?
A schema context, or simply context, is essentially a grouping of subject names and schema IDs. A single Schema Registry cluster can host any number of contexts. Each context can be thought of as a separate “sub-registry”. A context can also be copied to another Schema Registry cluster, using a schema exporter.
How contexts work
Following are a few key aspects of contexts and how they help to organize schemas.
Schemas and schema IDs are scoped by context
Subject names and schema IDs are scoped by context so that two contexts in the same Schema Registry cluster can each have a schema with the same ID, such as 123, or a subject with the same name, such as mytopic-value, without any problem.
To put this another way, subject names and schema IDs are unique per context. You can have schema ID 123 in context .mycontext and schema ID 123 in context .yourcontext and these can be different from one another.
Caution
Since schema IDs are unique per context, linking different sources to the same context on the destination could result in schema ID conflicts on the destination.
Default context
Any schema ID or subject name without an explicit context lives in the default context, which is represented as a single dot .. An explicit context starts with a dot and can contain any parts separated by additional dots, such as .mycontext.subcontext. You can think of context names as similar to absolute Unix paths, but with dots instead of forward slashes (in this analogy, the default schema context is like the root Unix path). However, there is no relationship between two contexts that share a prefix.
Global context
Schema Registry supports a global configuration context using the special context name :.__GLOBAL:. When looking up a configuration or mode with defaultToGlobal, the lookup proceeds from the subject to the context, and then to the global context (:.__GLOBAL:). The global context is only valid for configuration and mode settings; it cannot be used to store subjects or schemas. For contexts without global configuration, compatibility is handled per context. To learn more, see Schema Evolution and Compatibility for Schema Registry on Confluent Cloud.
The global context provides a hierarchical configuration lookup mechanism:
Subject level: Configuration is first checked at the specific subject level.
Context level: If not found at the subject level, configuration is checked at the context level.
Global level: Finally, if not found at the context level, configuration falls back to the global context (
:.__GLOBAL:).
This hierarchy allows you to:
Set default configurations that apply across all contexts using the global context.
Override global defaults with context-specific configurations.
Further override with subject-specific configurations for fine-grained control.
The global context is particularly useful for establishing organization-wide defaults for compatibility modes while maintaining the flexibility to customize behavior for specific contexts or subjects as needed.
Qualified subjects
A subject name can be qualified with a context, in which case it is called a qualified subject. When a context qualifies a subject, the context must be surrounded by colons. An example is :.mycontext:mysubject. A subject name that is unqualified is assumed to be in the default context, so that mysubject is the same as :.:mysubject (the dot representing the default context).
The one exception to this rule is in the case of a subject name specified for a schema reference. In this case, if the subject name of the schema reference is not qualified with an explicit context, it inherits the context in which the root schema resides.
For example, if the following set of schema references are associated with a schema in a subject in the .prod context:
[
  {
    "name": "io.confluent.examples.avro.Customer",
    "subject": "customer",
    "version": 1
  },
  {
    "name": "io.confluent.examples.avro.Product",
    "subject": "product",
    "version": 1
  },
  {
    "name": "io.confluent.examples.avro.Order",
    "subject": "order",
    "version": 1
  }
]
then, the subject names above, customer, product, and order, will refer to the subjects :.prod:customer, :.prod:product, and :.prod:order, respectively.
There are two ways to pass a context to the REST APIs.
Using a qualified subject
A qualified subject can be passed anywhere that a subject name is expected. Most REST APIs take a subject name, such as POST /subjects/{subject}/versions.
There are a few REST APIs that don’t take a subject name as part of the URL path:
/schemas/ids/{id}/schemas/ids/{id}/subjects/schemas/ids/{id}/versions
The three APIs above can now take a query parameter named “subject” (written as ?subject), so you can pass a qualified subject name, such as /schemas/ids/{id}?subject=:.mycontext:mysubject, and the given context is then used to look up the schema ID.
Using a base context path
As mentioned, all APIs that specify an unqualified subject operate in the default context. Besides passing a qualified subject wherever a subject name is expected, a second way to pass the context is by using a base context path. A base context path takes the form /contexts/{context} and can be prepended to any existing Schema Registry path. Therefore, to look up a schema ID in a specific context, you could also use the URL /contexts/.mycontext/schemas/ids/{id}.
A base context path can also be used to operate with the default context. In this case, the base context path takes the form “/contexts/:.:/”; for example, /contexts/:.:/schemas/ids/{id}. A single dot cannot be used because it is omitted by some URL parsers.
Multi-Context APIs
All the examples so far operate in a single context. There are three APIs that return results for multiple contexts.
/contexts/subjects/schemas?subjectPrefix=:*:
The first two APIs, /contexts and /subjects, return a list of all contexts and subjects, respectively. The other API, /schemas, normally only operates in the default context. This API can be used to query all contexts by passing a subjectPrefix with the value :*:, called the context wildcard. The context wildcard matches all contexts.
Specifying a context name for clients
When using a client to talk to Schema Registry, you may want the client to use a particular context. An example of this scenario is when migrating a client from communicating with one Schema Registry to another. You can achieve this by using a base context path, as defined above. To do this, simply change the Schema Registry URL used by the client from https://<host1> to https://<host2>/contexts/.mycontext.
Note that by using a base context path in the Schema Registry URL, the client will use the same schema context for every Schema Registry request. However, an advanced scenario might involve a client using different contexts for different topics. To achieve this, you can specify a context name strategy to the serializer or deserializer:
context.name.strategy=com.acme.MyContextNameStrategy
The context name strategy is a class that must implement the following interface:
/**
 * A {@link ContextNameStrategy} is used by a serializer or deserializer to determine
 * the context name used with the schema registry.
 */
public interface ContextNameStrategy extends Configurable {

  /**
   * For a given topic, returns the context name to use.
   *
   * @param topic The Kafka topic name.
   * @return The context name to use
   */
  String contextName(String topic);
}
Again, the use of a context name strategy should not be common. Specifying the base context path in the Schema Registry URL should serve most needs.
Exporters
What is an Exporter?
Previously, Confluent Replicator was the primary means of migrating schemas from one Schema Registry cluster to another, as long as the source Schema Registry cluster was on-premise. To support schema migration using this method, the destination Schema Registry is placed in IMPORT mode, either globally or for a specific subject.
The new schema exporter functionality replaces and extends the schema migration functionality of Replicator. Schema exporters reside within a Schema Registry cluster, and can be used to replicate schemas between two Schema Registry clusters in Confluent Cloud.
Schema Linking
You use schema exporters to accomplish Schema Linking, using contexts and/or qualified subject names to sync schemas across registries. Schema contexts provide the conceptual basis and namespace framework, while the exporter does the heavy-lift work of the linking.
Schemas export from the source default context to a new context on the destination
By default, a schema exporter exports schemas from the default context in the source Schema Registry to a new context in the destination Schema Registry. The destination context (or a subject within the destination context) is placed in IMPORT mode. This allows the destination Schema Registry to use its default context as usual, without affecting any clients of its default context.
The new context created by default in the destination Schema Registry will have the form .lsrc-xxxxxx, taken from the logical name of the source.
Schema Registry clusters can export schemas to each other
Two Schema Registry clusters can each have a schema exporter that exports schemas from the default context to the other Schema Registry. In this setup, each side can read from or write to the default context, and each side can read from (but not write to) the exported context. This allows you to match the setup of Cluster Linking, where you might have a source topic and a read-only mirror topic on each side.
Customizing exporters
There are various ways to customize which contexts are exported from the source Schema Registry, and which contexts are used in the destination Schema Registry. The full list of configuration properties is shown below.
How many exporters are allowed per Schema Registry?
The limit on the number of exporters allowed at any one time per Schema Registry is 10.
Configuration options
An exporter has these main configuration properties:
nameA unique name for the exporter.
subjectsThis can take several forms:
A list of subject names, for example,
[ "subject1", "subject2" ]A singleton list containing a subject name prefix that ends in a wildcard, such as
["mytopic*"]A singleton list containing a lone wildcard,
["*"], that indicates all subjects in the default context. This is the default.A singleton list containing the context wildcard,
[":*:"], that indicates all contexts.A singleton list containing a context prefix that ends in a wildcard, such as
[":.mycontext:*"], to export subjects from multiple contexts that match the pattern (for example,.mycontext1and.mycontext2).A singleton list containing a subject prefix within a specific context, such as
[":.mycontext:mysubjects-*"], to export subjects that match the prefix within that context.
subject-formatThis is an optional parameter you can use to specify a format for the subject name in the destination cluster. You can specify
${subject}as a placeholder, which will be replaced with the default subject name. For example,dc_${subject}for the subjectorderswill map to the destination subject namedc_orders.context-typeOne of:
AUTO - Prepends the source context with an automatically generated context, which is
.lsrc-xxxxxxfor Confluent Cloud. This is the default.CUSTOM - Prepends the source context with a custom context name, specified in
contextbelow.NONE - Copies the source context as-is, without prepending anything. This is useful to make an exact copy of the source Schema Registry in the destination.
DEFAULT - Replaces the source context with the default context. This is useful for copying schemas to the default context in the destination. (Note: DEFAULT is available on Confluent Cloud as of July 2023, and on Confluent Platform starting with version 7.4.2.)
REPLACE - Replaces the source context with the context name specified in
contextbelow. REPLACE drops the source context. All exported subjects land in the destination under the replacement context, regardless of which context they came from in the source.
For example, if the source has subjects
:.:orders-valueand:.nondefault:products-valueand you setcontext-type: REPLACEwithcontext-name: .archive, they land in the destination as:.archive:orders-valueand:.archive:products-value.Using the same source subjects, the other context types map them as follows:
With
context-type: AUTO, they land as:.lsrc-xxxxxx:orders-valueand:.lsrc-xxxxxx.nondefault:products-value. AUTO prepends the generated context and keeps the source context for non-default subjects.With
context-type: CUSTOMandcontext-name: .archive, they land as:.archive:orders-valueand:.archive.nondefault:products-value. CUSTOM prepends the custom context and keeps the source context for non-default subjects.With
context-type: NONE, they land unchanged as:.:orders-valueand:.nondefault:products-value.
context-nameA context name to be used with the CUSTOM or REPLACE
contextTypeabove.configA set of configurations for creating a client to talk to the destination Schema Registry, which can be passed in a config file (for example,
--config-file ~/<my-config>.txt). Typically, this includes:schema.registry.url- The URL of the destination Schema Registry. Theschema.registry.urlmust contain a valid, fully-qualified domain name and not just an IP address. For example,https://my-registry.example.comwould meet this requirement buthttps://192.168.1.1would not.basic.auth.credentials.source- Typically “USER_INFO”basic.auth.user.info- Typically of the form<api-key>:<api-secret>
System topics and security configurations
The following configurations for system topics are available:
exporter.config.topic- Stores configurations for the exporters. The default name for this topic is_exporter_configs, and its default/required configuration is:numPartitions=1,replicationFactor=3, andcleanup.policy=compact.exporter.state.topic- Stores the status of the exporters. The default name for this topic is_exporter_states, and its default/required configuration is:numPartitions=1,replicationFactor=3, andcleanup.policy=compact.
If you are using role-based access control (RBAC), exporter.config.topic and exporter.state.topic require ResourceOwner on these topics, as does the _schemas internal topic. See also, Use Role-Based Access Control (RBAC) in Confluent Cloud and Configuring Role-Based Access Control for Schema Registry on Confluent Platform.
If you are configuring Schema Registry on Confluent Platform using the Schema Registry Security Plugin, you must activate both the exporter and the Schema Registry security plugin by specifying both extension classes in the $CONFLUENT_HOME/etc/schema-registry/schema-registry.properties files:
resource.extension.class=io.confluent.kafka.schemaregistry.security.SchemaRegistrySecurityResourceExtension,io.confluent.schema.exporter.SchemaExporterResourceExtension
The configuration for the exporter resource extension class in the schema-registry.properties is described in Set up source and destination environments in Schema Linking on Confluent Platform.
Lifecycle and states
Schema Registry stores schemas in a Kafka topic. A schema exporter uses the topic offset to determine its progress.
When a schema exporter is created, it begins in the STARTING state. While in this state, it finds and exports all applicable schemas already written to the topic. After exporting previously registered schemas, the exporter then enters the RUNNING state, during which it will be notified of any new schemas, which it can export if applicable. As schemas are exported, the exporter will save its progress by recording the latest topic offset.
If you want to make changes to the schema exporter, you must first “pause” it, which causes it to enter the PAUSED state. You can pause an exporter at any point in its lifecycle. The exporter can then be resumed after the proper changes are made. Upon resuming, the exporter will find and export any applicable schemas since the last offset that it recorded.
While an exporter is paused, it can also be “reset”, which will cause it to clear its saved offset and re-export all applicable schemas when it resumes. To accomplish this, the exporter starts off again in STARTING state after a reset, and follows the same lifecycle.
To update an exporter’s configuration, such as adding subjects to its subject list, pause the exporter, apply the update, and reset it before resuming. An exporter tracks its progress as an offset and exports only schemas registered after that offset. Schemas already registered for the newly added subjects fall before that offset. Without a reset, the exporter skips them and exports only schemas registered after it resumes. A reset clears the recorded offset. The exporter then re-scans from the start and exports all matching schemas, including the existing ones for the newly added subjects.
The states of a schema exporter at various stages in its lifecycle are summarized below.
State | Description |
|---|---|
STARTING | The exporter finds and exports all applicable previously registered schemas for the topic. This is the starting state, or the state after a reset. |
RUNNING | The exporter is notified of new schemas, exports them if applicable, and tracks progress by recording last topic offset. |
PAUSED | An exporter can be paused; for example, to make configuration changes. When it resumes, the exporter finds and exports schemas since the last recorded offset. |
REST APIs
Schema Registry supports the following REST APIs, as fully detailed in Exporters in the Schema Registry API documentation:
Task | API |
|---|---|
Gets a list of exporters for a tenant | GET /exporters |
Creates a new exporter | POST /exporters |
Gets info about an exporter | GET /exporters/{name} |
Gets the config for an exporter | GET /exporters/{name}/config |
Gets the status of an exporter | GET /exporters/{name}/status |
Updates the information for an exporter | PUT /exporters/{name}/config |
Pauses an exporter | PUT /exporters/{name}/pause |
Resumes an exporter | PUT /exporters/{name}/resume |
Resets an exporter, clears offsets | PUT /exporters/{name}/reset |
Deletes an exporter | DELETE /exporters/{name} |
Deployment strategies and Schema Linking
Schema Linking can replicate schemas between Schema Registry clusters as follows:
A schema link sends data from a “source cluster” to a “destination cluster”. The supported cluster types are shown in the table below.
Source Schema Registry Cluster Options | Destination Schema Registry Cluster Options |
|---|---|
Confluent Cloud with internet networking | Confluent Cloud with internet networking |
Confluent Cloud with internet networking | Confluent Platform 7.0+ with an IP address accessible over the public internet |
Confluent Platform 7.0+ | Confluent Platform 7.0+ |
Confluent Platform 7.0+ | Confluent Cloud with internet networking |
Schema Linking can also be used in both directions between two clusters, allowing each side to continue to receive both reads and writes for schemas.
With regard to Confluent Cloud and Confluent Platform solutions, you would use Schema Linking with Cluster Linking to mirror from one instance to the other. Any use of Confluent Platform in these setups require Confluent Platform 7.0.+ or later.
To learn more about Cluster Linking and mirror topics, see Cluster Linking for Confluent Platform and Geo-replication with Cluster Linking on Confluent Cloud.
Monitor a schema exporter
This section details the key metrics available for monitoring Confluent Cloud schema exporters. Each metric listed includes a description, usage and a sample query for retrieving the metric.
Note that the Metrics API retrieves data in one minute intervals. This means that you could see duplicate values, older metrics, or an empty response body depending on the frequency of your queries.
Exporter tasks
This metric tracks the number of exporters currently in each operational state: RUNNING, PAUSED, FAILED. This metric also indicates whether an exporter is in an error state.
Metric name:
io.confluent.kafka.schema_registry/exporter_tasksType: Gauge
Usage: Primary metric for assessing overall health of schema exporters. Group by
exporter_stateandhas_errorto build a dashboard highlighting failed exporters and error conditions for rapid troubleshooting.
This example queries for the count of exporter tasks by exporter name, state, and error status:
{
      "aggregations": [
         {
            "metric": "io.confluent.kafka.schema_registry/exporter_tasks"
         }
      ],
      "filter": {
         "op": "AND",
         "filters": [
            {
                  "field": "resource.schema_registry.id",
                  "op": "EQ",
                  "value": "{{schema_registry_id}}"
            },
            {
                  "field": "metric.exporter_name",
                  "op": "EQ",
                  "value": "{{exporter_name}}"
            }
         ]
      },
      "granularity": "PT1M",
      "intervals": [
         "now-6m/now-5m"
      ],
      "group_by": [
         "metric.exporter_name",
         "metric.exporter_state",
         "metric.has_error"
      ]
}
Exporter starting progress
This metric tracks the progress of an exporter’s initial batch export on a scale from zero to 100 (0-100). This metric is specifically for monitoring the STARTING task that covers the first-time transfer of existing schemas.
Metric name:
io.confluent.kafka.schema_registry/exporter_starting_progressType: Gauge
Usage: Confirm successful initialization of a new schema exporter. A value of 100 indicates the initial transfer is complete. Prolonged values below 100 may signal setup or connectivity issues.
The example queries for the starting progress for all exporters in a Schema Registry instance:
{
      "aggregations": [
         {
            "metric": "io.confluent.kafka.schema_registry/exporter_starting_progress"
         }
      ],
      "filter": {
         "op": "AND",
         "filters": [
            {
                  "field": "resource.schema_registry.id",
                  "op": "EQ",
                  "value": "{{schema_registry_id}}"
            }
         ]
      },
      "granularity": "PT1M",
      "intervals": [
         "now-6m/now-5m"
      ],
      "group_by": [
         "metric.exporter_name"
      ]
}
Schema transfer success
This metric counts schemas successfully transferred from the source to the destination registry. This metric is intended for monitoring transfers that occur after the initial STARTING state.
Metric name:
io.confluent.kafka.schema_registry/schema_transfer_success_totalType: Counter
Usage: Tracks real-time replication activity. An increasing value indicates successful transfer of new or updated schemas. The metric resets to zero after a batch transfer completes, which is useful for observing the frequency and completion of synchronization cycles.
This example queries for successful schema transfers for a specific exporter:
{
      "aggregations": [
         {
            "metric": "io.confluent.kafka.schema_registry/schema_transfer_success_total"
         }
      ],
      "filter": {
         "op": "AND",
         "filters": [
            {
                  "field": "resource.schema_registry.id",
                  "op": "EQ",
                  "value": "{{schema_registry_id}}"
            },
            {
                  "field": "metric.exporter_name",
                  "op": "EQ",
                  "value": "{{exporter_name}}"
            }
         ]
      },
      "granularity": "PT1M",
      "intervals": [
         "now-6m/now-5m"
      ],
      "group_by": [
         "metric.exporter_name"
      ]
}
Schema Linking on private networks
You can use the private endpoints for a Schema Registry when creating schema exporters on Confluent Platform or Confluent Cloud Schema Registry. You can use this Confluent CLI command to retrieve the endpoint, confluent schema-registry cluster describe. To learn more, see Use Schema Linking with private endpoints.
Link schemas from Confluent Platform to Confluent Cloud
You can link schemas from Confluent Platform to Confluent Cloud clusters by using a proxy. Define the proxy settings in the exporter configuration, setting both the proxy host and port.
Example proxy setup in the exporter configuration file
Typically, you’ll create an exporter configuration file at the time you create the exporter. The file is typically located at $CONFLUENT_HOME/etc/schema-registry/exporter-config.json, and contains the following fields:
The name of the exporter
The subjects to export
The context type
The context name
The proxy settings
For a Confluent Platform to Confluent Cloud exporter, configure proxy settings as follows.
"config": {
   "schema.registry.url": "${CC_SR_ENDPOINT}",
   "basic.auth.credentials.source": "USER_INFO",
   "basic.auth.user.info": "${SR_API_KEY}:${SR_API_SECRET}",
   "proxy.host": "{HTTP_OR_HTTPS}://{PROXY_HOST_FQDN}",
   "proxy.port": "{PORT}"
 }
Test connectivity
Verify that the Confluent Platform Schema Registry can communicate with the Confluent Cloud Schema Registry through the proxy. You can use curl commands to test connectivity to the proxy and the endpoint, as shown in this example:
curl -u ${SR_API_KEY}:${SR_API_SECRET} -k 'https://{PSRC}.{REGION}.{PROVIDER}.confluent.cloud/schemas/ids/{SCHEMA_ID}' --proxy {HTTP_OR_HTTPS}://{PROXY_HOST_FQDN}:{PORT}
Error handling
If the exporter state returns as PAUSED or fails with connection errors, check for the following.
DNS resolution issues for the proxy host.
Ensure the proxy allows bidirectional communication.
Review logs for specific error messages that can guide troubleshooting.
Where to learn more
To learn more about this use case, see the following topics:
Manage Schema Linking in Disaster Recovery Failover Scenarios
Confluent provides disaster recovery (DR) failover strategies with Cluster Linking and mirror topics. Failover can be achieved by using commands to Reverse a source and mirror topic, Convert a mirror topic to a normal topic, or a combination of both. DR failover is available on Confluent Cloud, Confluent Platform, and hybrid deployments; a full tutorial is provided in the Confluent Cloud documentation at Cluster Linking Disaster Recovery and Failover on Confluent Cloud, as the concepts and workflows are applicable to both Confluent Cloud and Confluent Platform. Also, you can refer to the white paper Best Practices for Multi-Region Apache Kafka Disaster Recovery in the Cloud (Active/Passive), which that covers similar information.
Schemas and mirror topics
Cluster Linking preserves the schema IDs stored in messages, allowing Schema Registry and Schema Linking to work seamlessly with mirror topics. To consume from a mirror topic that is using schemas, the consumer clients must use a Schema Registry context with the same schema IDs as on the Schema Registry context used by the producers to the source topic. This setup is described in further detail in How schemas work with mirror topics.
Configure a Schema Registry failover strategy
Given one Schema Registry per environment in a single region, you can set up Schema Registry for DR failover and recovery with Schema Linking, concurrent with your Cluster Linking strategies. To prepare for failover, you must replicate schemas to the DR region’s Schema Registry. This allows the Kafka applications, connectors, and stream processing applications to continue reading and writing schema-based data formats even during a disaster scenario. As a best practice, place each Schema Registry in the same region as the Kafka cluster it serves.
In steady state, Schema Linking requires the primary Schema Registry to be in READWRITE mode and the secondary Schema Registry to be in IMPORT mode, which allows new schemas to be written only by Schema Linking. This creates an Active/Passive topology for Schema Linking:
an active Schema Registry on one side that can accept new schemas
a passive Schema Registry on the other side being synced by means of Schema Linking for DR.
Reverse the schema link as a failover response
In the event of a failover, you must reverse the schema link. This will be necessary in any DR scenario to prevent data loss around schemas during the outage:
Fail forward (the secondary cluster becomes the primary cluster, the primary becomes the secondary).
Fail back to the original primary region/cluster.
Note that the secondary cluster is sometimes referred to as the “DR”, “standby”, or “destination” cluster. In this section, it is referred to as “secondary”. For Cluster Linking, a “secondary” would typically hosts mirror topics based on primary topics (in some Scenarios both clusters mirror). For Schema Linking, the secondary cluster imports schemas and metadata from the primary as a backup in case of DR.
The primary Schema Registry must be caught up with changes that occurred during the outage. Once the primary Schema Registry is back up, first do the following.
Pause the original schema link (which linked from primary to secondary).
Put the original primary Schema Registry into
IMPORTmode. If there were new or modified schemas during the outage, copy over all schemas from the DR (secondary) to the primary.Wait until all schemas registered during the outage are migrated back to the primary (by means of the IMPORT).
At this point, you will follow one or the other set of steps below, depending on whether you are failing forward (original primary and secondary switch places) or failing forward, where the original primary is once again the primary and original secondary is once again the secondary.
Failing forward
If you are failing forward:
Create a schema link from the original secondary Schema Registry to the original primary Schema Registry.
Put the original secondary (now primary) into
READWRITEmode. (The original primary is already appropriately inIMPORTmode, as it is now the secondary).
Failing back
If you are failing back, you must reactivate the original primary Schema Registry. To do this:
Stop the active schema link.
Set the original primary Schema Registry to
READWRITEmode.Set the original secondary Schema Registry to
IMPORTmode.Resume the original schema link from primary to secondary.
Using Client Side Field Level Encryption
Client-side field level encryption (CSFLE) uses a technique called envelope encryption, where a key encryption key (KEK) is used to encrypt data encryption keys (DEKs).
Schema Registry exposes a subcomponent called the DEK Registry, which provides APIs for managing KEKs and DEKs. The key from the KMS is registered as a KEK to the DEK Registry, and the DEK Registry will also hold the encrypted DEKs used for CSFLE. DEKs are scoped by schema subject.
When CSFLE is configured, Schema Linking copies the DEKs, pointers to the KEKs, along with rulesets and metadata, from one Schema Registry cluster to another. Confluent never has access to the KEK itself. The DEK Registry holds only a reference to it, such as an Amazon Resource Name (ARN). The key vault uses the KEK to encrypt and decrypt the DEKs. Confluent supports several different key management services (KMS) and key vaults, including AWS KMS.
To learn more about CSFLE on Confluent Cloud and Confluent Platform, see the following topics:
CSFLE considerations for Schema Linking exporters
Schema Linking exporters that copy CSFLE-protected subjects have additional RBAC and troubleshooting considerations beyond plain subject replication.
RBAC for Schema Linking exporters with CSFLE
Exporters that copy CSFLE-protected subjects require RBAC permissions on both the subjects and the KEKs that those subjects reference. Subject-level roles alone are not enough. When an exporter encounters a DEK whose KEK does not yet exist on the destination, it calls the destination DEK Registry to register the KEK. Without KEK-scoped permissions on the destination, that call fails.
On the destination Schema Registry cluster, the exporter principal needs:
DeveloperReadandDeveloperWrite(orResourceOwner) on the target subjects, scoped toSubject:<subject-name>or a prefix.DeveloperWrite(orResourceOwner) on each KEK referenced by those subjects, scoped toKek:<kek-name>.
The exporter principal is the owner of the destination Schema Registry API key configured on the exporter, or the identity pool or workload identity used when the exporter authenticates with OAuth. To find the owner of an existing Confluent Cloud Schema Registry API key, run:
confluent api-key describe ${DEST_SR_API_KEY} --environment ${DEST_ENV_ID}
The Owner field in the response is the service account that needs the KEK role bindings. Create the KEK binding with:
confluent iam rbac role-binding create \
  --principal User:${EXPORTER_SA} \
  --role DeveloperWrite \
  --environment ${DEST_ENV_ID} \
  --schema-registry-cluster ${DEST_SR_ID} \
  --resource "Kek:${KEK_NAME}"
For the full set of KEK-scoped roles and how they apply to CSFLE operations, see Access control (RBAC) for CSFLE.
Role-Based Access Control (RBAC) for Schema Linking
Role-Based Access Control (RBAC) enables administrators to set up and manage user access to Schema Linking. This allows for multiple users to collaborate on with different access levels to various resources.
The following table shows how RBAC roles map to Schema Linking resources. For details on how to manage RBAC for these resources, see List the role bindings for a principal, Predefined RBAC Roles in Confluent Cloud, and List the role bindings for a principal.
Role | Scope | All Schema Linking resources |
|---|---|---|
Organization | ✔ | |
Environment | ✔ | |
Cluster | ||
Organization, Environment, Cluster | ||
Organization, Environment, Cluster | ||
Schema Subject | ✔ On both the source and destination, for all subjects being exported. [1] | |
Schema Subject | ||
Schema Subject | ||
Schema Subject | ||
Environment | ||
Environment | ✔ |
Table Legend:
✔ = Yes
Blank space = No
Footnotes
How permission changes affect the destination Schema Registry
Keep these permission behaviors in mind when running exporters:
If schema exporters are running, removing subject permissions from the source does not block the same account from accessing those subjects on the destination — provided the destination Schema Registry is a separate registry from the source. As a precaution, also remove those subject permissions on the destination Schema Registry.
The schema exporter stops running if permissions are removed from the destination Schema Registry for the account that created the exporter.
Permissions on schema contexts
If you want to grant permissions to specific schema contexts, you can do so using the Prefix rule and grant permissions with prefix as :.schema_context:*. The permission can be applied to any of the RBAC roles that use scoping.
For example, topic apply READ permission (DeveloperRead) for the context .my_context:
Use the Confluent CLI to create a resource specific service account which will provide the specific permissions for the context.
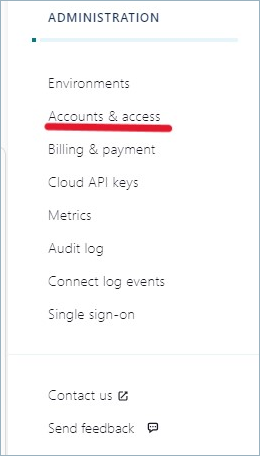
On Confluent Cloud Console, select Access and Accounts under the dropdown menu on the sidebar.
Select the service account and add the access as shown below.
Applying the prefix rule, as shown, will enable the DeveloperRead role for the service account only for context
.my_context.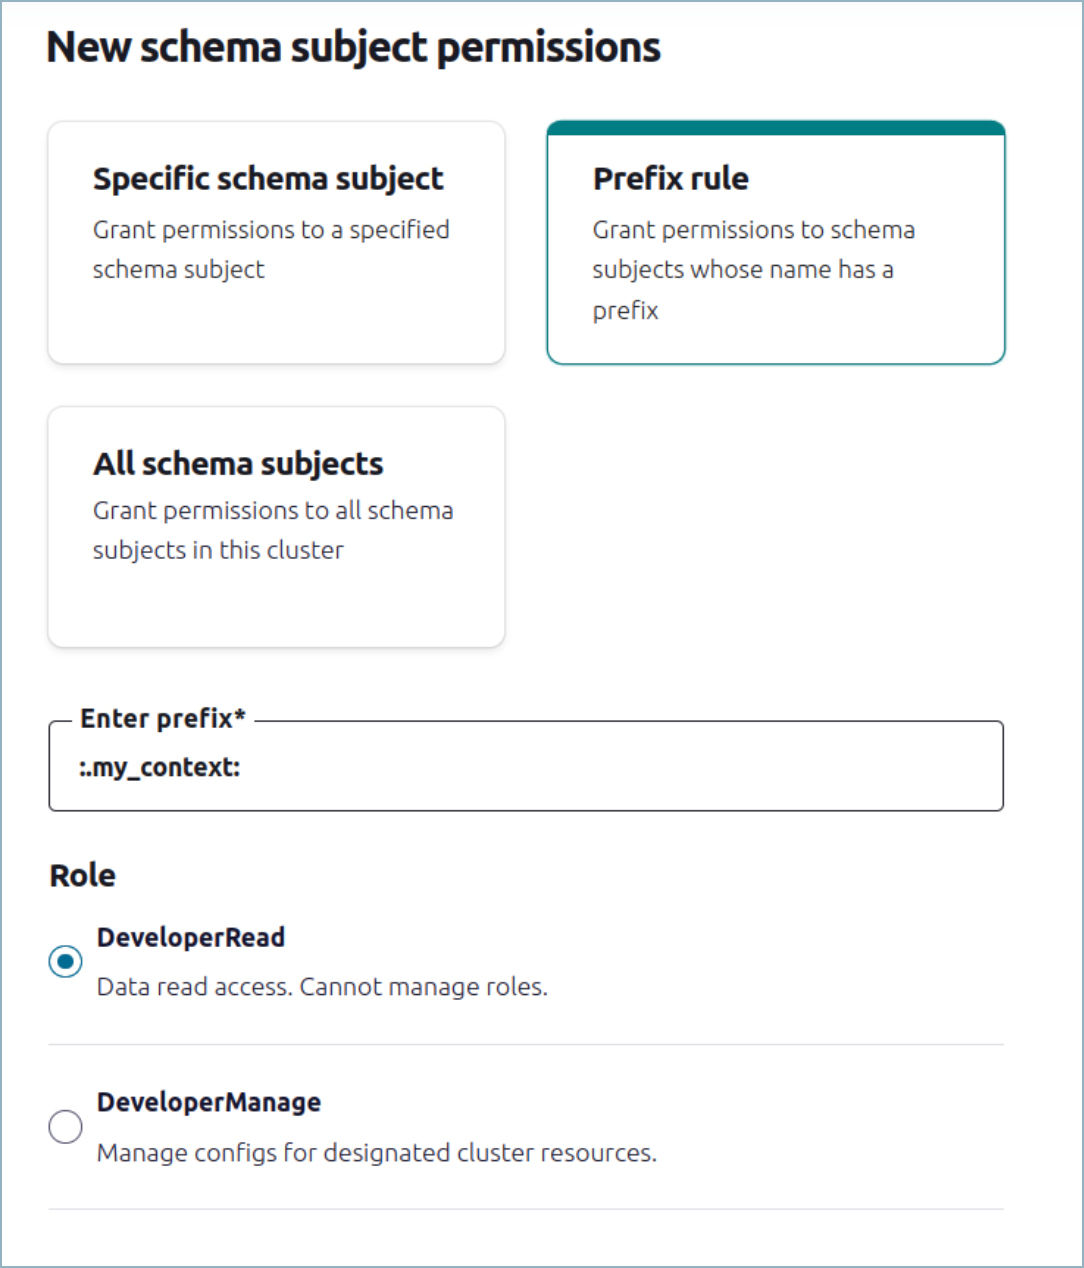
Using OAuth for exporters
Use OAuth 2.0 to authenticate Schema Linking exporters instead of long-lived API keys. OAuth provides token-based authentication and integrates with your organization’s identity management system (Okta, Microsoft Entra ID, Auth0, Google, and others).
See also
For comprehensive OAuth setup guidance, see Use OAuth/OIDC to Authenticate to Confluent Cloud. For Schema Registry client OAuth configuration, see Configure Schema Registry Java clients.
When to use OAuth with exporters
OAuth is recommended for exporters when:
You want to integrate with your organization’s identity provider (Microsoft Entra ID, Okta, Auth0, Google, etc.)
You need short-lived, automatically rotated credentials for enhanced security
You want to use existing enterprise identity and access management systems
You need fine-grained access control based on user attributes and group memberships
You prefer token-based authentication over static API keys
Prerequisites
Before configuring OAuth for exporters, ensure you have:
Identity Provider Setup: A configured OAuth/OIDC identity provider (Okta, Microsoft Entra ID, Auth0, Google, etc.)
Confluent Cloud OAuth Configuration: - Added your identity provider to Confluent Cloud (Add an identity provider using Confluent Cloud Console) - Created identity pools with appropriate policies (Use OAuth Identity Pools with Your OAuth/OIDC Identity Provider on Confluent Cloud)
OAuth Client: A client application registered with your identity provider with: - Client ID and client secret - Appropriate scopes for Schema Registry access - Client credentials grant type enabled
Example OAuth exporter configuration
Use this minimal OAuth exporter configuration as a starting point. The table that follows describes each property.
{
"name": "test-exporter-cloud",
"contextType": "CUSTOM",
"context": "test-context",
"subjects": ["bacon", "eggs"],
"config": {
   "schema.registry.url": "https://psrc-abc123.us-west-2.aws.confluent.cloud",
   "bearer.auth.client.id": "0oa1abc123def456",
   "bearer.auth.credentials.source": "OAUTHBEARER",
   "bearer.auth.client.secret": "your-client-secret-here",
   "bearer.auth.issuer.endpoint.url": "https://dev-12345.okta.com/oauth2/aus12345/v1/token",
   "bearer.auth.credentials.source": "OAUTHBEARER",
   "bearer.auth.scope": "groups",
   "bearer.auth.identity.pool.id": "pool-wxyz123",
   "bearer.auth.logical.cluster": "lsrc-1234abc"
   }

}
The following table describes each configuration property used in the example above:
Property | Required | Description |
|---|---|---|
| Yes | Name of the exporter |
| No | Context type for the exporter ( |
| Conditional | Context name when contextType is CUSTOM |
| No | Array of subject names to export. Default: all subjects |
| Yes | Destination Schema Registry URL endpoint |
| Yes | OAuth client ID from your identity provider |
| Yes | Set to |
| Yes | OAuth client secret from your identity provider |
| Yes | OAuth token endpoint URL from your identity provider |
| No | OAuth scopes for the token request (e.g., |
| Conditional | Identity pool ID. Required if not using auto pool mapping |
| Yes | Schema Registry cluster ID (e.g., |
OAuth configuration parameters
The following OAuth configuration parameters are supported for Schema Registry exporters:
Parameter | Required | Description |
|---|---|---|
| Yes | Set to |
| Yes | OAuth token endpoint URL from your identity provider |
| Yes | OAuth client ID from your identity provider |
| Yes | OAuth client secret from your identity provider |
| Yes | Schema Registry cluster ID (e.g., |
| Conditional | Identity pool ID. Required if not using auto pool mapping |
| No | OAuth scopes for the token request (e.g., |
| No | Name of the JWT claim containing the subject. Default: |
| No | Name of the JWT claim containing the scope. Default: |
| No | Buffer time before token expiration for refresh. Default: |
Configuration examples
The following examples show OAuth configuration for common identity providers and pool-mapping scenarios.
Example 1: OAuth with Okta
Create a configuration file (oauth-config.txt) for your exporter:
schema.registry.url=https://psrc-abc123.us-west-2.aws.confluent.cloud
bearer.auth.credentials.source=OAUTHBEARER
bearer.auth.issuer.endpoint.url=https://dev-12345.okta.com/oauth2/aus12345/v1/token
bearer.auth.client.id=0oa1abc123def456
bearer.auth.client.secret=your-client-secret-here
bearer.auth.scope=groups
bearer.auth.logical.cluster=lsrc-1234abc
bearer.auth.identity.pool.id=pool-wxyz123
Create the exporter using the CLI:
confluent schema-registry exporter create oauth-exporter \
  --subjects ":*:" \
  --config oauth-config.txt
Example 2: OAuth with Microsoft Entra ID (Azure AD)
schema.registry.url=https://psrc-def456.us-east-1.aws.confluent.cloud
bearer.auth.credentials.source=OAUTHBEARER
bearer.auth.issuer.endpoint.url=https://login.microsoftonline.com/your-tenant-id/oauth2/v2.0/token
bearer.auth.client.id=your-azure-app-id
bearer.auth.client.secret=your-azure-client-secret
bearer.auth.scope=https://graph.microsoft.com/.default
bearer.auth.logical.cluster=lsrc-5678def
bearer.auth.identity.pool.id=pool-azure789
Example 3: OAuth with auto pool mapping
When using auto pool mapping, you can omit the bearer.auth.identity.pool.id parameter:
schema.registry.url=https://psrc-ghi789.us-central1.gcp.confluent.cloud
bearer.auth.credentials.source=OAUTHBEARER
bearer.auth.issuer.endpoint.url=https://auth.example.com/oauth2/token
bearer.auth.client.id=kafka-exporter-client
bearer.auth.client.secret=super-secret-value
bearer.auth.scope=schema-registry
bearer.auth.logical.cluster=lsrc-automap
Example 4: OAuth with custom claims
schema.registry.url=https://psrc-jkl012.eu-west-1.aws.confluent.cloud
bearer.auth.credentials.source=OAUTHBEARER
bearer.auth.issuer.endpoint.url=https://custom-idp.example.com/oauth2/token
bearer.auth.client.id=schema-exporter-001
bearer.auth.client.secret=custom-secret-123
bearer.auth.scope=custom-scope
bearer.auth.logical.cluster=lsrc-custom789
bearer.auth.identity.pool.id=pool-custom456
bearer.auth.sub.claim.name=userId
bearer.auth.scope.claim.name=permissions
bearer.auth.cache.expiry.buffer.seconds=600
CLI commands for OAuth exporters
The following commands are available for use with Schema Registry and exporters:
Create an OAuth-enabled exporter
# Create exporter with OAuth configuration
confluent schema-registry exporter create my-oauth-exporter \
  --subjects ":*:" \
  --config oauth-config.txt
Create exporter for specific contexts with OAuth
# Export only schemas from a specific context
confluent schema-registry exporter create context-oauth-exporter \
  --subjects "orders,customers" \
  --context-type CUSTOM \
  --context-name production \
  --config oauth-config.txt
Update exporter OAuth configuration
# Update OAuth configuration
confluent schema-registry exporter update my-oauth-exporter \
  --config updated-oauth-config.txt
Check exporter status with OAuth
# Verify OAuth exporter is running
confluent schema-registry exporter status describe my-oauth-exporter
JSON API configuration format
For programmatic creation using the Schema Registry REST API, use the following JSON format:
{
   "name": "api-oauth-exporter",
   "contextType": "CUSTOM",
   "context": "production",
   "subjects": ["orders", "customers", "products"],
   "config": {
      "schema.registry.url": "https://psrc-api123.us-west-2.aws.confluent.cloud",
      "bearer.auth.credentials.source": "OAUTHBEARER",
      "bearer.auth.issuer.endpoint.url": "https://auth.company.com/oauth2/token",
      "bearer.auth.client.id": "schema-exporter-client",
      "bearer.auth.client.secret": "secure-client-secret",
      "bearer.auth.scope": "schema:read schema:write",
      "bearer.auth.logical.cluster": "lsrc-api456",
      "bearer.auth.identity.pool.id": "pool-api789"
   }
}
Security considerations
When using OAuth with exporters, follow these security best practices:
Client Secret Management
Store client secrets securely using environment variables or secret management systems
Never commit secrets to version control
Rotate client secrets regularly according to your organization’s security policies
Use different client credentials for different environments (dev, staging, production)
Scope and Permissions
Use the principle of least privilege when defining OAuth scopes
Grant only the minimum Schema Registry permissions needed for the exporter’s function
Regularly audit and review identity pool policies and access permissions
Token Security
Configure appropriate token expiration times (typically 1-24 hours)
Use the
bearer.auth.cache.expiry.buffer.secondsparameter to ensure tokens are refreshed before expirationMonitor token usage and authentication failures
Example secure configuration
# Use environment variables for sensitive values
export OAUTH_CLIENT_ID="your-client-id"
export OAUTH_CLIENT_SECRET="your-client-secret"
export SR_CLUSTER_ID="lsrc-your-cluster"
export IDENTITY_POOL_ID="pool-your-pool"
Create configuration file with environment variable references:
schema.registry.url=https://psrc-secure.region.provider.confluent.cloud
bearer.auth.credentials.source=OAUTHBEARER
bearer.auth.issuer.endpoint.url=https://secure-idp.company.com/oauth2/token
bearer.auth.client.id=${OAUTH_CLIENT_ID}
bearer.auth.client.secret=${OAUTH_CLIENT_SECRET}
bearer.auth.logical.cluster=${SR_CLUSTER_ID}
bearer.auth.identity.pool.id=${IDENTITY_POOL_ID}
bearer.auth.cache.expiry.buffer.seconds=300
Validate and debug OAuth configuration
Use these utilities to verify your OAuth setup and inspect exporter state.
Configuration validation
To test your OAuth configuration before creating an exporter:
# Test OAuth configuration with a simple API call
curl -X POST "https://your-idp.com/oauth2/token" \
  -H "Content-Type: application/x-www-form-urlencoded" \
  -d "grant_type=client_credentials&client_id=YOUR_CLIENT_ID&client_secret=YOUR_CLIENT_SECRET"
Debug exporter status
# Get detailed exporter information
confluent schema-registry exporter describe my-oauth-exporter

# Check exporter logs for errors
confluent schema-registry exporter status describe my-oauth-exporter
Troubleshooting OAuth exporters
Authentication failures
Error: Unable to authenticate with OAuth provider
Verify client ID and secret are correct
Check that the OAuth issuer endpoint URL is accessible
Ensure the client has the required grants and scopes
Verify the identity provider is properly configured in Confluent Cloud
Token expiration issues
Error: Token expired
Increase
bearer.auth.cache.expiry.buffer.secondsvalueCheck token lifetime settings in your identity provider
Verify network connectivity for token refresh requests
OAuth-specific resources
Use OAuth/OIDC to Authenticate to Confluent Cloud - Complete OAuth setup guide for Confluent Cloud
Configure Schema Registry Java clients - Schema Registry client OAuth configuration
Add an identity provider using Confluent Cloud Console - Adding identity providers to Confluent Cloud
Use OAuth Identity Pools with Your OAuth/OIDC Identity Provider on Confluent Cloud - Creating and managing identity pools
Schema Registry client configuration - All Schema Registry client configuration options