Validate Broker-side Schemas IDs in Confluent Platform
Schema ID Validation enables the broker to verify that data produced to a Kafka topic is using a valid schema ID in Schema Registry that is registered according to the subject naming strategy.
Schema Validation does not perform data introspection, but rather checks that the schema ID in the Wire Format is registered in Schema Registry under a valid subject.
You must use a serializer and deserializer (serdes) that respect the Wire format, or use a Confluent supported serde, as described in Formats, Serializers, and Deserializers.
Schema validation works both in cases where the topic name matches a subject or the topic name matches a schema alias (for example, a named context).
Tip
Schema ID Validation is also available on Confluent Cloud clusters using the hosted, per environment Schema Registry. To learn more, see Using Broker-Side Schema ID Validation on Confluent Cloud.
Limitations
Schema validation is supported only in the default context. Otherwise, you run the risk of subject name collisions for some cases. To learn more about schema contexts, see Use Schema Contexts in Confluent Platform and Schema Linking on Confluent Platform.
Schema validation feature does not reject tombstone records, records with a null value, even if there is no schema ID associated with the record. Messages with a null value or a null key will pass validation. This is a design choice that supports effective data management and deletion in compacted topics.
Prerequisites and Setting Schema Registry URLs on the Brokers
Basic requirements to run these examples are generally the same as those described for the Schema Registry Tutorial with the exception of Maven, which is not needed here. Also, Confluent Platform version 5.4.0 or later is required here.
As an additional prerequisite to enable Schema ID Validation on the brokers, you must specify confluent.schema.registry.url in the Kafka server.properties file ($CONFLUENT_HOME/etc/kafka/server.properties) before you start Confluent Platform. This tells the broker how to connect to Schema Registry.
For example:
confluent.schema.registry.url=http://schema-registry:8081
This configuration accepts a comma-separated list of URLs for Schema Registry instances. This setting is required to make Schema ID Validation available both from the Confluent CLI and on the Control Center for Confluent Platform.
Enabling Schema ID Validation on a topic from the Confluent CLI
You can enable Schema ID Validation on a topic when you create a topic or modify an existing topic.
Create a Topic with Schema ID Validation
To set Schema ID Validation on a topic when you create the topic, set confluent.value.schema.validation=true and confluent.key.schema.validation=true.
Value schema and key schema validation are independent of each other; you can enable either or both. (By default, schema validation is not enabled; both key and value schema validation default to false.)
For example, this command creates a topic called my-topic-sv with schema validation enabled on the value schema:
kafka-topics --create --bootstrap-server localhost:9092 --replication-factor 1 \
--partitions 1 --topic my-topic-sv \
--config confluent.value.schema.validation=true
The output of this command is:
Created topic my-topic-sv.
With this configuration, if a message is produced to the topic my-topic-sv that does not have a valid schema for the value of the message, an error is returned to the producer, and the message is discarded.
If a batch of messages is sent, and at least one is invalid, then the entire batch is discarded.
Tip
To learn more about value and key schemas, see Terminology in the Schema Registry tutorial.
To learn how to create a schema for a topic, see Manage Schemas in Confluent Platform and Control Center.
Add Schema ID Validation to an Existing Topic
Create a new topic called my-first-topic:
kafka-topics --create --bootstrap-server localhost:9092 --replication-factor 1 --partitions 1 --topic my-first-topic
The output of this command is:
Created topic my-first-topic.
To change topic validation configuration on an existing topic (in this case from false to true), specify validation using the alter and --add-config flags as shown in this example:
kafka-configs --bootstrap-server localhost:9092 --alter --entity-type topics --entity-name my-first-topic --add-config confluent.value.schema.validation=true
You should get this confirmation:
Completed updating config for topic 'my-first-topic'.
To disable topic validation on this topic (from true to false), rerun the above command with --add-config confluent.value.schema.validation=false.
Change the subject naming strategy for a topic
By default, Confluent Server uses the TopicNameStrategy as the naming strategy to map topics with schemas in Schema Registry.
Before Confluent Platform 5.5.0, the subject name strategy was configured on the brokers in server.properties, which required that you use the same strategy for all topics on a broker.
The naming strategy is associated with the topics. Therefore, you now have the option to configure a naming strategy to something other than the default on a per-topic basis for both the schema subject key and value with confluent.key.subject.name.strategy and confluent.value.subject.name.strategy.
From the Confluent CLI, use the --config option to create or modify a topic with the specified naming strategy. For example:
To create a topic that uses RecordNameStrategy for the value:
./bin/kafka-topics --create --bootstrap-server localhost:9092 \
--replication-factor 1 --partitions 1 --topic my-other-cool-topic \
--config confluent.value.schema.validation=true --config confluent.value.subject.name.strategy=io.confluent.kafka.serializers.subject.RecordNameStrategy
To modify a topic to use RecordNameStrategy as the key:
kafka-configs --bootstrap-server localhost:9092 \
--alter --entity-type topics --entity-name my-other-cool-topic \
--add-config confluent.key.subject.name.strategy=io.confluent.kafka.serializers.subject.RecordNameStrategy
The possible configurations for both confluent.value.subject.name.strategy and confluent.key.subject.name.strategy are:
io.confluent.kafka.serializers.subject.TopicNameStrategy(the default)io.confluent.kafka.serializers.subject.RecordNameStrategyio.confluent.kafka.serializers.subject.TopicRecordNameStrategy
See also
Enabling Schema ID Validation on a topic in Confluent Control Center
You can view, enable, or disable Schema ID Validation on a topic in Control Center (see Manage Schemas in Confluent Platform and Control Center in Control Center guide). Additionally, you can configure per-topic subject naming strategies.
View or Change Schema ID Validation settings for a topic
To view current configurations or enable Schema ID Validation on a topic from the Control Center (http://localhost:9021/):
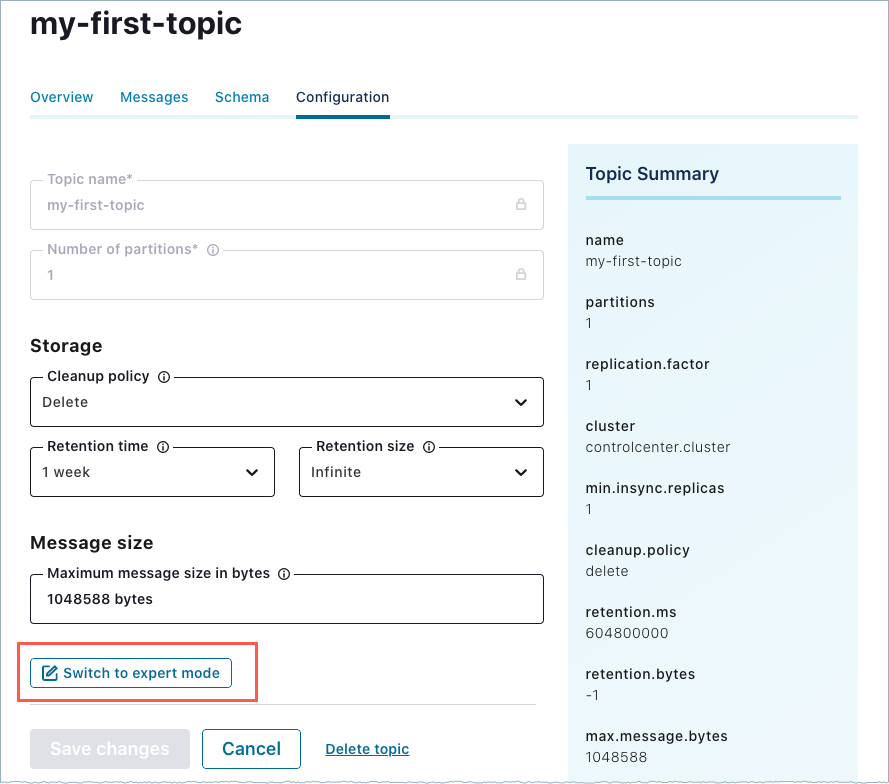
Click the Configuration tab on an existing topic, and click Edit settings.
Click Switch to expert mode.
In Expert mode, change the settings for
confluent.value.schema.validationandconfluent.key.schema.validationfrom false to true.You may need to scroll down to find
confluent.key.schema.validation.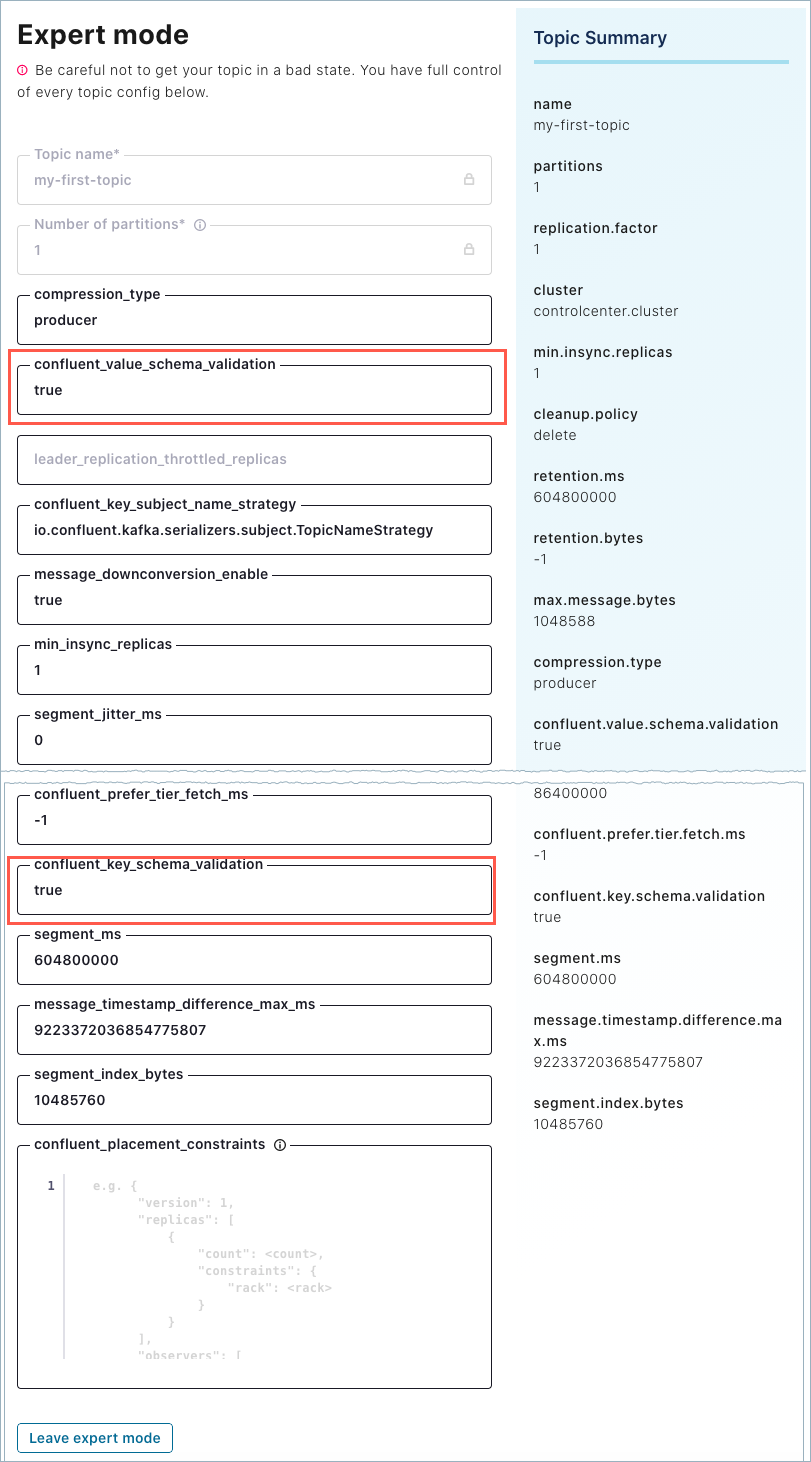
Click Save changes.
Change the subject naming strategy for a topic
To change the subject naming strategy using Control Center:
On Control Center, select the topic to update, click Configuration, then click Switch to expert mode.
Search for
confluent.value.subject.name.strategyandconfluent.key.subject.name.strategy.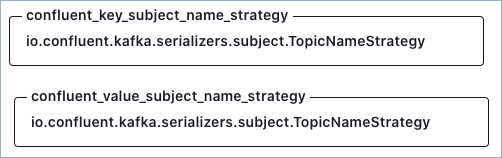
Modify the settings and click Save changes.
The possible configurations for both confluent.value.subject.name.strategy and confluent.key.subject.name.strategy are:
io.confluent.kafka.serializers.subject.TopicNameStrategy(the default)io.confluent.kafka.serializers.subject.RecordNameStrategyio.confluent.kafka.serializers.subject.TopicRecordNameStrategy
To learn more, see Change the subject naming strategy for a topic, which describes how to perform the same tasks on the Confluent CLI and gives more background information on the feature.
Demo: Enabling Schema ID Validation on a Topic at the Command Line
This short demo shows the effect of enabling or disabling schema validation on a topic.
If you are just getting started with Confluent Platform and Schema Registry, you might want to first work through the Tutorial: Use Schema Registry on Confluent Platform to Implement Schemas for a Client Application, then return to this demo.
The examples make use of the kafka-console-producer and kafka-console-consumer, which are located in $CONFLUENT_HOME/bin.
On a local install of Confluent Platform version 5.4.0 or later, modify
$CONFLUENT_HOME/etc/kafka/server.propertiesto include the following configuration for the Schema Registry URL:############################## My Schema Validation Demo Settings ################ # Schema Registry URL confluent.schema.registry.url=http://localhost:8081
The example above includes two lines of comments, which are optional, to keep track of the configurations in the file.
Start Confluent Platform using the following command:
confluent local start
Tip
Alternatively, you can simply run
confluent local services schema-registry startwhich also startskafkaandzookeeperas dependencies. This demo does not directly reference the other services, such as Connect and Control Center. That said, you may want to run the full stack anyway to further explore, for example, how the topics and messages display on Control Center. To learn more aboutconfluent local, see Quick Start for Confluent Platform and confluent local in the Confluent CLI command reference.The
confluent localcommands run in the background so you can re-use this command window. Separate sessions are required for the producer and consumer.
Create a test topic called
test-schemaswithout specifying the Schema ID Validation setting so that it defaults tofalse.kafka-topics --bootstrap-server localhost:9092 --create --partitions 1 --replication-factor 1 --topic test-schemas
This creates a topic with no broker validation on records produced to the test topic, which is what you want for the first part of the demo. You can verify that the topic was created with
kafka-topics --bootstrap-server localhost:9092 --list.In a new command window for the producer, run this command to produce a serialized record (using the default string serializer) to the topic
test-schemas.kafka-console-producer --bootstrap-server localhost:9092 --topic test-schemas --property parse.key=true --property key.separator=,
The command is successful because you currently have Schema ID Validation disabled for this topic. If broker Schema ID Validation had been enabled for this topic, the above command to produce to it would not be permitted.
The output of this command is a producer command prompt (
>), where you can type the messages you want to produce.Type your first message at the
>prompt as follows:1,my first record
Keep this session of the producer running.
Open a new command window for the consumer, and enter this command to read the messages:
kafka-console-consumer --bootstrap-server localhost:9092 --from-beginning --topic test-schemas --property print.key=true
The output of this command is
my first record.Keep this session of the consumer running.
Now, set Schema ID Validation for the topic
test-schemastotrue.kafka-configs --bootstrap-server localhost:9092 --alter --entity-type topics --entity-name test-schemas --add-config confluent.value.schema.validation=true
You should get a confirmation:
Completed updating config for topic test-schemas.Return to the producer session, and type a second message at the
>prompt.2,my second record
You will get an error because Schema ID Validation is enabled and the messages we are sending do not contain schema IDs:
This record has failed the validation on brokerIf you subsequently disable Schema ID Validation (use the same command to set it to
false), restart the producer, then type and resend the same or another similarly formatted message, the message will go through. (For example, produce3,my third record.)Tip
As an alternative to restarting the producer in this last step (after switching schema validation back to
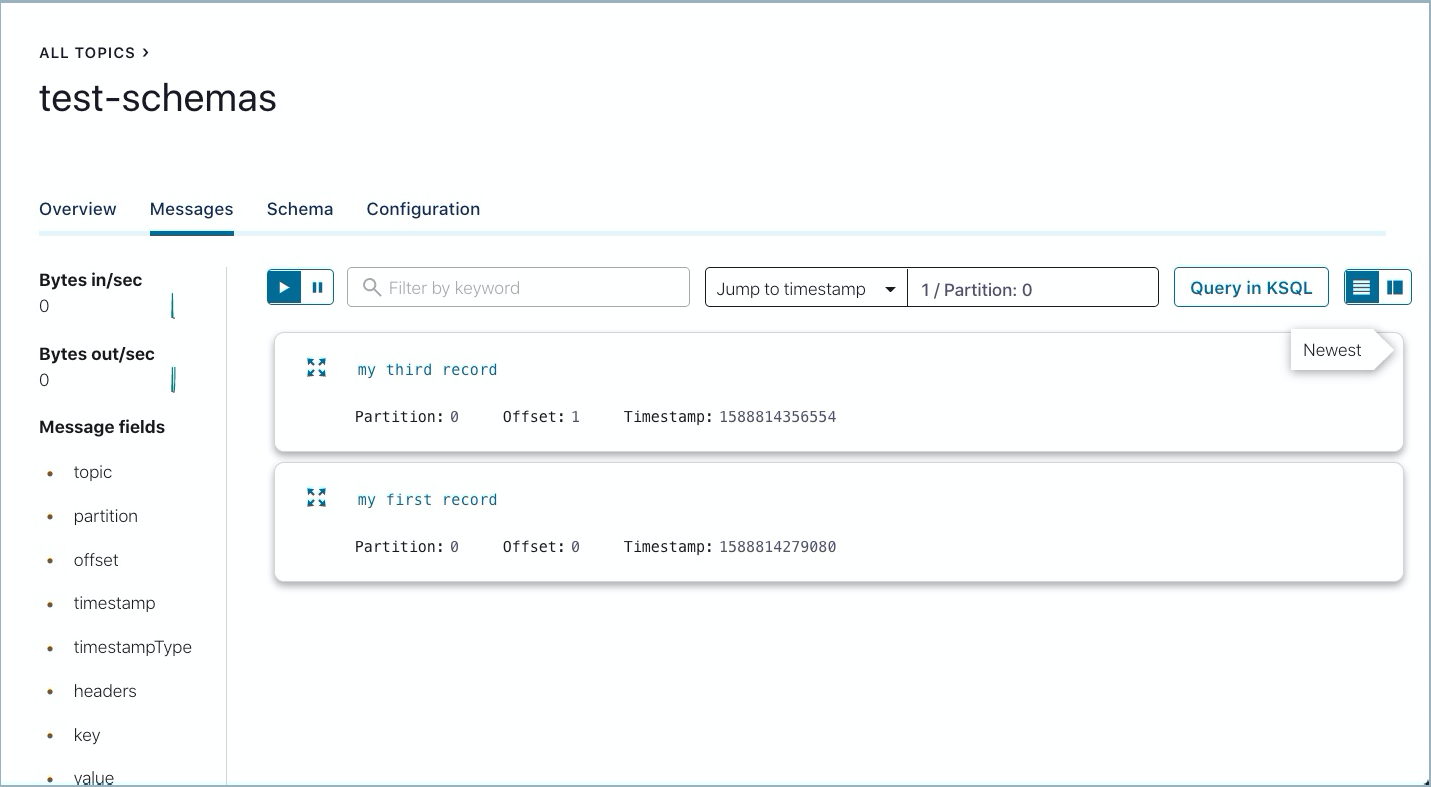
false), you can simply type or copy-paste the suggested message3,my third recordon the blank line after the error and hit return. The consumer will pick it up, and you will then get the producer prompt back. However, this is an unintuitive workflow because there is no prompt showing after the error, and you may be tempted to hit return first, which will shut down the producer.The messages that were successfully produced also show on Control Center (http://localhost:9021/ in your web browser) in Topics > test-schemas > messages. You may have to select a partition or jump to a timestamp to see messages sent earlier.
Run shutdown and cleanup tasks.
You can stop the consumer and producer with Ctl-C in their respective command windows.
To stop Confluent Platform, type
confluent local services stop.If you would like to clear out existing data (topics, schemas, and messages) before starting again with another test, type
confluent local destroy.
Configuring the range for valid schema IDs
Schema Validation tracks the maximum schema ID seen in Schema Registry. If a schema ID is seen that is too far above the maximum schema ID, it is automatically considered invalid. Since the maximum schema ID may be slightly out of date, you can configure an additional range above the maximum schema ID to allow Schema Validation to verify whether the schema ID exists in Schema Registry.
The property confluent.missing.id.query.range indicates the range above the maximum schema ID beyond which schemas are automatically considered invalid. The default value for confluent.missing.id.query.range is 200. With the default setting, if the schema ID is greater than the maximum schema ID plus 200, it is automatically considered invalid and an alert is triggered.
Messages with null keys or values will pass schema validation
If you have confluent.value.schema.validation enabled and produce a Kafka message with a null value, it will pass schema validation even though the value does not follow the protocol defined for the Wire format (because it is null).
If you have confluent.key.schema.validation enabled, and produce a Kafka message with null key, it will pass schema validation, even though the key does not follow the protocol defined for the Wire format (because it is null).
Configuring Security for Schema ID Validation
In general, Schema Registry initiates the connection to the brokers. Schema ID Validation is unique in that the broker(s) initiate the connection to Schema Registry. They do so in order to retrieve schemas from the registry, and verify that the messages they receive from producers match schemas associated with particular topics. With Schema ID Validation enabled, the sequence of tasks looks something like this:
A broker receives a message from a producer, and sees that it’s directed to a topic that has a schema associated.
The broker initiates a connection to Schema Registry.
The broker asks for the schema associated with the topic (by schema ID).
Schema Registry receives the request, finds the requested schema in its schema storage, and returns it to the broker.
The broker validates the schema ID.
Therefore, to set up security on a cluster that has broker-side Schema ID Validation enabled on topics, you must configure settings on the Kafka broker to support this broker-initiated connection to Schema Registry. For multiple brokers, each broker must be configured. For example, for mTLS, ideally you would have a different certificate for each broker.
Note that Schema Registry’s internal Kafka client to Kafka brokers is not relevant at all to the connection between broker-side Schema ID Validation and Schema Registry’s HTTP listeners. The security settings below do not reflect anything about the Schema Registry internal client-to-broker connection.
The broker configurations below include confluent.schema.registry.url, which tells the broker how to connect to Schema Registry. You may already have configured this on your brokers, as a prerequisite for using Schema Validation. The rest of the settings shown are specific to security configurations.
Tip
The sections below focus on security configurations on the brokers. For information about setting up security on Schema Registry, see Secure Schema Registry for Confluent Platform and related sections. For example, to set up Schema Registry to require clients (like brokers) to authenticate with a username and password, see Schema Registry under Use HTTP Basic Authentication in Confluent Platform.
mTLS (mutual TLS) Authentication
To configure mutual TLS (mTLS) authentication (also known as Mutual TLS (mTLS)), the broker will authenticate to Schema Registry using TLS/SSL for authentication (certificates) and encryption.
Define the following settings in the broker properties file for each broker ($CONFLUENT_HOME/etc/kafka/server.properties).
confluent.schema.registry.url=https://<host>:<port>
confluent.ssl.truststore.location=<path to truststore file>
confluent.ssl.truststore.password=<password for the truststore if encrypted>
confluent.ssl.keystore.location=<path to file with private key for the broker>
confluent.ssl.keystore.password=<password to keystore file>
confluent.ssl.key.password=<password>
Basic Authentication
For this setup, the brokers are configured to authenticate to Schema Registry using basic authentication.
Define the following settings on each broker ($CONFLUENT_HOME/etc/kafka/server.properties).
confluent.schema.registry.url=http://<host>:<port>
confluent.basic.auth.credentials.source=<USER_INFO, URL, or SASL_INHERIT>
confluent.basic.auth.user.info=<username>:<password> #required only if credentials source is set to USER_INFO
The property
confluent.basic.auth.credentials.sourcedefines the type of credentials to use (user name and password). These are literals, not variables.If you set
confluent.basic.auth.credentialstoUSER_INFO, you must also specifyconfluent.basic.auth.user.info.
Basic Authentication with SSL
Define the following settings on each broker ($CONFLUENT_HOME/etc/kafka/server.properties).
confluent.schema.registry.url=https://<host>:<port>
confluent.basic.auth.credentials.source=USER_INFO
confluent.basic.auth.user.info=<username>:<password>
confluent.ssl.truststore.location=<path to the truststore file>
confluent.ssl.truststore.password=<password for the truststore if encrypted>
To learn more about Basic Authentication, see Schema Registry in the Security documentation for authenticating using HTTP Basic Authentication.
Role-based Access Control (RBAC) and ACLs
You can configure Role-Based Access Control (and/or ACLs) for authorization to Schema Registry, and use it with other types of security on the brokers.
The Schema Registry Security Plugin for Confluent Platform supports authorization for both RBAC and ACLs.
Configure the Brokers
Define the appropriate settings on the brokers similar to those shown in previous sections, depending on the type of security. For example, for basic authentication, the broker properties files would contain:
confluent.schema.registry.url=http://<host>:<port>
confluent.basic.auth.credentials.source=USER_INFO
confluent.basic.auth.user.info=<username>:<password> #required only if credentials source is set to USER_INFO
Set RBAC Role Bindings to Allow Access to Schema Registry
At a minimum, in terms of defining RBAC role bindings, Schema Registry needs the following IAM assignment:
confluent iam rbac role-binding list --principal User:<user-id> \
--role DeveloperRead --kafka-cluster <kafka-cluster-id> \
--resource Subject:* --schema-registry-cluster-id <schema-registry-group-id>
The Schema Registry cluster ID is the same as schema-registry-group-id, which defaults to schema-registry.
OAuth on Schema Registry server
When a service such as broker-side schema ID validation is enabled on topics, the broker tries to connect to Schema Registry.
Starting with Confluent Platform version 7.7, the Schema Registry server can be configured for Open Authentication (OAuth) to secure Schema Registry services and clients. For broker-side schema ID validation, specific configurations are are required on the Kafka broker. To learn more about these broker, Schema Registry server, and client configurations, see Configure OAuth for Schema Registry in Confluent Platform.
License
A Confluent Enterprise license is required for broker-side Schema ID Validation. In this case, the Confluent Enterprise license must be applied to the brokers, not the Schema Registry node. To learn more, see License.
Starting October 1, 2025, a new Confluent Enterprise license is available for the Customer-Managed Confluent Platform for Confluent Cloud subscription. This license allows you to use self-managed Confluent Platform components exclusively with Confluent Cloud services. However, If you use the Customer-Managed Confluent Platform for Confluent Cloud license with Schema Registry, you can’t use Schema ID validation with Kafka brokers on Confluent Platform.