

Protobuf Schema Serializer and Deserializer for Schema Registry on Confluent Platform
Use Protocol Buffers (Protobuf) with the Apache Kafka® Java client and console tools to serialize and deserialize structured Kafka data.
What is Protobuf?
Protobuf is a language-neutral, platform-neutral, extensible mechanism for serializing structured data. Developed by Google, Protobuf is widely used in many applications, including RPC systems, database systems, and data storage. Protobuf has these key features:
Protobuf schemas can evolve over time while maintaining backward and forward compatibility. For more information, see Schema Evolution and Compatibility for Schema Registry on Confluent Platform.
Binary encoding provides compact, efficient storage and transmission.
Protobuf supports many programming languages, including Java, Python, and C++.
You can read and process schemas at runtime without code generation.
The Protobuf serializer for Confluent Schema Registry doesn’t include the message schema. It includes the schema ID, in addition to a magic byte, followed by message indexes and then the normal binary encoding of the data in the protobuf-payload. You can choose whether to embed a schema inline, for cases where you want to communicate the schema offline, with headers, or some other way. Other systems, such as Hadoop, always include the schema with the message data. For more information, see Wire format.
Protobuf serializer
Plug KafkaProtobufSerializer into KafkaProducer to send messages of
Protobuf type to Kafka.
When you give the serializer an instance of a Protobuf generated class, the
serializer can register the Protobuf schema and all referenced schemas. By
default, the serializer registers each referenced schema under a subject with
the same name as the reference. For example, if the main schema references
google/protobuf/timestamp.proto, the serializer registers the timestamp
schema under a subject named google/protobuf/timestamp.proto. To customize
this behavior, provide a custom implementation of
ReferenceSubjectNameStrategy to the serializer with the
reference.subject.name.strategy configuration, as described in
Subject name strategy configuration properties.
The interface for ReferenceSubjectNameStrategy is:
public interface ReferenceSubjectNameStrategy extends Configurable
{
 /**
  * For a given reference name, topic, and message, returns the subject name under which the
  * referenced schema should be registered in the schema registry.
  *
  * @param refName The name of the reference.
  * @param topic The Kafka topic name to which the message is being published.
  * @param isKey True when encoding a message key, false for a message value.
  * @param schema The referenced schema.
  * @return The subject name under which the referenced schema should be registered.
  */
 String subjectName(String refName, String topic, boolean isKey, ParsedSchema schema);
}
Two implementations are available for this interface:
io.confluent.kafka.serializers.subject.DefaultReferenceSubjectNameStrategy: the default. It returns the reference name as the subject name.io.confluent.kafka.serializers.subject.QualifiedReferenceSubjectNameStrategy: replaces slashes with dots and removes the.protosuffix from the reference name to obtain the subject name. For example,mypackage/myfile.protobecomesmypackage.myfile.
For example, suppose you have the following schema:
syntax = "proto3";
package com.acme;

import "other.proto";

message MyRecord {
  string f1 = 1;
  OtherRecord f2 = 2;
}
The MyRecord schema references other.proto, which looks like this:
syntax = "proto3";
package com.acme;

message OtherRecord {
  int32 other_id = 1;
}
Tip
The following examples use the default hostname and port for the Kafka
bootstrap server (localhost:9092) and Schema Registry (localhost:8081).
The following code creates an instance of the MyRecord class that the
Protobuf compiler generates. The Kafka producer serializes the MyRecord
instance with the Protobuf serializer:
Properties props = new Properties();
props.put(ProducerConfig.BOOTSTRAP_SERVERS_CONFIG, "localhost:9092");
props.put(ProducerConfig.KEY_SERIALIZER_CLASS_CONFIG,
  "org.apache.kafka.common.serialization.StringSerializer");
props.put(ProducerConfig.VALUE_SERIALIZER_CLASS_CONFIG,
  "io.confluent.kafka.serializers.protobuf.KafkaProtobufSerializer");
props.put("schema.registry.url", "http://127.0.0.1:8081");

Producer<String, MyRecord> producer = new KafkaProducer<String, MyRecord>(props);

String topic = "testproto";
String key = "testkey";
OtherRecord otherRecord = OtherRecord.newBuilder()
  .setOtherId(123).build();
MyRecord myrecord = MyRecord.newBuilder()
  .setF1("value1").setF2(otherRecord).build();

ProducerRecord<String, MyRecord> record
      = new ProducerRecord<String, MyRecord>(topic, key, myrecord);
producer.send(record).get();
producer.close();
When it serializes the Protobuf instance, the code automatically registers two
schemas with Schema Registry, one for MyRecord and one for OtherRecord, under two
different subjects. To turn off automatic schema registration, pass
auto.register.schemas=false to the serializer.
To examine the registered schemas, use the REST endpoints. To list the subjects, run:
curl http://localhost:8081/subjects
The output is:
["testproto-value", "other.proto"]
The SubjectNameStrategy determines the subject for the top-level schema and
defaults to suffixing the topic with -key or -value. The
ReferenceSubjectNameStrategy determines the subjects for referenced schemas
and defaults to the name in the import statement. You can customize both
strategies.
The schemas in the following output include a schemaType field, added in
Confluent Platform 5.5, and the top-level schema includes a references field that refers
to other.proto. To view the testproto-value schema, run:
curl http://localhost:8081/subjects/testproto-value/versions/1
The output is:
{
  "subject": "testproto-value",
  "version": 1,
  "id": 2,
  "schemaType": "PROTOBUF",
  "references": [
    {
      "name": "other.proto",
      "subject": "other.proto",
      "version": 1
    }
  ],
  "schema": "syntax = \"proto3\";\npackage com.acme;\n\nimport \"other.proto\";\n\nmessage MyRecord {\n  string f1 = 1;\n  .com.acme.OtherRecord f2 = 2;\n}\n"
}
The testproto-value schema ID is 2, and the other.proto schema ID is
1.
To view the other.proto schema, run:
curl http://localhost:8081/subjects/other.proto/versions/1
The output is:
{
"subject": "other.proto",
"version": 1,
"id": 1,
"schemaType": "PROTOBUF",
"schema": "syntax = \"proto3\";\npackage com.acme;\n\nmessage OtherRecord {\n  int32 other_id = 1;\n}\n"
}
To try deleting the referenced schema other.proto, run:
curl -X DELETE http://localhost:8081/subjects/other.proto/versions/1
Schema Registry returns the following error because it prevents you from creating a dangling reference, which would happen if you deleted the referenced schema before the top-level schema:
{"error_code":42206,"message":"One or more references exist to the schema {magic=1,keytype=SCHEMA,subject=other.proto,version=1}."}
The schema with ID 2 references the schema you tried to delete. To get that
information from Schema Registry directly, run:
curl http://localhost:8081/subjects/other.proto/versions/1/referencedby
The command returns the ID of the testproto-value schema, ID 2, which
references your other.proto schema:
[2]
A schema can exist in multiple subjects. Before you can delete the referenced schema, delete the schema in each subject where it occurs. To determine where a schema ID is used, run:
curl http://localhost:8081/schemas/ids/2/versions
The command returns the following, which shows that only one schema references
other.proto:
[{"subject":"testproto-value","version":1}]
To delete the top-level schema testproto-value, which references
other.proto, run:
curl -X DELETE http://localhost:8081/subjects/testproto-value/versions/1
The output is 1.
To delete the referenced schema, run the following command, which now succeeds:
curl -X DELETE http://localhost:8081/subjects/other.proto/versions/1
The output is 1.
Protobuf deserializer
Plug KafkaProtobufDeserializer into KafkaConsumer to receive messages of
any Protobuf type from Kafka.
Tip
The following example uses the default hostname and port for the Kafka
bootstrap server (localhost:9092) and Schema Registry (localhost:8081).
The following consumer receives Protobuf messages from Kafka:
Properties props = new Properties();

props.put(ConsumerConfig.BOOTSTRAP_SERVERS_CONFIG, "localhost:9092");
props.put(ConsumerConfig.GROUP_ID_CONFIG, "group1");
props.put(ConsumerConfig.KEY_DESERIALIZER_CLASS_CONFIG, "org.apache.kafka.common.serialization.StringDeserializer");
props.put(ConsumerConfig.VALUE_DESERIALIZER_CLASS_CONFIG, "io.confluent.kafka.serializers.protobuf.KafkaProtobufDeserializer");
props.put("schema.registry.url", "http://localhost:8081");
props.put(ConsumerConfig.AUTO_OFFSET_RESET_CONFIG, "earliest");

String topic = "testproto";
final Consumer<String, Message> consumer = new KafkaConsumer<String, Message>(props);
consumer.subscribe(Arrays.asList(topic));

try {
  while (true) {
    ConsumerRecords<String, Message> records = consumer.poll(100);
    for (ConsumerRecord<String, Message> record : records) {
      System.out.printf("offset = %d, key = %s, value = %s \n", record.offset(), record.key(), record.value());
    }
  }
} finally {
  consumer.close();
}
When deserializing a Protobuf payload, KafkaProtobufDeserializer can behave
in these ways:
If you give it
specific.protobuf.key.typeorspecific.protobuf.value.type, the deserializer uses the specified type to deserialize the payload.The previous configuration doesn’t work with
RecordNameStrategywhen the Protobuf definition has more than one message. In this case, you must also specify eitherjava_outer_classnameorjava_multiple_files = truein the original Protobuf file. These options let the deserializer derive the Java type from the schema to deserialize the Protobuf payload.If you provide no type and the deserializer can’t derive one, the deserializer uses the schema to return an instance of a Protobuf
DynamicMessage.
Like the Avro deserializer, which returns an instance of a specific Avro record
type or a GenericRecord, the Protobuf deserializer returns an instance of a
specific Protobuf message type or a DynamicMessage. If the Protobuf
deserializer can’t determine a specific type, it returns a generic type.
One way to return a specific type is to use an explicit property. For the
Protobuf deserializer, you can configure
KafkaProtobufDeserializerConfig.SPECIFIC_PROTOBUF_VALUE_TYPE or
KafkaProtobufDeserializerConfig.SPECIFIC_PROTOBUF_KEY_TYPE.
To let the Protobuf deserializer work with topics that have heterogeneous types,
provide additional information in the schema. Configure the deserializer with
derive.type=true, and then specify either java_outer_classname or
java_multiple_files=true in the schema.
Here is a summary of specific and generic return types for each schema format.
Avro |
Protobuf |
JSON Schema |
|
|---|---|---|---|
Specific type |
Generated class that implements org.apache.avro.SpecificRecord |
Generated class that extends com.google.protobuf.Message |
Java class (that is compatible with Jackson serialization) |
Generic type |
org.apache.avro.GenericRecord |
com.google.protobuf.DynamicMessage |
com.fasterxml.jackson.databind.JsonNode |
Configure expiry time for client-side schema caches
The following format-agnostic configuration options for cache expiry time are available on both the serializer and deserializer:
latest.cache.size- The maximum size for caches holding latest schemaslatest.cache.ttl.sec- The time to live (TTL) in seconds for caches holding latest schemas, or-1for no TTL
Test drive Protobuf schema
Test drive the Protobuf schema format by using the producer and consumer commands in a shell to send and receive Protobuf data in JSON format. Like Avro, Protobuf defines a binary serialization format and a JSON serialization format. Use JSON when you want human-readable data, and use the more efficient binary format to store data in topics.
The command line producer and consumer show how the built-in Protobuf schema support works on Confluent Platform and Confluent Cloud.
When you incorporate the serializer and deserializer into the code for your own producers and consumers, messages and associated schemas are processed the same way as they are on the console producers and consumers.
The suggested consumer commands include a flag to read --from-beginning to
be sure you capture the messages even if you don’t run the consumer immediately
after running the producer. If you leave off the --from-beginning flag, the
consumer will read only the last message produced during its current session.
The following examples include a few minimal configurations. For full property references, see Producer and consumer configuration reference.
Prerequisites
Prerequisites to run these examples are generally the same as those described for the Schema Registry Tutorial with the exception of Maven, which is not needed here. Also, Confluent Platform version 5.5.0 or later is required here.
The following examples use the default Schema Registry URL value (
localhost:8081). The examples show how to configure this inline by supplying the URL as an argument to the--propertyflag in the command line arguments of the producer and consumer (--property schema.registry.url=<address of your schema registry>). Alternatively, you could set this property in$CONFLUENT_HOME/etc/kafka/server.properties, and not have to include it in the producer and consumer commands. For example:confluent.schema.registry.url=http://localhost:8081These examples make use of the
kafka-avro-console-producerandkafka-avro-console-consumer, which are located in$CONFLUENT_HOME/bin.
Confluent Cloud prerequisites are:
A Confluent Cloud account
Permission to create a topic and schema in a cluster in Confluent Cloud
Stream Governance Package enabled
API key and secret for Confluent Cloud cluster (
$APIKEY,$APISECRET)API key and secret for Schema Registry (
$SR_APIKEY,$SR_APISECRET)Schema Registry endpoint URL (
$SCHEMA_REGISTRY_URL)Cluster ID (
$CLUSTER_ID)Schema registry cluster ID (
$SR_CLUSTER_ID)
The examples assume that API keys, secrets, cluster IDs, and API endpoints are
stored in persistent environment variables wherever possible, and refer to them
as such. You can store these in shell variables if your setup is temporary. If
you want to return to this environment and cluster for future work, consider
storing them in a profile (such as .zsh, .bashrc, or powershell.exe profiles).
The following steps provide guidelines on these prerequisites specific to these examples. To learn more general information, see Manage Clusters.
Log in to Confluent Cloud:
confluent loginCreate a Kafka cluster in Confluent Cloud
confluent kafka cluster create <name> [flags]
For example:
confluent kafka cluster create quickstart_cluster --cloud "aws" --region "us-west-2"
Your output will include a cluster ID (in the form of
lkc-xxxxxx), show the cluster name and cluster type, a Basic cluster in this case, and endpoints. Take note of the cluster ID, and store it in an environment variable such as$CLUSTER_ID.Get an API key and secret for the cluster:
confluent api-key create --resource $CLUSTER_ID
Store the API key and secret for your cluster in a safe place, such as shell environment variables:
$APIKEY,$APISECRETView Stream Governance packages and Schema Registry endpoint URL.
A Stream Governance package was enabled as a part of creating the environment.
To view governance packages, use the Confluent CLI command confluent environment list:
confluent environment list
Your output will show the environment ID, name, and associated Stream Governance packages.
To view the Stream Governance API endpoint URL, use the command confluent schema-registry cluster describe:
confluent schema-registry cluster describe
Your output will show the Schema Registry cluster ID in the form of
lsrc-xxxxxx) and endpoint URL, which is also available to you in Cloud Console on the right side panel under “Stream Governance API” in the environment. Store these in environment variables:$SR_CLUSTER_IDand$SCHEMA_REGISTRY_URL.
Create a Schema Registry API key, using the Schema Registry cluster ID (
$SR_CLUSTER_ID) from the previous step as the resource ID.confluent api-key create --resource $SR_CLUSTER_ID
Store the API key and secret for your Schema Registry in a safe place, such as shell environment variables:
$SR_APIKEYand$SR_APISECRET
Create and use schemas
Create a Protobuf schema, add a second version with a new field, and view the schemas and messages.
Start Confluent Platform with the following command:
confluent local services start
Tip
Alternatively, you can simply run
confluent local services schema-registry startwhich also startskafkaand KRaft as dependencies. This demo does not directly reference the other services, such as Connect and Control Center (Legacy). That said, you may want to run the full stack anyway to further explore, for example, how the topics and messages display on Control Center (Legacy). To learn more aboutconfluent local, see Quick Start for Confluent Platform and confluent local in the Confluent CLI command reference.The
confluent localcommands run in the background so you can re-use this command window. Separate sessions are required for the producer and consumer.
Verify registered schema types.
Schema Registry supports arbitrary schema types. You should verify which schema types are currently registered with Schema Registry.
To do so, type the following command (assuming you use the default URL and port for Schema Registry,
localhost:8081):curl http://localhost:8081/schemas/typesThe response will be one or more of the following. If additional schema format plugins are installed, these will also be available.
["JSON", "PROTOBUF", "AVRO"]
Alternatively, use the curl
--silentflag, and pipe the command through jq (curl --silent http://localhost:8081/schemas/types | jq) to get nicely formatted output:"JSON", "PROTOBUF", "AVRO"
Use the producer to send Protobuf records in JSON as the message value.
The following command starts a producer, creates the
transactions-prototopic if it doesn’t already exist, and creates a schema for the topic with two fields,idandamount:kafka-protobuf-console-producer --bootstrap-server localhost:9092 \ --property schema.registry.url=http://localhost:8081 --topic transactions-proto \ --property value.schema='syntax = "proto3"; message MyRecord { string id = 1; float amount = 2;}'Tip
The producer doesn’t show a
>prompt. Type producer messages at the blank line.Type the following message in the shell, and press Enter:
{ "id":"1000", "amount":500 }The command line Protobuf producer converts the JSON object to a Protobuf message, using the schema specified in
value.schema, and then uses an underlying serializer to serialize the message to the Kafka topictransactions-proto.To read the message value in JSON from the
transactions-prototopic, run the consumer in a new terminal window:kafka-protobuf-console-consumer --bootstrap-server localhost:9092 --from-beginning --topic transactions-proto
The console shows the following output:
{"id":"1000","amount":500.0}The underlying deserializer creates a Protobuf message and then serializes the message to JSON for readability.
Leave this consumer running.
Register a new schema version under the same subject by adding a new field,
customer_id.Because the default subject-level compatibility is
BACKWARD, add the new field as optional so that the schema is compatible with the previous version.Open a new terminal window, or press Ctrl+C to shut down the previous producer. Then run the following command to start a new producer:
kafka-protobuf-console-producer --bootstrap-server localhost:9092 \
--property schema.registry.url=http://localhost:8081 --topic transactions-proto \
--property value.schema='syntax = "proto3"; message MyRecord {string id = 1; float amount = 2; string customer_id=3;}'
Type the following message into your producer, and press Enter:
{ "id":"1001", "amount":700, "customer_id":"1221"}Return to your running consumer to read the new message from the
transactions-prototopic.The new output appears after the original output:
{"id":"1000","amount":500.0}
{"id":"1001","amount":700.0,"customerId":"1221"}
If you closed the original consumer, restart it with the same command as in step 5.
To examine the schemas registered with Schema Registry, use
curlin another shell:curl http://localhost:8081/subjects/transactions-proto-value/versions/1/schema
The output for version 1 shows the
idandamountfields:syntax = "proto3"; message MyRecord { string id = 1; float amount = 2; }To view version 2, run the following command:
curl http://localhost:8081/subjects/transactions-proto-value/versions/2/schema
The output for version 2 includes the
customer_idfield:syntax = "proto3"; message MyRecord { string id = 1; float amount = 2; string customer_id = 3; }View the schema in more detail with the following command, which pipes the output through
jqand suppresses thecurldownload messages for readable output:curl --silent -X GET http://localhost:8081/subjects/transactions-proto-value/versions/latest | jq
Your output should resemble:
"subject": "transactions-proto-value",
"version": 2,
"id": 3,
"schemaType": "PROTOBUF",
"schema": "syntax = \"proto3\";\n\nmessage MyRecord {\n  string id = 1;\n  float amount = 2;\n  string customer_id = 3;\n}\n"
Use Confluent Control Center (Legacy) to examine schemas and messages.
Messages that were successfully produced also show on Control Center (Legacy) (http://localhost:9021/) in Topics > <topicName> > Messages. You may have to select a partition or jump to a timestamp to see messages sent earlier. (For timestamp, type in a number, which will default to partition
1/Partition: 0, and press return. To get the message view shown here, select the cards icon on the upper right.)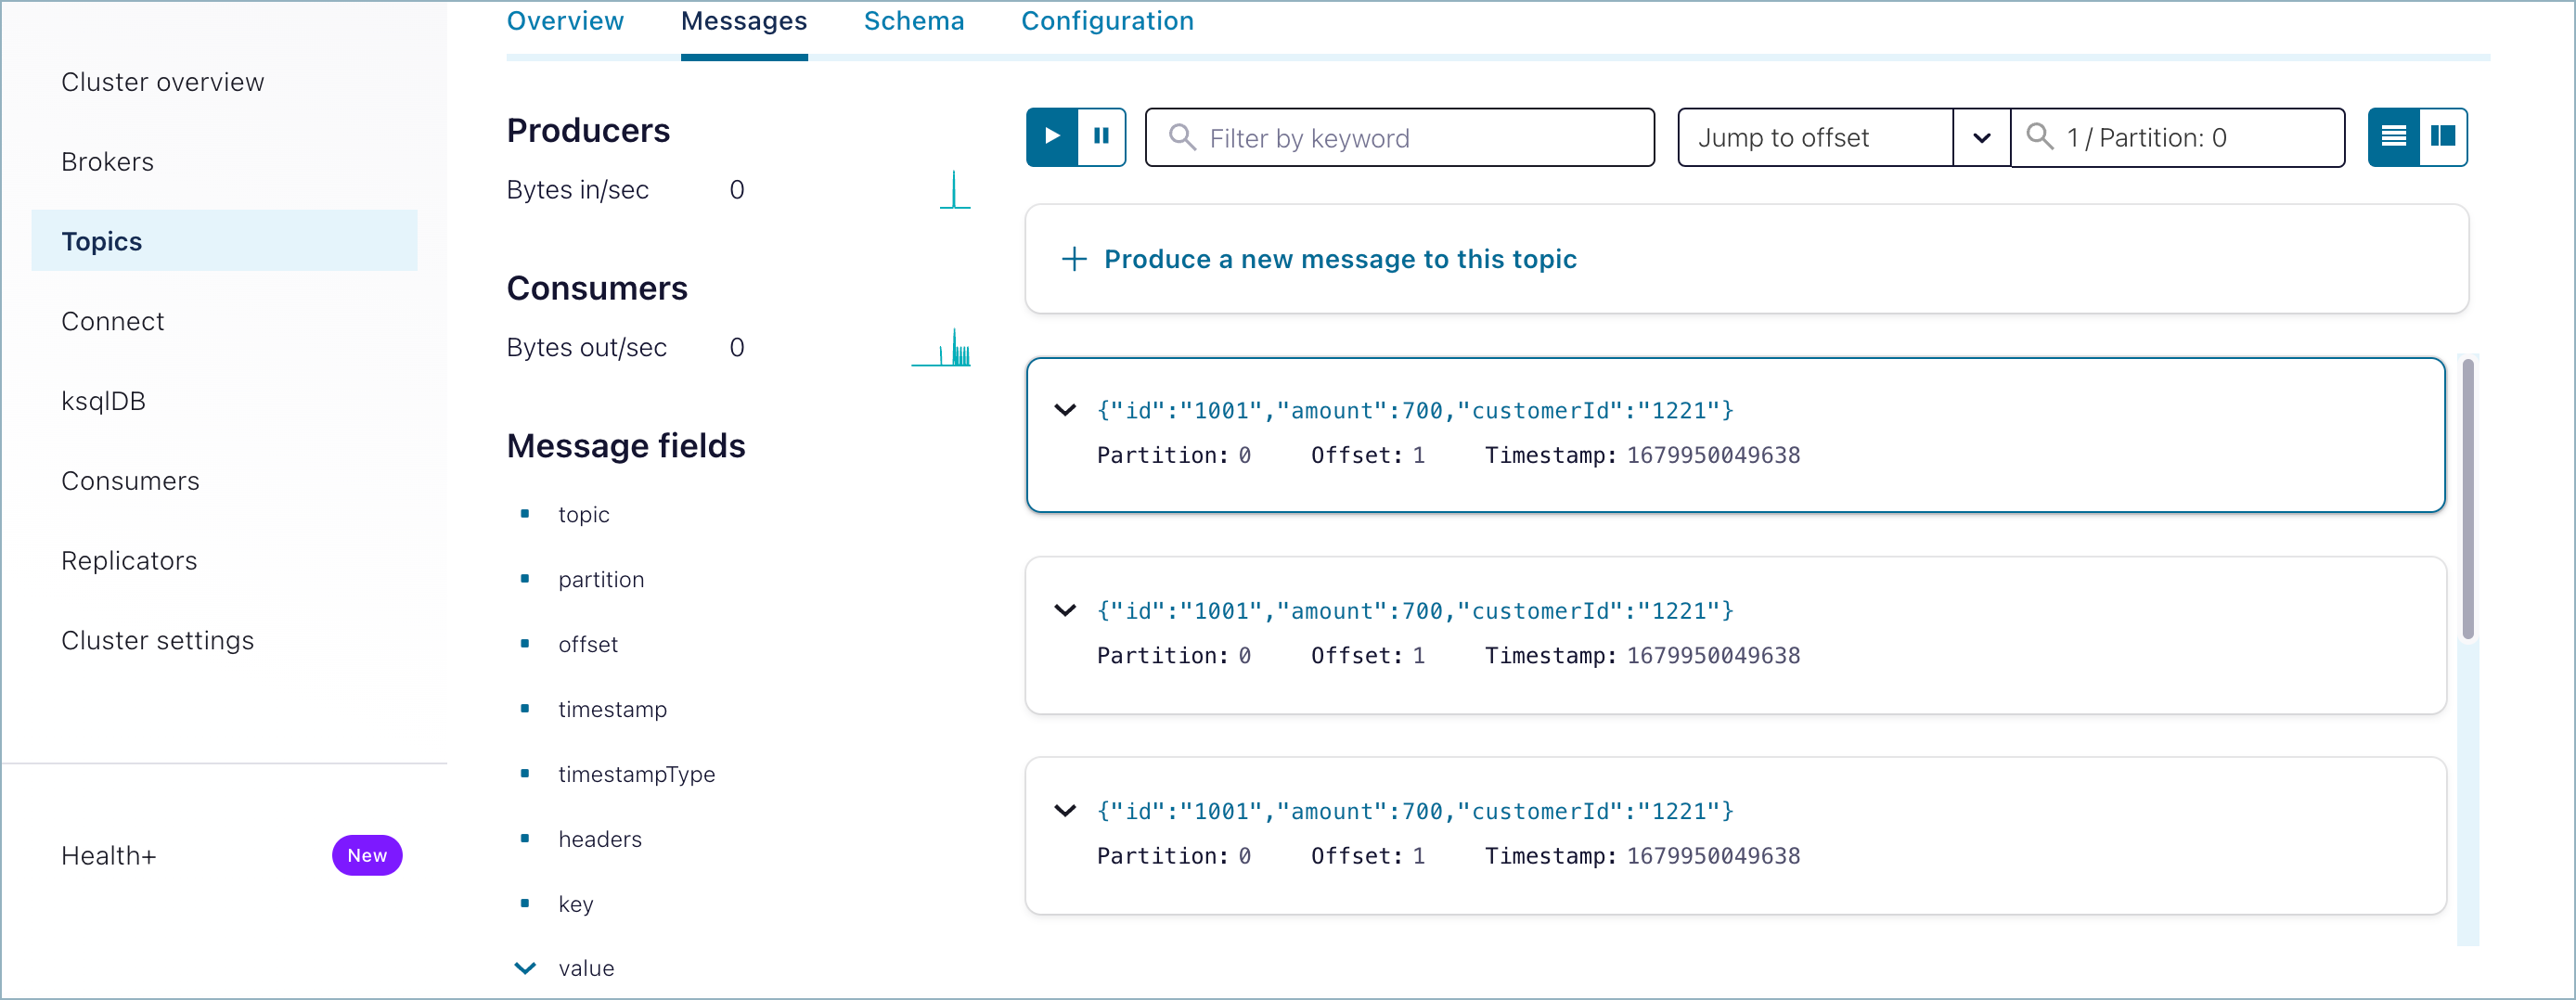
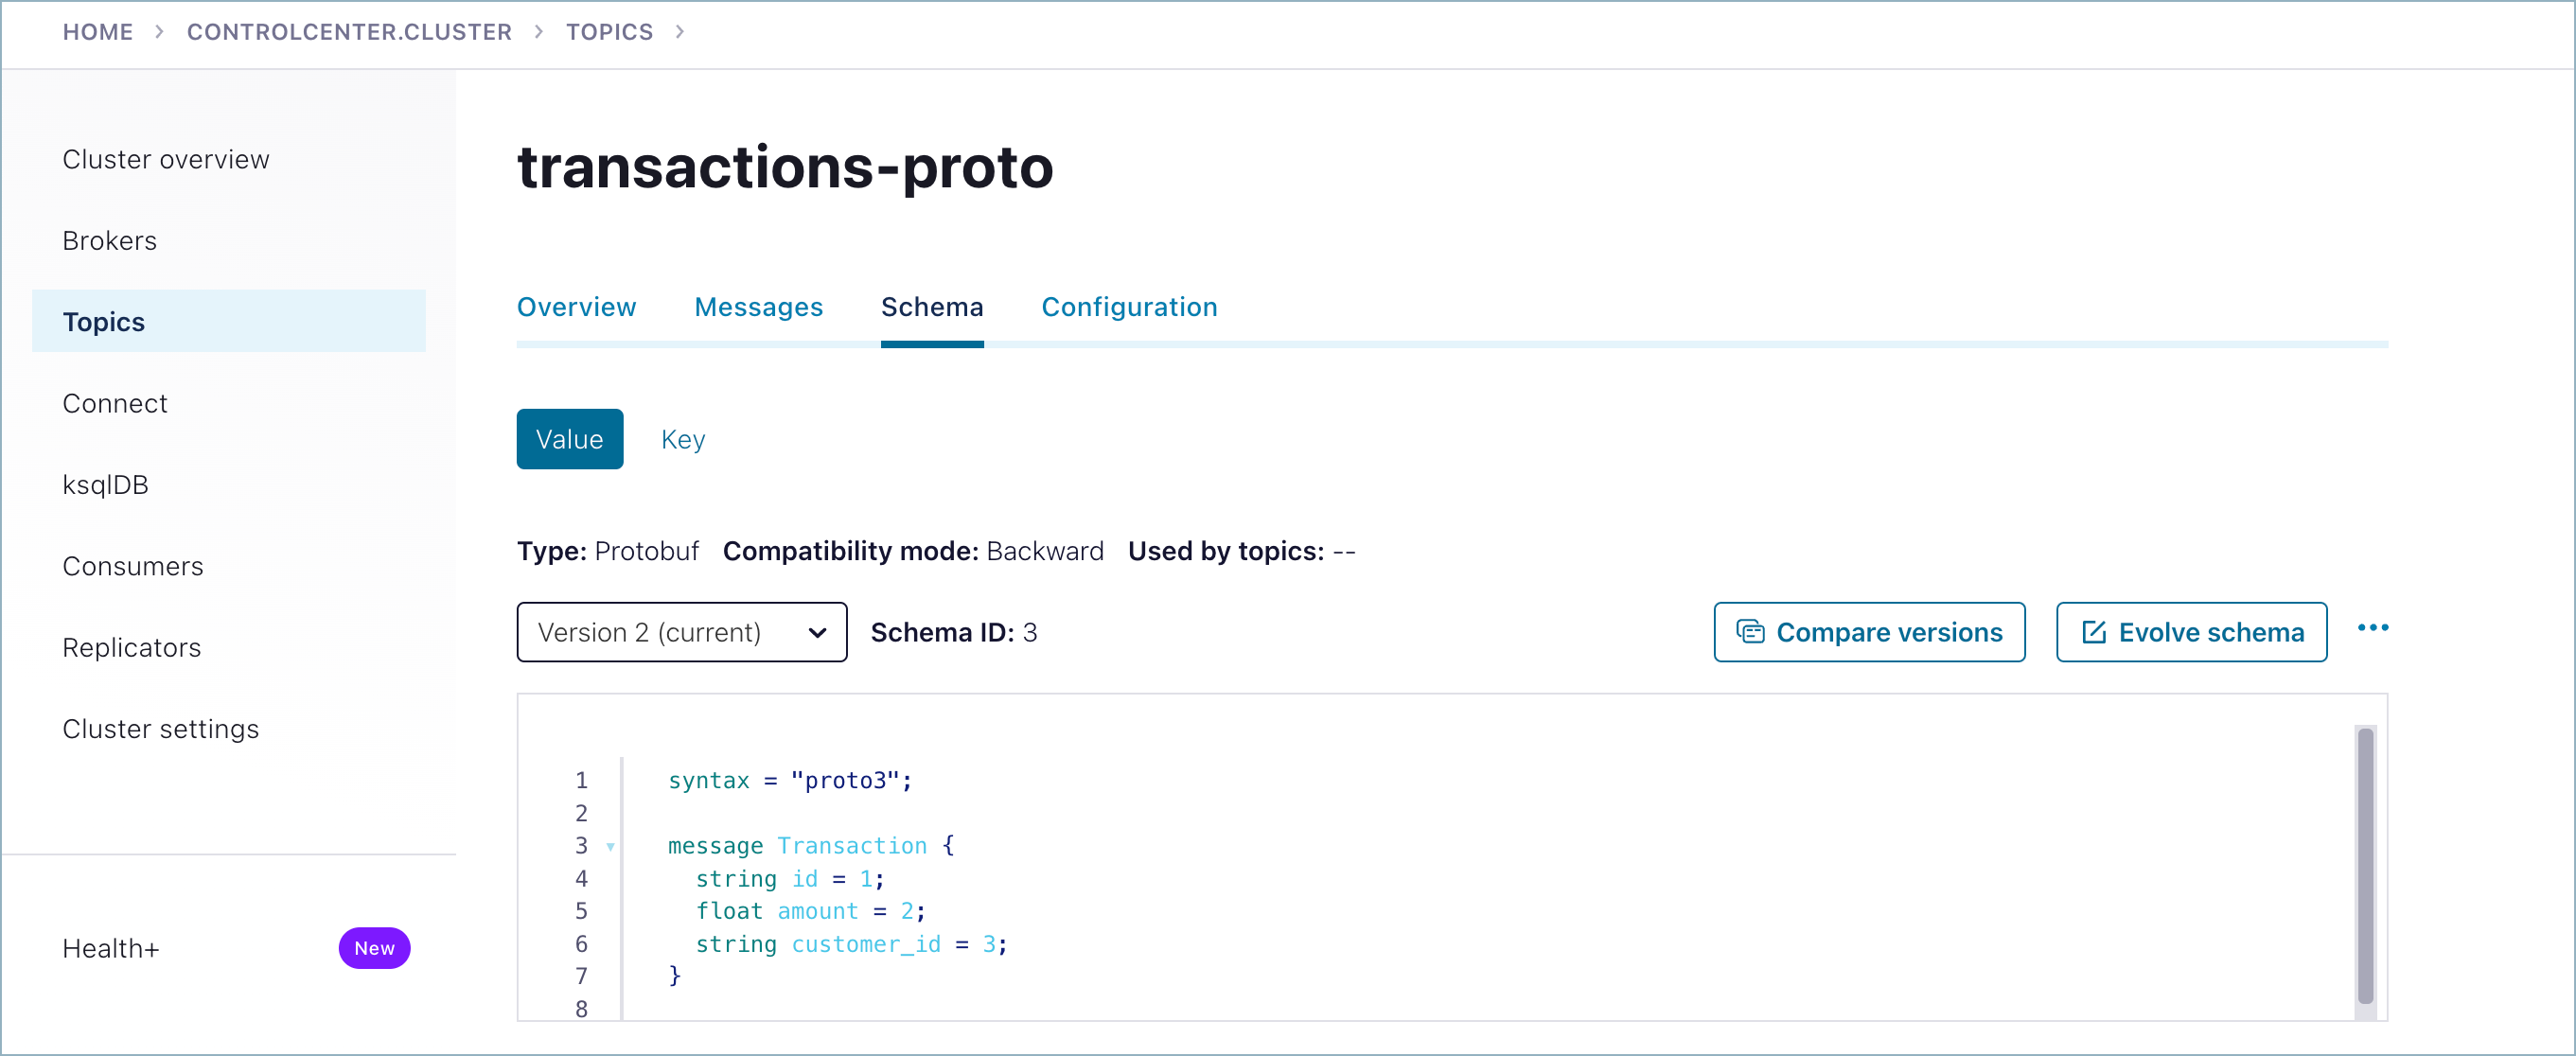
Schemas you create are available on the Schemas tab for the selected topic.
Run shutdown and cleanup tasks.
You can stop the consumer and producer with Ctl-C in their respective command windows.
To stop Confluent Platform, type
confluent local services stop.If you would like to clear out existing data (topics, schemas, and messages) before starting again with another test, type
confluent local destroy.
Create a Kafka topic:
confluent kafka topic create transactions-protobuf --cluster $CLUSTER_ID
Copy the following schema into a file named
schema.txt:syntax = "proto3"; message MyRecord { string id = 1; float amount = 2; }
Run the following command to create a producer that uses the schema from the previous step:
confluent kafka topic produce transactions-protobuf \
--cluster $CLUSTER_ID \
--schema "<full path to file>/schema.txt" \
--schema-registry-endpoint $SCHEMA_REGISTRY_URL \
--schema-registry-api-key $SR_APIKEY \
--schema-registry-api-secret $SR_APISECRET \
--api-key $APIKEY --api-secret $APISECRET \
--value-format "protobuf"
Your output should resemble:
Successfully registered schema with ID 100001
Starting Kafka Producer. Use Ctrl-C or Ctrl-D to exit.
Provide the full path to the schema file, even if the file is in the current directory.
Note
The examples assume that you use the latest version of the Confluent CLI. The new
--schema-registry-endpoint,--schema-registry-api-key, and--schema-registry-api-secretflags replace the deprecated--sr-endpoint,--sr-api-key, and--sr-api-secretflags. If the CLI doesn’t recognize the new flags, either update the CLI or use the deprecated flags.Type the following message in the shell, and press Enter:
{ "id":"1000", "amount":500 }To read the message value in JSON from the
transactions-protobuftopic, run a consumer in another terminal:confluent kafka topic consume transactions-protobuf \ --cluster $CLUSTER_ID \ --from-beginning \ --value-format "protobuf" \ --schema-registry-endpoint $SCHEMA_REGISTRY_URL \ --schema-registry-api-key $SR_APIKEY \ --schema-registry-api-secret $SR_APISECRET \ --api-key $APIKEY --api-secret $APISECRET
Your output should be:
{"id":"1000","amount":500}
Register a new schema version under the same subject by adding a new field,
customer_id.Copy the following schema into a new file named
schema2.txt:syntax = "proto3"; message MyRecord { string id = 1; float amount = 2; string customer_id=3; }
In another terminal, run the following command:
confluent kafka topic produce transactions-protobuf \
--cluster $CLUSTER_ID \
--schema "<full path to file>/schema2.txt" \
--schema-registry-endpoint $SCHEMA_REGISTRY_URL \
--schema-registry-api-key $SR_APIKEY \
--schema-registry-api-secret $SR_APISECRET \
--api-key $APIKEY --api-secret $APISECRET \
--value-format "protobuf"
Your output should resemble:
Successfully registered schema with ID 100002
Starting Kafka Producer. Use Ctrl-C or Ctrl-D to exit.
Type the following message into your producer, and press Enter:
{ "id":"1001", "amount":700, "customer_id":"1221"}Switch to the terminal with your running consumer to read the new message from the
transactions-protobuftopic.The new output appears after the original output:
{"id":"1000","amount":500}
{"id":"1001","amount":700,"customerId":"1221"}
If you closed the original consumer, restart it with the same command as in step 5.
View versions 1 and 2 of the schema registered with Schema Registry. To view version 1, run the following command:
confluent schema-registry schema describe --subject transactions-protobuf-value --version 1
The output for version 1 shows the
idandamountfields:Schema ID: 100001 Type: PROTOBUF Schema: syntax = "proto3"; message MyRecord { string id = 1; float amount = 2; }To view version 2, run the following command:
confluent schema-registry schema describe --subject transactions-protobuf-value --version 2
The output for version 2 includes the
customer_idfield:Schema ID: 100002 Type: PROTOBUF Schema: syntax = "proto3"; message MyRecord { string id = 1; float amount = 2; string customer_id = 3; }Run shutdown and cleanup tasks.
You can stop the consumer and producer with Ctl-C in their respective command windows.
If you were using shell environment variables and want to keep them for later, remember to store them in a safe, persistent location.
You can remove topics, clusters, and environments from the command line or from the Confluent Cloud Console.
Producer and consumer configuration reference
The following configuration properties apply to any Kafka producers and consumers, regardless of schema format.
Add Schema Registry security credentials
Pass truststore and keystore credentials for Schema Registry as properties, in addition to the Schema Registry properties that the test drive examples pass on the command line and in configuration files. For more information, see Additional configurations for HTTPS. The following example shows a producer on Confluent Platform:
protobuf-console-producer --broker-list localhost:9093 --topic myTopic \
--producer.config ~/etc/kafka/producer.properties \
--property value.schema='syntax = "proto3"; message MyRecord {string id = 1; float amount = 2; string customer_id=3;}' \
--property schema.registry.url=https://localhost:8081 \
--property schema.registry.ssl.truststore.location=/etc/kafka/security/schema.registry.client.truststore.jks \
--property schema.registry.ssl.truststore.password=myTrustStorePassword
Kafka producer configurations
For a complete reference of producer configuration properties, see Kafka Producer Configurations.
Kafka consumer configurations
For a complete reference of consumer configuration properties, see Kafka Consumer Configurations.
Schema Registry configuration options
For a complete reference of Schema Registry configuration options, see Schema Registry Configuration Options in the Confluent Platform documentation.
Use Schema Registry with Connect
If you use serializers and deserializers with Kafka Connect, you need to configure key and value converters. For details, see Configuring key and value converters in the Connect documentation.
Schema references in Protobuf
Confluent Platform provides full support for the notion of schema references, the ability of a schema to refer to other schemas.
Tip
Schema references are also supported in Confluent Cloud on Avro, Protobuf, and JSON Schema formats. On the Confluent CLI, you can use the --refs <file> flag on confluent schema-registry schema create to reference another schema.
If you give KafkaProtobufSerializer an instance of a generated Protobuf
class, it can register all referenced schemas automatically.
The easiest way to manually register referenced schemas is with the Schema Registry Maven Plugin for Confluent Platform. You can also use the Confluent Cloud APIs or Confluent Platform APIs to manually register referenced schemas.
This Protobuf example imports a schema for the order subject, defined in the
file Order.proto, and its references for the product and customer
subjects. The following Maven plugin configuration registers the schemas:
<plugin>
    <groupId>io.confluent</groupId>
    <artifactId>kafka-schema-registry-maven-plugin</artifactId>
    <version>5.5.0</version>
    <configuration>
        <schemaRegistryUrls>
            <param>http://192.168.99.100:8081</param>
        </schemaRegistryUrls>
        <subjects>
            <order>src/main/protobuf/Order.proto</order>
            <product>src/main/protobuf/Product.proto</product>
            <customer>src/main/protobuf/Customer.proto</customer>
        </subjects>
        <schemaTypes>
            <order>PROTOBUF</order>
            <product>PROTOBUF</product>
            <customer>PROTOBUF</customer>
        </schemaTypes>
        <references>
            <order>
                <reference>
                    <name>Product.proto</name>
                    <subject>product</subject>
                </reference>
                <reference>
                    <name>Customer.proto</name>
                    <subject>customer</subject>
                </reference>
            </order>
        </references>
    </configuration>
    <goals>
        <goal>register</goal>
    </goals>
</plugin>
The schema for the order subject, defined in the Order.proto file, might
look like:
syntax = "proto3";

package io.confluent.examples.generated_sources.protobuf;

import "Product.proto";
import "Customer.proto";

message Order {
    int32 order_id = 1;
    string order_date = 2;
    int32 order_amount = 3;
    repeated Product products = 4;
    Customer customer = 5;
}
The schema for the customer subject, defined in Customer.proto, might
look like:
syntax = "proto3";

package io.confluent.examples.generated_sources.protobuf;

message Customer {
    int64 customer_id = 1;
    string customer_name = 2;
    string customer_email = 3;
    string customer_address = 4;
}
The schemaType and references fields are optional for backward
compatibility. When schemaType is omitted, Schema Registry assumes AVRO.
For more information about reusing existing Protobuf message definitions by importing them, see Using Other Message Types in the Protobuf documentation.
Multiple event types in the same topic
Use schema references to combine multiple event types in the same topic and still maintain subject-topic constraints. Schema references also let one schema call other schemas.
To do this in Protobuf:
Use the default subject name strategy,
TopicNameStrategy. It uses the topic name to determine the subject for schema lookups and helps enforce subject-topic constraints.Wrap a
oneOfin a message to define a list of schema references, such as:syntax = "proto3"; package io.confluent.examples.proto; import "Customer.proto"; import "Product.proto"; import "Order.proto"; message AllTypes { oneof oneof_type { Customer customer = 1; Product product = 2; Order order = 3; } }When you register the schema, send an array of reference versions:
[
  {
    "name": "Customer.proto",
    "subject": "customer",
    "version": 1
  },
  {
    "name": "Product.proto",
    "subject": "product",
    "version": 1
  },
  {
    "name": "Order.proto",
    "subject": "order",
    "version": 1
  }
]
Protobuf doesn’t permit top-level oneOf definitions, which is why you must
wrap the oneOf in a message.
Tip
Wrapping the oneOf in a message lets auto-registration of the top-level
schema work by default, unlike Avro
or JSON Schema, which require
additional configuration for this use case. Protobuf also auto-registers all
referenced schemas recursively.
By default, the field names of oneOf messages get an index suffix, such as
_0. To turn off the suffix, configure generate.index.for.unions, added
in Confluent Platform 7.3.0. For more information, see Protobuf
in Using Kafka Connect with Schema Registry.
Handle null values with wrappers or optional fields
Protobuf doesn’t allow null values on object fields. Setting a null value causes a null pointer exception.
To handle null values with Protobuf, use one of the following approaches:
Use optional fields. This approach is the best practice.
Use wrappers.
Use optional fields to handle null values
Optional fields streamline your Protobuf schemas and avoid the complications of wrapper types. Optional fields make nullability clearer and reduce the risk of runtime exceptions.
Protocol Buffers v3 (proto3) supports optional primitive fields, which are
similar to nullable types. In the following example, name, age, and
isActive are optional fields. If you don’t set them, they are absent and
don’t cause errors.
syntax = "proto3";

message ExampleMessage {
    optional string name = 1;
    optional int32 age = 2;
    optional bool isActive = 3;
}
For more information about this approach, see:
Google documentation on Optional Primitive Fields
Google documentation on Protocol Buffer types
Use wrappers to handle null values
Wrappers are a workaround that older versions of Protobuf support. To use them,
import google/protobuf/wrappers.proto and use the
wrapper.for.nullables converter, which specifies whether to use Protobuf
wrapper types for nullable fields. The default is false. If you set it to
true, nullable fields use the wrapper types described in
protocolbuffers/protobuf
on GitHub and in the
google.protobuf package documentation.
For example, you can replace a non-nullable name that defaults to an empty
string (""):
message GreetRequest {
  string name = 1;
}
with a nullable name that uses a wrapper class from wrappers.proto, in this
case StringValue:
message GreetRequest {
  google.protobuf.StringValue name = 1;
}
In Confluent Platform, the wrapper.for.nullables flag in the Protobuf converter has these
effects:
When converting from a Connect schema to a Protobuf schema, an optional Connect field converts to a Protobuf field that uses a wrapper class.
When converting from a Protobuf schema to a Connect schema, a Protobuf field that uses a wrapper class converts to an optional Connect field.
For more information, see the description of “Wrapper types” for null values in the table under JSON Mapping in the Protocol Buffers Developer Guide.
Protobuf schema compatibility rules
Compatibility rules support schema evolution and let downstream consumers handle data encoded with old and new schemas. The rules overlap across formats, especially for Protobuf and Avro, except for backward compatibility, which differs between the two.
As a best practice, use BACKWARD_TRANSITIVE with Protobuf, because adding
new message types isn’t forward compatible.
For more detail on Protobuf compatibility rules, including backward compatibility, see:
Limitations and developer notes
The console consumer doesn’t support the Protobuf
Anytype.Anyis an advanced Protobuf feature that requires registering the Protobuf type with a TypeRegistry. You can’t pass additional types tokafka-protobuf-console-consumer.The Confluent
kafka-protobuf-serializerworks with Google Protobuf v.3. Google Protobuf v.4 isn’t supported.The
import publicfeature of Protobuf 2 and Protobuf 3 isn’t supported in Java, which means the Schema Registry tools don’t support it either. Transitively included dependencies don’t resolve as you might expect. This limitation comes from Protobuf, not Schema Registry, but it can look like a failure in Schema Registry.Don’t upload Google or Protobuf dependencies into Schema Registry. The tooling doesn’t automatically exclude dangerous files that shouldn’t be imported.