

Configure Role-Based Access Control for Schema Registry in Confluent Platform
Confluent Schema Registry supports Use Role-Based Access Control (RBAC) for Authorization in Confluent Platform (RBAC).
Users are granted access to manage, read, and write to particular topics and their associated schemas (contained in Schema Registry subjects) based on RBAC roles. User access is scoped to specified resources and the Schema Registry supported operations.
With RBAC enabled, Schema Registry can authenticate incoming requests and authorize them based on role bindings. This allows schema evolution management to be restricted to administrative users, while providing users and applications with different types of access to a subset of subjects for which they are authorized (such as, write access to relevant subjects for producers, read access for consumers).
Overview
RBAC makes it easier and more efficient to set up and manage user access to Schema Registry subjects and topics.
Schema Management before RBAC
Without RBAC, an administrator must specify every subject or use * (for all) and specify each operation (SUBJECT_READ, SUBJECT_COMPATIBILITY_READ, and so forth) that a user needs. If you have 100 developers who need to read schemas, you must set up access 100 times.
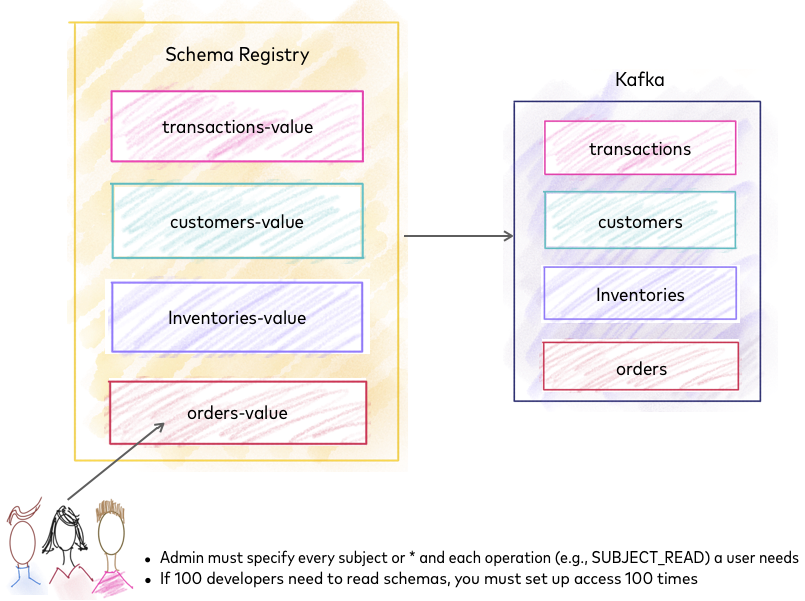
Schema Registry before RBAC
Schema Management with RBAC
An RBAC-enabled environment addresses the following use cases:
Jack can give limited access to Samantha by assigning her a
DeveloperReadrole and specify a set of subjects with a prefix.Samantha can have multiple roles on different subjects. She can be a
DeveloperReadfor “transactions-value” and “orders-value”, but assume aDeveloperWriterole for “customers-value”.If Jack needs to serve 100 developers in his organization, he can create a group for developers and grant the group read-only access to schemas in Schema Registry.
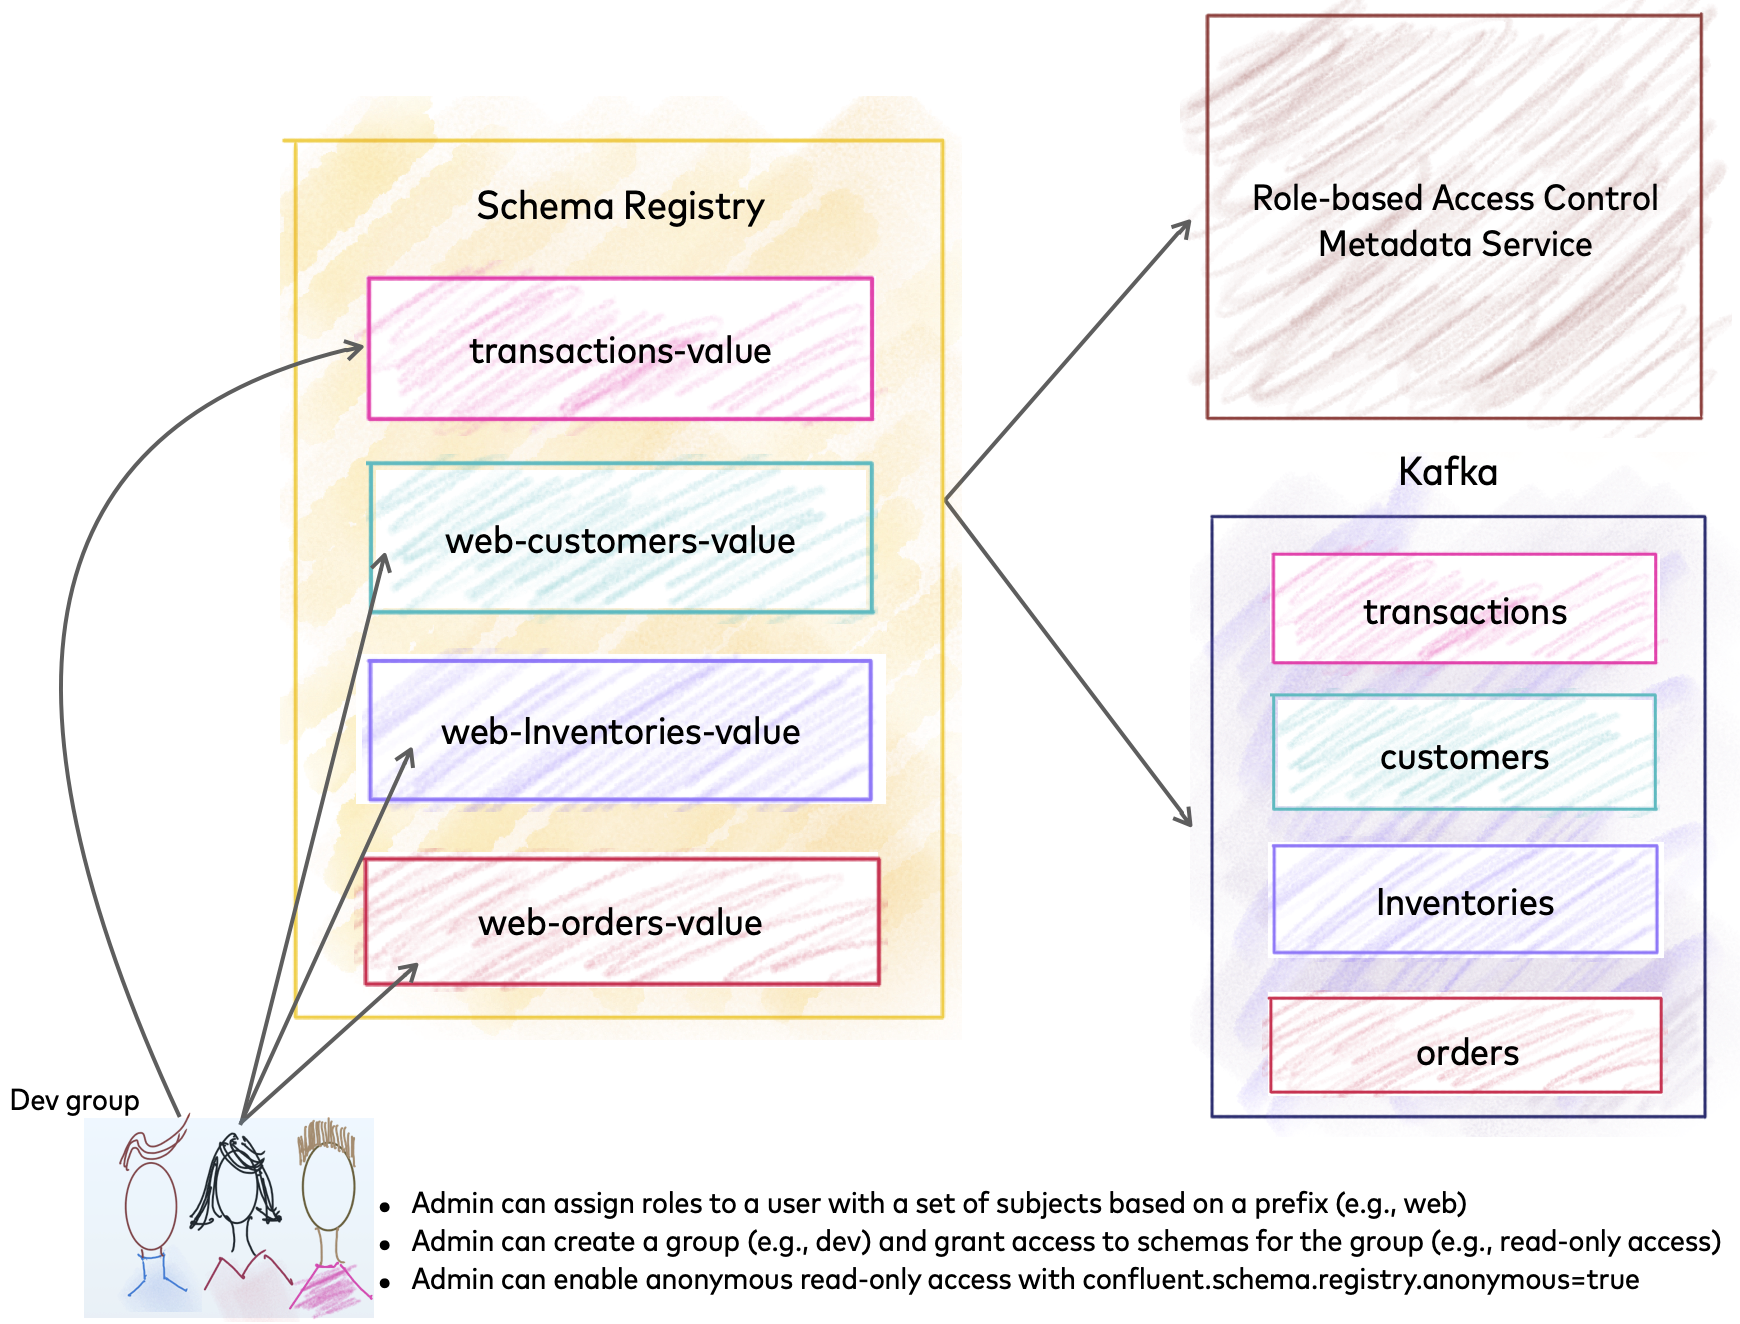
Schema Registry with RBAC
How it Works
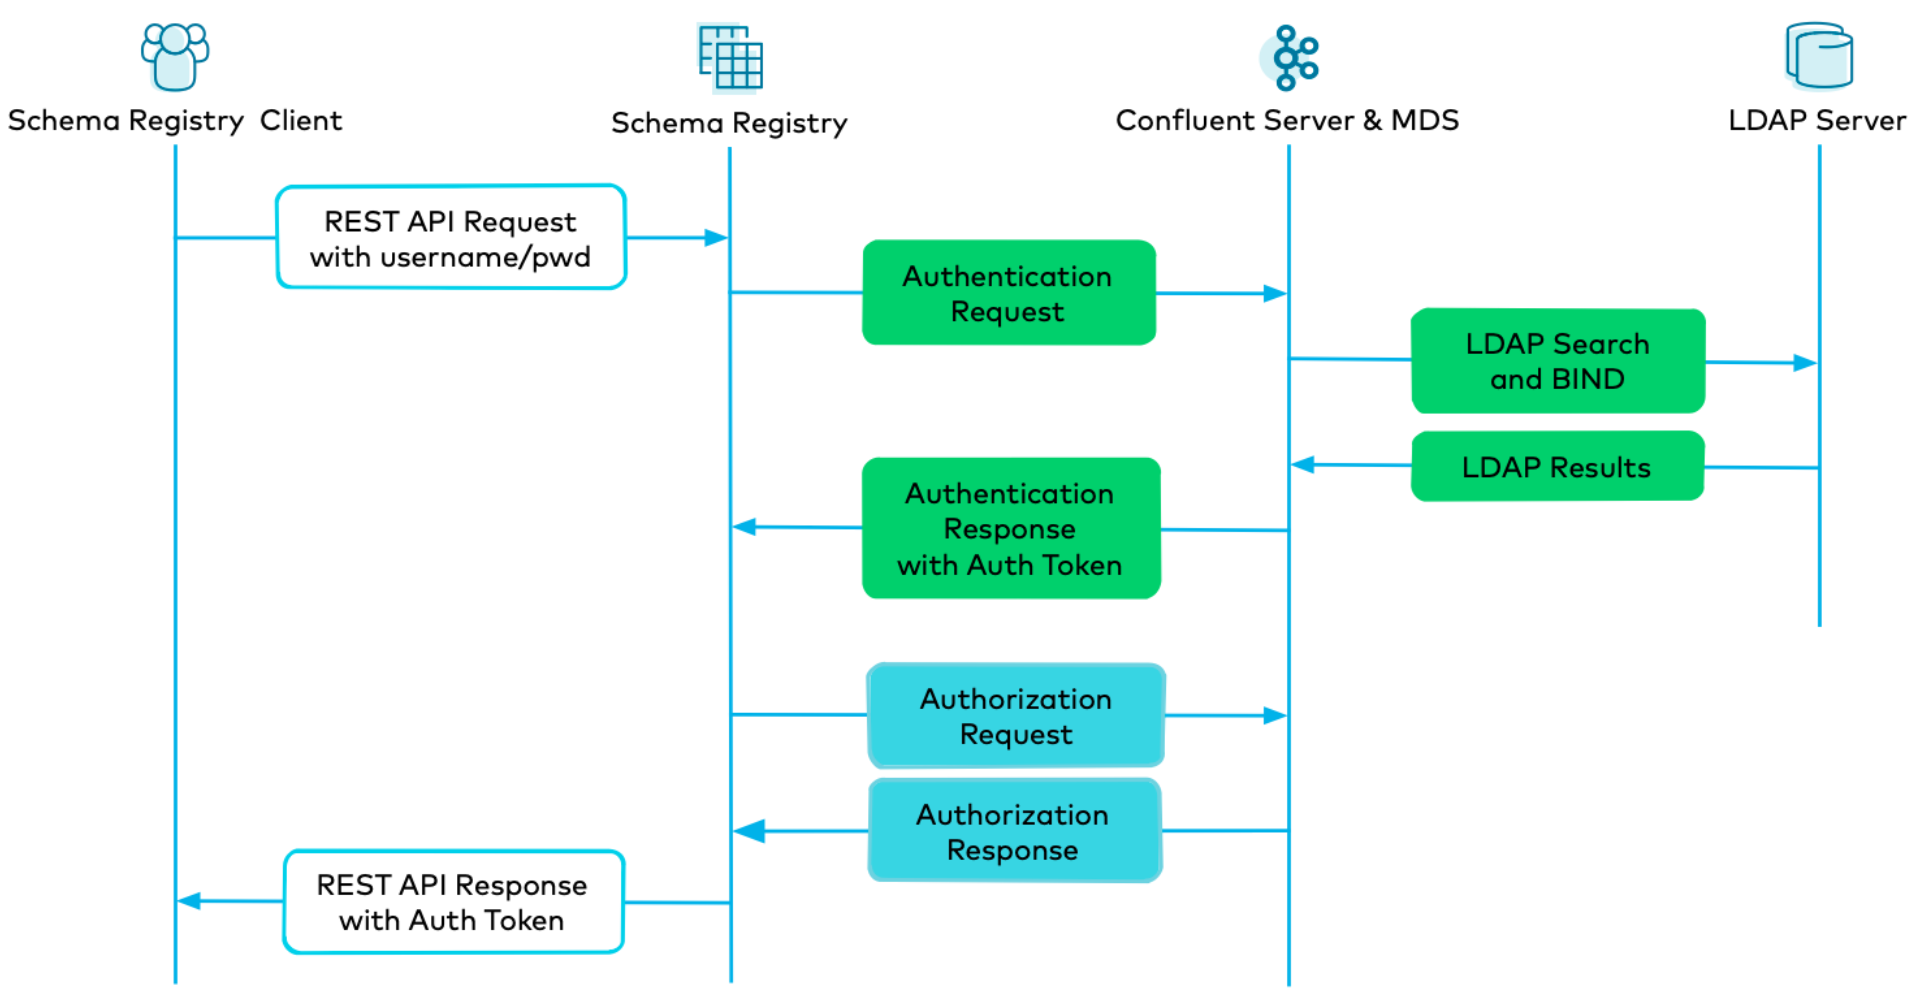
When a client communicates to the Schema Registry HTTPS endpoint, Schema Registry passes the client credentials to Metadata Service (MDS) for authentication. MDS is a REST layer on the Kafka broker within Confluent Server, and it integrates with LDAP to authenticate end users on behalf of Schema Registry and other Confluent Platform services such as Connect, Confluent Control Center, and ksqlDB. As shown in Scripted Confluent Platform Demo, clients must have predefined LDAP entries.
After a client is authenticated, you must enforce that only authorized entities have access to the permitted resources. You can use ACLs, RBAC, or both to do so. You can use ACLs and RBAC together or independently, but RBAC is the preferred solution because it provides finer-grained authorization and a unified method for managing access across Confluent Platform.
The following diagram shows the combined authentication and authorization workflow for a Kafka client connecting to Schema Registry.
Setup Overview
To enable role-based access control (RBAC) on schemas, you must configure the
schema-registry.properties file with connection information to a
metadata service (MDS) running RBAC, and use the
Confluent CLI to grant user and application access
to subjects and other resources based on roles.
Typically, you can request account access and the MDS details needed for RBAC from your security administrator.
If you’re a security admin experimenting with a fully local setup, first set up RBAC using MDS, and then create a service principal for Schema Registry using the Confluent CLI.
Next, create principal user accounts with roles such as ResourceOwner,
DeveloperRead, DeveloperWrite, and DeveloperManage, bound to
subjects (schemas associated with Kafka topics) and other resources.
Example ClusterAdmin Use Case
Jack, a ClusterAdmin, wants to set up a Schema Registry cluster for his organization.
Jack, as a cluster administrator, contacts the RBAC security administrator with the following information:
The Kafka cluster to use (if there is more than one to choose from)
Schema Registry cluster ID (for example, schema-registry-a)
Jack’s principal name
Resources required by Schema Registry (schemas topic, schemas topic group, and so on)
UserAdmincreates a service principal to represent the Schema Registry cluster and does the following:Grants that service principal permissions to access the internal schemas topic and the other roles a Schema Registry cluster needs to operate
Provides Jack with the credentials for that service principal
Grants Jack the role
ClusterAdminon the Schema Registry clusterProvides Jack with a public key that he can use to authenticate requests
Jack configures the Schema Registry cluster to use the provided public key, the specified group ID (for example, “schema-registry-a”), and the service principal provided by the
UserAdmin, and then starts the cluster.
Example User Experience
Samantha, a developer, needs READ access to two subjects, “transactions-value” and “orders-value”, to understand the schemas that her application needs to interact with.
Samantha contacts the user administrator with the following information:
List of subjects (for example, “transactions-value”, “orders-value”)
Schema Registry cluster ID (for example, “schema-registry-a”)
UserAdmingrants Samantha access to the subjects.When Samantha runs
GET /subjects, she sees only “transactions-value” and “orders-value”.Accidental
POSTorDELETEoperations on these subjects are prevented.
Quick Start
This quick start describes how to configure Schema Registry for Role-Based Access Control to manage user and application authorization to topics and subjects (schemas), including how to:
Configure Schema Registry to start and connect to the RBAC-enabled Apache Kafka® cluster (edit
schema-registry.propertiesand use the Confluent CLI to create roles)Use the Confluent CLI to grant a SecurityAdmin role to the Schema Registry service principal.
Use the Confluent CLI to grant a ResourceOwner role to the Schema Registry service principal on the internal topic and group (used to coordinate across the Schema Registry cluster).
Use the Confluent CLI to grant users access to topics (and associated subjects in Schema Registry).
The examples assume a local install of Schema Registry and shared RBAC and MDS configuration. Your production environment might differ, for example if you use Confluent Cloud or a remote Schema Registry.
If you use a local Kafka, ZooKeeper, and bootstrap server, as you might for testing, these also need authorization through RBAC, which requires additional prerequisite setup and credentials.
See also
To get started, try the automated RBAC example that showcases the RBAC functionality in Confluent Platform.
Before You Begin
If you’re new to Confluent Platform or Schema Registry, first read or work through these tutorials to get a baseline understanding of the platform, Schema Registry, and Role-Based Access Control across Confluent Platform.
Steps at a glance
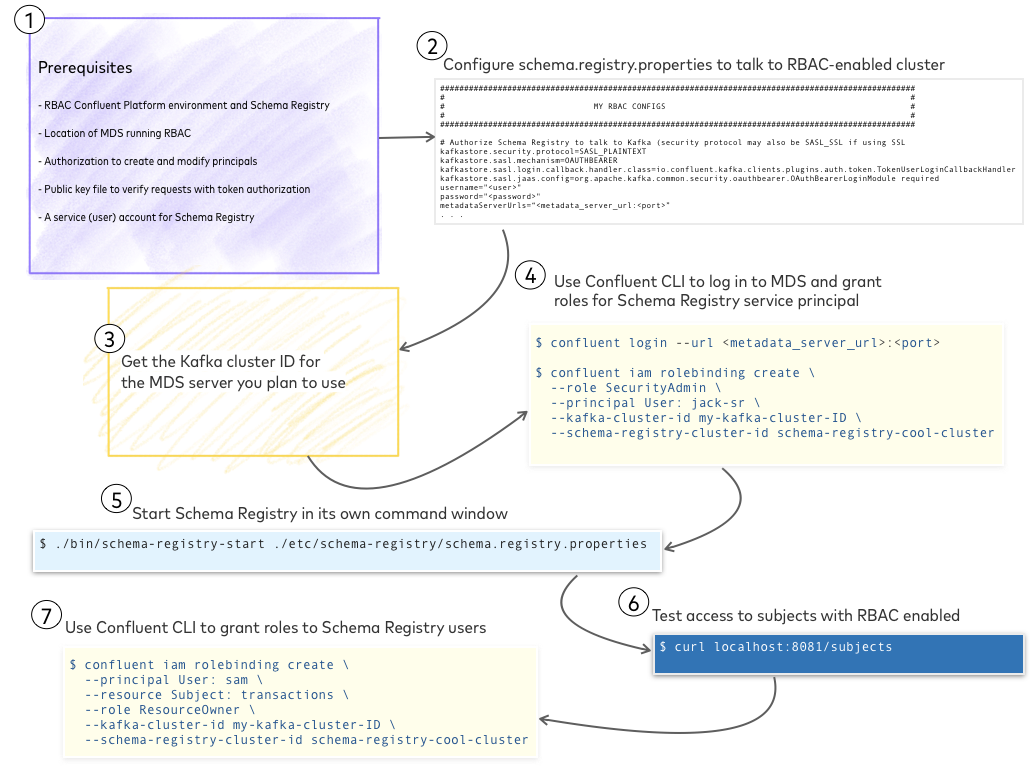
Schema Registry RBAC quick start at a glance
Prerequisites
To run a resource like Schema Registry in an RBAC environment, you need a Schema Registry service principal (the user account for the resource), credentials, and the location of the Metadata Service (MDS) running RBAC. With these, you can configure Schema Registry properties to connect to the RBAC-enabled Kafka cluster and grant various types of access to Schema Registry using the Confluent CLI.
To get started, you need the following:
An RBAC-enabled Confluent Platform environment and Schema Registry.
The location of the Metadata Service (MDS) running RBAC, which is a URL for the Metadata Service (MDS) or a file path if you’re testing a local MDS.
Authorization to create and modify principals for the organization.
A public key file for verifying requests with token-based authorization.
A service (user) account for Schema Registry.
In most cases, you get this information from your security administrator.
Install Confluent Platform and the Confluent CLI
If you haven’t already, download and install Confluent Platform locally.
Install the Confluent CLI.
Configure Schema Registry to communicate with RBAC services
The following examples show how to connect a local Schema Registry to a remote Metadata Service (MDS)
running RBAC. The schema.registry.properties file configurations reflect a
remote Metadata Service (MDS) URL, location, and Kafka cluster ID. The examples also assume
that you use credentials from your security administrator for a pre-configured
schema registry principal user (”service principal”), as mentioned in the prerequisites.
Tip
The examples use backslashes (
\) before carriage returns to show multi-line property values. These line breaks and backslashes might cause errors in the actual properties file. If they do, remove the backslashes and join the lines so that no property value spans multiple lines.If you have multiple servers to reference, use a semicolon-separated list, for example as values for
metadataServerUrlsorconfluent.metadata.bootstrap.server.urls.
Define these settings in
CONFLUENT_HOME/etc/schema-registry/schema-registry.properties:
Configure Schema Registry authorization for communicating with the RBAC Kafka cluster.
The
usernameandpasswordare RBAC credentials for the Schema Registry service principal, andmetadataServerUrlsis the location of your RBAC Kafka cluster (for example, a URL to anec2server).# Authorize Schema Registry to talk to Kafka (security protocol may also be SASL_SSL if using TLS/SSL) kafkastore.security.protocol=SASL_PLAINTEXT kafkastore.sasl.mechanism=OAUTHBEARER kafkastore.sasl.login.callback.handler.class=io.confluent.kafka.clients.plugins.auth.token.TokenUserLoginCallbackHandler kafkastore.sasl.jaas.config=org.apache.kafka.common.security.oauthbearer.OAuthBearerLoginModule required \ username="<username>" \ password="<password>" \ metadataServerUrls="<https>://<metadata_server_url>:<port>";
Configure RBAC authorization and bearer or basic authentication for the Schema Registry resource.
Use these settings as-is.
JETTY_AUTHis the preferred authentication mechanism.# These properties install the Schema Registry security plugin, and configure it to use RBAC for # authorization and OAuth for authentication resource.extension.class=io.confluent.kafka.schemaregistry.security.SchemaRegistrySecurityResourceExtension confluent.schema.registry.authorizer.class=io.confluent.kafka.schemaregistry.security.authorizer.rbac.RbacAuthorizer rest.servlet.initializor.classes=io.confluent.common.security.jetty.initializer.InstallBearerOrBasicSecurityHandler confluent.schema.registry.auth.mechanism=JETTY_AUTH
Tip
The
resource.extension.classsetting activates the security plugin.The
confluent.schema.registry.auth.mechanismsetting sets the authentication mechanism as Jetty, the preferred mechanism for RBAC.
Configure Schema Registry to communicate with the Kafka cluster running the Metadata Service (MDS) and to authenticate requests using a public key.
The value for
confluent.metadata.bootstrap.server.urlscan be the same asmetadataServerUrls, depending on your environment.This step requires a public key file for verifying requests with token-based authorization, as mentioned in the prerequisites.
# The location of the metadata service
confluent.metadata.bootstrap.server.urls=<https>://<metadata_server_url>:<port>

# Credentials to use with the MDS, these should usually match those used for talking to Kafka
confluent.metadata.basic.auth.user.info=<username>:<password>
confluent.metadata.http.auth.credentials.provider=BASIC

# The path to public keys that should be used to verify json web tokens during authentication
public.key.path=<public_key_file_path.pem>
For additional configurations available to any client that communicates with MDS, see REST client configurations in the Confluent Platform Security documentation.
Specify the
kafkastore.bootstrap.serverto use.The default is a commented-out line for a local server. If you don’t change or uncomment it, Schema Registry uses the default.
#kafkastore.bootstrap.servers=PLAINTEXT://localhost:9092Uncomment this line and set it to the address of your bootstrap server. This address might differ from the MDS server URL. The standard port for the Kafka bootstrap server is
9092.kafkastore.bootstrap.servers=<rbac_kafka_bootstrap_server>:9092(Optional) Specify a custom
schema.registry.group.id, which serves as the Schema Registry cluster ID, to replace the default,schema-registry.In the example,
schema.registry.group.idis set to “schema-registry-cool-cluster”.# Schema Registry group id, which is the cluster id # The default for |sr| cluster ID is **schema-registry** schema.registry.group.id=schema-registry-cool-cluster
Tip
The Schema Registry cluster ID is the same as
schema-registry-group-id, which defaults toschema-registry. It specifies the target resource inrolebindingcommands on the Confluent CLI. You might need a custom cluster ID to distinguish your Schema Registry from others in the organization and avoid overwriting roles and users in multiple registries.(Optional) Specify a custom name for the Schema Registry default topic. The default is
_schemas.In the example,
kafkastore.topicis set to_jax-schemas-topic.# The name of the topic to store schemas in # The default schemas topic is **_schemas** kafkastore.topic=_jax-schemas-topic
Tip
Schema Registry uses an internal topic to hold schemas. The default name for this topic is
_schemas. You might need a custom name for the schemas topic to distinguish it from others in the organization and avoid overwriting data.An underscore isn’t required in the name. It’s a convention that indicates an internal topic.
(Optional) Enable anonymous access for requests that occur without authentication.
Schema Registry automatically grants requests without authentication the principal
User:ANONYMOUS.# This enables anonymous access with a principal of User:ANONYMOUS confluent.schema.registry.anonymous.principal=true authentication.skip.paths=/*
If you get the following authorization error when you run the
curlcommand to list subjects as described in Start Schema Registry and test it, you can enable anonymous requests to bypass authentication temporarily while you troubleshoot credentials.curl localhost:8081/subjects <html> <head> <meta http-equiv="Content-Type" content="text/html;charset=utf-8"/> <title>Error 401 Unauthorized</title> </head> <body><h2>HTTP ERROR 401</h2> <p>Problem accessing /subjects. Reason: <pre> Unauthorized</pre></p><hr><a href="https://eclipse.org/jetty">Powered by Jetty:// 9.4.18.v20190429</a><hr/> </body> </html>
Tip
For the preceding
curlcommand to succeed, configure rolebindings or ACLs forUser:ANONYMOUS.The command bypasses the requirement to present valid credentials with a REST request. It doesn’t bypass the authorization check that ensures the user (or
User:ANONYMOUS, if no credentials are provided) has the proper roles or ACLs to perform the action.
Get the Kafka cluster ID for the MDS server you plan to use
You need this ID to specify the Kafka cluster in rolebinding commands on the
Confluent CLI.
To get the Kafka cluster ID for a local host:
bin/zookeeper-shell
localhost:2181 get /cluster/id
To get the Kafka cluster ID on a remote host:
zookeeper-shell <host>:<port>
get /cluster/id
For example, the output of this command shows the Kafka cluster ID,
my-kafka-cluster-ID:
zookeeper-shell <metadata_server_url>:2181 get /cluster/id
Your output should resemble:
Connecting to <metadata_server_url>:2181

WATCHER::

WatchedEvent state:SyncConnected type:None path:null
{"version":"1","id":"my-kafka-cluster-ID"}
...
Grant roles for the Schema Registry service principal
In these steps, you use the Confluent CLI to log on to MDS and create the Schema Registry service principal. After you set up these roles, you can use the Confluent CLI to manage Schema Registry users. For this example, assume the commands use the MDS server credentials, URLs, and property values that you set up in your local Schema Registry properties file. Optionally, you can use a registered cluster name in your role bindings.
Log on to MDS.
confluent login --url <https>://<metadata_server_url>:<port>
As a prerequisite to granting additional access, grant permission to create the topic
_schema_encoders, which serves as themetadata.encoder.topicas described in Schema Registry Configuration Reference for Confluent Platform.confluent iam rbac role-binding create \ --principal User:<sr-user-id> \ --role ResourceOwner \ --resource Topic:<_schema_encoders> \ --kafka-cluster <kafka-cluster-id>
For example:
confluent iam rbac role-binding create \
 --principal User:jack-sr \
 --role ResourceOwner \
 --resource Topic:_schema_encoders \
 --kafka-cluster my-kafka-cluster-ID
Grant the user the role
SecurityAdminon the Schema Registry cluster.confluent iam rbac role-binding create \ --role SecurityAdmin \ --principal User:<service-account-id> \ --kafka-cluster <kafka-cluster-id> \ --schema-registry-cluster <schema-registry-group-id>
Use the command
confluent iam rbac role-binding list <flags>to view the role you just created.confluent iam rbac role-binding list \ --principal User:<service-account-id> \ --kafka-cluster <kafka-cluster-id> \ --schema-registry-cluster <schema-registry-group-id>
For example, the following listing is for a user “jack-sr” who was granted the
SecurityAdminrole on “schema-registry-cool-cluster”, connecting to MDS through the Kafka clustermy-kafka-cluster-ID:confluent iam rbac role-binding list \ --principal User:jack-sr \ --kafka-cluster my-kafka-cluster-ID \ --schema-registry-cluster schema-registry-cool-cluster Role | ResourceType | Name | PatternType +---------------+--------------+------+-------------+ SecurityAdmin | Cluster | |
Grant the user the role
ResourceOwneron the group that Schema Registry nodes use to coordinate across the cluster.confluent iam rbac role-binding create \ --principal User:<sr-user-id> \ --role ResourceOwner \ --resource Group:<schema-registry-group-id> \ --kafka-cluster <kafka-cluster-id>
For example:
confluent iam rbac role-binding create \ --principal User:jack-sr \ --role ResourceOwner \ --resource Group:schema-registry-cool-cluster \ --kafka-cluster my-kafka-cluster-ID
Grant the user the role
ResourceOwneron the Kafka topic that Schema Registry uses to store its schemas.confluent iam rbac role-binding create \ --principal User:<sr-user-id> \ --role ResourceOwner \ --resource Topic:<schemas-topic> \ --kafka-cluster <kafka-cluster-id>
For example:
confluent iam rbac role-binding create \ --principal User:jack-sr \ --role ResourceOwner \ --resource Topic:_jax-schemas-topic \ --kafka-cluster my-kafka-cluster-ID
Use the command
confluent iam rbac role-binding list <flags>to view the role you just created.confluent iam rbac role-binding list \ --principal User:jack-sr \ --role ResourceOwner \ --kafka-cluster my-kafka-cluster-ID
For example:
confluent iam rbac role-binding list \ --principal User:jack-sr \ --role ResourceOwner \ --kafka-cluster my-kafka-cluster-ID Role | ResourceType | Name | PatternType +-------------+--------------+----------------------------------+-------------+ ResourceOwner | Topic | _jax-schemas-topic | LITERAL ResourceOwner | Topic | __schema_encoders | LITERAL ResourceOwner | Group | schema-registry-cool-cluster | LITERAL ResourceOwner | Topic | _schemas | LITERAL ResourceOwner | Group | schema-registry | LITERAL
(Optional) Use a registered cluster name
Starting in Confluent Platform 6.0, you can register your Schema Registry Kafka cluster in the
cluster registry and specify a user-friendly cluster
name, which makes it easier to create role bindings. In all of the example
commands in Grant roles for the Schema Registry service principal, you can substitute the registered
cluster name for <schema-registry-group-id> and <kafka-cluster-id>.
For example, the role binding command for a non-registered cluster must include both the Schema Registry group ID and cluster ID:
confluent iam rbac role-binding create \
 --principal User:<sr-user-id> \
 --role ResourceOwner \
 --resource Group:<schema-registry-group-id> \
 --kafka-cluster <kafka-cluster-id>
If your Schema Registry cluster is registered in the Confluent Platform cluster registry, replace
<schema-registry-group-id> and <kafka-cluster-id> with the user-friendly
name of the registered cluster:
confluent iam rbac role-binding create \
  --principal User:<sr-user-id> \
  --role ResourceOwner \
  --cluster-name <registered-cluster-name>
Start Schema Registry and test it
Shut down your local ZooKeeper and Kafka servers to keep a clean slate. In this example, you run against a remote cluster, so you only need to start Schema Registry.
Open a command window, change to the directory of your local Confluent Platform installation, and run the following command to start Schema Registry.
./bin/schema-registry-start ./etc/schema-registry/schema-registry.propertiesRun the following command to view subjects.
curl localhost:8081/subjectsIf you get an empty
[ ](or brackets with topics), the command succeeded. Empty brackets indicate that no topics exist yet.If the local Schema Registry starts and the
curlcommand onsubjectssucceeds, you have access to Schema Registry through RBAC.Tip
If the
curlcommand doesn’t work, try sending the Schema Registry service principal credentials with it:curl -u <username>:<password> localhost:8081/subjects
You can create and manage topics, subjects, and schemas through an RBAC-enabled Confluent Control Center or with
curlcommands. RBAC scopes the available resources and actions based on login credentials. For details, see Tutorial: Use Schema Registry on Confluent Platform to define schemas for a client application and Schema Registry API Usage Examples for Confluent Platform.
You have now configured Schema Registry to run with RBAC.
Next, use the Confluent CLI to grant role-based access to Schema Registry users, scoped to subjects.
Log on to Confluent CLI and grant access to Schema Registry users
Log on to MDS again.
confluent login --url <https>://<metadata_server_url>:<port>
To grant a user named “sam” the role
ResourceOwneron a Subject named “transactions” for a Kafka cluster namedmy-kafka-cluster-IDand a Schema Registry cluster named “schema-registry-cool-cluster”:confluent iam rbac role-binding create \ --principal User:sam \ --resource Subject:transactions \ --role ResourceOwner \ --kafka-cluster my-kafka-cluster-ID \ --schema-registry-cluster schema-registry-cool-cluster
Role bindings for subjects in non-default contexts
Schema contexts scope subject names within an
independent namespace. To target a subject in a non-default context, pass the
qualified subject name as Subject::.<context>:<subject> to the
--resource flag. The double colon at the start has two parts: the first
colon separates the Subject resource type from the subject name, and the
second colon begins the qualified subject name.
The following command grants sam ResourceOwner on subject
transactions in context .mycontext:
confluent iam rbac role-binding create \
--principal User:sam \
--resource "Subject::.mycontext:transactions" \
--role ResourceOwner \
--kafka-cluster my-kafka-cluster-ID \
--schema-registry-cluster schema-registry-cool-cluster
The following command grants sam ResourceOwner on every subject in
context .mycontext by using the wildcard:
confluent iam rbac role-binding create \
--principal User:sam \
--resource "Subject::.mycontext:*" \
--role ResourceOwner \
--kafka-cluster my-kafka-cluster-ID \
--schema-registry-cluster schema-registry-cool-cluster
Quote the --resource value so the shell doesn’t interpret the colons or
asterisk. A role binding on transactions doesn’t grant access to
:.mycontext:transactions, and vice versa. Each qualified subject is a
distinct resource.
Note
Available in Confluent Platform 8.2 and later. Response-side authorization for unqualified
subject lookups is controlled by
confluent.schema.registry.context.authorization.enabled, which defaults
to true. When this check is enabled, a request that resolves to a subject
in a non-default context returns 403 Forbidden if the principal lacks
read access to the qualified subject. To exempt principals such as
administrators, list them in
confluent.schema.registry.context.authorization.excluded.principals.