重要
このページの日本語コンテンツは古くなっている可能性があります。最新の英語版コンテンツをご覧になるには、こちらをクリックしてください。
Quick Start for Confluent Cloud
This quick start gets you up and running with Confluent Cloud using a basic cluster. The first section shows how to use Confluent Cloud to create topics, how to produce data to the Confluent Cloud cluster, and how to consume from the cluster. The second section walks you through how to add ksqlDB to the cluster, and perform queries on the data using a SQL-like syntax.
Section 1: Create a cluster, add a topic
Follow the steps this section to set up a Kafka cluster on Confluent Cloud and produce data to Kafka topics on the cluster.
Confluent Cloud は、Apache Kafka® をベースとして作成された、回復性が高くスケーラブルなストリーミングデータサービスです。フルマネージドサービスとして提供されています。Confluent Cloud にはウェブインターフェイスとローカルのコマンドラインインターフェイスがあります。ウェブインターフェイスでは、クラスターのリソース、設定、請求を管理できます。Confluent CLI では、Kafka トピックを作成および管理できます。はじめに Confluent Cloud にサインアップしてください。
For a list of interfaces and features of Confluent Cloud, see the Confluent Cloud documentation.
注釈
Confluent Cloud Console には、環境をセットアップする基本的な手順について説明するチュートリアルが製品内部に組み込まれています。このチュートリアルで、Confluent Cloud コンポーネントをコンソールから直接構成する作業を練習することができます。Confluent Cloud にログインして チュートリアルのリンク 先の指示に従うか、コンソールの LEARN ボタンをクリックしてチュートリアルを開始します。
- 前提条件
- Access to Confluent Cloud. See Confluent Cloud の無料試用 to get started for free.gray
- インターネット接続
ステップ 1: Confluent Cloud で Kafka クラスターを作成する
https://confluent.cloud で Confluent Cloud にサインインします。
Add cluster をクリックし、Create cluster ページで Basic をクリックします。
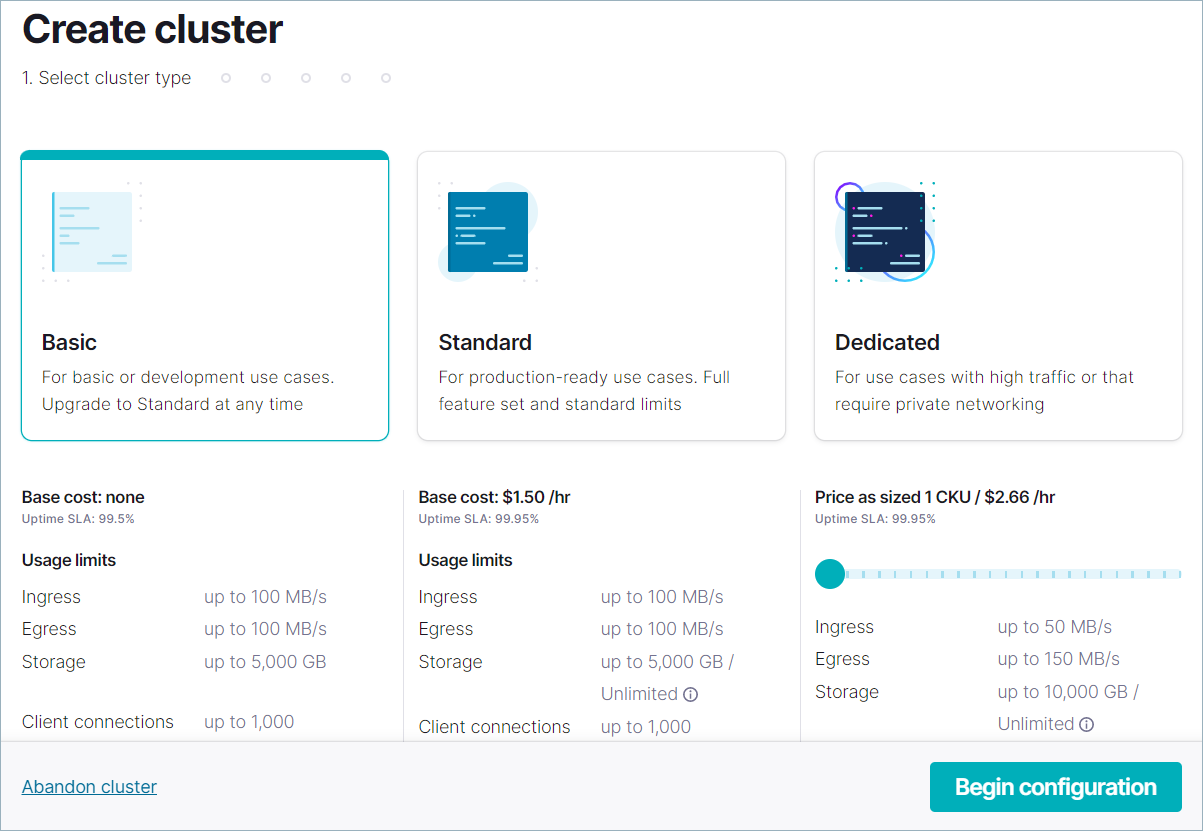
この例では、シングルゾーンの可用性をサポートする ベーシック クラスターを作成します。クラスタータイプ "スタンダード" と "専用" については、「クラスタータイプごとの Confluent Cloud の機能と制限」を参照してください。
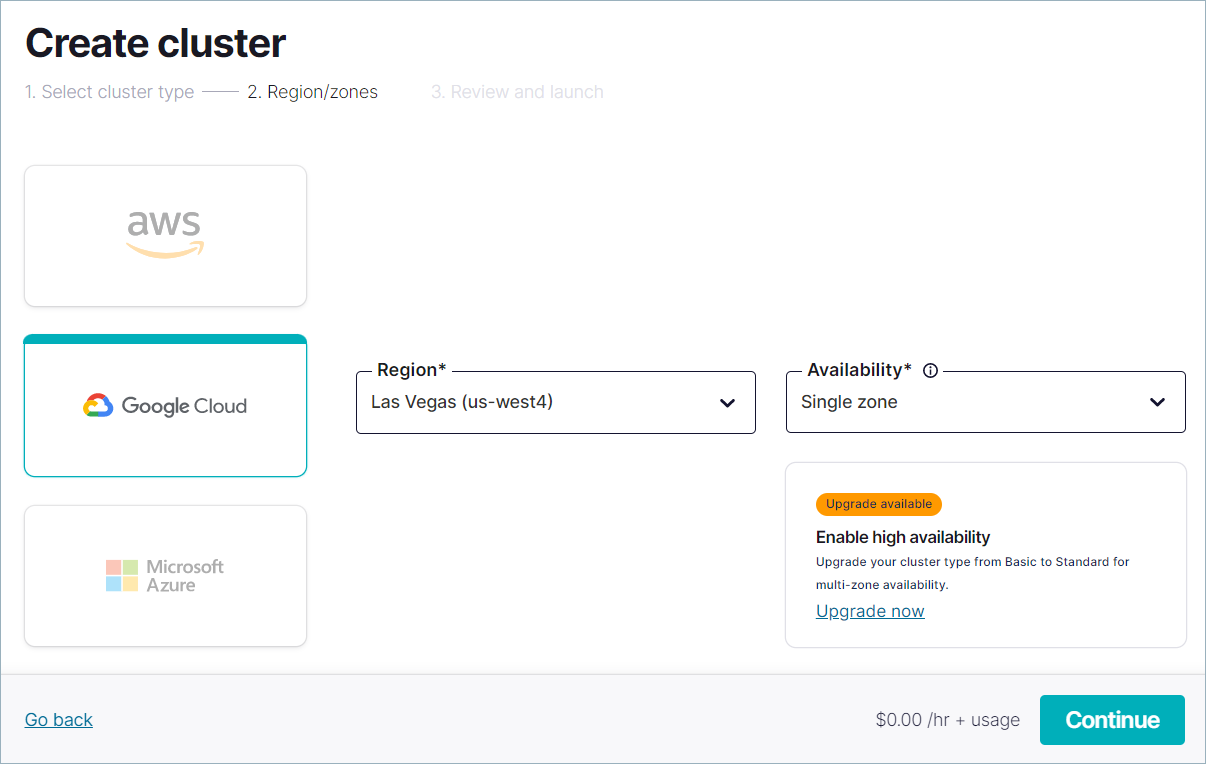
クラウドプロバイダー、リージョン、およびアベイラビリティゾーンを選択してから、Continue をクリックします。
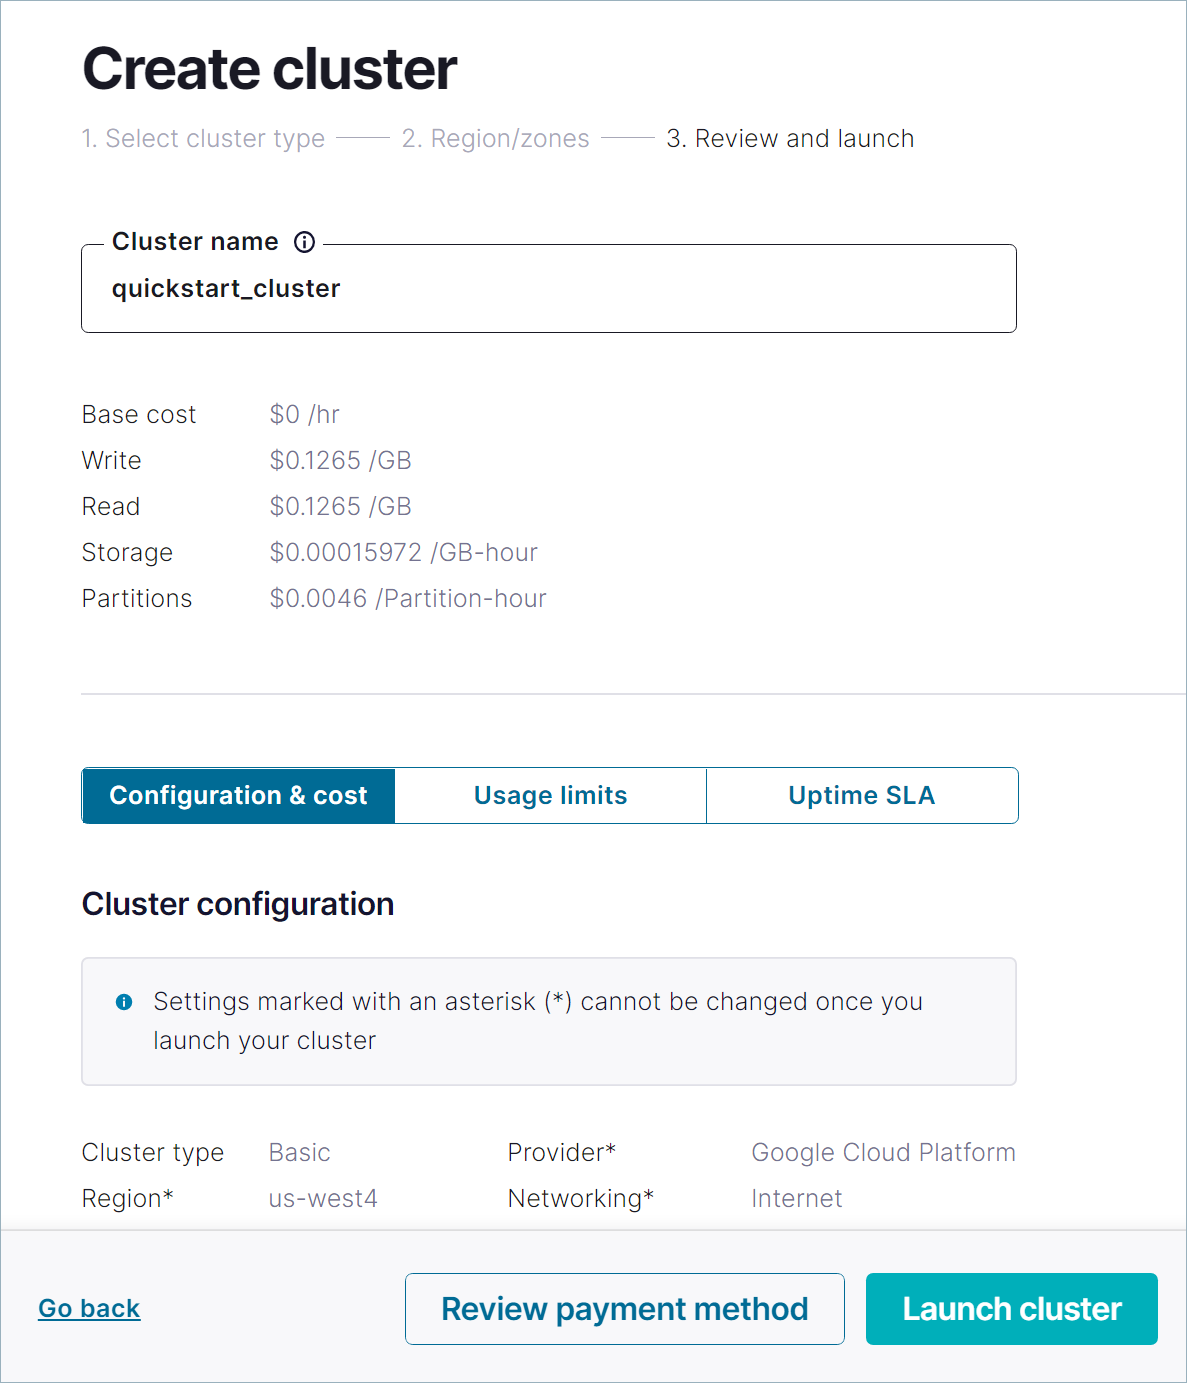
クラスター名を指定し、設定、コスト、使用量について確認し、Launch cluster をクリックします。
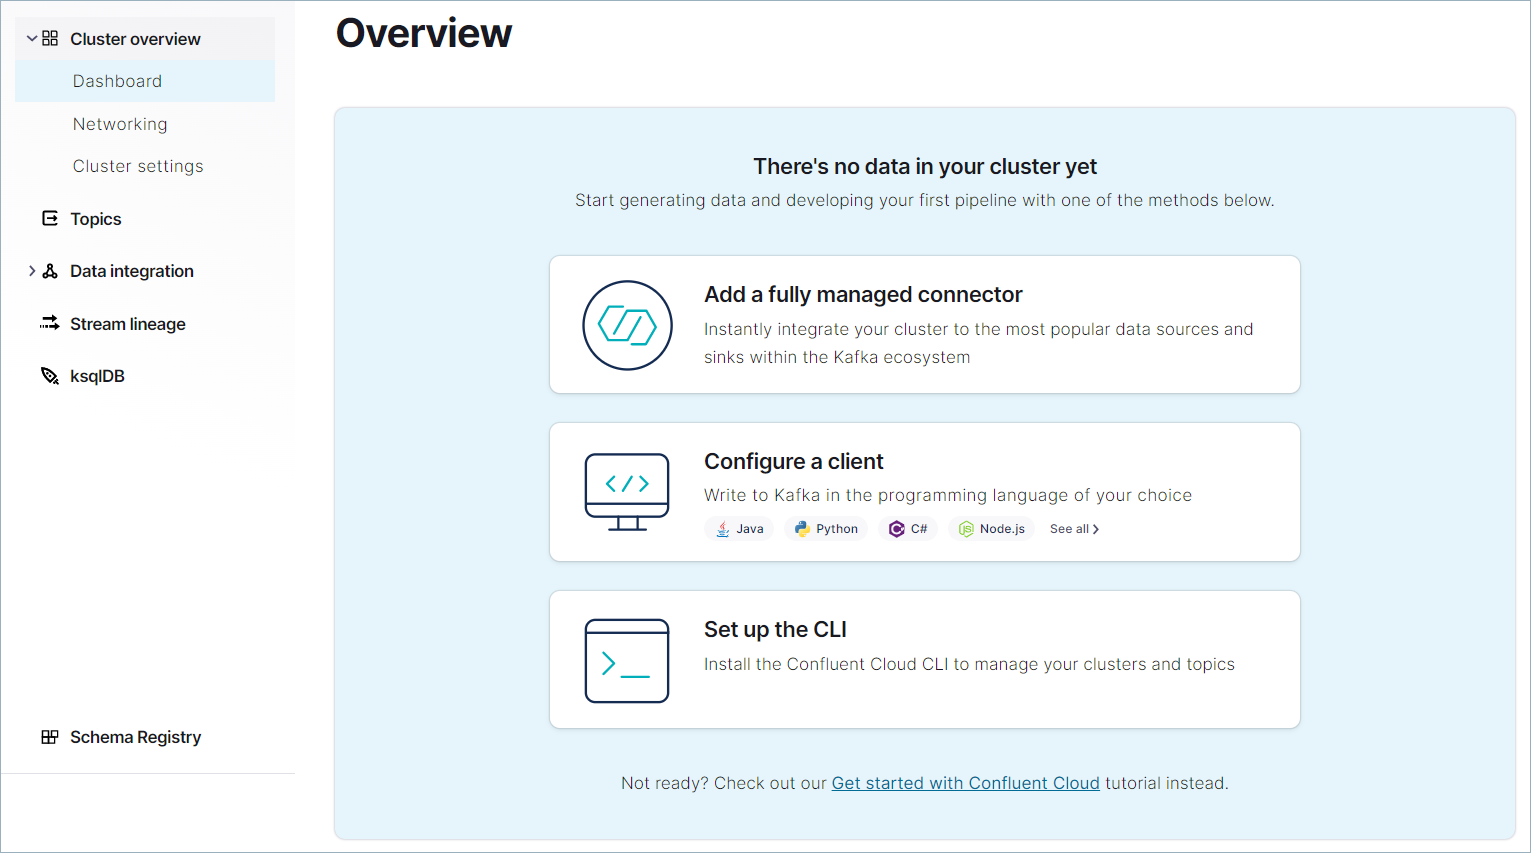
選択したクラウドプロバイダーやその他の設定によっては、クラスターのプロビジョニングに数分かかる場合があります。クラスターがプロビジョニングされると、Cluster Overview ページが表示されます。これで、新しいクラスターでアプリとデータの構成を開始できます。
ちなみに
You can also create a cluster using a REST API or the Confluent CLI. To create a cluster with the REST API, see クラスターの作成, to use Confluent CLI use confluent kafka cluster commands.
ステップ 2: トピックを作成する
In this step, you create a users topic by using the Cloud Console. A Kafka topic
is a unit of organization for a cluster, and is essentially an append-only log.
For more about topics, see https://developer.confluent.io/what-is-apache-kafka/
ちなみに
You can also create topics by using the Confluent CLI or REST API. See トピックの作成.
ナビゲーションメニューで Topics をクリックし、Topics ページの Create topic をクリックします。
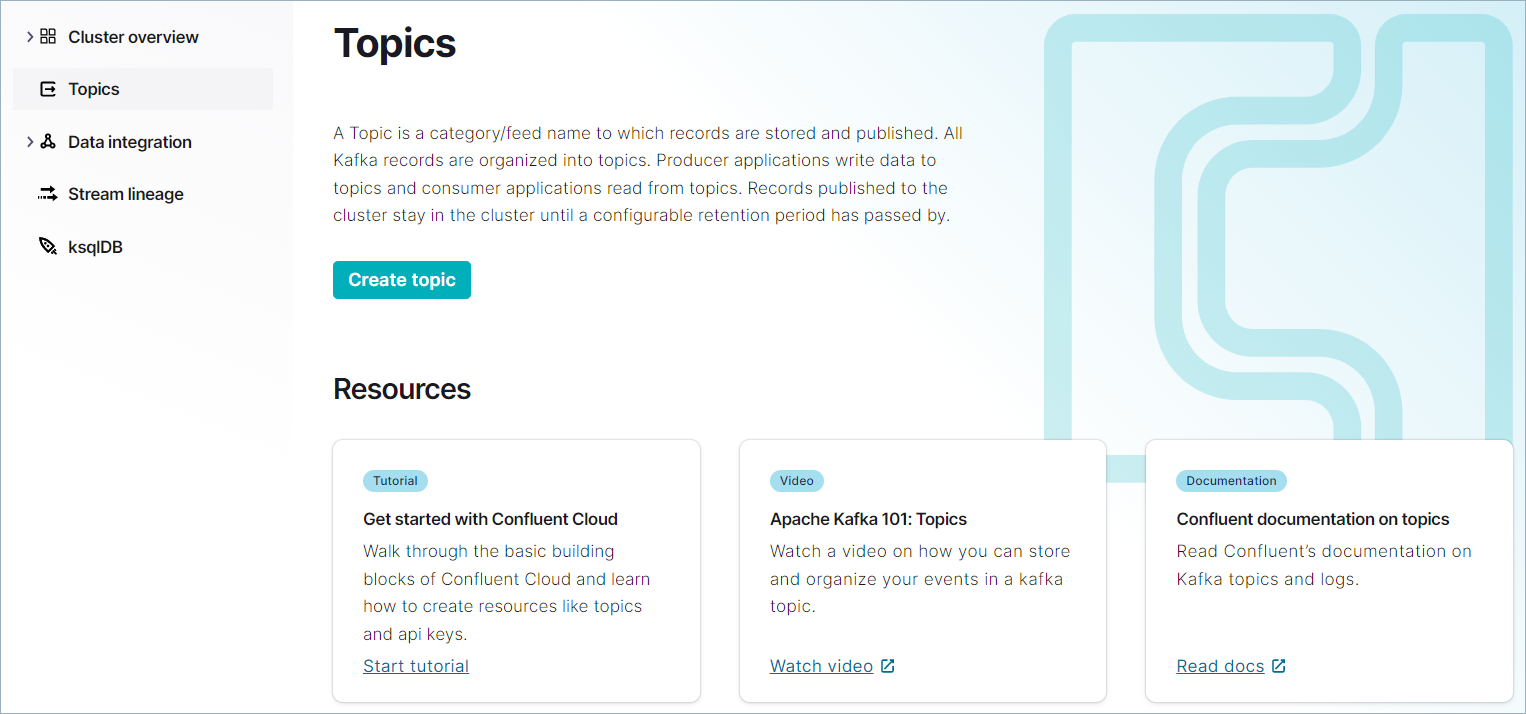
Topic name フィールドで "users" と入力します。Create with defaults をクリックします。
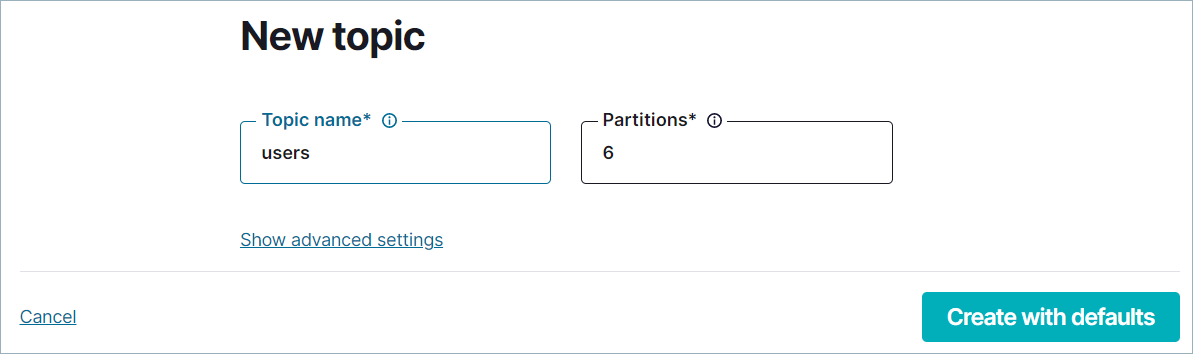
users トピックが Kafka クラスターに作成され、プロデューサーとコンシューマーで使用できるようになります。
ステップ 3: サンプルプロデューサーを作成する
ホストされている Datagen Source Connector for Confluent Cloud を使用して、Kafka クラスターにサンプルデータを生成できます。
ナビゲーションメニューから Data integration、Connectors の順にクリックします。Connectors ページが開きます。
Search ボックスに "datagen" と入力します。

検索結果から Datagen Source コネクターを選択します。
On the Configuration page, select Users, and then Continue.
On the Topic selection pane, the users topic you created in the previous section should display. Select it and click Continue.
In the API credentials pane, click Generate API key & download. This creates an API key and secret that allows the connector to access your cluster, and downloads the key and secret to your computer.
API キーは、コネクターおよび Confluent CLI と ksqlDB CLI からクラスターにアクセスするために必要です。
注釈
API キーおよび対応するシークレットは、アクティブな Kafka クラスターに適用されます。新しいクラスターを追加した場合は、その新しい Kafka クラスターのプロデューサーとコンシューマーのために新しい API キーを作成する必要があります。詳細については、「API キーを使用したアクセス制御」を参照してください。
Enter "users" as the description for the key, and click Continue.
For Connector sizing, leave the slider at the default of 1 task and click Continue
On the Review and launch page, select the text in the Connector name box and replace it with "DatagenSourceConnector_users". Then click Continue to start the connector.
See all connectors をクリックし、Connectors ページに移動します。新しいコネクターのステータスに Provisioning と数秒間表示されます。ステータスが Running に変わったら、コネクターが
usersトピックにデータを生成しています。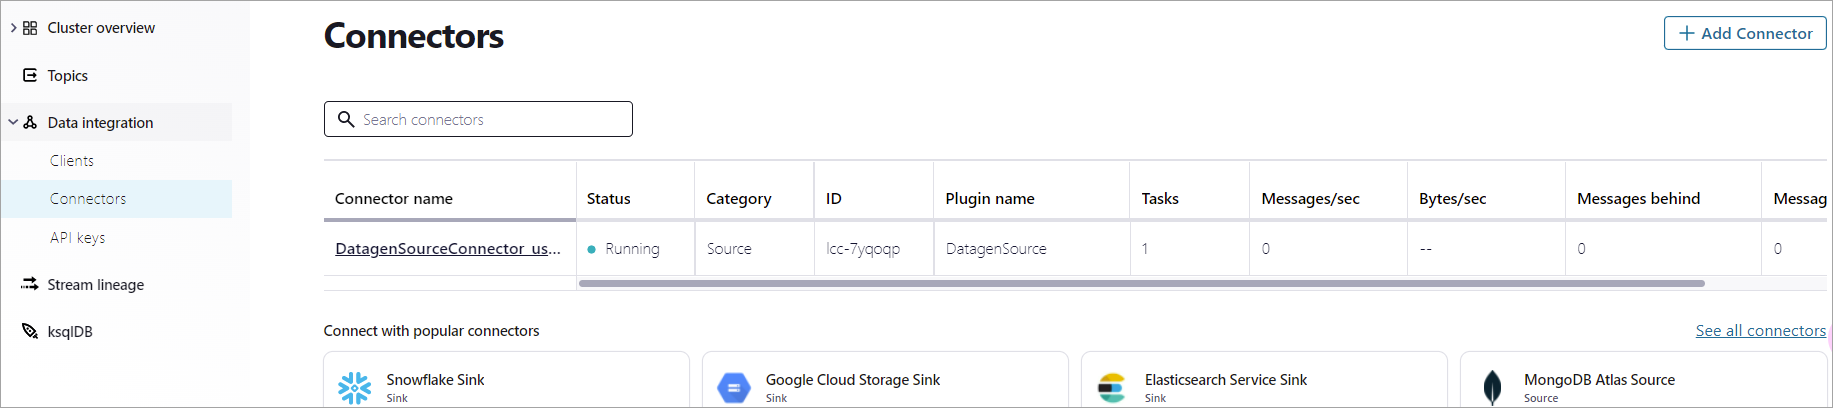
ステップ 4: メッセージを消費する
ナビゲーションメニューで Topics をクリックしてクラスター内のトピックのリストを表示します。

users トピック名をクリックし、詳細ページで Messages タブをクリックすると、トピックに生成されているメッセージが表示されます。このメッセージビューアーには、ページが読み込まれた後に生成されたメッセージが表示されますが、履歴ビューは表示されません。
ステップ 5: データストリームを調べる
ストリーム系列 を使用して、クラスター内のデータの移動を追跡します。このページでは、ソース、シンク、トピックを確認したり、メッセージがどこからどこに移動しているかをモニタリングしたりすることができます。
users トピックページで、See in Stream Lineage をクリックします。
usersのトピックのストリーム系列が表示されます。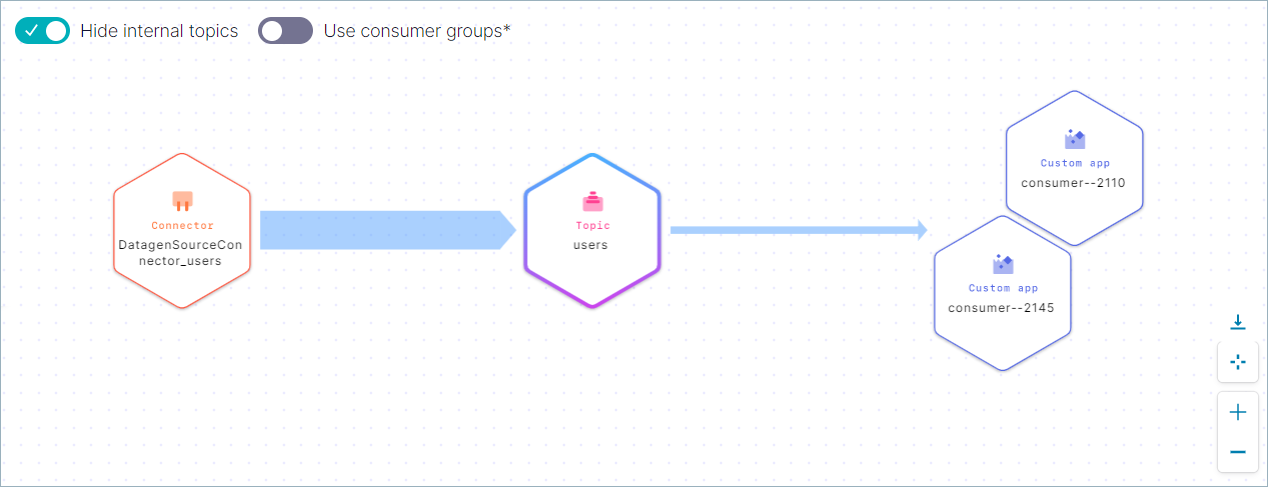
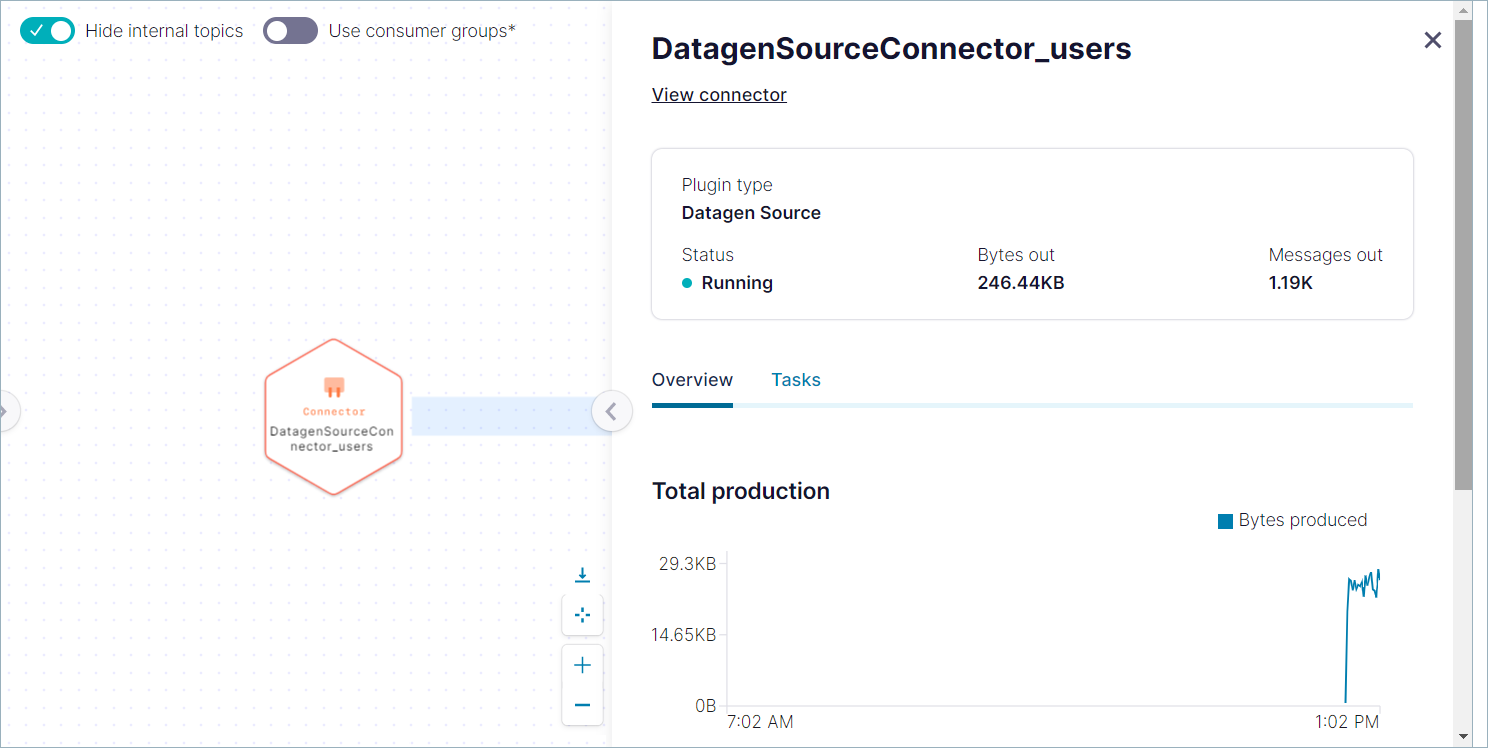
DatagenSourceConnector_users というラベルのノード(ステップ 3 で作成したコネクター)をクリックします。詳細ビューが開き、合計生成量や他のデータのグラフが表示されます。
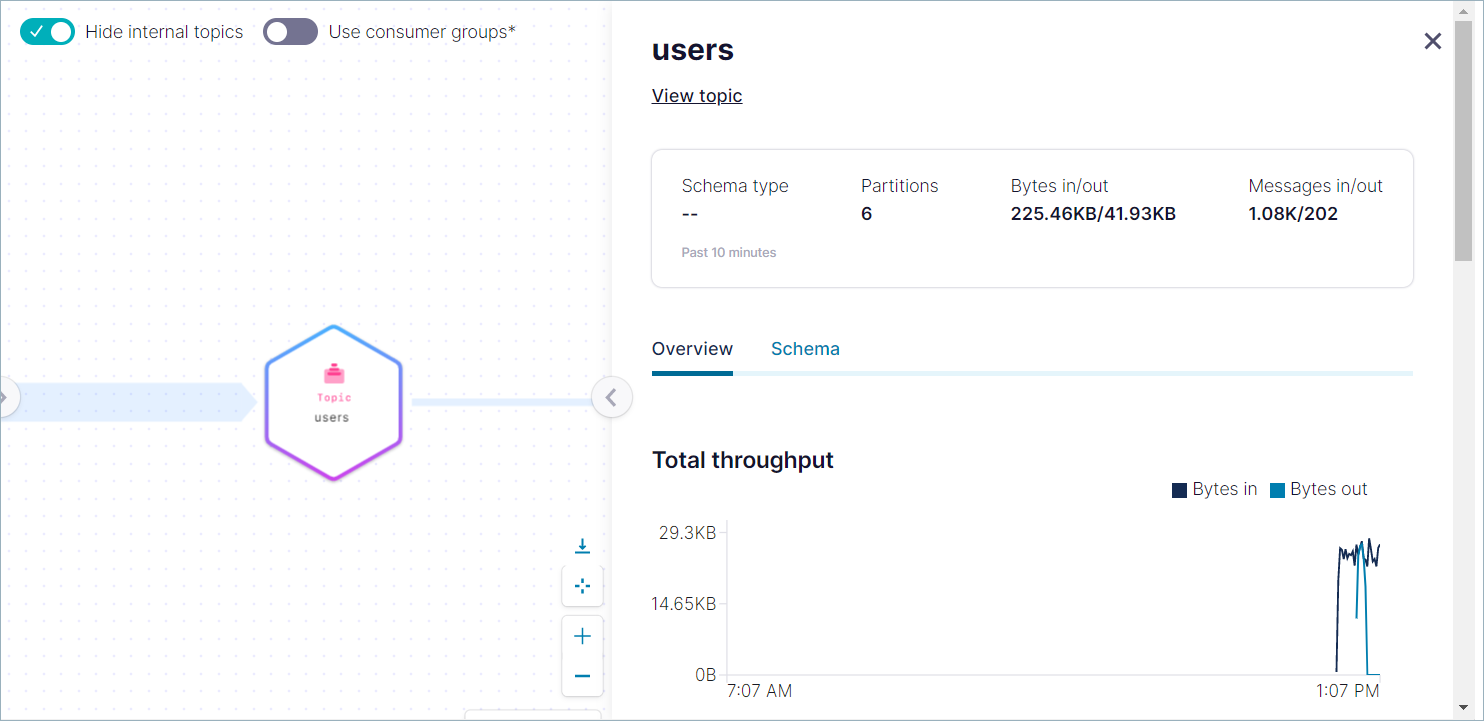
詳細ビューを終了し、users というラベルのトピックをクリックします。詳細ビューが開き、合計スループットや他のデータのグラフが表示されます。
(optional) Step 6: Delete the connector and topic
Skip this step if you plan to move on to Section 2: Add ksqlDB to the cluster and learn how to use SQL statements to query your data.
If you don't plan to complete Section 2 and you're ready to quit the Quick Start, delete the resources you created to avoid unexpected charges to your account.
- 次のようにして、コネクターを削除します。
- ナビゲーションメニューから Data Integration、Connectors の順にクリックします。
- DatagenSourceConnector_users をクリックし、詳細ページで Delete をクリックします。
- コネクター名(
DatagenSourceConnector_users)を入力し、Confirm をクリックします。
- 次のようにして、トピックを削除します。
- ナビゲーションメニューで Topics をクリックし、users トピックを選択して Configuration タブを選択します。
- Delete topic をクリックし、トピック名(
users)を入力して、Continue をクリックします。
Section 2: Add ksqlDB to the cluster
In Section 1, you installed a Datagen connector to produce data
to the users topic in your Confluent Cloud cluster.
In this section, you will create a ksqlDB cluster, and a stream and a table in that cluster, and write queries against them.
注釈
This section uses the Cloud Console to create a ksqlDB cluster. For an introduction that uses the Confluent CLI exclusively, see ksqlDB Quickstart for Confluent Cloud.
Step 1: Create a ksqlDB cluster in Confluent Cloud
To write queries against streams and tables, create a new ksqlDB cluster in Confluent Cloud.
Select the cluster you created in Section 1, and in the navigation menu, click ksqlDB.
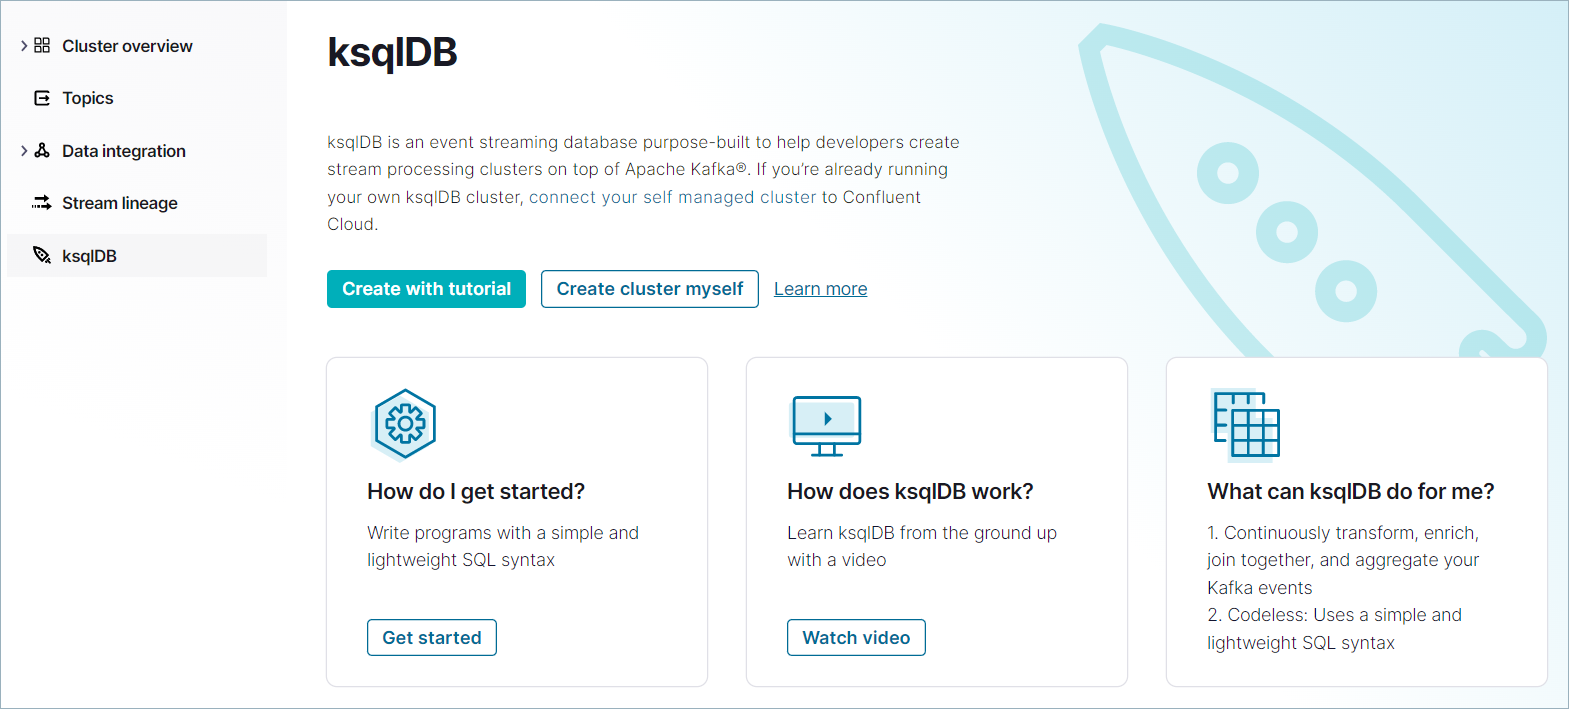
Click Create cluster myself. On the New cluster page, ensure that Global access is selected, and click Continue.
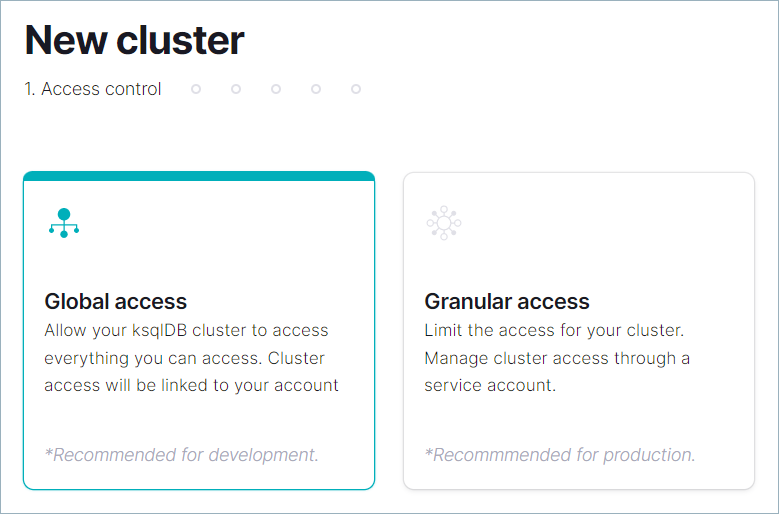
注釈
To enable stricter access control for the new ksqlDB cluster, click Granular access and follow these steps.
On the Configuration page, enter
ksqldb-app1for the Cluster name. In the Cluster size dropdown, select 1. For more information on cluster sizes, see Confluent Cloud の請求.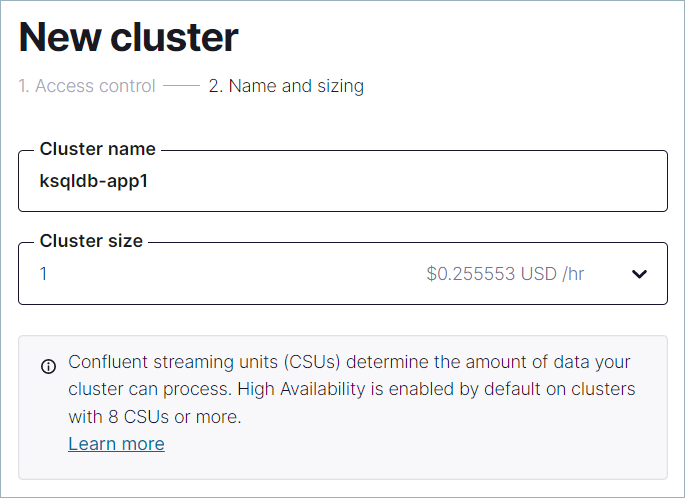
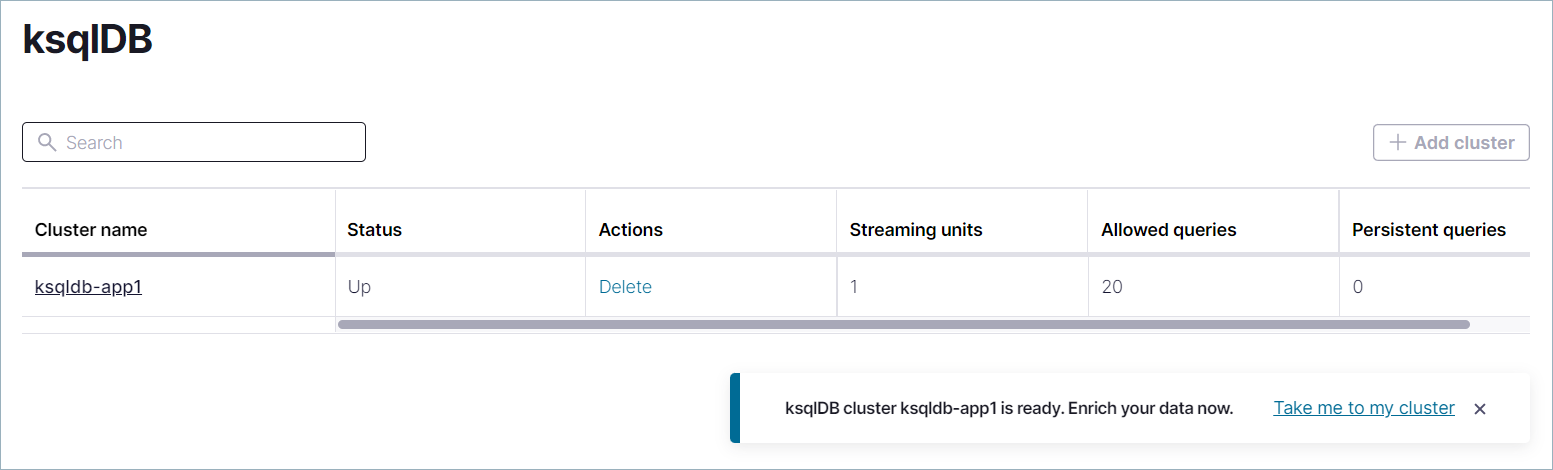
Click Launch cluster. The ksqlDB clusters page opens, and the new cluster appears in the list. The new cluster has a Provisioning status. It may take a few minutes to provision the ksqlDB cluster. When the ksqlDB cluster is ready, its Status changes from Provisioning to Up.
The new ksqlDB cluster appears in the clusters list.
Step 2: Create the pageviews topic
In Section 1, you created the users topic by using the
Cloud Console. In this step, you create the pageviews topic
the same way.
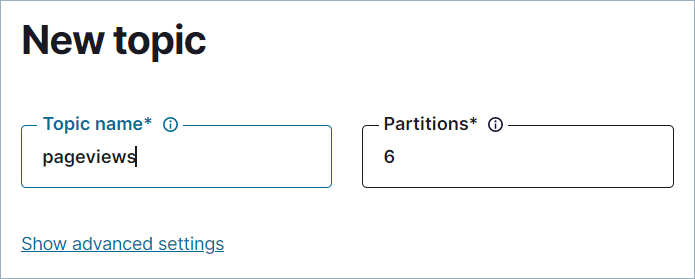
In the navigation menu, click Topics, and in the Topics page, click Add topic.
In the Topic name field, type "pageviews". Click Create with defaults.
The pageviews topic is created on the Kafka cluster and is available for use
by producers and consumers.
Step 3: Produce pageview data to Confluent Cloud
In this step, you create a Datagen connector for the pageviews topic, using
the same procedure that you used to create DatagenSourceConnector_users.
In the navigation menu, select Data integration > Connectors, and click Add connector.
In the Search connectors box, enter "datagen".
検索結果から Datagen Source コネクターを選択します。
On the Configuration page, select Pageviews, and then Continue.
On the Topic selection pane, the pageviews topic you created in the previous step should display. Select it and click Continue.
In the API credentials pane, click Generate API key & download. This creates an API key and secret that allows the connector to access your cluster, and downloads the key and secret to your computer.
The key and secret are required for the connector and also for the Confluent CLI and ksqlDB CLI to access your cluster.
Enter "pageviews" as the description for the key, and click Continue.
For Connector sizing, leave the slider at the default of 1 task and click Continue
On the Review and launch page, select the text in the Connector name box and replace it with "DatagenSourceConnector_pageviews". Then click Continue to start the connector.
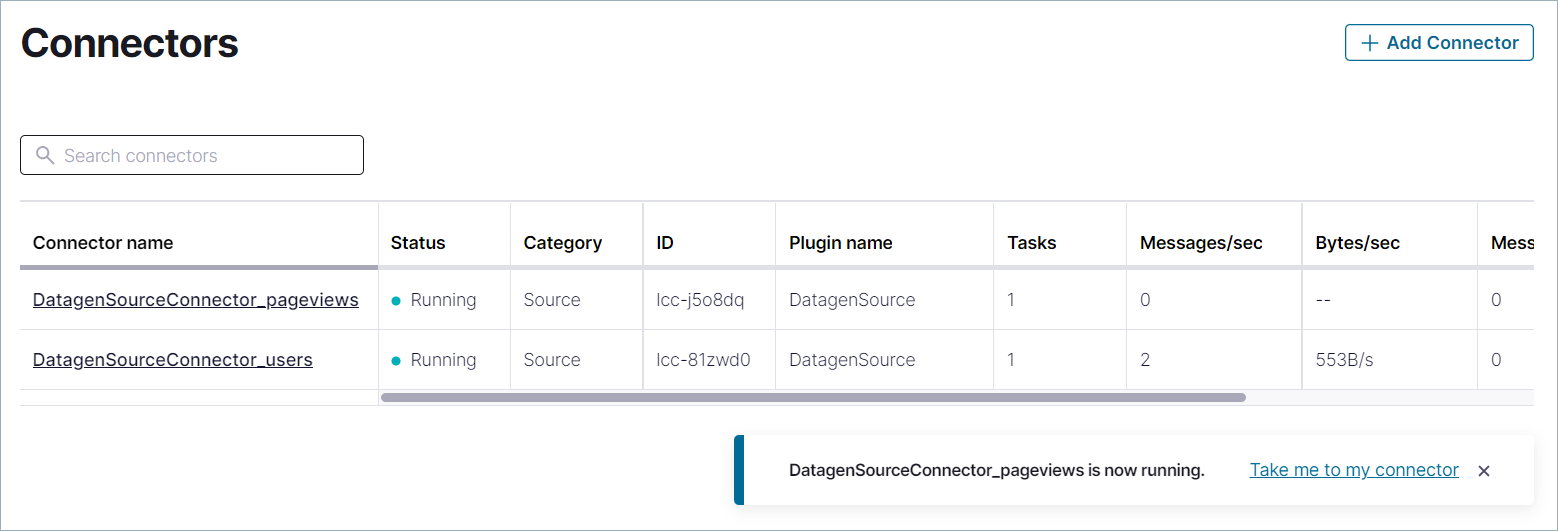
Click See all connectors to navigate to the Connectors page. The status of your new connector should read Provisioning, which lasts for a few seconds. When the status of the new connector changes from Provisioning to Running, you have two producers sending event streams to topics in your Confluent Cloud cluster.
Step 4: Create a stream and a table
In this step, you create a stream for the pageviews topic and a table for the users
topic by using familiar SQL syntax. When you register a
stream or a table on a topic, you can use the stream/table in SQL statements.
- A stream is an immutable append-only collection that represents a series of historical facts, or events. Once a row is inserted into a stream, the row can never change. You can append new rows at the end of the stream, but you can't update or delete existing rows.
- A table is a mutable collection that models change over time. Tables work by leveraging the keys of each row. If a sequence of rows shares a key, the last row for a given key represents the most up-to-date information for that key's identity. A background process periodically runs and deletes all but the newest rows for each key.
Together, streams and tables comprise a fully realized database. For more information, see Stream processing
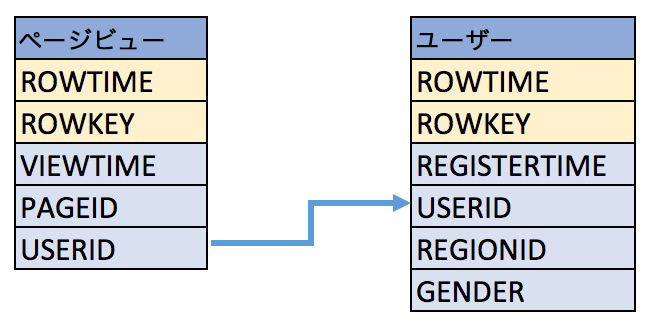
These examples query records from the pageviews and users topics using
the following schema.
Step 5: Create a stream in the ksqlDB editor
You can create a stream or table by using the CREATE STREAM and CREATE TABLE statements in the ksqlDB Editor, similar to how you use them in the ksqlDB CLI.
In the navigation menu, click ksqlDB.
In the ksqlDB clusters list, click ksqldb-app1.
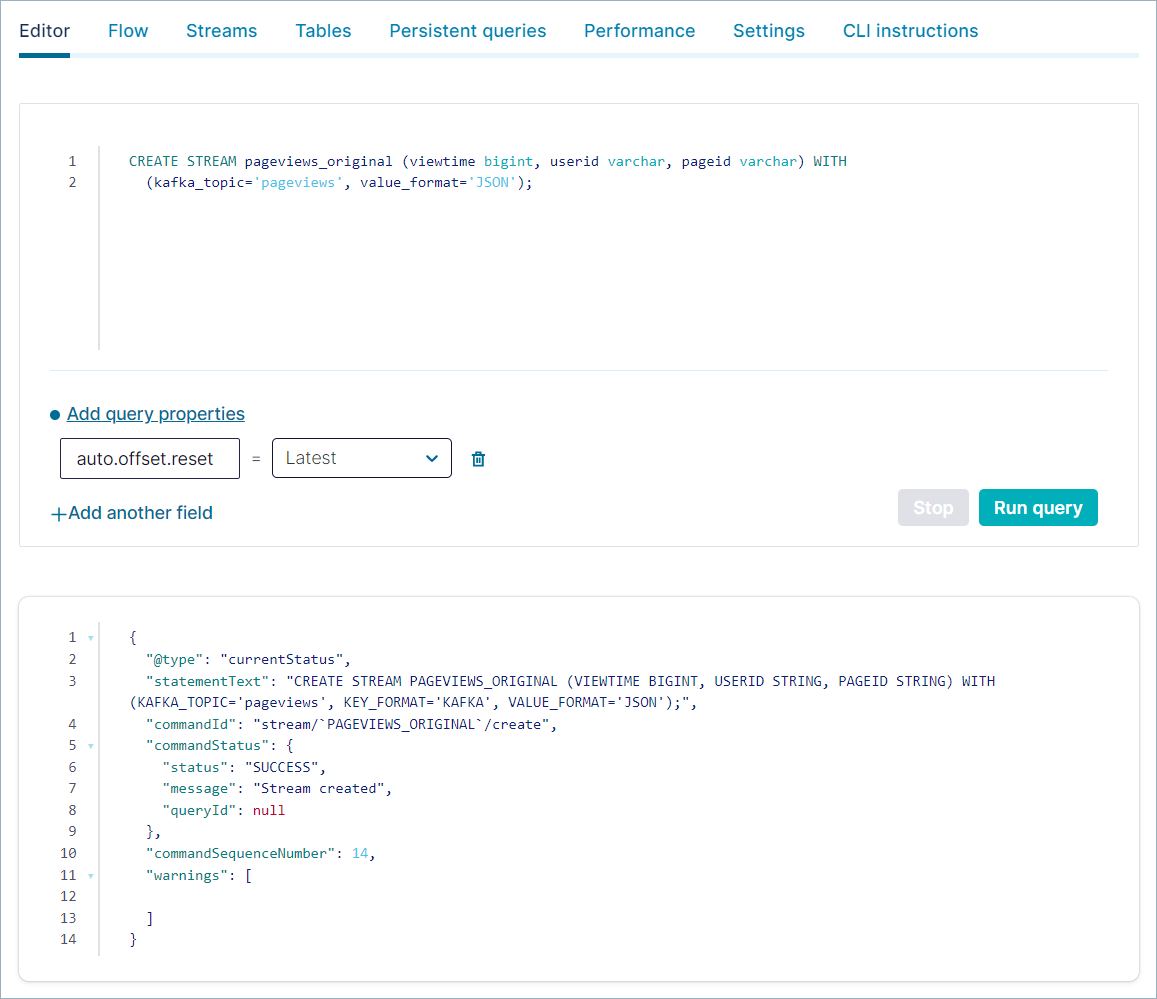
Make sure the Editor tab is selected, copy the following code into the editor window, and click Run query.
CREATE STREAM pageviews_original (viewtime bigint, userid varchar, pageid varchar) WITH
(kafka_topic='pageviews', value_format='JSON');
出力は以下のようになります。
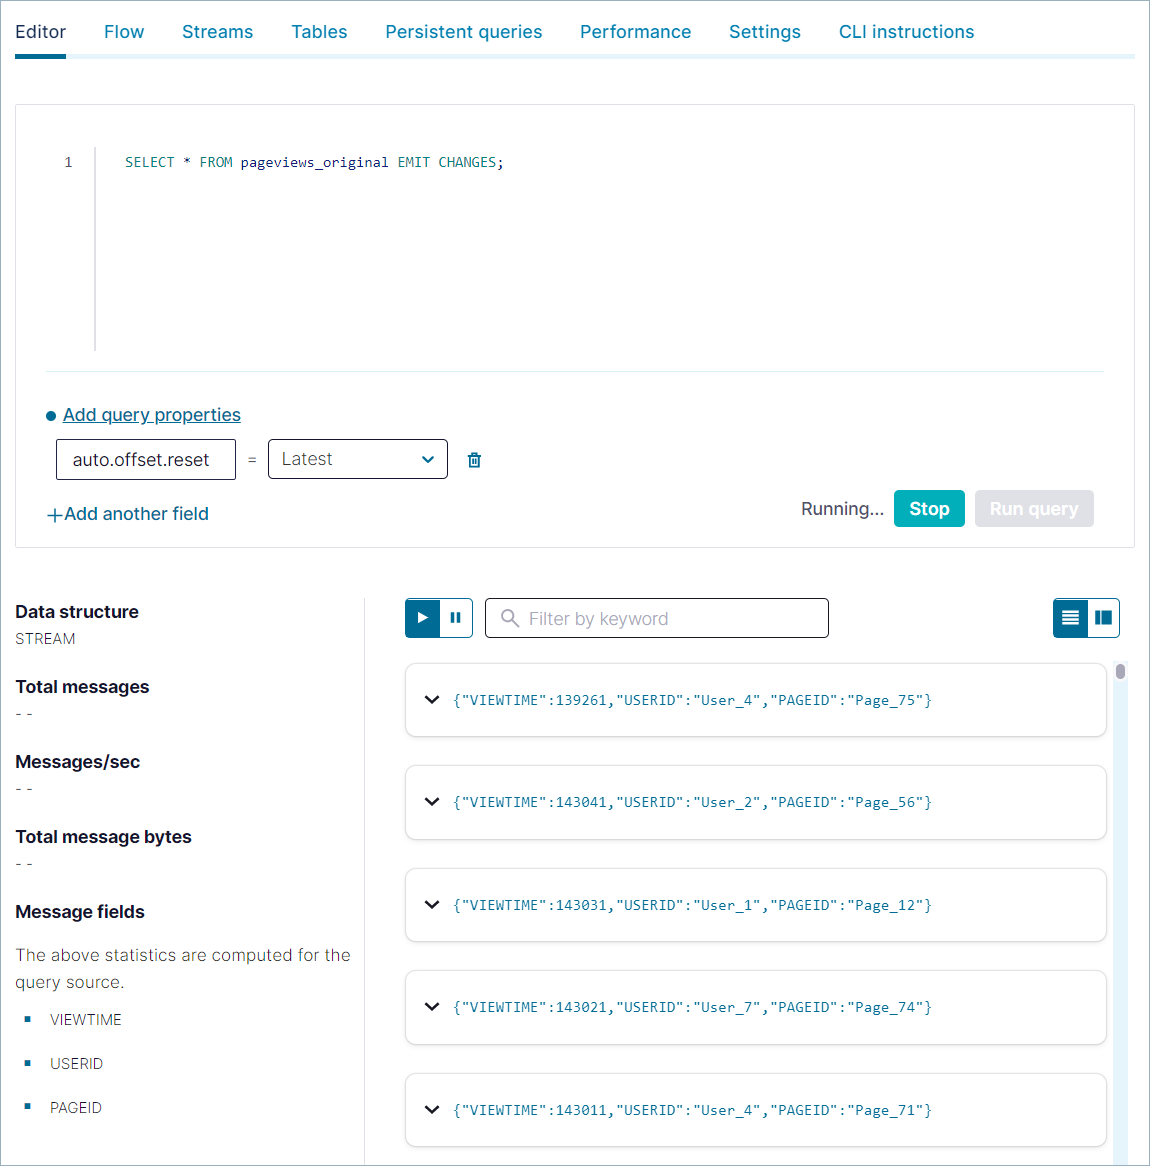
Clear the editor window and copy the following SELECT query to inspect records in the
pageviewsstream. Click Run query.SELECT * FROM pageviews_original EMIT CHANGES;
出力は以下のようになります。
The query continues until you end it explicitly. Click Stop to end the query.
Step 6: Create a table in the ksqlDB editor
Use the CREATE TABLE statement to register a table on a topic.
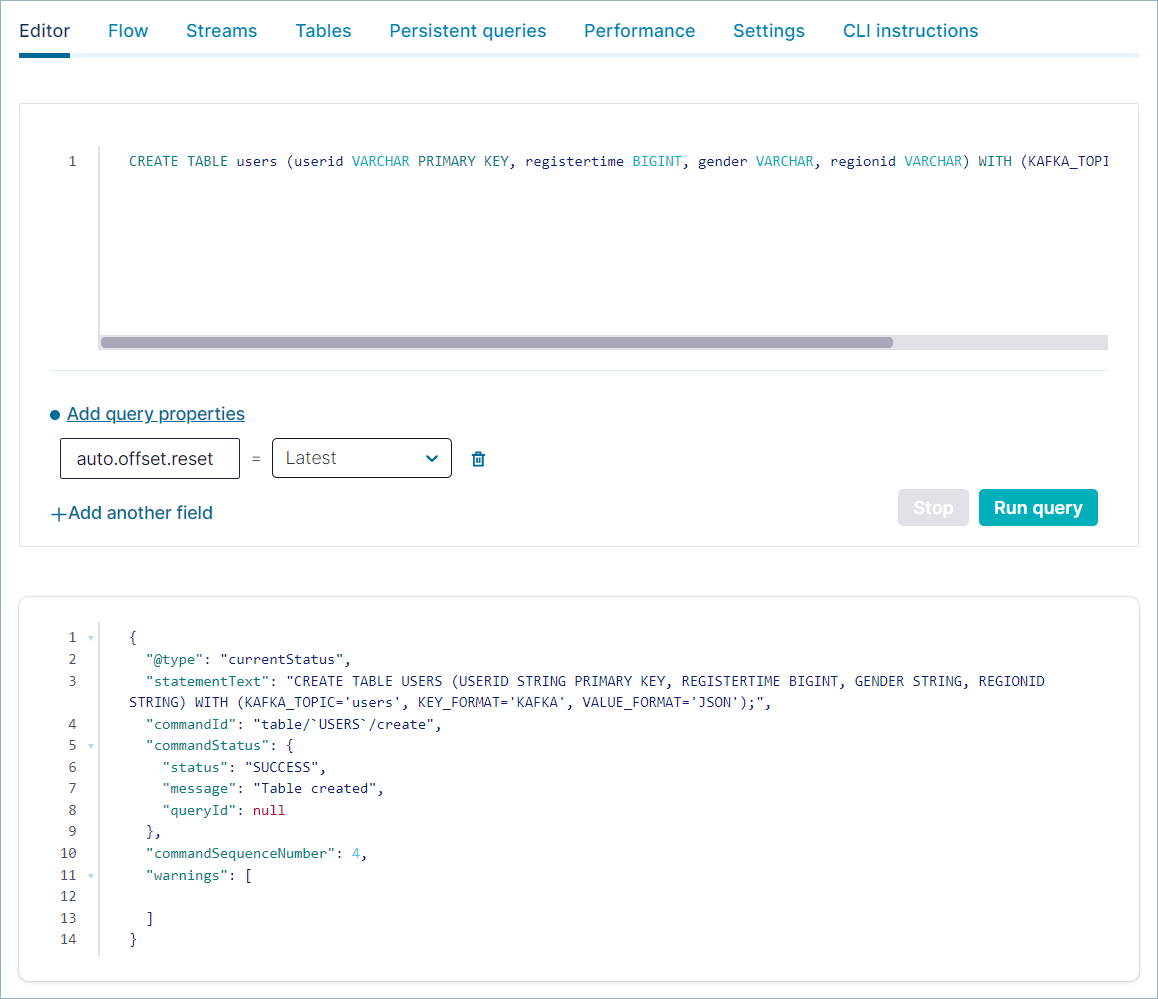
Clear the editor window. Then copy the following code into the window and click Run query.
CREATE TABLE users (userid VARCHAR PRIMARY KEY, registertime BIGINT, gender VARCHAR, regionid VARCHAR) WITH
(KAFKA_TOPIC='users', VALUE_FORMAT='JSON');
出力は以下のようになります。
Clear the editor window, and use the following SELECT query to inspect records in the
userstable. Click Run query.SELECT * FROM users EMIT CHANGES;
出力は以下のようになります。
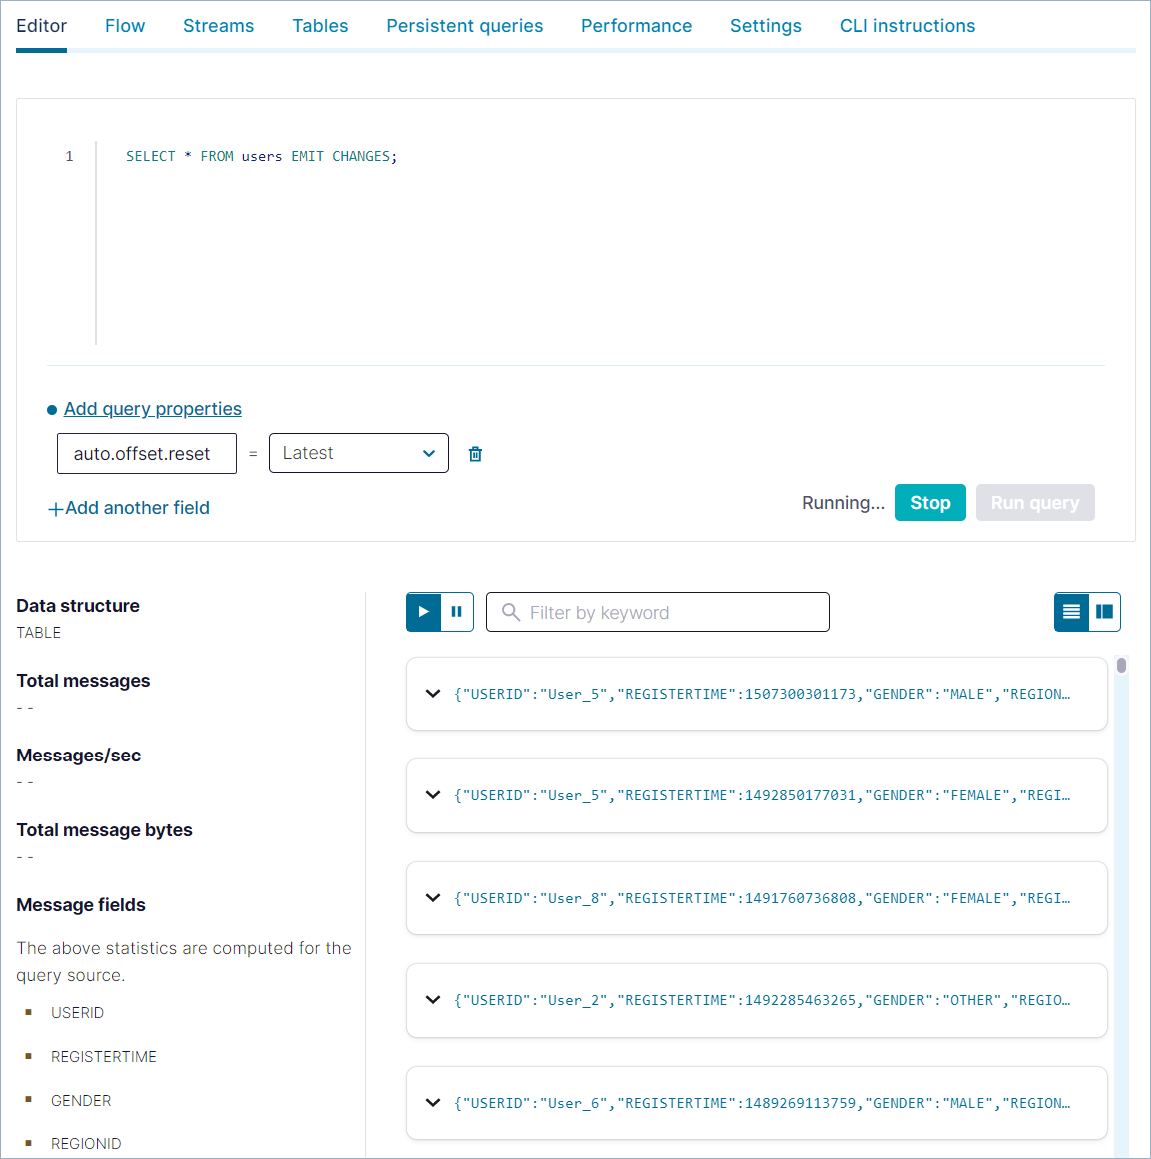
The query continues until you end it explicitly. Click Stop to end the query.
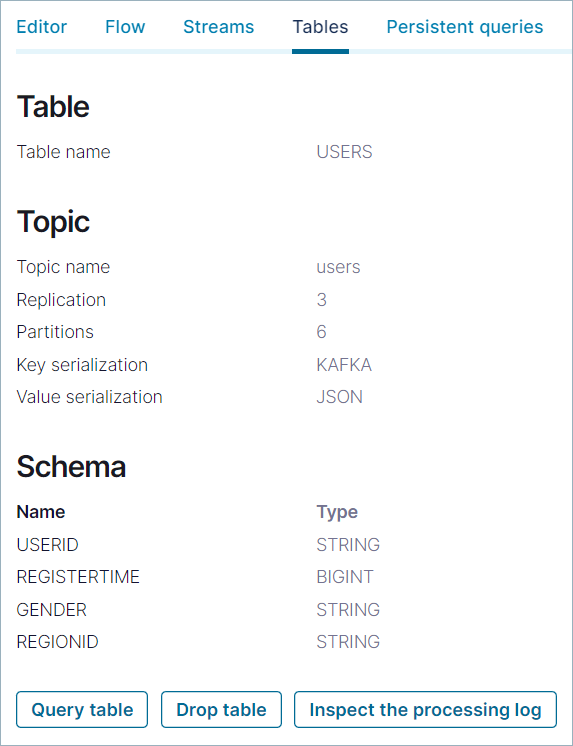
Click Tables, and in the list, click USERS to open the details page.
Step 7: Write a persistent query
With the pageviews topic registered as a stream, and the users topic
registered as a table, you can write a streaming join query that runs until you
end it with the TERMINATE statement.
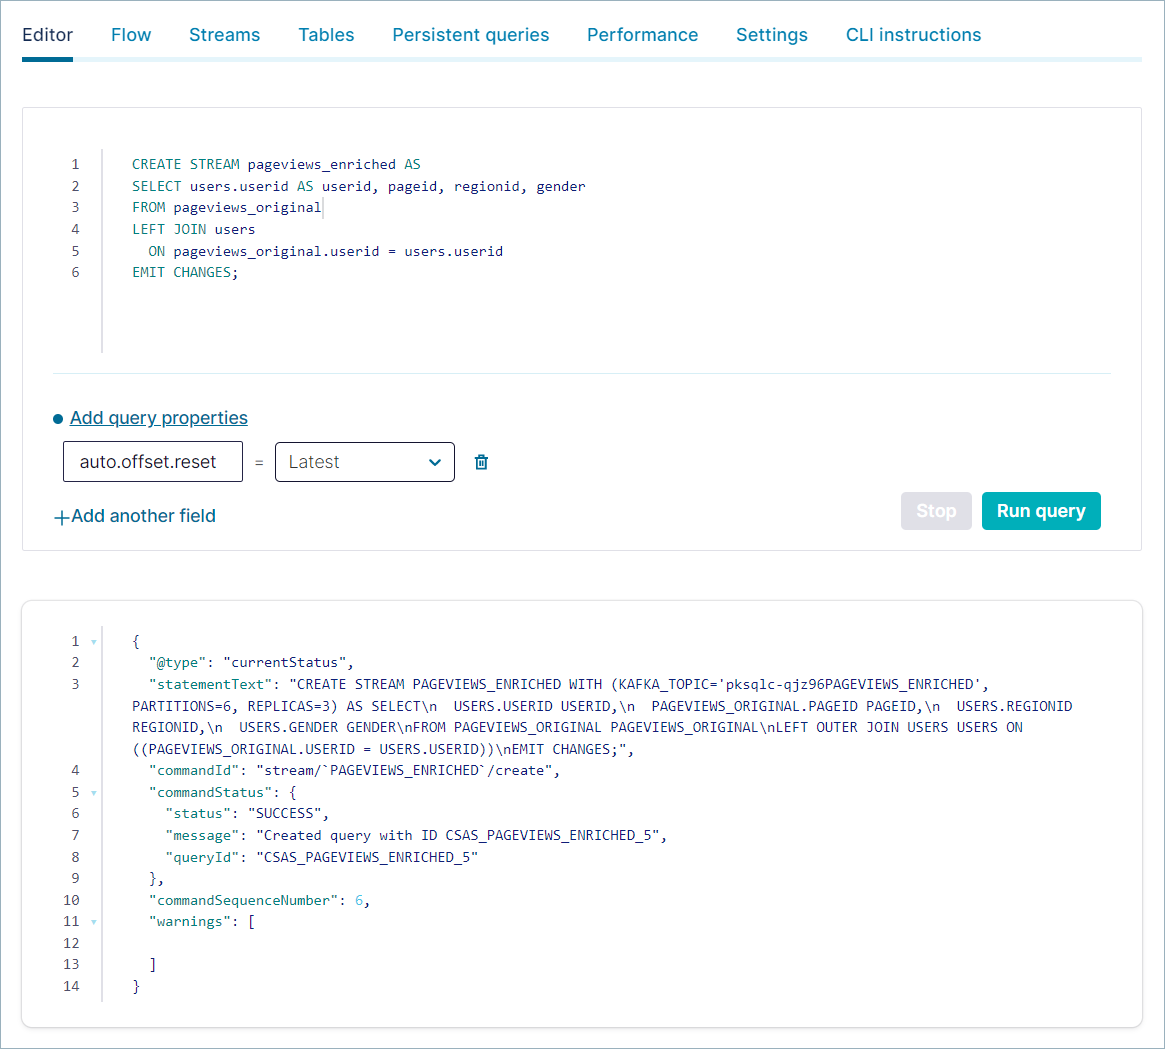
Click Editor and copy the following code into the editor, clearing its previous contents, and click Run query.
CREATE STREAM pageviews_enriched AS
SELECT users.userid AS userid, pageid, regionid, gender
FROM pageviews_original
LEFT JOIN users
  ON pageviews_original.userid = users.userid
EMIT CHANGES;
出力は以下のようになります。
To inspect your persistent queries, click the Persistent queries tab, which shows details about the
pageviews_enrichedstream that you created in the previous query.
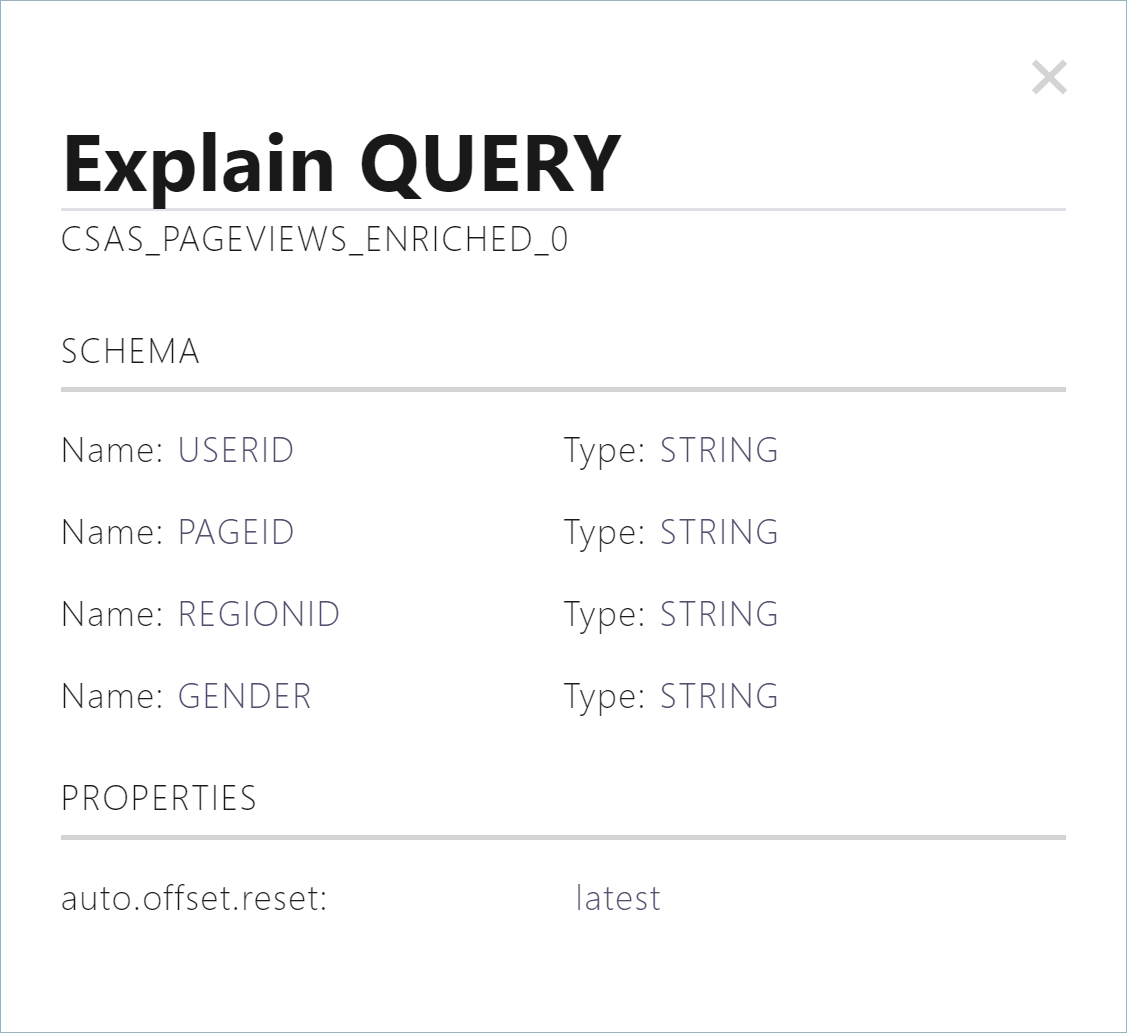
Click Explain query to see the schema and query properties for the persistent query.
Step 8: Use Flow view to inspect data
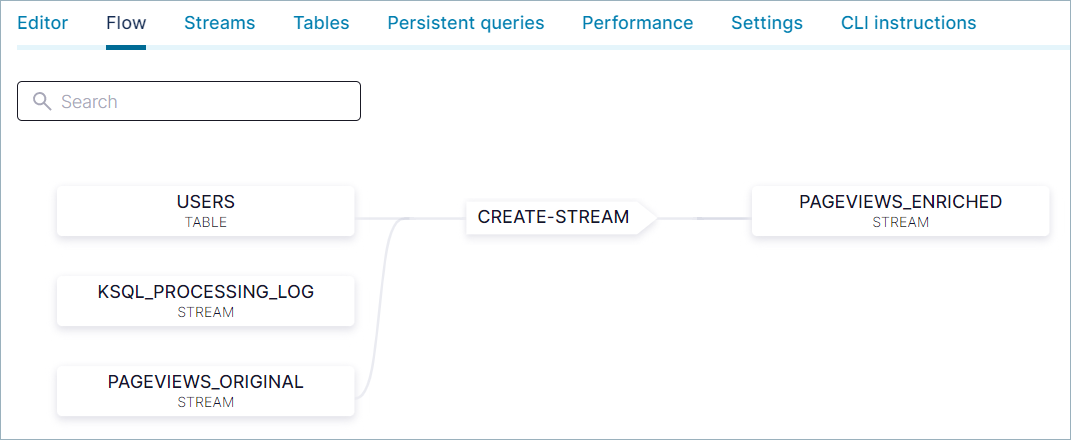
To visualize data flow in your ksqlDB application, click the Flow tab.
Use the Flow view to:
- View the topology of your ksqlDB application.
- Inspect the details of streams, tables, and the SQL statements that create them.
- View events as they flow through your application.
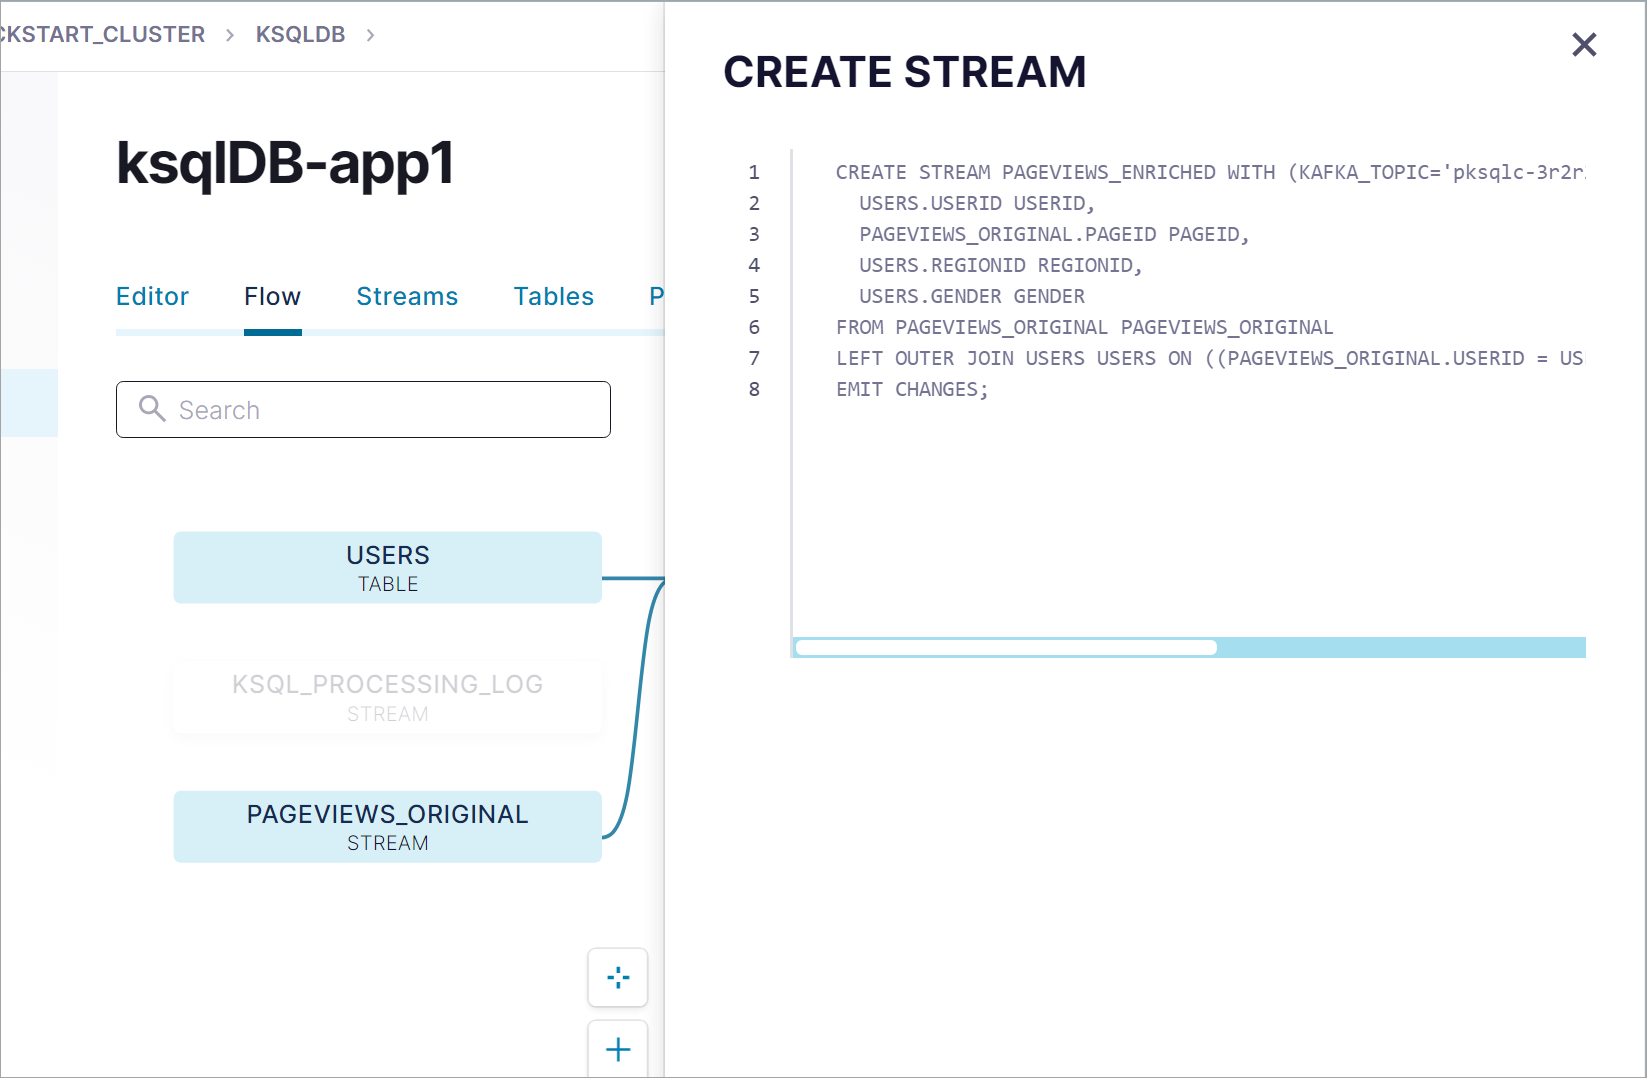
Click the CREATE-STREAM node to see the query that you used to create the PAGEVIEWS_ENRICHED stream.
Click the PAGEVIEWS_ENRICHED node to see stream's events and schema.

Step 9: Monitor persistent queries
You can monitor your persistent queries visually using the Cloud Console.
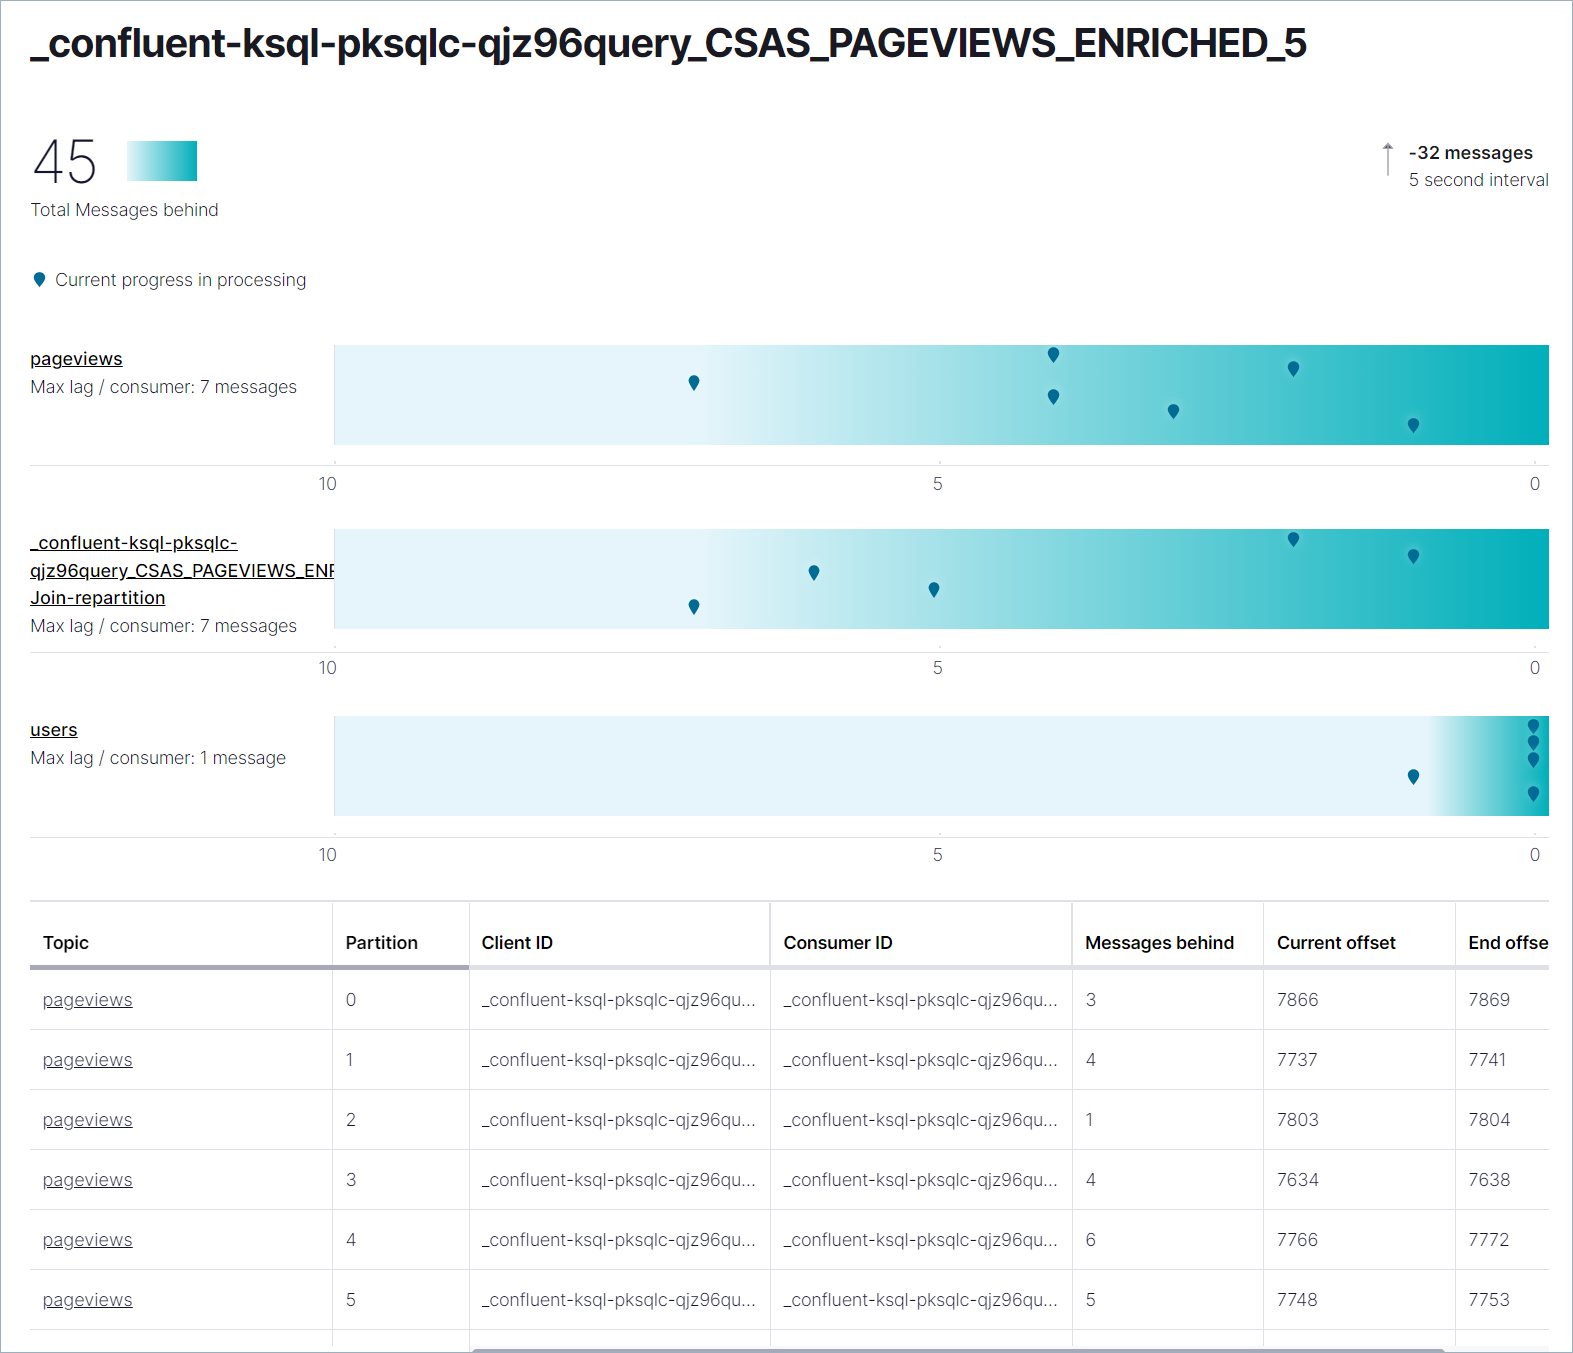
In the navigation menu, select Data integration > Clients and click the Consumer lag tab.
Find the group that corresponds with your pageviews_enriched stream, for
example _confluent-ksql-pksqlc-lgwpnquery_CSAS_PAGEVIEWS_ENRICHED_5. This
view shows how well your persistent query is keeping up with the incoming data.
Step 10: Delete the connectors and topics
When you are finished with the Quick Start, delete the resources you created to avoid unexpected charges to your account.
- Delete the connectors:
- ナビゲーションメニューから Data Integration、Connectors の順にクリックします。
- DatagenSourceConnector_users をクリックし、詳細ページで Delete をクリックします。
- コネクター名(
DatagenSourceConnector_users)を入力し、Confirm をクリックします。 - Repeat these steps with the DatagenSourceConnector_pageviews connector.
- Delete the topics:
- ナビゲーションメニューで Topics をクリックし、users トピックを選択して Configuration タブを選択します。
- Delete topic をクリックし、トピック名(
users)を入力して、Continue をクリックします。 - Repeat these steps with the
pageviewstopic.
次のステップ
- Learn more about Connectors: Connect External Systems to Confluent Cloud
- Learn about schema management in Confluent Cloud: Confluent Cloud のスキーマ管理のクイックスタート
- Learn how to Connect Clients to Confluent Cloud
- マルチノード環境を構成する
- Confluent Cloud のデモとサンプルを試す
- Learn how serverless infrastructure is built and use this in your own projects, see Cloud-Native Apache Kafka: Designing Cloud Systems for Speed and Scale