Egress Private Link Endpoints Setup Guide: First-Party Services on Azure for Confluent Cloud
This topic presents the steps for setting up Egress Private Link Endpoints for the Azure first-party services on Azure and Confluent Cloud to enable the use of fully managed connectors in Confluent Cloud using Azure Private Link.
Prerequisites
In Confluent Cloud, one of the following cluster types was set up with the specified network resource:
A Dedicated cluster with a Confluent Cloud network
For the steps to create a Confluent Cloud network, see Create a Confluent Cloud network. The Connection type of the network needs to be “Private Link Access”.
A Enterprise cluster with a network gateway
For the steps to create a gateway, see Create a gateway for outbound connectivity in Confluent Cloud.
Step 1. Retrieve the Resource ID
Step 2. Create an Egress Private Link Endpoint
Confluent Cloud Egress Private Link Endpoints are Azure Private Endpoints used to connect to Azure Private Link Services.
In the Network management page or tab of the desired Confluent Cloud environment, click the Confluent Cloud network you want to add the Private Link Endpoint to. The Connection Type of the network needs to be “Private Link Access”.
Click Create endpoint in the Egress connections tab.
Click the service you want to connect to. Select Other if you do not see the specific service.
Follow the guided steps to specify the field values, including:
Service: Specify the service that you want Confluent Cloud to connect to. For example, Azure Key Vault.
Name: The name of the Private Link Endpoint.
Resource ID: The resource ID of the Private Link service.
The Resource ID is the one noted down above, in the last step of the Step 1 section.
Note that the resource alias is not supported.
Sub-resource name: The sub-resource name for the specific Azure service.
The applicable sub-resource name can be retrieved in Azure Private-link resource.
For example:
Target System
Sub-resource Name
Blob
blob
Data Lake Storage Gen2
dfs
Cosmos DB (Dependent on type)
Sql, MongoDB, Cassandra, Gremlin, Table
Azure Key Vault
vault
Click Create to create the Private Link Endpoint.
If there are additional steps for the specific target service, follow the prompt to complete the tasks, and then click Finish.
In the Network management page or tab of the desired Confluent Cloud environment, click the For serverless products tab.
Click the gateway to which you want to add the Private Link Endpoint.
In the Access points tab, click Add access point.
Select the service you want to connect to.
Specific services are listed based on the cloud provider for the gateway.
Follow the guided steps to specify the field values, including:
Access point name: The name of the Private Link Endpoint.
Resource ID: The resource ID of the Private Link service.
The Resource ID is the one noted down above, in the last step of the Step 1 section.
Note that the resource alias is not supported.
Sub-resource name: The sub-resource name for the specific Azure service.
The applicable sub-resource name can be retrieved in Azure Private-link resource.
For example:
Target System
Sub-resource Name
Blob
blob
Data Lake Storage Gen2
dfs
Cosmos DB (Dependent on type)
Sql, MongoDB, Cassandra, Gremlin, Table
Click Create access point to create the Private Link Endpoint.
If there are additional steps for the specific target service, follow the prompt to complete the tasks, and then click Finish.
Step 3. Accept the connection request
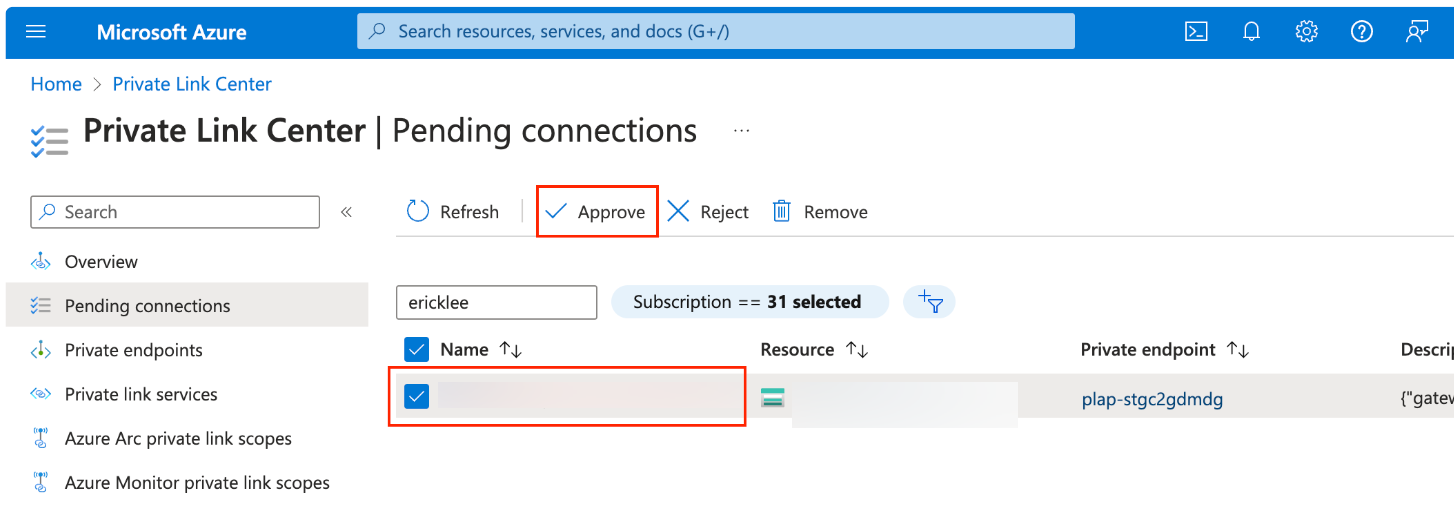
When the Private Link Endpoint status becomes “Pending Accept” in the Azure portal, go to Pending Connections and approve the associated connection request.
Confirm this is the correct connection by checking the Description column which will provide the associated Confluent Cloud gateway and environment ID.

Step 4. Create the DNS record
When the Private Link Endpoint status transitions to “Ready”, in the Egress DNS tab, click Create DNS record, or click Create Record on the associated Private Link Endpoint tile.
Specify the following:
Access point: The Egress Private Link Endpoint ID you created in create an Egress Private Link Endpoint.
Domain: The associated service endpoint. For example, for Azure SQL Server, it is in the pattern,
<sql-server-name>.database.windows.net. For Azure Key Vault, it is in the pattern<key-vault-name>.vault.azure.net. For multiple domains, for example with Cosmo DB, you can specify a comma-separated list of the domain values. Get the domain values from Azure.
Click Save.
In the Network Management tab of your environment, click the Confluent Cloud gateway you want to add the DNS record to.
In the DNS tab, click Create DNS record.
Specify the following field values.
Egress Private Link Endpoint: The Access Point ID you created in create an Egress Private Link Endpoint.
Domain: The associated service endpoint. For example, for Azure SQL Server, it is in the pattern,
<sql-server-name>.database.windows.net. For multiple domains, for example, with Cosmo DB, you can specify a comma-separated list of the domain values. Get the domain values from Azure.
Click Save.
Step 5. Create the connector
When the DNS Record status transitions to “Ready”, you can create the connector.
For the steps to create the connector, refer to the connector-specific documentation that is listed for your specific connector in Supported connectors.

