
(Preview) Pinecone Sink Connector for Confluent Cloud
The (Preview) Pinecone Sink connector takes content from Confluent Cloud, converts it to vector embeddings using Large Language Models (LLMs), and then stores these in a Pinecone vector database.
This is not a fully-managed connector.
Important
Preview features are not currently supported and are not recommended for production use. A preview feature is a Confluent Cloud component that is being introduced to gain early feedback. Preview connectors and features can be used for evaluation and non-production testing purposes or to provide feedback to Confluent. Comments, questions, and suggestions related to preview features are encouraged and can be submitted to ccloud-connect-preview@confluent.io.
Note that Preview connectors are billed in the same way as other managed connectors. For more information, see Managed connectors and custom connectors.
Features
The following are features available with this connector.
Supports streaming UPSERT operations from a list of topics into the specified Pinecone index and namespace.
Supports Avro, JSON Schema, Protobuf, or JSON (schemaless) input data formats. Schema Registry must be enabled to use a Schema Registry-based format (for example, Avro, JSON_SR (JSON Schema), or Protobuf).
You can configure the connector to skip the generated vector embeddings using Azure OpenAI.
Supports multiple tasks. More tasks may improve performance.
Supports at-least-once delivery semantics.
Limitations
The following are limitations for this connector.
Versions
The following table provides changes for each connector software version.
Version | Changelog | Notes |
|---|---|---|
1.1.0-preview | Added the support for user-agent tagging in the connector. The property | Preview use only |
1.0.0-preview | Added the | Preview use only |
0.3.0-preview | Initial version | Preview use only |
Pinecone UPSERT Operation
The connector performs an UPSERT operation by converting the data present in Kafka topics to Pinecone vector format. The connector expects following fields in the Kafka record value:
id: This field maps to theidfield which is used to uniquely identify the Pinecone vector.values: This field depicts the vector embedded data which will be upserted. It is primarily a list or array of float values. It can be generated using Azure OpenAI mode in the connector.metadata: This is an optional field and is primarily a map of key and value pairs that need to be sent along with the upsert request.
Note
If the id field is not present in the Kafka record value, a random unique ID string is generated by the connector for this record and this random ID string is used to upsert data to the Pinecone index.
The following two connector modes are set by the pinecone.azure.openai configuration:
If
pinecone.azure.openaiis set totrue, then thevaluesfield (vector embedded data) is generated using the record value as the input to the configured Azure OpenAI model. The record value is then used during Pinecone upsert operation. In this mode, the connector does not expect thevaluesfield to be part of record value.If
pinecone.azure.openaiis set tofalse, the connector expects thevaluesfield to be part of the Kafka record value and uses thevaluesfield during the upsert operation.
Note
The dimension of Pinecone Index must match the dimension of values field. If you are using the Azure OpenAI model to generate vector embeddings, the dimension of the index must match the output dimensions of the embedding model.
Azure OpenAI Models
Azure OpenAI supports following embedding models:
text-embedding-ada-002 (version 2) - 1536 output dimensions
text-embedding-ada-002 (version 1) - 1536 output dimensions
For more information, see Embeddings models.
Quick Start
Use this quick start to get up and running with the Pinecone Sink (Preview) connector.
Step 1: Download the Pinecone plugin from Confluent Marketplace
Complete the following steps to download the Pinecone Sink plugin from Confluent Marketplace.
Go to the Pinecone Sink page in Confluent Marketplace.
Click Download to download the Pinecone plugin JAR file.
Step 2: Upload the Pinecone plugin to Confluent Cloud
Complete the following steps to upload the Pinecone Sink plugin JAR file to Confluent Cloud. After the plugin is uploaded, your Confluent Cloud organization users can select the Pinecone Sink connector, add the configuration properties, and then launch it to stream events to Pinecone.
- Prerequisites
Authorized access to a Confluent Cloud cluster in a supported region.
Only admin RBAC roles have permission to upload files to Confluent Cloud. For more information, see RBAC role mappings.
The file size cannot exceed 200 MB.
Go to Connectors in your Confluent Cloud cluster. If you have one or more existing connectors, click Add Connector.
Click Add plugin.
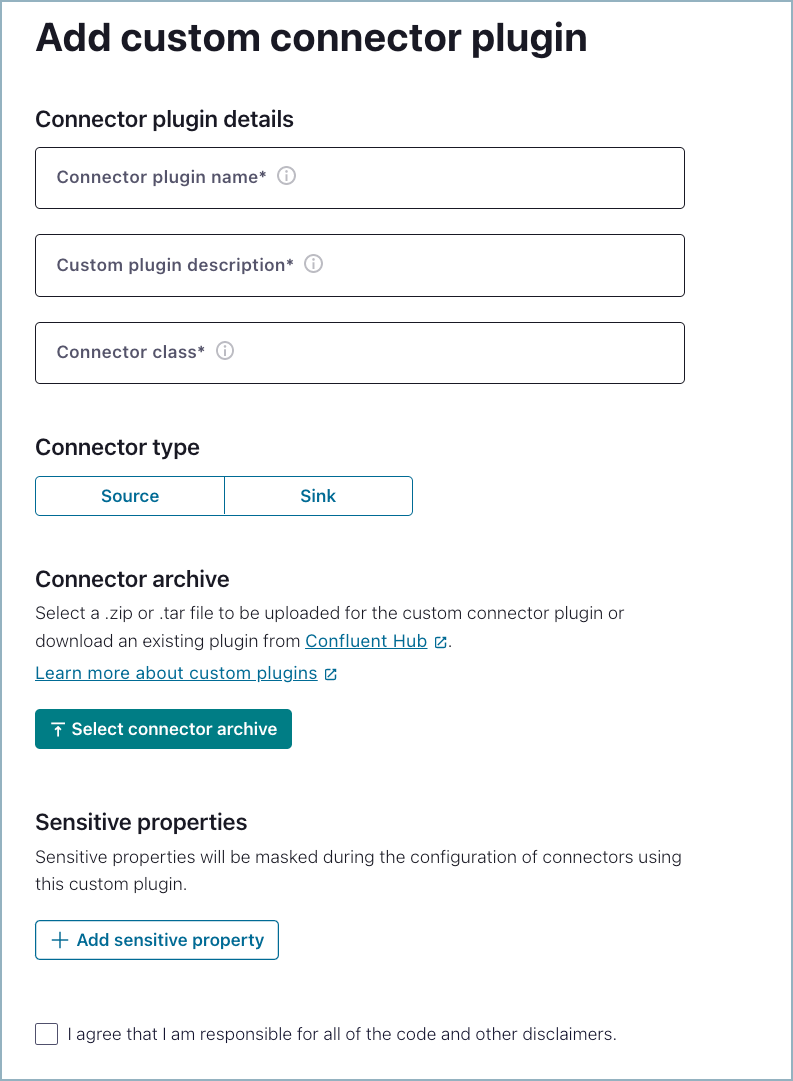
Add connector plugin
Add the custom connector plugin details.
Connector plugin name: Enter a meaningful name for the connector.
Custom plugin description: Provide a connector description.
Connector class: Enter the Java class or alias for the connector. The connector class is
io.confluent.connect.pinecone.PineconeSinkConnectorfor the Pinecone Sink connector.
Select the Sink connector type.
Click Select connector archive and upload the Pinecone JAR file.
Add sensitive properties that will be used with the connector. Add the following sensitive properties for the Pinecone Sink connector:
pinecone.api.keypinecone.openai.api.key
A sensitive property is a connector configuration property that must be hidden after a user enters the property value when setting up the connector (for example: passwords, keys, and tokens). Marking a property as sensitive ensures that these fields are handled appropriately within the Confluent infrastructure. This includes masking fields, for example exception logging, and encrypting field values in the underlying data store.
You must identify all sensitive properties. Failure to identify sensitive properties can result in the sensitive property value being stored in plain text rather than in encrypted format. Only add connector-specific sensitive properties. Kafka keys, passwords, and service account information should not be entered.
Select the box that indicates that you are responsible for the connector, and then click Submit.
Once you submit the archive, the JAR file is uploaded and Confluent Cloud makes the connector available to users. The connector selection screen is displayed once the upload is complete.
When the main Connectors screen is displayed, click Filter by: Deployment and select Custom. The uploaded custom connector is displayed. A user can now configure and launch the Pinecone Sink connector.
Step 3: Configure and launch the connector
Complete the following steps to configure and launch the connector.
- Prerequisites
Authorized access to a Confluent Cloud cluster in a supported AWS region.
The Confluent CLI installed and configured for the cluster. For installation help, see Install the Confluent CLI.
At least one source Kafka topic must exist in your Confluent Cloud cluster before creating the sink connector.
The fully-qualified domain name (FQDN) endpoint to connect to the Pinecone Index. For example,
index-dd12345.svc.abc-starter.pinecone.io.A FQDN for the Azure OpenAPI endpoint. For example,
<azure-resource-name>.openai.azure.com/.Schema Registry must be enabled to use a Schema Registry-based format (for example, Avro, JSON_SR (JSON Schema), or Protobuf).
Kafka cluster credentials. The following lists the different ways you can provide credentials.
Enter an existing service account resource ID.
Create a Confluent Cloud service account for the connector. Make sure to review the ACL entries required in the service account documentation. Some connectors have specific ACL requirements.
Create a Confluent Cloud API key and secret. To create a key and secret, you can use confluent api-key create or you can autogenerate the API key and secret directly in the Cloud Console when setting up the connector.
Select the Pinecone Sink connector and Get started.
Select the way you want to provide Kafka Cluster credentials. You can choose one of the following options:
Global Access: Allows your connector to access everything you have access to. With global access, connector access will be linked to your account. This option is not recommended for production.
Granular access (not available for custom connectors): Limits the access for your connector. You will be able to manage connector access through a service account. This option is recommended for production.
Use an existing API key: Allows you to enter an API key and secret you have stored. You can enter an API key and secret (or generate these in the Cloud Console).
Click Continue.
Configure the connector. You have two options for entering configuration properties. You can enter each configuration key and value pair, or you can add the JSON configuration.
The following shows an example JSON with the properties required to launch the connector using the Azure OpenAI to generate vector embeddings. For all required and optional properties, see Configuration Properties. To use Schema Registry input data formats, see Schema Registry integration for additional required configuration properties.
Note the following configuration properties:
value.converter: This property is used to convert the data format. For more information, see Connect Converters.value.converter.schemas.enable: This property is used to pass a schema with schema-based data formats, like Avro.consumer.override.<config>: This property is used to override a default Connect worker configuration setting. For more information, see Override configuration properties.
{
  "pinecone.api.key": "*****************************************",
  "pinecone.endpoint": "https://index-dd12345.svc.abc-starter.pinecone.io",
  "pinecone.namespace": "default",
  "pinecone.azure.openai": "true",
  "pinecone.openai.api.key": "*****************************************",
  "pinecone.openai.deployment": "<deployment-id>",
  "pinecone.openai.endpoint": "https://<azure-resource-name>.openai.azure.com/",
  "topics": "topic_0",
  "value.converter": "org.apache.kafka.connect.json.JsonConverter",
  "value.converter.schemas.enable": "false",
  "consumer.override.max.poll.records": "50"
}
If you are using a schema-based data format, you can automatically add the required Schema Registry properties using Auto Configure Schema Registry. Note that you must enable Schema Registry for the Confluent Cloud environment to use a Schema Registry-based format and to have a pre-populated Schema Registry endpoint.

Auto configure Schema Registry
Click Auto Configure Schema Registry.
Select the Key converter type, if the key is using a schema-based format.
Select the Value converter type.
Click Apply changes.
After you apply the changes, all Schema Registry-related configuration properties are added to the connector configuration. For more information about adding the required Schema Registry properties to a custom connector configuration, see Schema Registry integration.
Add the Networking egress endpoints for the connector to use when accessing the Pinecone Index and Azure OpenAI. You must use a fully-qualified domain name (FQDN) when adding the networking egress endpoints. For example, the Pinecone Index endpoint looks like this:
index-dd12345.svc.abc-starter.pinecone.ioAn Azure OpenAPI endpoint looks like this:
<azure-resource-name>.openai.azure.com/You must add both the Pinecone Index endpoint and the OpenAPI endpoint so the connector can access both Pinecone and Azure OpenAPI.
Select the number of Tasks and click Continue.
Confluent Cloud shows that the connector is provisioning. Click on the connector card to get the provisioning details. Once the connector completes provisioning, the status changes to running.
Note
If the connector remains in a provisioning state for a long time, check the connector configuration and make sure all required properties are included and that there are no typos or other mistakes in how the properties were originally set up. For more information, see Modify a custom connector configuration.
Configuration Properties
Use the following configuration properties with the connector.
Which topics do you want to get data from?
topicsIdentifies the topic name or a comma-separated list of topic names.
Type: list
Importance: high
How should we connect to Pinecone?
pinecone.endpointThe URL endpoint that provides the Pinecone environment, project ID, and index name. This must be entered as a fully-qualified domain name (FQDN). For example:
https://index-dd12345.svc.abc-starter.pinecone.io.Type: string
Importance: high
pinecone.api.keyA Pinecone API key is required by client to upsert data to the Pinecone index.
Type: password
Importance: high
Pinecone Details
pinecone.namespaceNamespace to use when the connector upserts the data to Pinecone.
Type: string
Default: “”
Importance: low
OpenAI Details
pinecone.azure.openaiWhether to use Azure OpenAI to generate vector-embeddings or not.
Type: boolean
Default: false
Importance: low
pinecone.openai.endpointOpenAI endpoint URL to use.
Type: string
Default: “”
Importance: low
pinecone.openai.api.keyOpenAI API key required to generate OpenAI vector embeddings.
Type: password
Importance: high
pinecone.openai.deploymentOpenAI Deployment ID or Model ID.
Type: string
Importance: low
How should we handle errors?
behavior.on.errorError handling behavior setting when an error occurs while extracting metric from Kafka record value. Valid options are
LOGandFAIL.LOGlogs the error message and continues processing andFAILstops the connector in case of an error.Type: string
Default: log
Importance: low
Consumer configuration
The consumer.override.* property is used to override a default setting. For more information, see Override configuration properties.
consumer.override.max.poll.interval.msThe maximum delay between subsequent consume requests to Kafka. This configuration property may be used to improve the performance of the connector, if the connector cannot send records to the sink system.
Type: long
Default: 300000 (5 minutes)
Importance: low
consumer.override.max.poll.recordsThe maximum number of records to consume from Kafka in a single request. This configuration property may be used to improve the performance of the connector, if the connector cannot send records to the sink system.
Type: long
Default: 500
Importance: low
Number of tasks for this connector
tasks.maxMaximum number of tasks for the connector.
Type: int
Valid Values: [1,…]
Importance: high
Next steps
To use the Custom Connect API to configure a connector, see Confluent Cloud API for Connect Usage Examples.