
Manage Private Networking for Cluster Linking on Confluent Cloud
The following sections describe supported cluster combinations, commands, configurations, use cases, and walkthroughs for private networking on Confluent Cloud.
Supported cluster combinations
Cluster Linking is fundamentally a networking feature: it copies data over the network. As such, Cluster Linking requires that at least one of the clusters involved has connectivity to the other cluster. The networking parameters of each cluster determines whether the two clusters can be linked, and whether the destination cluster or the source cluster must initiate the connection. By default, the destination cluster initiates the connection. A special mode called “source-initiated links” allows the source cluster to initiate the connection of the cluster link.
Submit source and destination cluster types in the compatibility checkers below to quickly determine if a given combination is supported, or consult the detailed tables that follow for more guidance.
Confluent Cloud source and destination clusters
Use the combos checker wizard or the table below to determine supported Cluster Linking combinations across Confluent Cloud clusters.
Confluent Cloud combinations (wizard)
Cloud providers Amazon Web Services (AWS), Microsoft Azure, and Google Cloud are all supported. See also, supported regions for each Cloud provider.
Confluent Cloud combinations (table)
Source cluster | Destination cluster | Possible? | Notes |
|---|---|---|---|
Basic, Standard, or Dedicated with secure public endpoints [1] | Any Enterprise cluster with private networking, or Dedicated cluster | Yes |
|
Public Dedicated cluster on any supported cloud provider | Public Dedicated cluster on any supported cloud provider | Yes |
|
Public Dedicated cluster on any supported cloud provider | Private Dedicated cluster on any supported cloud provider | Yes |
|
Privately networked Enterprise cluster on any supported cloud provider [1] | Public Dedicated cluster on any supported cloud provider | Yes |
|
Public Dedicated cluster on any supported cloud provider [1] | Privately networked Enterprise cluster on any supported cloud provider | Yes |
|
Enterprise cluster with AWS, Azure, or Google Cloud private networking [2] [3] [4] [6] | Enterprise cluster with AWS, Azure, or Google Cloud private networking | Yes |
|
Enterprise cluster with AWS, Azure, or Google Cloud private networking [2] [3] [4] [6] | Dedicated cluster with AWS, Azure, or Google Cloud private networking | Yes |
|
Dedicated cluster with AWS, Azure, or Google Cloud private networking [2] [3] [4] [6] | Enterprise cluster with AWS, Azure, or Google Cloud private networking | Yes |
|
Dedicated cluster with AWS, Azure, or Google Cloud private networking [2] [3] [4] [6] | Dedicated cluster with AWS, Azure, or Google Cloud private networking | Yes |
|
Dedicated cluster with private networking | Dedicated cluster with public networking | Yes |
|
Any Kafka cluster on AWS, Azure, or Google Cloud with public or private networking or Freight [7] on AWS with private networking. | Freight cluster on AWS with private networking | Yes |
|
Basic or Standard cluster | No |
| |
(Legacy) Dedicated cluster with AWS Transit Gateway networking [5] | (Legacy) Dedicated cluster with AWS Transit Gateway networking | Yes |
|
Note
When using the Confluent Cloud Console to create cluster links, you will see only linkable clusters in the drop-down options. Clusters that cannot be linked are filtered out.
To learn more about all available Confluent Cloud cluster types, see Kafka Cluster Types in Confluent Cloud. The above table shows supported cluster types for this particular Cluster Linking scenario (private networking). For a more general overview of supported cluster types for Cluster Linking, see Supported cluster types.
Cluster Linking across Basic or Standard clusters as a destination is not supported.
Confluent Platform and Confluent Cloud
Use the combos checker wizard or the table below to determine supported Cluster Linking combinations across Confluent Platform and Confluent Cloud.
Confluent Platform and Confluent Cloud combinations (wizard)
Choose one each of Confluent Platform and Confluent Cloud cluster types for source and destination on either side of the link. Confluent Cloud supported cluster types are Dedicated, Enterprise, and Freight. Cloud providers Amazon Web Services (AWS), Microsoft Azure, and Google Cloud are all supported, execept where otherwise noted. See also, supported regions for each Cloud provider.
Confluent Platform and Confluent Cloud combinations (table)
Source cluster | Destination cluster | Possible? | Notes |
|---|---|---|---|
Confluent Platform 7.1.0 or later | Confluent Cloud - Any Enterprise cluster with private networking, Freight cluster on AWS with private networking, or Dedicated cluster | Yes |
|
Confluent Platform 5.4+ with public endpoints on all brokers | Confluent Cloud - Any Enterprise cluster with private networking, Freight cluster on AWS with private networking or Dedicated cluster | Yes |
|
Confluent Platform 5.4+ without public endpoints | Confluent Cloud - A privately networked Enterprise or Freight cluster (AWS only if Freight), or Dedicated cluster with VPC Peering, VNet Peering, or Transit Gateway | Yes |
|
Confluent Cloud - A Basic or Standard cluster, or a Dedicated cluster with secure public endpoints | Confluent Platform 7.0.0 or later | Yes | |
Confluent Cloud - A cluster with private networking | Confluent Platform 7.0.0 or later | Yes |
|
For details on Confluent Platform only supported combinations, see Supported platform and tools compatibilities
Confluent Cloud and Kafka
The following combinations are supported for private networking with Confluent Cloud and Apache Kafka®.
Source cluster | Destination cluster | Possible? | Notes |
|---|---|---|---|
Kafka 2.4 or later with public endpoints on all brokers | Confluent Cloud - Any Dedicated or Enterprise cluster | Yes |
|
Kafka 2.4 or later without public endpoints | Confluent Cloud - Any Dedicated cluster with VPC Peering, VNet Peering, or Transit Gateway | Yes |
|
Kafka 2.4 or later in an AWS VPC (including MSK clusters) | Confluent Cloud - Any Enterprise cluster | Yes |
|
Limitations and Summary
The matrices of supported and non-supported cluster combinations above are a bit complex. To simplify at a high level, keep in mind these more generalized, shorthand tips.
The following cluster combinations are supported for cross-cloud scenarios; that is, clusters can be in different cloud providers:
Any public cluster can connect to private networking.
“Public to Public” using destination-initiated, source-initiated, or bidirectional links is supported across organizations and cloud providers.
“Public to Private” using destination-initiated, source-initiated, or bidirectional links is supported across organizations and cloud providers.
“Private to Public” using source-initiated or bidirectional links is supported across organizations and cloud providers. (This is not supported with destination-initiated links.)
“Private to Private” clusters across cloud providers Azure, AWS, and Google Cloud are supported. It is not supported across organizations.
Conversely, the following combinations are not supported for cross-cloud scenarios:
“Private to Public” with destination-initiated links is not supported across organizations or cloud providers. This is only supported with source-initiated links.
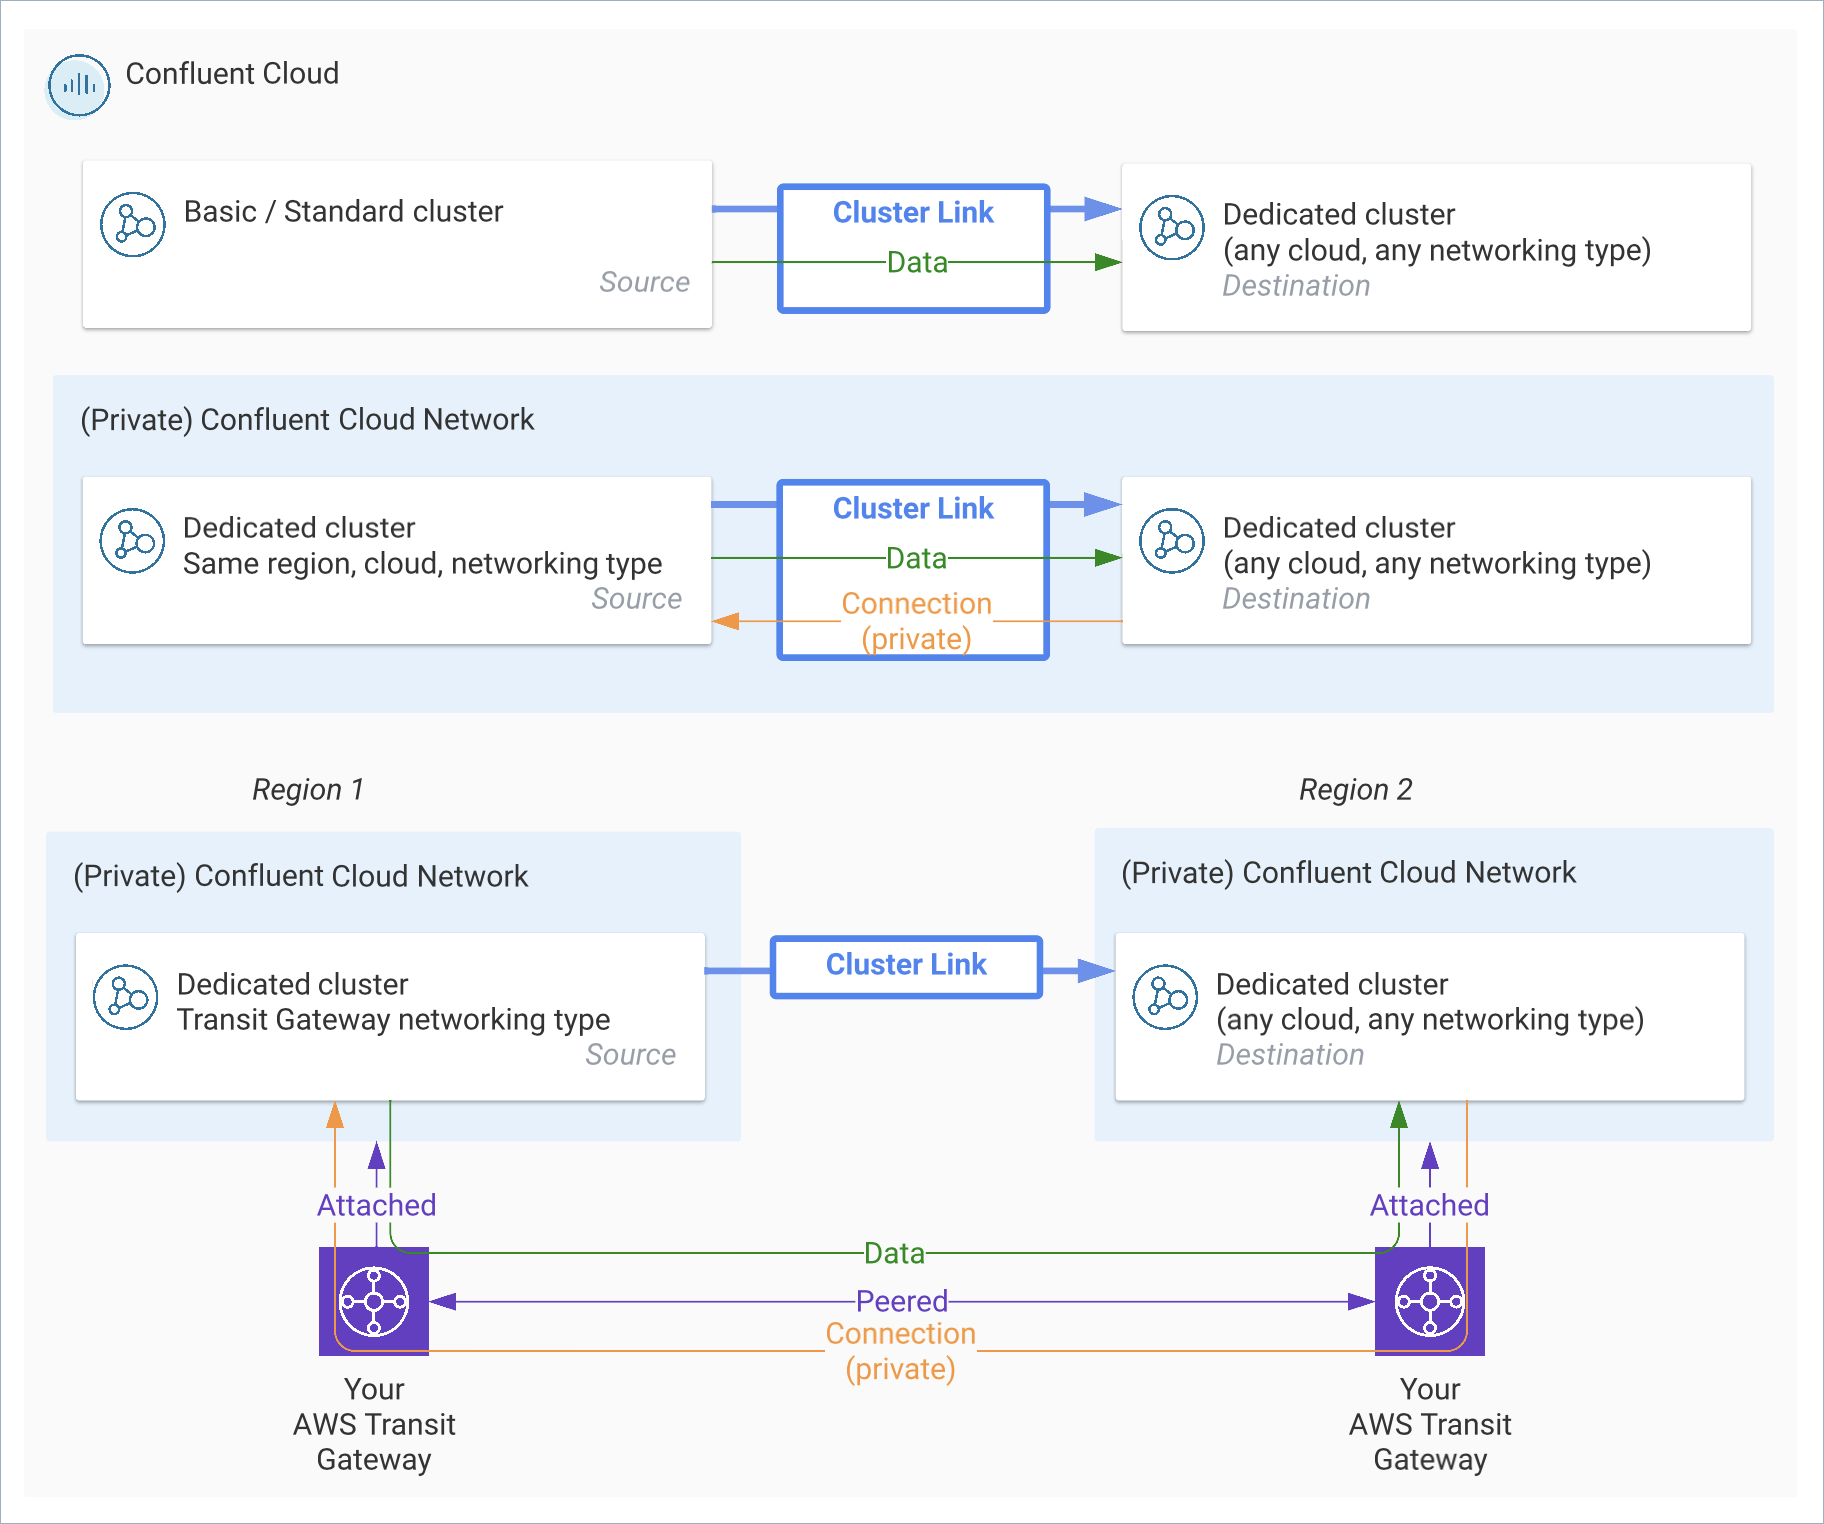
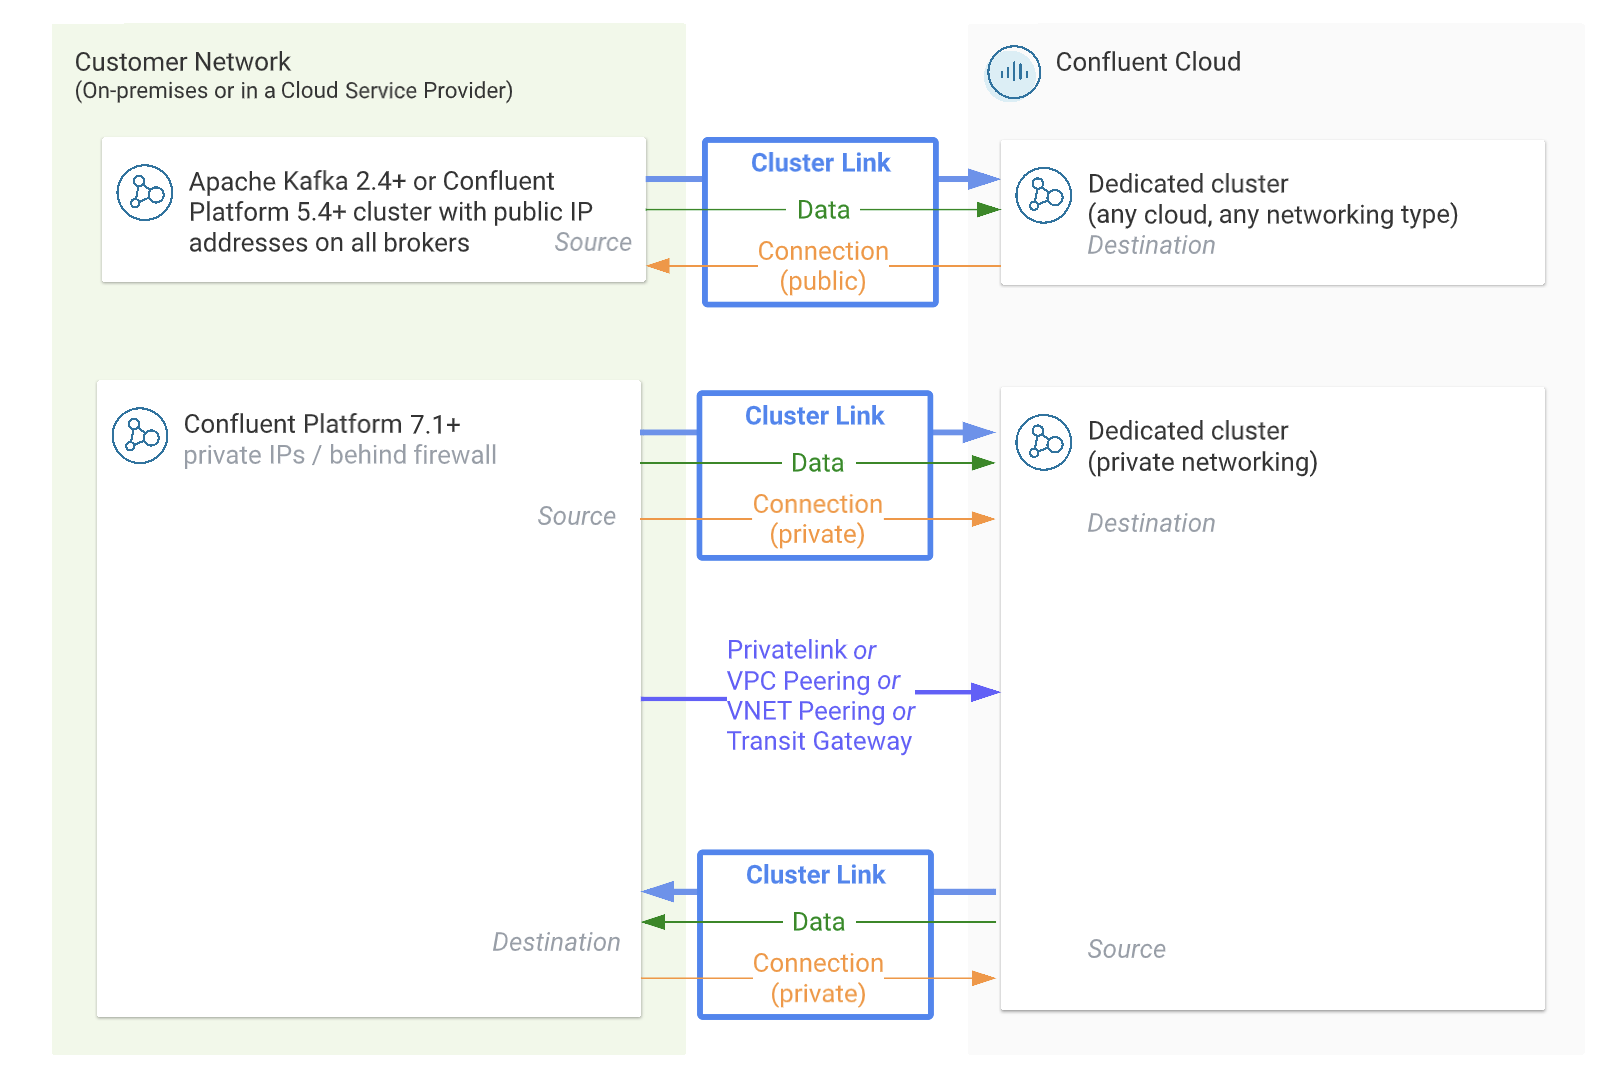
Diagrams of supported combinations for private networking
Confluent Cloud to Confluent Cloud
Confluent Cloud to Confluent Platform/Kafka
Supported regions
Supported AWS Regions
The following AWS regions are supported in the current release.
The Americas and Canada
Code | Region |
|---|---|
ca-central-1 | Canada (Central) |
ca-west-1 | Canada (West) |
us-west-2 | US West (Oregon) |
us-east-1 | US East (N. Virginia) |
us-east-2 | US East (Ohio) |
sa-east-1 | South America (São Paulo) |
Europe
Code | Region |
|---|---|
eu-north-1 | Europe (Stockholm) |
eu-south-1 | Europe (Milan) |
eu-south-2 | Europe (Spain) |
eu-central-1 | Europe (Frankfurt) |
eu-central-2 | Europe (Zurich) |
eu-west-1 | Europe (Ireland) |
eu-west-2 | Europe (London) |
eu-west-3 | Europe (Paris) |
Middle East
Code | Region |
|---|---|
me-central-1 | Middle East (UAE) |
me-south-1 | Middle East (Bahrain) |
il-central-1 | Israel (Tel Aviv) |
Africa
Code | Region |
|---|---|
af-south-1 | Africa (Cape Town) |
Asia Pacific
Code | Region |
|---|---|
ap-south-1 | Asia Pacific (Mumbai) |
ap-south-2 | Asia Pacific (Hyderabad) |
ap-east-1 | Asia Pacific (Hong Kong) |
ap-northeast-1 | Asia Pacific (Tokyo) |
ap-northeast-2 | Asia Pacific (Seoul) |
ap-northeast-3 | Asia Pacific (Osaka) |
ap-southeast-1 | Asia Pacific (Singapore) |
ap-southeast-2 | Asia Pacific (Sydney) |
ap-southeast-3 | Asia Pacific (Jakarta) |
ap-southeast-4 | Asia Pacific (Melbourne) |
ap-southeast-7 | Asia Pacific (Bangkok) |
Supported Azure Regions
The following Azure regions are supported in the current release.
The Americas and Canada
Code | Region |
|---|---|
canadacentral | Canada (Central) |
eastus | United States (Virginia) |
eastus2 | United States (Virginia) |
centralus | United States (Iowa) |
southcentralus | United States (Texas) |
westus2 | United States (Washington) |
westus3 | United States (Phoenix) |
mexicocentral | Mexico (Central) |
brazilsouth | Brazil (São Paulo State) |
Middle East, Asia Pacific, and Africa
Code | Region |
|---|---|
uaenorth | United Arab Emirates (Dubai) |
japaneast | Japan (Tokyo) |
southeastasia | Asia Pacific (Singapore) |
eastasia | Asia Pacific (Hong Kong) |
southafricanorth | South Africa (Johannesburg) |
centralindia | India (Pune) |
australiaeast | Australia (New South Wales) |
Supported Google Cloud Regions
The following Google Cloud regions are currently supported.
The Americas and Canada
Code | Region |
|---|---|
us-central1 | Iowa (United States) |
us-east1 | South Carolina (United States) |
us-east4 | Northern Virginia (United States) |
us-west1 | Oregon (United States) |
us-west2 | Los Angeles (United States) |
us-west3 | Salt Lake City, Utah (United States) |
us-west4 | Las Vegas, Nevada (United States) |
us-south1 | Dallas (Texas) (United States) |
northamerica-northeast1 | Montreal (Canada) |
northamerica-northeast2 | Toronto (Canada) |
southamerica-east1 | São Paulo (Brazil) |
southamerica-west1 | Santiago (Chile) |
Europe and Scandinavia
Code | Region |
|---|---|
europe-west1 | Belgium (Europe) |
europe-west2 | London (Europe) |
europe-west3 | Frankfurt (Germany) |
europe-west4 | Netherlands (Europe) |
europe-west6 | Zurich (Switzerland) |
europe-west8 | Milan (Italy) |
europe-west9 | Paris (France) |
europe-west12 | Turin (Italy) |
europe-north1 | Finland (Finland) |
europe-central2 | Warsaw (Poland) |
europe-southwest1 | Madrid (Spain) |
Middle East and Asia Pacific
Code | Region |
|---|---|
me-central1 | Doha (Qatar) |
me-central2 | Dammam (Saudi Arabia) |
me-west1 | Tel Aviv (Israel) |
asia-east1 | Hong Kong (Asia Pacific) |
asia-east2 | Hong Kong (Asia Pacific) |
asia-northeast1 | Tokyo (Japan) |
asia-northeast2 | Osaka (Japan) |
asia-northeast3 | Seoul (Korea) |
asia-south1 | Mumbai (India) |
asia-south2 | Delhi (India) |
asia-southeast1 | Singapore (Asia Pacific) |
asia-southeast2 | Jakarta (Indonesia) |
australia-southeast1 | Sydney (Australia) |
australia-southeast2 | Melbourne (Australia) |
How to use cluster links with private networking
Using the Confluent Cloud Console for Cluster Linking with private networking
To view, create, and modify cluster links and mirror topics in the Confluent Cloud Console, the cluster link’s destination cluster must be accessible from your browser. If your destination cluster is a Confluent Cloud cluster with private networking, you must have completed the setup described in Use the Confluent Cloud Console with Private Networking.
If your browser cannot access the destination cluster, you will not see any cluster links on that cluster, nor an indication of which topics are mirror topics. You will not be able to create a cluster link with that cluster as its destination cluster.
If your source cluster is also a Confluent Cloud cluster with private networking, then some features of the Confluent Cloud Console require your browser to be able to reach your source cluster, also:
Creating a “Confluent Cloud to Confluent Cloud” cluster link as an OrganizationAdmin, which creates ACLs and an API key on the source cluster.
Viewing the source cluster topics’ throughput metric on a cluster link
Using the drop-down menu of source cluster topic names to create a mirror topic. Topic names must be entered manually.
When creating a cluster link in the Confluent Cloud Console, rest assured that the drop-down menus automatically filter for source clusters and destination clusters that can be linked. If you see a drop-down option for the cluster, then a cluster link is possible and generally available. Preview cases are excluded from the drop-downs, and require using the Confluent CLI or the Confluent Cloud REST API to create a cluster link.
Running Cluster Linking API and CLI commands with private networking
Cluster Linking commands require that the location where you are running them has access to the destination cluster of the cluster link:
Creating, updating, listing, describing, and deleting cluster links
Creating, listing, and describing mirror topics
For example, when running the Confluent CLI command, the shell must have access to the destination cluster. If your destination cluster has private networking, one way to achieve this is to SSH into a virtual machine that has network connectivity (by means of Private Link, Transit Gateway, or Peering) to the destination cluster.
Managing cluster links with private networking
Aside from the above mentioned requirements, the user experience when using a cluster link with private networking is the same as when using a cluster link with public networking. The same commands work in the same ways. That means you can follow the same Cluster Linking tutorials using the same steps, regardless of whether your clusters use public or private networking.
Exception: When Cluster Linking from a cluster with private networking to a cluster with public networking, a source-initiated link is required. This introduces different configurations and an extra step.
Cluster Linking between Confluent Cloud clusters using Azure, AWS, or Google Cloud private networking
Cluster Linking over private networking is supported within a single cloud (AWS to AWS, Azure to Azure, or Google Cloud to Google Cloud) or across cloud providers (AWS to Azure or vice versa, Google Cloud to AWS or vice versa, Google Cloud to Azure or vice versa) and works across all private networking options supported by your source and destination clusters.
Requirements
To implement Azure, AWS, or Google Cloud private networking on Confluent Cloud, you must have an active Confluent Cloud organization containing:
One or more users with these RBAC roles:
OrganizationAdmin, or
EnvironmentAdmin, or
CloudClusterAdmin
Two clusters with Azure, AWS, or Google Cloud private networking; these can be Dedicated or Enterprise Confluent Cloud clusters on either cloud provider. For more information, see Azure Networking Overview on Confluent Cloud, AWS Networking Overview on Confluent Cloud, or Google Cloud Networking Overview on Confluent Cloud.
Connectivity to your privately networked clusters via Confluent Cloud Console, REST API, the Confluent CLI, and/or Terraform
Limitations
Dedicated and Enterprise clusters with Azure private networking is supported, but currently only in a subset of regions, as described in Supported Azure Regions. - Supported private networking options for Azure are described in Azure Networking Overview on Confluent Cloud.
Dedicated and Enterprise clusters with AWS private networking is supported, but currently only in a subset of regions, as described in Supported AWS Regions. - Supported private networking options for AWS are described in AWS Networking Overview on Confluent Cloud.
Dedicated and Enterprise clusters with Google Cloud private networking is supported, but currently only in a subset of regions, as described in Supported Google Cloud Regions. - Supported private networking options for Google Cloud are described in Google Cloud Networking Overview on Confluent Cloud.
Cluster links must be between clusters in the same Confluent Cloud Organization. Cross-organization cluster linking between private networking clusters is not supported.
If using either the Confluent CLI (
confluent kafka cluster link create) or the Apache Kafka CLI (kafka-cluster-links --create) to create a cluster link in Confluent Cloud between two clusters with private networking, you must provide the source cluster ID with the--cluster-idflag for the link to be created successfully.
Tutorial: Create a Cluster Link
Decide on the source cluster and destination cluster for the cluster link. You will need the following information about these clusters:
Environment ID containing the source cluster
Environment ID containing the destination cluster
Cloud API key(s) for user(s) with RBAC role authorization over the source cluster, either:
OrganizationAdmin, or
EnvironmentAdmin, or
CloudClusterAdmin
Cloud API key(s) for user(s) with RBAC role authorization over the destination cluster, either:
OrganizationAdmin, or
EnvironmentAdmin, or
CloudClusterAdmin
Tip
The same Cloud API key may be used as for the source cluster if the user has authorization over both clusters. This tutorial uses one API key referenced with these bash environment variables:
CLOUD_API_KEY=<your-cloud-api-key>CLOUD_API_SECRET=<your-cloud-api-secret>
Create the Cluster Link
Create a cluster link using your preferred method. The Confluent Cloud Console, the Confluent CLI, REST API, or Terraform are all valid methods to create a cluster link. Following is an example of how to create one using the Confluent CLI.
Create or retrieve an API key for the source cluster. The API key should correspond to a Service Account that has appropriate read permissions on the source cluster. Copy-paste command examples are available in the Cluster Linking security tutorial.
From a network that has network access to the Destination cluster, use the command to create a cluster link:
confluent kafka link create <name-of-your-choosing> \
    --cluster <dst-cluster-id> \
    --source-cluster <source-cluster-id> \
    --source-bootstrap-server <source-cluster-bootstrap> \
    --source-api-key <api-key-for-source-cluster> \
    --source-api-secret <api-secret-for-source-cluster>
(As an alternative to explicitly providing the destination cluster ID in the above command, you could first run
confluent kafka cluster use <destination-cluster-ID>to establish the destination cluster ID as the context for subsequent commands. Another example of creating a cluster link is provided in the basic topic data sharing tutorial. Although those steps are not specific to private networking, the syntax for creating the cluster link is the same.)
At this point, you have successfully created a link from a Azure Private Link Confluent Cloud cluster.
To learn more, these resources describe how to create a cluster link step-by-step for various use cases:
Cluster Linking Quick Start on Confluent Cloud is a fast-paced tutorial
The Cluster Linking Data Sharing tutorial is an in-depth tutorial
The Disaster Recovery Whitepaper covers how to architect an active-passive DR setup in Confluent Cloud
The Cluster Linking Disaster Recovery page gives a basic overview of Cluster Linking for Disaster Recovery
To learn more about Confluent Cloud and mirror topics, see the Cluster Linking docs and examples.
Delete the cluster links
If you want to remove cluster links and stop accruing charges, you can delete them in any order with the following command:
confluent kafka link delete <link-name> --cluster <cluster-id>
Alternatively, you can use the Confluent Cloud Console, the REST API, or Terraform.
Stopping the data flow
Deleting any one resource–cluster link will stop data from being mirrored from source to destination cluster.
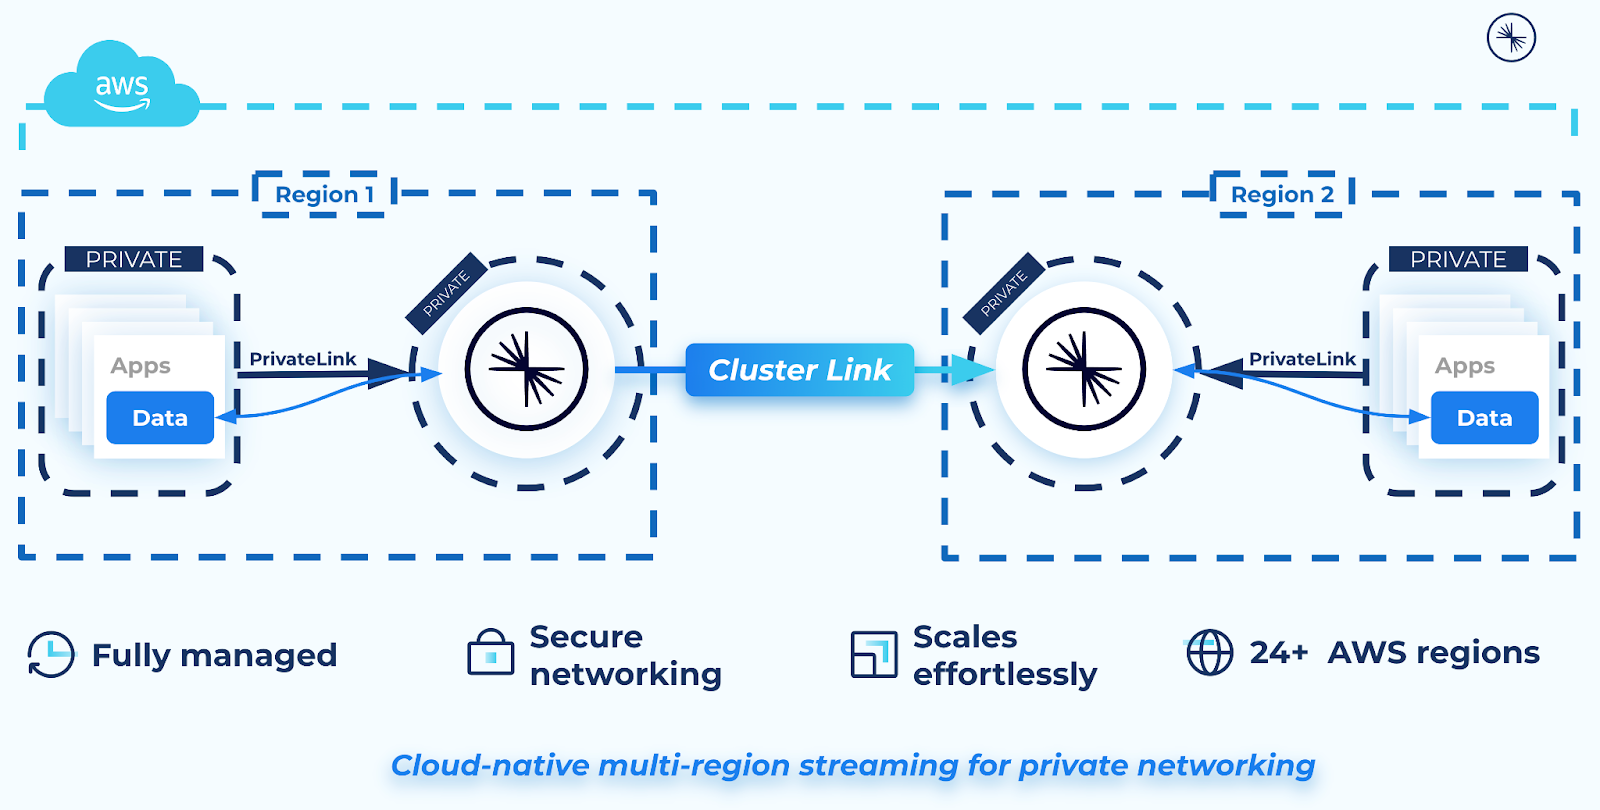
Link external clusters to Confluent Cloud over a private network
You can use Cluster Linking to link external clusters to Confluent Cloud clusters over a private network. This can serve various use cases, including high availability data replication, disaster recovery, or data migration. Cluster Linking over private networking preserves offsets from your external sources to destination Confluent Cloud clusters, and provides an efficient, secure, and seamless experience. Organizations can replicate data from self-hosted or managed Kafka clusters, starting with Amazon MSK and other Kafka compatible services in AWS, without exposing brokers to the public internet or performing manual offset translation.
Confluent supports some of the most sensitive workloads across financial services, healthcare, and insurance. Cluster Linking enables business-critical workloads with high security demands to make their way into the cloud securely and quickly, without compromising security controls, data integrity, or timelines.
What problem does this solve?
Kafka migrations are notoriously difficult, especially when clusters live behind firewalls in secure, private networks. Not only are there risks of data loss, but orchestrating migration requires copying configurations, managing offsets, and coordinating application switchover, or potentially exposing data to the public internet in contradiction to security best practices.
Alternatives such as MirrorMaker2 require you to manage the VMs, offsets, networking, and all the associated infrastructure.
How does it work?
External Cluster Linking leverages direct, private connections to remote Kafka clusters on AWS using PrivateLink. Cluster Linking Kafka native, byte-for-byte replication, simplifies multi-cluster architectures and cluster migrations while eliminating the complexities and risks of external tooling or exposing data to the public internet.
Teams operating open-source Apache Kafka or Amazon MSK clusters can configure Confluent access points which attach to VPC Endpoint Services in your virtual private cloud (VPC). Cluster Linking can then use this private connection and start replicating data while preserving topic configurations, ACLs, and synchronizing consumer offsets automatically.
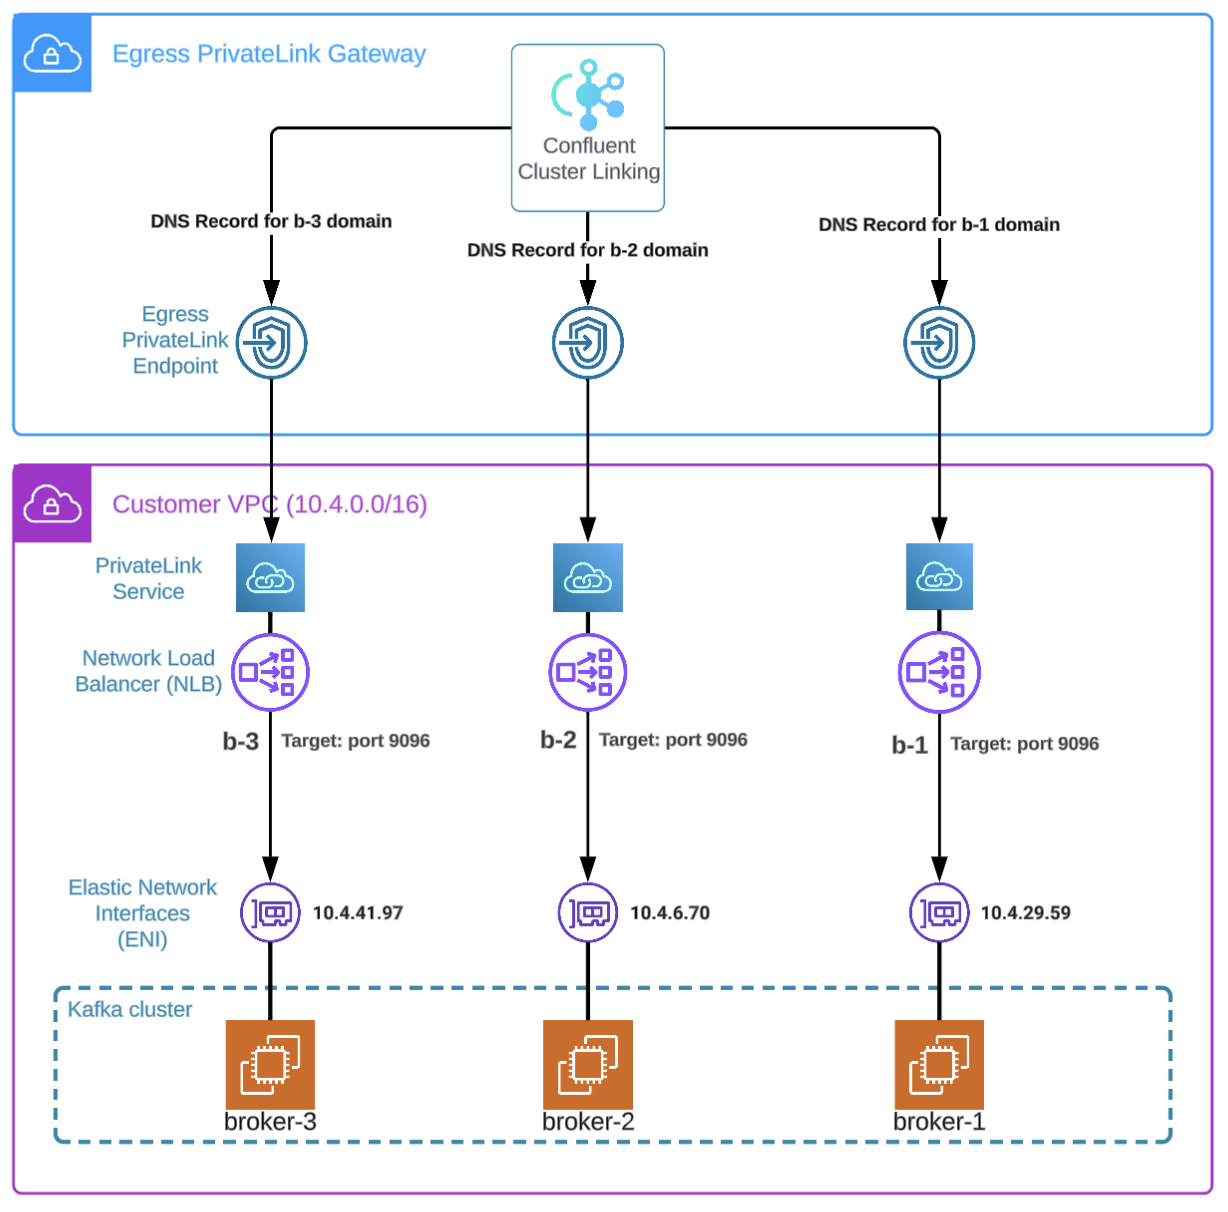
Keep in mind the following points related to this solution:
A single network load balancer (NLB) per-broker is required because a single NLB cannot route requests to the correct brokers without knowledge of Kafka partition leadership. Generic NLBs are not Kafka-aware, so a NLB would be insufficient.
Each NLB has one single target–an IP address corresponding to a single Kafka broker. In the diagram, this is represented as an Elastic Network Interface (ENI) that could be attached to a variety of different things.
Each NLB is configured to listen on a specified port corresponding to a Kafka listener port and maps to the same specified port on the target.
Each NLB is associated to a Kafka broker-specific VPC Endpoint Service.
Kafka broker-specific Confluent access points attach to each VPC Endpoint Service.
Kafka broker-specific Confluent DNS records point to each Confluent Access Point.
This setup creates a sort of “virtual endpoint” for each Kafka broker in the Confluent Cloud Network, making the entire Kafka cluster reachable by Cluster Linking. For efficiency, you can follow the tutorial below using Terraform module provided by Confluent.
Limitations
External Cluster Linking over PrivateLink is not supported for destination clusters on Azure.
Linking external clusters to Confluent Cloud cannot be accomplished with only Terraform. Terraform is not supported for the end-to-end workflow.
Tutorial: Link external clusters to Confluent Cloud
This tutorial demonstrates use of Terraform to provision networking resources, but creating the cluster link itself requires the Confluent CLI or REST API. An end-to-end Terraform-only workflow is not currently supported.
Prerequisites and assumptions
An active Confluent Cloud account, and access to Confluent Cloud Console.
An existing Enterprise cluster running on Confluent Cloud.
A source Kafka cluster running on AWS with PrivateLink enabled. This tutorial uses a managed AWS MSK cluster with accessible endpoints as the example source cluster.
Confluent CLI installed, configured, and up-to-date.
Terraform, with access to the Terraform CLI.
Terraform public module: module-clusterlinking-outbound-private.
AWS CLI installed and configured with credentials files. (This requirement is explained in the Terraform module README).
Step 1. Add a Terraform module
Create a new Terraform configuration, or use an existing configuration.
Collect or reference the required variable values in a new module block, as shown in the following example.
module "cluster-linking-aws-msk-private-link" {
   source = "git::https://github.com/confluentinc/cc-terraform-module-clusterlinking-outbound-private.git"

name_prefix = "msk"

use_aws    = true
aws_region = "eu-south-2"
aws_vpc_id = "vpc-01234567891011120"
aws_kafka_brokers = [
   {
      id        = "1"
      subnet_id = "subnet-0123456789101112a"
      endpoints = [
      {
         host = "b-1.mskcluster.a1b2c3.c3.kafka.eu-south-2.amazonaws.com"
         port = 9096
         ip   = "10.0.1.101"
      }
      ]
   },
   {
      id        = "2"
      subnet_id = "subnet-0123456789101112b"
      endpoints = [
      {
         host = "b-2.mskcluster.a1b2c3.c3.kafka.eu-south-2.amazonaws.com"
         port = 9096
         ip   = "10.0.2.102"
      }
      ]
   },
   {
      id        = "3"
      subnet_id = "subnet-0123456789101112c"
      endpoints = [
      {
         host = "b-3.mskcluster.a1b2c3.c3.kafka.eu-south-2.amazonaws.com"
         port = 9096
         ip   = "10.0.3.103"
      }
      ]
   }
]
cc_env_id     = "env-012345"
cc_cluster_id = "lkc-012345"
}
Initialize and install the new module in your new or existing Terraform configuration.
terraform init -upgrade
Step 2. Apply the configuration
Generate a new plan to uncover any configuration issues and prepare to apply the configuration.
terraform planThe output of this command previews the resources that will be created.
...

module.cluster-linking-outbound-private.module.aws_networking["main"].aws_vpc_endpoint_service.brokers["broker-3"] will be created
+ resource "aws_vpc_endpoint_service" "brokers" {
      + acceptance_required            = false
      + allowed_principals             = [
         + "arn:aws:iam::123456789101:role/env-a1b2c3-role",
      ]
      + arn                            = (known after apply)
      + availability_zones             = (known after apply)
      + base_endpoint_dns_names        = (known after apply)
      + id                             = (known after apply)
      + manages_vpc_endpoints          = (known after apply)
      + network_load_balancer_arns     = (known after apply)
      + private_dns_name               = (known after apply)
      + private_dns_name_configuration = (known after apply)
      + region                         = "eu-south-2"
      + service_name                   = (known after apply)
      + service_type                   = (known after apply)
      + state                          = (known after apply)
      + supported_ip_address_types     = (known after apply)
      + supported_regions              = [
         + "eu-south-2",
      ]
      + tags                           = {
         + "Description" = "VPC Endpoint Service for Kafka broker 3 managed by Terraform"
         + "Name"        = "cl-demo-broker-3-vpces"
      }
   }

Plan: 23 to add, 0 to change, 0 to destroy.
Review the output of the plan command to verify that the resources will be created as expected. Resolve any issues with the configuration.
Apply the configuration to create the resources.
module.cluster-linking-outbound-private.confluent_dns_record.aws["broker-1"]: Still creating... [0m10s elapsed]
module.cluster-linking-outbound-private.confluent_dns_record.aws["broker-2"]: Still creating... [0m10s elapsed]
module.cluster-linking-outbound-private.confluent_dns_record.aws["broker-3"]: Still creating... [0m10s elapsed]
module.cluster-linking-outbound-private.confluent_dns_record.aws["broker-3"]: Still creating... [0m20s elapsed]
module.cluster-linking-outbound-private.confluent_dns_record.aws["broker-1"]: Still creating... [0m20s elapsed]
module.cluster-linking-outbound-private.confluent_dns_record.aws["broker-2"]: Still creating... [0m20s elapsed]
module.cluster-linking-outbound-private.confluent_dns_record.aws["broker-3"]: Creation complete after 0m29s [id=dnsrec-a1c2b3]
module.cluster-linking-outbound-private.confluent_dns_record.aws["broker-1"]: Creation complete after 0m29s [id=dnsrec-d4e5f6]
module.cluster-linking-outbound-private.confluent_dns_record.aws["broker-2"]: Creation complete after 0m29s [id=dnsrec-g7h8i9]

Apply complete! Resources: 23 added, 0 changed, 0 destroyed.
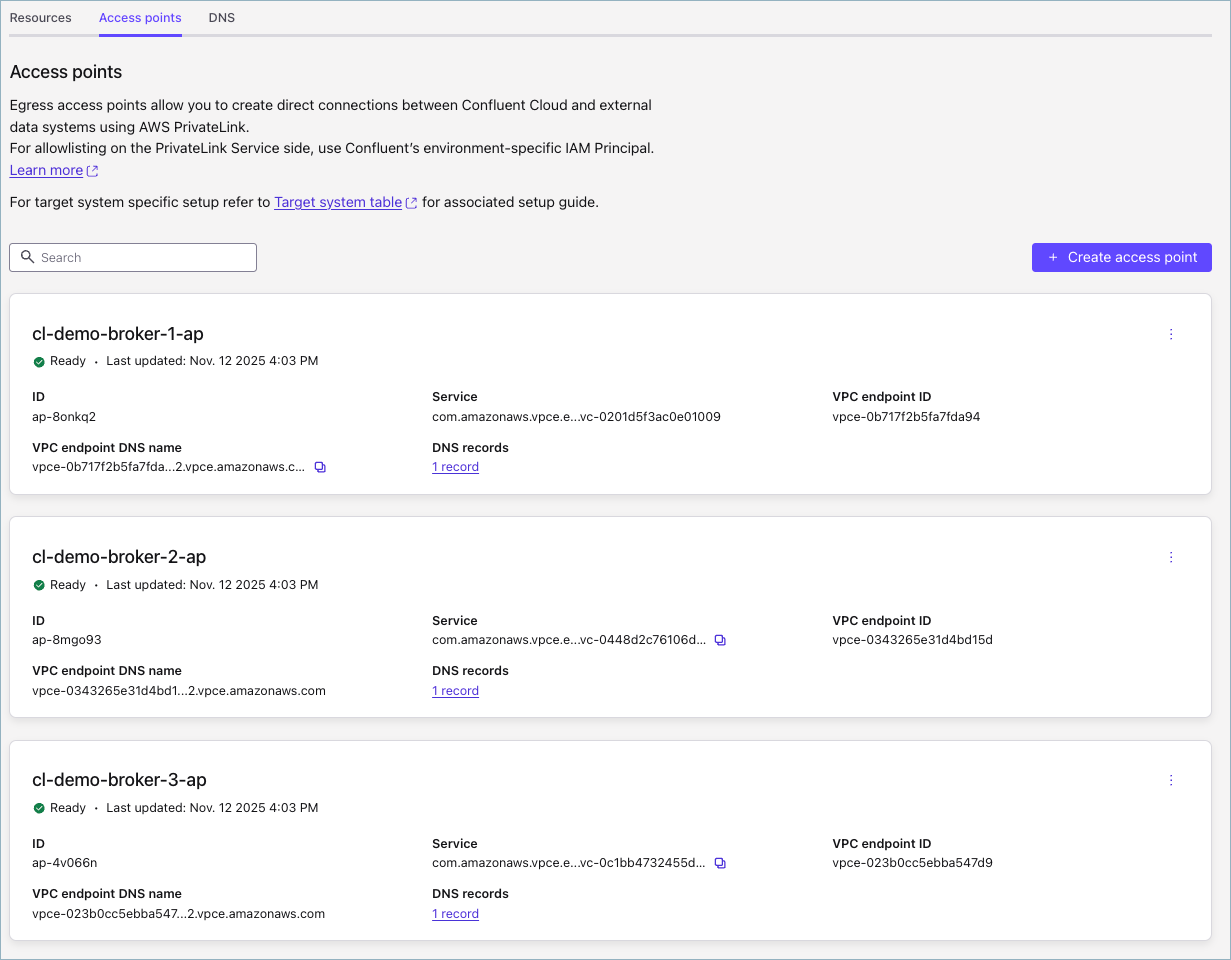
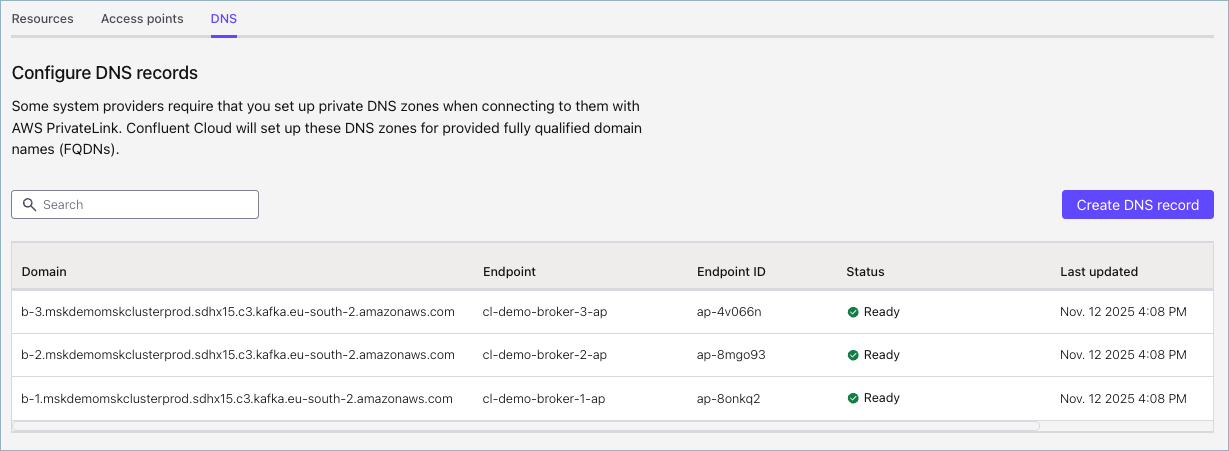
In the Confluent Cloud Console (https://confluent.cloud/login), navigate to the environment that contains the Confluent access points and select the Network Management tab. Find the new or existing gateway you plan to use, and select it.
Click the the Access points tab, to view the list of per-broker access points, as configured in the Terraform module.
Click the DNS tab to view the list of domain names associated with the broker endpoints.
Step 3. Create a new cluster link
Create a new properties file containing the client authentication properties to connect to Amazon MSK. (Note that AWS IAM Authentication to MSK is not yet supported.)
# msk-client-auth.properties
bootstrap.servers=b-1.mskdemomskclusterprod.sdhx15.c3.kafka.eu-south-2.amazonaws.com:9096,b-2.mskdemomskclusterprod.sdhx15.c3.kafka.eu-south-2.amazonaws.com:9096,b-3.mskdemomskclusterprod.sdhx15.c3.kafka.eu-south-2.amazonaws.com:9096
security.protocol=SASL_SSL
sasl.mechanism=SCRAM-SHA-512
sasl.jaas.config=org.apache.kafka.common.security.scram.ScramLoginModule required username="zach" password="C0nflu3nt!";
Use the Confluent CLI to create a new cluster link.
confluent kafka link create msk-external-link \
   --config msk-client-auth.properties \
   --destination-cluster lkc-012345 \
   --destination-bootstrap-server lkc-012345.eu-south-2.aws.private.confluent.cloud:9092 \
   --destination-api-key <lkc-012345-api-key> \
   --destination-api-secret <lkc-012345-api-secret>
Your output should resemble the following.
Created cluster link "msk-external-link" with configs:
"bootstrap.servers"="b-1.mskdemomskclusterprod.sdhx15.c3.kafka.eu-south-2.amazonaws.com:9096,b-2.mskdemomskclusterprod.sdhx15.c3.kafka.eu-south-2.amazonaws.com:9096,b-3.mskdemomskclusterprod.sdhx15.c3.kafka.eu-south-2.amazonaws.com:9096"
"link.mode"="DESTINATION"
"sasl.mechanism"="SCRAM-SHA-512"
"security.protocol"="SASL_SSL"
(Optional) Update the cluster link configuration to automatically create mirror topics for all remote topics.
The updated configuration file should resemble the following.
# cluster-link-update.properties
auto.create.mirror.topics.enable=true
auto.create.mirror.topics.filters={"topicFilters":[{"name":"*","patternType":"LITERAL","filterType":"INCLUDE"}]}
Run confluent kafka link configuration update to update the cluster link configuration.
confluent kafka link configuration update msk-external-link --config cluster-link-update.properties
Step 4. View Cluster Link and mirroring
In the Confluent Cloud Console (https://confluent.cloud/login), navigate to the Cluster Links tab. Find the cluster link you created, and select it.
The cluster link view should resemble the following. Your cluster link may look different from this example, depending on whether there is data being produced to your external cluster and if you chose to auto-create mirror topics.
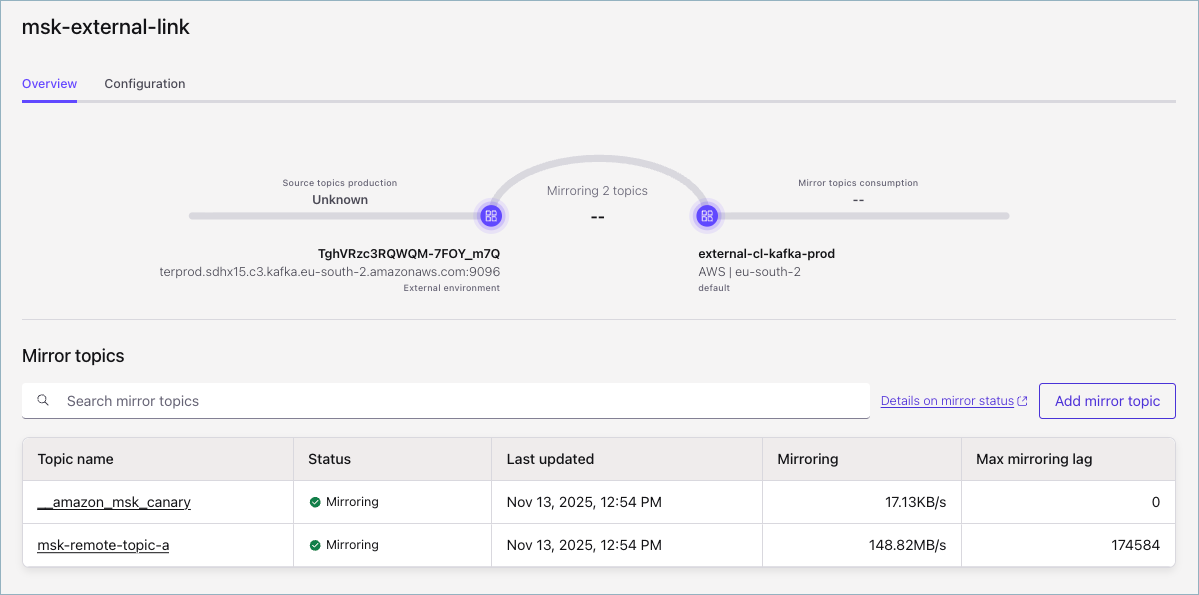
Select a mirror topic from the list to view the replicated messages.
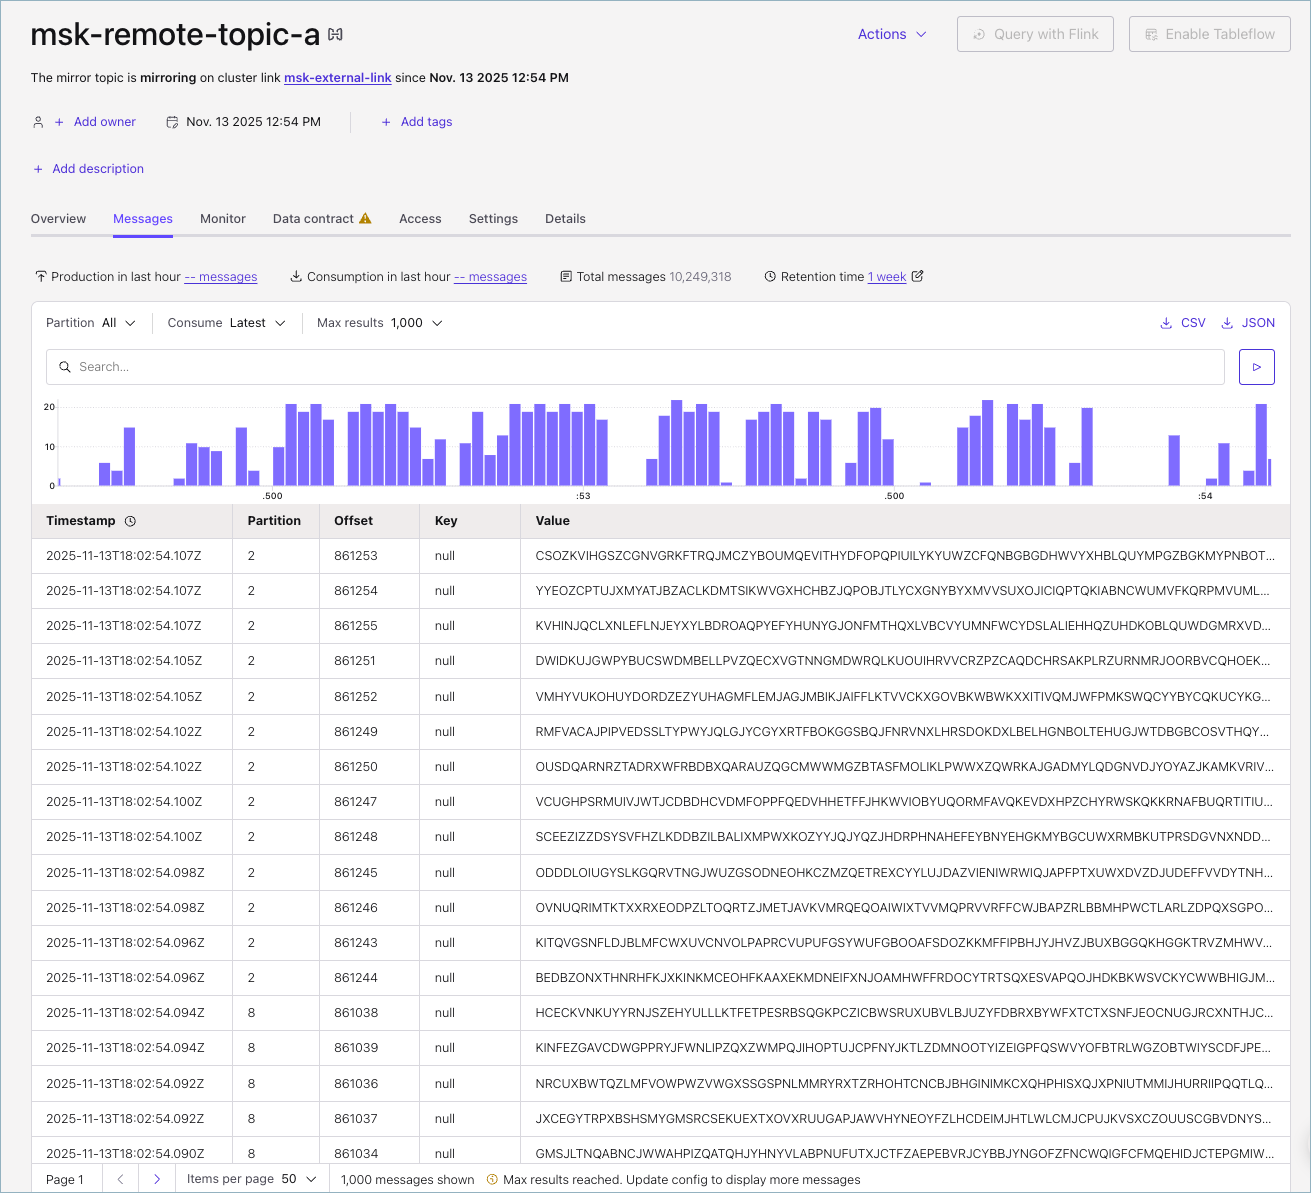
This concludes the tutorial. Congratulations! You have now created a cluster link and mirror topics to replicate data from your external cluster to your Confluent Cloud cluster.
Private to public Cluster Linking
Private to public Cluster Linking has some specific requirements and configurations. These are described below, followed by a walkthrough.
Requirements
These instructions apply to cluster links which fall under this category:
Source Cluster | Dedicated Confluent Cloud cluster with private networking. Any cloud provider, region, and networking type (for example, Private Link, VPC Peering, Transit Gateway, and Private Service* Connect) |
Destination Cluster | Dedicated Confluent Cloud cluster with secure public endpoints. |
The clusters can be in the same or different Confluent Cloud organizations.
Such a cluster link requires using a “source-initiated link”, which differs from other cluster links in these ways:
First, create a cluster link on the destination with specific configurations that are described below. This must be done before the link is created on the source cluster.
After the cluster link is created on the destination cluster, a cluster link object must be created on the source cluster, too. It must have certain configurations (described below).
This type of cluster link cannot be created on the Confluent Cloud Console. It must be created using the cluster REST APIs, the Confluent CLI, Terraform, or Confluent for Kubernetes.
Deleting either cluster link object –- source or destination –- will stop data from being replicated between the clusters.
Both cluster link objects must be deleted in order to stop billing charges. If one is deleted but one remains, hourly billing charges may continue to accrue.
The cluster link’s service account must have a CLUSTER:ALTER ACL on the destination cluster. Alternatively, the service account can have the CloudClusterAdmin RBAC role on the destination cluster.
Configurations
Destination cluster
The cluster link on the Destination cluster needs these configurations:
connection.mode=INBOUNDNo bootstrap server, instead, the source cluster’s cluster link object will get this.
No security configuration or authentication credentials; instead, the source cluster’s cluster link object will get these.
Other optional configuration options for this cluster link, such as consumer offset sync, ACL sync, and prefix.
Source cluster
The cluster link on the Source cluster needs these configurations:
link.mode=SOURCEconnection.mode=OUTBOUNDBootstrap server set to the Destination cluster’s bootstrap server
Security credentials to authenticate into the Destination cluster. (These can be either API key or OAuth). The Service Account or user with these security credentials must have the CLUSTER:ALTER ACL on the destination (public) cluster, or alternatively the CloudClusterAdmin RBAC role.
Security credentials to authenticate into the Source cluster. (These can be either API key or OAuth.)
The service account or user associated with this API key needs the permissions described in Permissions for the cluster link to read from the source cluster.
These configurations must all be prefixed with:
local. For example, the configurationsecurity.protocolshould be set aslocal.security.protocol.
Use the Confluent CLI to create a private to public link
The following steps walk through how to create a Private to Public cluster link using the Confluent CLI.
Private cluster
In this walkthrough, information about your private cluster is referred to as <private>.
You will need the following information about your private cluster:
Cluster ID. This will have the format
lkc-XXXXX. You can get this using the command confluent kafka cluster list. This is referred to as<private-id>.Cluster bootstrap servers. You can get this by describing the cluster with confluent kafka cluster describe;
confluent kafka cluster describe <private-id>. The bootstrap will be in the Endpoint row. This is referred to as<private-bootstrap>.
Public cluster
In this walkthrough, information about your public cluster is referred to as <public>.
You will need the following information about the public cluster:
Cluster ID. This will have the format
lkc-XXXXX. You can get this using the command confluent kafka cluster list. This is referred to as<public-id>.Cluster bootstrap server. You can get this by describing the cluster with confluent kafka cluster describe;
confluent kafka cluster describe <public-id>. The bootstrap will be in the Endpoint row. This is referred to as<public-bootstrap>.
Create the Public half of the link
Create a file called
public-destination-link.configwith these contents:link.mode=DESTINATION connection.mode=INBOUND
Tip
If you want to enable other features or configurations on this cluster link, like consumer offset sync, you can put those in the configuration file, too.
This configuration tells the cluster link to be the destination half of a “source initiated” cluster link.
Create the public half with this command:
confluent kafka link create private-to-public --cluster <public-id> \
  --config public-destination-link.config \
  --source-cluster <private-id>
Create the Private half of the link
Create security credentials for the private half of the link with two sets of API keys.
To create the Private half, you’ll need two sets of security credentials: one for each cluster. This is because the Private cluster must authenticate with the Public cluster to establish the cluster link, and then the cluster link must authenticate with the Private cluster to read data.
To get security credentials, you need API keys on both clusters. Choose one of the following methods; either for development and testing, or for production.
For development and testing, a quick way to do is with this commands:
confluent api-key create --resource <cluster-id>
This creates an API key with Admin privileges. This is not recommended for production or for clusters with sensitive data.
For production, create a Confluent Cloud service account for the cluster link and assign it ACLs on the source cluster (the private cluster), as described in Permissions for the cluster link to read from the source cluster.
Additionally, assign the service account the CLUSTER:ALTER ACL on the destination cluster (the public cluster):
confluent kafka acl create --allow --service-account <service-account-id> --operations alter --cluster-scope --cluster <destination-cluster-id>
If the clusters belong to two different owners or two different Confluent Cloud organizations, then two different service accounts will be needed: one for the source cluster and one for the destination cluster.
Using this service account or these service accounts, create two Kafka API keys, one on each Kafka cluster:
confluent api-key create --resource <cluster-id>
Create the Private link configuration file.
Create a file called
private-source-link.configthat contains all necessary link configurations with the following content:link.mode=SOURCE connection.mode=OUTBOUND security.protocol=SASL_SSL sasl.mechanism=PLAIN sasl.jaas.config=org.apache.kafka.common.security.plain.PlainLoginModule required username='<public-api-key>' password='<public-api-secret>'; local.security.protocol=SASL_SSL local.sasl.mechanism=PLAIN local.sasl.jaas.config=org.apache.kafka.common.security.plain.PlainLoginModule required username='<private-api-key>' password='<private-api-secret>';
This file creates a cluster link and specifies:
this is the source half of a “source initiated” cluster link (top two lines).
where to find the destination cluster and how to authenticate with it (the middle section).
how to authenticate with the source cluster (the bottom section, prefixed with
local).
Run the command to create the private half of the link.
confluent kafka link create private-to-public \
  --cluster <private-id> \
  --destination-cluster <public-id> \
  --destination-bootstrap-server <public-bootstrap-url> \
  --config private-source-link.config
You should see a success message. If so, you now have a link between your clusters that you can use to create mirror topics.
If the command times out after 30 seconds, then the private cluster was unable to reach and authenticate to your destination cluster using the provided information. Make sure you can consume from the destination cluster using the
public-destination-link.configfile.
Create a mirror topic and replicate data
Now that you’ve got a cluster link from your Private cluster to your Public one, you can use the cluster link to create mirror topics as described in Mirror a topic.
Use the REST API to create a private to public link
The API call to create a cluster is described in Create a cluster link in the Confluent Cloud API reference.
To use this call to create a private to public link with the REST API:
CloudClusterAdmin, EnvironmentAdmin, or OrganizationAdmin for the public cluster sends this request:
POST to {Public_Cluster_REST_API}/kafka/v3/clusters/{Public_Cluster_ID}/links?link_name={link_name}For example:
https://pkc-12345.us-west-2.aws.confluent.cloud:443/kafka/v3/clusters/lkc-12345/links?link_name=private-to-public{ "source_cluster_id": "<private-cluster-id>", "configs": [ { "name": "link.mode", "value": "DESTINATION" }, { "name": "connection.mode", "value": "INBOUND" } ] }
An OrganizationAdmin, EnvironmentAdmin, or CloudClusterAdmin for the private cluster sends this request to the private cluster:
POST to {Private_Cluster_REST_API}/kafka/v3/clusters/{Private_Cluster_ID}/links?link_name={link_name}For example:
https://lkc-67890-67890.us-west-2.aws.glb.confluent.cloud:443/kafka/v3/clusters/lkc-67890/links?link_name=private-to-public{ "destination_cluster_id": "<public-cluster-id>", "configs": [ { "name": "link.mode", "value": "SOURCE" }, { "name": "connection.mode", "value": "OUTBOUND" }, { "name": "bootstrap.servers", "value": "<public-bootstrap-server>" }, { "name": "security.protocol", "value": "SASL_SSL" }, { "name": "sasl.mechanism", "value": "PLAIN" }, { "name": "sasl.jaas.config", "value": "org.apache.kafka.common.security.plain.PlainLoginModule required username='<public-api-key>' password='<public-api-secret>';" }, { "name": "local.security.protocol", "value": "SASL_SSL" }, { "name": "local.sasl.mechanism", "value": "PLAIN" }, { "name": "local.sasl.jaas.config", "value": "org.apache.kafka.common.security.plain.PlainLoginModule required username='<private-api-key>' password='<private-api-secret>';" } ] }
Both REST API calls should return a status of 201: CREATED and a blank response if successful.
Private-Public-Private Pattern with cluster link chaining and a jump cluster
You can configure Cluster Linking between any two Dedicated or Enterprise Confluent Cloud clusters with any private networking configuration, as a fully supported pattern. These clusters must be in the same organization.
Cluster link chaining and jump clusters
However, it is still possible to use Cluster Linking between private networking combinations that cannot be directly linked (per the supported clusters table). Cluster Linking can replicate data and metadata between any two privately networked, dedicated Confluent Cloud clusters using two mechanisms:
A chain of multiple cluster links–or simply “chaining”, which keep data and metadata replicated from start to finish. Cluster Links and mirror topics are designed to be composable and to chain together intuitively.
A dedicated Confluent Cloud cluster with secure public endpoints, which can be securely reached by both private clusters. This is colloquially known as a “jump cluster”, as it is the middle point between the two disparate private networks. To learn more about the security implications of using a cluster with secure public endpoints, and why this is a secure choice, see Security considerations for the Private-Public-Private pattern.
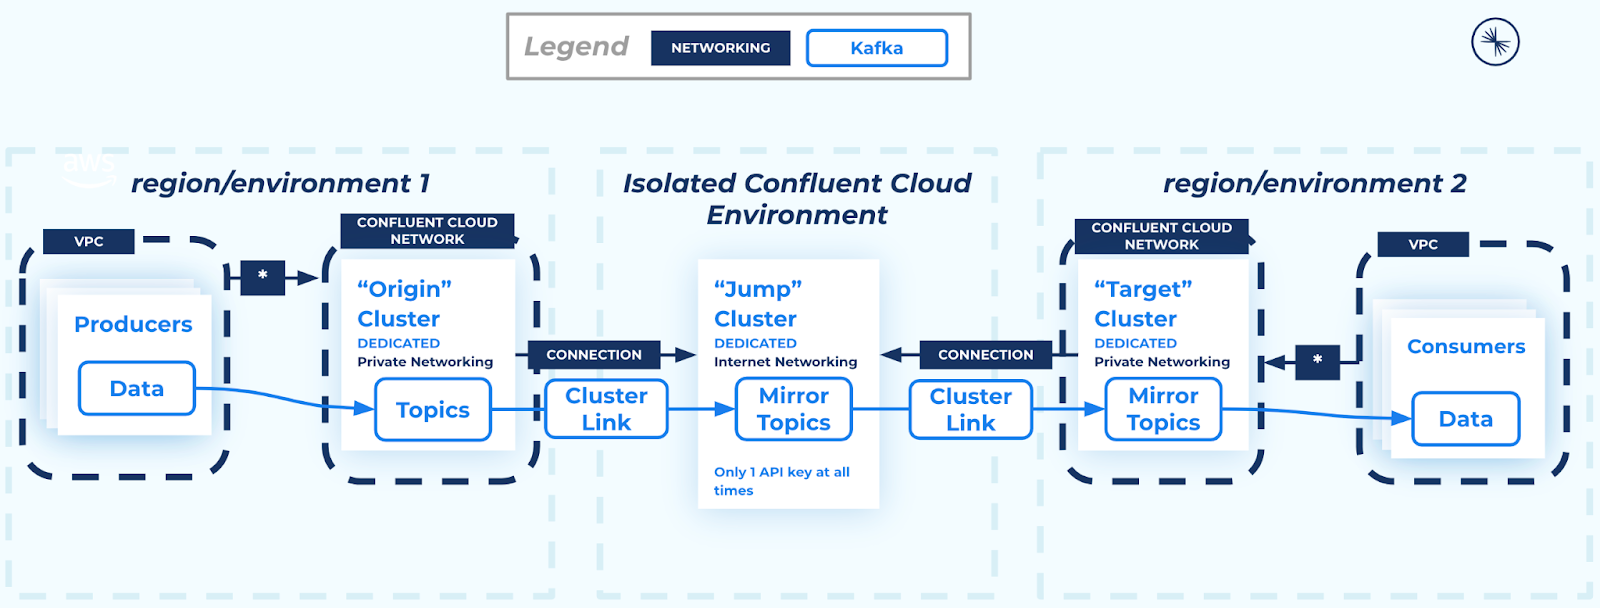
How it works
The solution consists of an origin cluster, a “jump” cluster, and a target cluster, as described below.
- Origin cluster
a Dedicated Confluent Cloud cluster with any private networking type where the data is coming from. The original source of the data and metadata.
- Jump cluster
a Dedicated Confluent Cloud cluster with secure public endpoints
A cluster link replicates topics and desired metadata from the origin cluster (its source cluster) to the jump cluster (its destination cluster)
This cluster link uses the “private to public” feature, where the private target cluster always initiates an outbound connection to the internet destination cluster. The internet cluster never has access to the private network.
- Target cluster
a Dedicated Confluent Cloud cluster with any private networking type where the data is going to. The final destination of the data and metadata.
A cluster link replicates data and metadata from the jump cluster (the link’s source cluster) to the target cluster (the link’s destination cluster)
Data and metadata are kept consistent with the origin cluster thanks to cluster link chaining and the buyer for byte replication offered by mirror topics.
The private target cluster always initiates an outbound connection to the internet destination cluster. The internet cluster never has access to the private network.
Security considerations for the Private-Public-Private pattern
There are three security goals that are achieved by choosing private networking as opposed to public networking, and all three can be achieved with the private-public-private Cluster Linking pattern:
Prevent data from being intercepted and sniffed in transit over the internet
Private networking is appealing because it ensures that no third party can be involved in the transfer of data and potentially “sniff” or otherwise reveal the contents of that data. However, all Cloud Service Providers (CSPs) that Confluent Cloud operates on guarantee that data between two of their networks always stays on their own, private backbone, even if a public IP is used in the process (reference documentation for AWS, Azure, and Google Cloud). Therefore, if all three Confluent Cloud clusters in the private-public-private pattern are on the same CSP, the data never leaves the cloud service provider’s backbone and cannot be intercepted by a third party, satisfying this goal.
Prevent Distributed Denial of Service (DDoS) attacks from interrupting cluster operations
Private IP addresses cannot be addressed or resolved from outside the private network, giving an extra layer of protection against a potential DDoS attack from a malicious actor who learned the cluster’s addresses. The private-public-private pattern does use internet-accessible addresses on the jump cluster; these addresses are only used for replication. The private cluster(s) which serve business-critical applications remain protected behind private IPs. A theoretical DDoS attack on the jump cluster could temporarily interrupt replication, but if replication is used for Disaster Recovery, migration, or another similar goal, this would not impact the business-critical workloads which are isolated to the private clusters, and the private clusters themselves cannot be DDoSed.
Prevent a malicious party from accessing data
Private networking gives an extra layer of protection against data exfiltration, by requiring access to the private network in order to access the data. Since the private-public-private pattern puts the data on an Internet cluster, the data on the jump cluster is not protected by network isolation, and therefore access to this cluster must be carefully guarded. Because accessing a Confluent Cloud cluster requires an API key specifically created for that cluster, the jump cluster can be protected by only creating one API key for it–the API key given to the cluster link–and then immediately destroying that API key. There is no need to store the cluster link’s API key, as it is securely and permanently stored on the cluster link. It is impossible to retrieve the API key from the cluster link; even for Confluent Cloud engineers, which ensures that this API key will never be used for anything other than the Cluster Linking operations. Since no other API keys exist for this cluster, nothing can access the cluster other than the cluster links.
Confluent Cloud billing considerations
There are cost differences associated with private vs. public networking. These are detailed under Cluster Linking in the Billing documentation. Examples are provided there for public networking.
Here is further detail specifically related to the private-public-private pattern outlined for Cluster Linking.
Private-Public-Private pattern cost considerations and security
When adding the jump cluster architecture to an existing Origin and Target cluster, new Confluent Cloud cost will be introduced by:
The Jump cluster (an hourly cost)
The two cluster links: one from origin to Jump, and one from Jump to Target (an hourly cost)
The data throughput (ClusterLinkRead and ClusterLinkWrite charged twice), once on each cluster link (a per GB cost).
How to keep costs as low as possible and maintain security
Consider these suggestions and recommendations for keeping costs as low as possible while still achieving the desired level of security on the cluster links.
Use a single zone for the jump cluster
Using a “single zone” cluster for the Jump cluster will reduce the hourly cost of the jump cluster, if the replication use case can tolerate the “single zone” service level agreement (SLA). Here are points to consider for this strategy:
“Multi-zone” clusters are always recommended for clusters that run “production” traffic–which the Origin and Target clusters likely do–as they come with a higher SLA. However, the “single zone” Jump cluster’s SLA may be sufficient if the use case is data sharing, data aggregation, or even disaster recovery.
If there is a disruption in the availability zone used by a “single zone” jump cluster, it will only impact the replication flow from Origin to Target. Producers and consumers on both Origin and Target clusters will be unaffected. When the disruption ends, if the Jump cluster returns to healthy status, the cluster links will automatically resume and catch the Target cluster up with any data that it missed.
For a Data Sharing or Data Aggregation architecture, replication is used to send a copy of data from the Origin to the Target, so the Target’s consumers can read the data. An outage of the availability zone of a single zone Jump cluster would stop the cluster links from replicating new data to the Target cluster. During this time, the Target’s consumers can still read any data that was already replicated to the Target. When the outage is over, if the Jump cluster recovers in good health, the Target’s replicated topics will automatically catch up and the consumers will be able to read data. Topics on the Target cluster that do not use replication will be unaffected. Therefore, the only effect of an availability zone outage on a single zone Jump cluster is a delay in some replicated data. A multi-zone Jump cluster would avoid this case, but for an added cost.
For a Disaster Recovery (DR) architecture, replication is used to keep topics on the Target cluster up-to-date and ready for failover, should an outage hit the Origin cluster. If the availability zone of a single zone Jump cluster has an outage, this would temporarily halt replication, thereby increasing the RPO at the moment. Hypothetically, if some time after this outage began and before it resolved, the Origin cluster’s region (a different cloud region from the Jump cluster) also experienced an outage, then its applications would fail over to the Target cluster without access to recent data produced since the Jump cluster’s zone outage. The net effect is that, in this corner case, a multi-zone Jump cluster would yield a lower RPO than a single zone jump cluster, for an added cost. However, as of this writing, there are no documented cases of a cloud provider experiencing a regional outage and an availability zone outage in a different region at the same time. Because this hypothetical corner case is exceedingly rare, most enterprise companies require disaster recovery for only a single cloud region outage at a time, and therefore would be served by a single zone Jump cluster.
Use bidirectional cluster links if data needs to flow in both directions
If data needs to flow in both directions (Origin to Target, and Target to Origin), using a bidirectional link is most cost-effective.
Using the “bidirectional” cluster link mode will allow topics to mirror from Origin to Target, and will also allow topics to go back from Target to Origin without any additional cluster links. (Bidirectional mode is always recommended when using Cluster Linking for Disaster Recovery.)
A single Jump cluster can be used for both directions, as long as prefixing is used on at least one of the cluster links.
Legacy workflows using network linking
Although less efficient than the newer solutions described in How to use cluster links with private networking, the following workflows using network linking are still supported. If you already have these workflows in place, you can continue to use them.
(Legacy) Cluster Linking between AWS PrivateLink Confluent Cloud clusters
(Legacy) Cluster Linking between AWS Transit Gateway attached Confluent Cloud clusters
(Legacy) Cluster Linking between AWS PrivateLink Confluent Cloud clusters
Warning
This legacy workflow requires you to first create network link service and private endpoint over which to create the cluster link. Support for private linking with AWS and Azure now enables you to bypass this setup. The currently recommended workflow for both AWS and Azure is described in Cluster Linking between Confluent Cloud clusters using Azure, AWS, or Google Cloud private networking. That said, if you are currently using network linking, you can continue to do so. Existing networking linking users who wish to upgrade can send a request to Confluent support.
You can use Cluster Linking on Confluent Cloud to create a cluster link that perpetually mirrors data between two Confluent Cloud clusters in different AWS regions, each with the “AWS PrivateLink” networking type. Both clusters must be in the same Confluent Cloud organization.
Confluent Cloud is available through AWS Marketplace or directly from Confluent.
Requirements
To implement AWS PrivateLink on Confluent Cloud, you must have an active Confluent Cloud organization containing:
One or more users with these RBAC roles:
OrganizationAdmin, or
EnvironmentAdmin, or
CloudClusterAdmin
Two Dedicated Confluent Cloud clusters with AWS PrivateLink (any regions)
Ability to send REST API calls over the Internet to Confluent Cloud
Connectivity to your AWS PrivateLink clusters via Confluent Cloud Console, REST API, the Confluent CLI, and/or Terraform
Limitations
An Organization supports a maximum of 20 Network Link Endpoints
A Confluent Cloud network supports a maximum of 5 Network Link Endpoints
Usage of the advanced “source-initiated link” feature is not allowed.
Cluster links must be between clusters in the same Confluent Cloud Organization. Cross-organization cluster linking between AWS PrivateLink clusters is not supported.
Mental model
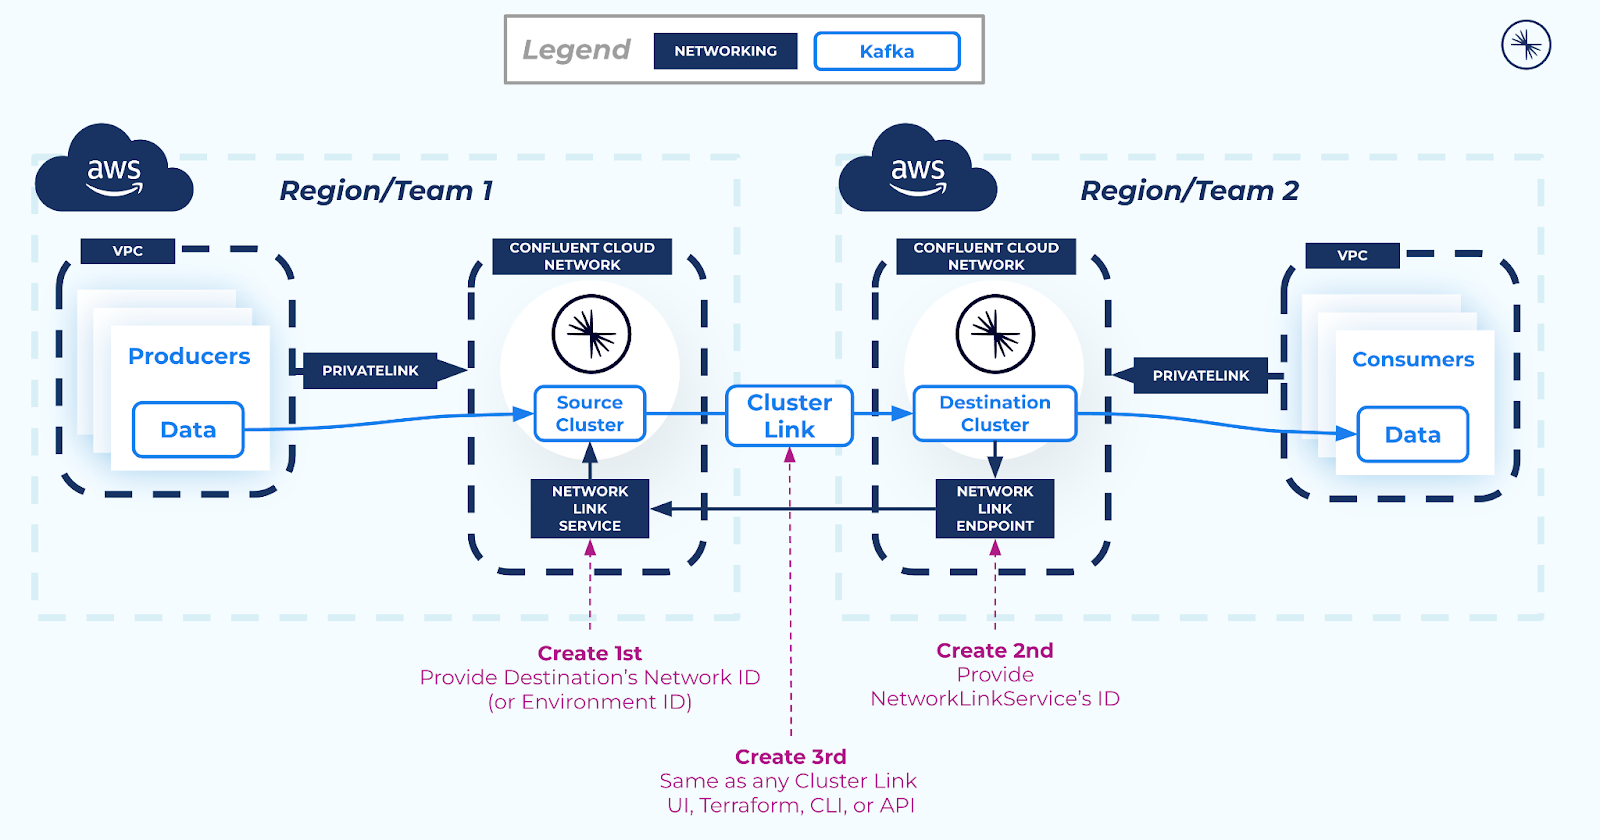
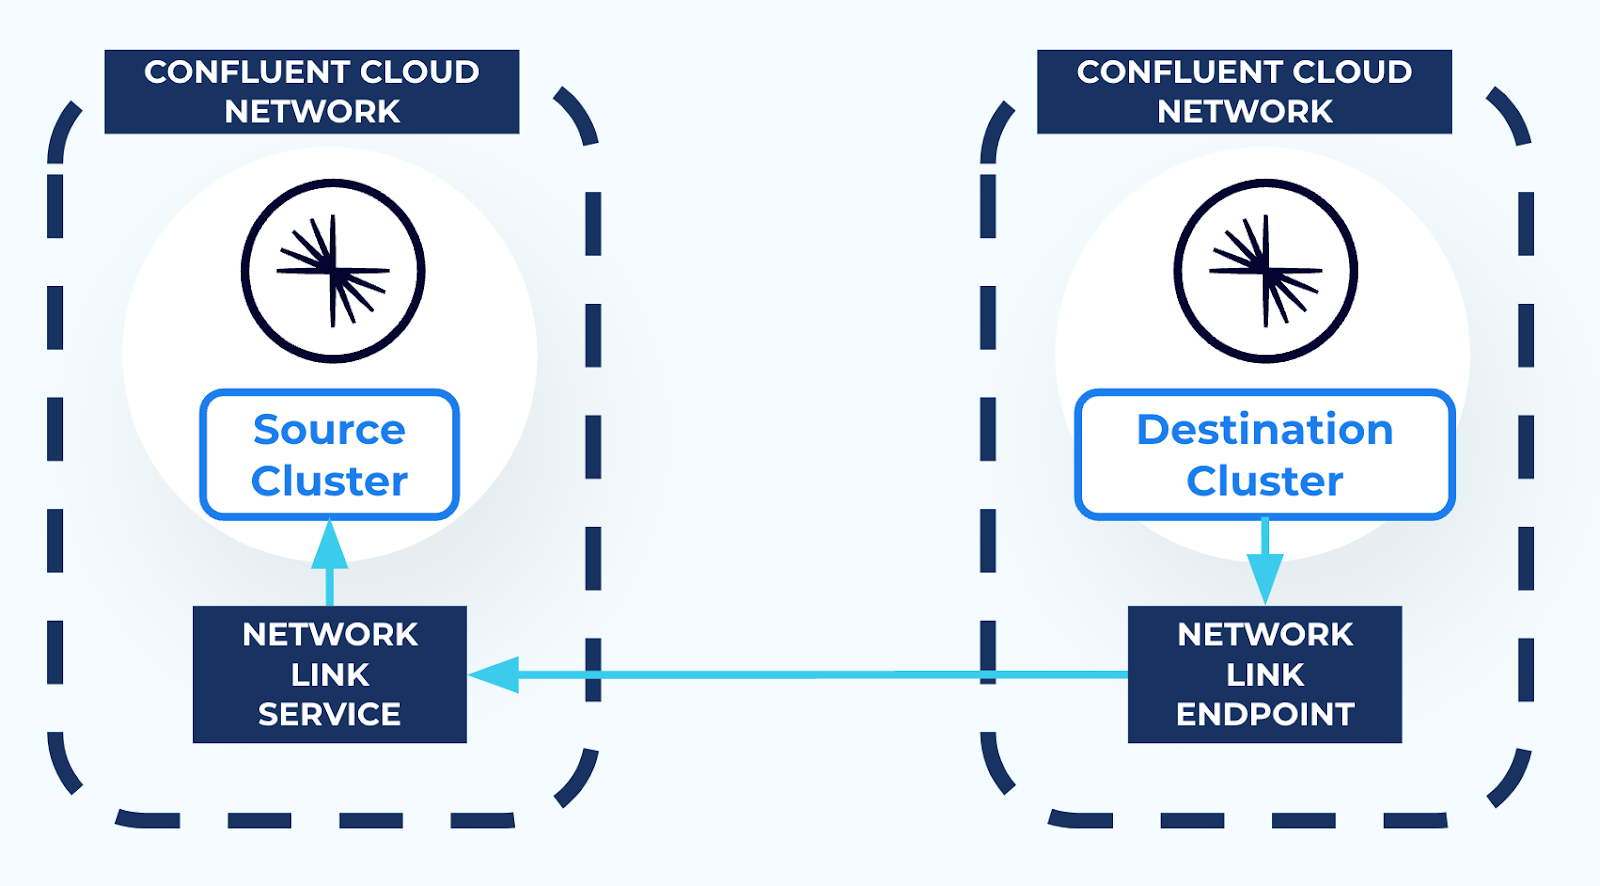
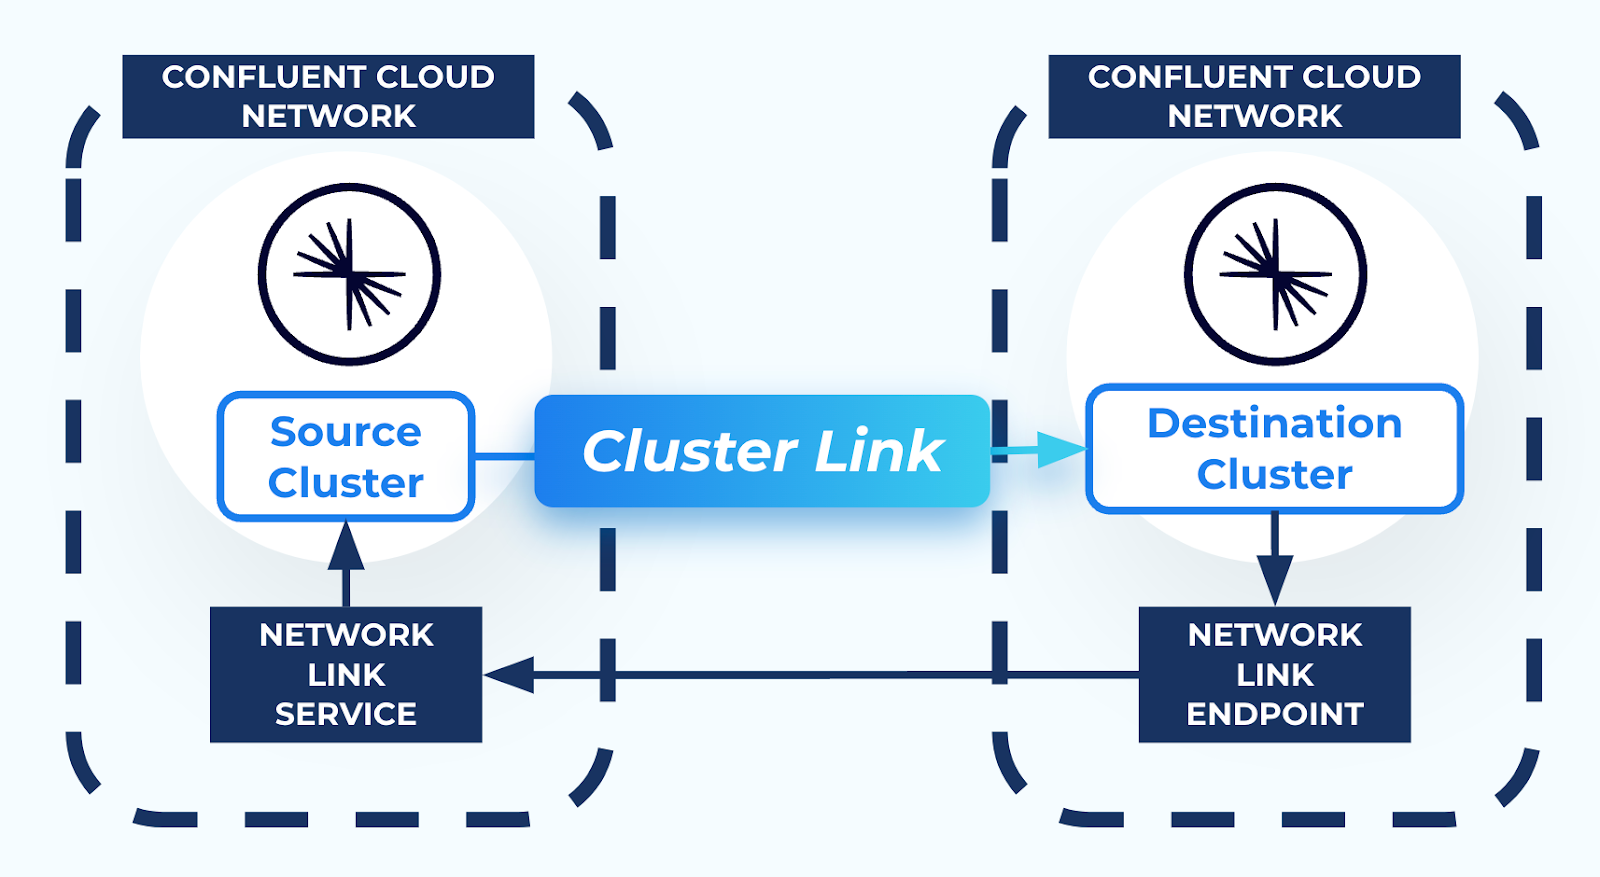
When AWS PrivateLink is used to connect to a Confluent Cloud cluster, the cluster is isolated in its own Confluent Cloud network for network-level security. This prevents external resources, including Cluster Linking, from connecting to the Kafka cluster. Thus, in order to use Cluster Linking between two Confluent Cloud clusters in different Confluent Cloud networks, a secure networking path is required between the two Confluent Cloud networks. You can create this secure network path using resources called a Network Link Service and a Network Link Endpoint, as described in the networking document Use Cluster Linking on Confluent Cloud with AWS PrivateLink.
Network Link Services allow secure inbound connectivity from specific networks that you specify.
Network Link Endpoints allow secure outbound connectivity to specific networks that you specify.
To use Cluster Linking between two AWS PrivateLink clusters in different regions, you first must establish secure connectivity between the clusters as follows:
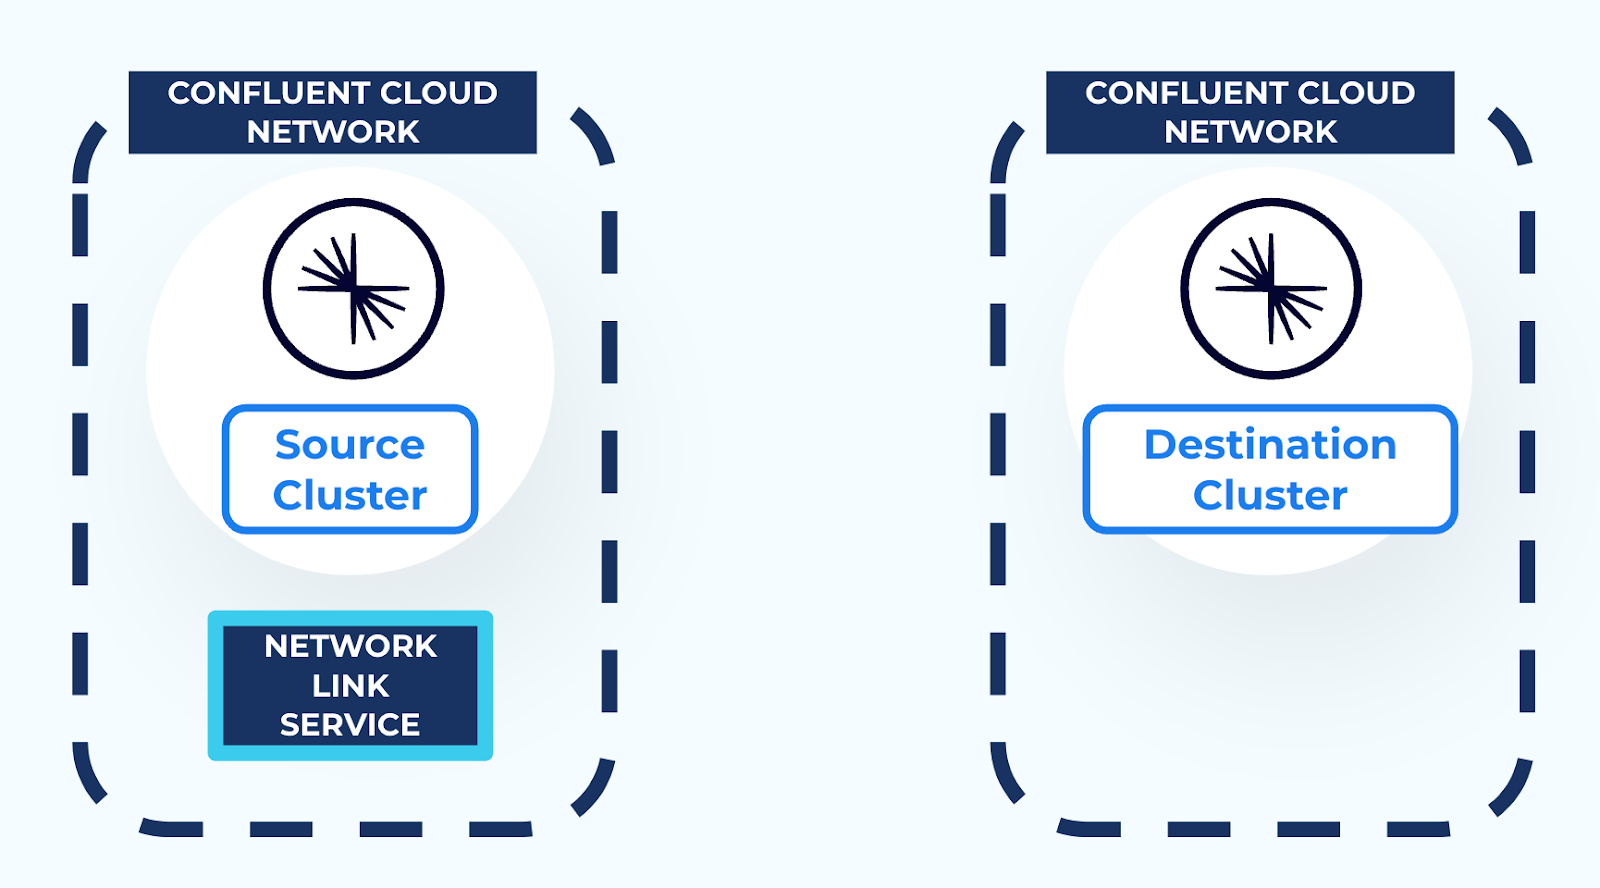
Create a Network Link Service in the source cluster Confluent Cloud network to allow incoming connectivity from the destination cluster Confluent Cloud network.
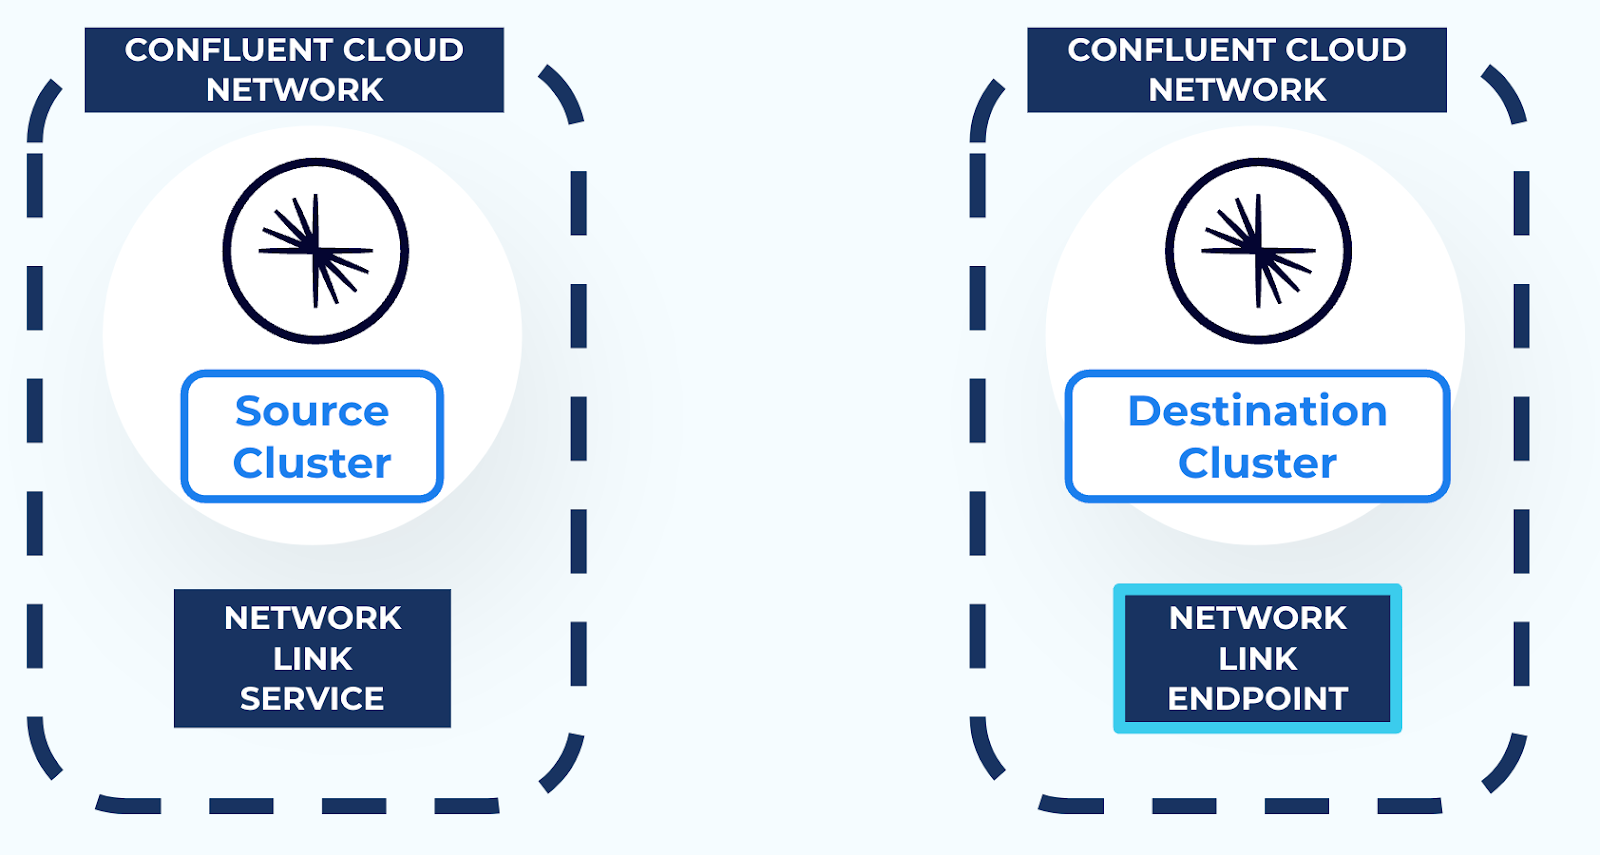
Then, create a Network Link Endpoint in the destination cluster Confluent Cloud network. This allows secure outbound connectivity to the source cluster.
REST API for Network Resources
The REST API for Network Link Endpoints and Services are shown in the Confluent Cloud APIs reference under Network Link Services (networking/v1) and are used in the tutorial that follows.
Terraform for Networking Resources
The Terraform documentation for Network Link Endpoints and Services is here:
An end-to-end example is shown in this public GitHub repo here: confluentinc/terraform-provider-confluent
Tutorial: Create a Network Link and Cluster Link
This tutorial uses the REST API, as described in REST API for Network Resources. To learn more about network links, see also Use Cluster Linking on Confluent Cloud with AWS PrivateLink.
Decide on the source cluster and destination cluster for the cluster link. You will need the following information about these clusters:
Environment ID and Network ID containing the source cluster
Environment ID and Network ID containing the destination cluster
Cloud API key(s) for user(s) with RBAC role authorization over the source cluster, either:
OrganizationAdmin, or
EnvironmentAdmin, or
CloudClusterAdmin
Cloud API key(s) for user(s) with RBAC role authorization over the destination cluster, either:
OrganizationAdmin, or
EnvironmentAdmin, or
CloudClusterAdmin
Tip
The same Cloud API key may be used as for the source cluster if the user has authorization over both clusters. This tutorial uses one API key referenced with these bash environment variables:
CLOUD_API_KEY=<your-cloud-api-key>CLOUD_API_SECRET=<your-cloud-api-secret>
Step 1: Create Network Link Service
Create the Network Link Service by sending a POST REST API request as a properly authenticated user who has OrganizationAdmin, EnvironmentAdmin, or NetworkAdmin over the source cluster:
curl --location 'https://api.confluent.cloud/networking/v1/network-link-services' \
  --header 'Content-Type: application/json' \
  --header "Authorization: Basic $(echo -n "$CLOUD_API_KEY:$CLOUD_API_SECRET" | base64)" \
  --data '{
    "spec": {
        "display_name": "<a-name-of-your-choosing>",
        "description": "<an-optional-description>",
        "environment": {
            "id": "<source-cluster-environment-id>"
        },
        "network": {
            "id": "<source-cluster-network-id>"
        },
        "accept": {
            "networks": [ "<destination-cluster-network-id>" ]
        }
    }
}'
Take note of the ID of the network_link_service in the REST API response. If lost, this ID can be retrieved with a GET REST API call:
curl --location 'https://api.confluent.cloud/networking/v1/network-link-services?environment=<source-cluster-environment-id>' \
  --header "Authorization: Basic $(echo -n "$CLOUD_API_KEY:$CLOUD_API_SECRET" | base64)"
Note
For advanced setups:
Multiple network IDs can be listed at once
As an alternative to a network, to allow secure inbound connectivity from an entire Confluent Cloud Environment, pass an environment with the destination cluster environment ID(s) instead
Step 2: Create Network Link Endpoint
Create the Network Link Endpoint by sending the POST REST API request as a properly authenticated with a user who has OrganizationAdmin, EnvironmentAdmin, or NetworkAdmin over the destination cluster:
curl --location 'https://api.confluent.cloud/networking/v1/network-link-endpoints' \
  --header 'Content-Type: application/json' \
  --header "Authorization: Basic $(echo -n "$CLOUD_API_KEY:$CLOUD_API_SECRET" | base64)" \
  --data '{
    "spec": {
        "display_name": "<another-name-of-your-choosing>",
        "description": "<an-optional-description>",
        "environment": {
            "id": "<destination-cluster-environment-id>"
        },
        "network": {
            "id": "<destination-cluster-network-id>"
        },
        "network_link_service": {
            "id": "<ID-of-network-link-service>"
        }
    }
}'
Step 3: Wait until the Network Link Endpoint is READY
It takes several minutes to establish secure connectivity. When ready to be used by Cluster Linking, the network link endpoint’s status will change from PROVISIONING to READY, which you can check with a GET REST API call:
curl --location 'https://api.confluent.cloud/networking/v1/network-link-endpoints?environment=<destination-cluster-environment-id>' \
  --header "Authorization: Basic $(echo -n "$CLOUD_API_KEY:$CLOUD_API_SECRET" | base64)"
To learn more about this step, see Check Network Link Endpoint status in the network link documentation.
Step 4: Create the Cluster Link
After the Network Link Endpoint is in READY status, create a cluster link using your preferred method. The Confluent Cloud Console, the Confluent CLI, REST API, or Terraform are all valid methods to create a cluster link. Here is an example of how to create one using the Confluent CLI:
Create or retrieve an API key for the source cluster. The API key should correspond to a Service Account that has appropriate read permissions on the source cluster. Copy-paste command examples are available in the Cluster Linking security tutorial.
From a network that has network access to the Destination cluster (such as, an EC2 instance in a VPC with the PrivateLink endpoint), issue the command to create a cluster link:
confluent kafka link create <name-of-your-choosing> \
    --source-cluster <source-cluster-id> \
    --source-bootstrap-server <source-cluster-bootstrap> \
    --source-api-key <api-key-for-source-cluster> \
    --source-api-secret <api-secret-for-source-cluster>
To learn more, browse these resources which walk through how to create a cluster link step-by-step for various use cases:
Cluster Linking Quick Start on Confluent Cloud is a fast-paced tutorial
The Cluster Linking Data Sharing tutorial is an in-depth tutorial
The Disaster Recovery Whitepaper covers how to architect an active-passive DR setup in Confluent Cloud
The Cluster Linking Disaster Recovery page gives a basic overview of Cluster Linking for Disaster Recovery
Congratulations, you have successfully geo-replicated data between two AWS PrivateLink Confluent Cloud clusters!
To learn more about what you can accomplish with Confluent Cloud and mirror topics, see the Cluster Linking docs and examples.
Deleting the cluster links and networking resources
If you want to remove cluster links and stop accruing charges, you can delete them in any order with the following command:
confluent kafka link delete <link-name> --cluster <cluster-id>
Or on the Confluent Cloud Console, the REST API, or Terraform.
If all cluster links are deleted and you no longer need the network links, use the DELETE REST API to delete the Network Link Endpoint(s) first, and then delete the Network Link Service.
Stopping the data flow
Deleting any one resource–cluster link, network link service, or network link endpoint will stop data from being mirrored from source to destination cluster.
Removing the destination cluster network or environment ID from the allowed list of IDs in the Network Link Service will also stop the data flow.
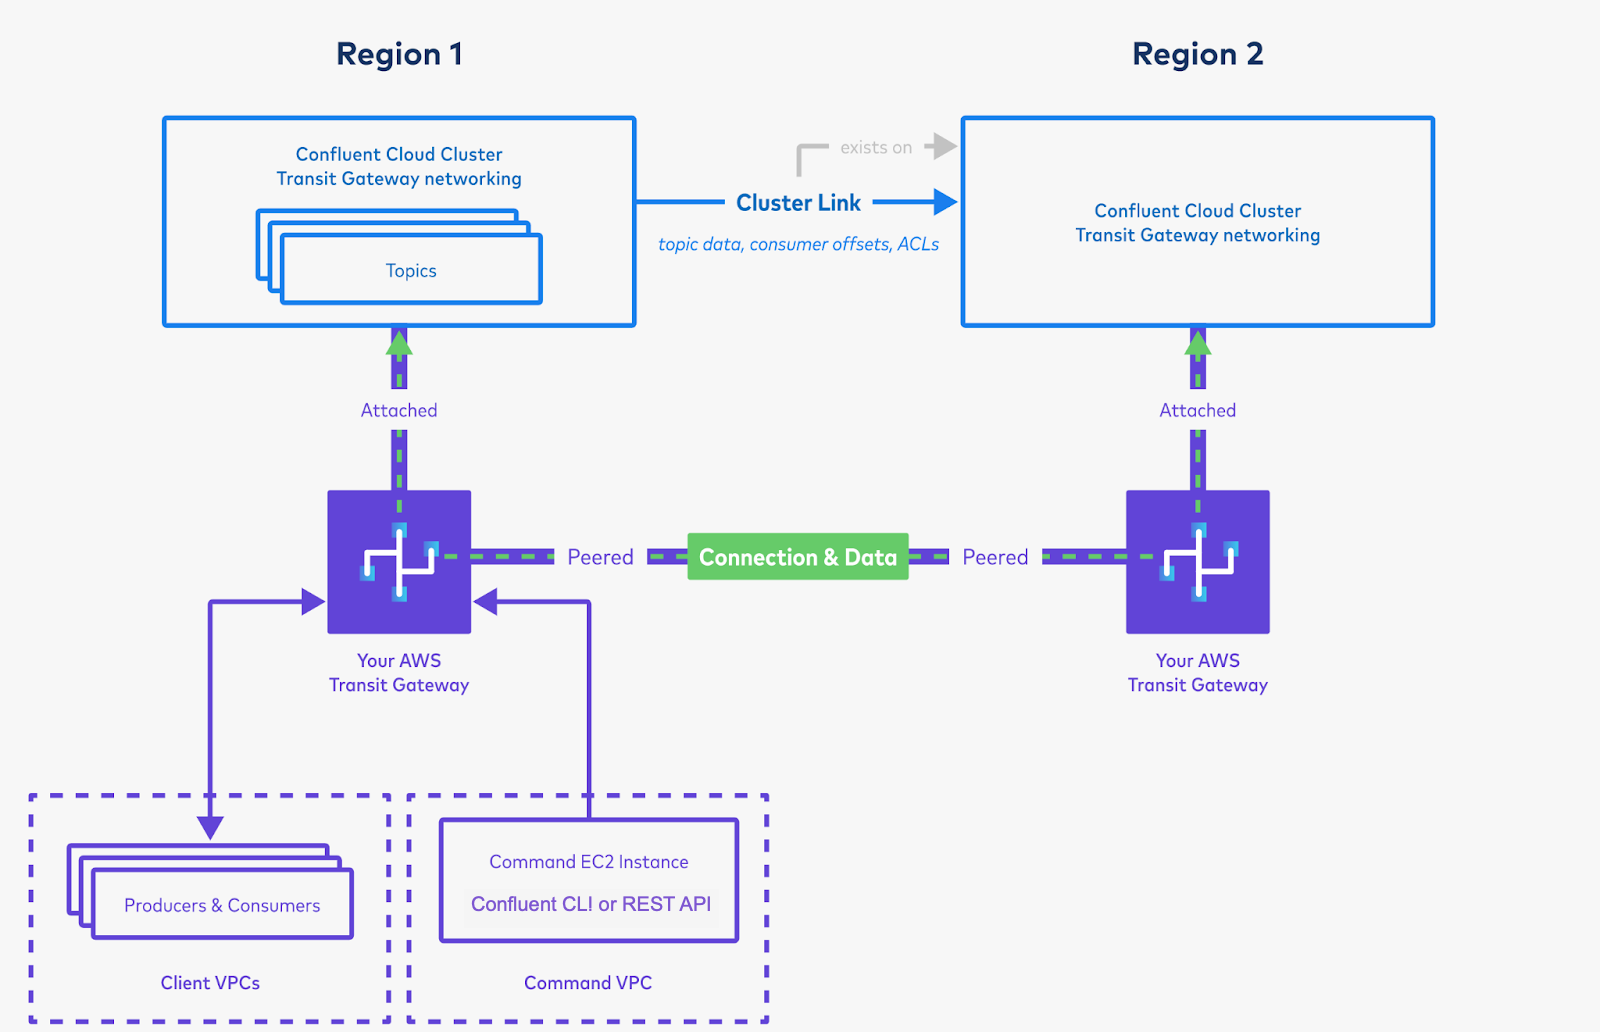
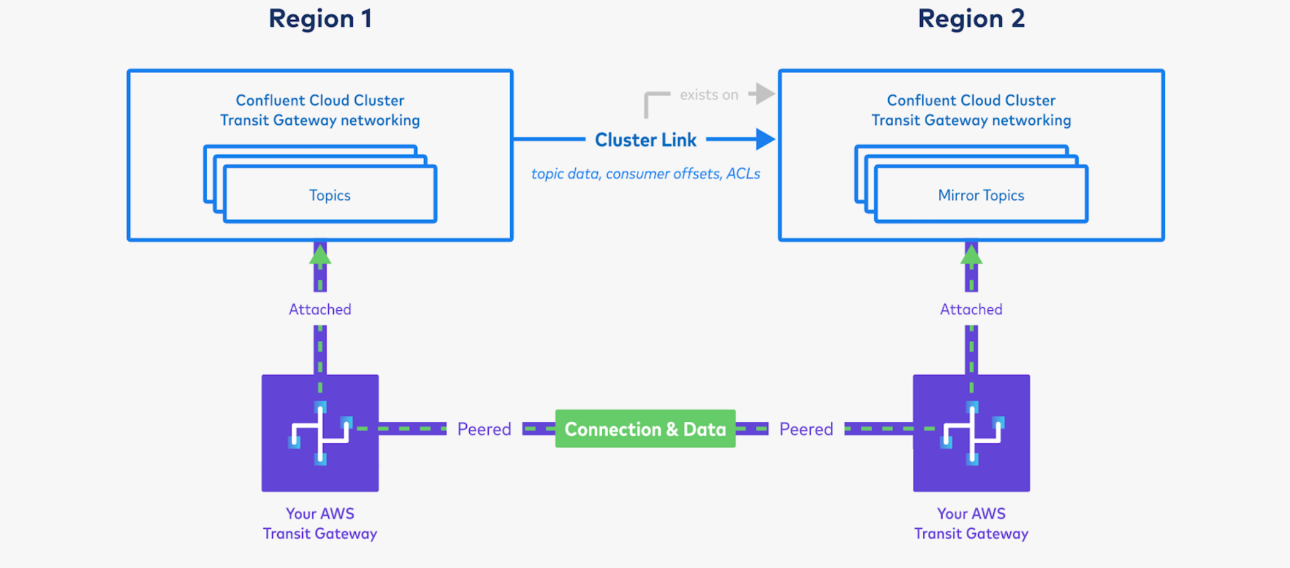
(Legacy) Cluster Linking between AWS Transit Gateway attached Confluent Cloud clusters
Warning
This legacy workflow requires you to use AWS Transit Gateway to create a cluster link with private networking. Support for private linking with AWS and Azure now enables you to bypass this setup. The currently recommended workflow for both AWS and Azure is described in Cluster Linking between Confluent Cloud clusters using Azure, AWS, or Google Cloud private networking.
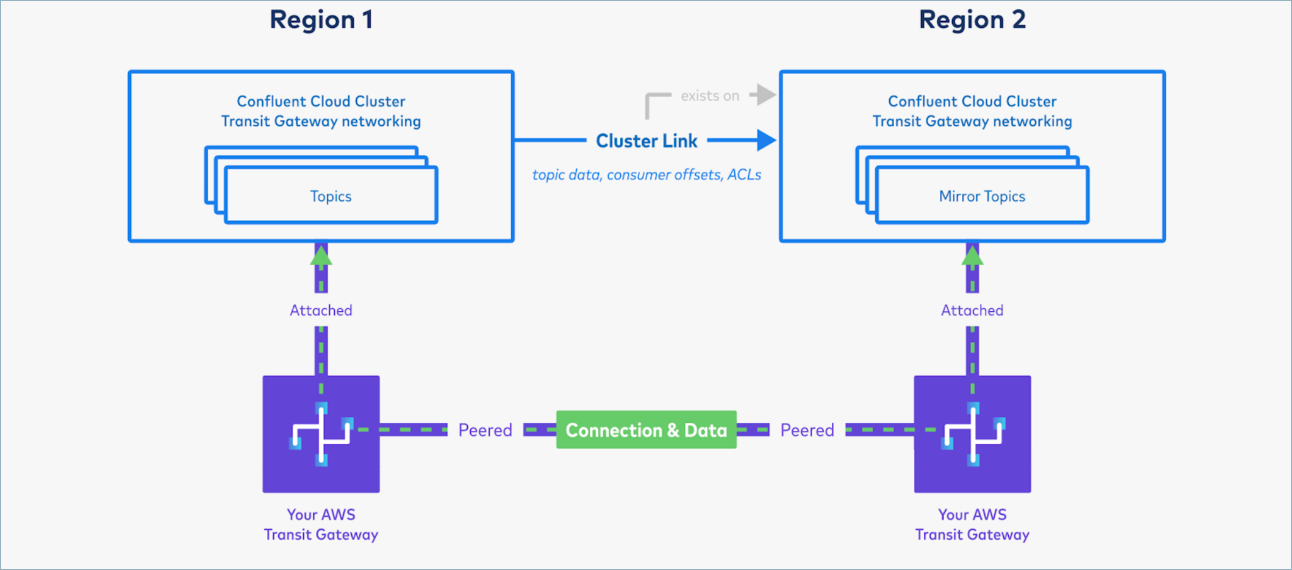
Confluent provides Cluster Linking between AWS Transit Gateway Confluent Cloud clusters as a fully-managed solution for geo-replication, multi-region, high availability and disaster recovery, data sharing, or aggregation.
This section describes how to use Cluster Linking to sync data between two private Confluent Cloud clusters in different AWS regions that are each attached to an AWS Transit Gateway. You can provision new Confluent Cloud clusters or use existing AWS Transit Gateway attached or AWS virtual private cloud (VPC) Peered Confluent Cloud clusters.
Limitations
This is limited to Confluent Cloud clusters that use AWS Transit Gateway as their networking type.
Tip
AWS VPC Peered clusters can be seamlessly converted to AWS Transit Gateway clusters with a Confluent support ticket. The Confluent Cloud clusters can be in the same or in different Confluent Cloud Environments or Organizations. The Transit Gateways can be in the same or different AWS Accounts. Connecting clusters from different organizations is useful for data sharing between organizations.
The clusters must be provisioned with different CIDRs. The address ranges cannot overlap.
The CIDRs for both clusters must be within RFC 1918:
10.0.0.0/8
100.64.0.0/10
172.16.0.0/12
192.168.0.0/16
The CIDRs for either cluster cannot be 198.18.0.0/15, even though it is a valid Confluent Cloud CIDR.
This configuration does not support combinations with other networking types, such as PrivateLink, or with other cloud providers, such as Google Cloud or Microsoft Azure.
Setup
Step 1: Create the networks and clusters
Determine:
the two regions to use
the two non-overlapping /16 CIDRs for the two Confluent Cloud clusters to use
the AWS account(s) to use
This decision will depend on your architecture and business requirements.
Note that:
You can use only one region, but most use cases will involve two (or more) different regions.
It is possible for the Cluster Linking to be between different AWS accounts or Confluent Cloud accounts, but most use cases will involve one AWS account and one Confluent Cloud account.
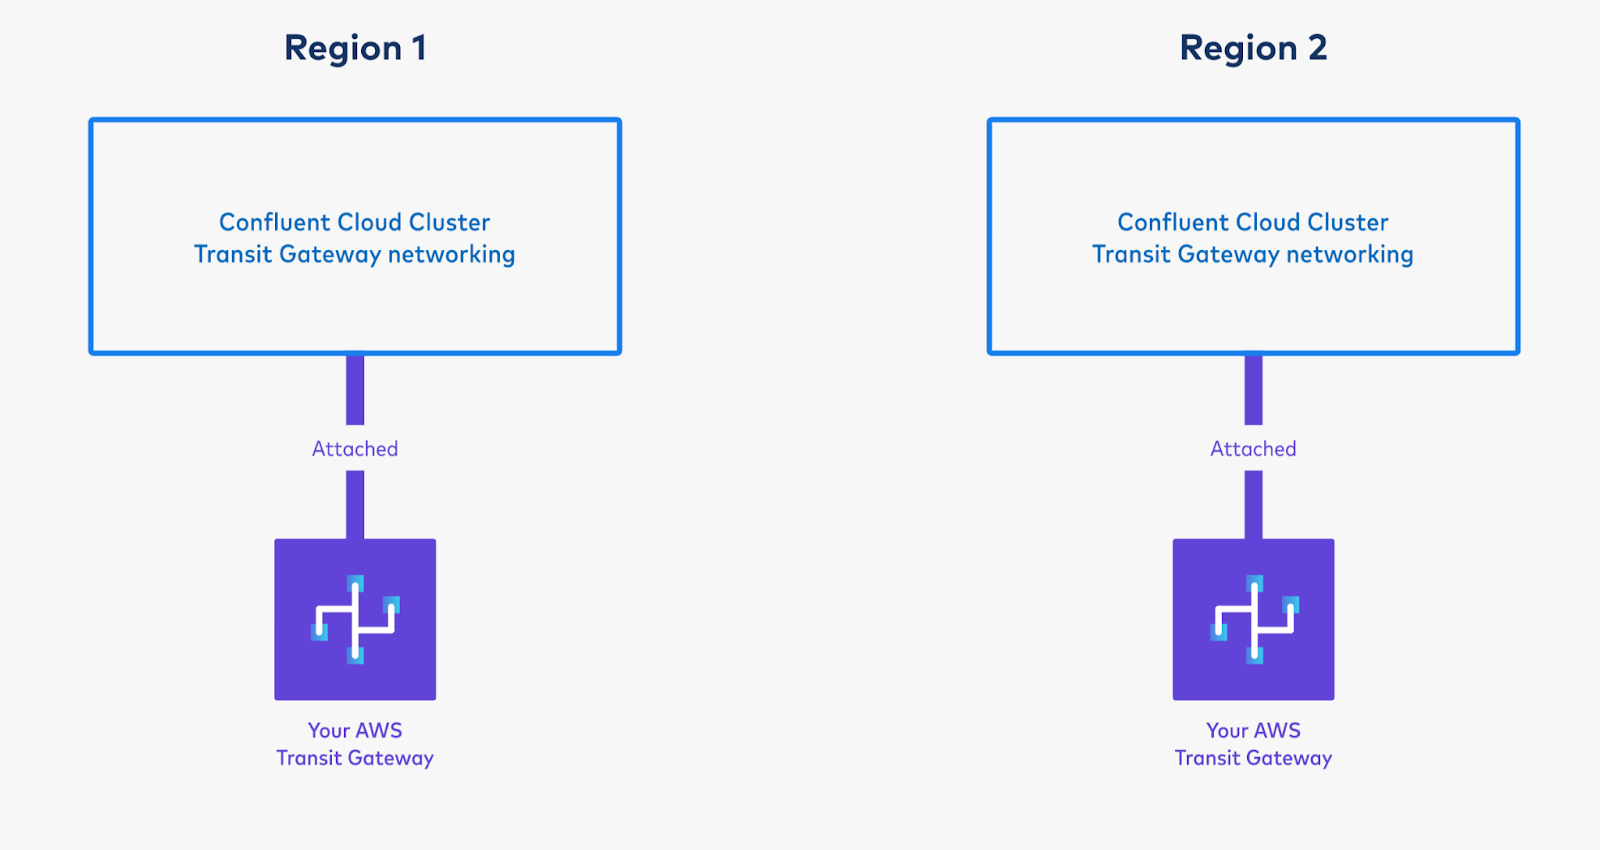
Provision two AWS Transit Gateways, one in each region, and create two resource shares; one for each Transit Gateway, as described in Use AWS Transit Gateway on Confluent Cloud under Networking.
Provision a new Transit Gateway enabled Confluent Cloud network, as described in Use AWS Transit Gateway on Confluent Cloud.
You will need to specify the network ID and the ARN of the resource share containing that region’s Transit Gateway. It is possible to seamlessly convert an existing AWS VPC Peered Confluent Cloud cluster in that region to a Transit Gateway attached cluster.
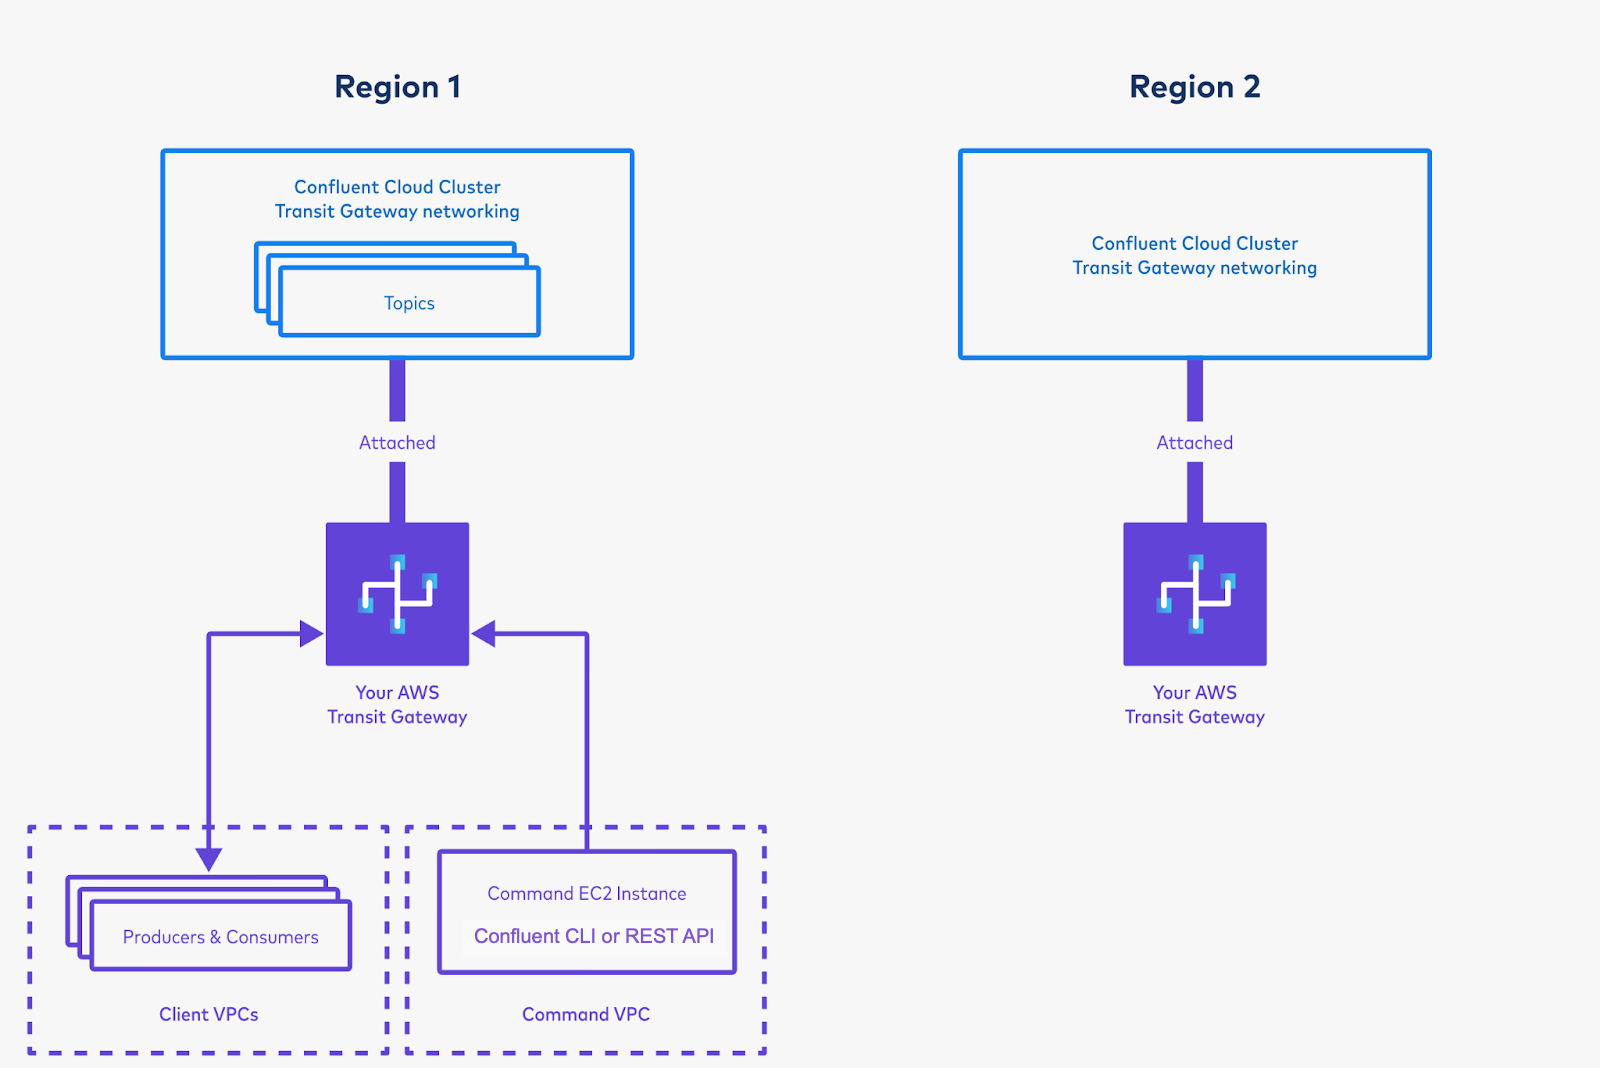
Connect a “Command VPC” from which to issue commands, and create topics on the Confluent Cloud cluster in “Region 1”.
Create a new VPC in Region 1, from which to run commands against your Confluent Cloud cluster. For purposes of this example, call this the “Command VPC”.
Attach the Command VPC to your Transit Gateway. (Make sure you have a route in the Transit Gateway’s route table that points to the Command VPC for the Command VPC’s CIDR range.)
In the Command VPC’s route table, create the following routes if they do not already exist:
Component
Route to:
Command VPC CIDR range
localConfluent Cloud CIDR range in this region
Transit Gateway in this region
Confluent Cloud CIDR range in the other region
Transit Gateway in this region
$0.0.0.0/0An Internet Gateway (create one if needed) [8]
Create and launch an EC2 instance in that VPC.
SSH into the EC2 instance. (If needed for this step, create an Elastic IP and assign it to this EC2 instance.)
Log on to the Confluent CLI with confluent login.
Select your Confluent environment with confluent environment use <environment-ID>. (You can list your environments with confluent environment list <environment-ID>.)
Select your Confluent cluster in this region with confluent kafka cluster use <cluster-id>. (You can list your clusters with confluent kafka cluster list.)
List the topics in your Confluent Cloud cluster with confluent kafka topic list. If this command fails, your Command EC2 instance may not be able to reach your Confluent Cloud cluster. Your networking may not be correctly set up. Make sure you followed the steps above. See the Troubleshoot section if needed.
Create a new topic with confluent kafka topic create my-topic –partitions 1. If you have more Kafka clients, you can spin them up in VPCs attached to the Transit Gateway, and produce to and consume from the cluster.
Step 2: Create a cluster link
After you have two Transit Gateway-attached Confluent Cloud clusters, you can set up Cluster Linking between the two clusters to copy data and metadata from one to the other.
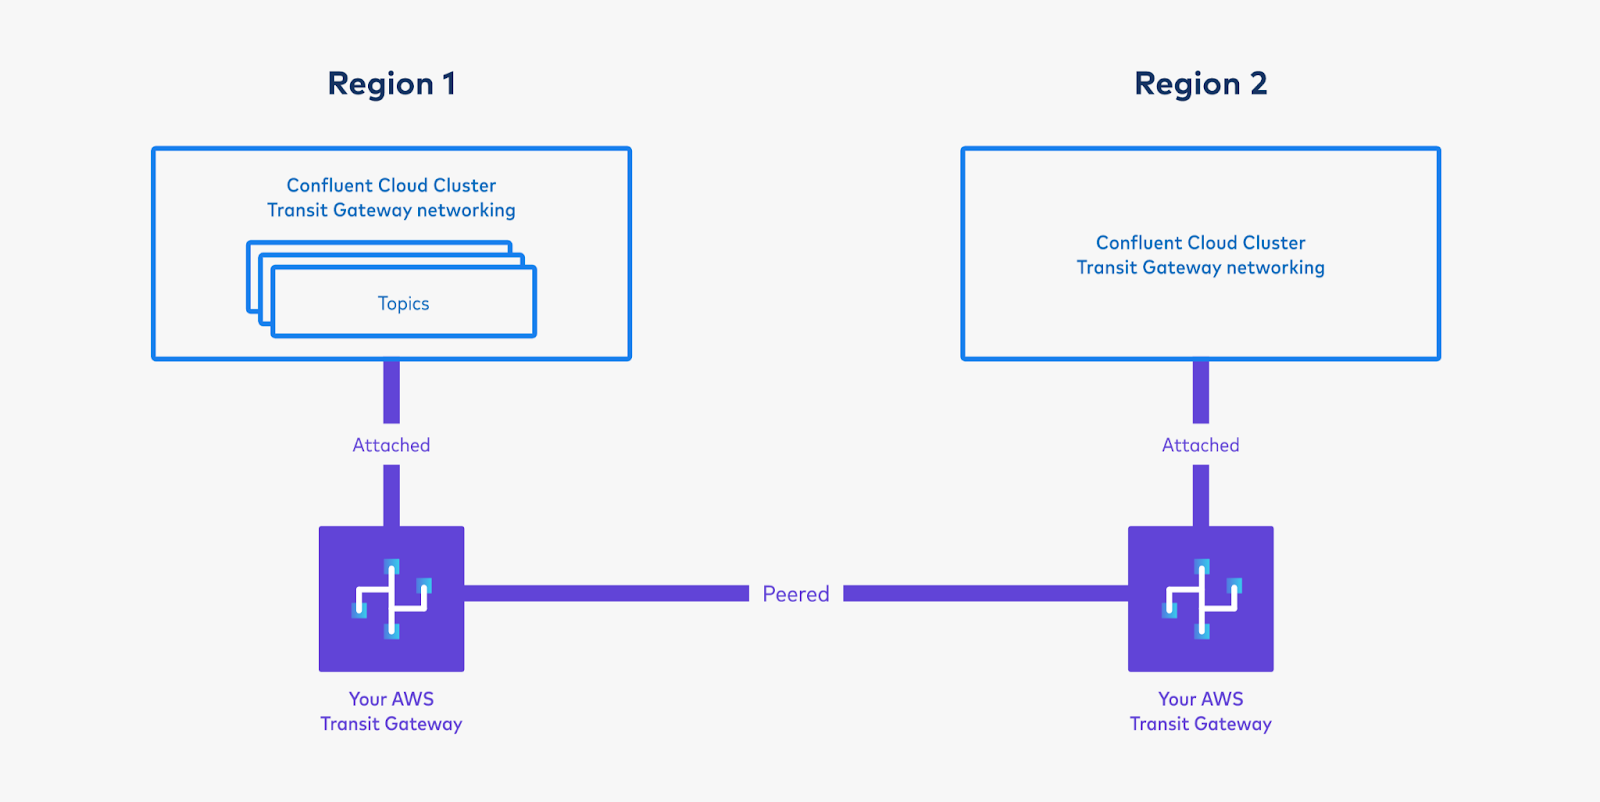
Peer the Transit Gateways. This will create connectivity between the two. This can be done cross-account, if needed.
Set up routes and propagation so that the two clusters have connectivity to each other.
In each Transit Gateway’s Route Table, these routes are required:
Component
Route to:
To the local Confluent Cloud cluster
CIDR: This region’s Confluent Cloud cluster CID
Type: Propagated
Destination: a Confluent VPC [9]
To the other region’s Confluent Cloud cluster
CIDR: The other region’s Confluent Cloud cluster CID
Type: Static
Destination: Peering — the other region’s Transit Gateway, that was peered
To the other command VPC in this region [10]
CIDR: CIDR range of your Command VPC
Type: Propagated
Destination: Command VPC
To the other command VPC in the other regions (if applicable)
CIDR: CIDR range of your Command VPC
Type: Propagated
Destination: Command VPC
Check that the Command VPC from Region 1 can access the Confluent Cloud cluster in Region 2. This ensures that your networking is set up properly.
List the cluster’s topics with
confluent kafka topic list --cluster <region-2-cluster-id>.If this command succeeds, then you’ve verified that Confluent Cloud has inter-region connectivity!
Set up privileges on the cluster in Region 1 for the cluster link, and create a cluster link on Region 2’s cluster.
You will use the bootstrap server of the cluster in Region 1. Because you have peered the Transit Gateways and set up routing between the two clusters, the cluster in Region 2 will be able to resolve the private CIDR of the cluster in Region 1.
As long as your Command VPC can reach the Destination Cluster (Region 2 in this picture), it does not matter which region the Command VPC is in. (It is okay to run the command from Region 1.)
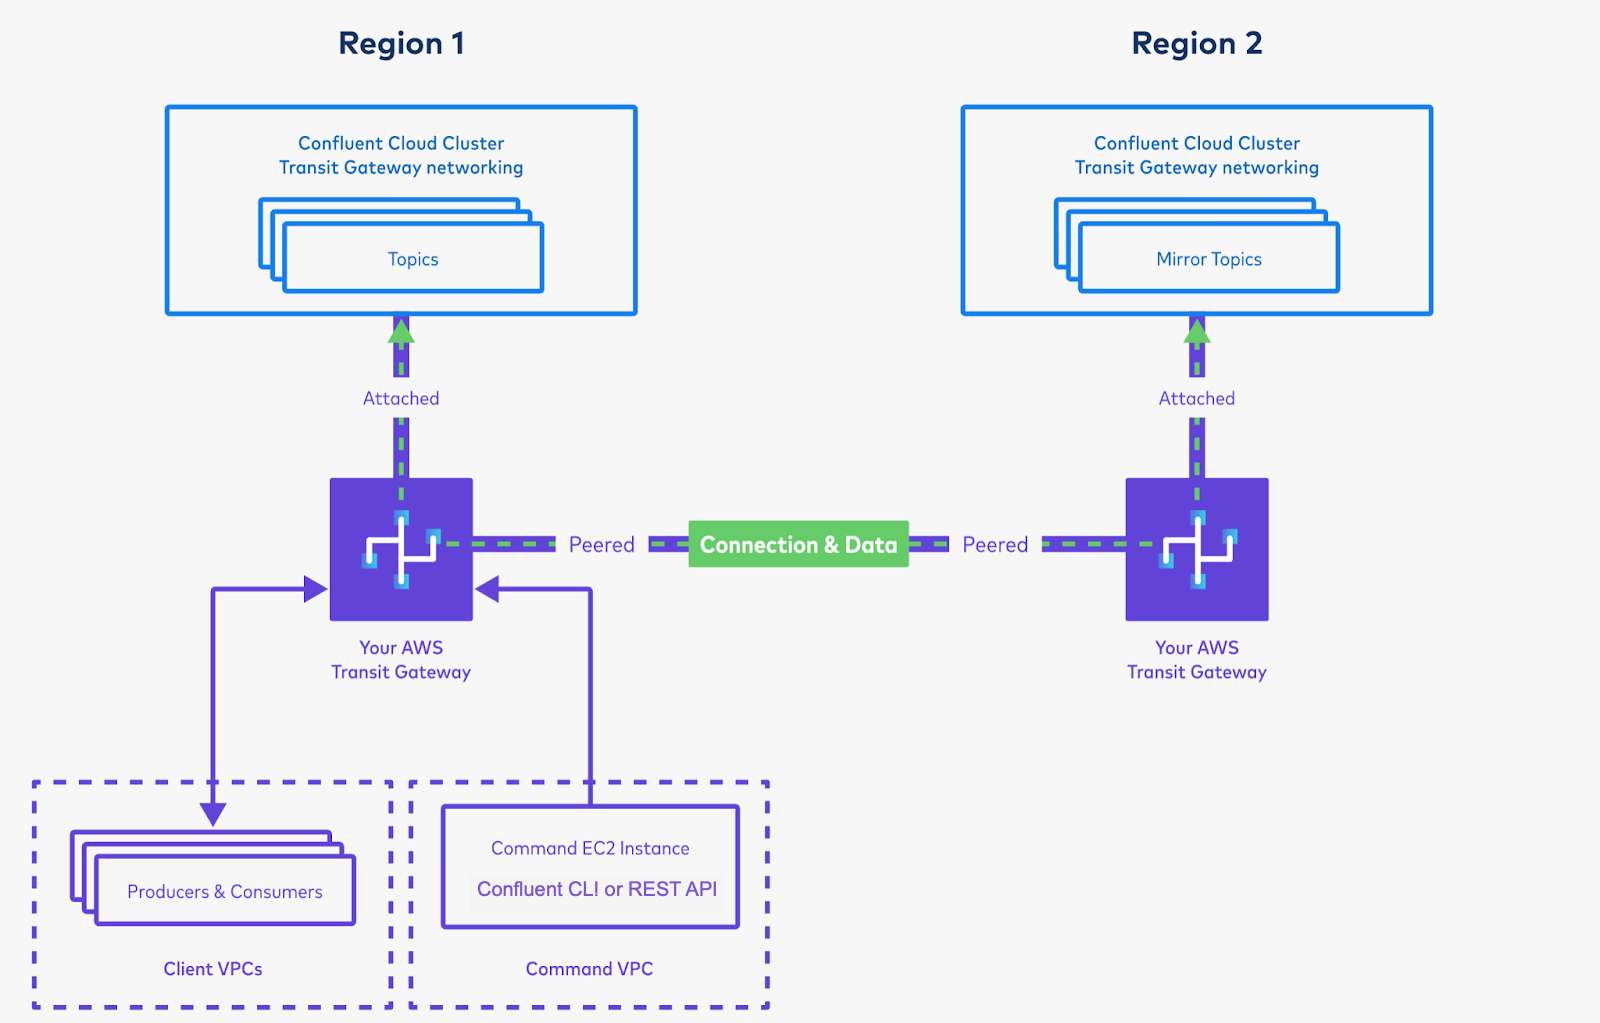
Create mirror topics using the cluster link, and produce and consume the data. This will bring data from Region 1 to Region 2.
Follow the Quick Start instructions or the more in-depth Data sharing tutorial instructions.
It is okay to run these commands from Region 1, even if they are against Region 2’s cluster, as long as your Command VPC has connectivity to Region 2’s cluster. Successfully consuming messages from Region 2 proves the inter-region replication is working, no matter where your Command VPC itself lives.
Now, you can spin up more Kafka producers and consumers in Region 1, and Kafka consumers in Region 2. You can also create a Command VPC in Region 2, so that you can issue
confluentcommands should Region 1 experience an outage.
You can also set up a cluster link in the opposite direction, too. You only need to repeat steps 4 through 6 above. You do not need to set up additional networking to create additional cluster links. You only need to set up the networking once.
Cluster Linking between two Confluent Cloud clusters in the same region
If you want to create a cluster link between two AWS Transit Gateway Confluent Cloud clusters in the same AWS region, this is a special case in which the requirements may be different, depending on the networking setup: Here are some scenarios and factors to consider:
If both Confluent Cloud clusters are in the same Confluent Cloud network, the additional configuration described in previous sections is not necessary, Only one Transit Gateway is required; without any Transit Gateway peering or changes to its route table.
If the Confluent Cloud clusters are in different Confluent Cloud networks, but both are attached to the same Transit Gateway, then the only requirement is that they use the same Transit Gateway Route Table. The routes from each CIDR to each Confluent VPC must be in the same route table. No Transit Gateway Peering is required.
If the Confluent Cloud clusters are attached to different Transit Gateways, then the above configuration is required. The steps are no different for two Transit Gateways in the same region from two Transit Gateways in different regions.
Management responsibilities
Every cluster link runs as a continuous service managed by Confluent Cloud. Keeping a cluster link running is a shared responsibility between Confluent and its customers:
Confluent is responsible for the Cluster Linking service.
The customer is responsible for the network that facilitates the connection between the two clusters.
To operate a cluster link between two AWS Transit Gateway Confluent Cloud clusters, Confluent requires that the AWS networking be configured as laid out in the sections on this page.
Troubleshoot Transit Gateway Cluster Linking
This section covers these issues:
For more troubleshooting help, see Troubleshoot Cluster Linking on Confluent Cloud.
My CLI commands / API calls are failing
Often, CLI commands may fail if you are not running them from a place that has connectivity to your Confluent Cloud cluster. Verify that your CLI (for example, which may be running in a Command EC2 instance) has connectivity to the Confluent Cloud cluster.
You can test connectivity to the cluster with:
confluent kafka cluster describe <destination-cluster-id>
Get the URL out of REST Endpoint.
telnet <url> 443
Tip
Note the space in front of
443instead of a colon (:).Example success showing connectivity:
telnet pkc-z3000.us-west-2.aws.confluent.cloud 443
Trying 10.18.72.172…
Connected to pkc-z3000.us-west-2.aws.confluent.cloud.
Escape character is '^]'
Example failure (the command will hang indefinitely):
telnet pkc-z3000.us-west-2.aws.confluent.cloud 443
...
If this process ends in failure, you are not running the CLI commands from a location that has connectivity to your Confluent Cloud cluster. Work with your networking team to ensure your instance is attached and routed to your Transit Gateway to the Confluent Cloud cluster.
Troubleshoot Transit Gateway connectivity
Ensure the Transit Gateways, Peering, and Route Tables are properly configured.
Assuming a transit gateway in Region A and one in Region B, with CIDRs CIDR-A and CIDR-B :
Transit Gateway Region A route table
Component | Route to: |
|---|---|
CIDR-A | Confluent VPC A (Confluent is responsible for setting this) |
CIDR-B | Transit Gateway B via Peering connection |
Transit Gateway Region B route table
Component | Route to: |
|---|---|
CIDR-A | Transit Gateway B via Peering connection |
CIDR-B | Confluent VPC B (Confluent is responsible for setting this) |
Note that each transit gateway has routes set for both CIDRs. This may be the issue. If the transit gateways are not both set up with both CIDRs, then the clusters will not have connectivity to each other. The route between the two Confluent Cloud clusters and transit gateways must allow traffic over port 9092.
You can test if the cross-region connectivity works like this:
Attach a Test VPC in Region A to A’s transit gateway.
Launch an EC2 instance in the Test VPC (or you can use the “Command VPC” if you set one up per the previous steps).
Route the EC2 instance into transit gateway in Region A:
Test VPC Route Table:
Component
Route to:
CIDR-Test-VPC:
local
CIDR-A
Transit gateway A
CIDR-B
Transit gateway A (also)
Transit gateway Region A Route Table: Add
CIDR-Test-VPC: Test VPC AttachmentTransit gateway Region B Route Table: Add
CIDR-Test-VPC: TGW A via Peering connection(needed for bidirectional connectivity)
SSH into the EC2 instance. For example, put an elastic IP on the EC2 instance.
Check connectivity to Cluster A:
telnet CIDR-A 9092
If successful, you should see similar output:
Trying 10.18.72.172...
Connected to pkc-z3000.us-west-2.aws.confluent.cloud.
Escape character is '^]'.
Check connectivity across the peering connection to Cluster B:
telnet CIDR-A 9092
If successful, you should see similar output:
Trying 10.18.72.172...
Connected to pkc-z3000.us-west-2.aws.confluent.cloud.
Escape character is '^]'.
Confluent Cloud billing considerations
There are cost differences associated with private vs. public networking. These are detailed under Cluster Linking in the Billing documentation. Examples are provided there for public networking.
Here is further detail specifically related to the private-public-private pattern outlined for Cluster Linking.
Private-Public-Private pattern cost considerations and security
When adding the jump cluster architecture to an existing Origin and Target cluster, new Confluent Cloud cost will be introduced by:
The Jump cluster (an hourly cost)
The two cluster links: one from origin to Jump, and one from Jump to Target (an hourly cost)
The data throughput (ClusterLinkRead and ClusterLinkWrite charged twice), once on each cluster link (a per GB cost).
How to keep costs as low as possible and maintain security
Consider these suggestions and recommendations for keeping costs as low as possible while still achieving the desired level of security on the cluster links.
Use a single zone for the jump cluster
Using a “single zone” cluster for the Jump cluster will reduce the hourly cost of the jump cluster, if the replication use case can tolerate the “single zone” service level agreement (SLA). Here are points to consider for this strategy:
“Multi-zone” clusters are always recommended for clusters that run “production” traffic–which the Origin and Target clusters likely do–as they come with a higher SLA. However, the “single zone” Jump cluster’s SLA may be sufficient if the use case is data sharing, data aggregation, or even disaster recovery.
If there is a disruption in the availability zone used by a “single zone” jump cluster, it will only impact the replication flow from Origin to Target. Producers and consumers on both Origin and Target clusters will be unaffected. When the disruption ends, if the Jump cluster returns to healthy status, the cluster links will automatically resume and catch the Target cluster up with any data that it missed.
For a Data Sharing or Data Aggregation architecture, replication is used to send a copy of data from the Origin to the Target, so the Target’s consumers can read the data. An outage of the availability zone of a single zone Jump cluster would stop the cluster links from replicating new data to the Target cluster. During this time, the Target’s consumers can still read any data that was already replicated to the Target. When the outage is over, if the Jump cluster recovers in good health, the Target’s replicated topics will automatically catch up and the consumers will be able to read data. Topics on the Target cluster that do not use replication will be unaffected. Therefore, the only effect of an availability zone outage on a single zone Jump cluster is a delay in some replicated data. A multi-zone Jump cluster would avoid this case, but for an added cost.
For a Disaster Recovery (DR) architecture, replication is used to keep topics on the Target cluster up-to-date and ready for failover, should an outage hit the Origin cluster. If the availability zone of a single zone Jump cluster has an outage, this would temporarily halt replication, thereby increasing the RPO at the moment. Hypothetically, if some time after this outage began and before it resolved, the Origin cluster’s region (a different cloud region from the Jump cluster) also experienced an outage, then its applications would fail over to the Target cluster without access to recent data produced since the Jump cluster’s zone outage. The net effect is that, in this corner case, a multi-zone Jump cluster would yield a lower RPO than a single zone jump cluster, for an added cost. However, as of this writing, there are no documented cases of a cloud provider experiencing a regional outage and an availability zone outage in a different region at the same time. Because this hypothetical corner case is exceedingly rare, most enterprise companies require disaster recovery for only a single cloud region outage at a time, and therefore would be served by a single zone Jump cluster.
Use bidirectional cluster links if data needs to flow in both directions
If data needs to flow in both directions (Origin to Target, and Target to Origin), using a bidirectional link is most cost-effective.
Using the “bidirectional” cluster link mode will allow topics to mirror from Origin to Target, and will also allow topics to go back from Target to Origin without any additional cluster links. (Bidirectional mode is always recommended when using Cluster Linking for Disaster Recovery.)
A single Jump cluster can be used for both directions, as long as prefixing is used on at least one of the cluster links.
Next steps
Try Confluent Cloud on AWS Marketplace with $1000 of free usage for 30 days, and pay as you go. No credit card is required.