

Integrate Tableflow with Snowflake Open Catalog in Confluent Cloud
Snowflake Open Catalog is a catalog solution for Apache Iceberg™ tables that uses the open source Iceberg REST protocol. Snowflake Open Catalog integrates with Tableflow at the cluster level and automatically publishes all Tableflow-enabled topics as tables in Snowflake Open Catalog.
Warning
For new deployments, use Integrate Tableflow with Snowflake Horizon Catalog in Confluent Cloud. Snowflake no longer offers Open Catalog sign-up to new accounts and directs them to Snowflake Horizon Catalog. For more information, see the Snowflake Open Catalog overview. This page applies to existing Open Catalog deployments.
Step 1: Configure your Amazon S3 bucket
In this step, you create an Amazon S3 bucket to store your Iceberg tables. If you have an S3 bucket already, you can skip to the next step.
In the Amazon S3 console, navigate to General purpose buckets and click Create bucket.
Accept the default values and name your bucket. The bucket name must be unique. In this example, the bucket name is
tableflow-s3-bucket.Click Create bucket.
Step 2: Create the permission policy
In this step, you create a permission policy for the storage provider integration.
Log in to Confluent Cloud Console and navigate to the environment that has the Kafka cluster with your topics.
In the navigation menu, click Integrations.
The Integrations page opens.
Click Add integration.
The Add integration details page opens.
Select AWS IAM role and click Continue.
The Configure role in AWS page opens.
Select New role and click Continue.
The Create permission policy in AWS page opens.
In the Select Confluent resource dropdown, select Tableflow S3 Bucket.
Copy the provided Permission-policy.json and click Continue.
The Create role in AWS and map to Confluent page opens.
In a new tab, open your Amazon Web Services account and navigate to IAM > Policies, or click the AWS IAM Console link in Cloud Console.
In the Policies page, click Create policy.
The Specify permissions page opens.
In the Policy editor section, select JSON.
Paste the copied
Permission-policy.json.Replace all instances of
<bucket-name>with the name of your bucket, for example,tableflow-s3-bucket, and click Next.The Review and create page opens.
In the Policy details section, name the policy
tableflow-s3-access-policyand click Create policy.
Step 3: Create the trust policy
In this step, you create a role in AWS that uses the policy you created,
plus a trust-policy.json to allow Confluent to assume this role.
In Confluent Cloud Console, return to the Create role in AWS and map to Confluent page.
Copy the provided Trust-policy.json.
In the AWS console, navigate to IAM > Roles and click Create role.
Tableflow assumes this role.
Select Custom Trust Policy, paste the
trust-policy.jsoninto the editor, and click Next.The Add permissions page opens.
In the Permissions policies list, find the policy you created in the previous step, for example,
tableflow-s3-access-policy. Attach it to the role, and click Next.The Name, review, and create page opens.
In the Role details section, name the role
s3-tableflow-assume-roleand click Create role.When the role is created, click View role to see the role details.
Copy the ARN of the role, which resembles
arn:aws:iam::<xxx>:role/<your-role-name>.In Cloud Console, return to the Create role in AWS and map to Confluent page, and in the Map the role in Confluent section, paste the ARN.
Name the role
s3-provider-integrationand click Continue.The Update trust policy in AWS page opens.
Copy the updated
trust-policy.json, which contains the Confluent External ID and role.In the AWS Console, return to the AWS IAM role you created, for example,
s3-tableflow-assume-role.Select the Trust relationships tab.
Click Edit trust policy or Edit trust relationship.
Replace the entire existing JSON with the updated
trust-policy.jsonyou copied from Cloud Console. This adds the necessary External ID condition.Click Update policy or Save changes.
In Cloud Console, return to the Update trust policy in AWS page and click Continue.
Your new integration is created and appears in the Integrations page.
Step 4: Enable Tableflow on your Kafka topics
With the provider integration configured, you can enable Tableflow for your Kafka topics.
In Cloud Console, navigate to your environment, then select the Kafka cluster that has your topics.
In the navigation menu, click Topics, and in the topic list, find the specific topic you want to enable Tableflow for.
In the Tableflow column, click Enable Tableflow.
In the Enable Tableflow dialog, click Configure custom storage.
The Choose where to store your Tableflow data page opens.
In the Provider integration dropdown, select your provider integration, for example,
s3-provider-integration.In the AWS S3 Bucket name field, enter the name of your bucket, for example,
tableflow-s3-bucket, and click Continue.Review the details and click Launch.
The details page for your topic displays Tableflow sync pending. After a few seconds the status updates to Syncing, which means your topic is connected to the table in your S3 bucket and Tableflow is syncing the data.
Configure Snowflake Open Catalog integration
Follow these steps to enable Snowflake Open Catalog integration at the cluster level. Start by creating an external catalog in Snowflake Open Catalog.
Important
Topics must be materialized in order for catalog synchronization to
complete. Enable Tableflow on a topic before enabling your external
catalog provider. Catalog sync remains in the pending state until at
least one topic is enabled with Tableflow.
Create an IAM policy that grants access to your bucket, for example,
my_snow_table_bucket, where you plan to materialize Iceberg tables by following the steps in Create an IAM policy that grants access to your S3 location.Create an IAM role in AWS by following the steps in Create an IAM role to grant privileges on your S3 bucket. Attach the IAM policy you created in the previous step.
In Snowflake Open Catalog, create an external catalog, for example,
my_tableflow_ext_catalog, using a storage bucket, for example,my_table_bucket, by following the steps in Create a catalog in Open Catalog.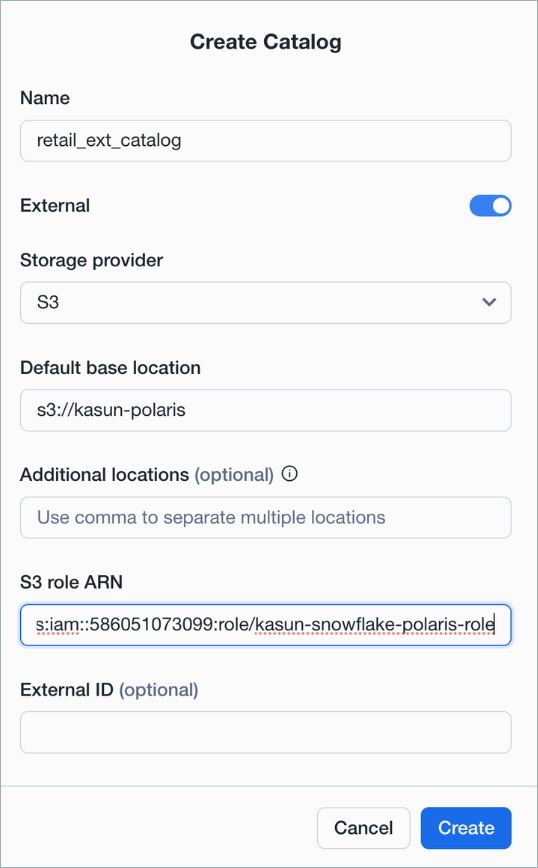
Retrieve the Snowflake Open catalog
arnand external ID by following the steps in Retrieve the AWS IAM user for your Open Catalog account.Grant the IAM user access to your bucket following the steps in Grant the IAM user permissions to access bucket objects.
Configure a new service connection for Tableflow and obtain the
client IDandclient secretby following the steps in Configure a service connection.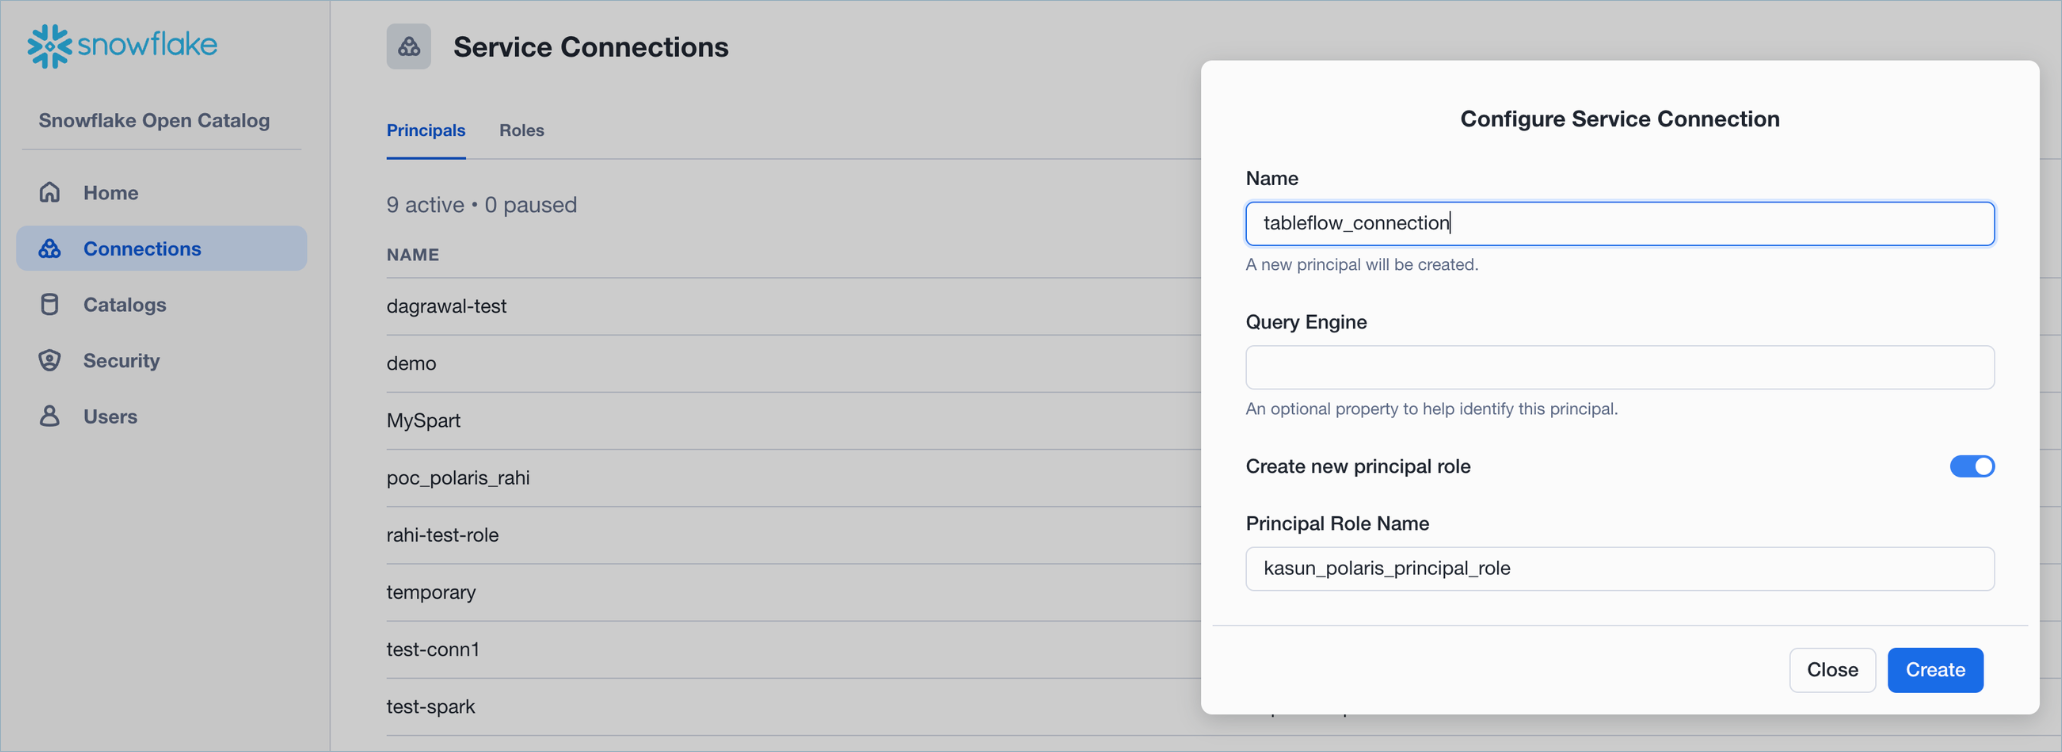
Set up catalog privileges for the connection by following the steps in Set up catalog privileges.
In Confluent Cloud Console, create a catalog integration in Tableflow by providing the following inputs.
Snowflake Open Catalog URL:
https://<polaris account id>.snowflakecomputing.comWarehouse name:
<my_tableflow_ext_catalog>Client ID:
<client ID of the service connection>Client secret:
<client secret of the service connection>Allowed scope:
<PRINCIPAL_ROLE:your_polaris_principal_role>
After connecting Tableflow with the Snowflake Open Catalog, navigate to the external catalog that you created and verify that the Iceberg tables are published to the catalog.
Tip
After you configure the catalog integration, you can monitor each topic’s catalog sync status from the Tableflow page in the Confluent Cloud Console. For more information, refer to Topic catalog sync status.