
Kafka REST API Quick Start for Confluent Cloud
Apache Kafka® REST APIs, listed in the API reference under KAFKA API (V3), are a subset of the Confluent Cloud REST APIs available as core building blocks of Confluent Cloud. You can use the APIs to manage your own account or to integrate Confluent into your product.
Get Started for Free
Sign up for a Confluent Cloud trial and get $400 of free credit.
The Kafka REST API is a set of cloud-native APIs for administering and using your Kafka clusters. The API endpoint is available by default for all cluster types and can be accessed via the Confluent Cloud Console.
This quick start gets you up and running with administering your Apache Kafka® cluster using the Confluent Cloud REST APIs.
Note
Currently, these APIs support only BINARY, JSON and STRING. Therefore, the APIs do not currently support using Schema Registry for validation of produced messages against the supported schema formats.
What the Quick Start Covers
With this quick start, you will learn how to use the REST admin endpoints to:
View existing topics
Create a topic
Update the topic configuration
Get a full list of properties and values for a topic
Get the value for a specified property for a topic
Produce data to a topic
Delete the topic
The Quick Start demos a small subset of the endpoints available, and shows how to use a few different types of calls. This is a primer, and therefore not comprehensive. A much wider range of functionality is available through the API.
Prerequisites
As a prerequisite, you’ll need a Kafka cluster in Confluent Cloud.
You can use an existing cluster or create a new one, as described in step 1 of the Quick Start for Apache Kafka using Confluent Cloud.
Usage Tips for the Examples
The Quick Start shows how to use curl commands to test API calls.
For your API testing, you may want to use the
--silentflag withcurland pipe the entire command through jq to get nicely formatted output. For example:curl --silent -H "Authorization: Basic <BASE64-encoded-key-and-secret>" \ --request GET --url 'https://<REST-endpoint>/kafka/v3/clusters/<cluster-id>/topics/<topic-name>/configs' | jq
Output for commands in this quick start is shown as formatted, but you have to use
curl --silentand|jqto get this, and those are not included in most of the example commands so as not to confuse this nice-to-have formatting with the core commands.To send output to a file and also view it on-screen, use
<command> | tee notes.txtto create a new file or overwrite a same-named file. Thereafter, use theteecommand with the-aflag if you want to append to an existing file; for example,<command> | tee -a notes.txt. You can chain this after thejqpipe.
Tip
Some of the examples use backslashes (\) to add returns to multi-line commands. Backslashes enable you to type a single command on multiple lines in your shell or terminal. Also, they are used here to optimize the display for the documentation. However, if you copy-paste examples with backslashes, you may not be able to arrow back up through the command to change values to match your deployment. This will depend on the type of shell you are using, and the settings for it.
Step 1: Find the REST endpoint address and cluster ID
Get the REST endpoint and cluster ID from the Confluent CLI or the Cloud Console UI:
Log on to the Confluent CLI with
confluent login.Make sure you are viewing the environment you want with
confluent environment list,confluent environment use.List the clusters to get the IDs with the command
confluent kafka cluster list.Enter this command to get cluster details:
confluent kafka cluster describe <cluster-id>
Tip
See CLI installation guide for information on installing or updating the CLI.
Sign in to the Confluent Cloud Console.
Navigate to the cluster you want to use, and click Cluster settings.
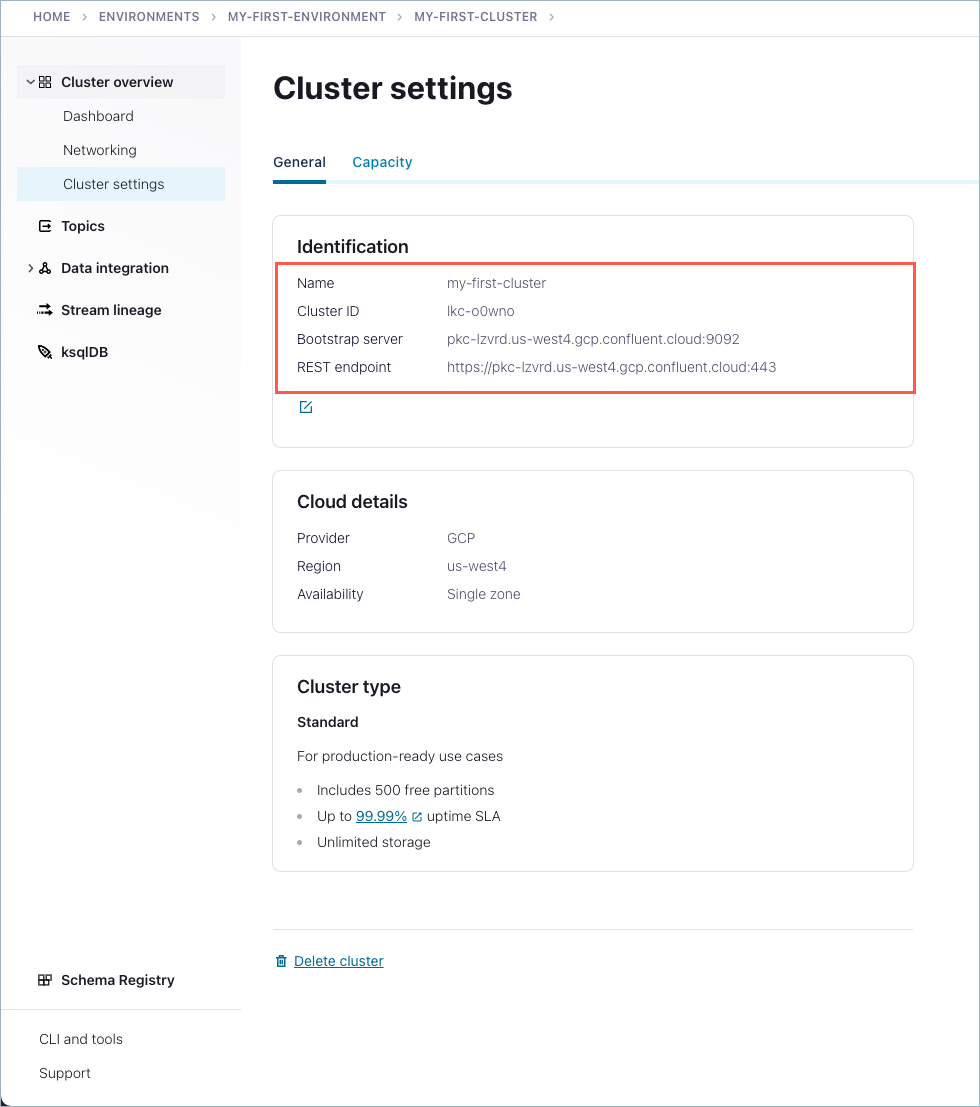
Note the REST endpoint.
This is the server where the REST APIs are hosted. Use this endpoint ID in place of the example server in the examples below.
Note the cluster ID.
This is the ID of the Kafka cluster that will be administered using the REST API and should be used in place of the example cluster ID in the examples below.
Step 2: Create credentials to access the Kafka cluster resources
Create a Confluent Cloud cluster-scoped API key and secret.
To communicate with the REST API, you need a Confluent Cloud API key and API secret. You can generate an API key pair by using the CLI or Cloud Console.
If you have not done so already, log on to the Confluent CLI with
confluent login.Run the following command to create the API key and secret for the cluster.
confluent api-key create --resource <cluster-id> --description <key-description>
Your output should resemble:
It may take a couple of minutes for the API key to be ready.
Save the API key and secret. The secret is not retrievable later.
+---------+------------------------------------------------------------------+
| API Key | 1234WXYZ4321ZYXW                                                 |
| Secret  | 1aBcDEFG234Hy7CeGBoBDoBBsSttOMJ5oFUwwkhj7g7MlS3p01c99C6ao84pQb8X |
+---------+------------------------------------------------------------------+
In Confluent Cloud Console, navigate to the cluster you want to use, and from the left menu, select Cluster Overview -> API Keys.
Click Create key and follow the prompts to create a Global access API key.
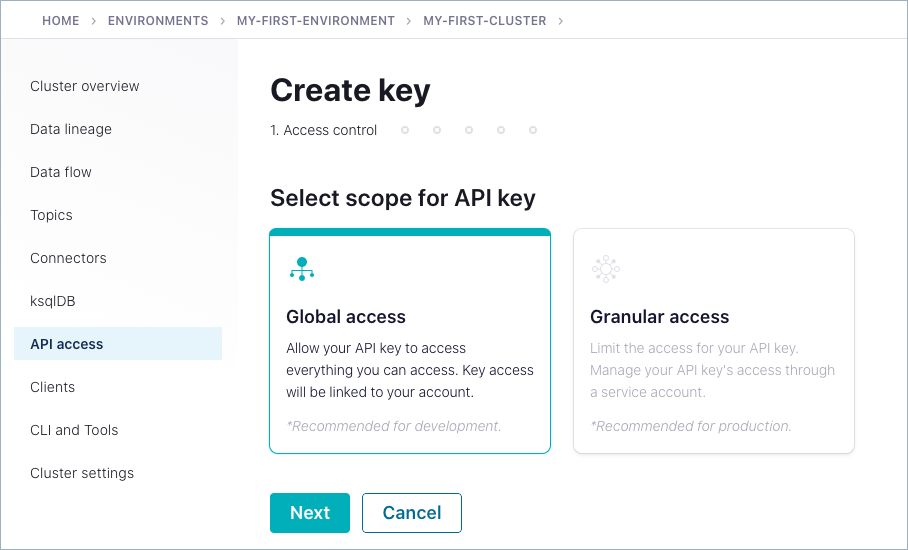
For more information, see Use API Keys to Authenticate to Confluent Cloud.
Use the API key ID and corresponding secret to create the base64 encoded string used in the authorization header that will be included in the REST calls to the Confluent Cloud API.
To learn more, see Authentication in the API documentation, which describes Cloud and Cluster API keys and base64 encoding.
For example, to generate a base64 header from an API key on Mac OS:
echo -n "<api-key>:<api-secret>" | base64
Your output from the above command will be a long alphanumeric string: the base64 encoded key and secret, which you will use as basic authorization in the REST API calls that follow. Save this so that you can use it in the next steps.
(Optional) Store the base64 encoded key and secret in an environment variable for use in commands.
To make rest of the steps in this quick start more efficient, you can optionally store the base64 encoded key and secret in an environment variable, then use the variable in subsequent commands. For example, to store the encoded key and secret in a variable called
MYKEY:MYKEY=<alphanumeric string of your base64 encoded API key and secret>
You can check the contents of the variable with
echo $MYKEY.Then, use it for authorization in subsequent commands:
"Authorization: Basic $MYKEY".
Step 3: List the topics already available on the Kafka cluster
List the topics in the Kafka cluster:
curl -H "Authorization: Basic <BASE64-encoded-key-and-secret>" --request GET --url 'https://<REST-endpoint>/kafka/v3/clusters/<cluster-id>/topics'
For example:
curl -H "Authorization: Basic ABC123ABC" --request GET --url 'https://pkc-abcde.us-west4.gcp.confluent.cloud:443/kafka/v3/clusters/lkc-vo9pz/topics'
The response lists any existing topics.
In this example, there are no existing topics in this Kafka cluster:
{"kind":"KafkaTopicList",

"metadata":{

"self":"https://pkc-lzvrd.us-west4.gcp.confluent.cloud/kafka/v3/clusters/lkc-vo9pz/topics",

"next":null

},

"data":[]

}
Step 4: Create a topic using Cluster Administration for the Kafka REST API
Create a topic:
curl -H "Authorization: Basic <BASE64-encoded-key-and-secret>" -H 'Content-Type: application/json' \
--request POST --url 'https://<REST-endpoint>/kafka/v3/clusters/<cluster-id>/topics' \
-d '{"topic_name": "<topic-name>", "partitions_count": <Partitions count>, "replication_factor": <Replication factor>}'
For example:
curl -H "Authorization: Basic ABC123ABC" -H 'Content-Type: application/json' \
--request POST --url 'https://pkc-abcde.us-west4.gcp.confluent.cloud:443/kafka/v3/clusters/lkc-vo9pz/topics' \
-d '{"topic_name": "testTopic1", "partitions_count": 5, "replication_factor": 3}'
The response gives information about the new topic:
{

  "kind": "KafkaTopic",

  "metadata": {

    "self": "https://pkc-abcde.us-west4.gcp.confluent.cloud:443/kafka/v3/clusters/lkc-vo9pz/topics/testTopic1”,

    "resource_name": "crn:///kafka=lkc-vo9pz/topic=testTopic1"

  },

  "cluster_id": "lkc-vo9pz",

  "topic_name": "testTopic1",

  "is_internal": false,

  "replication_factor": 3,

  "partitions_count": 5,

  "partitions": {

    "related": "https://pkc-abcde.us-west4.gcp.confluent.cloud:443/kafka/v3/clusters/lkc-vo9pz/topics/testTopic1/partitions"

  },

  "configs": {

    "related": "https://pkc-abcde.us-west4.gcp.confluent.cloud:443/kafka/v3/clusters/lkc-vo9pz/topics/testTopic1/configs"

   },

  "partition_reassignments": {

    "related": "https://pkc-abcde.us-west4.gcp.confluent.cloud:443/kafka/v3/clusters/lkc-vo9pz/topics/testTopic1//partitions/-/reassignment"

    }

}
Step 5: Administer topic configurations
View the default configuration for the topic created in Step 4.
You can get the full list of topic configuration properties with this API call:
curl -H "Authorization: Basic <BASE64-encoded-key-and-secret>" \
--request GET --url 'https://<REST-endpoint>/kafka/v3/clusters/<cluster-id>/topics/<topic-name>/configs'
For example, the following command gets the full list of configurations for
testTopic1, pipes it through jq for more readable output, and usesteeto send the output to a new file (calledtestTopic1-configs.txt) and simultaneously display it on-screen. Sending the output to a file will enable you to browse and search all the original configs, which might be tangentially useful for the next steps.curl --silent -H "Authorization: Basic ABC123ABC" \ --request GET --url 'https://pkc-abcde.us-west4.gcp.confluent.cloud:443/kafka/v3/clusters/lkc-vo9pz/topics/testTopic1/configs' | jq | tee testTopic1-configs.txt
The response shows a list of topic configuration properties and the values these are set to:
{

  "kind": "KafkaTopicConfigList",

  "metadata": {

    "self": "https://pkc-abcde.us-west4.gcp.confluent.cloud:443/kafka/v3/clusters/lkc-vo9pz/topics/testTopic1/configs",

    "next": null

  },

  "data": [

    {

      "kind": "KafkaTopicConfig",

      "metadata": {

        "self": "https://pkc-abcde.us-west4.gcp.confluent.cloud:443/kafka/v3/clusters/lkc-vo9pz/topics/testTopic1/configs/cleanup.policy",

        "resource_name": "crn:///kafka=lkc-vo9pz/topic=testTopic1/config=cleanup.policy"

      },

      "cluster_id": "lkc-vo9pz",

      "name": "cleanup.policy",

      "value": "delete",

      "is_read_only": false,

      "is_sensitive": false,

      "source": "DYNAMIC_TOPIC_CONFIG",

      "synonyms": [

        {

          "name": "cleanup.policy",

          "value": "delete",

          "source": "DYNAMIC_TOPIC_CONFIG"

        },

        {

          "name": "log.cleanup.policy",

          "value": "delete",

          "source": "DEFAULT_CONFIG"

        }

      ],

      "topic_name": "testTopic1",

      "is_default": false

    },

    ...
Edit the topic configuration.
You can find a full list of configuration properties in the Topic Configurations reference in the Confluent Platform documentation.
To edit the topic properties, add the property name to the end of the URL:
curl -H "Authorization: Basic <BASE64-encoded-key-and-secret>" -H 'Content-Type: application/json' \
--request PUT  --url 'https://<REST-endpoint>/kafka/v3/clusters/<cluster-id>/topics/‘<topic-name>/configs/<property-name> \
-d '{"value": “<New value>”}’
For example, to change the value of retention.ms, from its default value of 604800000 (7 days) to 259200000 (3 days):
curl -H "Authorization: Basic ABC123ABC" -H 'Content-Type: application/json' --request PUT  \
--url 'https://pkc-abcde.us-west4.gcp.confluent.cloud:443/kafka/v3/clusters/lkc-vo9pz/topics/testTopic1/configs/retention.ms' \
-d '{"value": "259200000"}'
No response payload is returned for this call.
View the updated topic configuration.
To view the value for a single property, specify the property name in the URL:
curl -H "Authorization: Basic <BASE64-encoded-key-and-secret>" --request GET --url 'https://<REST-endpoint>/kafka/v3/clusters/<cluster-id>/topics/<topic-name>/configs/<property-name>’
For example:
curl -H "Authorization: Basic ABC123ABC" --request GET --url 'https://pkc-abcde.us-west4.gcp.confluent.cloud:443/kafka/v3/clusters/lkc-vo9pz/topics/testTopic1/configs/retention.ms'
The response payload shows the current value of the topic configuration property
retention.ms:{ "kind": "KafkaTopicConfig", "metadata": { "self": “https://pkc-abcde.us-west4.gcp.confluent.cloud:443/kafka/v3/clusters/lkc-vo9pz/topics/testTopic1/configs/retention.ms", "resource_name": "crn:///kafka=lkc-vo9pz/topic=testTopic1/config=retention.ms" }, "cluster_id": "lkc-vo9pz", "name": "retention.ms", "value": "259200000", "is_read_only": false, "is_sensitive": false, "source": "DYNAMIC_TOPIC_CONFIG", "synonyms": [ { "name": "retention.ms", "value": "259200000", "source": "DYNAMIC_TOPIC_CONFIG" } ], "topic_name": "testTopic1", "is_default": false }Batch update topic configurations.
To update multiple configuration properties with a single REST call, use a batch update:
curl -H "Authorization: Basic <BASE64-encoded-key-and-secret>" -H 'Content-Type: application/json' \
--request POST  --url 'https://<REST-endpoint>/kafka/v3/clusters/<cluster-id>/topics/<topic-name>/configs:alter' \
-d '{"data": [{"name": “<property-name>”, "value": "<new-value>", {"name": “<property-name>”, "value": “<new-value>}…]}’
For example, this API call updates retention.ms again, this time to 172800000 (2 days) and segment.bytes from its default (1073741824) to 123456789:
curl -H "Authorization: Basic ABC123ABC" -H 'Content-Type: application/json' --request POST --url 'https://pkc-abcde.us-west4.gcp.confluent.cloud:443/kafka/v3/clusters/lkc-vo9pz/topics/testTopic1/configs:alter' -d '{"data": [{"name": "retention.ms", "value": "172800000"}, {"name": "segment.bytes", "value": "123456789"}]}'View the updated values for topic configuration.
You can view the updates as shown in the previous step, substituting
retention.msand thensegment.bytesfor<property-name>in this API call:curl -H "Authorization: Basic <BASE64-encoded-key-and-secret>" --request GET --url 'https://<REST-endpoint>/kafka/v3/clusters/<cluster-id>/topics/<topic-name>/configs/<property-name>’
Alternatively, sign in to the Confluent Cloud Console, navigate to
testTopic1on your cluster, click the Configuration tab, and then click Show full config.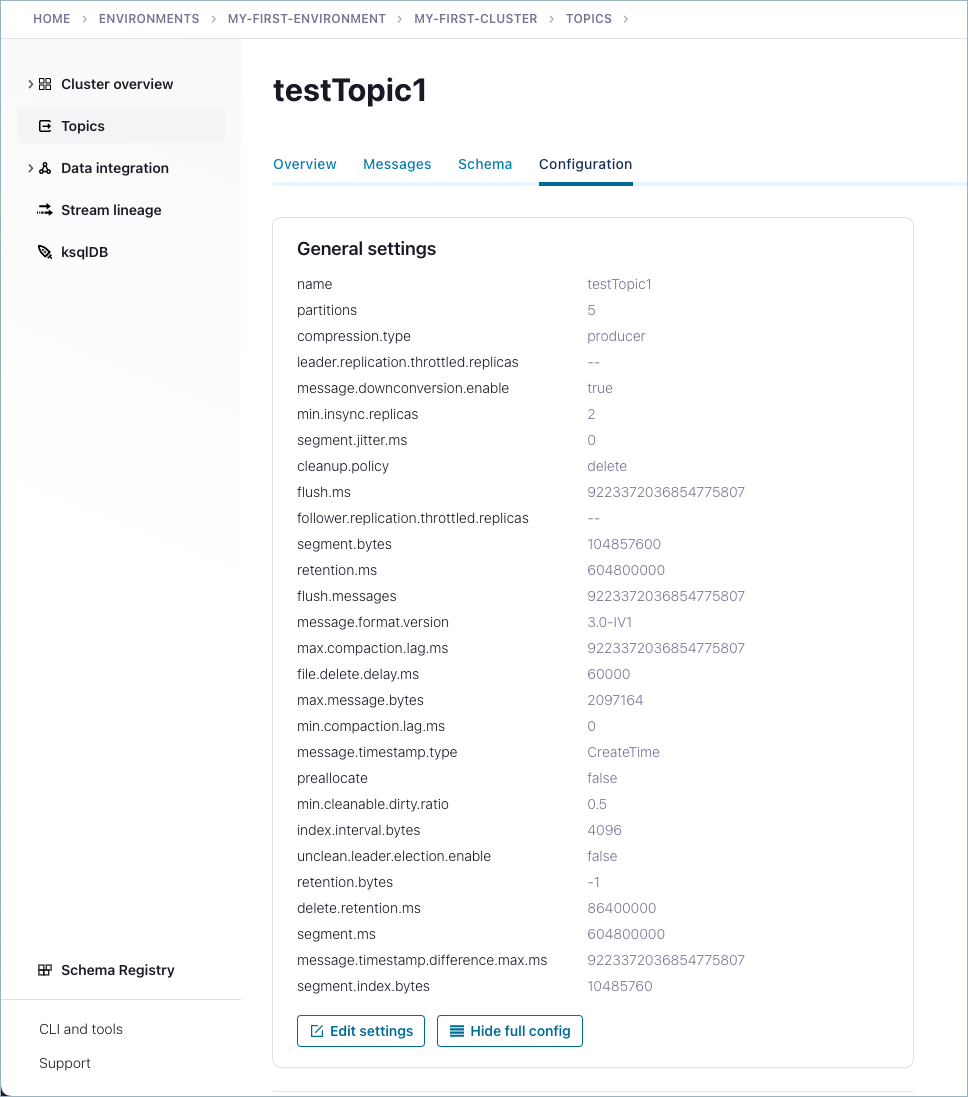
Step 6: Create a topic and configure properties simultaneously
You can also update topic configurations as a part of creating a topic.
To try this out, create a new topic. For example:
curl --silent -H "Authorization: Basic TOKEN" -H 'Content-Type: application/json' --request POST --url \
'https://pkc-abcde.us-west4.gcp.confluent.cloud:443/kafka/v3/clusters/lkc-vo9pz/topics' \
-d '{"topic_name": "testTopic2", "partitions_count": 4, "replication_factor": 3, "configs":[{"name": "retention.ms", "value": 98765},{"name": "segment.bytes", "value":"98765432"}]}' | jq
This creates the topic testTopic2, specifies replication_factor and partitions_count (as in the previous example), and also provides new values for retention.ms and segment.bytes at time of topic creation.
Step 7: Produce data to the topic
To produce to a topic, provide JSON data and a base64-encoded API key and secret to the REST Produce endpoint (/kafka/v3/clusters/<cluster-id>/topics/<topic-name>/records) as shown in the examples below.
As you work through the examples, have the Confluent Cloud Console opened to the cluster and topic Messages tab where you are sending data. This way, you can watch the messages show up when you send the data. You will miss the messages if you do not have the Confluent Cloud Console open as you make the records request.
This example sends messages to testTopic1 in MY-FIRST-CLUSTER.
Streaming mode (recommended for sending a batch of records)
For additional examples, see the following note:
Note
For additional examples, see the public GitHub site kafka-rest/examples/produce_v3.
Streaming mode is the more efficient way to send multiple records. In streaming mode, you can open an interactive terminal connection as part of the API call, and send multiple records over a single stream. To use this mode, set an additional header "Transfer-Encoding: chunked” on the initial request:
curl -X POST -H "Transfer-Encoding: chunked" -H "Content-Type: application/json" \
-H "Authorization: Basic <BASE64-encoded-key-and-secret>" \
 <REST-endpoint>/kafka/v3/clusters/<cluster-id>/topics/<topic-name>/records -T-
For example:
curl -X POST -H  "Transfer-Encoding: chunked" -H "Content-Type: application/json" \
-H "Authorization: Basic <BASE64-encoded-key-and-secret>"\
https://pkc-abcde.us-west4.gcp.confluent.cloud:443/kafka/v3/clusters/lkc-vo9pz/topics/testTopic1/records -T-

{"value": {"type": "JSON", "data": "Hello World!"}}
{"value": {"type": "JSON", "data": "Hola Mundo!"}}
{"value": {"type": "JSON", "data": "Hola Mundo, otra vez!"}}
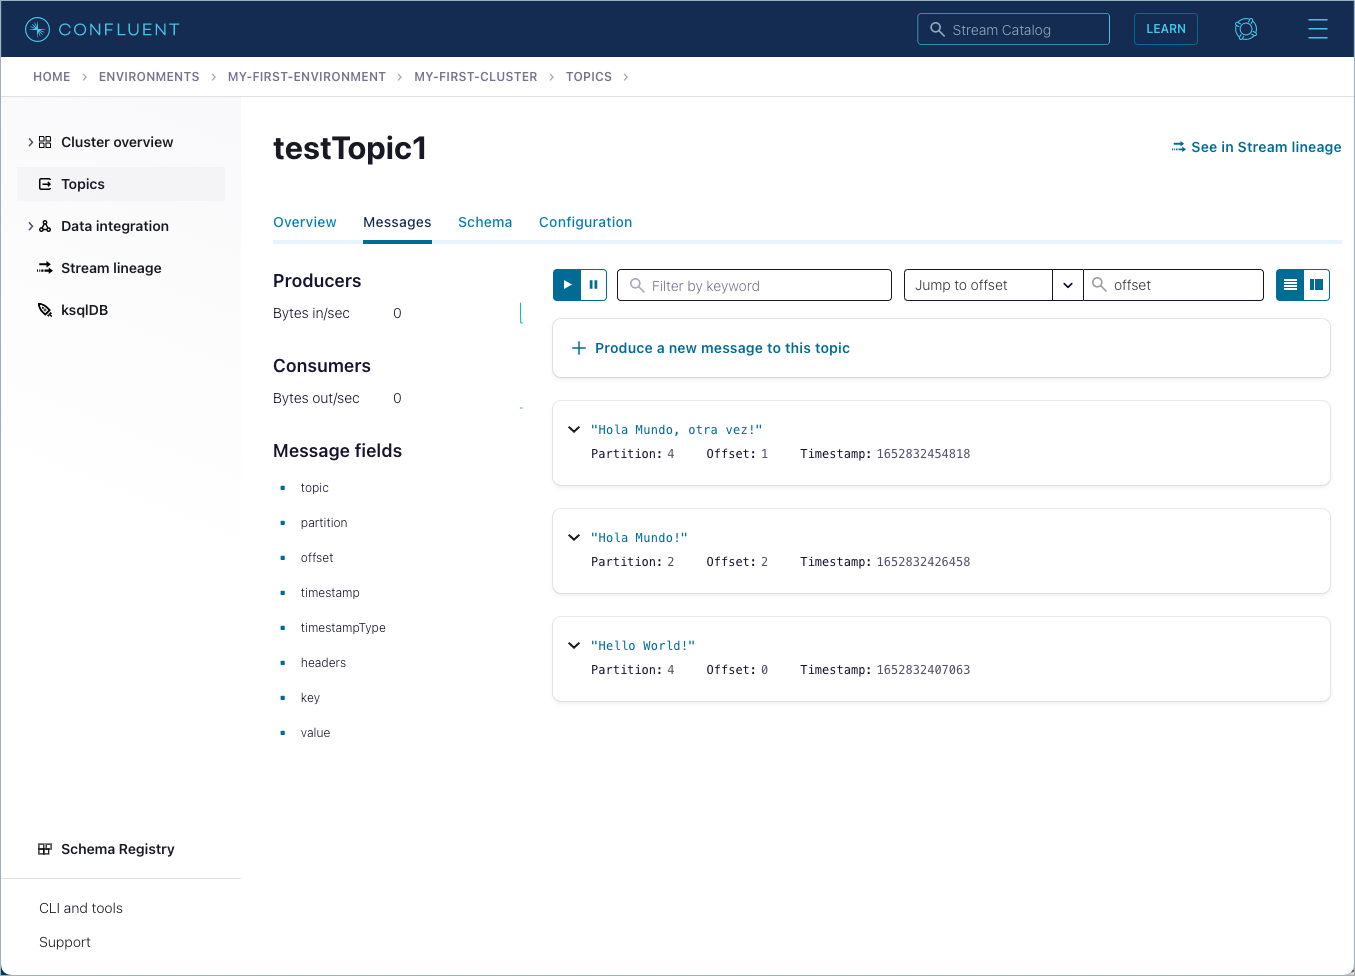
View the Messages tab for testTopic1 on the Confluent Cloud Console (as you are sending the message):
Non-streaming mode (not recommended)
The syntax to produce a single record to a topic is as follows:
 curl -X POST -H "Content-Type: application/json" \
 -H "Authorization: Basic <BASE64-encoded-key-and-secret>" \
 '<REST-endpoint>/kafka/v3/clusters/<cluster-id>/topics/<topic-name>/records' -d \
'{"value": {"type": "<type>", "data": "<data>"}}'
For type, current options are BINARY, JSON or STRING.
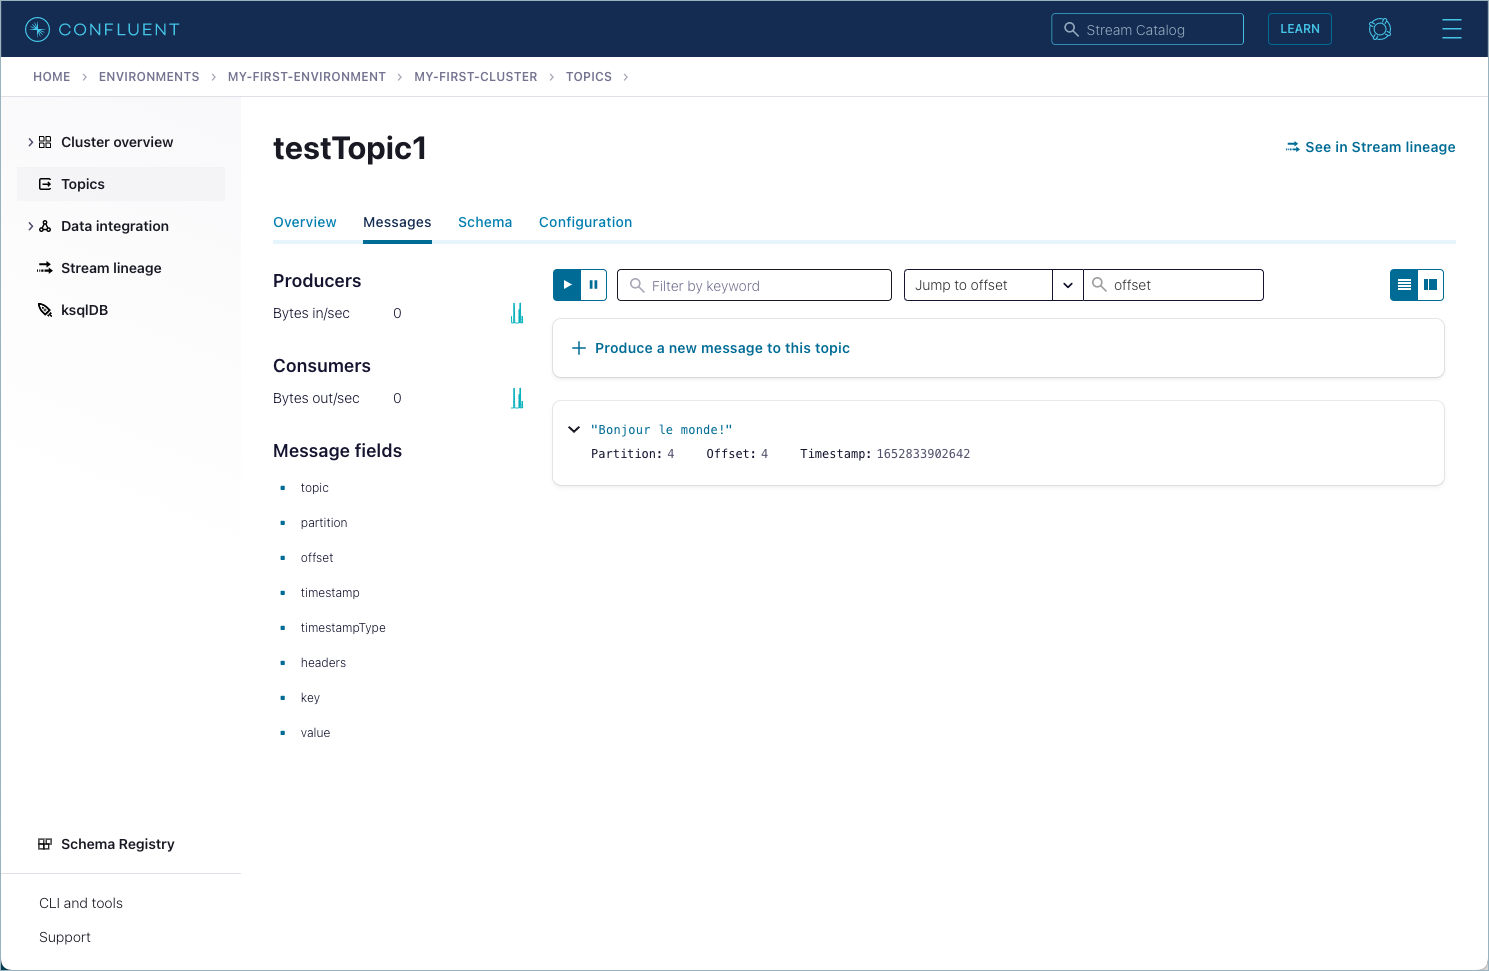
For example, this call sends the message “Bonjour le monde!” as JSON data to the topic, testTopic1:
curl -X POST -H "Content-Type: application/json" \
-H "Authorization: Basic <BASE64-encoded-key-and-secret>"
"https://pkc-abcde.us-west4.gcp.confluent.cloud:443/kafka/v3/clusters/lkc-vo9pz/topics/testTopic1/records" -d \
'{"value": {"type": "JSON", "data": "Bonjour le monde!"}}'
View the Messages tab for testTopic1 on the Confluent Cloud UI:
Tip
The Confluent Cloud Console must be open as you send the messages, otherwise you will miss them.
You can use non-streaming mode to send multiple records in a single request by appending records together and in the data payload of a single, non-streamed request as shown in the following example:
curl -X POST -H "Content-Type: application/json"  -H  \
"Authorization: Basic <BASE64-encoded-key-and-secret>” \
"https://<REST-endpoint>/kafka/v3/clusters/<cluster-id>/topics/<topic-name>/records" -d \
'{"partition_id": "1", "value": {"type": "JSON", "data": "Bonjour le monde!"}} {"partition_id": "10", "value": {"type": "JSON", "data": "Bonjour le monde, de nouveau!"}}'
Note that each individual record sent over the endpoint can have its own partition specified, so you can produce to multiple partitions in the same /records call.
That said, streaming mode is more efficient for sending multiple records, as shown in the next section. The performance difference is quite marked; under a hundred requests per second for individual calls, as compared to several 1000 per second for streamed.
Step 8: Delete the topics
When you are ready to quit the Quick Start demo or when the topic is no longer needed, you can delete the sample topics.
To delete a topic, use this API call:
curl -H "Authorization: Basic <BASE64-encoded-key-and-secret>" -H 'Content-Type: application/json' --request DELETE --url 'https://<REST-endpoint>/kafka/v3/clusters/<cluster-id>/topics/<topic-name>'
For example:
curl -H "Authorization: Basic ABC123ABC" -H 'Content-Type: application/json' --request DELETE --url 'https://pkc-abcde.us-west4.gcp.confluent.cloud:443/kafka/v3/clusters/lkc-vo9pz/topics/‘testTopic1'
curl -H "Authorization: Basic ABC123ABC" -H 'Content-Type: application/json' --request DELETE --url 'https://pkc-abcde.us-west4.gcp.confluent.cloud:443/kafka/v3/clusters/lkc-vo9pz/topics/‘testTopic2'
This call has no response payload.
Confirm that topic was deleted by listing the topics in the cluster:
curl -H "Authorization: Basic <BASE64-encoded-key-and-secret>" --request GET --url 'https://<REST-endpoint>/kafka/v3/clusters/<cluster-id>/topics'
For example:
curl -H "Authorization: Basic ABC123ABC" --request GET --url 'https://pkc-abcde.us-west4.gcp.confluent.cloud:443/kafka/v3/clusters/lkc-vo9pz/topics'
The response shows that there are no topics in the cluster:
{

  "kind": "KafkaTopicList",

  "metadata": {

    "self": "https://pkc-abcde.us-west4.gcp.confluent.cloud:443/kafka/v3/clusters/lkc-vo9pz/topics",

    "next": null

  },

  "data": []

}