Flink SQL Quick Start with Confluent Cloud Console
This quick start gets you up and running with Confluent Cloud for Apache Flink®. The following steps show how to create a workspace for running SQL statements on streaming data.
In this quick start guide, you perform the following steps:
Prerequisites
Access to Confluent Cloud.
Step 1: Create a workspace
Workspaces provide an intuitive, flexible UI for dynamically exploring and interacting with all of your data on Confluent Cloud using Flink SQL. In a workspace, you can save your queries, run multiple queries simultaneously in a single view, and browse your catalogs, databases, and tables.
Log in to Confluent Cloud Console at https://confluent.cloud/login.
In the navigation menu, click Stream processing to open the Stream processing page.
In the dropdown, select the environment where you want to run Flink SQL, or use the default environment. If you have Kafka topics that you want to run SQL queries on, choose the environment that has these topics.
Click Create new workspace, and in the dialog, select the cloud provider and region. If you have Kafka topics that you want to run SQL queries on, select the region that has your Kafka cluster.
Click Create workspace.
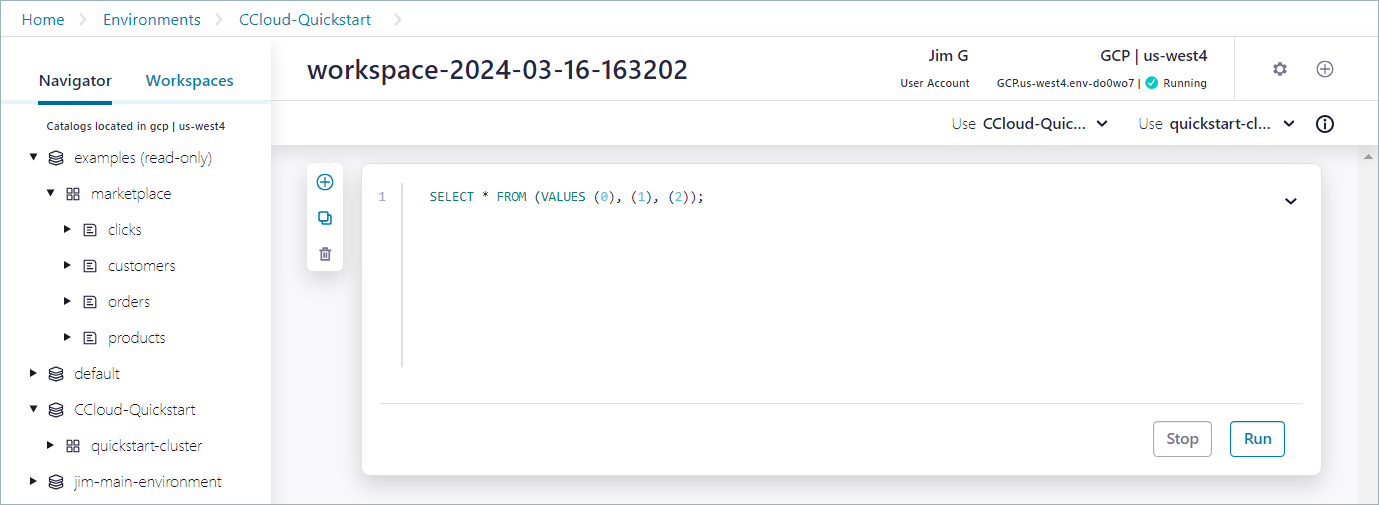
A new workspace opens with an example query in the code editor, or cell.

Under the hood, Confluent Cloud for Apache Flink is creating a compute pool, which represents the compute resources that are used to run your SQL statements. The resources provided by the compute pool are shared among all statements that use it. It enables you to limit or guarantee resources as your use cases require. A compute pool is bound to a region. There is no cost for creating compute pools.
It may take a minute or two for the compute pool to be provisioned.
You can change the compute pool where a workspace runs by clicking the workspace settings icon and choosing from the Compute pool selection dropdown.
Step 2: Run SQL statements
When the compute pool status changes from Provisioning to Running, it’s ready to run queries.
In the cell of the new workspace, you can start running SQL statements.
Click Run.
The example statement is submitted, and information about the statement is displayed, including its status and a unique identifier. Click the Statement name link to open the statement details view, which displays the statement status and other information. Click X to dismiss the details view.
After an initialization period, the query results display beneath the cell.
Your output should resemble:
EXPR$0
0
1
2
Copy the following SQL and paste it into the cell. The statement runs the CURRENT_TIMESTAMP function, which is one of many built-in functions provided by Confluent Cloud for Apache Flink.
SELECT CURRENT_TIMESTAMP;
Click Run.
The result from the statement is displayed beneath the cell. Your output should resemble:
CURRENT_TIMESTAMP
2024-03-15 16:23:18.912
Step 3: Query streaming data
Flink SQL enables using familiar SQL syntax to query streaming data. Confluent Cloud for Apache Flink provides example data streams that you can experiment with. In this step, you query the orders table from the marketplace database in the examples catalog.
In Flink SQL, catalog objects, like tables, are scoped by catalog and database.
A catalog is a collection of databases that share the same namespace.
A database is a collection of tables that share the same namespace.
In Confluent Cloud, an environment is mapped to a Flink catalog, and a Kafka cluster is mapped to a Flink database.
You can always use three-part identifiers for your tables, like catalog.database.table, but it’s more convenient to set a default.
Set the default catalog and database by using the Use catalog and Use database dropdown menus in the top-right corner of the workspace. Select examples for the catalog, and marketplace for the database.
Click
 to create a new cell, and run the following statement to list all the tables in the marketplace database.
SHOW TABLES;
Your output should resemble:
table name
clicks
customers
orders
products
Run the following statement to inspect the
ordersdata stream.SELECT * FROM orders;
Your output should resemble:
order_id                             customer_id product_id price
36d77b21-e68f-4123-b87a-cc19ac1f36ac 3137        1305       65.71
7fd3cd2a-392b-4f8f-b953-0bfa1d331354 3063        1327       17.75
1a223c61-38a5-4b8c-8465-2a6b359bf05e 3064        1166       14.95
...
Click Stop to end the query.
Step 4: Query existing topics (optional)
If you’ve created the workspace in a region where you already have Kafka clusters and topics, you can explore this data with Flink SQL. Confluent Cloud for Apache Flink automatically registers Flink tables on your topics, so you can run statements on your streaming data.
Set the default catalog and database by using the Use catalog and Use database dropdown menus. You can find your catalogs and databases in the navigation menu on the left side of the workspace.
Click
 to create a new cell, and run the following statement to list all the tables in the database that you selected as the default.
SHOW TABLES;
You can browse any of your tables by running a SELECT statement.
SELECT * FROM <table_name>;