
Use the Confluent Cloud Console with Private Networking
In Confluent Cloud clusters with private networking, cluster endpoints used by some Confluent Cloud workflows, including topic management and ksqlDB query management, are not publicly accessible. For example, you cannot view Kafka topic data/message from the Confluent Cloud Console running on a workstation outside of the private network.
Important
If you’ve configured access to Confluent resources as described in this topic, but you still cannot view topics on private clusters in the Confluent Cloud Console using Google Chrome and you get the message, “This Cluster is protected by a private network”, you must enable the Local Network Access setting in Chrome. Chrome recently added the Local Network Access check as explained in Google’s documentation. For more information and the workaround, see the Confluent Support knowledge base article.
To view and manage your Confluent resources on a private network in Confluent Cloud Console with a client computer, you have the following options:
Enable the Resource metadata access option
If you only need to view topics and their metrics information, or if you need to use the Stream Lineage feature on the Confluent Cloud Console, you can enable the Resource metadata access option on the Confluent Cloud Console.
This option does not allow you to view topics data/messages.
Create a connection to the network that hosts the private cluster endpoints
For your Confluent clients (Confluent Cloud Console, REST API, CLI, Terraform, and Kafka API) from outside the private network to have access to the full functionality of Confluent Cloud, create and use a connection to the network that hosts the private endpoints.
For example, to manage topics (create/update/delete), to produce to/consume from topics, or to manage ksqlDB queries, create a connection to the network that hosts the private cluster endpoints, and then update your DNS configuration for topics or ksqlDB endpoints to use that connection.
Note
This option involves configuring external components, such as proxies, SSH tunnels, and DNS in your network.
Troubleshooting these additional components in your network is outside the Confluent Cloud support scope and is not covered by any support plan.
See the support note for more information.
If you do not use one of the above options, you do not have access to view and manage topics and topics metadata in the Confluent Cloud Console.
Create a connection to the network that hosts the private cluster endpoints
For single-cluster deployments, you can leverage managed services offered by your cloud provider — such as load balancers and gateways — to enable access to Confluent resources in private networking environments. These resources can then be managed and accessed using the Confluent Cloud Console or the Confluent CLI.
For large scale centralized architectures, you need a component with more advanced SNI routing than what the cloud provider load balancers and gateways can provide. NGINX remains the best technical solution.
Use the table below to find the right solution for Confluent Cloud service access. You need to implement only one of the supported (check marked) solutions for your configuration. For details, click the applicable scenario and complete the required steps.
Scenario | From an internet-based client | From a VPC or VNet using VPN tunnel, Direct Connect, ExpressRoute, or Cloud Interconnect | From a VPC or VNet |
|---|---|---|---|
✔ | N/A | No additional configuration required | |
✔ | N/A | No additional configuration required | |
N/A | ✔ | N/A |
Scenario | From an internet-based client | From a VPC or VNet using VPN tunnel, Direct Connect, ExpressRoute, or Cloud Interconnect | From a VPC or VNet |
|---|---|---|---|
✔ | ✔ | No additional configuration required | |
✔ | ✔ | No additional configuration required | |
N/A | N/A | N/A |
Configure a proxy
To enable access to Confluent services in a privately-networked Confluent Cloud cluster from your local machine, you can use a proxy (NGINX, HAProxy, Envoy, or others). The proxy relays communication between your local clients and Confluent Cloud resources.
Confluent Cloud hostnames must be maintained over a TCP proxy. Otherwise, TLS hostname validation will fail, and TLS will not be established. You must have a DNS record, or an entry in your /etc/hosts file, that points to the IP address of the proxy instance that routes to the appropriate Confluent endpoint.
In the following example topology, the client runs outside of a VPC or VNet and uses an NGINX proxy to connect to Confluent Cloud.
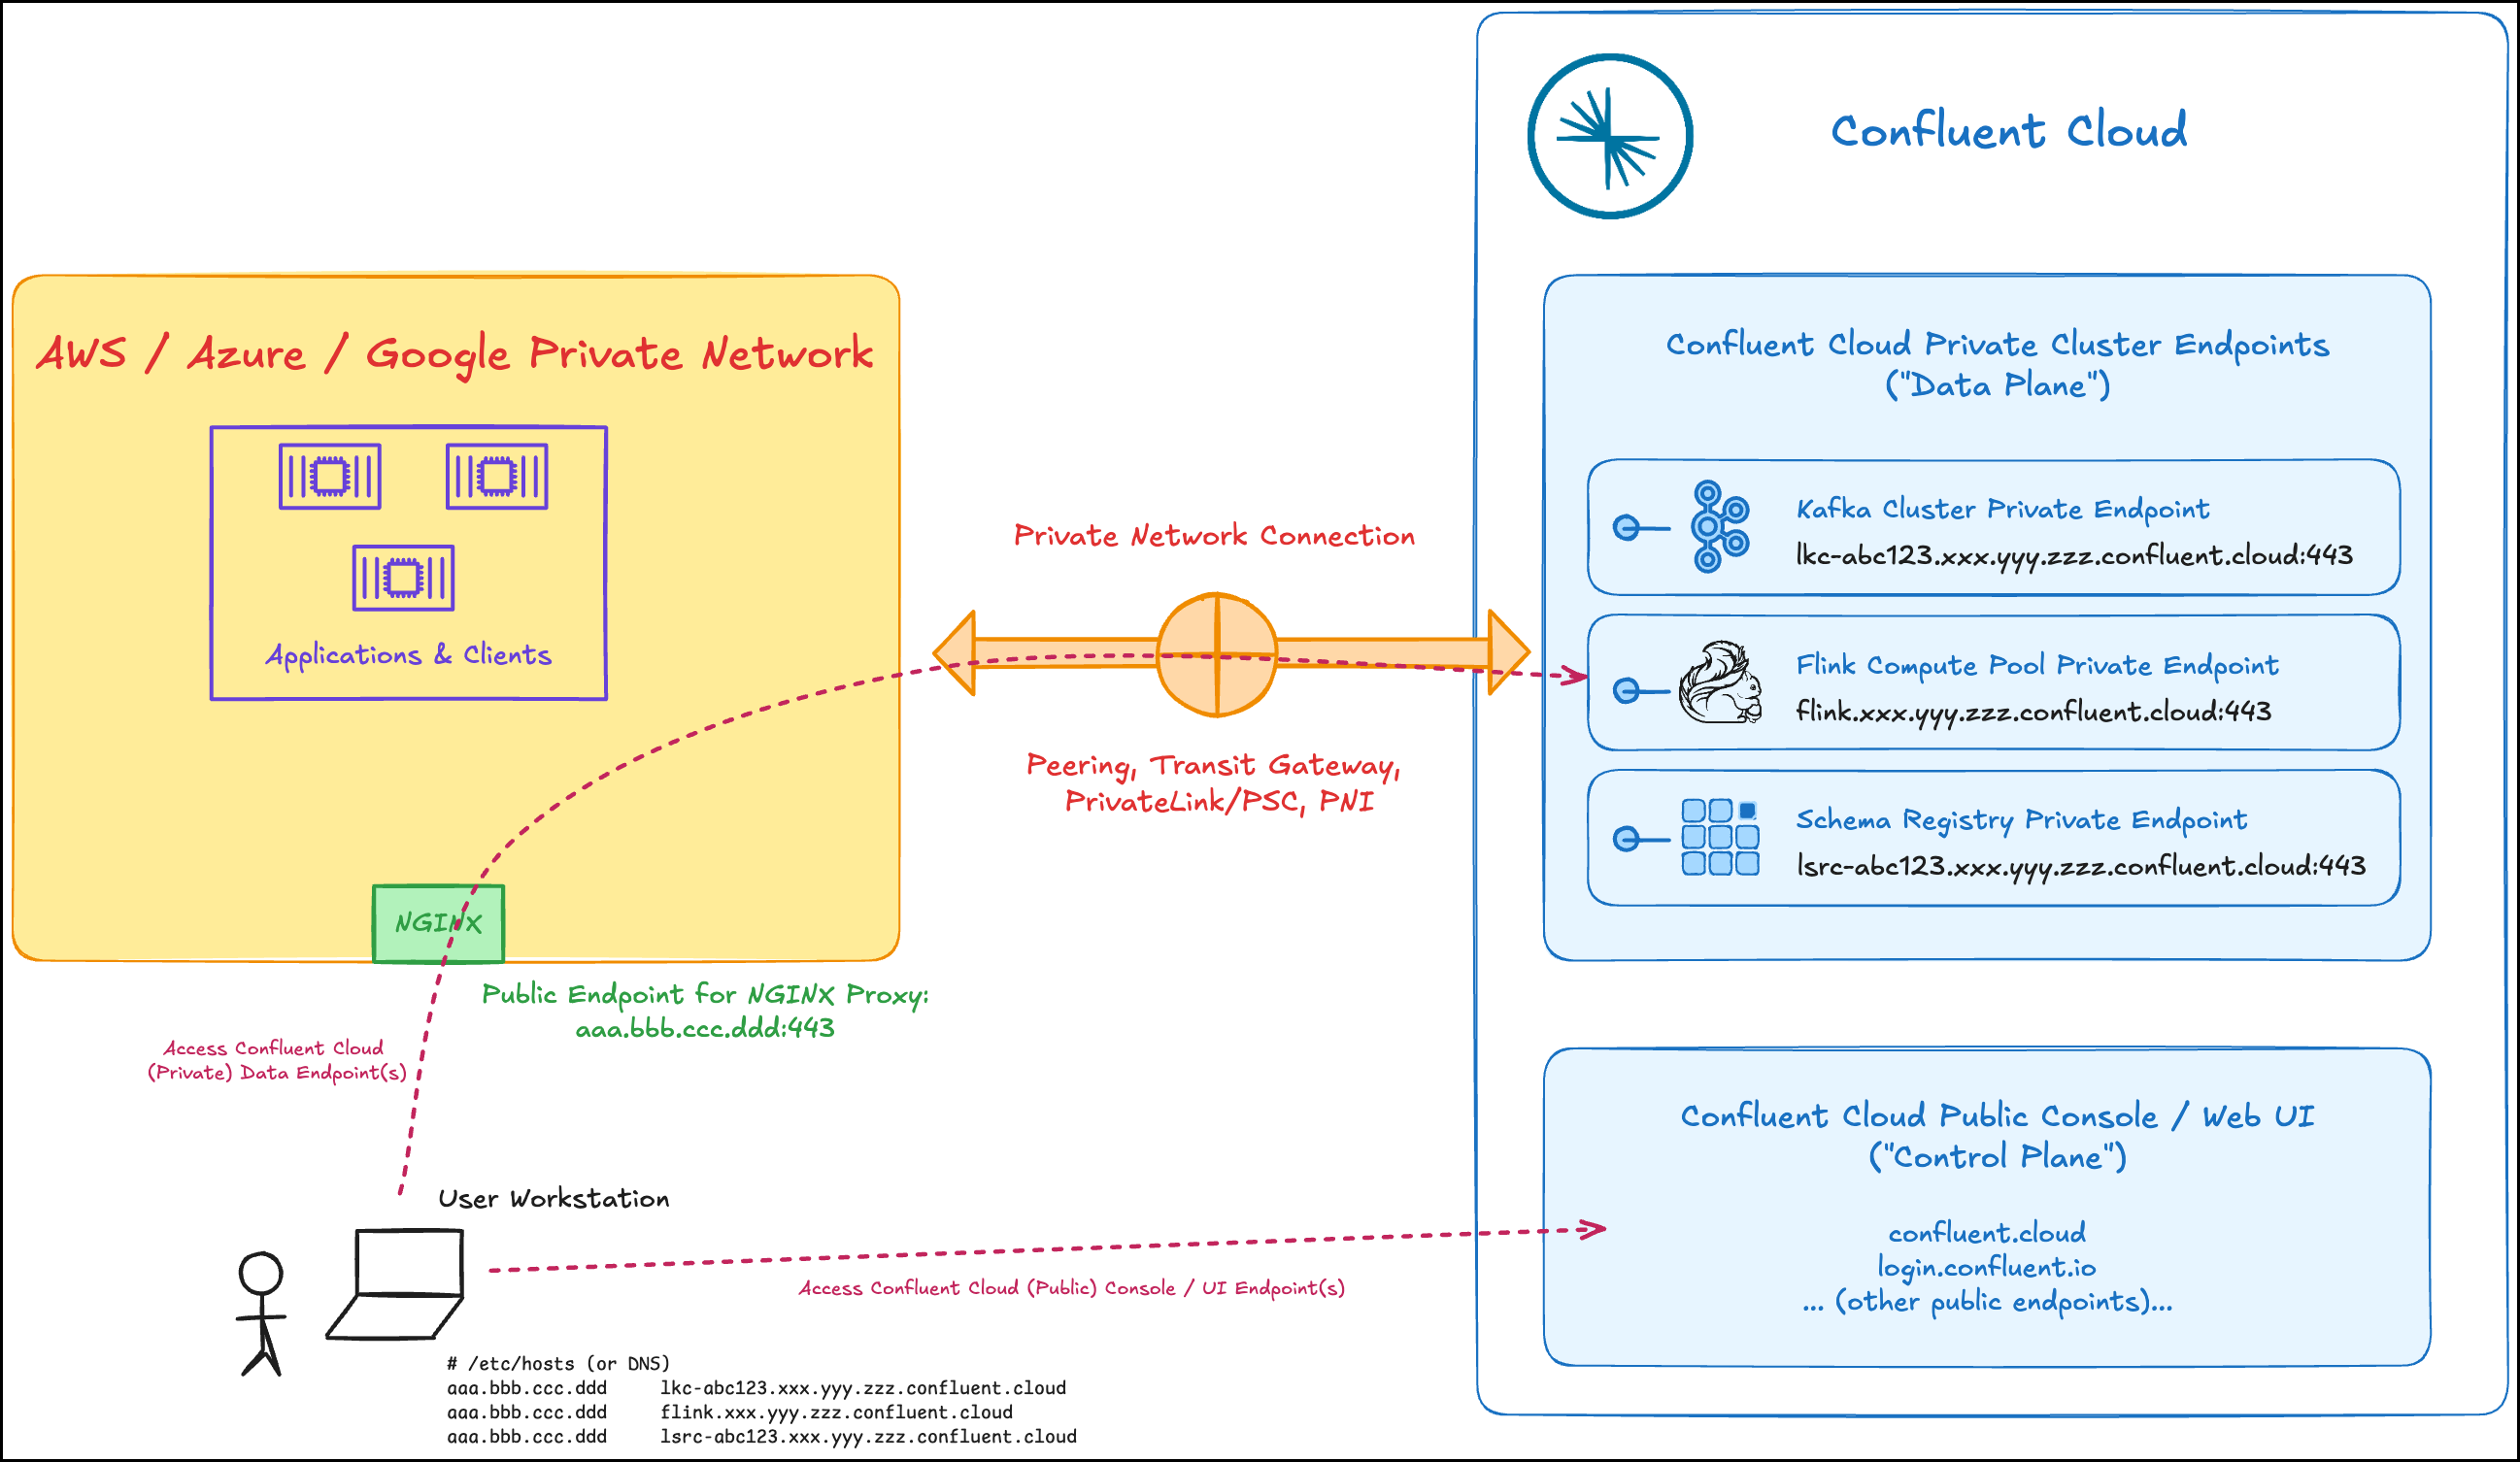
Example NGINX proxy topology
To install and configure the proxy, complete the following steps. The configuration steps use NGINX as an example:
Provision a Virtual Machine (VM) in your VPC or VNet that is connected to Confluent Cloud.
You can set it up with the default properties.
Install NGINX on an instance in the VPC or VNet connected to Confluent Cloud.
If you are on Ubuntu or Debian, use the below command to install the latest version of NGINX onto your VM. If you are using RedHat, use the
yumcommand.sudo apt update
sudo apt install nginx
Test the NGINX configuration. NGINX checks the configuration for correct syntax and tries to open files referred to in the configuration:
nginx -tThe NGINX module path varies depending on the Linux distribution you’re using, for example,
/usr/lib/nginx/modulesor/usr/lib64/nginx/modules.If you get an error about
ngx_stream_module.so:Locate the
ngx_stream_module.somodule.Add the following at the top of the NGINX configuration file (
/etc/nginx/nginx.conf):load_module /usr/lib/nginx/modules/ngx_stream_module.so;
Re-test:
nginx -t
Update the NGINX configuration file (
/etc/nginx/nginx.conf) to use SNI from incoming TLS sessions for routing traffic to the appropriate servers on ports443and9092.Note: Do not replace
$targetBackend. It is not a replaceable variable.events {} stream { map $ssl_preread_server_name $targetBackend { default $ssl_preread_server_name; } server { listen 9092; proxy_connect_timeout 1s; proxy_timeout 7200s; resolver 127.0.0.53; proxy_pass $targetBackend:9092; ssl_preread on; } server { listen 443; proxy_connect_timeout 1s; proxy_timeout 7200s; resolver 127.0.0.53; proxy_pass $targetBackend:443; ssl_preread on; } log_format stream_routing '[$time_local] remote address $remote_addr' 'with SNI name "$ssl_preread_server_name" ' 'proxied to "$upstream_addr" ' '$protocol $status $bytes_sent $bytes_received ' '$session_time'; access_log /var/log/nginx/stream-access.log stream_routing; }To verify the resolver, run the following command on the NGINX host:
nslookup <ConfluentCloud_BootstrapHostname> 127.0.0.53
Check
/var/log/nginx/error.logfor any resolving issues using127.0.0.53.On lookup failure, reconfigure to use the cloud provider’s resolver:
For AWS:
resolver 169.254.169.253For Azure:
resolver 168.63.129.16For Google Cloud:
resolver 169.254.169.254
If you do need to switch resolvers, update
resolverin BOTHserverblocks that havelisten 9092andlisten 443.
Restart NGINX to pick up the latest configuration (
/etc/nginx/nginx.conf).sudo systemctl restart nginx
Verify that NGINX is running.
sudo systemctl status nginx
Configure your DNS provider to resolve requests to Confluent Cloud to the proxy server.
In the following example, the
/etc/hostsfile is updated to include the public IP address of your VM mapped to your Confluent Cloud cluster endpoint. This will route traffic that is destined for your Confluent Cloud through the proxy.Note that you update the
/etc/hostsfile of your local machine, not of the bastion host/proxy server.## # Host Database # # localhost is used to configure the loopback interface # when the system is booting. Do not change this entry. ## 127.0.0.1 localhost 255.255.255.255 broadcasthost ::1 localhost <Public IP Address of VM instance> <Kafka-REST-Endpoint> <Public IP Address of VM instance> <Flink-private-endpoint> <Public IP Address of VM instance> <Flinkpls-private-endpoint> <Public IP Address of VM instance> <Schema-registry-private-endpoint>
<Kafka-REST-Endpoint>can be retrieved in the Cluster settings page on your Confluent Cloud Console.For retrieving the
<Kafka-REST-Endpoint>for an AWS Enterprise cluster, see Select a Kafka endpoint for AWS Enterprise clusters.<Flink-private-endpoint>can be retrieved as described in Flink.For
<Flinkpls-private-endpoint>(Flink language service), replaceflinkwithflinkplsin the<Flink-private-endpoint>endpoint and specify that endpoint here.<Schema-registry-private-endpoint>can be retrieved as described in Enable Private Networking on Confluent Cloud for Schema Registry.
The example above resolves both the Kafka bootstrap server host and the Kafka REST host. The host addresses of the Kafka bootstrap server and the REST endpoint are the same, and only the port numbers differ.
For AWS Enterprise clusters only, set the cluster endpoint as described in Select a Kafka endpoint for AWS Enterprise clusters.
Go to the Confluent Cloud Console and verify that topics and ksqlDB query management are now visible under the Topics and ksqlDB tabs for your cluster.
Configure a reverse SSH tunnel
To connect to a privately-networked Confluent Cloud cluster from a local client on the internet or on the on-premises network, you can use a reverse SSH tunnel.
At a high level, the reverse SSH tunnel captures all traffic going towards your privately-networked Confluent Cloud cluster, then it routes that traffic over the specified port through a bastion server deployed in your VPC/Vnet that has access to your Confluent Cloud cluster.
Provision a bastion virtual machine (VM) in your VPC or VNet that is connected to Confluent Cloud with the SSH service.
Upon “SSH public key source”, select an existing SSH key pair. Paste in your existing public key onto the “SSH public key” field. If you need to locate it, you can find it via going into your terminal and typing in the below command. Otherwise, create a new SSH public key pair.
cat ~/.ssh/id_rsa.pubYou can set up with the default values for the rest of the properties.
Test basic connectivity using the following command:
sudo ssh <your_cloud_provider_username>@<public_ip_of_vm> -i ~/.ssh/id_rsa
Your output should show a successful SSH into your VM.
Verify that the VMs have connectivity to your private endpoint using one of the following commands.
$BOOTSTRAPcan be retrieved in the Cluster settings on your Confluent Cloud Console.For retrieving the
$BOOTSTRAPfor an AWS Enterprise cluster, see Select a Kafka endpoint for AWS Enterprise clusters.Create an HTTP connection to the specified bootstrap URL (
$BOOTSTRAP):openssl s_client \ -connect $BOOTSTRAP:9092 \ -servername $BOOTSTRAP \ -verify_hostname $BOOTSTRAP </dev/null 2>/dev/null | \ grep -E 'Verify return code|BEGIN CERTIFICATE' | xargs
If the return output is
-----BEGIN CERTIFICATE----- Verify return code: 0(ok), connectivity to the bootstrap is confirmed.Verify the connectivity to the specified bootstrap URL (
$BOOTSTRAP):telnet $BOOTSTRAP 9092
Establish a reverse SSH tunnel from the client machine to the bastion VM for each Confluent Cloud component you are trying to connect from your local client.
There are 3 different endpoints to reach different components of your Confluent Cloud cluster:
443 is the Kafka REST API endpoint.
9092 is the broker endpoint to direct traffic to from your local host.
ksqlDB endpoint.
The Kafka REST endpoint (
<Kafka-REST-Endpoint>) can be found in the Cluster settings page. The ksqlDB endpoint (<ksqlDB-Endpoint>) is displayed in the Confluent Cloud Console under Cluster Settings > ksqlDB > Settings.Note that the host addresses of the Kafka bootstrap server and the REST endpoint are the same, and only the port numbers differ.
sudo ssh -L 127.0.0.2:443:<Kafka-REST-Endpoint>:443 <username>@<VM-instance-public-DNS> -i ~/.ssh/id_rsa

sudo ssh -L 127.0.0.3:443:<ksqlDB-Endpoint>:443 <username>@<VM-instance-public-DNS> -i ~/.ssh/id_rsa
Note that these connections must be maintained in order for the tunnel to work. However, in cases, such as a system restart, the tunnel and the DNS loopback aliases may not persist.
Configure DNS to resolve traffic to the Confluent Cloud component endpoints.
In the following example,
/etc/hostsis updated to include the local IP addresses mapped to your Confluent Cloud cluster endpoints.127.0.0.1 <Bootstrap-URL> 127.0.0.2 <Kafka-REST-Endpoint> 127.0.0.3 <ksqlDB-endpoint>
For AWS Enterprise clusters only, set the cluster endpoint as described in Select a Kafka endpoint for AWS Enterprise clusters.
Go to the Confluent Cloud Console and verify that topics are now visible under the Topics tab for your cluster.
Configure your local DNS resolution
If connectivity cannot be established between the web browser and Confluent Cloud, DNS provider updates are needed to route web browser requests to the Kafka REST API endpoint and then to the private endpoint connected to Confluent Cloud.
For retrieving the Kafka bootstrap server for an AWS Enterprise cluster, see Select a Kafka endpoint for AWS Enterprise clusters.
Note that the host addresses of the Kafka bootstrap server and the REST endpoint are the same, and only the port numbers differ. In the table below, <Kafka-REST-Endpoint> can resolve both the Kafka bootstrap server and the Kafka REST host.
Name | Value |
|---|---|
<Kafka-REST-Endpoint> Example: | <Private endpoint IP address> |
<KsqlEndpoint> Example: | <Private endpoint IP address> |
<Flink-private-endpoint> Example: | <Private endpoint IP address> |
<Flink-language-service-private-endpoint> Replace Example: | <Private endpoint IP address> |
<Schema-registry-private-endpoint> Example: | <Private endpoint IP address> |
When DNS update is complete, go to the Confluent Cloud Console and verify that topics are now visible under the Topics tab for your cluster.
For Enterprise clusters in AWS, you will have to follow the instructions to set the endpoint to be used by the Confluent Cloud Console found here as described in Set the endpoint to be used by the Confluent Cloud Console for AWS Enterprise clusters.
Select a Kafka endpoint for AWS Enterprise clusters
Retrieve the Kafka endpoint for an AWS Enterprise cluster in the Confluent Cloud Console.
When you initially access the Cluster settings page of an AWS Enterprise cluster in the Confluent Cloud Console, you are prompted to select the default networking endpoint.
Close the dialog box that prompts you to select the default networking endpoint.
In the Cluster settings page, select a
<Kafka-REST-Endpoint>that is associated with an active (in the Ready state) networking configuration.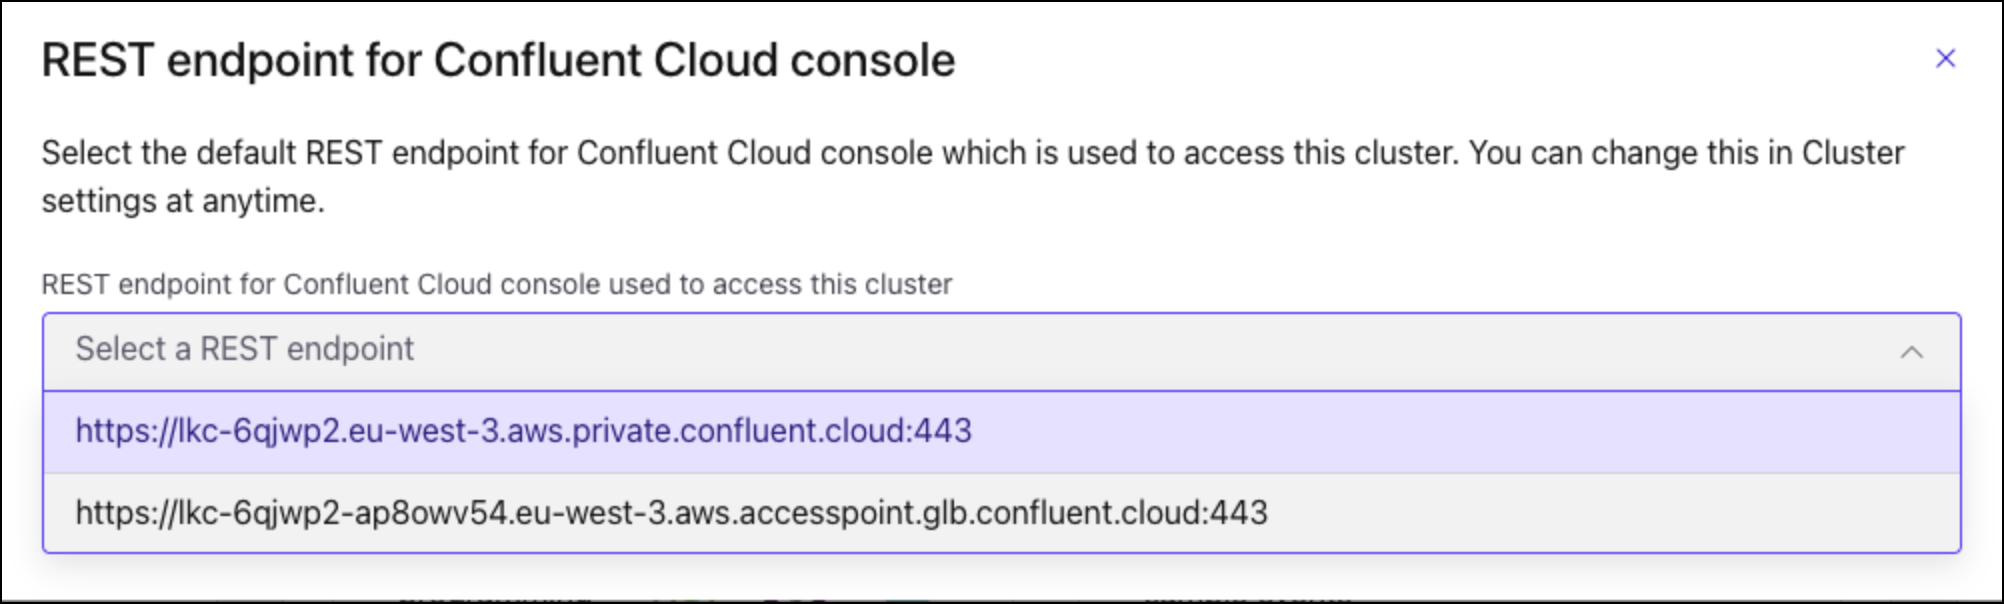
Kafka REST endpoint selection on the Cluster Settings page
To check if a network configuration is active, browse to the Network management page and check the Status column of the gateway. In an environment, all the serverless gateways can access all the Enterprise clusters. So you can pick any active gateway to get the Kafka endpoint.
Set the endpoint to be used by the Confluent Cloud Console for AWS Enterprise clusters
For an Enterprise type cluster on AWS, you must set the cluster endpoint to be used by the Confluent Cloud Console for access to full console functionality.
When you first access an AWS Enterprise cluster in the Confluent Cloud Console, you are prompted to select the default networking endpoint.
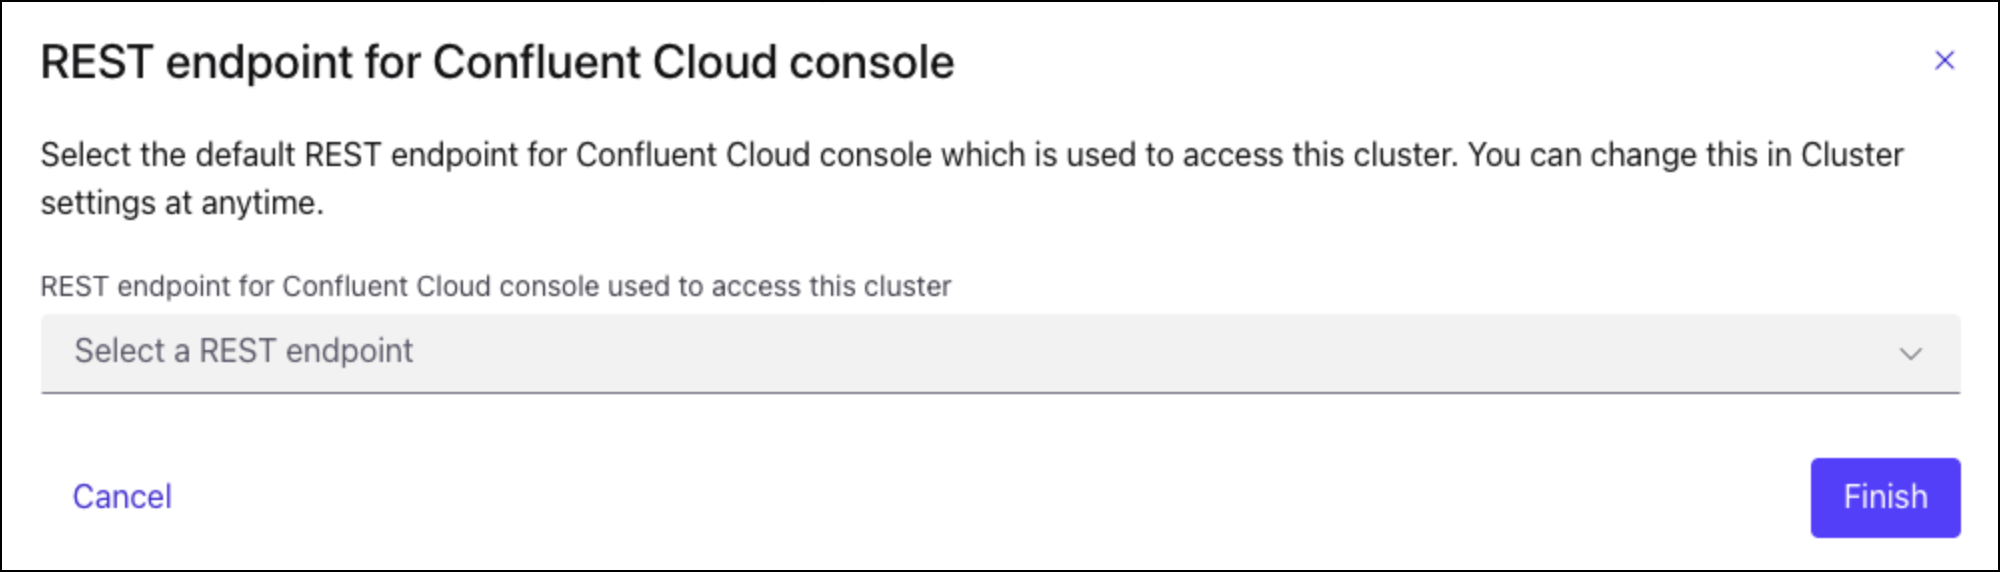
Default networking endpoint prompt
Note
Regardless of the endpoint selected, both PNI and PrivateLink Attachment endpoints are always listed for the cluster.
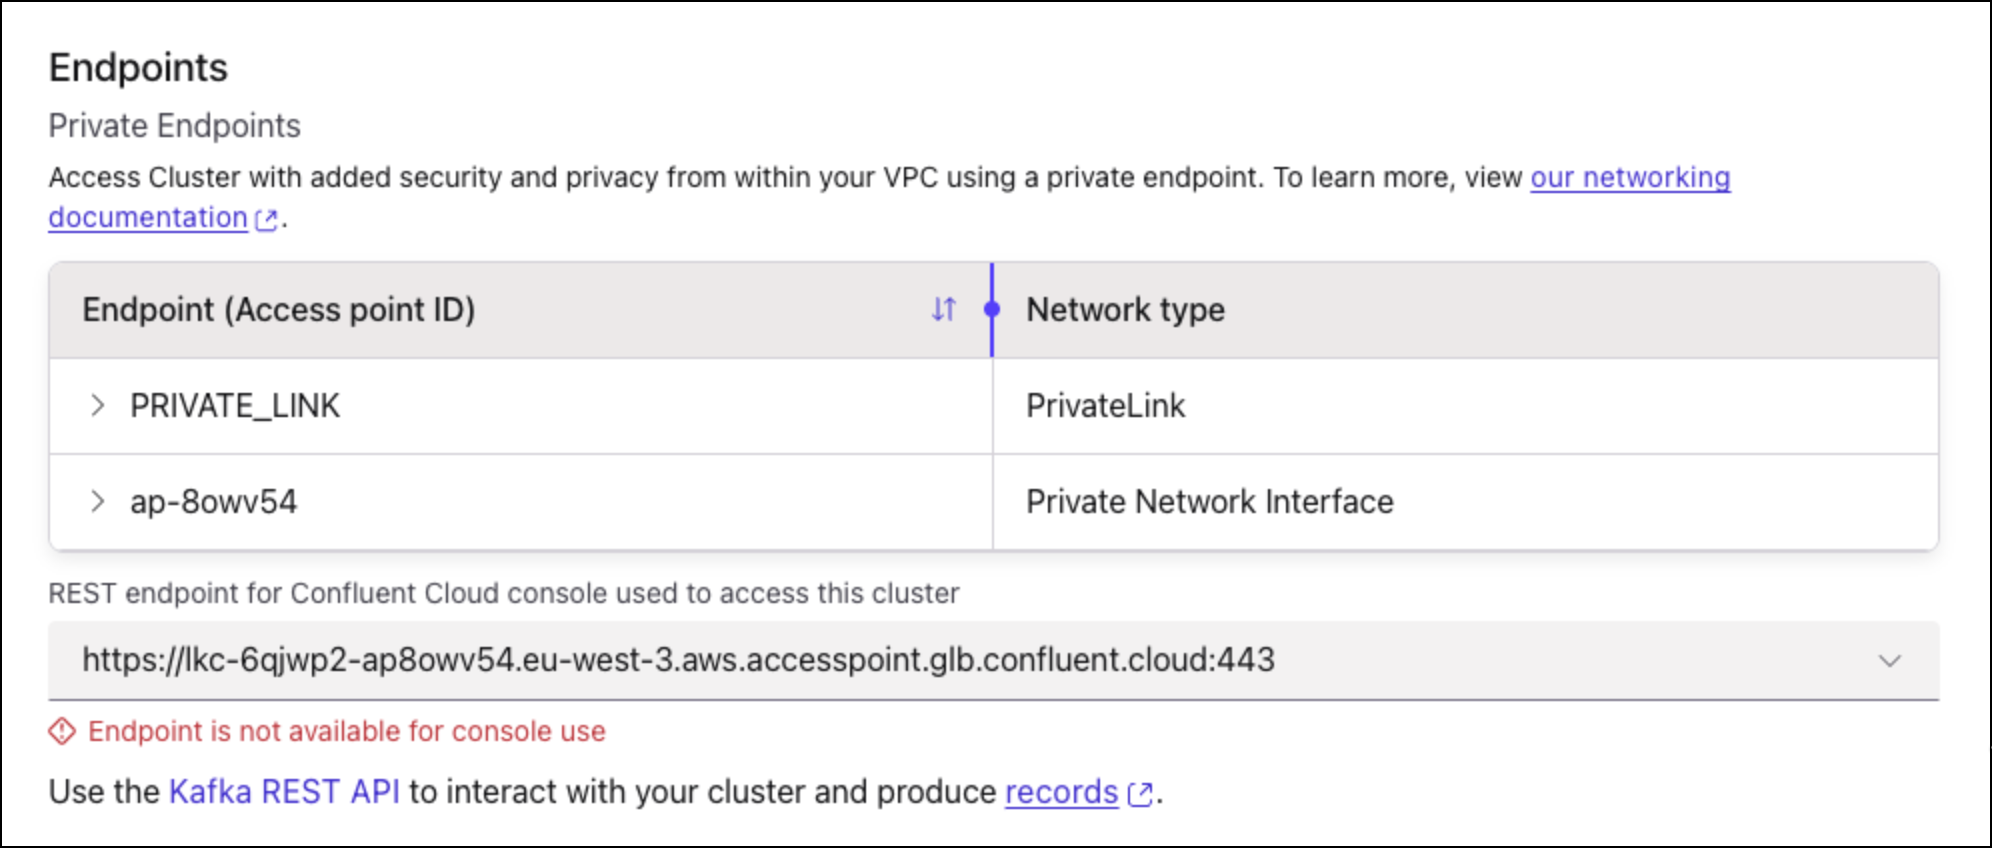
Select the <Kafka-REST-Endpoint> that is associated with the PNI gateway or PrivateLink Attachment. This will be the endpoint that allows you access to the cluster details in the Confluent Cloud Console. The endpoint that includes glb in the URL is the endpoint for the PNI networking type.
Kafka REST endpoint selection on the Cluster Settings page
When you make a selection, you will see an error message that the endpoint is not available if you haven’t set up the proxy and configured your DNS resolution. This is expected.
When you complete the full setup, you will get the message that the endpoint is ready to use. At this point, setup is complete and you will be able to access all functionality in the Confluent Cloud Console.
Endpoint ready confirmation message
Enable or disable the Resource metadata access option
The Resource metadata access option enables you to connect to the clusters with private networking to view resources. Specifically, the following features are enabled when you turn on the option:
Viewing topics metadata and configuration
Avoid turning on this option if topic names are considered sensitive.
Viewing consumer lags and other topic-level metrics
Viewing and configuring Schema Registry
Using Stream Lineage
Listing existing topics during connector creation
You can toggle the option at the cluster level or at the organization level. The cluster-level toggle overrides the organization-level toggle.
Note that the Resource metadata access option only controls access on the Confluent Cloud Console. Resource metadata is not accessible using Confluent Cloud APIs, Confluent CLI, or Terraform even when the option is enabled.
The Resource metadata access option is read-only. Even if you have the DeveloperWrite access or above on a topic and have the Resource metadata access option enabled, you cannot create, edit, or delete topics. Management operations (create, update, and delete) still require setting up a proxy or SSH as described in Create a connection to the network that hosts the private cluster endpoints.
Before you enable the Resource metadata access option, review the following information:
You access topic metadata (name and settings) on the Confluent Cloud Console over the public network using the TLS-enabled connections.
No one outside of your organization will be able to see the topic information, and the information will be protected by the RBAC permissions you configure.
As summarized in the below table, topic and Stream Lineage views are only available to users with the following roles: OrganizationAdmin, EnvironmentAdmin, DataDiscovery, DataSteward, and environment- or organization-scoped Operator.
Cluster-level roles, such as cluster admin or cluster metric viewer, do not have read access.
Role
Scope
READ Allowed
Organization
Yes
Environment
Yes
Environment
Yes
Environment
Yes
Organization, Environment
Yes
Cluster
No
The topic data will still not be accessible over the internet.
Topic-level DENY ACLs will not prevent users from reading topic metadata (name and settings). For more information about Kafka ACLs, see ACL Overview.
The RBAC roles that allow users to read topic metadata for individual topics (such as DeveloperRead and ResourceOwner), or the roles that allow users to read topic metadata on individual clusters (such as CloudClusterAdmin) will not be sufficient to use this feature. See the list below for roles that enable this feature.
To enable or disable the Resource metadata access:
Log into Confluent Cloud as an administrator with the OrganizationAdmin role.
Only the OrganizationAdmin role has the permission to toggle the Resource metadata access both at the cluster level and organization level.
Make sure the Stream Governance package is turned on in your Confluent Cloud environment.
You can use any package of Stream Governance, including the free Essentials package. For more information about Stream Governance, see Stream Governance on Confluent Cloud.
Enable or disable Resource metadata access.
To enable or disable the option at the cluster level, toggle Resource Metadata Access on or off in the Security tab on the Cluster Settings page.
You can also enable Resource metadata access when you create a cluster at the Networking setup step.
To enable or disable the option at the organization level, toggle Resource Metadata Access on or off on the Organizations page.
If you enabled the Resource metadata access option, navigate to your cluster’s topics and Stream Lineage pages to view them.