
Google Cloud Dataproc Sink Connector [End of Life] for Confluent Cloud
Important
This connector reached its end of life (EOL) on March 31, 2026. For more information, see Deprecated and end of life connectors.
The fully-managed Google Cloud Dataproc Sink connector for Confluent Cloud integrates Apache Kafka® with managed HDFS instances in Google Cloud Dataproc. The connector periodically polls data from Kafka and writes this data to HDFS. The connector supports Avro, JSON Schema, Protobuf, or JSON (schemaless) input data formats and Avro, JSON, and String output formats.
Confluent Cloud is available through Google Cloud Marketplace or directly from Confluent.
Note
This is a Quick Start for the fully-managed cloud connector. If you are installing the connector locally for Confluent Platform, see Google Cloud Dataproc Sink connector for Confluent Platform.
The fully-managed Google Cloud Dataproc Sink connector integrates with Hive. When it is enabled, the connector automatically creates an external Hive partitioned table for each Kafka topic and updates the table according to the available data in HDFS.
Important
Preview features are not currently supported and are not recommended for production use. A preview feature is a Confluent Cloud component that is being introduced to gain early feedback. Preview connectors and features can be used for evaluation and non-production testing purposes or to provide feedback to Confluent. Comments, questions, and suggestions related to preview features are encouraged and can be submitted to ccloud-connect-preview@confluent.io.
Note that Preview connectors are billed in the same way as other managed connectors. For more information, see Managed connectors and custom connectors.
Features
The Google Cloud Dataproc Sink connector provides the following features:
Exactly Once Delivery: The connector uses a write ahead log to ensure each record exports to HDFS exactly once. Also, the connector manages the offsets commit by encoding the Kafka offset information into the file so that the connector can start from the last committed offsets in case of failures and task restarts.
Data formats: The connector supports Avro, JSON Schema, Protobuf, or JSON (schemaless) input data formats and Avro, JSON, and String output formats. Schema Registry must be enabled to use a Schema Registry-based format (for example, Avro, JSON Schema, or Protobuf).
Hive Integration: The connector supports Hive integration. When it is enabled, the connector automatically creates a Hive external partitioned table for each topic exported to HDFS.
input.data.formatshould be AVROTime-Based Partitioner: The connector supports a daily and hourly partitioner.
Seamless Dataproc Integration: The only connection requirements are the Google Cloud credentials and the Dataproc cluster name and project. No need to get the HDFS URL or adjust a Hadoop configuration.
High Availability (HA) Cluster Support: No additional configuration is required to connect to a multi-master HA cluster.
Flush size: Defaults to 1000. The value can be increased if needed. The value can be lowered (1 minimum) if you are running a Dedicated Confluent Cloud cluster. The minimum value is 1000 for non-dedicated clusters.
The following scenarios describe a couple of ways records may be flushed to storage:
You use the default setting of 1000 and your topic has six partitions. Files start to be created in storage after more than 1000 records exist in each partition.
You use the default setting of 1000 and the partitioner is set to Hourly. 500 records arrive at one partition from 2:00pm to 3:00pm. At 3:00pm, an additional 5 records arrive at the partition. You will see 500 records in storage at 3:00pm.
Note
The properties
rotate.schedule.interval.msandrotate.interval.mscan be used withflush.sizeto determine when files are created in storage. These parameters kick in and files are stored based on which condition is met first.For FieldPartitioner in fully-managed connectors, an additional automatic rotation occurs when the number of open files reaches 50. This uploads the current batch of files to storage and creates a new batch.
For example: You have one topic partition. You set
flush.size=1000androtate.schedule.interval.ms=600000(10 minutes). 500 records arrive at the topic partition from 12:01 to 12:10. 500 additional records arrive from 12:11 to 12:20. You will see two files in the storage bucket with 500 records in each file. This is because the 10 minuterotate.schedule.interval.mscondition tripped before theflush.size=1000condition was met.
For more information and examples to use with the Confluent Cloud API for Connect, see the Confluent Cloud API for Connect Usage Examples section.
Important
Preview features are not currently supported and are not recommended for production use. A preview feature is a Confluent Cloud component that is being introduced to gain early feedback. Preview connectors and features can be used for evaluation and non-production testing purposes or to provide feedback to Confluent. Comments, questions, and suggestions related to preview features are encouraged and can be submitted to ccloud-connect-preview@confluent.io.
Note that Preview connectors are billed in the same way as other managed connectors. For more information, see Managed connectors and custom connectors.
Limitations
Be sure to review the following information.
For connector limitations, see Google Cloud Dataproc Sink Connector limitations.
If you plan to use one or more Single Message Transformations (SMTs), see SMT Limitations.
Quick Start
Use this quick start to get up and running with the Confluent Cloud Google Cloud Dataproc Sink connector. The quick start provides the basics of selecting the connector and configuring it to stream events to HDFS.
- Prerequisites
Authorized access to a Confluent Cloud cluster on Google Cloud in a VPC peering configuration with the Google Dataproc cluster.
Note
For a non-VPC peered environment, public inbound traffic access (
0.0.0.0/0) must be allowed to the VPC where the Dataproc cluster is located. You must also make configuration changes to allow public access to the Dataproc cluster while retaining the private IP addresses for the Dataproc master and worker nodes (HDFS NameNode and DataNodes). For configuration details, see Configuring a non-VPC peering environment. For more information about public Internet access to resources, see Networking and DNS.The Confluent CLI installed and configured for the cluster. See Install the Confluent CLI.
Schema Registry must be enabled to use a Schema Registry-based format (for example, Avro, JSON Schema, or Protobuf).
The Google Cloud Resource Manager API is enabled for your project.
An operating Dataproc cluster. For the steps necessary to create a cluster, see Create a cluster.
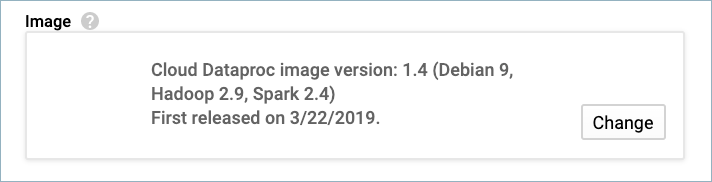
The Dataproc image version must be 1.4 (or later). See Cloud Dataproc Image version list.
A Google Cloud service account. You download service account credentials as a JSON file. These credentials are used when setting up the connector configuration.
Kafka cluster credentials. The following lists the different ways you can provide credentials.
Enter an existing service account resource ID.
Create a Confluent Cloud service account for the connector. Make sure to review the ACL entries required in the service account documentation. Some connectors have specific ACL requirements.
Create a Confluent Cloud API key and secret. To create a key and secret, you can use confluent api-key create or you can autogenerate the API key and secret directly in the Cloud Console when setting up the connector.
Using the Confluent Cloud Console
Complete the following steps to set up and run the connector.
Step 1: Launch your Confluent Cloud cluster
To create and launch a Kafka cluster in Confluent Cloud, see Create a kafka cluster in Confluent Cloud.
Step 2: Add a connector
In the left navigation menu, click Connectors. If you already have connectors in your cluster, click + Add connector.
Step 3: Select your connector
Click the Google Cloud Dataproc Sink connector card.
Step 4: Enter the connector details
Note
Ensure you have all your prerequisites completed.
An asterisk ( * ) designates a required entry.
At the Add Google Cloud Dataproc Sink Connector screen, complete the following:
If you’ve already populated your Kafka topics, select the topics you want to connect from the Topics list.
To create a new topic, click +Add new topic.
Select the way you want to provide Kafka Cluster credentials. You can choose one of the following options:
My account: This setting allows your connector to globally access everything that you have access to. With a user account, the connector uses an API key and secret to access the Kafka cluster. This option is not recommended for production.
Service account: This setting limits the access for your connector by using a service account. This option is recommended for production.
Use an existing API key: This setting allows you to specify an API key and a secret pair. You can use an existing pair or create a new one. This method is not recommended for production environments.
Note
Freight clusters support only service accounts for Kafka authentication.
Click Continue.
Configure the authentication properties:
GCP credentials file: Upload your Google Cloud credentials JSON file.
Dataproc project ID: ID for the Google Cloud project where the Dataproc cluster is located.
Dataproc cluster name: Google Cloud Dataproc cluster name.
Dataproc namenode address: Comma-separated list of namenodes to use. If present overrides the namenodes that were detected through the Dataproc cluster.
Use datanode hostname: Configuration indicating whether to use datanode hostnames when connecting to datanodes.
Click Continue.
Note
Configuration properties that are not shown in the Cloud Console use the default values. See Configuration Properties for all property values and definitions.
Input Kafka record value format: Select the input Kafka record value format (data coming from the Kafka topic). Valid entires AVRO, JSON_SR (JSON Schema), PROTOBUF, or JSON (schemaless). A valid schema must be available in Schema Registry to use a schema-based message format (for example, AVRO, JSON_SR, or PROTOBUF.
Note
Input format JSON to output format AVRO does not work for the preview connector.
Output message format: Sets the output message format. Valid entries are AVRO, JSON, or STRING. Note that the output message format defaults to the value in the input message format field. If either PROTOBUF or JSON_SR is selected as the input message format, you should select one explicitly. A valid schema must be available in Schema Registry to use a schema-based message format (for example, AVRO).
Hive integration: For Hive integration, select whether you want to use Hive integration.
Time interval: For Time interval, select the time-based partitioning interval you want to use.
Flush size: In the Flush size field, enter the number of records that will be written to storage before invoking file commits. The flush size defaults to 1000. This value can be raised and lowered (if running a dedicated cluster).
Show advanced configurations
Schema context: Select a schema context to use for this connector, if using a schema-based data format. This property defaults to the Default context, which configures the connector to use the default schema set up for Schema Registry in your Confluent Cloud environment. A schema context allows you to use separate schemas (like schema sub-registries) tied to topics in different Kafka clusters that share the same Schema Registry environment. For example, if you select a non-default context, a Source connector uses only that schema context to register a schema and a Sink connector uses only that schema context to read from. For more information about setting up a schema context, see What are schema contexts and when should you use them?.
HDFS logs directory: Top-level directory where write-ahead logs are stored.
Maximum span of record time (in ms) before scheduled rotation: Scheduled rotation uses
rotate.schedule.interval.msto close the file and upload to storage on a regular basis using the current time, rather than the record time. Settingrotate.schedule.interval.msis nondeterministic and will invalidate exactly-once guarantees. Minimum value is 600000 ms (10 minutes).Hive metastore URIs: The Hive metastore URIs. Can be an IP address or fully-qualified domain name and port of the metastore host.
Maximum span of record time (in ms) before rotation: The connector’s rotation interval specifies the maximum timespan (in milliseconds) a file can remain open and ready for additional records. In other words, when using
rotate.interval.ms, the timestamp for each file starts with the timestamp of the first record inserted in the file. The connector closes and uploads a file to the blob store when the next record’s timestamp does not fit into the file’srotate.intervaltime span from the first records’s timestamp. If the connector has no more records to process, the connector may keep the file open until the connector can process another record (which can be a long time). Minimum value is 600000 ms (10 minutes).Hive configuration directory: Hive configuration directory.
Timestamp field name: Sets the field that contains the timestamp used for the
TimeBasedPartitioner.Hive home directory: Hive home directory.
Timezone: Sets the timezone used by the
TimeBasedPartitioner.Hive database: The database to use when the connector creates tables in Hive.
Locale: Sets the locale to use with the
TimeBasedPartitioner.Topics directory: Top-level directory where ingested data is stored.
Path format: Used to set the data directories when partitioning with
TimeBasedPartitioner. The format set in this configuration converts the Unix timestamp to a valid directory string.
Additional Configs
Value Converter Decimal Format: Specifies the
JSONorJSON_SRserialization format for ConnectDECIMALlogical type values with two allowed literals:BASE64to serializeDECIMALlogical types as base64 encoded binary data, andNUMERICto serializeDECIMALlogical type values inJSONorJSON_SRas a number representing the decimal value.value.converter.replace.null.with.default: Whether to replace fields that have a default value and that are null to the default value. When set to true, the default value is used, otherwise null is used. Applicable for JSON Converter.
Schema GUID For Key Converter: Sets the schema GUID to use for deserialization when using
ConfigSchemaIdDeserializer. This lets you specify a fixed schema GUID for deserializing message keys. This property is applicable only whenkey.converter.key.schema.id.deserializeris set toConfigSchemaIdDeserializer.Value Converter Schema ID Deserializer: Sets the class name of the schema ID deserializer for values. The deserializer reads schema IDs from message headers.
Schema GUID For Value Converter: Sets the schema GUID to use for deserialization when using
ConfigSchemaIdDeserializer. This lets you specify a fixed schema GUID for deserializing message values. This property is applicable only whenvalue.converter.value.schema.id.deserializeris set toConfigSchemaIdDeserializer.Value Converter Reference Subject Name Strategy: Sets the subject reference name strategy for values. Valid entries are
DefaultReferenceSubjectNameStrategyorQualifiedReferenceSubjectNameStrategy. You can use this strategy only withPROTOBUFformat; the default strategy isDefaultReferenceSubjectNameStrategy.Schema ID For Value Converter: Sets the schema ID to use for deserialization when using
ConfigSchemaIdDeserializer. This lets you specify a fixed schema ID for deserializing message values. This property is applicable only whenvalue.converter.value.schema.id.deserializeris set toConfigSchemaIdDeserializer.value.converter.schemas.enable: Include schemas within each of the serialized values. Input messages must contain schema and payload fields and may not contain additional fields. For plain JSON data, set this to false. Applicable for JSON Converter.
errors.tolerance: Use this property if you would like to configure the connector’s error handling behavior. WARNING: This property should be used with CAUTION for SOURCE CONNECTORS as it may lead to dataloss. If you set this property to ‘all’, the connector will not fail on errant records, but will instead log them (and send to DLQ for Sink Connectors) and continue processing. If you set this property to ‘none’, the connector task will fail on errant records.
Value Converter Connect Meta Data: Enables the Connect converter to add its metadata to the output schema. Applies to Avro converters.
Value Converter Value Subject Name Strategy: Determines how to construct the subject name under which the value schema is registered with Schema Registry.
Key Converter Key Subject Name Strategy: Determines how to construct the subject name for key schema registration.
value.converter.ignore.default.for.nullables: When set to true, this property ensures that the corresponding record in Kafka is NULL, instead of showing the default column value. Applicable for AVRO,PROTOBUF and JSON_SR Converters.
Key Converter Schema ID Deserializer: Sets the class name of the schema ID deserializer for keys. The deserializer reads schema IDs from message headers.
Schema ID For Key Converter: Sets the schema ID to use for deserialization when using
ConfigSchemaIdDeserializer. This lets you specify a fixed schema ID for deserializing message keys. This property is applicable only whenkey.converter.key.schema.id.deserializeris set toConfigSchemaIdDeserializer.
Auto-restart policy
Enable Connector Auto-restart: Enables the auto-restart behavior of the connector and its task in the event of user-actionable errors. Defaults to
true, enabling the connector to automatically restart in case of user-actionable errors. Set this property tofalseto disable auto-restart for failed connectors. If disabled, you must manually restart the connector.
Consumer configuration
Max poll interval(ms): Sets the maximum delay between subsequent consume requests to Kafka. Use this property to improve connector performance in cases when the connector cannot send records to the sink system. The default is 300,000 milliseconds (5 minutes).
Max poll records: Sets the maximum number of records to consume from Kafka in a single request. Use this property to improve connector performance in cases when the connector cannot send records to the sink system. The default is 500 records.
Transforms
Single Message Transformations: To add a new SMT, see Add transforms. For more information about unsupported SMTs, see Unsupported transformations.
Processing position
Set offsets: Click Set offsets to define a specific offset for this connector to begin procession data from. For more information on managing offsets, see Manage offsets.
Click Continue.
Based on the number of topic partitions you select, you will be provided with a recommended number of tasks.
To change the number of recommended tasks, enter the number of tasks for the connector to use in the Tasks field.
Click Continue.
Verify the connection details.
Click Launch.
The status for the connector should go from Provisioning to Running.
Step 5: Check the Dataproc cluster
Go to your Dataproc cluster and make sure the topic is being populated with records.
For more information and examples to use with the Confluent Cloud API for Connect, see the Confluent Cloud API for Connect Usage Examples section.
Tip
When you launch a connector, a Dead Letter Queue topic is automatically created. See View Connector Dead Letter Queue Errors in Confluent Cloud for details.
Using the Confluent CLI
Complete the following steps to set up and run the connector using the Confluent CLI.
Note
Make sure you have all your prerequisites completed.
Step 1: List the available connectors
Enter the following command to list available connectors:
confluent connect plugin list
Step 2: List the connector configuration properties
Enter the following command to show the connector configuration properties:
confluent connect plugin describe <connector-plugin-name>
The command output shows the required and optional configuration properties.
Step 3: Create the connector configuration file
Create a JSON file that contains the connector configuration properties. The following example shows required and optional connector properties.
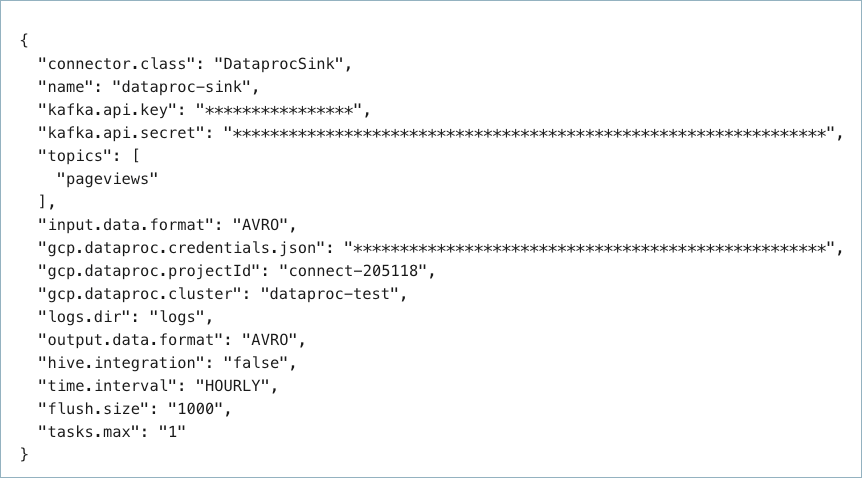
{
  "connector.class": "DataprocSink",
  "name": "dataproc-test",
  "kafka.auth.mode": "KAFKA_API_KEY",
  "kafka.api.key": "<my-kafka-api-key>",
  "kafka.api.secret": "<my-kafka-api-secret>",
  "topics": "<topic-name>",
  "input.data.format": "AVRO",
  "gcp.dataproc.credentials.json": "<credentials-json-file-contents>",
  "gcp.dataproc.projectId": "<my-dataproc-project-ID",
  "gcp.dataproc.cluster": "<my-dataproc-cluster-name>",
  "gcp.dataproc.namenode": "<IP-address-of-the-namenode>",
  "logs.dir": "<HDFS-logs-directory>",
  "output.data.format": "AVRO",
  "flush.size": "1000",
  "time.interval": "HOURLY",
  "tasks.max": "1"
}
Note the following property definitions:
"connector.class": Identifies the connector plugin name."name": Sets a name for your new connector.
"kafka.auth.mode": Identifies the connector authentication mode you want to use. There are two options:SERVICE_ACCOUNTorKAFKA_API_KEY(the default). To use an API key and secret, specify the configuration propertieskafka.api.keyandkafka.api.secret, as shown in the example configuration (above). To use a service account, specify the Resource ID in the propertykafka.service.account.id=<service-account-resource-ID>. To list the available service account resource IDs, use the following command:confluent iam service-account list
For example:
confluent iam service-account list

   Id     | Resource ID |       Name        |    Description
+---------+-------------+-------------------+-------------------
   123456 | sa-l1r23m   | sa-1              | Service account 1
   789101 | sa-l4d56p   | sa-2              | Service account 2
"topics": Identifies the topic name or a comma-separated list of topic names."input.data.format": Sets the input Kafka record value format (data coming from the Kafka topic). Valid entries are AVRO, JSON_SR, PROTOBUF, or JSON. You must have Confluent Cloud Schema Registry configured if using a schema-based message format (for example, Avro, JSON_SR (JSON Schema), or Protobuf).Note
Input format JSON to output format AVRO does not work for the preview connector.
"gcp.dataproc.credentials.json": This contains the contents of the downloaded JSON file. See Formatting Google Cloud credentials for details about how to format and use the contents of the downloaded credentials file."gcp.dataproc.namenode": For VPC-peered environments, this is the internal IP address of the HDFS NameNode (Google Cloud Dataproc master node). For non-VPC-peered environments, this is the FQDN that resolves to the public IP address or the public IP address of the NameNode (for example:cluster1-m.confluentinc.com). For non-VPC-peered environment configuration details, see Configuring a non-VPC peering environment."logs.dir": This is the top-level HDFS directory where write-ahead logs are stored."output.data.format": Sets the output Kafka record value format. Valid entries are AVRO, JSON, or STRING. You must have Confluent Cloud Schema Registry configured if using a schema-based output format (for example, Avro).(Optional)
flush.size: Defaults to 1000. The value can be increased if needed. The value can be lowered (1 minimum) if you are running a Dedicated Confluent Cloud cluster. The minimum value is 1000 for non-dedicated clusters.The following scenarios describe a couple of ways records may be flushed to storage:
You use the default setting of 1000 and your topic has six partitions. Files start to be created in storage after more than 1000 records exist in each partition.
You use the default setting of 1000 and the partitioner is set to Hourly. 500 records arrive at one partition from 2:00pm to 3:00pm. At 3:00pm, an additional 5 records arrive at the partition. You will see 500 records in storage at 3:00pm.
Note
The properties
rotate.schedule.interval.msandrotate.interval.mscan be used withflush.sizeto determine when files are created in storage. These parameters kick in and files are stored based on which condition is met first.For FieldPartitioner in fully-managed connectors, an additional automatic rotation occurs when the number of open files reaches 50. This uploads the current batch of files to storage and creates a new batch.
For example: You have one topic partition. You set
flush.size=1000androtate.schedule.interval.ms=600000(10 minutes). 500 records arrive at the topic partition from 12:01 to 12:10. 500 additional records arrive from 12:11 to 12:20. You will see two files in the storage bucket with 500 records in each file. This is because the 10 minuterotate.schedule.interval.mscondition tripped before theflush.size=1000condition was met.
"time.interval": Sets how your messages are grouped. Valid entries are DAILY or HOURLY.
SMTs: For details about adding SMTs using the Confluent CLI, see the Single Message Transformations documentation.
See Configuration Properties for all property values and definitions.
Formatting Google Cloud credentials
The contents of the downloaded credentials file must be converted to string format before it can be used in the connector configuration.
Convert the JSON file contents into string format.
Add the escape character
\before all\nentries in the Private Key section so that each section begins with\\n(see the highlighted lines below). The example below has been formatted so that the\\nentries are easier to see. Most of the credentials key has been omitted.Tip
A script is available that converts the credentials to a string and also adds additional
\escape characters where needed. See Stringify Google Cloud Credentials.{ "connector.class": "DataprocSink", "name": "dataproc-sink", "kafka.api.key": "<my-kafka-api-key>", "kafka.api.secret": "<my-kafka-api-secret>", "topics": "<topic-name>", "data.format": "AVRO", "gcp.dataproc.credentials.json" : "{\"type\":\"service_account\",\"project_id\":\"connect- 1234567\",\"private_key_id\":\"omitted\", \"private_key\":\"-----BEGIN PRIVATE KEY----- \\nMIIEvAIBADANBgkqhkiG9w0BA \\n6MhBA9TIXB4dPiYYNOYwbfy0Lki8zGn7T6wovGS5pzsIh \\nOAQ8oRolFp\rdwc2cC5wyZ2+E+bhwn \\nPdCTW+oZoodY\\nOGB18cCKn5mJRzpiYsb5eGv2fN\/J \\n...rest of key omitted... \\n-----END PRIVATE KEY-----\\n\", \"client_email\":\"pub-sub@connect-123456789.iam.gserviceaccount.com\", \"client_id\":\"123456789\",\"auth_uri\":\"https:\/\/accounts.google.com\/o\/oauth2\/ auth\",\"token_uri\":\"https:\/\/oauth2.googleapis.com\/ token\",\"auth_provider_x509_cert_url\":\"https:\/\/ www.googleapis.com\/oauth2\/v1\/ certs\",\"client_x509_cert_url\":\"https:\/\/www.googleapis.com\/ robot\/v1\/metadata\/x509\/pub-sub%40connect- 123456789.iam.gserviceaccount.com\"}", "gcp.dataproc.projectId": "<my-dataproc-project-ID", "gcp.dataproc.region": "<gcp-region>", "gcp.dataproc.cluster": "<my-dataproc-cluster-name>", "logs.dir": "<HDFS-logs-directory>", "flush.size": "1000", "time.interval": "HOURLY", "tasks.max": "1" }
Add all the converted string content to the
"gcp.dataproc.credentials.json"section of your configuration file as shown in the example above.
Step 4: Load the configuration file and create the connector
Enter the following command to load the configuration and start the connector:
confluent connect cluster create --config-file <file-name>.json
For example:
confluent connect cluster create --config-file dataproc-sink-config.json
Example output:
Created connector dataproc-sink lcc-ix4dl
Step 5: Check the connector status
Enter the following command to check the connector status:
confluent connect cluster list
Example output:
ID          |       Name      | Status  | Type
+-----------+-----------------+---------+------+
lcc-ix4dl   | dataproc-sink   | RUNNING | sink
Step 6: Check the Dataproc cluster.
Go to your Dataproc cluster and make sure the topic is being populated with records.
For more information and examples to use with the Confluent Cloud API for Connect, see the Confluent Cloud API for Connect Usage Examples section.
Tip
When you launch a connector, a Dead Letter Queue topic is automatically created. See View Connector Dead Letter Queue Errors in Confluent Cloud for details.
Configuration Properties
Use the following configuration properties with the fully-managed connector. For self-managed connector property definitions and other details, see the connector docs in Self-managed connectors for Confluent Platform.
Which topics do you want to get data from?
topicsIdentifies the topic name or a comma-separated list of topic names.
Type: list
Importance: high
Schema Config
schema.context.nameAdd a schema context name. A schema context represents an independent scope in Schema Registry. It is a separate sub-schema tied to topics in different Kafka clusters that share the same Schema Registry instance. If not used, the connector uses the default schema configured for Schema Registry in your Confluent Cloud environment.
Type: string
Default: default
Importance: medium
Input messages
input.data.formatSets the input Kafka record value format. Valid entries are AVRO, JSON_SR, PROTOBUF, or JSON. Note that you need to have Confluent Cloud Schema Registry configured if using a schema-based message format like AVRO, JSON_SR, and PROTOBUF.
Type: string
Default: JSON
Importance: high
How should we connect to your data?
nameSets a name for your connector.
Type: string
Valid Values: A string at most 64 characters long
Importance: high
Kafka Cluster credentials
kafka.auth.modeKafka Authentication mode. It can be one of KAFKA_API_KEY or SERVICE_ACCOUNT. It defaults to KAFKA_API_KEY mode, whenever possible.
Type: string
Valid Values: SERVICE_ACCOUNT, KAFKA_API_KEY
Importance: high
kafka.api.keyKafka API Key. Required when kafka.auth.mode==KAFKA_API_KEY.
Type: password
Importance: high
kafka.service.account.idThe Service Account that will be used to generate the API keys to communicate with Kafka Cluster.
Type: string
Importance: high
kafka.api.secretSecret associated with Kafka API key. Required when kafka.auth.mode==KAFKA_API_KEY.
Type: password
Importance: high
GCP credentials
gcp.dataproc.credentials.jsonGCP service account JSON file with write permssions for Dataproc.
Type: password
Importance: high
How should we connect to your Dataproc?
gcp.dataproc.projectIdID for the GCP project where the Dataproc cluster is located.
Type: string
Importance: high
gcp.dataproc.clusterName of the GCP Dataproc cluster.
Type: string
Importance: high
gcp.dataproc.namenodeComma separated list of namenodes to use. If present, overrides the namenodes that were detected through Dataproc cluster.
Type: list
Importance: medium
gcp.dataproc.use.datanode.hostnameConfiguration indicating whether to use datanode hostnames when connecting to datanodes.
Type: boolean
Default: false
Importance: low
Output messages
output.data.formatSets the output message format. Valid entries are AVRO, JSON, or STRING.Note that the output message format defaults to the value in the Input Message Format field. If either PROTOBUF or JSON_SR is selected as the input message format, you should select one explicitly. If no value for this property is provided, the value specified for the ‘input.data.format’ property is used.
Type: string
Importance: high
HDFS details
logs.dirTop-level directory where write-ahead logs are stored.
Type: string
Default: logs
Importance: high
Hive
hive.integrationWhether or not to use Hive integration.
Type: boolean
Default: false
Importance: high
hive.metastore.urisThe Hive metastore URIs. Can be an IP address or fully-qualified domain name and port of the metastore host.
Type: string
Importance: high
hive.conf.dirHive configuration directory.
Type: string
Default: “”
Importance: high
hive.homeHive home directory.
Type: string
Default: “”
Importance: high
hive.databaseThe database to use when the connector creates tables in Hive.
Type: string
Default: false
Importance: high
Organize my data by…
topics.dirConfigures the directory to store the data ingested from Kafka. If you want to organize files like the following example, hdfs://<dataproc-directory>/json_logs/daily/<Topic-Name>/dt=2020-02-06/hr=09/<files>, please put topic.directory=json_logs/daily, path.format=’dt’=YYYY-MM-dd/’hr’=HH, and time.interval=HOURLY.
Type: string
Default: topics
Importance: high
path.formatThis configuration is used to set the format of the data directories when partitioning with TimeBasedPartitioner. The format set in this configuration converts the Unix timestamp to a valid directory string. To organize files like this example, path.format= hdfs://<dataproc-directory>/json_logs/daily/<Topic-Name>/dt=2020-02-06/hr=09/<files>, use the properties: topic.directory=json_logs/daily, path.format=’dt’=YYYY-MM-dd/’hr’=HH, and time.interval=HOURLY.
Type: string
Default: ‘year’=YYYY/’month’=MM/’day’=dd/’hour’=HH
Importance: high
time.intervalPartitioning interval of data, according to the time ingested to storage.
Type: string
Importance: high
rotate.schedule.interval.msScheduled rotation uses rotate.schedule.interval.ms to close the file and upload to storage on a regular basis using the current time, rather than the record time. Setting rotate.schedule.interval.ms is nondeterministic and will invalidate exactly-once guarantees.
Type: int
Default: -1
Importance: medium
rotate.interval.msThe connector’s rotation interval specifies the maximum timespan (in milliseconds) a file can remain open and ready for additional records. In other words, when using rotate.interval.ms, the timestamp for each file starts with the timestamp of the first record inserted in the file. The connector closes and uploads a file to the blob store when the next record’s timestamp does not fit into the file’s rotate.interval time span from the first record’s timestamp. If the connector has no more records to process, the connector may keep the file open until the connector can process another record (which can be a long time). If no value for this property is provided, the value specified for the ‘time.interval’ property is used.
Type: int
Importance: high
flush.sizeNumber of records written to storage before invoking file commits.
Type: int
Default: 1000
Valid Values: [1000,…] for non-dedicated clusters and [1,…] for dedicated clusters
Importance: high
timestamp.fieldSets the field that contains the timestamp used for the TimeBasedPartitioner
Type: string
Default: “”
Importance: high
timezoneSets the timezone used by the TimeBasedPartitioner.
Type: string
Default: UTC
Importance: high
localeSets the locale to use with TimeBasedPartitioner.
Type: string
Default: en
Importance: high
Consumer configuration
max.poll.interval.msThe maximum delay between subsequent consume requests to Kafka. This configuration property may be used to improve the performance of the connector, if the connector cannot send records to the sink system. Defaults to 300000 milliseconds (5 minutes).
Type: long
Default: 300000 (5 minutes)
Valid Values: [60000,…,1800000] for non-dedicated clusters and [60000,…] for dedicated clusters
Importance: low
max.poll.recordsThe maximum number of records to consume from Kafka in a single request. This configuration property may be used to improve the performance of the connector, if the connector cannot send records to the sink system. Defaults to 500 records.
Type: long
Default: 500
Valid Values: [1,…,500] for non-dedicated clusters and [1,…] for dedicated clusters
Importance: low
Number of tasks for this connector
tasks.maxMaximum number of tasks for the connector.
Type: int
Valid Values: [1,…]
Importance: high
Additional Configs
key.converter.use.schema.guidThe schema GUID to use for deserialization when using ConfigSchemaIdDeserializer. This allows you to specify a fixed schema GUID to be used for deserializing message keys. Only applicable when key.converter.key.schema.id.deserializer is set to ConfigSchemaIdDeserializer.
Type: string
Importance: low
key.converter.use.schema.idThe schema ID to use for deserialization when using ConfigSchemaIdDeserializer. This allows you to specify a fixed schema ID to be used for deserializing message keys. Only applicable when key.converter.key.schema.id.deserializer is set to ConfigSchemaIdDeserializer.
Type: int
Importance: low
value.converter.connect.meta.dataAllow the Connect converter to add its metadata to the output schema. Applicable for Avro Converters.
Type: boolean
Importance: low
value.converter.use.schema.guidThe schema GUID to use for deserialization when using ConfigSchemaIdDeserializer. This allows you to specify a fixed schema GUID to be used for deserializing message values. Only applicable when value.converter.value.schema.id.deserializer is set to ConfigSchemaIdDeserializer.
Type: string
Importance: low
value.converter.use.schema.idThe schema ID to use for deserialization when using ConfigSchemaIdDeserializer. This allows you to specify a fixed schema ID to be used for deserializing message values. Only applicable when value.converter.value.schema.id.deserializer is set to ConfigSchemaIdDeserializer.
Type: int
Importance: low
errors.toleranceUse this property if you would like to configure the connector’s error handling behavior. WARNING: This property should be used with CAUTION for SOURCE CONNECTORS as it may lead to dataloss. If you set this property to ‘all’, the connector will not fail on errant records, but will instead log them (and send to DLQ for Sink Connectors) and continue processing. If you set this property to ‘none’, the connector task will fail on errant records.
Type: string
Default: all
Importance: low
key.converter.key.schema.id.deserializerThe class name of the schema ID deserializer for keys. This is used to deserialize schema IDs from the message headers.
Type: string
Default: io.confluent.kafka.serializers.schema.id.DualSchemaIdDeserializer
Importance: low
key.converter.key.subject.name.strategyHow to construct the subject name for key schema registration.
Type: string
Default: TopicNameStrategy
Importance: low
value.converter.decimal.formatSpecify the JSON/JSON_SR serialization format for Connect DECIMAL logical type values with two allowed literals:
BASE64 to serialize DECIMAL logical types as base64 encoded binary data and
NUMERIC to serialize Connect DECIMAL logical type values in JSON/JSON_SR as a number representing the decimal value.
Type: string
Default: BASE64
Importance: low
value.converter.ignore.default.for.nullablesWhen set to true, this property ensures that the corresponding record in Kafka is NULL, instead of showing the default column value. Applicable for AVRO,PROTOBUF and JSON_SR Converters.
Type: boolean
Default: false
Importance: low
value.converter.reference.subject.name.strategySet the subject reference name strategy for value. Valid entries are DefaultReferenceSubjectNameStrategy or QualifiedReferenceSubjectNameStrategy. Note that the subject reference name strategy can be selected only for PROTOBUF format with the default strategy being DefaultReferenceSubjectNameStrategy.
Type: string
Default: DefaultReferenceSubjectNameStrategy
Importance: low
value.converter.replace.null.with.defaultWhether to replace fields that have a default value and that are null to the default value. When set to true, the default value is used, otherwise null is used. Applicable for JSON Converter.
Type: boolean
Default: true
Importance: low
value.converter.schemas.enableInclude schemas within each of the serialized values. Input messages must contain schema and payload fields and may not contain additional fields. For plain JSON data, set this to false. Applicable for JSON Converter.
Type: boolean
Default: false
Importance: low
value.converter.value.schema.id.deserializerThe class name of the schema ID deserializer for values. This is used to deserialize schema IDs from the message headers.
Type: string
Default: io.confluent.kafka.serializers.schema.id.DualSchemaIdDeserializer
Importance: low
value.converter.value.subject.name.strategyDetermines how to construct the subject name under which the value schema is registered with Schema Registry.
Type: string
Default: TopicNameStrategy
Importance: low
Auto-restart policy
auto.restart.on.user.errorEnable connector to automatically restart on user-actionable errors.
Type: boolean
Default: true
Importance: medium
Next Steps
For an example that shows fully-managed Confluent Cloud connectors in action with Confluent Cloud for Apache Flink, see the Cloud ETL Demo. This example also shows how to use Confluent CLI to manage your resources in Confluent Cloud.
Configuring a non-VPC peering environment
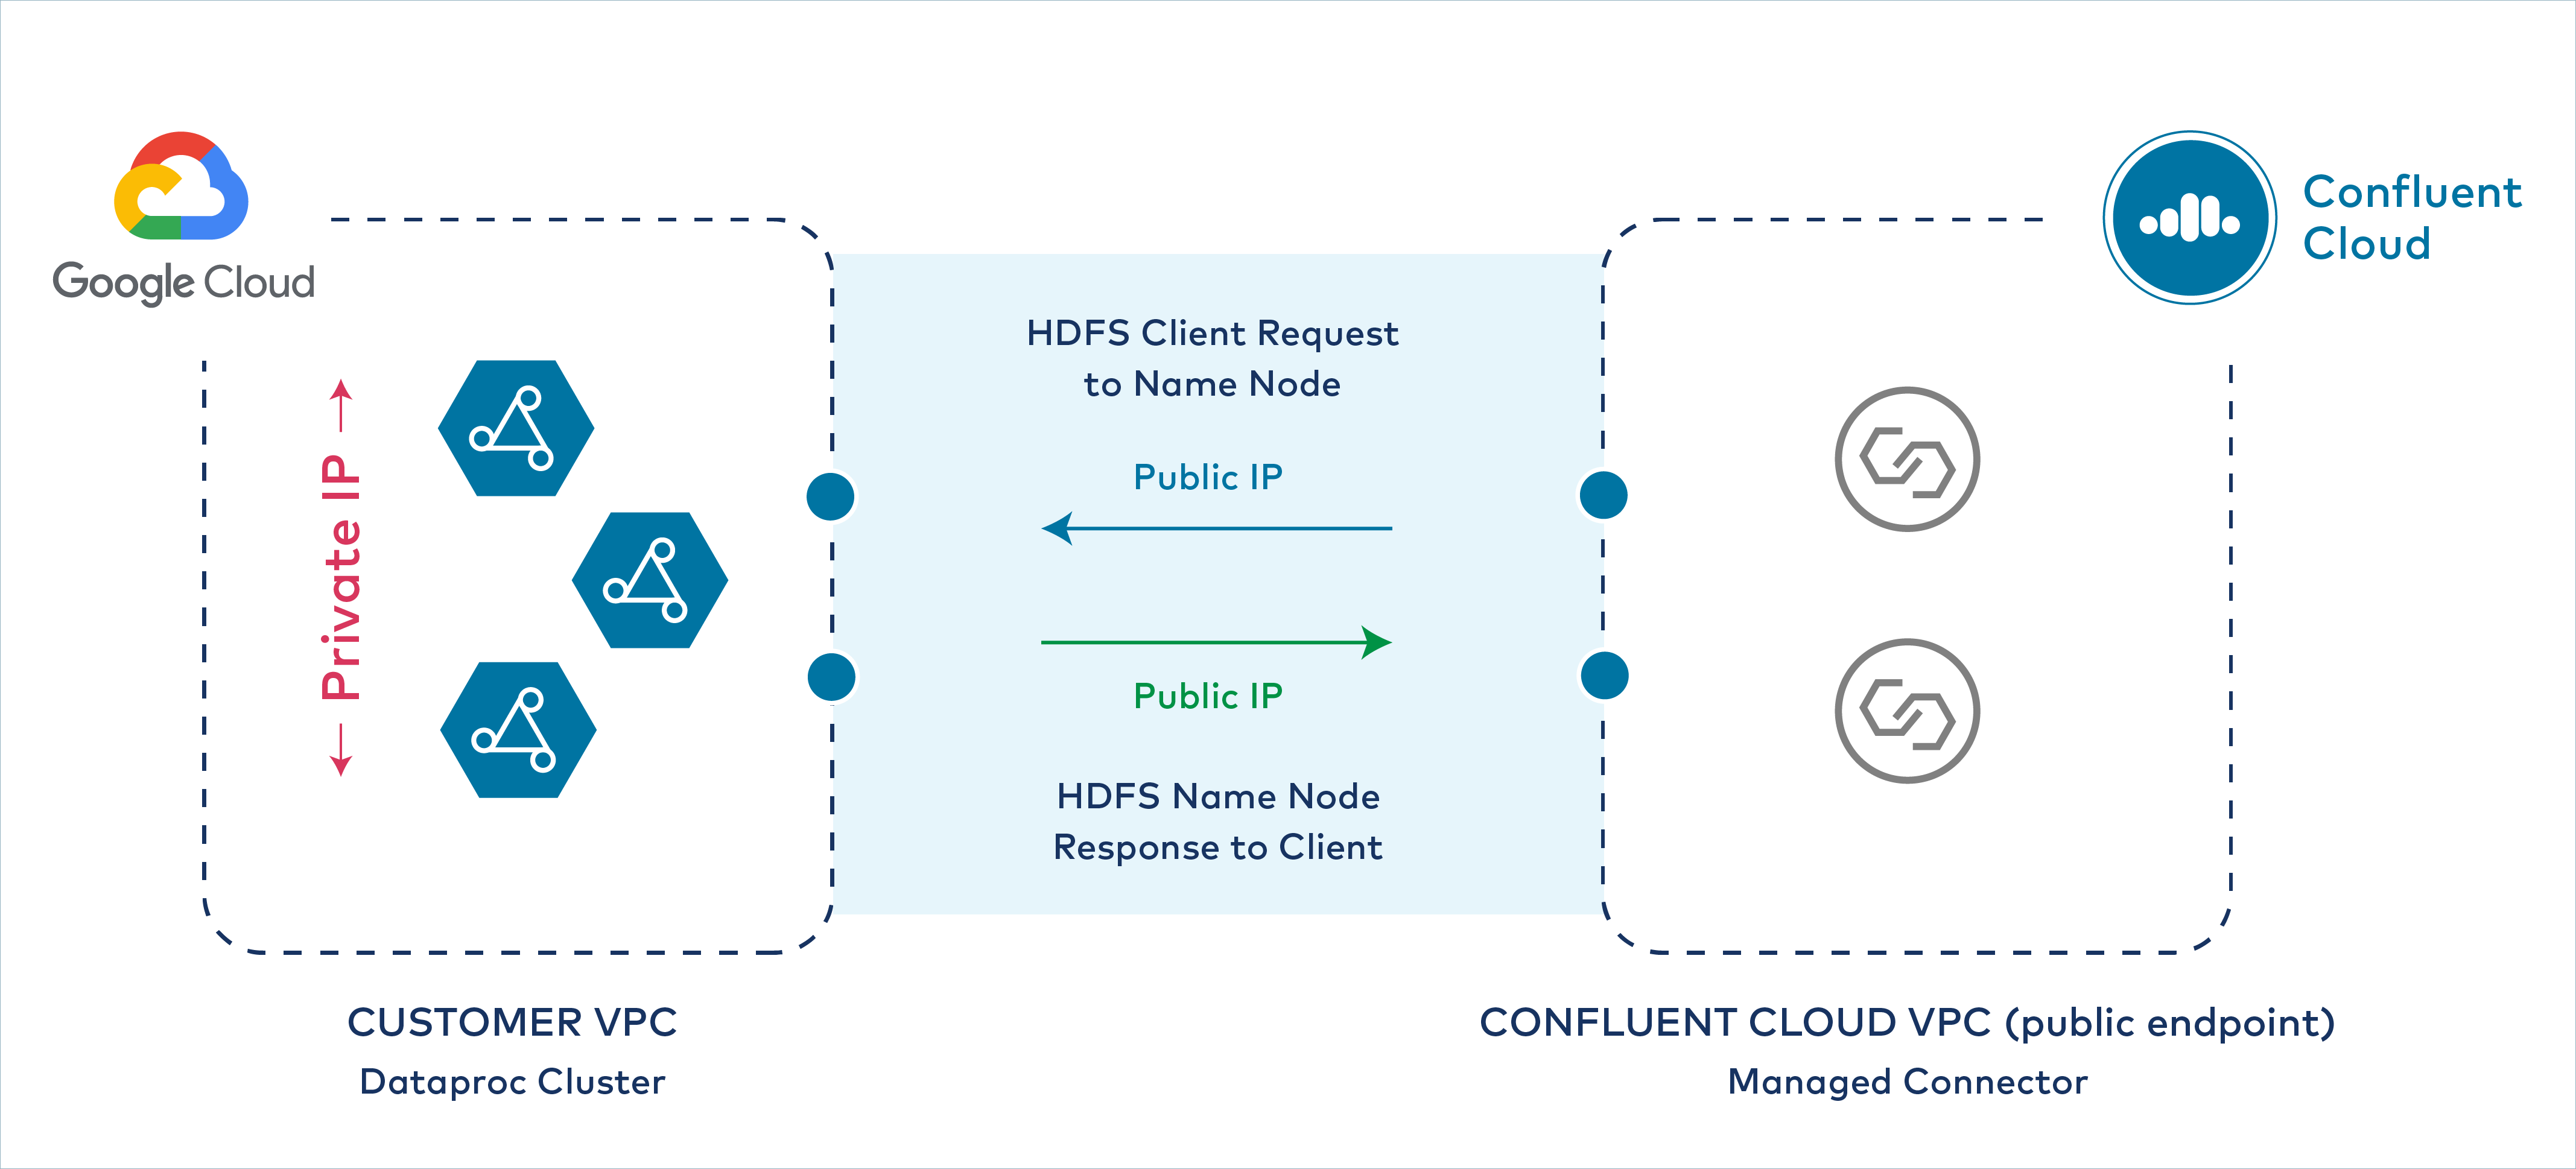
When Confluent Cloud is set up with public endpoints in a non-VPC peering environment, connector requests originate from a public IP endpoint at the Confluent Cloud VPC where the Dataproc connector is running. However, the Dataproc cluster VPC does not provide a public IP address endpoint. Even if each Dataproc node has a Public IP address configured, the VPC does not, and the Hadoop daemon returns private IP addresses and private hostnames to the Confluent Cloud connector.
Tip
For more information about public Internet access to resources, see Networking and DNS.
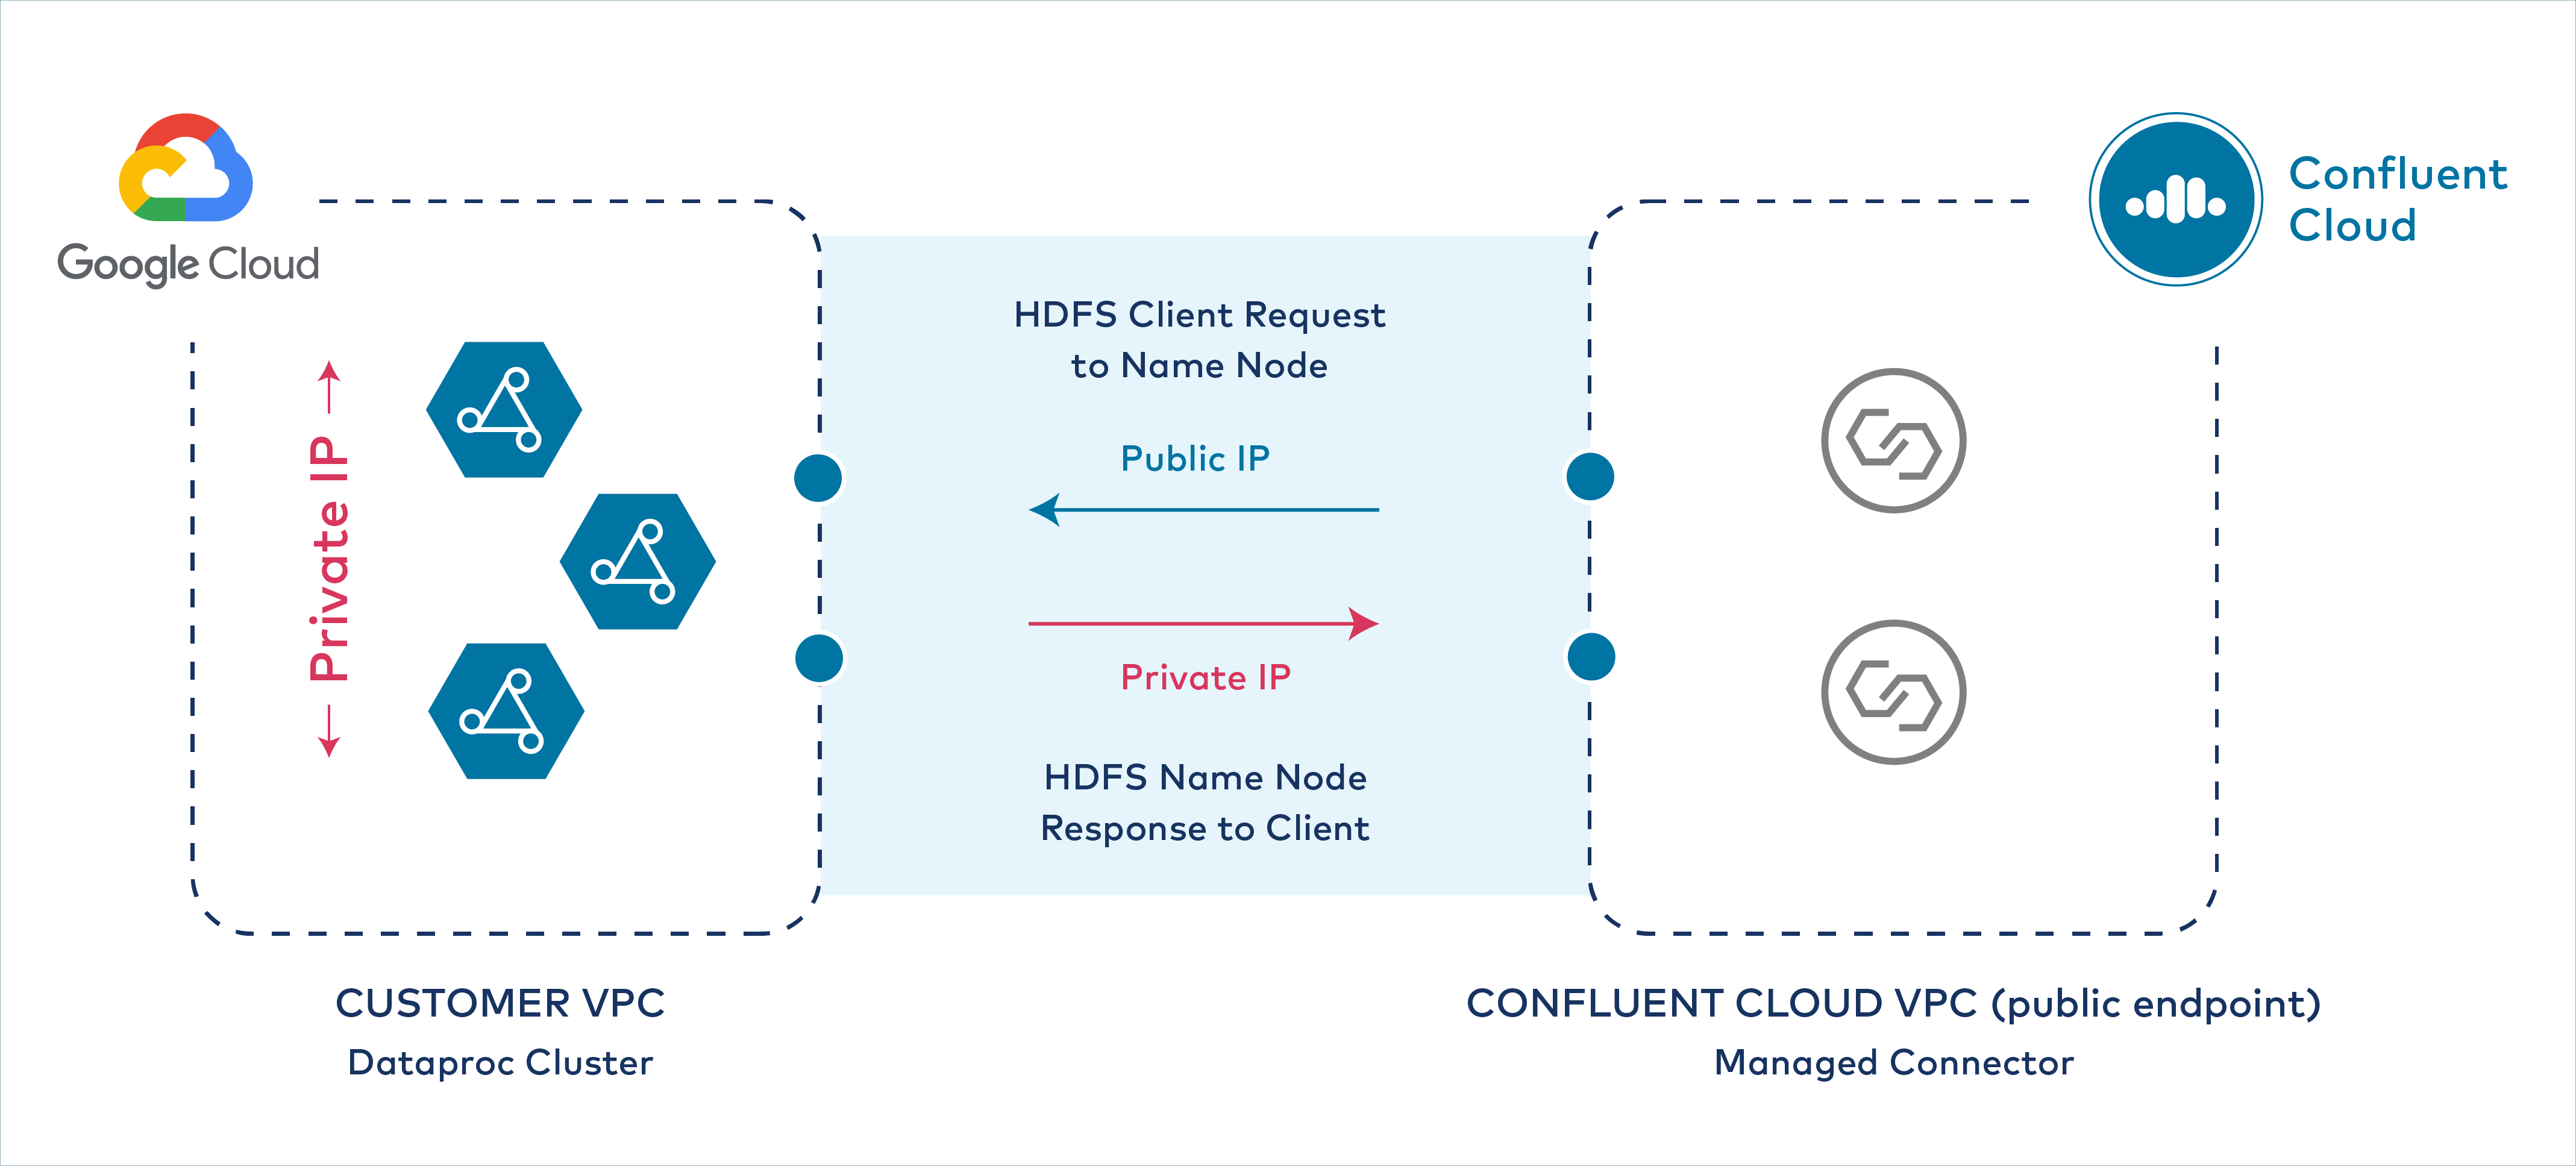
Private IP response to Confluent Cloud
After you complete the following procedure:
The Dataproc connector can successfully establish connectivity to the Google Cloud Dataproc cluster master node (HDFS NameNode).
The Google Cloud Dataproc cluster can respond over public IP to the Confluent Cloud VPC and Dataproc connector.
All Dataproc nodes (HDFS NameNode and DataNodes) in the cluster retain the use of their private IP addresses.
The procedure assumes you are starting a new Dataproc and Confluent Cloud cluster.
- Prerequisites
Authorization to update Google Cloud instances (Dataproc nodes) and configure DNS record sets for your Google Cloud project account.
The gcloud CLI must be installed and configured to manage your Google Cloud Dataproc cluster.
Access to a running Dataproc cluster in Google Cloud.
The Dataproc cluster must have the Cloud Resource Manager API enabled.
The Dataproc cluster VPC must have the following ports open (IP ranges: 0.0.0.0/0) for Confluent Cloud connector ingress:
tcp:8020tcp:9000tcp:9083tcp:9864-9867
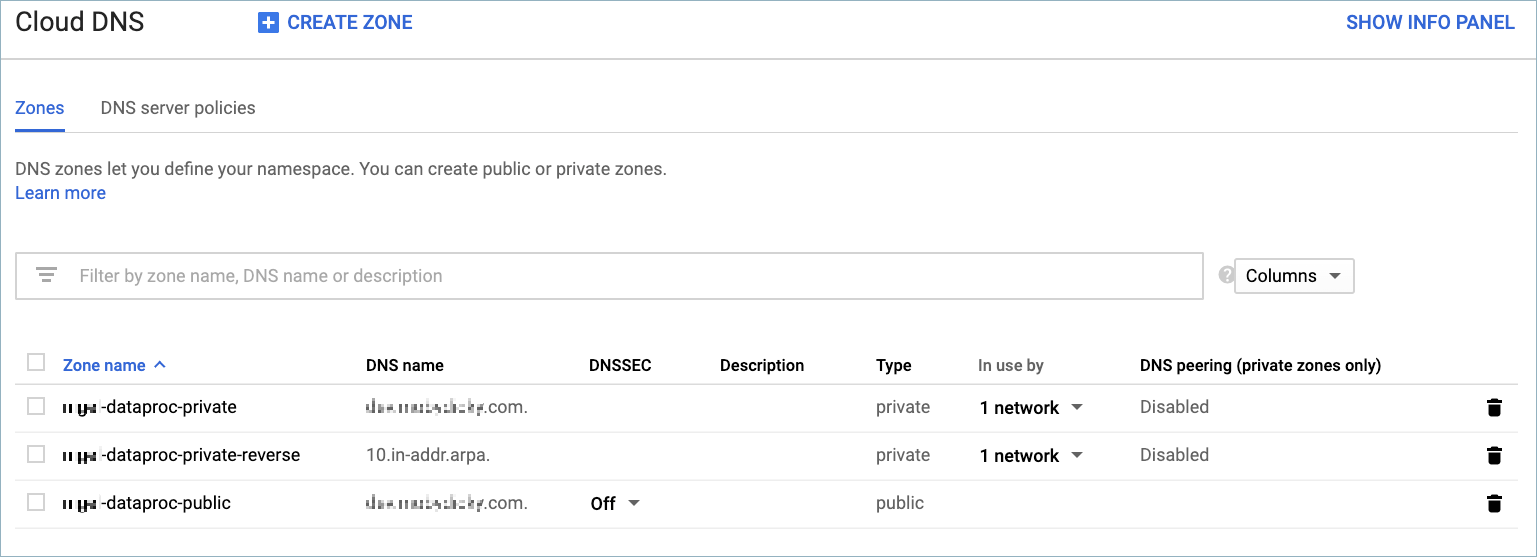
Step 1: Add or create record sets in Cloud DNS
To create a configuration in a non-VPC peered environment, you first need to add or create record sets in the Google Cloud Cloud DNS service. Create the following zones:
public zone: Contains record sets corresponding to the external IP addresses of each Dataproc cluster node.
private zone #1: Contains record sets corresponding to the internal IP addresses of each Dataproc cluster node.
private zone #2: This is a managed reverse lookup zone. It contains the reverse internal IP addresses (in 10.in-addr.arpa. format) for each Dataproc cluster node.
Google Cloud DNS console
You can create DNS zones and record sets using the gcloud CLI or by using the Google Cloud Cloud DNS console.
Get the instance names, external IP addresses, and internal IP addresses for each of your Dataproc nodes.
gcloud compute instances list --project=<my-gcp-project> --zone <region-zone> --filter "<my-cluster-ID>"
For example:
gcloud compute instances list --project=ccloud-lab-47372 --zones us-west1-c --filter "cluster-fa79"

NAME              ZONE           MACHINE_TYPE   PREEMPTIBLE  INTERNAL_IP  EXTERNAL_IP     STATUS
cluster-fa79-m    us-central1-c  n1-standard-4               10.128.0.6   34.67.10.174    RUNNING
cluster-fa79-w-0  us-central1-c  n1-standard-4               10.128.0.2   34.72.119.108   RUNNING
cluster-fa79-w-1  us-central1-c  n1-standard-4               10.128.0.3   104.154.209.27  RUNNING
Create or add each instance name and external IP address to a public cloud DNS zone using the gcloud CLI or the Cloud DNS console. Once you have created the DNS zone and record sets, view the records in the UI or list them using the following gcloud command.
gcloud dns record-sets list --zone=<public-dns-zone> --project=<gcp-project-ID>
For example:
gcloud dns record-sets list --zone=ccloud-dataproc-public --project=ccloud-lab-47372
NAME                                       TYPE  TTL    DATA
ccloud.dataproc.lab.net.                   NS    21600  ns-cloud-b1.googledomains.com.,ns-cloud-b2.googledomains.com.,ns-cloud-b3.googledomains.com.,ns-cloud-b4.googledomains.com.
ccloud.dataproc.lab.net.                   SOA   21600  ns-cloud-b1.googledomains.com. cloud-dns-hostmaster.google.com. 1 21600 3600 259200 300
cluster-fa79-m.ccloud.dataproc.lab.net.    A     300    34.67.10.174
cluster-fa79-w-0.ccloud.dataproc.lab.net.  A     300    34.72.119.108
cluster-fa79-w-1.ccloud.dataproc.lab.net.  A     300    104.154.209.27
Create or add each instance name and internal IP address to a private cloud DNS zone using the gcloud CLI or the Cloud DNS console. Once you have created the DNS zone and record sets, view the records in the UI or list them using the following gcloud command.
gcloud dns record-sets list --zone=<private-dns-zone> --project=<gcp-project-ID>
For example:
gcloud dns record-sets list --zone=ccloud-dataproc-private --project=ccloud-lab-47372
NAME                                       TYPE  TTL    DATA
ccloud.dataproc.lab.net.                   NS    21600  ns-gcp-private.googledomains.com.
ccloud.dataproc.lab.net.                   SOA   21600  ns-gcp-private.googledomains.com. cloud-dns-hostmaster.google.com. 1 21600 3600 259200 300
cluster-fa79-m.ccloud.dataproc.lab.net.    A     300    10.128.0.6
cluster-fa79-w-0.ccloud.dataproc.lab.net.  A     300    10.128.0.2
cluster-fa79-w-1.ccloud.dataproc.lab.net.  A     300    10.128.0.3
Create or add each instance name and reverse lookup address (
10.in-addr.arpa.) to a private cloud DNS zone using the gcloud CLI or the Cloud DNS console. Once you have created the DNS zone and record sets, view the records in the UI or list them using the following gcloud command.gcloud dns record-sets list --zone=<private-reverse-dns-zone> --project=<gcp-project-ID>
For example:
gcloud dns record-sets list --zone=ccloud-dataproc-private-reverse --project=ccloud-lab-47372
NAME                                       TYPE  TTL    DATA
10.in-addr.arpa.          NS    21600  ns-gcp-private.googledomains.com.
10.in-addr.arpa.          SOA   21600  ns-gcp-private.googledomains.com. cloud-dns-hostmaster.google.com. 1 21600 3600 259200 300
6.0.128.10.in-addr.arpa.  PTR   300    cluster-fa79-m.ccloud.dataproc.lab.net.
2.0.128.10.in-addr.arpa.  PTR   300    cluster-fa79-w-0.ccloud.dataproc.lab.net.
3.0.128.10.in-addr.arpa.  PTR   300    cluster-fa79-w-1.ccloud.dataproc.lab.net.
Step 2: (Optional) Create permanent custom hostnames
Note
Google Cloud creates a default hostname for each Dataproc instance in the cluster. You can use the default Google Cloud hostnames instead of creating custom hostnames. However, you may want to create custom hostnames that correspond to your network plan or specific cloud application.
Complete the following steps to set custom hostnames for each Dataproc cluster node. You store the hostname on the nodes using the gcloud CLI and the Google Cloud metadata service (see Storing and retrieving instance metadata).
Add a hostname to the Dataproc master node.
gcloud compute instances add-metadata <master-instance-name> \
--metadata <master-node-hostname> --zone <region-zone>
For example:
gcloud compute instances add-metadata cluster-fa79-m \
--metadata hostname=master.cluster1.ccloud.net --zone us-west1-c
Verify that the master node hostname is configured.
gcloud compute instances describe <master-instance-name> --format='value[](metadata.items.hostname)' \
--project=<my-gcp-project> --zone <region-zone>
For example:
gcloud compute instances describe cluster-fa79-m --format='value[](metadata.items.hostname)' \
--project=cloud-lab-47372 --zone us-west1-c
master.cluster1.ccloud.net
Add a hostname for each Dataproc worker node. Complete this step for all worker nodes.
gcloud compute instances add-metadata <worker-instance-name> --metadata <worker-node-hostname> --zone <region-zone>
For example:
gcloud compute instances add-metadata cluster-fa79-w-0 \
--metadata hostname=worker0.cluster1.ccloud.net --zone us-west1-c
Verify that the worker hostname is configured.
gcloud compute instances describe <worker-instance-name> --format='value[](metadata.items.hostname)' \
--project=<my-gcp-project> --zone <region-zone>
For example:
gcloud compute instances describe cluster-fa79-w-0 --format='value[](metadata.items.hostname)' \
--project=ccloud-lab-47372 --zone us-west1-c
worker0.cluster1.ccloud.net
At this point if the nodes restarted, the hostnames would be lost. Make the master hostname persist on restart.
gcloud compute instances add-metadata <master-instance-name> \
--metadata startup-script="sudo -s hostnamectl set-hostname <master-node-hostname>" \
--zone <region-zone>
For example:
gcloud compute instances add-metadata cluster-fa79-m \
--metadata startup-script="sudo -s hostnamectl set-hostname master.cluster1.ccloud.net" \
--zone us-west1-c
Updated [https://www.googleapis.com/compute/v1/projects/ccloud-lab-47372/zones/us-central1-c/instances/cluster-fa79-m].
Verify that the master node startup script is configured.
gcloud compute instances describe <master-instance-name> --format='value[](metadata.items.startup-script)' \
--project=<my-gcp-project> --zone <region-zone>
For example:
gcloud compute instances describe cluster-fa79-m --format='value[](metadata.items.startup-script)' \
--project=ccloud-lab-47372 --zone us-west1-c
sudo -s hostnamectl set-hostname master.cluster1.ccloud.net
Make the worker hostnames persist on restart. Complete this step for all worker nodes.
gcloud compute instances add-metadata <worker-instance-name> \
--metadata startup-script="sudo -s hostnamectl set-hostname <worker-node-hostname>" \
--zone <region-zone>
For example:
gcloud compute instances add-metadata cluster-fa79-w-0 \
--metadata startup-script="sudo -s hostnamectl set-hostname worker0.cluster1.ccloud.net" \
--zone us-west1-c
Updated [https://www.googleapis.com/compute/v1/projects/ccloud-lab-47372/zones/us-central1-c/instances/cluster-fa79-w-0].
Verify that the worker node startup script is configured. Complete this step for all worker nodes.
gcloud compute instances describe <worker-instance-name> --format='value[](metadata.items.startup-script)' \
--project=<my-gcp-project> --zone <region-zone>
For example:
gcloud compute instances describe cluster-fa79-w-0 --format='value[](metadata.items.startup-script)' \
--project=ccloud-lab-47372 --zone us-west1-c
sudo -s hostnamectl set-hostname worker0.cluster1.ccloud.net
Step 3: Verify external and internal IP mapping
Complete the following steps to verify that the external and internal IP mappings are configured properly.
Open a new terminal session and use
nslookupto get the external address mappings. Use the hostname for each node. Complete this step for all worker nodes.nslookup <cluster-node-hostname>
For example:
nslookup master.cluster1.ccloud.net
Server:     192.168.86.1
Address:    192.168.86.1#53

Non-authoritative answer:
Name:    master.cluster1.ccloud.net
Address: 208.91.197.26
(Optional) Use
pingto verify reachability to each node. Use the<cluster-node-hostname>.For example:
ping master.cluster1.ccloud.net
PING master.cluster1.ccloud.net (208.91.197.26): 56 data bytes
64 bytes from 208.91.197.26: icmp_seq=0 ttl=240 time=58.091 ms
64 bytes from 208.91.197.26: icmp_seq=1 ttl=240 time=57.666 ms
64 bytes from 208.91.197.26: icmp_seq=2 ttl=240 time=59.568 ms
Launch an SSH terminal session on one of the worker nodes. The example below shows the gcloud CLI command you can use.
gcloud beta compute ssh --zone "<region-zone>" "<cluster-node-hostname>" --project "<my-gcp-project>"
For example:
gcloud beta compute ssh --zone "us-west1-c" "worker0.cluster1.ccloud.net" -project "ccloud-lab-47372"


Updating project ssh metadata...

Updated [https://www.googleapis.com/compute/beta/projects/ccloud-lab-47372].
Updating project ssh metadata...done.
Waiting for SSH key to propagate.
Warning: Permanently added [] to the list of known hosts.

... omitted
On the Dataproc worker node, use
nslookupto get the internal address mappings for the master node. Use the hostname for each node. Complete this step for all worker nodes.nslookup master.cluster1.ccloud.net Server: 192.168.86.1 Address: 192.168.86.1#53 Non-authoritative answer: Name: master.cluster1.ccloud.net Address: 10.128.0.6
Step 4: Make core-site.xml and hdfs-site.xml modifications
Note
If you are using the default Google Cloud hostnames, you do not have to complete all of the steps in this procedure. However, make sure to verify everything is set up properly at each step and make sure to add the public DNS name on each worker node in the step where this is requested.
Complete the following steps to modify core-site.xml and hfds-site.xml configuration files to use the new hostnames.
Edit the
/etc/hadoop/conf/core-site.xmlon the master node and all worker nodes. Update the configuration to refer to the master hostname. The following uses the example master hostname created earlier.... omitted <property> <name>fs.default.name</name> <value>hdfs://master.cluster1.ccloud.net</value> <description>The old FileSystem used by FsShell.</description> </property> <property> <name>fs.defaultFS</name> <value>hdfs://master.cluster1.ccloud.net</value> <description> The name of the default file system. A URI whose scheme and authority determine the FileSystem implementation. The uri's scheme determines the config property (fs.SCHEME.impl) naming the FileSystem implementation class. The uri's authority is used to determine the host, port, etc. for a filesystem. </description> </property> ... omitted
Edit the
/etc/hadoop/conf/hdfs-site.xmlon the master node and all worker nodes. Update the configuration to refer to the master hostname. The following uses the example master hostname created earlier.... omitted <property> <name>dfs.namenode.rpc-address</name> <value>master.cluster1.ccloud.net:8020</value> <description> RPC address that handles all clients requests. If empty then we'll get the value from ``fs.default.name``. The value of this property will take the form of hdfs://nn-host1:rpc-port. </description> </property> ... omitted <property> <name>dfs.namenode.servicerpc-address</name> <value>master.cluster1.ccloud.net:8051</value> <final>false</final> <source>Dataproc Cluster Properties</source> </property> ... omitted <property> <name>dfs.namenode.lifeline.rpc-address</name> <value>master.cluster1.ccloud.net:8050</value> <final>false</final> <source>Dataproc Cluster Properties</source> </property> ... omitted
At the end of the
hdfs-site.xmlfile on each worker node, add the public DNS name for the node. Create this <property> section for each worker node. This is a required step even if using the default Google Cloud hostnames.... end of file <property> <name>dfs.datanode.hostname</name> <value>cluster-fa79-w-0.ccloud.dataproc.lab.net</value> <description> obscure property </description> </property>
Step 5: Make additional configuration modifications
Note
If you are using the default Google Cloud hostnames, you do not have to complete all of the steps in this procedure. However, make sure to verify everything is set up properly at each step.
Complete the following steps to make additional configuration changes to the nodes_include configuration file and to etc/hosts on each node. You do not have to add these lines if you are using the default Google Cloud hostnames.
Edit the
/etc/hadoop/conf/nodes_includeon the master node. Add all worker node hostnames. The example below shows the worker hostnames created earlier.... omitted worker0.cluster1.ccloud.net worker1.cluster1.ccloud.netLaunch an SSH terminal session on the master node. Add the master hostname and internal IP address to
/etc/hosts. The additional line is highlighted in the example below.127.0.0.1 localhost ::1 localhost ip6-localhost ip6-loopback ff02::1 ip6-allnodes ff02::2 ip6-allrouters 10.128.0.6 master.cluster1.ccloud.net # <-- add this line 10.128.0.6 cluster-fa79-m.c.ccloud.dataproc.lab.net.internal cluster-fa79-m # Added by Google 169.254.169.254 metadata.google.internal # Added by Google
Launch an SSH terminal session on a worker node. Add the worker hostname and internal IP address to
/etc/hosts. The additional line is highlighted in each example below. Complete this step for all worker nodes.127.0.0.1 localhost ::1 localhost ip6-localhost ip6-loopback ff02::1 ip6-allnodes ff02::2 ip6-allrouters 10.128.0.2 worker0.cluster1.ccloud.net # <-- add this line 10.128.0.2 cluster-fa79-w-0.c.ccloud.dataproc.lab.net.internal cluster-fa79-w-0 # Added by Google 169.254.169.254 metadata.google.internal # Added by Google
127.0.0.1 localhost
::1               localhost ip6-localhost ip6-loopback
ff02::1           ip6-allnodes
ff02::2           ip6-allrouters
10.128.0.3 worker1.cluster1.ccloud.net  # <-- add this line
10.128.0.3 cluster-fa79-w-1.c.ccloud.dataproc.lab.net.internal cluster-fa79-w-1  # Added by Google
169.254.169.254 metadata.google.internal  # Added by Google
Step 6: Configure the Dataproc connector
Complete Dataproc connector configuration steps. Configure the Dataproc connector with the gcp.dataproc.use.datanode.hostname configuration property. The example below shows this configuration property added to the configuration. This property defaults to false if not used. Note that for HA deployments, the gcp.dataproc.namenode property supports a comma-separated list of namenodes.
{
  "connector.class": "DataprocSink",
  "name": "dataproc-test",
  "kafka.api.key": "<my-kafka-api-key>",
  "kafka.api.secret": "<my-kafka-api-secret>",
  "topics": "<topic-name>",
  "input.data.format": "AVRO",
  "gcp.dataproc.credentials.json": "<credentials-json-file-contents>",
  "gcp.dataproc.projectId": "<my-dataproc-project-ID",
  "gcp.dataproc.cluster": "<my-dataproc-cluster-name>",
  "gcp.dataproc.namenode": "<public-IP-address or FQDN>",
  "gcp.dataproc.use.datanode.hostname": "true"
  "logs.dir": "<HDFS-logs-directory>",
  "output.data.format": "AVRO",
  "flush.size": "1000",
  "time.interval": "HOURLY",
  "tasks.max": "1"
}
After the configuration settings have been completed, the Dataproc cluster VPC nodes respond over a public IP endpoint to the Confluent Cloud cluster and fully-managed Dataproc connector as shown below.
Public IP address response to Confluent Cloud