
Enable Private Networking on Confluent Cloud for Schema Registry
Confluent Cloud Schema Registry supports private networking on Amazon Web Services, Azure, and Google Cloud.
This feature enables your client applications in the virtual private cloud (VPC) to securely access Schema Registry without egressing to the public internet from your VPC.
How does it work?
Schema Registry has public access by default. You have the following options for using private networking with Confluent Cloud for Schema Registry.
Confluent Cloud network (CCN) on AWS and Azure
If you have a Confluent Cloud network configured for Dedicated Kafka clusters, this is a quick-and-easy starting point for setting up private networking on AWS or Azure. With a CCN already configured, and at least one Kafka Dedicated cluster in the environment and region, a corresponding private endpoint for the Schema Registry is automatically provided in the same region. You can view this on the Confluent Cloud Console at Environment > Schema Registry > Endpoints.
For existing Kafka Dedicated users, the setup is seamless when everything is already configured for Kafka.
To create a CCN, follow the steps in Create Confluent Cloud Network on AWS.
Private network connectivity on AWS, Azure, and Google Cloud
Private network endpoints are resources that enable you to connect to Confluent serverless products, like Enterprise clusters and Apache Flink®.
You can get a private endpoint by creating one in every region where you have a Apache Kafka® cluster deployed. For example, if you have a Kafka cluster deployed in region A, you can create a private endpoint in region A and get a region A specific private endpoint for Schema Registry, making it accessible in region A’s VPC. In this way, you can have multiple VPCs deployed across different regions accessing the Kafka clusters within the environment, through these regional private endpoints for Schema Registry.
Each private endpoint is used to establish a connection between your client applications (including Cloud Console, Confluent CLI, Terraform) and Schema Registry, enabling your clients to access Schema Registry from your VPCs.
Private Network Interface (PNI) on AWS
On AWS, if you use Private Network Interface (PNI) to connect to Enterprise or Freight clusters, you can reach Schema Registry over the same PNI connection. You don’t need a separate AWS PrivateLink connection for Schema Registry.
When a PNI gateway and access point exist in an environment, Confluent Cloud creates a PNI endpoint for Schema Registry in that environment automatically. You can view it on the Confluent Cloud Console at Environment > Schema Registry > Endpoints.
To set up a PNI gateway and access point, follow the steps in Use Private Network Interface on Confluent Cloud. For the endpoint format and connection details, see Access Schema Registry over PNI.
IP filtering to secure Schema Registry connectivity on public networks
You can restrict the public endpoint using IP filtering, so that only a limited set of IPs are able to access Schema Registry via the public endpoint.
Enable private networking for Schema Registry
Prerequisites
You can use Terraform version 2.23.0 or later; but recommended is v2.32.0 or later.
You must use Confluent CLI version v4.29.0 or later.
Access to Confluent Cloud.
A Confluent Cloud environment with at least the Stream Governance Essentials package enabled.
The OrganizationAdmin, EnvironmentAdmin, or NetworkAdmin role to create a private endpoint.
The Confluent Cloud network (CCN) or private endpoint, Kafka cluster, and Schema Registry cluster should be configured in any of the supported regions.
A VPC in AWS or Google Cloud, or VNet in Azure.
Overview
The high level steps are:
Step 1: Use a Confluent Cloud network, private network endpoint, or PNI connection.
(Optional) Step 2: Restrict public access to Schema Registry with IP filtering.
(Optional) Step 3: Connect to the network with Confluent Cloud Console.
Step 1: Use a Confluent Cloud network, private network endpoint, or PNI connection
You can enable private networking to Schema Registry with a Confluent Cloud network, a private network endpoint, or an existing PNI connection on AWS.
Configure a Confluent Cloud network (an option for AWS or Azure)
Follow the steps in the networking documentation to Create Confluent Cloud Network on AWS or Create Confluent Cloud Network on Azure.
If you already have a CCN setup in a supported region, you automatically get a private endpoint to connect to the Schema Registry in the virtual private cloud (VPC) where the network is set up.
To check if you already have a CCN setup, go to Environments > Network Management > For Dedicated clusters. This page lists all the CCNs set up in your environment.
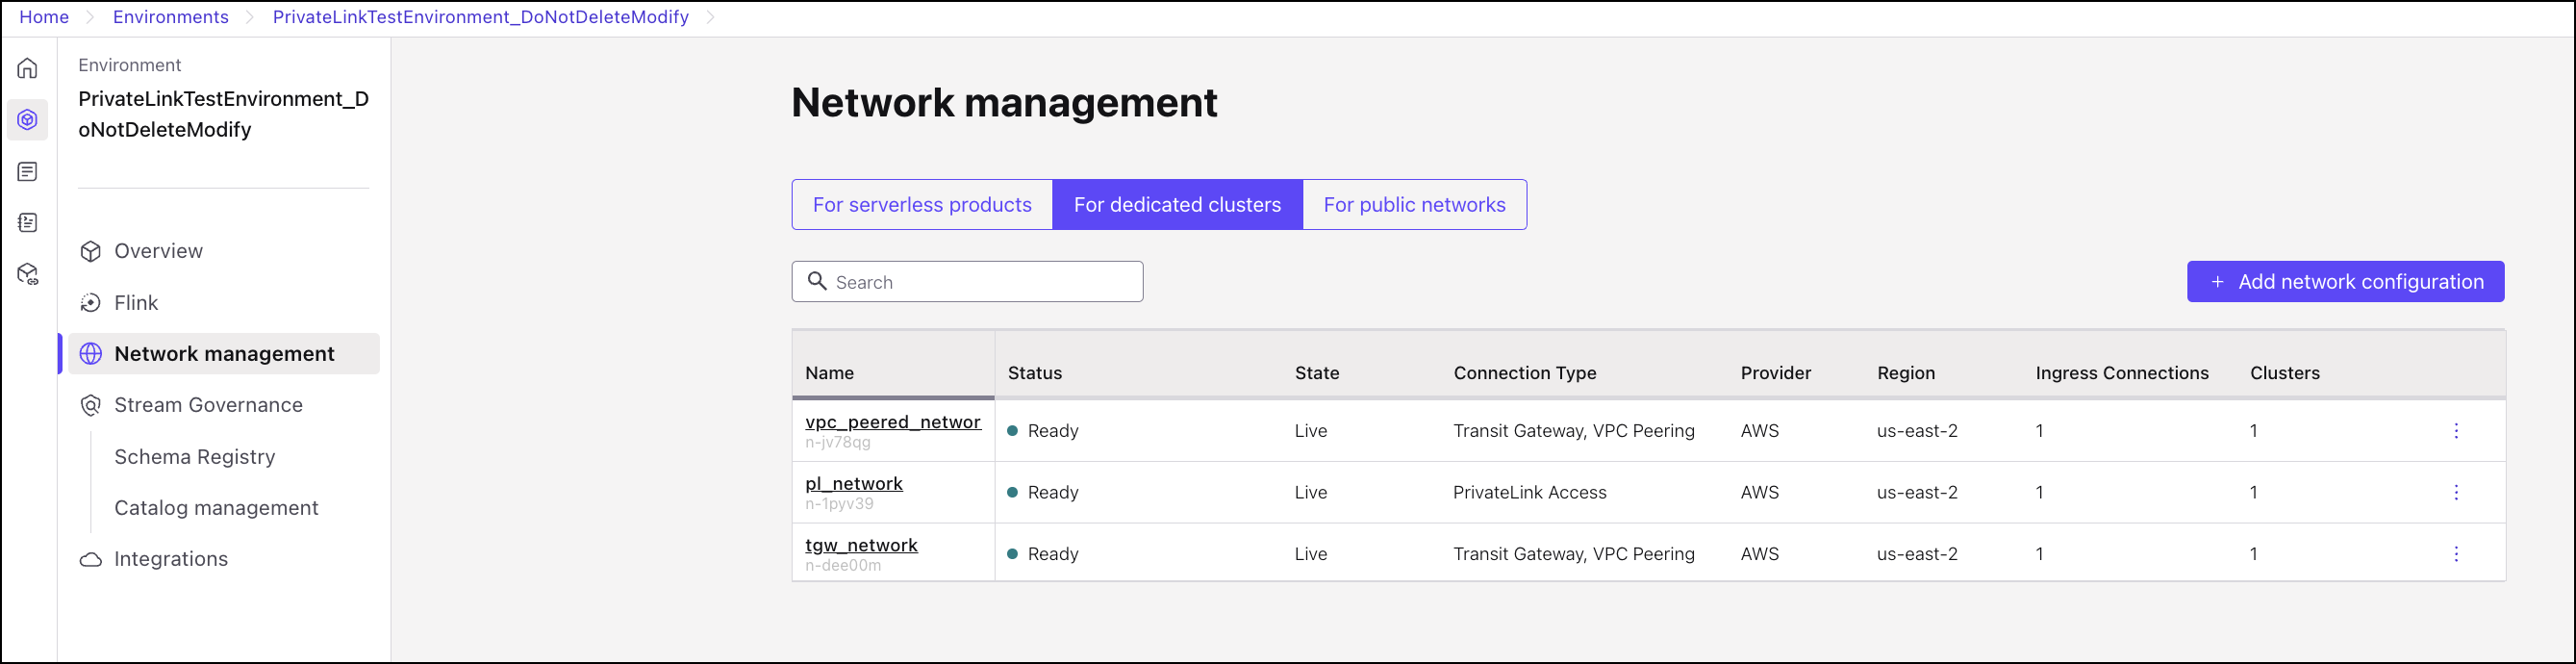
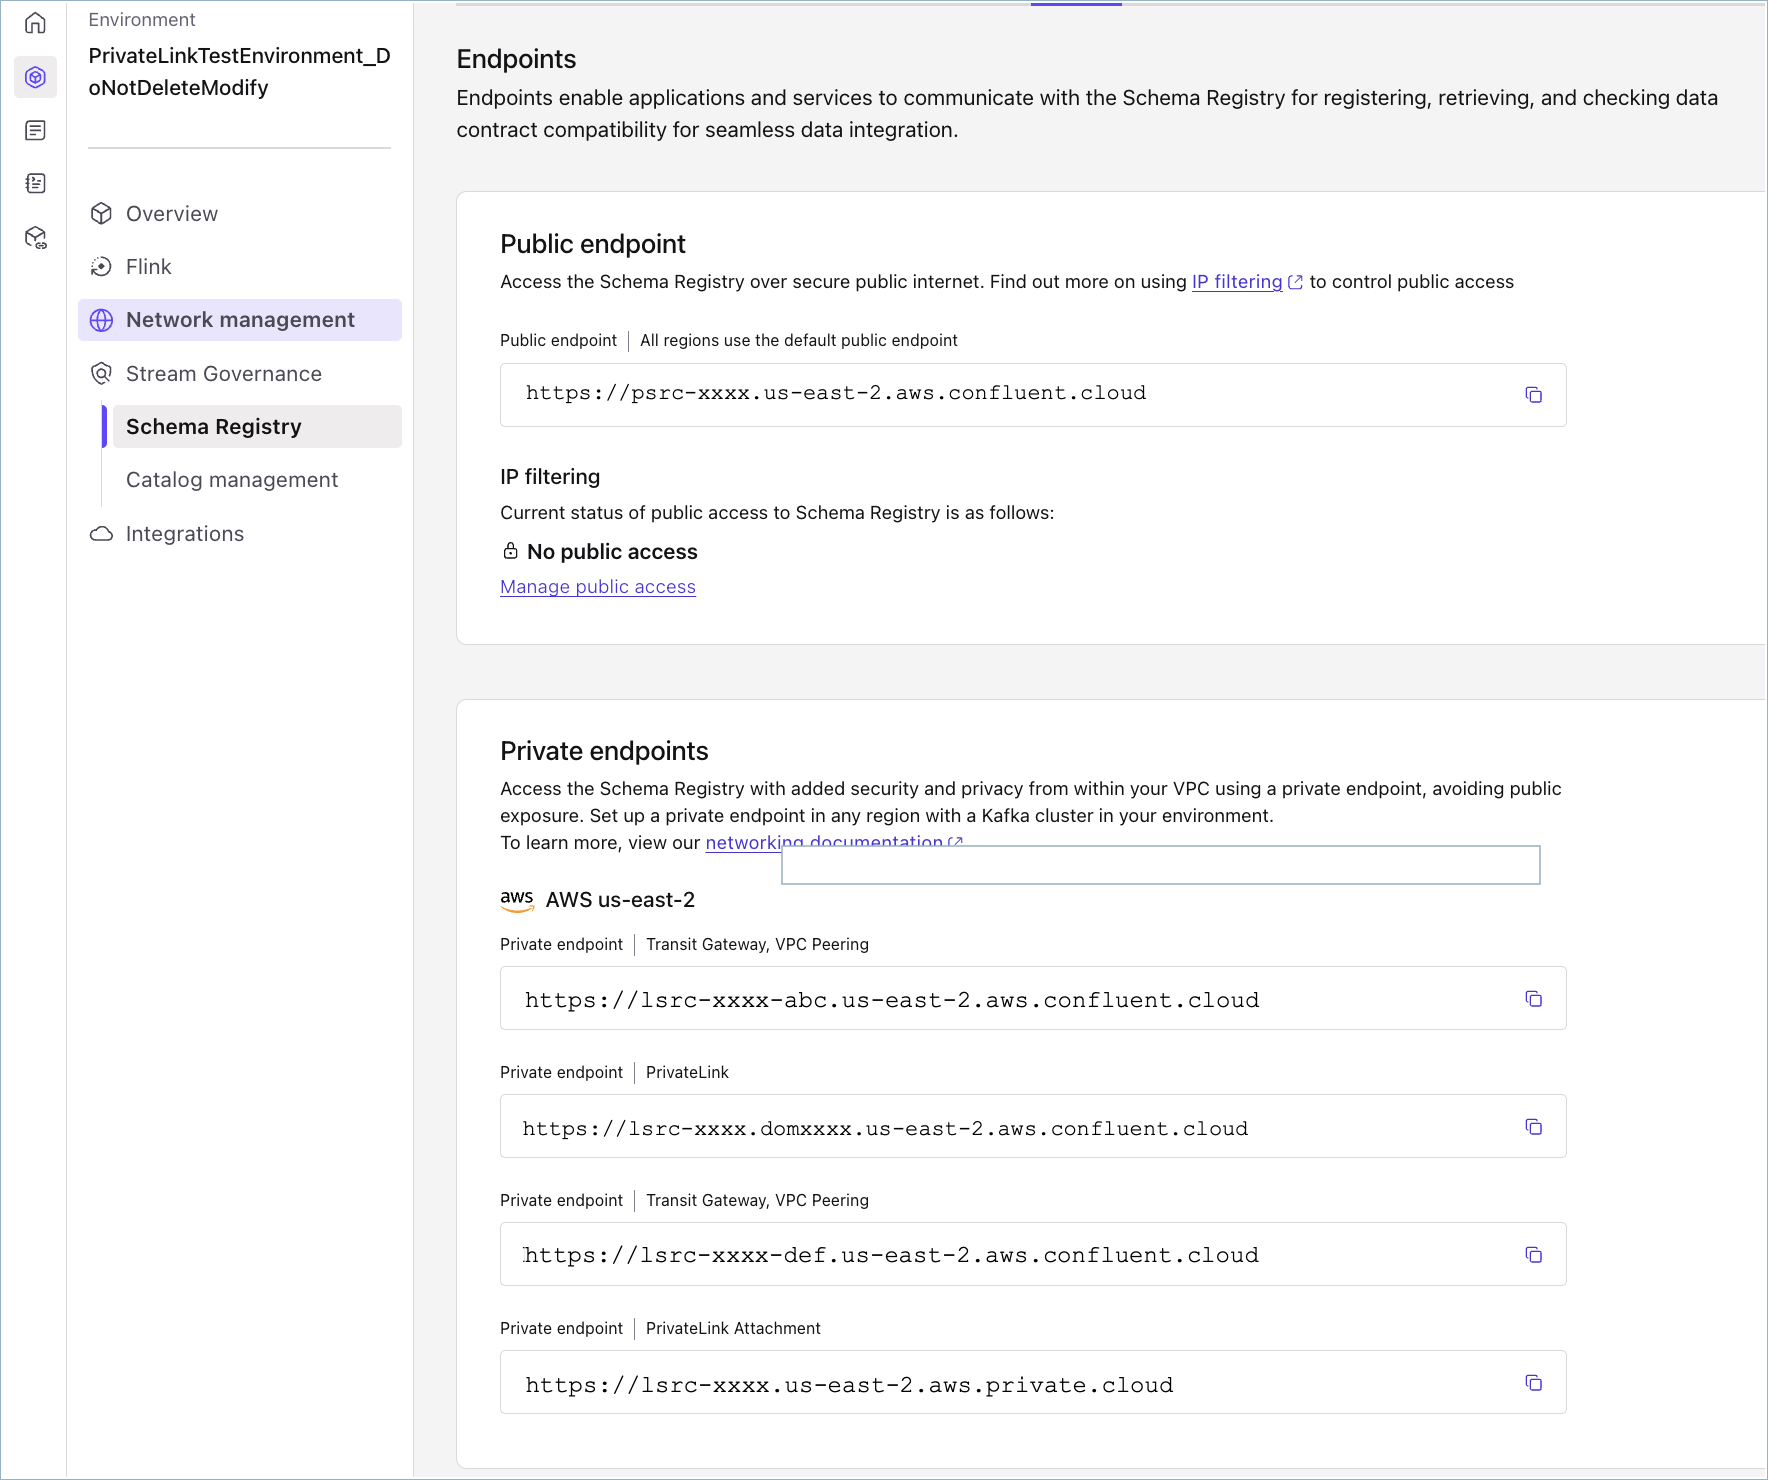
If they are set up in a supported region, you will get corresponding private endpoints for Schema Registry. You can view them in Environment > Schema Registry > Endpoints.
The private endpoints based on CCN network can be obtained by replacing the <service-identifier> in the endpoint suffix for the private network:
For a private endpoint, use the endpoint suffix for the network:
<service-identifier>.<nid>.region.cloud.confluent.cloud. Obtain the corresponding private endpoint by replacing the<service-identifier>with the LSRC ID. For example,lsrc-xxxx.<nid>.region.cloud.confluent.cloud.For VPC Peering and Transit Gateway, use the endpoint suffix for the network:
<service-identifier>-<nid>.region.cloud.confluent.cloud. Obtain the corresponding private endpoint by replacing the<service-identifier>with the LSRC ID. For example,lsrc-xxxx-<nid>.region.cloud.confluent.cloud.
Each supported region’s CCN will have a unique private endpoint for the Schema Registry. Use the CCN’s endpoint in its associated VPC.
Configure private endpoint and network connectivity
The following steps guide you through setup of Schema Registry private networking primarily using the Cloud Console. You can also set up private endpoints to Schema Registry with the Confluent CLI or Terraform. Information about using those tools and other tools is provided at the end of this Quick Start.
Follow these steps to create a private endpoint, a network connection on Confluent Cloud, and set up a DNS resolution.
In Confluent Cloud, create a network connection point in AWS, Azure, or Google Cloud.
Create either a VPC endpoint (AWS), or private endpoint (Azure or Google Cloud) as follows:
In Confluent Cloud, create a private network connection in AWS, Azure, or Google Cloud.
Set up a DNS resolution in AWS, Azure, or Google Cloud.
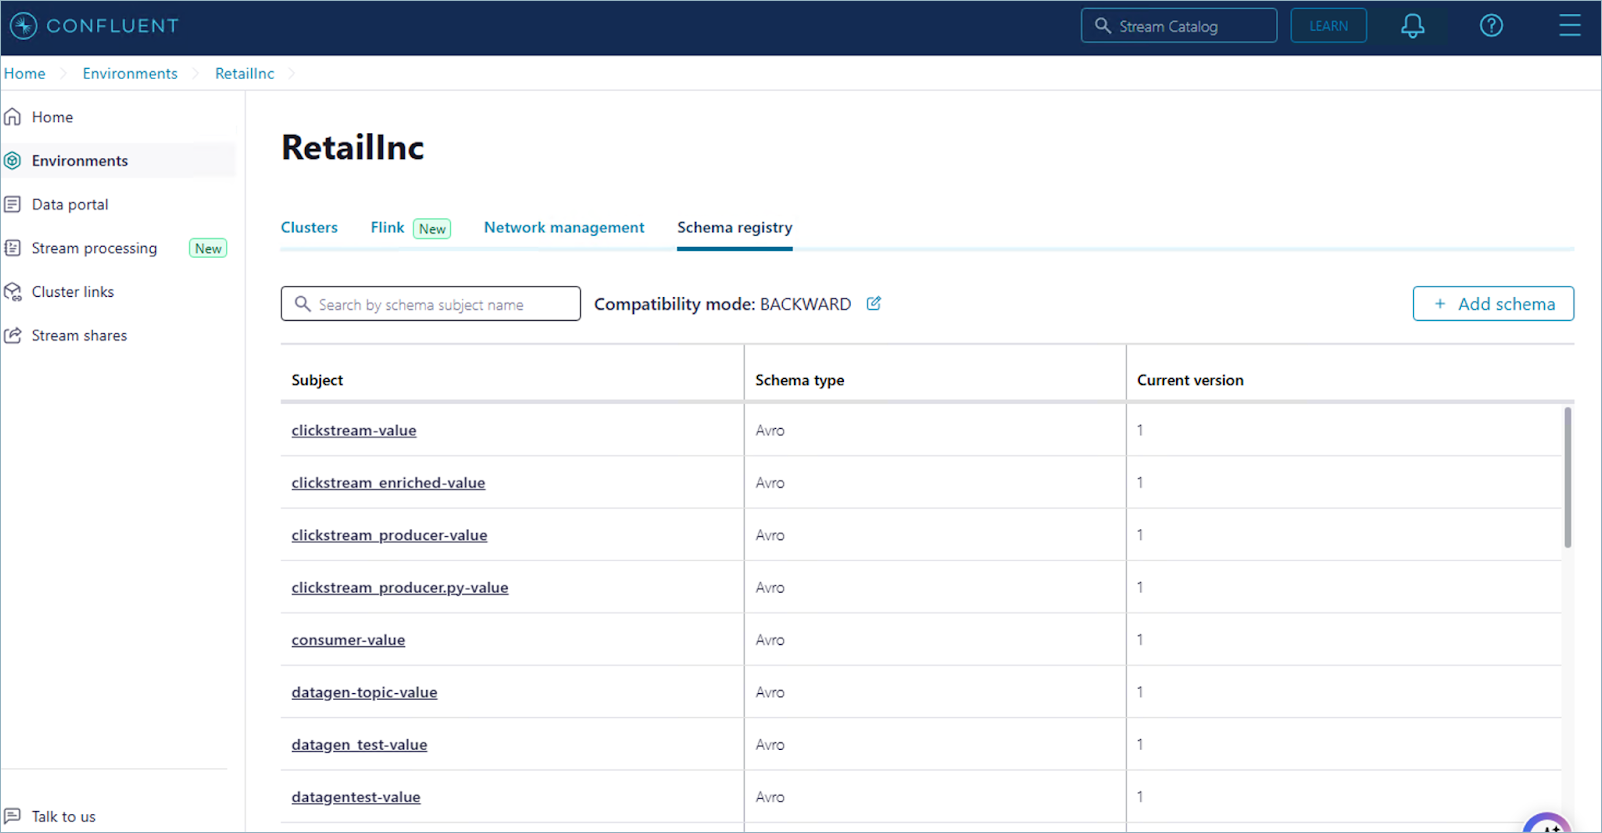
When you have successfully created the endpoint and connectivity in Confluent Cloud, you should see this reflected in Schema Registry on the Cloud Console as shown:
At this point, Schema Registry is ready for use on the private network.
Use an existing PNI connection on AWS
On AWS, if you use PNI to connect to Enterprise or Freight clusters, you can reach Schema Registry in that environment over the same PNI connection. No separate Schema Registry setup is required.
Confirm that a PNI gateway and access point exist in the environment, or create them by following the steps in Use Private Network Interface on Confluent Cloud. Confluent Cloud then creates a PNI endpoint for Schema Registry automatically, in the following format:
lsrc-<schema_registry_id>-<access_point_id>.<region>.aws.accesspoint.glb.confluent.cloud
To find the endpoint, go to Environment > Schema Registry > Endpoints on the Confluent Cloud Console, or read it from the confluent_endpoint Terraform data source. For more information, see Access Schema Registry over PNI.
(Optional) Step 2: Restrict public access to Schema Registry with IP filtering
You can use IP filters to restrict the public access to Schema Registry to specified IP address ranges.
Create IP groups.
Create IP filters.
Apply to schema management.
View IP filters applied to the Schema Registry by going to Network Management > Public Networks on the Cloud Console.
If you want to disable all public access to Schema Registry, create an IP filter using the No Public Networks IP group. If you do this Step 3 becomes mandatory to access schemas on the Cloud Console.
Note that internal clients such as fully-managed connectors, Flink SQL statements, Tableflow, and ksqlDB will continue to access Schema Registry through public internet. Traffic on internal Confluent components is uniquely identified, and not affected by IP filtering.
(Optional) Step 3: Connect to the network with Confluent Cloud Console
You can access the Cloud Console from anywhere if you have enabled the public endpoint access for Schema Registry. If you have restricted access to it using IP filtering, you need to connect to Cloud Console using a valid IP over public internet or on the appropriate VPC where you have provisioned the private endpoint.
Users will see the following error if they attempt to access schemas from an unauthorized IP address or from a VPC network that does not have access to the private endpoint you created.
To connect to Confluent Cloud with the private endpoint, see Use Confluent Cloud with Private Networking. The Resource Metadata access option is not currently supported for Schema Registry.
One way to connect is to set up a reverse proxy. To learn more, see Configure a proxy.
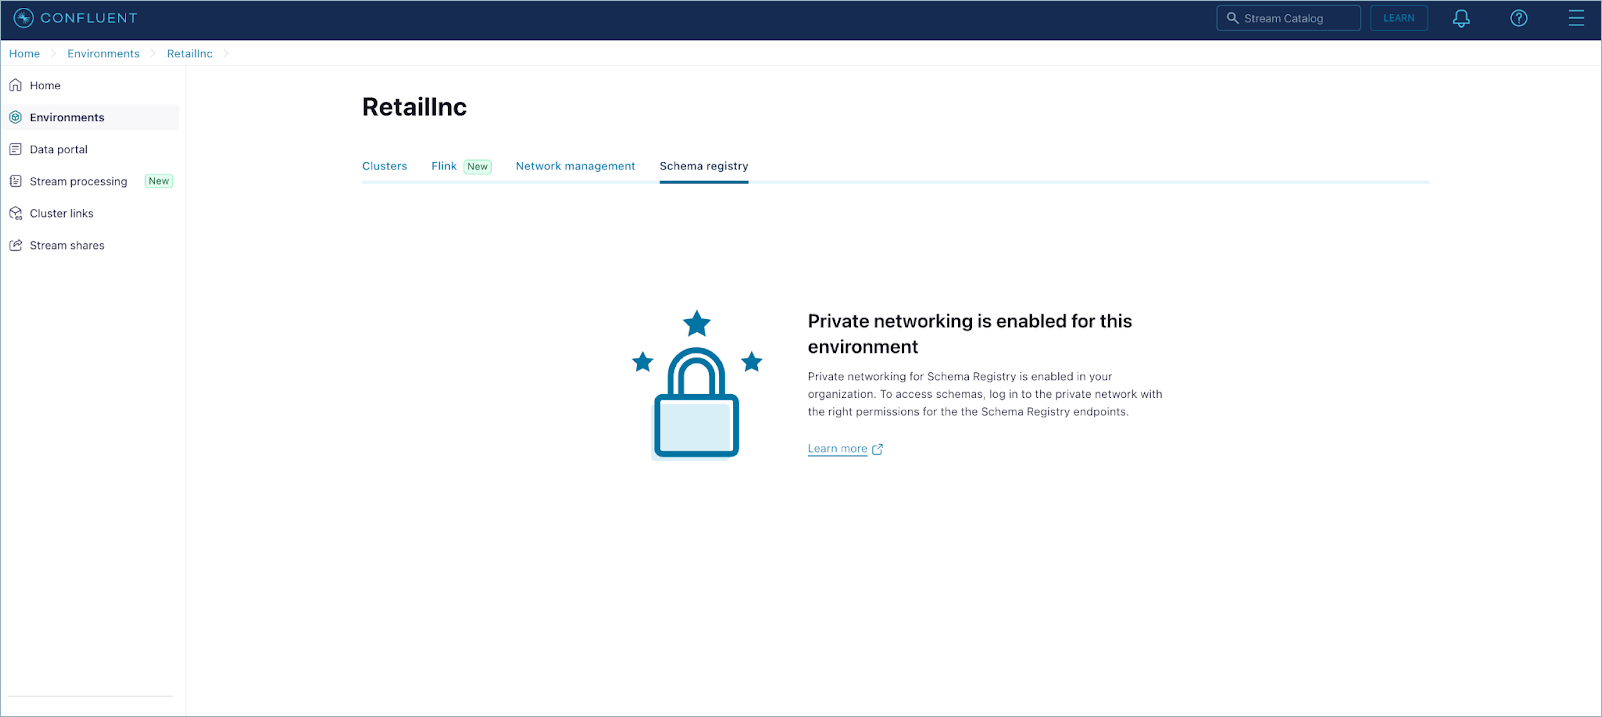
When networking is set up in Cloud Console, select the private endpoint in the drop-down menu.
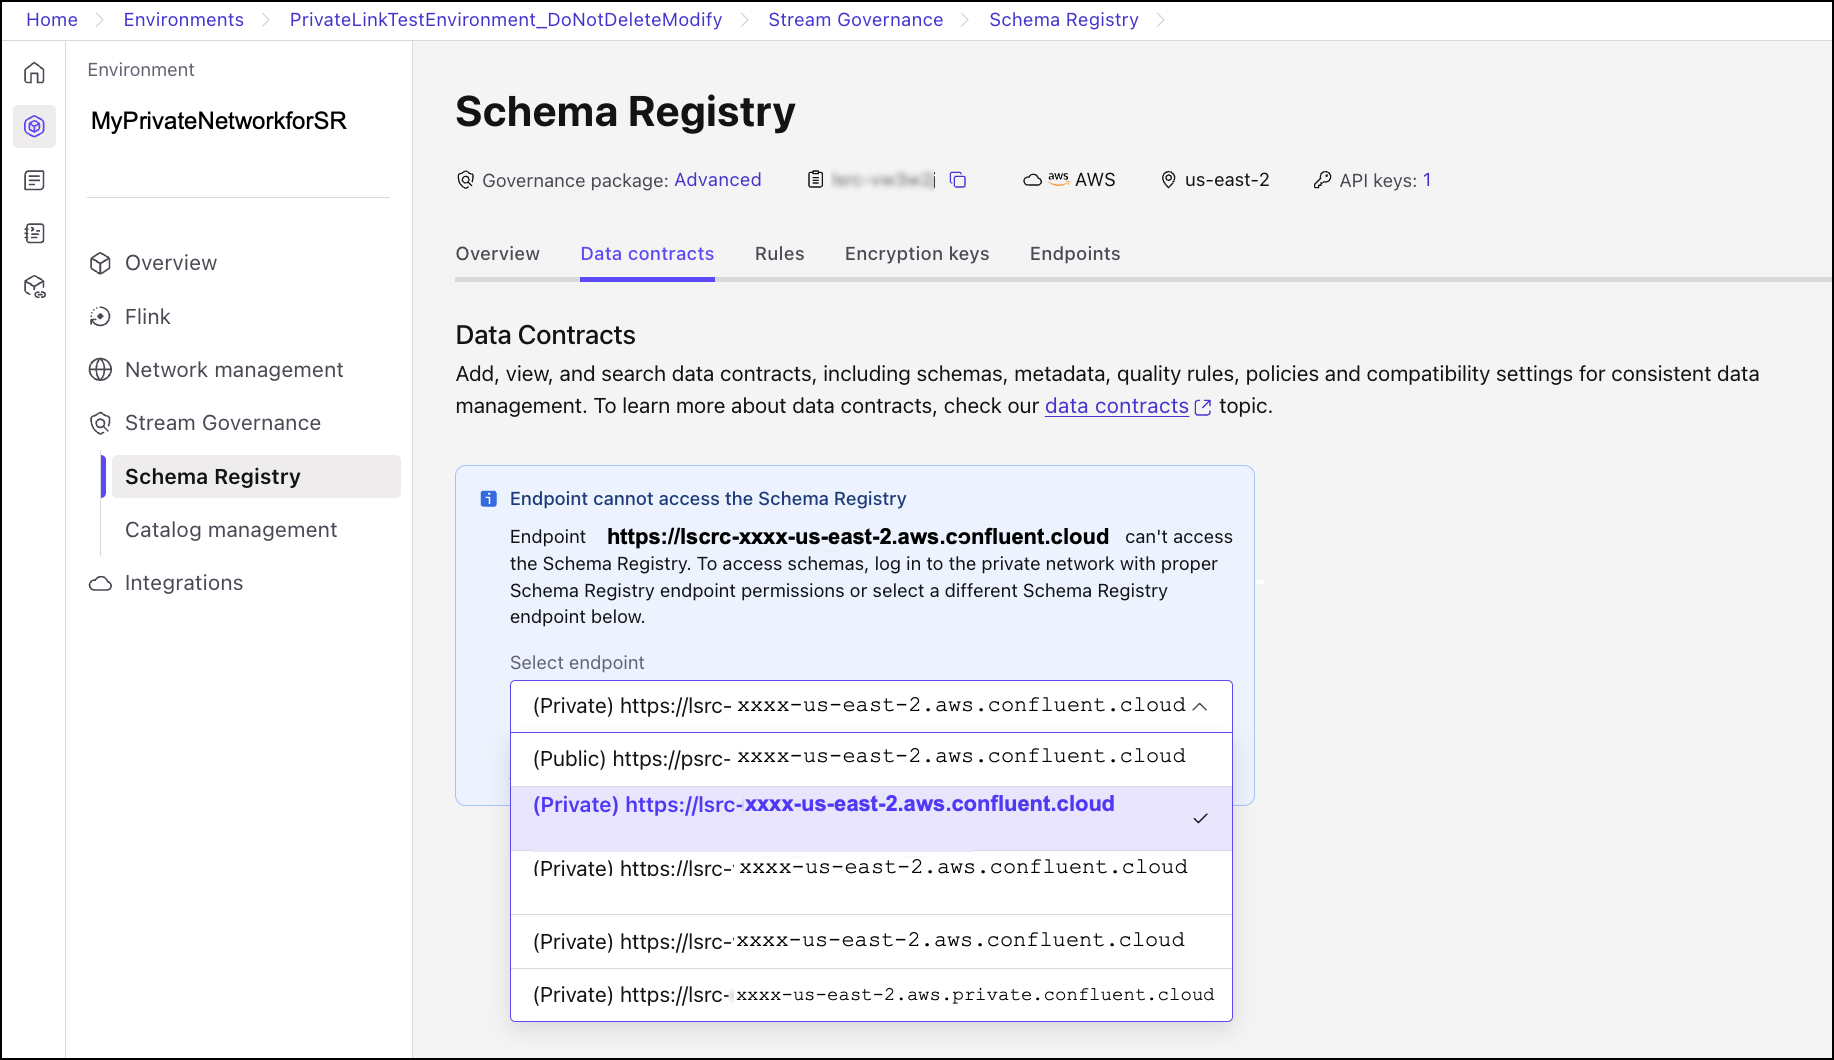
Your schemas should now be viewable on the Schema Registry page.
Migrate clients from the public endpoint to private endpoint for Schema Registry
If you are using the public endpoint for Schema Registry but want to migrate clients to use the private endpoint, you can do so as follows:
Identify the principal IDs sending traffic by means of the public endpoint to Schema Registry.
The
traffic_typemetric recently added toschema_operations_counthas values PUBLIC and PRIVATE which allow you to identify public and private traffic to Schema Registry. You can useprincipal_idwith this metric to see which principal IDs are sending which kinds of traffic, as shown in the example below.Create a file named
sr_traffic.jsonusing the following template. Be sure to changelsrc-XXXXXand the timestamp values to match your needs.{ "aggregations": [ { "metric": "io.confluent.kafka.schema_registry/schema_operations_count" } ], "filter": { "field": "resource.schema_registry.id", "op": "EQ", "value": "lsrc-XXXXX" "internal_request": "false" }, "granularity": "PT1M", "intervals": [ "2021-02-24T10:00:00Z/2021-02-24T10:01:00Z" ], "group_by": [ "resource.schema_registry.id", "metric.principal_id", "metric.traffic_type" ] }
Submit the query as a POST using the following command. Be sure to change
<API_KEY>and<SECRET>to match your environments.http 'https://api.telemetry.confluent.cloud/v2/metrics/cloud/query' --auth '<API_KEY>:<SECRET>' < sr_traffic.json
Your output should resemble:
{
"data": [
   {
      "resource.schema_registry.id": "lsrc-XXXXX",
      "metric.principal_id": "sa-abc123",
      "traffic_type": "PUBLIC" ,
      "timestamp": "2021-02-24T10:00:00Z",
      "value": 1.0
   }
]
}
To learn more about monitoring and metrics for Confluent Cloud, see Confluent Cloud Metrics.
To learn more about Schema Registry metrics definitions, refer to Resource: schema_registry section in the Confluent Cloud Metrics API Reference.
Use Schema Linking with private endpoints
You can use the private endpoints for a Schema Registry when creating schema exporters on Confluent Platform or Confluent Cloud Schema Registry. You need to provide the private endpoint and the corresponding API key information when creating the exporter. You can use this Confluent CLI command to retrieve the endpoint: confluent schema-registry cluster describe.
You can’t use CCN based endpoints or PNI endpoints for Schema Linking between two Confluent Cloud Schema Registry clusters. To use a private endpoint for Schema Linking between two Confluent Cloud Schema Registry clusters, use the following endpoint format:
https://<lsrc-id>.<region>.<cloud-provider>.private.confluent.cloud
This does not require a private endpoint configuration.
Schema Linking between Confluent Cloud Schema Registry clusters supports only the .private.confluent.cloud endpoint format, not multi-PrivateLink Attachment (Multi-PLATT) endpoints, which use the accesspoint.glb.confluent.cloud suffix.
To learn more about Schema Linking, see Schema Linking on Confluent Cloud.
Use Confluent CLI with private endpoints to talk to Schema Registry
Once you have set up private networking for Schema Registry, you can use the Confluent CLI version v4.29.0 or later with private endpoints for Schema Registry, as follows:
Get a list of private endpoints.
confluent schema-registry endpoint list
Your output should resemble:
+--------------------------------+-------------------------------------------------------------------+
| Public Endpoint URL            | https://psrc-xxxx.us-west-2.aws.confluent.cloud                   |
| Private Endpoint URL           | https://lsrc-xxxx.us-west-2.aws.private.confluent.cloud           |
| Private Regional Endpoint URLs | n-nxxxx=https://lsrc-xxxx.domabc.us-west-2.aws.confluent.cloud    |
|                                | n-nxxxx=https://lsrc-xxxx-nxyx.us-west-2.aws.confluent.cloud      |
|                                | n-nxxxx=https://lsrc-xxxx-ndef.us-west-2.aws.glb.confluent.cloud  |
|                                | us-west-2=https://lsrc-xxxx.us-west-2.aws.private.confluent.cloud |
| Catalog Endpoint URL           | https://psrc-xxxx.us-west-2.aws.confluent.cloud                   |
+--------------------------------+-------------------------------------------------------------------+
In the list:
The Private Endpoint URL was created when you set up private networking (
https://lsrc-xxxx.us-west-2.aws.private.confluent.cloud).The endpoints mapped to the network ID, which start with
n-, are the Confluent Cloud network endpoints. For example:n-nxxxx=https://lsrc-xxxx.domabc.us-west-2.aws.confluent.cloudThe endpoints mapped to the region are private network endpoints. For example:
us-west-2=https://lsrc-xxxx.us-west-2.aws.private.confluent.cloud
To use a specific private endpoint, use the
--schema-registry-endpointflag with any Confluent CLI command. For example:confluent sr configuration describe --schema-registry-endpoint https://lsrc-xxxx.domabc.us-west-2.aws.confluent.cloud
confluent sr configuration describe --schema-registry-endpoint https://lsrc-xxxx-nxyz.us-west-2.aws.confluent.cloud
confluent sr configuration describe --schema-registry-endpoint https://lsrc-xxxx.us-west-2.aws.private.confluent.cloud
In all cases, your output should resemble the following (providing the compatibility level configured for the Schema Registry on the given network):
+---------------------+----------+
| Compatibility Level | BACKWARD |
+---------------------+----------+
Use Terraform with private endpoints to talk to Schema Registry
Once you have set up private networking for Schema Registry, you can use Terraform version v2.32.0 or later with private endpoints for Schema Registry.
Use confluent_private_link_access Confluent Terraform Provider resource to create a private endpoint and Confluent Cloud private network connectivity. For example, to create a Schema Registry encryption key, you would feed this into the rest_endpoint attribute:
resource "confluent_schema_registry_kek" "aws_key" {
schema_registry_cluster {
   id = data.confluent_schema_registry_cluster.essentials.id
}
rest_endpoint = "https://${data.confluent_schema_registry_cluster.essentials.id}${data.confluent_network.main.endpoint_suffix}"
credentials {
   key    = "<Schema Registry API Key for data.confluent_schema_registry_cluster.essentials>"
   secret = "<Schema Registry API Secret for data.confluent_schema_registry_cluster.essentials>"
}

name = "my_key"
kms_type = "aws-kms"
kms_key_id = "key_id"
doc = "test key"
shared = false
hard_delete = true

lifecycle {
   prevent_destroy = true
}
}
Stream Catalog endpoints
The Stream Catalog endpoint and APIs will remain accessible only via public internet. To learn more, see: Stream Catalog REST API Usage and Examples on Confluent Cloud, and especially, Setup and suggestions.
Limitations
Schema Registry with private networking is currently available only in select regions on AWS, Azure, and Google Cloud.
Resource Metadata access is not applicable for Schema Registry.
Custom connectors cannot use Schema Registry configured with private access.
CCN Networks for Google Cloud are not supported.
PNI connectivity for Schema Registry is available on AWS only.
Schema Linking does not support PNI endpoints. To use Schema Linking with a private endpoint, see Use Schema Linking with private endpoints.
Supported regions
PNI connectivity for Schema Registry is available only in the supported AWS regions where Schema Registry private networking is enabled.
Supported AWS Regions
The following AWS regions are currently supported.
The Americas and Canada
AWS Region | Location | Schema Registry |
|---|---|---|
us-east-1 |
| ✓ |
us-east-2 | Ohio, USA | ✓ |
us-west-2 | Oregon, USA | ✓ |
ca-central-1 | Canada Central | ✓ |
ca-west-1 | Calgary, Canada | ✓ |
sa-east-1 | São Paulo, Brazil | ✓ |
Asia Pacific
AWS Region | Location | Schema Registry |
|---|---|---|
ap-east-1 | Hong Kong | ✓ |
ap-northeast-1 | Tokyo, Japan | ✓ |
ap-northeast-2 | Seoul, South Korea | ✓ |
ap-northeast-3 | Osaka, Japan | ✓ |
ap-south-1 | Mumbai, India | ✓ |
ap-south-2 | Hyderabad, India | ✓ |
ap-southeast-1 | Singapore | ✓ |
ap-southeast-2 | Sydney, Australia | ✓ |
ap-southeast-3 | Jakarta, Indonesia | ✓ |
ap-southeast-4 | Melbourne, Australia | ✓ |
ap-southeast-5 | Malaysia | ✓ |
ap-southeast-7 | Thailand | ✓ |
Europe
AWS Region | Location | Schema Registry |
|---|---|---|
eu-central-1 | Frankfurt, Germany | ✓ |
eu-central-2 | Zurich, Switzerland | ✓ |
eu-north-1 | Stockholm, Sweden | ✓ |
eu-south-1 | Milan, Italy | ✓ |
eu-south-2 | Spain | ✓ |
eu-west-1 | Ireland | ✓ |
eu-west-2 | London, UK | ✓ |
eu-west-3 | Paris, France | ✓ |
Africa and the Middle East
AWS Region | Location | Schema Registry |
|---|---|---|
me-south-1 | Bahrain | ✓ |
me-central-1 | UAE | ✓ |
af-south-1 | Cape Town, South Africa | ✓ |
il-central-1 | Tel Aviv, Israel | ✓ |
Supported Azure Regions
The following Azure regions are currently supported.
The Americas and Canada
Azure Region | Location | Schema Registry |
|---|---|---|
canadacentral | Toronto, Canada | ✓ |
mexicocentral | Mexico Central | ✓ |
brazilsouth | Sao Paulo state, Brazil | ✓ |
centralus | Iowa, USA | ✓ |
eastus | Virginia, USA | ✓ |
eastus2 | Virginia, USA | ✓ |
southcentralus | Texas, USA | ✓ |
westus2 | Washington, USA | ✓ |
westus3 | Phoenix, USA | ✓ |
Asia Pacific
Azure Region | Location | Schema Registry |
|---|---|---|
australiaeast | New South Wales, Australia | ✓ |
centralindia | Pune, India | ✓ |
eastasia | Hong Kong | ✓ |
japaneast | Tokyo, Japan | ✓ |
koreacentral | Seoul, South Korea | ✓ |
southeastasia | Singapore | ✓ |
newzealandnorth | New Zealand North | ✓ |
Africa and the Middle East
Azure Region | Location | Schema Registry |
|---|---|---|
southafricanorth | Johannesburg, South Africa | ✓ |
uaenorth | Dubai, UAE | ✓ |
qatarcentral | Doha, Qatar | ✓ |
Supported Google Cloud Regions
The following Google Cloud regions are currently supported.
The Americas and Canada
GCP Region | Location | Schema Registry |
|---|---|---|
northamerica-northeast1 | Montreal, Canada | ✓ |
northamerica-northeast2 | Toronto, Canada | ✓ |
southamerica-east1 | São Paulo, Brazil | ✓ |
southamerica-west1 | Santiago, Chile | ✓ |
us-central1 | Iowa, USA | ✓ |
us-east1 |
| ✓ |
us-east4 |
| ✓ |
us-west1 | Oregon, USA | ✓ |
us-west2 | Los Angeles, USA | ✓ |
us-west3 | Salt Lake City, USA | ✓ |
us-west4 | Las Vegas, USA | ✓ |
us-south1 | Dallas, USA | ✓ |
Asia Pacific
GCP Region | Location | Schema Registry |
|---|---|---|
asia-east1 | Taiwan | ✓ |
asia-east2 | Hong Kong | ✓ |
asia-northeast1 | Tokyo, Japan | ✓ |
asia-northeast2 | Osaka, Japan | ✓ |
asia-northeast3 | Seoul, South Korea | ✓ |
asia-south1 | Mumbai, India | ✓ |
asia-south2 | Delhi, India | ✓ |
asia-southeast1 | Singapore | ✓ |
asia-southeast2 | Jakarta, Indonesia | ✓ |
australia-southeast1 | Sydney, Australia | ✓ |
australia-southeast2 | Melbourne, Australia | ✓ |
Europe
GCP Region | Location | Schema Registry |
|---|---|---|
europe-central2 | Warsaw, Poland | ✓ |
europe-north1 | Finland | ✓ |
europe-southwest1 | Madrid, Spain | ✓ |
europe-west1 | Belgium | ✓ |
europe-west2 | London, UK | ✓ |
europe-west3 | Frankfurt, Germany | ✓ |
europe-west4 | Netherlands | ✓ |
europe-west6 | Zurich, Switzerland | ✓ |
europe-west8 | Milan, Italy | ✓ |
europe-west9 | Paris, France | ✓ |
europe-west12 | Turin, Italy | ✓ |
Africa and the Middle East
GCP Region | Location | Schema Registry |
|---|---|---|
me-west1 | Tel Aviv, Israel | ✓ |
me-central1 | Doha, Qatar | ✓ |
me-central2 | Dammam, Saudi Arabia | ✓ |
FAQ
FAQ Quick List
Q&As
- Is there an extra charge for using this feature?
This feature is available starting with the Stream Governance Essentials package which is free till 100 schemas. There is no extra charge for this feature. (See, Manage Stream Governance Packages in Confluent Cloud to learn more about Stream Governance packages.)
- I already have a Dedicated cluster and corresponding private network setup, is a new private endpoint still necessary?
This depends on which cloud provider you use.
On AWS or Azure, no, you do not need to perform further private endpoint and connectivity setup, as you will automatically get a private endpoint based on the private network setup for the Dedicated cluster.
On Google Cloud, Confluent Cloud network for private networking is not supported. This means that with an existing Dedicated cluster and associated private network, you have to set up a specific private endpoint for Schema Registry.
- Is the private endpoint created for Flink or Enterprise cluster private networking re-used for Schema Registry?
Yes, a private endpoint created in a region will be re-used automatically.
- Can I use PNI to access Schema Registry on AWS?
Yes. On AWS, if you use PNI to connect to Enterprise or Freight clusters, you can reach Schema Registry over the same PNI connection, with no separate AWS PrivateLink setup. For more information, see Access Schema Registry over PNI.
- Is it possible to block all public traffic to the Schema Registry using IP filtering?
Using the No Public Networks IP group will block all public traffic to the Schema Registry. With this configuration, Cloud Console would not display data contracts over the public internet. To regain access to the data contracts UI, create a proxy with access to the VPC where the private Schema Registry endpoint is accessible, as described in Step 3.
- Does IP filtering affect my private traffic, public traffic, or both?
IP filtering is only applied to public traffic.
- Does IP filtering for schema management impact existing connectors, Flink statements, linked schema registries, or ksqlDB setups that access Schema Registry?
No, IP filtering is only applied to public traffic originating outside Confluent Cloud.
- Is IP filtering also applicable for Stream Catalog, as it shares the same public endpoint as Schema Registry?
No, IP filtering is only applicable for Schema Registry APIs.
- Is the private endpoint applicable for Stream Catalog access?
No, private endpoints only provide private access to Schema Registry.
(To learn more about Stream Catalog and using its APIs, see Stream Catalog on Confluent Cloud: User Guide to Manage Tags and Metadata and Stream Catalog REST API Usage and Examples on Confluent Cloud.)
- Is it possible to use Schema Linking with private endpoints?
Yes, you can create a schema exporter using a private endpoint with source and destination Schema Registry in the same or different region.
- There are multiple endpoints for Schema Registry, does this mean a different Schema Registry exists in every region?
No, all the endpoints provide access to one Schema Registry in the environment.
- There are multiple endpoints for Schema Registry in different regions, does this mean there is schema redundancy in the these regions?
No, all the endpoints provide access to one Schema Registry in the environment. If the region of the Schema Registry is unavailable, schema operations will be unavailable.
- Why is a “Create Cluster” message shown on the UI when I try to enable Stream Governance, if I already have Kafka clusters present in the environment?
If you see this message, then it is possible that this environment was created using an older version of of the Confluent CLI (v3 or lower) or Terraform (v1). In this case, update your CLI to version 4 or higher and Terraform to version 2 or higher.
To use Schema Registry with a private endpoint, use CLI version 4.21.0 and Terraform version 2.23.0.
To resolve this issue, you could use the deprecated Schema Registry cluster management (SRCM) v2 regions API only as a workaround to provision the Schema Registry cluster or contact Confluent support to provision a Schema Registry cluster. To learn more about the v2 and v3 SRCM regions APIs, see Upgrade to SRCM v3 clusters and regions APIs (Deprecation of SRCM v2).