PostgreSQL CDC Source V2 (Debezium) Connector for Confluent Cloud
The fully-managed PostgreSQL Change data capture (CDC) Source V2 (Debezium) connector for Confluent Cloud captures every INSERT, UPDATE, and DELETE on a PostgreSQL table and publishes them to Apache Kafka®, using the Debezium engine internally. The connector can also take an initial snapshot of existing data before streaming changes. Each table’s events are recorded to a separate Kafka topic, and the connector supports Avro, JSON Schema, Protobuf, or JSON (schemaless) output formats.
The Confluent Cloud connector plugin name is PostgresCdcSourceV2.
Before you begin, note the following:
This quick start is for version 2 of the fully-managed Confluent Cloud connector. For the earlier version, see PostgreSQL CDC Source Connector (Debezium) [End of Life] for Confluent Cloud. To migrate from V1 to V2, see Moving from V1 to V2.
To install the connector locally for Confluent Platform, see Debezium PostgreSQL CDC Source Connector for Confluent Platform.
For more information on Debezium connectors, see Debezium documentation.
If you require private networking for fully-managed connectors, make sure to set up the proper networking beforehand. For more information, see Manage Networking for Confluent Cloud Connectors.
V2 Improvements
Note the following improvements made to the V2 connector.
Added support for PostgreSQL 15.
Added support for PostgreSQL 16 along with logical replication from standby.
Added support for PostgreSQL 17 along with failover slots.
Supports columns of type bytea[], an array of bytes (byte array).
Supports columns of type pgVector and bpchar.
Filtered publications are updated automatically when updating the table capture list.
Can stop or pause an in-progress incremental snapshot. Can resume the incremental snapshot if it was previously been paused.
Supports regular expressions to specify table names for incremental snapshots.
Supports SQL-based predicates to control the subset of records to be included in the incremental snapshot.
Supports specifying a single column as a surrogate key for performing incremental snapshots.
Can perform ad-hoc blocking snapshots.
Indices that rely on hidden, auto-generated columns, or columns wrapped in database functions are no longer considered primary key alternatives for tables that do not have a primary key defined.
Configuration options to specify how topic and schema names should be adjusted for compatibility.
Features
The PostgreSQL CDC Source V2 (Debezium) connector provides the following features:
Topics created automatically: The connector automatically creates Kafka topics using the naming convention:
<topic.prefix>.<schemaName>.<tableName>. The tables are created with the properties:topic.creation.default.partitions=1andtopic.creation.default.replication.factor=3. For more information, see Maximum message size.Logical decoding plugins supported:
pgoutput. The default used ispgoutput.Database authentication: Uses password authentication, Google Cloud’s native identity authorization, or AWS IAM role-based authentication via Confluent Provider Integration.
SSL support: Supports SSL encryption.
Provider integration support: The connector supports Google Cloud’s native identity authorization and AWS IAM role-based authorization using Confluent Provider Integration. For more information about provider integration setup, see the connector authentication and AWS IAM Authentication Setup.
Client-side encryption (CSFLE and CSPE) support: The connector supports CSFLE and CSPE for sensitive data. For more information about CSFLE or CSPE setup, see the connector configuration.
Tables included and Tables excluded: Sets whether a table is or is not monitored for changes. By default, the connector monitors every non-system table.
Tombstones on delete: Configures whether a tombstone event should be generated after a delete event. Default is true.
Output data formats: The connector supports Avro, JSON Schema, Protobuf, or JSON (schemaless) output Kafka record value format. It supports Avro, JSON Schema, Protobuf, JSON (schemaless), and String output record key format. Schema Registry must be enabled to use a Schema Registry-based format (for example, Avro, JSON_SR (JSON Schema), or Protobuf).
Tasks per connector: Organizations can run multiple connectors with a limit of one task per connector (
"tasks.max": "1").Incremental snapshot: Supports incremental snapshotting via signaling. Note that the connector automatically adds the signal table to the publication only if the
publication.autocreate.modeis set tofilteredorall_tables. You will need to add it manually if the mode is set todisabled.Offset management capabilities: Supports offset management. For more information, see Manage custom offsets.
Supports exactly once semantics: The connector supports exactly once semantics. For more information, see Exactly once semantics.
Secret manager integration: The connector supports secret manager integration. For
Passwordbased authentication, the connector can retrieve the following configurations from an integrated secret manager at runtime as needed.Secret manager managed configuration
Type
database.hostnameSTRINGdatabase.portINTdatabase.userSTRINGdatabase.passwordPASSWORDFor more information, see Create a secret manager integration in Confluent Cloud.
For more information and examples to use with the Confluent Cloud API for Connect, see the Confluent Cloud API for Connect Usage Examples section.
Supported database versions
The PostgreSQL CDC Source V2 (Debezium) connector is compatible with the following PostgreSQL versions: 12, 13, 14, 15, 16, 17, 18.
Warning
PostgreSQL version 17.5 contains a known bug in logical decoding that can result in memory allocation failures, causing the Debezium PostgreSQL connector to fail during operation. For details, refer to the PostgreSQL mailing list discussion. This issue has been addressed in PostgreSQL 17.6.
Limitations
Be sure to review the following information.
For connector limitations, see PostgreSQL CDC Source V2 (Debezium) Connector limitations.
If you plan to use one or more Single Message Transformations (SMTs), see SMT Limitations.
If you plan to use one or more Custom SMTs, see Custom SMT limitations.
Deprecated features and configurations
The following features and configuration properties have been deprecated. Confluent recommends using the alternatives instead:
Snapshot mode: The
schema_onlysnapshot mode is deprecated. Useno_datainstead.Signaling: The
additional-conditionoption in the signal query is deprecated. Useadditional-conditionsinstead.ExtractNewRecordState SMT: The configurations
drop.tombstonesanddelete.handling.modeconfigurations are deprecated. Usedelete.tombstones.handling.modeinstead.
Database roles and permissions
By default, superusers have the REPLICATION and LOGIN roles. To follow the principle of least privilege, do not provide the Debezium replication user with elevated privileges. Instead, create a Debezium user with the following minimum required privileges:
Replication privilege
This privilege allows the user to stream changes from the write-ahead log (WAL). Define a PostgreSQL role with at least REPLICATION and LOGIN permissions:
CREATE ROLE <user_name> with LOGIN REPLICATION PASSWORD '<password>';
Database connection privilege
This privilege permits the user to connect to the specific database only.
GRANT CONNECT ON DATABASE <database_name> TO <user_name>;
Publication privilege
You have several options for creating publications. In general, it is best to manually create publications for the tables that you want to capture before configuring the connector. Alternatively, you can configure your environment to allow Debezium to automatically create publications and specify the data to include.
The following permissions are required only if the connector must manage the publication.
When using pgoutput as the logical decoding plugin, the connector requires specific privileges to create and manage publications. If the source table already exists, the replication user must have shared ownership with the original owner. Configure this by creating a replication group:
CREATE ROLE <replication_group>;                                     //Create a replication group
GRANT <replication_group> TO <original_owner>;                       //Add the original owner of the table to the group
GRANT <replication_group> TO <user_name>;                            //Add the Debezium replication user to the group.
ALTER TABLE <schema_name>.<table_name> OWNER TO <replication_group>; //Transfer ownership of the table to <replication_group>
In addition to the permissions above, the user requires CREATE privileges on the database to manage publications. Run the following command:
GRANT CREATE ON DATABASE <database_name> TO <user_name>;
If the connector user does not own the source tables, you must transfer ownership of every table the connector captures to that user. For future tables, you can automate this process using a database trigger. For example, configure a trigger to execute the following command whenever a CREATE TABLE event occurs in the target schema:
ALTER TABLE <schema_name>.<table_name> OWNER TO <replication_group>;
Maximum message size
This connector creates topics automatically. When it creates topics, the internal connector configuration property max.message.bytes is set to the following:
Basic cluster:
8 MBStandard cluster:
8 MBEnterprise cluster:
8 MBDedicated cluster:
20 MB
For more information about Confluent Cloud clusters, see Kafka Cluster Types in Confluent Cloud.
Log retention during snapshot
When launched, the CDC connector creates a snapshot of the existing data in the database to capture the nominated tables. To do this, the connector executes a “SELECT *” statement. Completing the snapshot can take a while if one or more of the nominated tables is very large.
During the snapshot process, the replication slot is not advanced. This is to ensure that the database server does not remove WAL segments needed for replication once the snapshot process completes. If one or more tables are very large in size, the snapshot process could take a long time to complete. In situations with a high rate of change, it is possible that the PostgreSQL disk space consumed by WAL files keeps increasing. This has the potential to exhaust the disk space on the database server, leading to database operation failures or server shutdown.
Connector stalls from lock contention
If another session holds a conflicting lock on a table or catalog that the connector reads, such as during DDL or maintenance, the connector’s query can hang indefinitely because PostgreSQL’s lock_timeout defaults to 0. The task stays RUNNING without producing records, so the stall surfaces only as growing lag.
For how to detect and resolve this, see Why does my connector stay in the RUNNING state but stop processing records?.
Manage CSFLE
In general, database connectors can automatically create topics and corresponding schemas to match tables created on the database side. This capability, however, is not supported with CSFLE, leading to source connector failures. To prevent issues, Confluent recommends specifying allowlist of tables when enabling CSFLE.
Manage custom offsets
You can manage the offsets for this connector. Offsets provide information on the point in the system from which the connector is accessing data. For more information, see Manage Offsets for Fully-Managed Connectors in Confluent Cloud.
To manage offsets:
Manage offsets using Confluent Cloud APIs. For more information, see Connect offsets API reference.
Note
When you reset the offset to a Log Sequence Number (LSN) from an earlier transaction, the connector might not be able to replay older events if that LSN precedes the confirmed_flush_lsn of the replication slot.
To get the current offset, make a GET request that specifies the environment, Kafka cluster, and connector name.
GET /connect/v1/environments/{environment_id}/clusters/{kafka_cluster_id}/connectors/{connector_name}/offsets
Host: https://api.confluent.cloud
Response:
Successful calls return HTTP 200 with a JSON payload that describes the offset.
{
    "id": "lcc-example123",
    "name": "{connector_name}",
    "offsets": [
      {
        "partition": {
          "server": "server_01"
        },
        "offset": {
          "lsn": 9943856034248,
          "lsn_proc": 9943856034248,
          "lsn_commit": 9943856034156,
          "messageType": "INSERT",
          "transaction_id": null,
          "txId": 1142586,
          "ts_usec": 1714023032677090
        }
      }
    ],
    "metadata": {
        "observed_at": "2024-03-28T17:57:48.139635200Z"
    }
}
Responses include the following information:
The position of latest offset.
The observed time of the offset in the metadata portion of the payload. The
observed_attime indicates a snapshot in time for when the API retrieved the offset. A running connector is always updating its offsets. Useobserved_atto get a sense for the gap between real time and the time at which the request was made. By default, offsets are observed every minute. CallingGETrepeatedly will fetch more recently observed offsets.Information about the connector.
To update the offset, make a POST request that specifies the environment, Kafka cluster, and connector name. Include a JSON payload that specifies new offset and a patch type.
POST /connect/v1/environments/{environment_id}/clusters/{kafka_cluster_id}/connectors/{connector_name}/offsets/request
Host: https://api.confluent.cloud

 {
     "type": "PATCH",
     "offsets": [
       {
         "partition": {
           "server": "server_01"
         },
         "offset": {
           "lsn": 9943855924248,
           "lsn_commit": 9943855924192,
           "lsn_proc": 9943855924248
         }
       }
     ]
 }
Considerations:
You can only make one offset change at a time for a given connector.
This is an asynchronous request. To check the status of this request, you must use the check offset status API. For more information, see Get the status of an offset request.
For source connectors, the connector attempts to read from the position defined by the requested offsets.
Response:
Successful calls return HTTP 202 Accepted with a JSON payload that describes the offset.
{
    "id": "lcc-example123",
    "name": "{connector_name}",
    "offsets": [
      {
          "partition": {
              "server": "server_01"
          },
          "offset": {
              "lsn": 9943855924248,
              "lsn_commit": 9943855924192,
              "lsn_proc": 9943855924248
          }
      }
    ],
    "requested_at": "2024-03-28T17:58:45.606796307Z",
    "type": "PATCH"
}
Responses include the following information:
The requested position of the offsets in the source.
The time of the request to update the offset.
Information about the connector.
To delete the offset, make a POST request that specifies the environment, Kafka cluster, and connector name. Include a JSON payload that specifies the delete type.
 POST /connect/v1/environments/{environment_id}/clusters/{kafka_cluster_id}/connectors/{connector_name}/offsets/request
 Host: https://api.confluent.cloud

{
  "type": "DELETE"
}
Considerations:
Delete requests delete the offset for the provided partition and reset to the base state. A delete request is as if you created a fresh new connector.
This is an asynchronous request. To check the status of this request, you must use the check offset status API. For more information, see Get the status of an offset request.
Do not issue delete and patch requests at the same time.
For source connectors, the connector attempts to read from the position defined in the base state.
Response:
Successful calls return HTTP 202 Accepted with a JSON payload that describes the result.
{
  "id": "lcc-example123",
  "name": "{connector_name}",
  "offsets": [],
  "requested_at": "2024-03-28T17:59:45.606796307Z",
  "type": "DELETE"
}
Responses include the following information:
Empty offsets.
The time of the request to delete the offset.
Information about Kafka cluster and connector.
The type of request.
To get the status of a previous offset request, make a GET request that specifies the environment, Kafka cluster, and connector name.
GET /connect/v1/environments/{environment_id}/clusters/{kafka_cluster_id}/connectors/{connector_name}/offsets/request/status
Host: https://api.confluent.cloud
Considerations:
The status endpoint always shows the status of the most recent PATCH/DELETE operation.
Response:
Successful calls return HTTP 200 with a JSON payload that describes the result. The following is an example of an applied patch.
{
   "request": {
      "id": "lcc-example123",
      "name": "{connector_name}",
      "offsets": [
         {
             "partition": {
                 "server": "server_01"
             },
             "offset": {
                 "lsn": 9943855924248,
                 "lsn_commit": 9943855924192,
                 "lsn_proc": 9943855924248
             }
         }
       ],
      "requested_at": "2024-03-28T17:58:45.606796307Z",
      "type": "PATCH"
   },
   "status": {
      "phase": "APPLIED",
      "message": "The Connect framework-managed offsets for this connector have been altered successfully. However, if this connector manages offsets externally, they will need to be manually altered in the system that the connector uses."
   },
   "previous_offsets": [
       {
           "partition": {
             "server": "server_01"
           },
           "offset": {
             "lsn": 9943856034248,
             "lsn_proc": 9943856034248,
             "lsn_commit": 9943856034156,
             "messageType": "INSERT",
             "transaction_id": null,
             "txId": 1142586,
             "ts_usec": 1714023032677090
           }
       }
   ],
   "applied_at": "2024-03-28T17:58:48.079141883Z"
}
Responses include the following information:
The original request, including the time it was made.
The status of the request: applied, pending, or failed.
The time you issued the status request.
The previous offsets. These are the offsets that the connector last updated prior to updating the offsets. Use these to try to restore the state of your connector if a patch update causes your connector to fail or to return a connector to its previous state after rolling back.
JSON payload
The table below offers a description of the unique fields in the JSON payload for managing offsets of the PostgreSQL Change Data Capture (CDC) Source V2 (Debezium) connector.
Field | Definition | Required/Optional |
|---|---|---|
| The logical name of the server, specified by the configuration | Required |
| The Log Sequence Number (LSN) is a 64-bit number to identify the position of Write Ahead Log (WAL) records.
| Required |
| The LSN of the last processed event. When consuming from the replication slot, commits and their corresponding commit LSNs are totally ordered. While LSNs of change events within a transaction maintain order, it is important to note that LSN ordering is not preserved across transactions. Hence, to establish totally ordered positions, both the commit LSN and the LSN of the last processed event are required. | Required |
|
| Required |
| The operation associated with the event for which the offset is committed. This is added to identify | Optional |
| If the configuration | Optional |
| If the configuration | Optional |
| Id of the transaction to which the event corresponds. | Optional |
| Time in microseconds for the | Optional |
Migrate connectors
Considerations:
The configurations of the self-managed connector must match the configurations of the fully-managed connector.
The self-managed connector must be operating in streaming mode. If the self-managed connector is still in the process of making a snapshot, you can either create a new connector on Confluent Cloud which starts the snapshot process from the beginning or wait for the snapshot process to complete and follow the migration guidance.
Exactly once semantics
Note
Exactly once semantics (EOS) is an Early Access Program feature in Confluent Cloud.
An Early Access feature is a component of Confluent Cloud introduced to gain feedback. This feature should be used only for evaluation and non-production testing purposes or to provide feedback to Confluent, particularly as it becomes more widely available in follow-on preview editions.
Early Access Program features are intended for evaluation use in development and testing environments only, and not for production use. Early Access Program features are provided: (a) without support; (b) “AS IS”; and (c) without indemnification, warranty, or condition of any kind. No service level commitment will apply to Early Access Program features. Early Access Program features are considered to be a Proof of Concept as defined in the Confluent Cloud Terms of Service. Confluent may discontinue providing preview releases of the Early Access Program features at any time in Confluent’s sole discretion.
The connector supports exactly once semantics (EOS) only in streaming mode. It processes each record exactly once, even through failures or restarts.
Consider the following limitations while using EOS for a connector:
Exactly once semantics is only supported for new connectors. You cannot change an existing connector’s delivery guarantee to or from exactly once semantics.
Offset storage topics are stored in your Kafka cluster. Deleting this topic or modifying its settings may affect the connector’s functionality.
The messages processed metric reflects the total messages handled by the connector, not the final count written to Kafka with EOS. This metric may therefore show a higher record count than expected.
Note
When enabling exactly once semantics (EOS), the service account requires the addtional permissions. For more information, see Exactly once semantics for source connectors.
EOS is not supported when the connector is in snapshot mode.
Quick Start
Use this quick start to get up and running with the Confluent Cloud PostgreSQL CDC Source V2 (Debezium) connector. The quick start provides the basics of selecting the connector and configuring it to obtain a snapshot of the existing data in a PostgreSQL database and then monitoring and recording all subsequent row-level changes.
- Prerequisites
Authorized access to a Confluent Cloud cluster on Amazon Web Services (AWS), Microsoft Azure (Azure), or Google Cloud.
The Confluent CLI installed and configured for the cluster. See Install the Confluent CLI.
Schema Registry must be enabled to use a Schema Registry-based format (for example, Avro, JSON_SR (JSON Schema), or Protobuf).
The PostgreSQL database must be configured for CDC. For details, see PostgreSQL in the Cloud.
Public access may be required for your database. See Manage Networking for Confluent Cloud Connectors for details. The following example shows the AWS Management Console when setting up a PostgreSQL database.
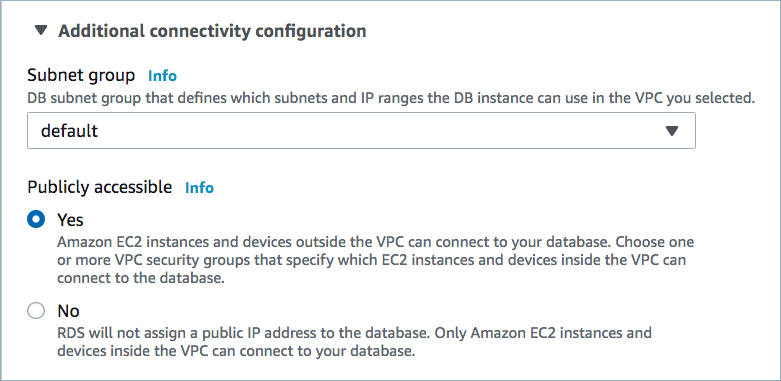
Public access enabled
A parameter group with the property
rds.logical_replication=1is required. An example is shown below. Once created, you must reboot the database.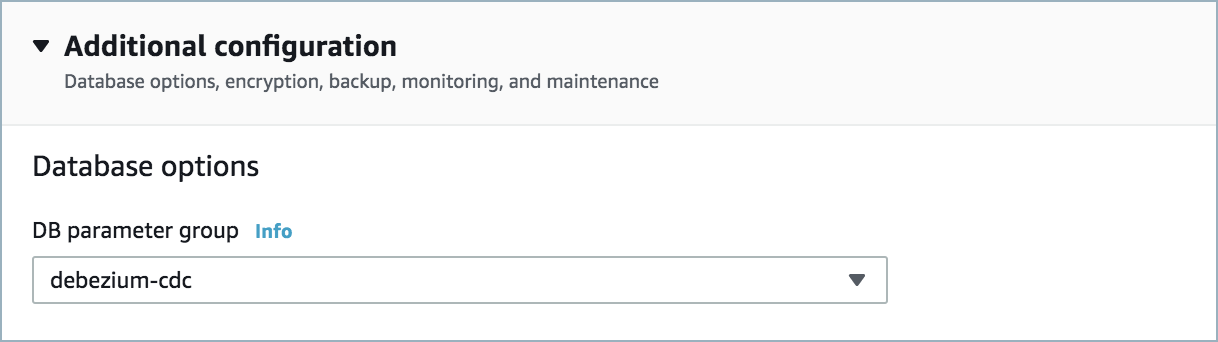
Parameter group

RDS logical replication
For networking considerations, see Networking and DNS. To use a set of public egress IP addresses, see Public Egress IP Addresses for Confluent Cloud Connectors. The following example shows the AWS Management Console when setting up security group rules for the VPC.

Open inbound traffic
Note
See your specific cloud platform documentation for how to configure security rules for your VPC.
Kafka cluster credentials. The following lists the different ways you can provide credentials.
Enter an existing service account resource ID.
Create a Confluent Cloud service account for the connector. Make sure to review the ACL entries required in the service account documentation. Some connectors have specific ACL requirements.
Create a Confluent Cloud API key and secret. To create a key and secret, you can use confluent api-key create or you can autogenerate the API key and secret directly in the Cloud Console when setting up the connector.
Using the Confluent Cloud Console
Step 1: Launch your Confluent Cloud cluster
To create and launch a Kafka cluster in Confluent Cloud, see Create a kafka cluster in Confluent Cloud.
Step 2: Add a connector
In the left navigation menu, click Connectors. If you already have connectors in your cluster, click + Add connector.
Step 3: Select your connector
Click the PostgreSQL CDC Source V2 connector card.
Step 4: Enter the connector details
Note
Make sure you have all your prerequisites completed.
At the Add Postgres CDC Source V2 (Debezium) Connector screen, complete the following:
Select the way you want to provide Kafka Cluster credentials. You can choose one of the following options:
My account: This setting allows your connector to globally access everything that you have access to. With a user account, the connector uses an API key and secret to access the Kafka cluster. This option is not recommended for production.
Service account: This setting limits the access for your connector by using a service account. This option is recommended for production.
Use an existing API key: This setting allows you to specify an API key and a secret pair. You can use an existing pair or create a new one. This method is not recommended for production environments.
Note
Freight clusters support only service accounts for Kafka authentication.
Click Continue.
Configure the authentication properties:
Authentication method
Authentication method: Select how you want to authenticate with the database. If you select
Password, enter the database connection details. If you selectGoogle service account impersonation, enter the provider integration name.Use secret manager: Enable this setting to fetch sensitive configuration values, such as the
Password, from a secret manager.Provider Integration: Select an existing integration that has access to your resource such as the secret manager or your
Google service account impersonation. For more information onGoogle serviceaccount impersonation, see Manage a Google Cloud Provider Integration.
Secret manager configuration
Secret manager: Select the secret manager that Confluent Cloud should use to retrieve sensitive data.
Configurations from Secret manager: Select the configurations whose values Confluent Cloud should fetch from the secret manager.
Provider Integration: Select an existing integration that has access to your resource such as the secret manager or your
Google service account impersonation. For more information onGoogle serviceaccount impersonation, see Manage a Google Cloud Provider Integration.
How should we connect to your database?
Database hostname: IP address or hostname of the PostgreSQL database server.
Database port: Port number of the PostgreSQL database server.
Database username: The name of the PostgreSQL database user that has the required authorization.
Database password: Password of the PostgreSQL database user that has the required authorization. This is required only for password-based authentication.
Database AWS region: The AWS region of the PostgreSQL database server for RDS/Aurora.
Database name: The name of the PostgreSQL database from which to stream the changes.
SSL mode: Whether to use an encrypted connection to the PostgreSQL server. Possible options are:
disable,prefer,require,verify-ca, andverify-full.prefer(default): Attempts to use a secure (encrypted) connection first and, failing that, an unencrypted connection.disable: Uses an unencrypted connection.require: Uses a secure (encrypted) connection, and fails if one cannot be established.verify-ca: Uses SSL/TLS for encryption and performs certificate verification, but does not perform hostname verification.verify-full: Uses SSL/TLS for encryption, certificate verification, and hostname verification.
SSL Root Certificate: Path to the file that contains the root certificate(s) used to validate the server (ssl_mode=``verify-full`` or
verify-ca).SSL Client Certificate: Path to the SSL client certificate file for the PostgreSQL connection. Only required when mutual TLS authentication is enabled (ssl_mode=``verify-full`` or
verify-ca). Note that Amazon RDS does not support client certificates.SSL Client Key: Path to the SSL client private key file for the PostgreSQL connection. Only required when mutual TLS authentication is enabled (ssl_mode=``verify-full`` or
verify-ca). This property must be used together with the SSL client certificate. The private key must be inPKCS#8format.SSL Key Password: Password for the SSL client private key file for PostgreSQL connection. Only needed when mutual TLS authentication is enabled and the private key is password-protected (ssl_mode=``verify-full`` or
verify-ca).
Click Continue.
Output messages
Select output record value format: Select the output record value format (data going to the Kafka topic). Valid entries are AVRO, JSON, JSON_SR (JSON Schema), or PROTOBUF. Schema Registry must be enabled to use a Schema Registry-based format (for example, AVRO, JSON_SR, or PROTOBUF).
Output Kafka record key format: Select the output Kafka record key format. Valid entries are AVRO, JSON_SR, PROTOBUF, STRING or JSON. Note that you need to have Confluent Cloud Schema Registry configured if using a schema-based message format like AVRO, JSON_SR, and PROTOBUF.
Database config
Slot name: The name of the PostgreSQL logical decoding slot that is created for streaming changes from a particular plug-in and for a particular database/schema. Defaults to
debezium.Publication name: The name of the PostgreSQL publication created for streaming changes when using the standard logical decoding plugin (pgoutput). Defaults to
dbz_publication.
Connector config
Snapshot mode: Specifies the criteria for running a snapshot when the connector starts. Possible settings are:
initial,initial_only,neverandno_data.initial(default): The connector performs a snapshot only when no offsets have been recorded for the logical server name.initial_only: The connector performs an initial snapshot and then stops, without processing any subsequent changes. In this mode, the connector does not create a replication slot. Because no slot exists, PostgreSQL does not retain the WAL files required to start streaming later. If you want to transition to streaming changes eventually, useinitialmode instead of this mode.never: Deprecated, useno_datainstead.no_data: The connector never performs snapshots. When a connector is configured this way, its behavior when it starts is as follows. If there is a previously stored LSN in the Kafka offsets topic, the connector continues streaming changes from that position. If no LSN has been stored, the connector starts streaming changes from the starting position available in the replication slot. The never snapshot mode is useful only when you know all data of interest is still reflected in the WAL.
Tables included: Enter a comma-separated list of fully-qualified table identifiers for the connector to monitor. By default, the connector monitors all non-system tables. A fully-qualified table name is in the form
schemaName.tableName. This property cannot be used with the property Tables excluded.Tables excluded: Enter a comma-separated list of fully-qualified table identifiers for the connector to ignore. A fully-qualified table name is in the form
schemaName.tableName. This property cannot be used with the property Tables included.
Data encryption
Enable Client-Side Field Level Encryption for data encryption. Specify a Service Account to access the Schema Registry and associated encryption rules or keys with that schema. For more information on CSFLE or CSPE setup, see Manage encryption for connectors.
Show advanced configurations
Schema context: Select a schema context to use for this connector, if using a schema-based data format. This property defaults to the Default context, which configures the connector to use the default schema set up for Schema Registry in your Confluent Cloud environment. A schema context allows you to use separate schemas (like schema sub-registries) tied to topics in different Kafka clusters that share the same Schema Registry environment. For example, if you select a non-default context, a Source connector uses only that schema context to register a schema and a Sink connector uses only that schema context to read from. For more information about setting up a schema context, see What are schema contexts and when should you use them?.
Additional Configs
Value Converter Replace Null With Default: Specifies whether to replace fields that have a default value and that are null to the default value. When set to
true, the connector uses the default value; otherwise, it usesnull. Applies to theJSONconverter.Value Converter Reference Subject Name Strategy: Sets the subject reference name strategy for values. Valid entries are
DefaultReferenceSubjectNameStrategyorQualifiedReferenceSubjectNameStrategy. You can use this strategy only withPROTOBUFformat; the default strategy isDefaultReferenceSubjectNameStrategy.Value Converter Schemas Enable: Includes schema within each of the serialized values. Input messages must contain
schemaandpayloadfields and must not contain additional fields. For plainJSONdata, set this tofalse. Applies to theJSONconverter.Errors Tolerance: Use this property to configure the connector’s error handling behavior.
Warning
Use this property with caution for sink connectors, as it can lead to data loss. If you set this property to
all, the connector does not fail on errant records, but logs them (and sends to DLQ for sink connectors) and continues processing. If you set this property tonone, the connector task fails on errant records.Value Converter Ignore Default For Nullables: When set to
true, this property ensures that the corresponding record in Kafka isnull, instead of showing the default column value. Applies to theAVRO,PROTOBUF, andJSON_SRconverters.Value Converter Decimal Format: Specifies the
JSONorJSON_SRserialization format for ConnectDECIMALlogical type values with two allowed literals:BASE64to serializeDECIMALlogical types as base64 encoded binary data, andNUMERICto serializeDECIMALlogical type values inJSONorJSON_SRas a number representing the decimal value.Key Converter Schema ID Serializer: The class name of the schema ID serializer for keys. This is used to serialize schema IDs in the message headers.
Value Converter Connect Meta Data: Enables the Connect converter to add its metadata to the output schema. Applies to Avro converters.
Value Converter Value Subject Name Strategy: Determines how to construct the subject name under which the value schema is registered with Schema Registry.
Key Converter Key Subject Name Strategy: Determines how to construct the subject name for key schema registration.
Value Converter Schema ID Serializer: The class name of the schema ID serializer for values. This is used to serialize schema IDs in the message headers.
Auto-restart policy
Enable Connector Auto-restart: Enables the auto-restart behavior of the connector and its task in the event of user-actionable errors. Defaults to
true, enabling the connector to automatically restart in case of user-actionable errors. Set this property tofalseto disable auto-restart for failed connectors. If disabled, you must manually restart the connector.
Exactly Once Semantics
Exactly Once Enabled: If set to
true, enables exactly-once support for this connector. This ensures that each record reaches the destination exactly once.Offset Storage Topic: The name of the topic that stores the connector’s offsets. The default value is
connect-offsets-${connector}. You can use${connector}as a placeholder for the logical cluster ID. This topic must not already exist.
Output messages
After-state only: Controls whether the generated Kafka record should contain only the state of the row after the event occurred. Defaults to
false.Tombstones on delete: Configure whether a tombstone event should be generated after a delete event. The default is
true.
Database config
Publication auto-create mode: Applies only when streaming changes by using the pgoutput plug-in. Possible settings are
all_tables,disabled, andfiltered.all_tables: If a publication exists, the connector uses it. If a publication does not exist, the connector creates a publication for all tables in the database for which the connector is capturing changes. For the connector to create a publication it must access the database through a database user account that has permission to create publications and perform replications. You can create the publication using following SQL command:CREATE PUBLICATION <publication_name> FOR ALLTABLES.disabled: The connector does not attempt to create a publication. A database administrator or the user configured to perform replications must have created the publication before running the connector. If the connector cannot find the publication, the connector throws an exception and stops.filtered: If a publication exists, the connector uses it. If no publication exists, the connector creates a new publication for tables that match the current filter configuration as specified by theTables included, andTables excludedconnector configuration properties. For example:CREATEPUBLICATION <publication_name> FOR TABLE <tbl1, tbl2, tbl3>. If the publication exists, the connector updates the publication for tables that match the current filter configuration. For example:ALTER PUBLICATION <publication_name> SET TABLE <tbl1,tbl2, tbl3>. For the connector to alter a publication it must access the database through a database user account that has ownership of the publication and the tables it is capturing.Note
If the existing regex patterns in
Tables includedorTables excludedmatch the fully qualified name of a newly created table, the connector will miss events from this new table until the publication is manually altered to include it. To avoid missing events, it is recommended to alter the publication before adding data to newly created tables.When configuring multiple connectors to capture different sets of tables from the database using a filtered configuration, do not use the same publication for all connectors. If multiple connectors use the same publication, the latest connector may alter the publication based on its capture list, potentially causing an incorrect publication configuration for the older connectors.
Publish via partition root: This configuration is applicable only when the connector is responsible for creating the publication in the source database. It determines how change events from partitioned tables are captured and emitted.
true: The connector includes thepublish_via_partition_root = trueparameter in the publication creation statement, instructing the source database to publish change events using the root table name. As a result, changes from all partitions are emitted under the root table in the change stream.false(the default): Thepublish_via_partition_root parameteris omitted, and change events are published using the individual partition names, reflecting the exact partition where each change occurred.
Note
The connector applies this configuration only during the initial creation of the publication. The connector ignores the changes made to this setting after the publication has been created.
The
publish_via_partition_rootproperty applies only to streaming changes captured from partitioned tables. If you want snapshot records from partitioned tables to be emitted under the root table topic only, ensure that your capture set includes only the root table and not its partitions. If partitions are also included in the capture configuration, snapshot records will be emitted into the individual partition topics in addition to the root table topic.
Signal data collection: Fully-qualified name of the data collection that is used to send signals to the connector. Use the following format to specify the fully-qualified collection name:
schemaName.tableName. These signals can be used to perform incremental snapshotting.Create failover slot: Specifies whether the connector creates a failover slot. If set to false (the default), or if the primary server runs PostgreSQL 16 or earlier, the connector does not create a failover slot.
Note
PostgreSQL uses the
synchronized_standby_slotsparameter to configure replication slot synchronization between primary and standby servers. This parameter should be set on the primary server to specify which physical replication slots are to be kept in sync with the standby servers.
Connector config
Columns excluded: An optional, comma-separated list of regular expressions that match the fully-qualified names of columns to exclude from change event record values. Fully-qualified names for columns are of the form
schemaName.tableName.columnName.Event processing failure handling mode: Specifies how the connector should react to exceptions during processing of events. Possible settings are:
fail,skip, andwarn.fail(default): propagates the exception, indicates the offset of the problematic event, and causes the connector to stop.skip: skips the problematic event and continues processing.warn: logs the offset of the problematic event, skips that event, and continues processing.
Schema name adjustment mode: Specifies how schema names should be adjusted for compatibility with the message converter used by the connector. Possible settings are:
none,avro, andavro_unicode.none(default): does not apply any adjustment.avro: replaces the characters that cannot be used in the Avro type name with underscore.avro_unicode: replaces the underscore or characters that cannot be used in the Avro type name with corresponding unicode like _uxxxx. Note: _ is an escape sequence like backslash in Java.
Field name adjustment mode: Specifies how field names should be adjusted for compatibility with the message converter used by the connector. Possible settings are:
none,avro, andavro_unicode.none(default): does not apply any adjustment.avro: replaces the characters that cannot be used in the Avro type name with underscore.avro_unicode: replaces the underscore or characters that cannot be used in the Avro type name with corresponding unicode like _uxxxx. Note: _ is an escape sequence like backslash in Java.
Heartbeat interval (ms): Controls how frequently the connector sends heartbeat messages to a Kafka topic. The behavior of default value 0 is that the connector does not send heartbeat messages. Heartbeat messages are useful for monitoring whether the connector is receiving change events from the database. Heartbeat messages might help decrease the number of change events that need to be re-sent when a connector restarts. To send heartbeat messages, set this property to a positive integer, which indicates the number of milliseconds between heartbeat messages.
Heartbeat action query: If specified, the connector executes this query on every heartbeat against the source database. The query must be a valid SQL DML statement, typically an
INSERTorUPDATE, that targets a dedicated heartbeat table.This configuration helps address situations where capturing changes from a low-traffic database on the same host as a high-traffic one prevents Debezium from processing WAL records and acknowledging WAL positions with the database. To address this:
Create a heartbeat table in the low-traffic database.
Set this property to a DML statement that periodically updates the table by either inserting a new row or repeatedly updating the same row.
This allows the connector to receive changes from the low-traffic database and acknowledge their LSNs, preventing unbounded WAL growth on the database host. The heartbeat query executes at regular intervals, as specified by the
heartbeat.interval.msconfiguration property.Note
To enable the connector to detect and process events from the heartbeat table, ensure the table is part of the PostgreSQL publication specified by the
publication.nameconfiguration property. In addition, if you are using a filtered publication, include the table in the connector’s capture set using the schema or table include configuration properties.To uphold the principle of least privilege, grant the connector user write permissions exclusively to essential tables, such as those used for heartbeats. In line with data minimization, ensure the connector configuration is free of PII or sensitive data, as this information is not needed for system-level functions like heartbeat queries.
Snapshot select statement overrides data map: A JSON object that maps fully-qualified table identifiers (
schemaName.tableNameordatabaseName.tableName) to customSELECTstatements. The connector uses these statements during snapshots instead of the defaultSELECT *statement. Use this property for large append-only tables to resume a snapshot from a specific point if a previous attempt was interrupted. These values are sensitive and are masked in the configuration.Note
Escape double quotes (
") in schema or table names. Use a single backslash (\") in the UI and three backslashes (\\\") in the CLI.
Schema Config
Key converter reference subject name strategy: Set the subject reference name strategy for key. Valid entries are DefaultReferenceSubjectNameStrategy or QualifiedReferenceSubjectNameStrategy. Note that the subject reference name strategy can be selected only for PROTOBUF format with the default strategy being DefaultReferenceSubjectNameStrategy.
How should we handle data types?
Decimal handling mode: Specifies how the connector should handle values for
DECIMALandNUMERICcolumns. Possible settings are:precise,double, andstring.precise(default): represents values by usingjava.math.BigDecimalto represent values in binary form in change events.double: represents values by using double values, which might result in a loss of precision but which is easier to use.string: encodes values as formatted strings, which are easy to consume but semantic information about the real type is lost.
Time precision mode: Time, date, and timestamps can be represented with different modes of precision:
adaptive(default): captures the time and timestamp values exactly as in the database using either millisecond, microsecond, or nanosecond precision values based on the database column’s type.adaptive_time_microseconds: captures the date, datetime and timestamp values exactly as in the database using either millisecond, microsecond, or nanosecond precision values based on the database column’s type. An exception isTIMEtype fields, which are always captured as microseconds.connect: always represents time and timestamp values by using Kafka Connect’s built-in representations for Time, Date, and Timestamp, which use millisecond precision regardless of the database columns’ precision.
Transforms
Single Message Transformations: To add a new SMT, see Add transforms. For more information about unsupported SMTs, see Unsupported transformations.
Processing position
Set offsets: Click Set offsets to define a specific offset for this connector to begin procession data from. For more information on managing offsets, see Manage offsets.
For additional information about the Debezium SMTs ExtractNewRecordState and EventRouter (Debezium), see Debezium transformations.
For all property values and definitions, see Configuration Properties.
Click Continue.
Based on the number of topic partitions you select, you will be provided with a recommended number of tasks.
This connector supports a single task only.
Click Continue.
Verify the connection details by previewing the running configuration.
After you’ve validated that the properties are configured to your satisfaction, click Launch.
The status for the connector should go from Provisioning to Running.
Step 5: Check the Kafka topic
After the connector is running, verify that messages are populating your Kafka topic.
For more information and examples to use with the Confluent Cloud API for Connect, see the Confluent Cloud API for Connect Usage Examples section.
Using the Confluent CLI
Complete the following steps to set up and run the connector using the Confluent CLI.
Note
Make sure you have all your prerequisites completed.
Step 1: List the available connectors
Enter the following command to list available connectors:
confluent connect plugin list
Step 2: List the connector configuration properties
Enter the following command to show the connector configuration properties:
confluent connect plugin describe <connector-plugin-name>
The command output shows the required and optional configuration properties.
Step 3: Create the connector configuration file
Create a JSON file that contains the connector configuration properties. The following examples show the required connector properties for both password and IAM role-based authentication.
Using password authentication:
{
  "connector.class": "PostgresCdcSourceV2",
  "name": "PostgresCdcSourceV2Connector_0",
  "kafka.auth.mode": "KAFKA_API_KEY",
  "kafka.api.key": "****************",
  "kafka.api.secret": "****************************************************************",
  "database.hostname": "debezium-1.<host-id>.us-east-2.rds.amazonaws.com",
  "database.port": "5432",
  "database.user": "postgres",
  "database.password": "**************",
  "database.dbname": "postgres",
  "topic.prefix": "cdc",
  "slot.name": "dbz_slot",
  "publication.name": "dbz_publication",
  "table.include.list":"public.passengers",
  "output.data.format": "JSON",
  "tasks.max": "1"
}
Using IAM role-based authentication:
{
  "connector.class": "PostgresCdcSourceV2",
  "name": "PostgresCdcSourceV2Connector_0",
  "kafka.auth.mode": "KAFKA_API_KEY",
  "kafka.api.key": "****************",
  "kafka.api.secret": "****************************************************************",
  "database.hostname": "debezium-1.<host-id>.us-west-2.rds.amazonaws.com",
  "database.port": "5432",
  "database.user": "db_user_with_iam_login",
  "database.dbname": "postgres",
  "topic.prefix": "cdc",
  "slot.name": "dbz_slot",
  "publication.name": "dbz_publication",
  "publication.autocreate.mode": "disabled",
  "table.include.list":"public.passengers",
  "output.data.format": "JSON",
  "tasks.max": "1",
  "authentication.method": "IAM Roles",
  "provider.integration.id": "dlz-f3a90de",
  "database.aws.region": "us-west-2"
}
Note the following property definitions:
"connector.class": Identifies the connector plugin name."name": Sets a name for your new connector.
"kafka.auth.mode": Identifies the connector authentication mode you want to use. There are two options:SERVICE_ACCOUNTorKAFKA_API_KEY(the default). To use an API key and secret, specify the configuration propertieskafka.api.keyandkafka.api.secret, as shown in the example configuration (above). To use a service account, specify the Resource ID in the propertykafka.service.account.id=<service-account-resource-ID>. To list the available service account resource IDs, use the following command:confluent iam service-account list
For example:
confluent iam service-account list

   Id     | Resource ID |       Name        |    Description
+---------+-------------+-------------------+-------------------
   123456 | sa-l1r23m   | sa-1              | Service account 1
   789101 | sa-l4d56p   | sa-2              | Service account 2
"database.hostname": IP address or hostname of the PostgreSQL database server."database.port": Port number of the PostgreSQL database server."database.user": The name of the PostgreSQL database user that has the required authorization."authentication.method": Set to"Password"to use password-based authentication or"IAM Roles"to use AWS IAM role-based authentication."provider.integration.id": The ID of the provider integration resource that contains the IAM role configuration. Only applicable when using IAM role-based authentication."database.aws.region": The AWS region of the PostgreSQL database server for RDS/Aurora. Only applicable when using IAM role-based authentication."database.password": Password of the PostgreSQL database user that has the required authorization. Only applicable when using password-based authentication."database.dbname": The name of the PostgreSQL database from which to stream the changes."topic.prefix": Provides a namespace for the particular database server/cluster that the connector is capturing changes from."slot.name": The name of the PostgreSQL logical decoding slot that is created for streaming changes from a particular plug-in for a particular database/schema. The slot name can contain only lower-case letters, numbers, and the underscore character."publication.name": The name of the PostgreSQL publication created for streaming changes when using the standard logical decoding plugin (pgoutput)."table.include.list": An optional, comma-separated list of fully-qualified table identifiers for tables whose changes you want to capture. By default, the connector monitors all non-system tables. A fully-qualified table name is in the formschemaName.tableName. This property cannot be used with the propertytable.exclude.list."output.data.format": Sets the output record format (data coming from the connector). Valid entries are AVRO, JSON_SR, PROTOBUF, or JSON. You must have Confluent Cloud Schema Registry configured if using a schema-based record format (for example, Avro, JSON_SR (JSON Schema), or Protobuf)."tasks.max": Enter the number of tasks in use by the connector. Organizations can run multiple connectors with a limit of one task per connector (that is,"tasks.max": "1").
Note
To enable CSFLE or CSPE for data encryption, specify the following properties:
csfle.enabled: Flag to indicate whether the connector honors CSFLE or CSPE rules.sr.service.account.id: A Service Account to access the Schema Registry and associated encryption rules or keys with that schema.
For more information on CSFLE or CSPE setup, see Manage encryption for connectors.
SMTs: For details about adding SMTs using the Confluent CLI, see the Single Message Transformations documentation. For additional information about the Debezium SMTs ExtractNewRecordState and EventRouter (Debezium), see Debezium transformations.
See Configuration Properties for all property values and definitions.
Step 4: Load the properties file and create the connector
Enter the following command to load the configuration and start the connector:
confluent connect cluster create --config-file <file-name>.json
For example:
confluent connect cluster create --config-file postgresql-cdc-source-v2.json
Example output:
Created connector PostgresCdcSourceV2Connector_0 lcc-ix4dl
Step 5: Check the connector status
Enter the following command to check the connector status:
confluent connect cluster list
Example output:
ID          |            Name                | Status  |  Type
+-----------+--------------------------------+---------+-------+
lcc-ix4dl   | PostgresCdcSourceV2Connector_0 | RUNNING | source
Step 6: Check the Kafka topic.
After the connector is running, verify that messages are populating your Kafka topic.
For more information and examples to use with the Confluent Cloud API for Connect, see the Confluent Cloud API for Connect Usage Examples section.
After-state only output limitation
When a connector is configured with the property after.state.only set to false, you expect to see the previous values of all columns under before in the record.
However, depending on the REPLICA IDENTITY setting of the corresponding table, the before field will be set to null or show a subset of the columns. If PROTOBUF is used, the record may not contain the before field at all. The following example shows this issue and provides a corrective action to take.
{
  "before": null,
  "after": {
    "id": 5,
    "name": "Allen William Henry",
    "sex": "male",
    "age": 25,
    "sibsp": 0,
    "parch": 0,
    "created_at": "2024-01-17T11:30:40.831461Z"
   },
   "source": {
     "version": "2.4.2.Final",
     "connector": "postgresql",
     "name": "test",
     "ts_ms": 1705471663123,
     "snapshot": "false",
     "db": "postgres",
     "sequence": "[null,\"8736500352768\"]",
     "schema": "public",
     "table": "passengers",
     "txId": 572,
     "lsn": 8736500352768,
     "xmin": null
   },
   "op": "u",
   "ts_ms": 1705471663501,
   "transaction": null
}
For an updated record to contain the previous (before) values of all columns in the row, you need to modify the passengers table by running ALTER TABLEpassengers REPLICA IDENTITY FULL. After you make this change in the PostgreSQL database, and records are updated, you should see records similar to the following sample.
{
  "before": {
    "id": 8,
    "name": "Gosta Leonard",
    "sex": "male",
    "age": 2,
    "sibsp": 3,
    "parch": 1,
    "created_at": "2024-01-17T11:30:55.955056Z"
  },
  "after": {
    "id": 8,
    "name": "Gosta Leonard",
    "sex": "male",
    "age": 25,
    "sibsp": 3,
    "parch": 1,
    "created_at": "2024-01-17T11:30:55.955056Z"
  },
  "source": {
    "version": "2.4.2.Final",
    "connector": "postgresql",
    "name": "test",
    "ts_ms": 1705471953456,
    "snapshot": "false",
    "db": "postgres",
    "sequence": "[\"8736433249408\",\"8736500352768\"]",
    "schema": "public",
    "table": "passengers",
    "txId": 581,
    "lsn": 8736500482568,
    "xmin": null
  },
  "op": "u",
  "ts_ms": 1705471953986,
  "transaction": null
}
Publication modifications
In version 2, when the connector is configured with Publication auto-create mode as filtered and a publication already exists, the connector will automatically alter the publication to include the configured tables each time it restarts. This means that if you update the Tables included or Tables excluded connector configuration properties to include new tables, the publication will be automatically updated by the connector.
In version 1, the connector does not alter an existing publication. To add new tables to the capture list, you must manually alter the publication to include the new tables before updating the Tables included or Tables excluded configuration.
Incremental snapshots with generated columns limitation
Issue description
Incremental snapshots on tables with generated columns can cause the connector to fail with an IllegalArgumentException or fail to generate window-close events. This behavior stops the incremental snapshot process.
The error typically appears as follows:
java.lang.IllegalArgumentException: Column 'total_price' not found in result set
'id, qty, unit_price, total_price' for table 'public.orders', columns: {
  id serial(10, 0) NOT NULL AUTO_INCREMENTED DEFAULT VALUE nextval('orders_id_seq'::regclass)
  qty int4(10, 0) NOT NULL
  unit_price numeric(10, 2) NOT NULL
}
Root cause
This issue occurs due to a mismatch between the SQL query executed during incremental snapshot and Debezium’s internal schema representation:
Schema representation: When an incremental snapshot starts, the connector removes generated columns from Debezium’s internal schema because PostgreSQL’s logical replication (
pgoutput) does not include generated columns in the WAL stream.Query execution: During incremental snapshots, when no column include or exclude list is configured, the connector builds queries using
SELECT * FROM table_name, which returns all columns including generated columns.The mismatch: PostgreSQL returns generated columns in the result set that are missing from the Debezium’s internal schema. When the connector tries to map the result set columns to the schema, it encounters a column that doesn’t exist in the schema and throws an
IllegalArgumentException.
This issue is related to DBZ-8150 in the Debezium open source project.
Workaround
To resolve this, add the generated column(s) to the connector’s column.exclude.list configuration property:
{
  "column.exclude.list": "public.orders.total_price"
}
This configuration causes the connector to use explicit column names in the SELECT statement instead of SELECT *. Since Debezium’s internal schema already excludes generated columns, the query only selects the columns that exist in the schema and eliminates the mismatch.
If the connector is in a failed state:
Add the generated columns to the
column.exclude.listconfiguration property.Restart the connector.
The connector resumes the incremental snapshot without needing to clear offsets.
Example
For a table with the following structure:
CREATE TABLE public.orders (
  id SERIAL PRIMARY KEY,
  qty INTEGER NOT NULL,
  unit_price NUMERIC(10, 2) NOT NULL,
  total_price NUMERIC(10, 2) GENERATED ALWAYS AS (qty * unit_price) STORED
);
Configure the connector with:
{
  "column.exclude.list": "public.orders.total_price"
}
For multiple generated columns across different tables, use a comma-separated list:
{
  "column.exclude.list": "public.orders.total_price,public.products.calculated_field"
}
Upgrading PostgreSQL Database
When you upgrade the PostgreSQL database that Debezium uses, you must take specific steps to protect against data loss and to ensure that Debezium continues to operate. In general, Debezium is resilient to interruptions caused by network failures and other outages. For example, when a database server that a connector monitors stops or crashes, after the connector re-establishes communication with the PostgreSQL server, it continues to read from the last position recorded by the log sequence number (LSN) offset. The connector retrieves information about the last recorded offset from the Connect offsets topic, and queries the configured PostgreSQL replication slot for a LSN with the same value.
For the connector to start and to capture change events from a PostgreSQL database, a replication slot must be present. However, as part of the upgrade process, replication slots are removed, and the original slots are not restored after the upgrade completes. As a result, when the connector restarts and requests the last known offset from the replication slot, PostgreSQL cannot return the information.
You can create a new replication slot, but you must do more than create a new slot to guard against data loss. A new replication slot can provide the LSNs only for changes that occur after you create the slot; it cannot provide the offsets for events that occurred before the upgrade. When the connector restarts, it first requests the last known offset from the Connect offsets topic. It then sends a request to the replication slot to return information for the offset retrieved from the offsets topic. But the new replication slot cannot provide the information that the connector needs to resume streaming from the expected position. The connector then skips any existing change events in the log, and only resumes streaming from the most recent position in the log. This can lead to silent data loss: the connector emits no records for the skipped events, and it does not provide any information to indicate that events were skipped.
For guidance about how to perform a PostgreSQL database upgrade so that Debezium can continue to capture events while minimizing the risk of data loss, see the following procedure:
Temporarily stop applications that write to the database, or put them into a read-only mode.
Back up the database.
Temporarily disable write access to the database.
Provide the connector with enough time to capture all event records that are written to the replication slot. To verify that the connector has finished consuming entries from the replication slot, check the value of
confirmed_flush_lsnof the slot, which should remain constant after all changes have been consumed. This step ensures that all change events that occurred before the downtime are accounted for, and that they are saved to Kafka.Note the current connector configurations and then delete the connector.
As a PostgreSQL administrator, drop the replication slot on the primary database server.
Perform the upgrade using an approved PostgreSQL upgrade procedure, such as
pg_upgrade, orpg_dumpandpg_restore.Verify that the publication that defines the tables for Debezium to capture is still present after the upgrade. If the publication is not available, you can either connect to the database as a PostgreSQL administrator to create a new publication or let the new connector create it on startup.
Note
The publication can be created with the same name as the previously configured publication; however, it is not mandatory to do so.
As a PostgreSQL administrator, you can either create the logical replication slot on the database or let the connector create it on startup. The slot must be created before enabling writes to the database. Otherwise, Debezium cannot capture the changes, resulting in data loss.
Note
The replication slot can be created with the same name as the previously configured replication slot; however, it is not mandatory to do so.
Launch a new connector with the same configurations as the previous connector, but set
snapshot.modetonever. Additionally, updatepublication.nameandslot.nameif the publication name and replication slot name have changed.Note
If you were unable to verify that Debezium finished reading all database changes in step 4, you can configure the connector to perform a new snapshot by setting
snapshot.mode=initial.Verify that the new replication slot is available.
Restore write access to the database and restart any applications that write to the database.
AWS IAM Authentication Setup
To use AWS IAM role-based authentication with the PostgreSQL CDC Source V2 connector, configure your PostgreSQL database as described in the following sections. The same setup works for both Amazon RDS PostgreSQL and Aurora PostgreSQL — there are no Aurora-specific trust policy or cluster-attach steps required.
Database setup
Enable IAM authentication on your RDS or Aurora cluster (the Database authentication option in the AWS Console, or set
--enable-iam-database-authenticationvia the AWS CLI). For an existing instance/cluster, this change applies immediately.Set the following parameters on the (cluster) parameter group attached to your instance/cluster:
rds.logical_replication = 1(required for logical replication on AWS RDS/Aurora PostgreSQL — needs a reboot to take effect on first set).rds.iam_auth_for_replication = 1(required for IAM authentication on the replication connection that Debezium opens; dynamic, no reboot).
Connect to the database as the master/superuser and create a database role with the IAM grants required for replication:
CREATE ROLE db_user_with_iam_login WITH LOGIN;
GRANT rds_iam TO db_user_with_iam_login;
GRANT rds_replication TO db_user_with_iam_login;
GRANT CONNECT ON DATABASE <database-name> TO db_user_with_iam_login;
GRANT USAGE ON SCHEMA <schema> TO db_user_with_iam_login;
GRANT SELECT ON ALL TABLES IN SCHEMA <schema> TO db_user_with_iam_login;
ALTER DEFAULT PRIVILEGES IN SCHEMA <schema>
  GRANT SELECT ON TABLES TO db_user_with_iam_login;
Pre-create the publication and transfer ownership to the IAM-login user, then set
publication.autocreate.modetodisabledin the connector configuration. This is the Confluent-recommended least-privilege path:CREATE PUBLICATION ... FOR ALL TABLESrequiresrds_superuseron RDS, which you typically should not grant to a connector user.CREATE PUBLICATION dbz_publication FOR ALL TABLES; ALTER PUBLICATION dbz_publication OWNER TO db_user_with_iam_login;
If you prefer the connector to manage the publication itself, see Database roles and permissions for the additional grants required.
IAM permission policy
Attach the following IAM permission policy to the IAM role you have integrated with provider integration. The same policy shape applies to both RDS instances and Aurora clusters — only the resource identifier differs.
For RDS PostgreSQL (use the per-instance DbiResourceId — an immutable string of the form db-XXXXXXXXXXXXXXXXXXXXXXXXXX, not the human-friendly DB instance identifier):
{
  "Version": "2012-10-17",
  "Statement": [
    {
      "Effect": "Allow",
      "Action": "rds-db:connect",
      "Resource": [
        "arn:aws:rds-db:<region>:<account-id>:dbuser:<db-instance-resource-id>/<db-username>"
      ]
    }
  ]
}
For Aurora PostgreSQL (use the cluster DbClusterResourceId — an immutable string of the form cluster-XXXXXXXXXXXXXXXXXXXXXXXXXX, not the cluster identifier or the writer-instance resource ID):
{
  "Version": "2012-10-17",
  "Statement": [
    {
      "Effect": "Allow",
      "Action": "rds-db:connect",
      "Resource": [
        "arn:aws:rds-db:<region>:<account-id>:dbuser:<db-cluster-resource-id>/<db-username>"
      ]
    }
  ]
}
Replace the region, account-id, db-instance-resource-id (for RDS) or db-cluster-resource-id (for Aurora), and db-username placeholders with the values for your environment. You can find the resource ID in the AWS Console on the Configuration tab of your RDS instance or Aurora cluster, or via aws rds describe-db-instances --query 'DBInstances[].DbiResourceId' / aws rds describe-db-clusters --query 'DBClusters[].DbClusterResourceId'. The IAM token Debezium generates is signed against the database hostname; ensure the connector’s database.hostname is the canonical AWS-managed RDS or Aurora endpoint (so the signed hostname matches what the database expects).
Moving from V1 to V2
Version 2 of this connector supports new features and has breaking changes that are not backward compatible with version 1 of the connector. To understand these changes and to plan for moving to version 2, see Backward Incompatible Changes in Debezium CDC V2 Connectors.
Given the backward-incompatible changes between version 1 and 2 of the CDC connectors, version 2 is being provided in a new set of CDC connectors on Confluent Cloud. You can provision either version 1 or version 2. However, note that eventually version 1 will be deprecated and no longer supported.
Before exploring your options for moving from version 1 to 2, be sure to make the required changes documented in Backward Incompatible Changes in Debezium CDC V2 Connectors. To get the offset in the following section, use the Confluent Cloud APIs. For more information, see Connect offsets API reference, Manage custom offsets, and Manage Offsets for Fully-Managed Connectors in Confluent Cloud.
To move from version 1 to 2 (v1 to v2)
Use the following steps to migrate to version 2. Implement and validate any connector changes in a pre-production environment before promoting to production.
Pause the v1 connector.
Get the offset for the v1 connector.
Delete the v1 connector.
Important
For PostgreSQL CDC connectors, a replication slot can only be used by a single connector at a time. You must delete the v1 connector before creating the v2 connector to release the replication slot. If you need to keep the v1 connector in a paused state for any reason, you must manually terminate the backend process (PID) associated with the replication slot on the PostgreSQL side before creating the v2 connector.
Create the v2 connector using the offset from step 2.
confluent connect cluster create [flags]
For example:
Create a configuration file with connector configs and offsets.
{
  "name": "(connector-name)",
  "config": {
      ... // connector specific configuration
  },
  "offsets": [
      {
          "partition": {
      ... // connector specific configuration
          },
          "offset": {
      ... // connector specific configuration
          }
      }
  ]
}
Create a connector in the current or specified Kafka cluster context.
confluent connect cluster create --config-file config.json
Configuration Properties
Use the following configuration properties with the fully-managed connector. For self-managed connector property definitions and other details, see the connector docs in Self-managed connectors for Confluent Platform.
How should we connect to your data?
nameSets a name for your connector.
Type: string
Valid Values: A string at most 64 characters long
Importance: high
Kafka Cluster credentials
kafka.auth.modeKafka Authentication mode. It can be one of KAFKA_API_KEY or SERVICE_ACCOUNT. It defaults to KAFKA_API_KEY mode, whenever possible.
Type: string
Valid Values: SERVICE_ACCOUNT, KAFKA_API_KEY
Importance: high
kafka.api.keyKafka API Key. Required when kafka.auth.mode==KAFKA_API_KEY.
Type: password
Importance: high
kafka.service.account.idThe Service Account that will be used to generate the API keys to communicate with Kafka Cluster.
Type: string
Importance: high
kafka.api.secretSecret associated with Kafka API key. Required when kafka.auth.mode==KAFKA_API_KEY.
Type: password
Importance: high
Authentication method
authentication.methodSelect how you want to authenticate with the database. Valid options are
IAM Roles,Google service account impersonation, andPassword.Type: string
Default: Password
Valid Values: Google service account impersonation, IAM Roles, Password
Importance: high
provider.integration.idSelect an existing integration that has access to your resource.
Type: string
Importance: high
secret.manager.enabledFetch sensitive configuration values from a secret manager.
Type: boolean
Default: false
Importance: high
Secret manager configuration
secret.managerSelect the secret manager to use for retrieving sensitive data.
Type: string
Importance: high
secret.manager.managed.configsSelect the configurations to fetch their values from the secret manager.
Type: list
Importance: high
secret.manager.provider.integration.idSelect an existing provider integration that has access to your secret manager.
Type: string
Importance: high
How should we connect to your database?
database.aws.regionThe AWS region of the PostgreSQL database server for RDS/Aurora.
Type: string
Importance: high
database.hostnameIP address or hostname of the PostgreSQL database server.
Type: string
Importance: high
database.portPort number of the PostgreSQL database server.
Type: int
Valid Values: [0,…,65535]
Importance: high
database.userThe name of the PostgreSQL database user that has the required authorization.
Type: string
Importance: high
database.passwordPassword of the PostgreSQL database user that has the required authorization.
Type: password
Importance: high
database.dbnameThe name of the PostgreSQL database from which to stream the changes.
Type: string
Importance: high
database.sslmodeWhether to use an encrypted connection to the PostgreSQL server. Possible settings are:
disable,prefer,require,verify-ca, andverify-full.disable: Uses an unencrypted connection.prefer: Attempts to use a secure (encrypted) connection first, and if failed, an unencrypted connection.require: Uses a secure (encrypted) connection, and fails if one cannot be established.verify-ca: Uses a secure (encrypted) connection and verifies the server certificate against the CA.verify-full: Uses a secure (encrypted) connection and verifies the server certificate and hostname.Type: string
Default: prefer
Importance: high
database.sslrootcertThe path to the file that contains the root certificate(s) against which the server is validated.
Type: password
Importance: high
database.sslcertPath to the SSL client certificate file for PostgreSQL connection. Only needed when mutual TLS authentication is enabled. Note: AWS RDS does not support client certificates.
Type: password
Importance: medium
database.sslkeyPath to the SSL client private key file for PostgreSQL connection. Only needed when mutual TLS authentication is enabled (ssl_mode=verify-full or verify-ca). Must be used together with SSL Client Certificate. The private key must be in PKCS#8 format.
Type: password
Importance: medium
database.sslpasswordPassword for the SSL client private key file for PostgreSQL connection. Only needed when mutual TLS authentication is enabled and the private key is password-protected.
Type: password
Importance: medium
Exactly Once Semantics
exactly.once.enabledWhen set to true, enables exactly-once support for this connector, ensuring each record reaches the destination exactly once.
Type: boolean
Default: false
Importance: high
offsets.storage.topicThe topic name used as offset storage topic to store the connector’s offsets. Defaults to
connect-offsets-${connector}. Within the value,${connector}can be used as a placeholder for the logical cluster ID. The designated topic should not pre-exist.Type: string
Importance: medium
Output messages
output.data.formatSets the output Kafka record value format. Valid entries are AVRO, JSON_SR, PROTOBUF, or JSON. Note that you need to have Confluent Cloud Schema Registry configured if using a schema-based message format like AVRO, JSON_SR, and PROTOBUF
Type: string
Default: JSON
Importance: high
output.key.formatSets the output Kafka record key format. Valid entries are AVRO, JSON_SR, PROTOBUF, STRING or JSON. Note that you need to have Confluent Cloud Schema Registry configured if using a schema-based message format like AVRO, JSON_SR, and PROTOBUF
Type: string
Default: JSON
Valid Values: AVRO, JSON, JSON_SR, PROTOBUF, STRING
Importance: high
after.state.onlyControls whether the generated Kafka record should contain only the state of the row after the event occurred.
Type: boolean
Default: false
Importance: low
tombstones.on.deleteControls whether a delete event is followed by a tombstone event. The following values are possible:
true: For each delete operation, the connector emits a delete event and a subsequent tombstone event.false: For each delete operation, the connector emits only a delete event.After a source record is deleted, a tombstone event (the default behavior) enables Kafka to completely delete all events that share the key of the deleted row in topics that have log compaction enabled.
Type: boolean
Default: true
Importance: medium
How should we name your topic(s)?
topic.prefixTopic prefix that provides a namespace (logical server name) for the particular PostgreSQL database server or cluster in which Debezium is capturing changes. The prefix should be unique across all other connectors, since it is used as a topic name prefix for all Kafka topics that receive records from this connector. Only alphanumeric characters, hyphens, dots and underscores must be used. The connector automatically creates Kafka topics using the naming convention: <topic.prefix>.<schemaName>.<tableName>.
Type: string
Importance: high
How should we configure the topic(s)?
topic.creation.topic_prefix_match.partitionsNumber of partitions for Kafka topics auto-created by the connector for topics whose name starts with
topic.prefix.. Kafka preserves message ordering only within a partition. The connector keys each change event by the changed record’s primary key, and Kafka routes all events with the same key to the same partition - so events sharing a key stay in order, while events with different keys may be spread across partitions and lose their relative order. Tables that have no primary key produce unkeyed events, which Kafka distributes across all partitions, so any value above 1 removes ordering guarantees for those tables entirely. Keep this at 1 (the default) if you need all change events in a topic delivered in strict order.Type: int
Default: 1
Valid Values: [1,…]
Importance: high
topic.creation.topic_prefix_match.cleanup.policyCleanup policy applied to Kafka topics auto-created by the connector for topics whose name starts with
topic.prefix..compactretains only the latest value per key (typical for change-data-capture topics);deleteages records out based on retention settings.Type: string
Default: delete
Valid Values: compact, compact,delete, delete
Importance: high
Storage
topic.creation.topic_prefix_match.retention.msTime-based retention, in milliseconds, applied to Kafka topics auto-created by the connector for topics whose name starts with
topic.prefix.. Use-1for infinite retention.Type: long
Default: 604800000 (7 days)
Valid Values: [-1,…]
Importance: high
topic.creation.topic_prefix_match.retention.bytesSize-based retention, in bytes, applied to Kafka topics auto-created by the connector for topics whose name starts with
topic.prefix.. Use-1for unlimited size.Type: long
Default: -1
Valid Values: [-1,…]
Importance: high
Database config
slot.nameThe name of the PostgreSQL logical decoding slot that was created for streaming changes from a particular plug-in for a particular database/schema. The server uses this slot to stream events to the Debezium connector that you are configuring. Slot names must conform to PostgreSQL replication slot naming rules, which state: “Each replication slot has a name, which can contain lower-case letters, numbers, and the underscore character.”
Type: string
Default: debezium
Valid Values: Must match the regex
^[a-z0-9_]+$Importance: medium
publication.nameThe name of the PostgreSQL publication created for streaming changes when using pgoutput. Based on the value of
publication.autocreate.modethe publication is created at start-up if it does not already exist and it includes all tables. Debezium then applies its own include/exclude list filtering, if configured, to limit the publication to change events for the specific tables of interest. The connector user must have superuser permissions to create this publication, so it is usually preferable to create the publication before starting the connector for the first time. If the publication already exists, either for all tables or configured with a subset of tables, Debezium uses the publication as it is defined.Type: string
Default: dbz_publication
Valid Values: Must match the regex
^[^\s\"\'\`]+$Importance: medium
publication.autocreate.modeApplies only when streaming changes by using the pgoutput plug-in. Possible settings are
all_tables,disabled, andfiltered.all_tables: If a publication exists, the connector uses it. If a publication does not exist, the connector creates a publication for all tables in the database for which the connector is capturing changes. For the connector to create a publication it must access the database through a database user account that has permission to create publications and perform replications. You can create the publication using following SQL command: CREATE PUBLICATION <publication_name> FOR ALL TABLES;.disabled: The connector does not attempt to create a publication. A database administrator or the user configured to perform replications must have created the publication before running the connector. If the connector cannot find the publication, the connector throws an exception and stops.filtered: If a publication exists, the connector uses it. If no publication exists, the connector creates a new publication for tables that match the current filter configuration as specified by thetable.include.list, andtable.exclude.listconnector configuration properties. For example,CREATE PUBLICATION <publication_name> FOR TABLE <tbl1, tbl2, tbl3>. If the publication exists, the connector updates the publication for tables that match the current filter configuration. For example,ALTER PUBLICATION <publication_name> SET TABLE <tbl1, tbl2, tbl3>. For the connector to alter a publication it must access the database through a database user account that has ownership of the publication and the tables it is capturing.Note the following:
If the existing regex patterns in
table.include.list, andtable.exclude.listmatch the fully-qualified name of a newly created table, the connector will miss events from this new table until the publication is manually altered to include it. To avoid missing events, it is recommended to alter the publication before adding data to newly created tables.When configuring multiple connectors to capture different sets of tables from the database using a filtered configuration, do not use the same publication for all connectors. If multiple connectors use the same publication, the latest connector may alter the publication based on its capture list, potentially causing an incorrect publication configuration for the older connectors.
Type: string
Default: all_tables
Valid Values: all_tables, disabled, filtered
Importance: medium
publish.via.partition.rootThis configuration is applicable only when the connector is responsible for creating the publication in the source database. It determines how change events from partitioned tables are captured and emitted.
true: The connector includes thepublish_via_partition_root = trueparameter in the publication creation statement, instructing the source database to publish change events using the root table name. As a result, changes from all partitions are emitted under the root table in the change stream.false(the default): Thepublish_via_partition_rootparameter is omitted, and change events are published using the individual partition names, reflecting the exact partition where each change occurred.Note the following:
The connector applies this configuration only during the initial creation of the publication. The connector ignores the changes made to this setting after the publication has been created.
The
publish_via_partition_rootproperty applies only to streaming changes captured from partitioned tables. If you want snapshot records from partitioned tables to be emitted under the root table topic only, ensure that your capture set includes only the root table and not its partitions. If partitions are also included in the capture configuration, snapshot records will be emitted into the individual partition topics in addition to the root table topic.Type: boolean
Default: false
Importance: medium
signal.data.collectionFully-qualified name of the data collection that needs to be used to send signals to the connector. Use
schemaName.tableNameformat to specify the fully-qualified collection name. Note that the connector automatically adds the signal table to the publication only if thepublication.autocreate.modeis set tofilteredorall_tables. You will need to add it manually if the mode is set todisabled.Type: string
Importance: medium
slot.failoverSpecifies whether the connector creates a failover slot. If set to false (the default), or if the primary server runs PostgreSQL 16 or earlier, the connector does not create a failover slot.
Type: boolean
Default: false
Importance: medium
Connector config
snapshot.modeSpecifies the criteria for running a snapshot upon startup of the connector. Possible settings are
initial,never``(deprecated), ``no_data,initial_only, andwhen_needed.initial: The connector performs a snapshot only when no offsets have been recorded for the logical server name.never: Deprecated, useno_datainstead.no_data: The connector never performs snapshots. When a connector is configured this way, its behavior when it starts is as follows. If there is a previously stored LSN in the Kafka offsets topic, the connector continues streaming changes from that position. If no LSN has been stored, the connector starts streaming changes from the starting position available in the replication slot. Theno_datasnapshot mode is useful only when you know all data of interest is still reflected in the WAL.initial_only: The connector performs an initial snapshot and then stops, without processing any subsequent changes.when_needed: The connector runs a snapshot upon startup whenever it deems it necessary. That is, when no offsets are available, or when a previously recorded offset specifies an LSN that is not available with the replication slot.Type: string
Default: initial
Valid Values: initial, initial_only, never, no_data, when_needed
Importance: medium
table.include.listAn optional, comma-separated list of regular expressions that match fully-qualified table identifiers for tables whose changes you want to capture. When this property is set, the connector captures changes only from the specified tables. Each identifier is of the form schemaName.tableName. By default, the connector captures changes in every non-system table in each schema whose changes are being captured.
To match the name of a table, Debezium applies the regular expression that you specify as an anchored regular expression. That is, the specified expression is matched against the entire identifier for the table; it does not match substrings that might be present in a table name.
If you include this property in the configuration, do not also set the
table.exclude.listproperty.Type: list
Importance: medium
table.exclude.listAn optional, comma-separated list of regular expressions that match fully-qualified table identifiers for tables whose changes you do not want to capture. Each identifier is of the form schemaName.tableName. When this property is set, the connector captures changes from every table that you do not specify.
To match the name of a table, Debezium applies the regular expression that you specify as an anchored regular expression. That is, the specified expression is matched against the entire identifier for the table; it does not match substrings that might be present in a table name.
If you include this property in the configuration, do not set the
table.include.listproperty.Type: list
Importance: medium
column.exclude.listAn optional, comma-separated list of regular expressions that match the fully-qualified names of columns to exclude from change event record values. Fully-qualified names for columns are of the form schemaName.tableName.columnName.
To match the name of a column, Debezium applies the regular expression that you specify as an anchored regular expression. That is, the specified expression is matched against the entire name string of the column; it does not match substrings that might be present in a column name.
Type: list
Importance: medium
event.processing.failure.handling.modeSpecifies how the connector should react to exceptions during processing of events. Possible settings are
fail,skip, andwarn.fail: Propagates the exception, indicates the offset of the problematic event, and causes the connector to stop.warn: Logs the offset of the problematic event, skips that event, and continues processing.skip: Skips the problematic event and continues processing.Type: string
Default: fail
Valid Values: fail, skip, warn
Importance: low
schema.name.adjustment.modeSpecifies how schema names should be adjusted for compatibility with the message converter used by the connector. The following values are possible:
none: Does not apply any adjustment.avro: Replaces the characters that cannot be used in the Avro type name with underscore.avro_unicode: Replaces the underscore or characters that cannot be used in the Avro type name with corresponding unicode such as,_uxxxx. Note that_is an escape sequence like backslash in Java.Type: string
Default: none
Valid Values: avro, avro_unicode, none
Importance: medium
field.name.adjustment.modeSpecifies how field names should be adjusted for compatibility with the message converter used by the connector. The following values are possible:
none: Does not apply any adjustment.avro: Replaces the characters that cannot be used in the Avro type name with underscore.avro_unicode: Replaces the underscore or characters that cannot be used in the Avro type name with corresponding unicode such as,_uxxxx. Note that_is an escape sequence like backslash in Java.Type: string
Default: none
Valid Values: avro, avro_unicode, none
Importance: medium
heartbeat.interval.msControls how frequently the connector sends heartbeat messages to a Kafka topic. The behavior of default value 0 is that the connector does not send heartbeat messages. Heartbeat messages are useful for monitoring whether the connector is receiving change events from the database. Heartbeat messages might help decrease the number of change events that need to be re-sent when a connector restarts. To send heartbeat messages, set this property to a positive integer, which indicates the number of milliseconds between heartbeat messages.
Type: int
Default: 0
Valid Values: [0,…]
Importance: low
snapshot.select.statement.overrides.data.mapA JSON object that maps fully-qualified table identifiers (
schemaName.tableNameordatabaseName.tableName) to custom SELECT statements. The connector uses these statements during snapshots instead of the default SELECT * query. Use this property for large append-only tables to resume a snapshot from a specific point if a previous attempt was interrupted. These values are sensitive and are masked in the configuration.Note that you must escape double quotes (
") in table or schema names. Use a single backslash (\") in the UI and three backslashes (\\\") in the CLI.Type: password
Importance: medium
heartbeat.action.queryIf specified, the connector executes this query on every heartbeat against the source database. The query must be a valid SQL DML statement, typically an
INSERTorUPDATE, that targets a dedicated heartbeat table.This configuration helps address situations where capturing changes from a low-traffic database on the same host as a high-traffic one prevents Debezium from processing WAL records and acknowledging WAL positions with the database. To address this, create a heartbeat table in the low-traffic database, and set this property to a DML statement that periodically updates the table by either inserting a new row or repeatedly updating the same row. This allows the connector to receive changes from the low-traffic database and acknowledge their LSNs, preventing unbounded WAL growth on the database host. The heartbeat query executes at regular intervals, as specified by the
heartbeat.interval.msconfiguration property.Note the following:
To enable the connector to detect and process events from the heartbeat table, ensure the table is part of the PostgreSQL publication specified by the
publication.nameconfiguration property. In addition, if you are using a filtered publication, include the table in the connector’s capture set using the schema or table include configuration properties.To uphold the principle of least privilege, grant the connector user write permissions exclusively to essential tables, such as those used for heartbeats. In line with data minimization, ensure the connector configuration is free of PII or sensitive data, as this information is not needed for system-level functions like heartbeat queries.
Type: string
Importance: low
Schema Config
schema.context.nameAdd a schema context name. A schema context represents an independent scope in Schema Registry. It is a separate sub-schema tied to topics in different Kafka clusters that share the same Schema Registry instance. If not used, the connector uses the default schema configured for Schema Registry in your Confluent Cloud environment.
Type: string
Default: default
Importance: medium
key.converter.reference.subject.name.strategySet the subject reference name strategy for key. Valid entries are DefaultReferenceSubjectNameStrategy or QualifiedReferenceSubjectNameStrategy. Note that the subject reference name strategy can be selected only for PROTOBUF format with the default strategy being DefaultReferenceSubjectNameStrategy.
Type: string
Default: DefaultReferenceSubjectNameStrategy
Importance: high
How should we handle data types?
decimal.handling.modeSpecifies how the connector should handle DECIMAL and NUMERIC columns. You can set one of the following options:
precise: Represents values by usingjava.math.BigDecimalto represent values in binary form in change events.double: Represents values by using double values, which might result in a loss of precision but which is easier to use.string: encodes values as formatted strings, which are easy to consume but semantic information about the real type is lost.Type: string
Default: precise
Valid Values: double, precise, string
Importance: medium
time.precision.modeSpecifies how the connector should handle time, date, and timestamp columns. You can set one of the following options:
adaptive: Captures the time and timestamp values exactly as in the database using either millisecond, microsecond, or nanosecond precision values based on the database column’s type.adaptive_time_microseconds: Captures the date, datetime and timestamp values exactly as in the database using either millisecond, microsecond, or nanosecond precision values based on the database column’s type. An exception is TIME type fields, which are always captured as microseconds.connect: Always represents time and timestamp values by using Kafka Connect’s built-in representations for Time, Date, and Timestamp, which use millisecond precision regardless of the database columns’ precision.Type: string
Default: adaptive
Valid Values: adaptive, adaptive_time_microseconds, connect
Importance: medium
Number of tasks for this connector
tasks.maxMaximum number of tasks for the connector.
Type: int
Valid Values: [1,…,1]
Importance: high
Additional Configs
column.include.listA comma-separated list of regular expressions that match the fully-qualified names of columns that should be included in change event record values. Fully-qualified names for columns are of the form schemaName.tableName.columnName. Do not set
column.exclude.listif this property is set.Type: list
Importance: low
column.propagate.source.typeA comma-separated list of regular expressions matching fully-qualified names of columns that adds the column’s original type and original length as parameters to the corresponding field schemas in the emitted change records. When this property is set, the connector adds the following fields to the schema of event records with prefix
__debezium.source.column. These parameters propagate a column’s original type name and length (for variable-width types), respectively. Include ‘.*’ to match all column types.’Type: list
Importance: low
datatype.propagate.source.typeA comma-separated list of regular expressions matching the database-specific data type names that adds the data type’s original type and original length as parameters to the corresponding field schemas in the emitted change records. When this property is set, the connector adds the following fields to the schema of event records with prefix
__debezium.source.column. These parameters propagate a column’s original type name and length (for variable-width types), respectively. Include ‘.*’ to match all data types.’Type: list
Importance: low
header.converterThe converter class for the headers. This is used to serialize and deserialize the headers of the messages.
Type: string
Importance: low
message.key.columnsA semicolon-separated list of expressions that match fully-qualified tables and column(s) to be used as message key. Each expression must match the pattern ‘<fully-qualified table name>:<key columns>’, where the fully qualified table name could be defined as <schemaName>.<tableName> and the key columns are a comma-separated list of columns representing the custom key. For any table without an explicit key configuration the table’s primary key column(s) will be used as message key. Example: inventory.customers:pk1,pk2;(.*).purchaseorders:pk3,pk4
Type: string
Importance: low
message.prefix.exclude.listA comma-separated list of regular expressions that match the logical decoding message prefixes to be excluded from monitoring. The output message are by default populated to the kafka topic of format -
{topic.prefix}.messageType: list
Importance: low
message.prefix.include.listA comma-separated list of regular expressions that match the logical decoding message prefixes to be monitored. All prefixes are monitored by default. The output message are by default populated to the kafka topic of format -
{topic.prefix}.messageType: list
Importance: low
notification.enabled.channelsList of notification channels names that are enabled. The following channels are available:
logandsink. Whensinkis enabled, the connector sends notifications to a topic specified by thenotification.sink.topic.nameproperty.Type: list
Importance: low
notification.sink.topic.nameThe name of the topic for the notifications. This is required in case
sinkis in the list of enabled channels. If you set this name so that it starts with your topic prefix followed by a period, the topic uses the same partition, retention, and cleanup settings as your other topics with that prefix; otherwise it is created with a single partition.Type: string
Importance: low
producer.override.compression.typeThe compression type for all data generated by the producer. Valid values are none, gzip, snappy, lz4, and zstd.
Type: string
Importance: low
producer.override.linger.msThe producer groups together any records that arrive in between request transmissions into a single batched request. More details can be found in the documentation: https://docs.confluent.io/platform/current/installation/configuration/producer-configs.html#linger-ms.
Type: long
Valid Values: [100,…,1000]
Importance: low
schema.exclude.listA comma-separated list of regular expressions that match names of schemas for which you do not want to capture changes. Any schema whose name is not included in schema.exclude.list has its changes captured, with the exception of system schemas. If you include this property in the configuration, do not also set the schema.include.list property.
Type: list
Importance: low
schema.include.listA comma-separated list of regular expressions that match names of schemas for which you want to capture changes. Any schema name not included in schema.include.list is excluded from having its changes captured. By default, all non-system schemas have their changes captured. If you include this property in the configuration, do not also set the schema.exclude.list property.
Type: list
Importance: low
signal.enabled.channelsA comma-separated list of channel names that are enabled for the connector. If not set, the connector enables only the
sourcechannel by default. Supported values are:source(default): Signals are read from a signaling table in the source database.kafka: Signals are consumed from a Kafka topic.Type: list
Importance: low
signal.kafka.topicThe name of the Kafka topic that the connector monitors for ad hoc signals. Note that you can currently send signal messages to this topic via the Confluent CLI. Note that signal.kafka.topic must have exactly 1 partition as the connector’s signal consumer reads only from partition-0. Any signal messages routed to other partitions are silently ignored in a multi-partition topic.
Type: string
Importance: low
slot.stream.paramsSemicolon separated list of parameters to pass to the configured logical decoding plug-in. For example,
add-tables=public.table,public.table2;include-lsn=true.Type: string
Importance: low
snapshot.include.collection.listA comma-separated list of regular expressions that match the fully-qualified names (<schemaName>.<tableName>) of the tables to include in a snapshot. If not explicitly set, the connector defaults to snapshotting all tables listed in table.include.list. The specified items must be named in the connector’s table.include.list property. This property takes effect only if the connector’s snapshot.mode property is set to a value other than never.
Type: list
Importance: low
value.converter.allow.optional.map.keysAllow optional string map key when converting from Connect Schema to Avro Schema. Applicable for Avro Converters.
Type: boolean
Importance: low
value.converter.auto.register.schemasSpecify if the Serializer should attempt to register the Schema.
Type: boolean
Importance: low
value.converter.connect.meta.dataAllow the Connect converter to add its metadata to the output schema. Applicable for Avro Converters.
Type: boolean
Importance: low
value.converter.enhanced.avro.schema.supportEnable enhanced schema support to preserve package information and Enums. Applicable for Avro Converters.
Type: boolean
Importance: low
value.converter.enhanced.protobuf.schema.supportEnable enhanced schema support to preserve package information. Applicable for Protobuf Converters.
Type: boolean
Importance: low
value.converter.flatten.unionsWhether to flatten unions (oneofs). Applicable for Protobuf Converters.
Type: boolean
Importance: low
value.converter.generate.index.for.unionsWhether to generate an index suffix for unions. Applicable for Protobuf Converters.
Type: boolean
Importance: low
value.converter.generate.struct.for.nullsWhether to generate a struct variable for null values. Applicable for Protobuf Converters.
Type: boolean
Importance: low
value.converter.int.for.enumsWhether to represent enums as integers. Applicable for Protobuf Converters.
Type: boolean
Importance: low
value.converter.latest.compatibility.strictVerify latest subject version is backward compatible when use.latest.version is true.
Type: boolean
Importance: low
value.converter.object.additional.propertiesWhether to allow additional properties for object schemas. Applicable for JSON_SR Converters.
Type: boolean
Importance: low
value.converter.optional.for.nullablesWhether nullable fields should be specified with an optional label. Applicable for Protobuf Converters.
Type: boolean
Importance: low
value.converter.optional.for.proto2Whether proto2 optionals are supported. Applicable for Protobuf Converters.
Type: boolean
Importance: low
value.converter.scrub.invalid.namesWhether to scrub invalid names by replacing invalid characters with valid characters. Applicable for Avro and Protobuf Converters.
Type: boolean
Importance: low
value.converter.use.latest.versionUse latest version of schema in subject for serialization when auto.register.schemas is false.
Type: boolean
Importance: low
value.converter.use.optional.for.nonrequiredWhether to set non-required properties to be optional. Applicable for JSON_SR Converters.
Type: boolean
Importance: low
value.converter.wrapper.for.nullablesWhether nullable fields should use primitive wrapper messages. Applicable for Protobuf Converters.
Type: boolean
Importance: low
value.converter.wrapper.for.raw.primitivesWhether a wrapper message should be interpreted as a raw primitive at root level. Applicable for Protobuf Converters.
Type: boolean
Importance: low
incremental.snapshot.chunk.sizeThe maximum number of rows that the connector fetches and reads into memory during an incremental snapshot chunk. Increasing the chunk size improves efficiency by running fewer, larger snapshot queries. However, larger chunk sizes also require more memory to buffer the snapshot data. Adjust the chunk size to a value that provides the best performance in your environment.
Type: int
Default: 1024
Valid Values: [1,…,1024]
Importance: medium
read.onlyControls whether the connector writes watermarks to the signal data collection to track incremental snapshot progress. Set the value to
trueto enable the connector to use an incremental snapshot watermarking strategy that does not require writing to the signal data collection (useful for read-only database connections).Type: boolean
Default: false
Importance: medium
binary.handling.modeSpecify how binary (blob, binary, etc.) columns should be represented in change events, including: ‘bytes’ represents binary data as byte array (default); ‘base64’ represents binary data as base64-encoded string; ‘base64-url-safe’ represents binary data as base64-url-safe-encoded string; ‘hex’ represents binary data as hex-encoded (base16) string
Type: string
Default: bytes
Importance: low
errors.toleranceUse this property if you would like to configure the connector’s error handling behavior. WARNING: This property should be used with CAUTION for SOURCE CONNECTORS as it may lead to dataloss. If you set this property to ‘all’, the connector will not fail on errant records, but will instead log them (and send to DLQ for Sink Connectors) and continue processing. If you set this property to ‘none’, the connector task will fail on errant records.
Type: string
Default: none
Importance: low
hstore.handling.modeSpecify how HSTORE columns should be represented in change events, including: ‘json’ represents values as string-ified JSON (default); ‘map’ represents values as a key/value map
Type: string
Default: json
Importance: low
include.unknown.datatypesSpecify whether the fields of data type not supported by Debezium should be processed: ‘false’ (the default) omits the fields; ‘true’ converts the field into an implementation dependent binary representation.
Type: boolean
Default: false
Importance: low
incremental.snapshot.watermarking.strategySpecify the strategy used for watermarking during an incremental snapshot: ‘INSERT_INSERT’ both open and close signal is written into signal data collection (default); ‘INSERT_DELETE’ only open signal is written on signal data collection, the close will delete the relative open signal.
Type: string
Default: INSERT_INSERT
Importance: low
interval.handling.modeSpecify how INTERVAL columns should be represented in change events, including: ‘string’ represents values as an exact ISO formatted string; ‘numeric’ (default) represents values using the inexact conversion into microseconds
Type: string
Default: numeric
Importance: low
key.converter.key.schema.id.serializerThe class name of the schema ID serializer for keys. This is used to serialize schema IDs in the message headers.
Type: string
Default: io.confluent.kafka.serializers.schema.id.PrefixSchemaIdSerializer
Importance: low
key.converter.key.subject.name.strategyHow to construct the subject name for key schema registration.
Type: string
Default: TopicNameStrategy
Importance: low
max.batch.sizeMaximum size of each batch of events that the connector processes. Defaults to 2048 with the allowed range is from 1 to 5000.
Type: int
Default: 2048
Valid Values: [1,…,5000]
Importance: low
money.fraction.digitsNumber of fractional digits when PostgreSQL money type is converted to java.math.BigDecimal. Applicable only when
decimal.handling.modeis set toprecise.Type: short
Default: 2
Importance: low
poll.interval.msTime to wait for new change events to appear after receiving no events, given in milliseconds. Defaults to 500 ms.
Type: long
Default: 500
Valid Values: [200,…]
Importance: low
provide.transaction.metadataDetermines whether the connector generates events with transaction boundaries and enriches change event envelopes with transaction metadata. When enabled, the connector creates a dedicated transaction metadata topic. Its name starts with your topic prefix, so it uses the same partition, retention, and cleanup settings as your other topics with that prefix.
Type: boolean
Default: false
Importance: low
schema.refresh.modeSpecify the conditions that trigger a refresh of the in-memory schema for a table. ‘columns_diff’ (the default) is the safest mode, ensuring the in-memory schema stays in-sync with the database table’s schema at all times. ‘columns_diff_exclude_unchanged_toast’ instructs the connector to refresh the in-memory schema cache if there is a discrepancy between it and the schema derived from the incoming message, unless unchanged TOASTable data fully accounts for the discrepancy. This setting can improve connector performance significantly if there are frequently-updated tables that have TOASTed data that are rarely part of these updates. However, it is possible for the in-memory schema to become outdated if TOASTable columns are dropped from the table.
Type: string
Default: columns_diff
Importance: low
skip.messages.without.changeEnable to skip publishing messages when there is no change in included columns. This would essentially filter messages to be sent when there is no change in columns included as per column.include.list/column.exclude.list. For Postgres - this would require REPLICA IDENTITY of table to be FULL.
Type: boolean
Default: false
Importance: low
skipped.operationsThe comma-separated list of operations to skip during streaming, defined as: ‘c’ for inserts/create; ‘u’ for updates; ‘d’ for deletes, ‘t’ for truncates, and ‘none’ to indicate nothing skipped. By default, only truncate operations will be skipped.
Type: list
Default: t
Importance: low
slot.drop.on.stopWhether or not to drop the logical replication slot when the connector finishes orderly. By default the replication is kept so that on restart progress can resume from the last recorded location. WARNING: Do not set this to
truefor connectors in production.Type: boolean
Default: false
Importance: low
slot.max.retriesSpecifies how many times to retry connecting to a replication slot when an attempt fails.
Type: int
Default: 20
Valid Values: [0,…]
Importance: low
slot.retry.delay.msSpecified the time to wait between retry attempts when the connector fails to connect to a replication slot, given in milliseconds. Defaults to 30 seconds (30000 ms).
Type: long
Default: 30000 (30 seconds)
Valid Values: [0,…]
Importance: low
snapshot.delay.msAn interval in milliseconds that the connector should wait before performing a snapshot when the connector starts. Defaults to 0 ms.
Type: long
Default: 0
Valid Values: [0,…]
Importance: low
snapshot.isolation.modeControls which transaction isolation level is used. The default is ‘SERIALIZABLE’, which means that serializable isolation level is used. When ‘REPEATABLE_READ’ is specified, the connector runs the initial snapshot in REPEATABLE READ isolation level. When ‘READ_COMMITTED’ is specified, the connector runs the initial snapshot in READ COMMITTED isolation level. When ‘READ_UNCOMMITTED’ is specified, the connector runs the initial snapshot in READ UNCOMMITTED isolation level.
Type: string
Default: serializable
Importance: low
snapshot.lock.timeout.msThe maximum number of millis to wait for table locks at the beginning of a snapshot. If locks cannot be acquired in this time frame, the snapshot will be aborted. Defaults to 10 seconds.
Type: long
Default: 10000 (10 seconds)
Importance: low
status.update.interval.msFrequency for sending replication connection status updates to the server, given in milliseconds. Defaults to 10 seconds (10,000 ms).
Type: int
Default: 10000 (10 seconds)
Valid Values: [5000,…]
Importance: low
streaming.delay.msA delay period after the snapshot is completed and the streaming begins, given in milliseconds. This delay helps prevent re-snapshotting in case the connector fails during the transition to streaming. Defaults to 60000 ms.
Type: long
Default: 60000 (1 minute)
Valid Values: [0,…]
Importance: low
topic.heartbeat.prefixSpecifies the prefix of the heartbeat topic to which the connector sends heartbeat messages. The topic name has this pattern:
<topic.heartbeat.prefix>.<topic.prefix>. Defaults to__debezium-heartbeat-{{.logicalClusterId}}. By default the heartbeat topic does not start with your topic prefix, so it is created with a single partition. If you change this prefix so that the heartbeat topic name starts with your topic prefix followed by a period, it instead uses the same partition, retention, and cleanup settings as your other topics with that prefix. Keep the default unless you have a specific reason to change it.Type: string
Default: __debezium-heartbeat-{{.logicalClusterId}}
Importance: low
topic.transactionControls the name of the topic to which the connector sends transaction metadata messages. The final transaction topic name has this pattern:
<topic.prefix>.<topic.transaction>. Defaults to{{.logicalClusterId}}.transaction. Because this topic’s name always starts with your topic prefix, it uses the same partition, retention, and cleanup settings as your other topics with that prefix.Type: string
Default: {{.logicalClusterId}}.transaction
Importance: low
unavailable.value.placeholderSpecify the constant that will be provided by Debezium to indicate that the original value is unavailable and not provided by the database.
Type: string
Default: __debezium_unavailable_value
Importance: low
value.converter.decimal.formatSpecify the JSON/JSON_SR serialization format for Connect DECIMAL logical type values with two allowed literals:
BASE64 to serialize DECIMAL logical types as base64 encoded binary data and
NUMERIC to serialize Connect DECIMAL logical type values in JSON/JSON_SR as a number representing the decimal value.
Type: string
Default: BASE64
Importance: low
value.converter.flatten.singleton.unionsWhether to flatten singleton unions. Applicable for Avro and JSON_SR Converters.
Type: boolean
Default: false
Importance: low
value.converter.ignore.default.for.nullablesWhen set to true, this property ensures that the corresponding record in Kafka is NULL, instead of showing the default column value. Applicable for AVRO,PROTOBUF and JSON_SR Converters.
Type: boolean
Default: false
Importance: low
value.converter.reference.subject.name.strategySet the subject reference name strategy for value. Valid entries are DefaultReferenceSubjectNameStrategy or QualifiedReferenceSubjectNameStrategy. Note that the subject reference name strategy can be selected only for PROTOBUF format with the default strategy being DefaultReferenceSubjectNameStrategy.
Type: string
Default: DefaultReferenceSubjectNameStrategy
Importance: low
value.converter.replace.null.with.defaultWhether to replace fields that have a default value and that are null to the default value. When set to true, the default value is used, otherwise null is used. Applicable for JSON Converter.
Type: boolean
Default: true
Importance: low
value.converter.schemas.enableInclude schemas within each of the serialized values. Input messages must contain schema and payload fields and may not contain additional fields. For plain JSON data, set this to false. Applicable for JSON Converter.
Type: boolean
Default: false
Importance: low
value.converter.value.schema.id.serializerThe class name of the schema ID serializer for values. This is used to serialize schema IDs in the message headers.
Type: string
Default: io.confluent.kafka.serializers.schema.id.PrefixSchemaIdSerializer
Importance: low
value.converter.value.subject.name.strategyDetermines how to construct the subject name under which the value schema is registered with Schema Registry.
Type: string
Default: TopicNameStrategy
Importance: low
xmin.fetch.interval.msSpecify how often (in ms) the xmin will be fetched from the replication slot. This xmin value is exposed by the slot which gives a lower bound of where a new replication slot could start from. The lower the value, the more likely this value is to be the current ‘true’ value, but the bigger the performance cost. The bigger the value, the less likely this value is to be the current ‘true’ value, but the lower the performance penalty. The default is set to 0 ms, which disables tracking xmin.
Type: long
Default: 0
Valid Values: [0,…]
Importance: low
Auto-restart policy
auto.restart.on.user.errorEnable connector to automatically restart on user-actionable errors.
Type: boolean
Default: true
Importance: medium
Frequently asked questions
Find answers to frequently asked questions about the PostgreSQL CDC Source V2 (Debezium) connector for Confluent Cloud.
How do I connect to a self-hosted PostgreSQL database from Confluent Cloud?
To connect the fully-managed PostgreSQL CDC Source V2 connector to a self-hosted PostgreSQL database, you must configure private networking using egress endpoints:
Create a PrivateLink egress endpoint: In the Cloud Console, navigate to your environment and create an egress PrivateLink endpoint that connects to your PostgreSQL database.
Configure the endpoint service: Ensure your PostgreSQL database is accessible through an Amazon PrivateLink endpoint service, Azure Private Link service, or Google Cloud Private Service Connect.
Update the connector configuration: In the
database.hostnameproperty, use the DNS name of the egress endpoint instead of a public IP address or hostname.Verify connectivity: Ensure the egress endpoint status is
Readybefore creating the connector. You can verify this in the Cloud Console under Networking > Egress.
Important
The egress endpoint must be in the same region as your Kafka cluster. Cross-region egress is not supported.
For detailed setup instructions, see Manage Networking for Confluent Cloud Connectors.
Why is my connector failing with replication slot does not exist errors?
This error occurs when the connector cannot find the required replication slot in PostgreSQL.
ERROR: replication slot "debezium" does not exist
Common causes and solutions:
Replication slot was not created: The connector creates the replication slot automatically on first run if
slot.nameis specified.Verify the slot exists:
SELECT * FROM pg_replication_slots WHERE slot_name = 'debezium';
If the slot does not exist, ensure the connector user has
REPLICATIONprivilege:ALTER USER connector_user REPLICATION;
Replication slot was dropped: The slot may have been manually dropped or removed due to PostgreSQL maintenance.
If
slot.drop.on.stopis set tofalse, which is the default, the connector preserves the replication slot when it stops, so the slot should still exist on restart. If the slot was dropped externally, the connector automatically recreates it on the next startup.If
slot.drop.on.stopis set totrue, the connector drops the slot each time it stops and recreates it on restart. This can result in missed change events if changes occur while the connector is stopped.Slot name mismatch: Verify the
slot.nameproperty matches the actual slot name in PostgreSQL.{ "slot.name": "debezium" }
Multiple connectors using the same slot: Each connector instance requires its own replication slot.
Use unique slot names for each connector:
{
  "slot.name": "debezium_orders"
}
Note
By default, slot.drop.on.stop is false, which preserves the replication slot when the connector stops. This allows the connector to resume from where it left off.
What PostgreSQL user privileges are required for the connector?
The PostgreSQL database user specified in database.user must have specific privileges to perform logical replication and access table data.
Required privileges:
Replication privilege: Grant replication permission to the user:
ALTER USER connector_user REPLICATION;
Database connection: Grant connection to the database:
GRANT CONNECT ON DATABASE your_database TO connector_user;
Schema access: Grant usage on the schema:
GRANT USAGE ON SCHEMA public TO connector_user;
Table access: Grant
SELECTon all tables to be captured:GRANT SELECT ON ALL TABLES IN SCHEMA public TO connector_user;
Or grant on specific tables:
GRANT SELECT ON public.orders, public.customers TO connector_user;
Publication permissions: For manual publication creation:
GRANT CREATE ON DATABASE your_database TO connector_user;
Verify privileges: Check granted privileges:
SELECT * FROM information_schema.role_table_grants
WHERE grantee = 'connector_user';
Important
For Google Cloud Cloud SQL, use the cloudsqlsuperuser role or grant the REPLICATION attribute explicitly. The postgres superuser cannot be used for replication.
Why is my connector failing with publication does not exist errors?
This error indicates the connector cannot find the specified publication in PostgreSQL.
ERROR: publication "dbz_publication" does not exist
Common causes and solutions:
Publication was not created: Verify the publication exists:
SELECT * FROM pg_publication WHERE pubname = 'dbz_publication';
If it does not exist and
publication.autocreate.modeisdisabled, create it manually:CREATE PUBLICATION dbz_publication FOR ALL TABLES;
Publication name mismatch: Ensure the
publication.nameproperty matches the actual publication name:{ "publication.name": "dbz_publication" }
Publication names are case-sensitive.
Insufficient permissions: The connector user must have permission to access the publication.
Grant usage:
GRANT USAGE ON SCHEMA public TO connector_user;
Enable automatic creation: Set the connector to create the publication automatically:
{
  "publication.autocreate.mode": "filtered"
}
Important
If you delete and recreate a publication while the connector is running, the connector may fail. Stop the connector before making publication changes, or configure automatic publication management.
How can I optimize connector performance and reduce lag?
High lag or slow processing can be caused by large transactions, network latency, or connector configuration.
Monitor lag metrics: In the Cloud Console, check:
Connector lag: Time behind the database WAL
Throughput: Records per second
Task errors or restarts: Indicates configuration issues
Adjust batch sizes: Process more records per batch:
{
  "max.batch.size": "2048",
  "max.queue.size": "8192"
}
Optimize polling intervals: Reduce the polling interval for lower latency:
{
  "poll.interval.ms": "100"
}
Filter unnecessary columns: Use column filtering to reduce data volume:
{
  "column.exclude.list": "public.orders.internal_notes,public.customers.legacy_data"
}
Filter unnecessary tables: Capture only required tables to reduce processing overhead:
{
  "table.include.list": "public.orders,public.customers"
}
Monitor PostgreSQL performance: Check PostgreSQL server metrics:
WAL generation rate: How fast the database is generating changes
Disk I/O: Ensure adequate disk performance
Connection count: Verify connection limits are not reached
Replication slot lag: Check
pg_replication_slotsfor lag
Avoid large transactions: Large transactions can cause lag spikes. Break bulk operations into smaller transactions when possible.
Note
The connector processes WAL events sequentially to maintain order. Extremely high-volume PostgreSQL databases may require partitioning or optimization strategies.
Why does my connector stay in the RUNNING state but stop processing records?
The most common cause is database lock contention. If another session holds a conflicting lock on a table or system catalog that the connector reads, the connector’s query can block indefinitely, and the connector stops making progress without failing. If the database or network becomes unresponsive, a similar stall can also occur.
By default, PostgreSQL sets lock_timeout to 0, meaning no lock-wait timeout is enforced, so a statement waits indefinitely to acquire a lock. If a database operation holds a conflicting lock and does not release it, the connector’s query, including internal schema-discovery queries, waits for that lock and never returns. Common examples are DDL or maintenance operations such as ALTER TABLE, CREATE INDEX, VACUUM FULL, and DROP.
Because the blocked call is an uninterruptible socket read, the task stays in the RUNNING state and never transitions to FAILED. It stops producing records and stops committing offsets. Connector status alone does not reveal this condition.
Check for growing lag: While the task is stalled, the connector’s lag grows steadily. In the Cloud Console, check the connector lag and throughput. A steadily increasing lag on a connector that still reports
RUNNING, with throughput at zero, is the signature of this condition.Confirm the cause on the database: Look for the connector’s session waiting on a lock:
SELECT pid, state, wait_event_type, wait_event, query
FROM pg_stat_activity
WHERE wait_event_type = 'Lock';
Set a non-zero lock_timeout: Configure a
lock_timeoutfor the connector’s database user so that a query waiting on a lock fails fast with lock-timeout error “(SQLSTATE55P03)” instead of hanging, allowing the connector to error and retry:ALTER ROLE connector_user SET lock_timeout = '10s';
Note
Scoping lock_timeout to the connector’s role limits the effect to the connector’s own sessions. lock_timeout bounds only the time spent waiting to acquire a lock. It does not affect queries that are actively running, such as a large snapshot, so it is safe to set.
How do I configure SSL/TLS encryption for PostgreSQL connections?
The PostgreSQL CDC Source V2 connector supports SSL/TLS encryption for secure database connections.
Enable SSL on PostgreSQL server: Verify SSL is enabled:
SHOW ssl;
Configure connector for SSL: Enable SSL mode:
{
  "database.sslmode": "require"
}
SSL modes:
disable: No SSL encryption
allow: Use SSL if the server supports it
prefer: Use SSL if available, fallback to unencrypted
require: Require SSL, fail if unavailable
verify-ca: Require SSL and verify CA certificate
verify-full: Require SSL and verify server identity
For certificate verification: Use
verify-caorverify-fullmode:{ "database.sslmode": "verify-ca", "database.sslrootcert": "<base64-encoded-root-cert>" }
For client certificates: Provide client certificate and key:
{
  "database.sslmode": "verify-full",
  "database.sslcert": "<base64-encoded-client-cert>",
  "database.sslkey": "<base64-encoded-client-key>",
  "database.sslrootcert": "<base64-encoded-root-cert>"
}
For |gc| Cloud SQL: Use the Cloud SQL CA certificate:
Download the server CA certificate from Cloud SQL and encode it to base64, then add it to the connector configuration.
Important
When using SSL with Google Cloud Cloud SQL and provider integration, ensure the service account has the Cloud SQL Client role.
What should I do if my connector keeps restarting or failing?
Frequent connector restarts indicate configuration issues, resource constraints, or database connectivity problems.
Common causes and solutions:
Check connector logs: In the Cloud Console, review error messages:
Authentication failures: Verify username and password
Network timeouts: Check egress endpoint status
Replication slot errors: Verify slot exists and is not in use
Out-of-memory errors: Reduce batch sizes
Verify PostgreSQL connectivity: Test that PostgreSQL is reachable and accepting connections:
Check firewall rules: Allow traffic on PostgreSQL port such as
5432Verify egress endpoint status: Ensure status is
ReadyTest credentials manually: Connect using
psqlwith the same credentials
Review replication slot errors: Check if the replication slot is active:
SELECT * FROM pg_replication_slots WHERE slot_name = 'debezium';
If the slot is inactive or missing, the connector may need to recreate it.
Check for PostgreSQL server restarts: PostgreSQL restarts can interrupt replication:
Ensure the connector can reconnect after PostgreSQL restarts.
Monitor connector resources: Check if the connector is hitting memory limits:
Reduce max.batch.size: Lower the
max.batch.sizeconfiguration propertyReduce snapshot.fetch.size: Lower the
snapshot.fetch.sizeconfiguration propertyFilter unnecessary tables or columns: Use
table.include.listorcolumn.exclude.list
Verify schema compatibility: Ensure Schema Registry is available if using Avro, JSON Schema, or Protobuf formats.
Check for incompatible schema changes: Some PostgreSQL DDL changes can cause connector failures:
Column type changes: May cause deserialization errors
Primary key changes: Requires connector restart
Table drops: Tables being monitored should not be dropped while connector is running
Important
For persistent failures, use the connector diagnostics and share logs with Confluent Support.
How do I handle schema changes in my PostgreSQL database?
The PostgreSQL CDC Source V2 connector can handle many schema changes automatically, but some require specific configuration.
Supported schema changes:
Adding columns: New columns are automatically detected and included in change events:
Nullable columns: Added with NULL values for existing rows
Columns with defaults: Added with default values
Dropping columns: Removed columns no longer appear in change events.
Renaming columns: Treated as drop and add operation.
Configuration options:
Schema change handling: The connector automatically detects and handles schema changes. No additional configuration is required for basic schema evolution.
Schema evolution in Kafka topics: When using Schema Registry, enable schema evolution:
Set topic schema compatibility mode: Configure compatibility settings for the topic
Use forward or full compatibility for adding columns: Allows consumers to handle new fields
Use backward compatibility for removing columns: Ensures older consumers can still read data
Incompatible schema changes:
Changing primary key: Requires recreating the connector
Changing column data type: May cause deserialization errors
Dropping tables: Tables being monitored should not be dropped while connector is running
Best practices:
Test schema changes: Test DDL changes in a non-production environment first.
Pause connector during major changes: For breaking changes, pause the connector, make changes, then resume.
Monitor for errors: After schema changes, check connector logs for issues.
Use incremental snapshots: After adding a new table, trigger an incremental snapshot to capture existing data.
Important
Major schema changes such as dropping tables or changing primary keys may require recreating the connector with a new snapshot.
Next Steps
For an example that shows fully-managed Confluent Cloud connectors in action with Confluent Cloud for Apache Flink, see the Cloud ETL Demo. This example also shows how to use Confluent CLI to manage your resources in Confluent Cloud.