
Confluent Support for Confluent Cloud
Confluent Cloud offers three levels of paid support.
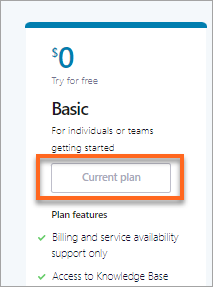
Developer
Business
Premier
Support plans
The Developer support plan is intended for non-production use cases, and covers components that are fully managed by Confluent. Self-managed components, which are defined as components which are not fully managed by Confluent in Confluent Cloud, are not covered by the Developer support plan.
The Business and Premier levels are appropriate for production environments. For licensing details regarding support of self-managed components deployed against Confluent Cloud, contact us.
Self-managed components
Confluent considers the following components to be self-managed and the Confluent Cloud Developer support plan does not cover them.
Self-managed connectors (meaning a connector that is not in the fully managed list) or any connector that is not running in Confluent Cloud
Self-managed ksqlDB, meaning standalone ksqlDB or any version of ksqlDB other than ksqlDB for Confluent Cloud
Issues with Confluent supported clients other than troubleshooting their connections to Confluent Cloud
Important
The following networking scenarios are not covered by any support plan:
Connections from on-premises or from external networks to Confluent Cloud clusters with private networking implemented, meaning VPC Peering, VNet Peering, or Private Links
Configuring external DNS providers to work with Confluent Cloud endpoints
If you are interested in these configurations for Confluent Cloud, contact your Confluent sales representative.
For more details on components and coverage contacts and hours, see the Confluent Cloud support plans. To view questions and answers for common problems, and to get extra help for supported components, see the Confluent Support Portal.
View your support plan
You can change view support plan in the Cloud Console.
To view your plan:
Log in to the Cloud Console.
Access the Support menu identified by the help icon in the upper right (
 ) and choose Support plans.
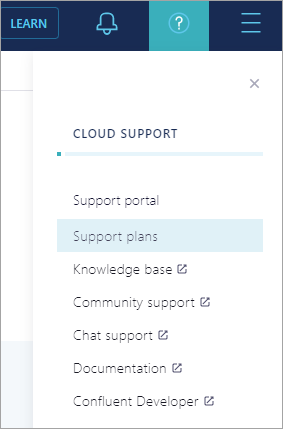
The support plans display. Your current plan is highlighted and identified with Current plan.
Change your support plan
You can change your support plan in the Cloud Console. Before you change your plan, note that downgrade restrictions apply to support plan purchases. Your current support level stays in effect until the end of the current calendar month. However, if you downgrade within a month of purchase, your current support plan level is maintained until the end of the next full calendar month.
To change your plan:
Log in to the Cloud Console.
Access the Support menu identified by the help icon in the upper right (
) and choose Support plans.Review the plans, level of support, and associated costs and click Select for the plan you want. A dialog appears, which displays the payment details. Select or add a credit card for support charges.
Important
Signing up for the Premier support plan requires a Confluent Cloud commitment. You click Contact us, enter any questions you have about Premier support, and a Confluent representative contacts you. You cannot upgrade to Premier support during an existing commitment.
Click Confirm upgrade or Confirm downgrade to confirm the change.
Request support
You can request support in the Confluent Support Portal. Access the portal directly, or navigate to it from the Cloud Console by selecting the help (![]() ) icon in the upper-right and choosing Support portal.
) icon in the upper-right and choosing Support portal.
To troubleshoot connectivity issues with Confluent Cloud before you contact support, use this support article.
To request support:
Log in to the support portal using the email address associated with your Confluent Cloud account.
In the upper right corner, select SUBMIT A REQUEST.
Under Submit a Request provide details for your issue and then click SUBMIT.
In Support Organization, choose the organization for which you have an issue (if you are a member of more than one Confluent Cloud organization).
In Subject, enter a short description of the issue.
From Assistance Type, select a category that best describes your issue or choose the other category.
(Optional) Add emails for users in the organization that have a Confluent Support Portal account.
In Description, add details about your issue.
(Optional) Add supporting documents as attachments.
You receive responses in a time frame specified by the support plan-level for your organization.