
Use Azure Private Link for Dedicated Clusters on Confluent Cloud
Azure Private Link allows for one-way secure connection access from your VNet to Confluent Cloud with added protection against data exfiltration. This networking option is popular for its unique combination of security and simplicity of setup.
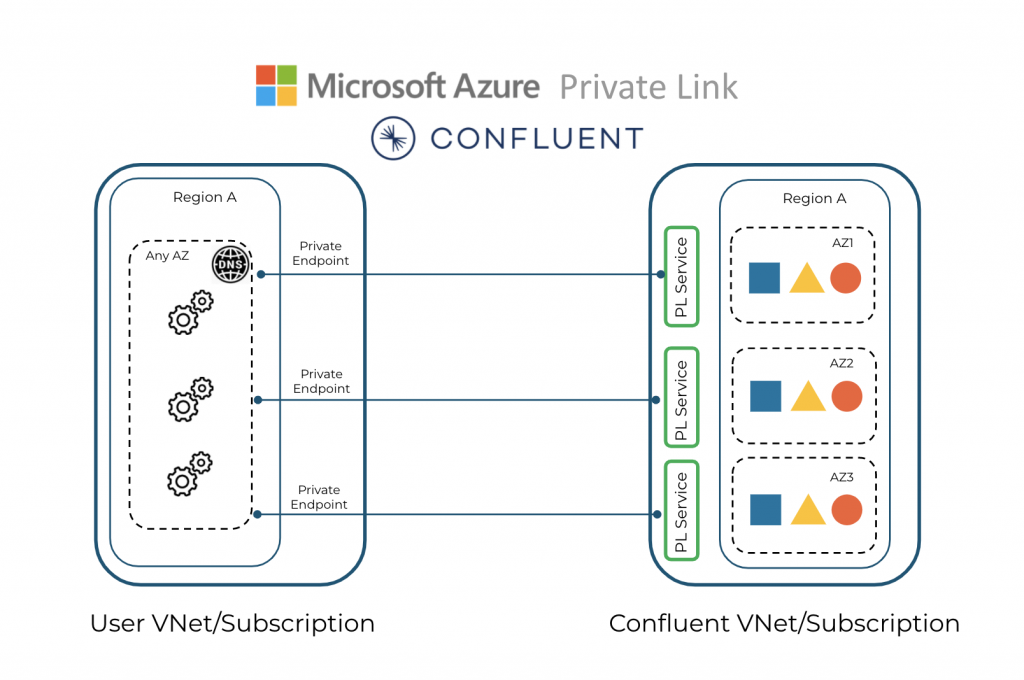
The following diagram summarizes the Azure Private Link architecture between the VNet or subscription and the Confluent Cloud cluster.
To set up to use Azure Private Link with Confluent Cloud:
Identify a Confluent Cloud network you want to use, or set up a new Confluent Cloud network.
Troubleshoot broker connectivity issues if necessary.
The following tutorial video walks you through the process of configuring a private link. It also covers common mistakes and gotchas when setting up a private link with Confluent Cloud. Even though it uses AWS PrivateLink as an example, you will still find it relevant and useful for setting up a Private Link in Azure.
Requirements and considerations
Review the following requirements and considerations before you set up a Private Link in Azure with Confluent Cloud:
Have a Confluent Cloud network of type
Private Linkin Azure. If a network does not exist, see Create Confluent Cloud Network on Azure.To use an Azure Private Link service with Confluent Cloud, your VNet must allow outbound Internet connections for Confluent Cloud Schema Registry, ksqlDB, and Confluent CLI to work.
DNS requests to public authority traversing to private DNS zone is required.
Confluent Cloud Schema Registry is accessible over the Internet.
Provisioning new ksqlDB instances requires Internet access. After ksqlDB instances are up and running, they are fully accessible over Azure Private Link connections.
Confluent CLI requires Internet access to authenticate with the Confluent Cloud control plane.
Confluent Cloud Console components, such as topic management, need additional configuration to function as they use cluster endpoints. To use all features of the Confluent Cloud Console with Azure Private Link, see Use the Confluent Cloud Console with Private Networking.
You can create Azure Private Endpoints in regions that are different from where Confluent hosts the Private Link Service
The Azure Private Link described in this document is only available for use with Dedicated clusters.
For use with Enterprise clusters, see Use Azure Private Link for Serverless Products on Confluent Cloud.
Existing Confluent Cloud clusters cannot be converted to use Azure Private Link.
Confluent Cloud selects the availability zones for the Confluent Cloud cluster and Azure Private Link service. You cannot select availability zones.
Connectors
Fully-managed Confluent Cloud connectors can connect to data sources or sinks using a public IP address.
Fully-managed Confluent Cloud connectors can use Egress Private Link Endpoints to connect to the sources or sinks in the customer network with private IP addresses. For information about configuring an Egress Private Link Endpoint, see Use Azure Egress Private Link Endpoints for Dedicated Clusters on Confluent Cloud.
Access to Confluent Cloud serverless products
Connections established for use with Dedicated Kafka clusters may also be used to connect to some serverless products. For service-specific information, see:
Add a Private Link Access in Confluent Cloud
Azure Private Link consists of two parts: the Private Link Service exposed by Confluent Cloud and private endpoints that you configure within your Azure subscription.
To make an Azure Private Link connection to a cluster in Confluent Cloud, first, register your Azure subscription with the Confluent Cloud network for automatic approval of private endpoint connections. This adds a Private Link Access in Confluent Cloud. If required, you can register multiple subscriptions.
In the Network Management tab of the desired Confluent Cloud environment, click the For dedicated cluster tab.
Click the Confluent Cloud network to which you want to add the connection.
In the Ingress connections tab, click + Private Link Access.
Specify the following values in the fields:
Name: The name for this private link access.
Azure subscription ID: The Azure subscription ID for the account containing the VNets you want to make the Azure Private Link connection from. The Azure subscription number can be found on your Azure subscription page of the Azure portal.
Click Add.
HTTP POST request
POST https://api.confluent.cloud/networking/v1/private-link-accesses
Authentication
See Authentication.
Request specification
In the request specification, include Confluent Cloud network ID, subscription, environment, and, optionally, add the display name. Update the attributes below with the correct values.
{
   "spec":{
      "display_name":"Azure-PL-CCN-1",
      "cloud":{
         "kind":"AzurePrivateLinkAccess",
         "subscription":"00000000-0000-0000-0000-000000000000"
      },
      "environment":{
         "id":"env-abc123"
      },
      "network":{
         "id":"n-000000"
      }
   }
}
Use the confluent network private-link access create Confluent CLI command to create an Azure private link access:
confluent network private-link access create <private-link-access-name> <flags>
The following command-specific flags are supported:
--network: Required. Confluent Cloud network ID.--cloud: Required. The cloud provider. Set toazure.--cloud-account. Required. Azure subscription ID for the account. containing the VNets you want to connect from using Azure Private Link.
You can specify additional optional CLI flags described in the Confluent CLI command reference, such as --environment.
The following is an example Confluent CLI command to create a private link access:
confluent network private-link access create my-private-link-access \
  --network n-123456 \
  --cloud azure \
  --cloud-account 1234abcd-12ab-34cd-1234-123456abcdef
Use the confluent_private_link_access Confluent Terraform Provider resource to create a Private Link Access.
An example snippet of Terraform configuration:
resource "confluent_environment" "development" {
  display_name = "Development"
}

resource "confluent_network" "azure-private-link" {
  display_name     = "Azure Private Link Network"
  cloud            = "AZURE"
  region           = "centralus"
  connection_types = ["PRIVATELINK"]
  environment {
    id = confluent_environment.development.id
  }

  lifecycle {
    prevent_destroy = true
  }
}

resource "confluent_private_link_access" "azure" {
  display_name = "Azure Private Link Access"
  azure {
    subscription = "1234abcd-12ab-34cd-1234-123456abcdef"
  }
  environment {
    id = confluent_environment.development.id
  }
  network {
    id = confluent_network.azure-private-link.id
  }

  lifecycle {
    prevent_destroy = true
  }
}
See more Terraform configuration examples for creating a Private Link connection using Terraform:
When your Azure Private Link connection status transitions to Ready in the Confluent Cloud Console, configure the private endpoints in your VNet before you can connect to the cluster.
Provision Private Link endpoints in Azure
When the Private Link Access becomes ready in the Confluent Cloud Console, configure private endpoints in your VNet from the Azure portal to make the Azure Private Link connection to your Confluent Cloud cluster.
For Confluent Cloud single availability zone clusters, create a single private endpoint to the Confluent Cloud Service Alias for the Kafka cluster zone.
For Confluent Cloud multi-availability zone clusters, create three private endpoints, one endpoint to each of the Confluent Cloud zonal Service Aliases.
To set up the VNet endpoint for Azure Private Link in your Azure account:
In the Confluent Cloud Console, gather the following information in Cluster Overview.
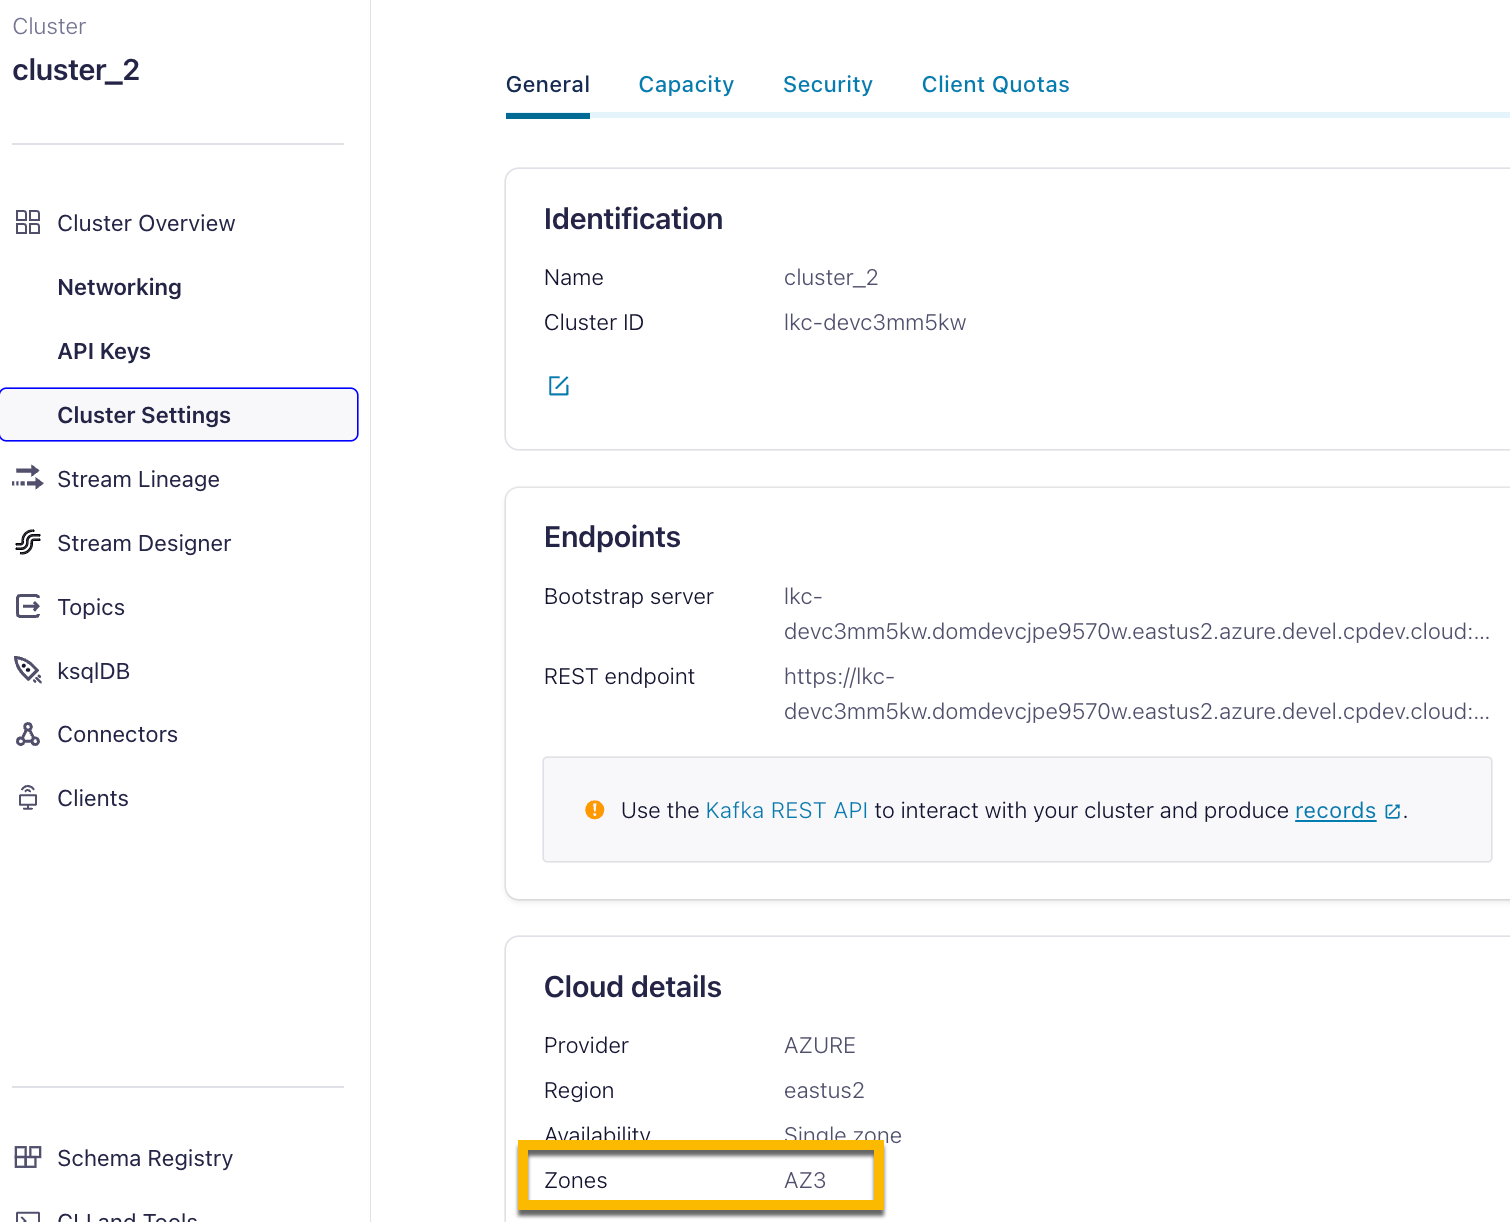
In Cluster Settings:
Bootstrap server endpoint in the Endpoints section
Zones in the Cloud details section
The availability zones of the Kafka cluster.
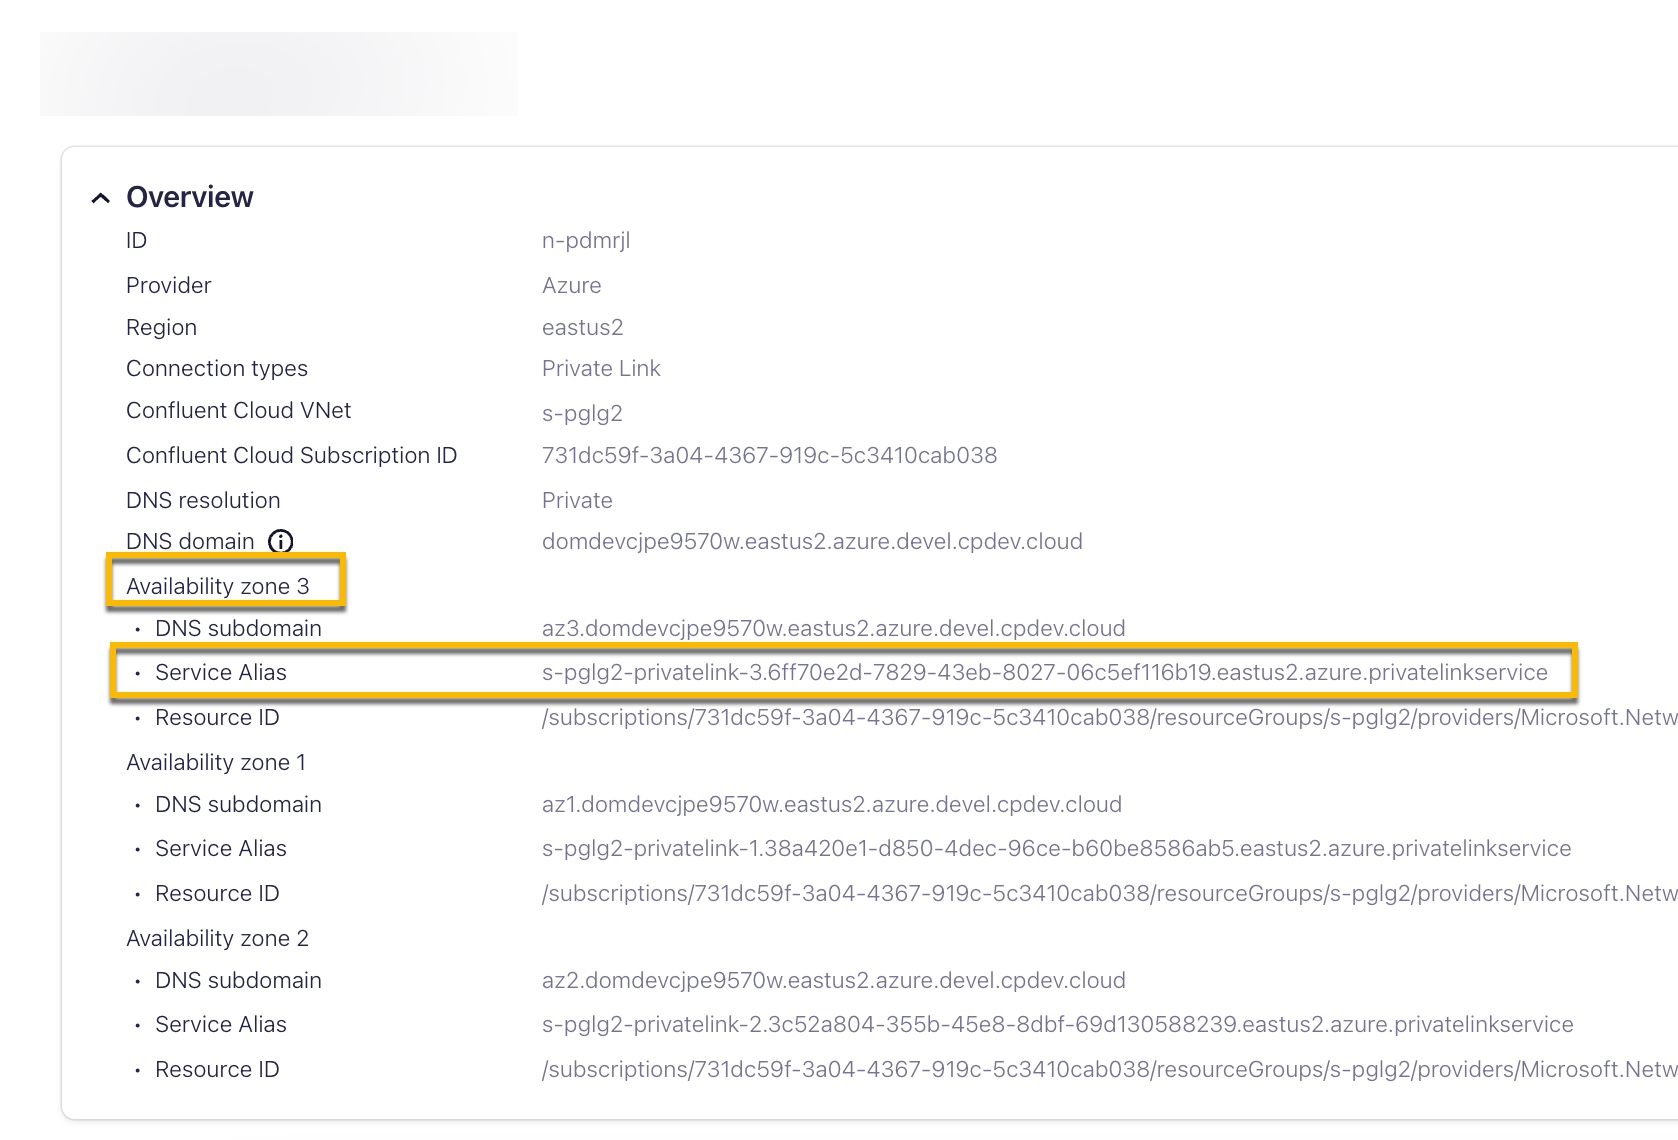
In Networking > Details:
DNS domain
DNS subdomain
Service aliases
For single availability zone clusters, you only need the Service Alias of the Kafka cluster zone (Zones) that you retrieved in Cluster Settings > Cloud details. above.
In the Azure Private Link Center, click Create private endpoint.
Specify the required fields as described in Create a private endpoint.
Selected Subscription must be the name of the subscription ID that you registered with Confluent Cloud in Add a Private Link Access in Confluent Cloud. You can check it on the Portal Subscriptions page.
Name: Specify an instance name.
Network Interface Name: Use the default given.
Region: Select the same region as the Confluent Cloud Private Link Access.
Click Next: Resource.
Connection method: Select the Connect to an Azure resource by resource ID or alias.
Resource ID or alias: Specify the Confluent Cloud Service Alias. and click Next.
You can find the Confluent Cloud Service Aliases on the Confluent Cloud Console, in the Networking tab under Cluster settings.
For a Confluent Cloud single availability zone cluster, use the Service Alias for the Kafka cluster availability zone.
For a Confluent Cloud multi-availability zone cluster, use the Confluent Cloud zonal Service Alias for each private endpoint. Note that you need three private endpoints.
Click Next: Virtual Network.
Virtual network: The virtual network where the private endpoint is to be created.
Subnet: The subnet where the private endpoint is to be created.
Select the subnets in the same region as your Confluent Cloud network from the Networking tab in the Confluent Cloud Console.
Network policy for private endpoints: Select the organization-approved or mandated policy. The default is Disabled.
Click Review + create. Review the details and click Create to create the private endpoint.
Wait for the Azure deployment to complete, go to the private endpoint resource, and verify the private endpoint connection status is Approved.
Set up DNS records in Azure
You must update your DNS records to ensure connectivity passes through Azure Private Link in the supported pattern. Any DNS provider that can ensure DNS is routed as follows is acceptable. Azure Private DNS Zone (used in this example) is one option.
DNS resolution options
For Azure Private Link Confluent Cloud networks, you can use the public or private DNS resolution:
The private DNS resolution is the recommended option and guarantees fully private DNS resolution.
The public DNS resolution is useful when you want to ensure that Confluent deployments are homogenous and conform to DNS configurations for your networks.
DNS resolution is selected when you create a Confluent Cloud network, and it cannot be modified after creating the Confluent Cloud network. See Create a Confluent Cloud network.
Public DNS resolution
The public (also known as chased private in Confluent Cloud) DNS resolution is used for the bootstrap server and broker hostnames of a Confluent Cloud cluster that is using Azure Private Link. When the public resolution is used, the clusters in this network require both public and private DNS to resolve cluster endpoints.
Only the Confluent Global DNS Resolver (GLB) endpoints are advertised.
The public DNS resolution performs the following two-step process:
The Confluent Cloud Global DNS Resolver removes the
glbsubdomain and returns a CNAME for your bootstrap and broker hostnames.Example:
$lkc-id-$nid.$region.$cloud.glb.confluent.cloudCNAME returned:
$lkc-id.$nid.$region.$cloud.confluent.cloudThe CNAME resolves to your VNet private endpoints based on the Private DNS Zone configuration.
Warning
Some DNS systems, like Windows DNS service, lack the ability to recursively resolve the previously mentioned two-step process within a single DNS node. To solve the issue, use Private DNS resolution.
Private DNS resolution
When the private DNS resolution is used, the clusters in this network only require private DNS to resolve cluster endpoints. Only non-GLB endpoints are advertised.
Create a DNS zone and DNS records
DNS entries need to be created for Private Link irrespective of the DNS resolution option you selected when creating the Confluent Cloud network. These DNS records map the Confluent Cloud DNS names to the Azure private endpoint addresses.
To update DNS resolution using Azure Private DNS Zone:
Browse to the Azure portal.
Create a Private DNS zone for the Private Link.
Search for the Private DNS zone resource in the Azure portal.
Click + Create.
Specify the required fields as described in Create a DNS zone.
Name: Use the Confluent Cloud DNS domain value from the Networking under Cluster Overview in the Confluent Cloud Console.
Note that there is no glb in the DNS Domain name.
If the Confluent Cloud DNS Domain name includes the logical cluster ID which starts with
lkc-, omit the logical cluster id when specifying it as the Private DNS Zone name. For example, the DNS Domain name shown aslkc-123abc-4kgzg.centralus.azure.confluent.cloudin Confluent Cloud should be converted to4kgzg.centralus.azure.confluent.cloudto be used as the Private DNS Zone name.
Click Review + create.
Wait for the Azure deployment to complete.
(Optional) To identify the correct mapping of DNS zone records to zonal endpoints for Confluent Cloud, you can run the DNS helper script from your VM instance within the VNet.
You specify the Azure resource group name, and one or more private endpoints as arguments. You can find these values form the networking detail page in the Confluent Cloud Console.
The output contains the Azure domain names, the record types, and the DNS values that you can input when you create DNS records. For example:
./dns-endpoints.sh my-resource-group private-endpoint-1 private-endpoint-2 private-endpoint-3

*              A    10.0.0.2 10.0.0.3 10.0.0.4
*.az2          A    10.0.0.2
*.az1          A    10.0.0.3
*.az3          A    10.0.0.4
Add DNS records.
Create required DNS records as described in Manage DNS records and record sets by using the Azure portal.
Go to the Private DNS Zone resource as created above.
Click + Record set.
Create the record set for bootstrap endpoint resolution.
The bootstrap DNS record should contain three zonal endpoints IPs to resolves to all three zonal endpoints that you created in Provision Private Link endpoints in Azure.
Name:
*Type:
ATTL:
1TTL unit:
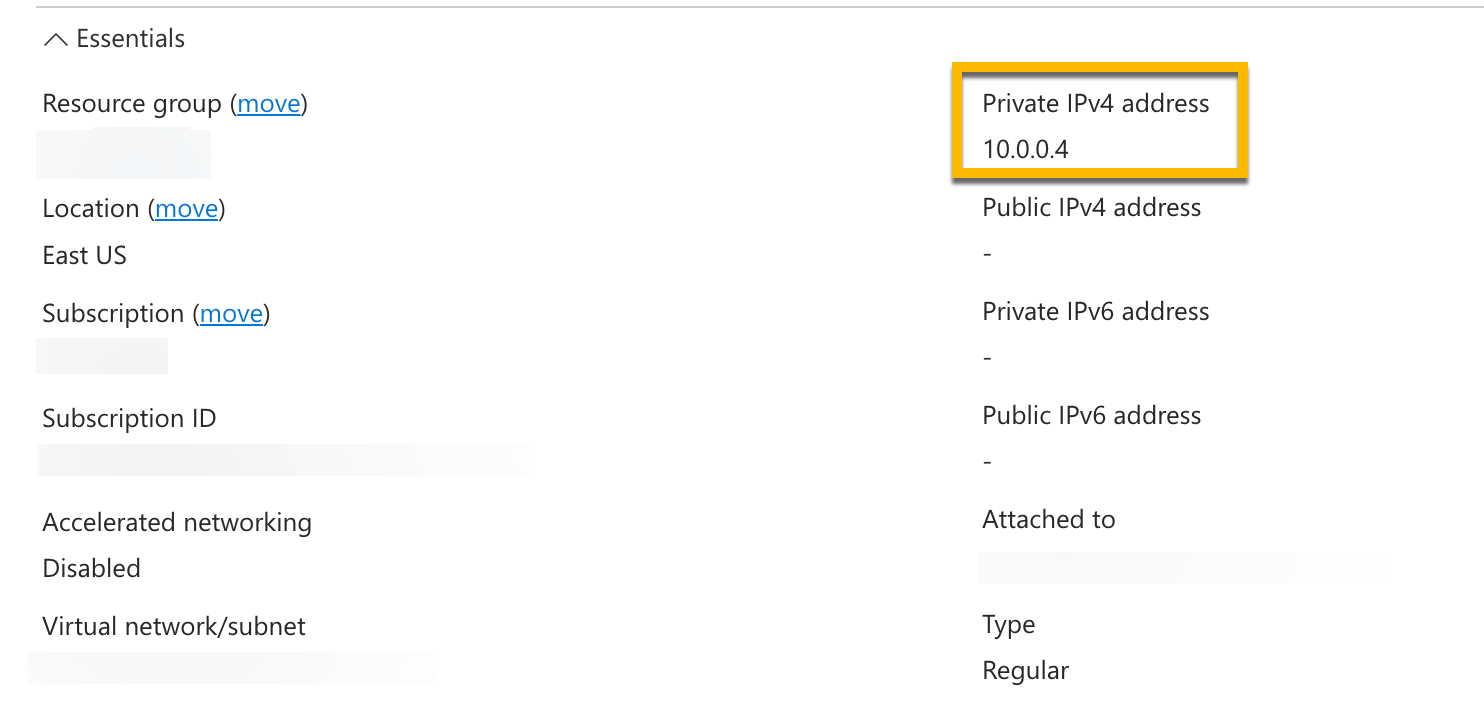
MinuteIP address: The IP addresses of the Azure private endpoints.
The IP address of an Azure private endpoint can be found under its associated Network interface.
Create three zonal DNS records, one zonal DNS record per availability zone of the Confluent Cloud network.
Note
Some Azure regions (for example, Jio India West) only support a single availability zone. In these regions, zone selection is not available.
The IP address of the private endpoint can be found under its associated network interface.
Zonal DNS record #1
Name:
*.az1Type:
ATTL:
1TTL unit:
MinuteIP address: IP address of the
az1private endpoint as created above.
Zonal DNS record #2
Name:
*.az2Type:
ATTL:
1TTL unit:
MinuteIP address: IP address of the
az2private endpoint as created above.
Zonal DNS record #3
Name:
*.az3Type:
ATTL:
1TTL unit:
MinuteIP address: IP address of the
az3private endpoint as created above.
Note
In Confluent Cloud with private linking, Kafka broker names you retrieve from the metadata are not static. Do not hardcode the broker names in DNS records.
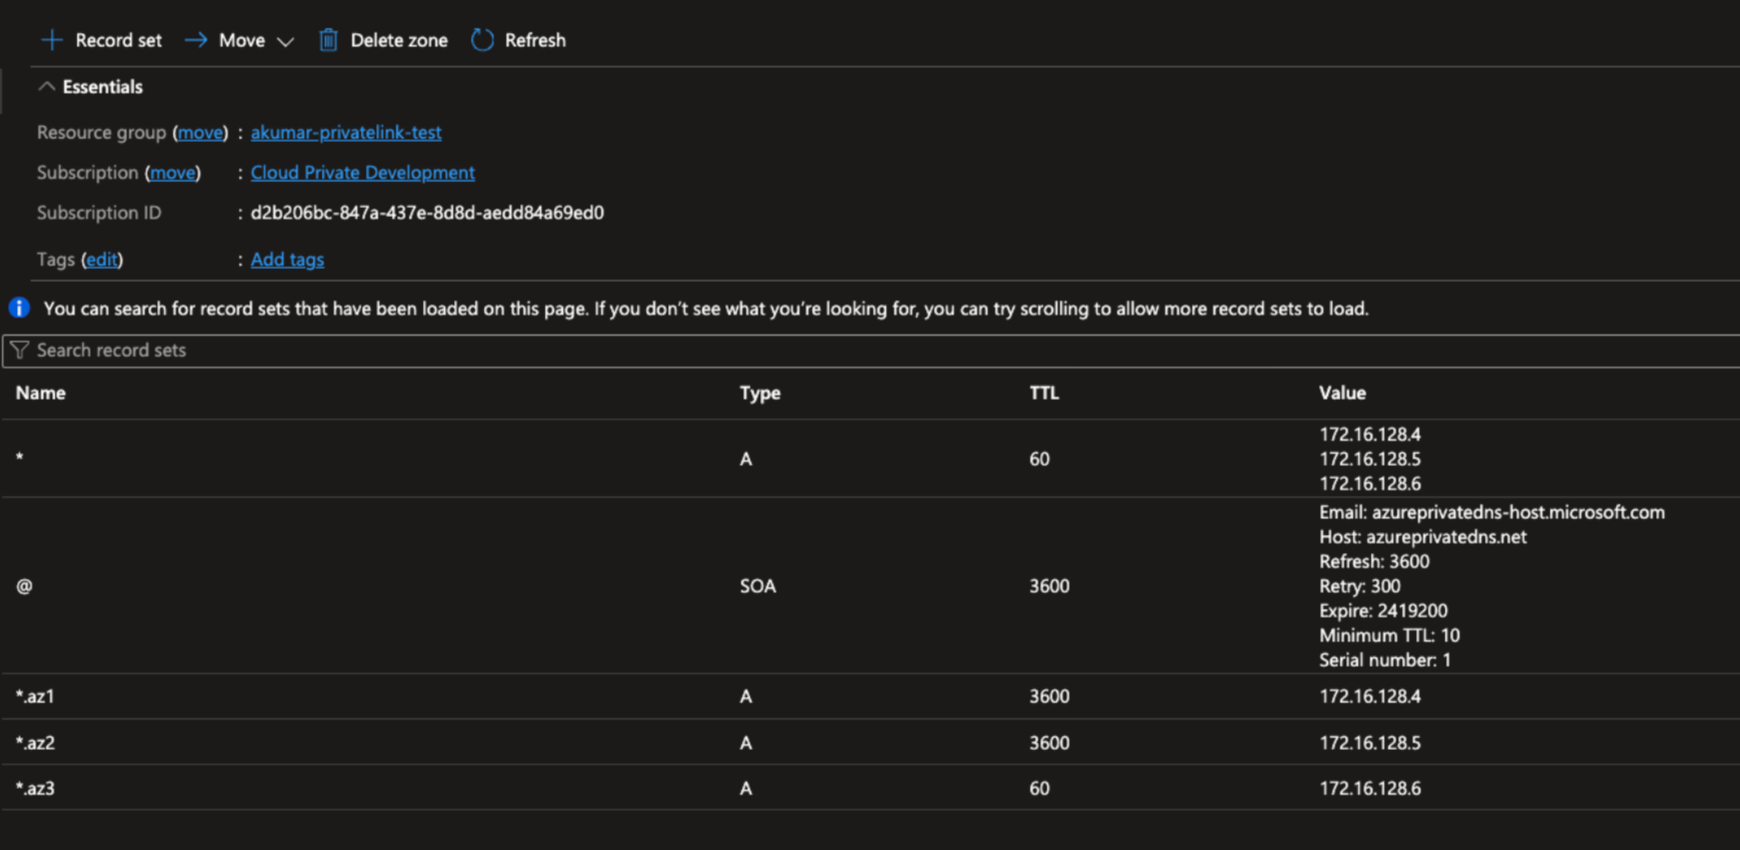
The following are example DNS record sets.
Attach the Private DNS Zone to the VNets where clients or applications are present.
Go to the Private DNS Zone resource and click Virtual network links under Settings.
Click Add.
Fill in Link name, Subscription, and Virtual network.
Click OK.
Your cluster is now ready for use. If you encounter any problem, refer to troubleshoot connectivity issues.