
Get Started with Client Quotas in Confluent Cloud
Confluent Cloud client quotas are throughput limits that you apply to specific service account or identity pool principals on a Apache Kafka® cluster. For multi-tenancy and client quotas concepts, see Multi-Tenancy and Client Quotas on Confluent Cloud.
You can create, update, list, and delete client quotas using the Confluent CLI, the Confluent Cloud Console, or the Terraform Provider for Confluent.
Prerequisites
Access to a Confluent Cloud administrator account.
A service account or identity pool with permissions to the cluster. To create a service account, see Create Service Accounts on Confluent Cloud.
An Enterprise, Freight, or Dedicated cluster. Client quotas are not available on Basic or Standard clusters.
For the Confluent CLI method, the Confluent CLI installed. For the Terraform method, the Terraform Provider for Confluent installed.
Create a client quota
A client quota requires the following fields:
A quota name
The target Kafka cluster ID
Ingress throughput limit, in bytes
Egress throughput limit, in bytes
One or more principal IDs (service accounts or identity pools)
Use values of at least 1 MB (1,000,000 bytes) per second for ingress and egress. A single quota can apply to multiple principals: specify them as a comma-separated list with no spaces, and you can mix service accounts and identity pools.
The following example creates a quota named test-quota for a service account principal:
confluent kafka quota create test-quota --cluster lkc-12345 \
                            --ingress 1000000 --egress 1000000 \
                            --description "Test Quota" \
                            --principals sa-12345
To use an identity pool principal, replace sa-12345 with the pool ID, such as pool-abcde. To apply the quota to multiple principals, separate them with commas, such as sa-12345,pool-abcde.
The output looks similar to the following:
+--------------+-------------+
| ID           | cq-abcde    |
| Display Name | test-quota  |
| Description  | Test Quota  |
| Ingress      | 1000000 B/s |
| Egress       | 1000000 B/s |
| Cluster      | lkc-12345   |
| Principals   | sa-12345    |
+--------------+-------------+
Sign in to your Confluent Cloud account. Select the environment and cluster where you want to set a client quota.
From the navigation menu, select Cluster settings. If your cluster type supports client quotas (Enterprise, Freight, or Dedicated), a Client Quotas tab appears.
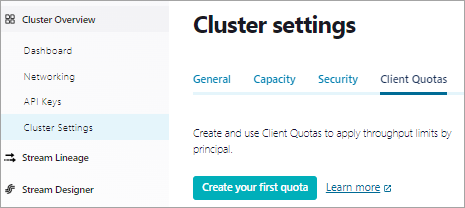
Select Client Quotas, then click Create your first quota.
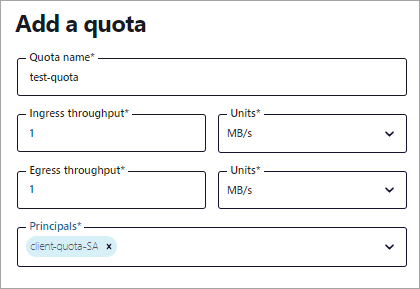
Specify the Quota name, Ingress throughput, and Egress throughput, and select the units (MB/s or KB/s). For Principals, select the service account or identity pool that you created as a prerequisite.
Click Submit to create the quota.
Use the following Terraform configuration to create a quota:
# Configure the Confluent Provider
terraform {
  required_providers {
    confluent = {
      source  = "confluentinc/confluent"
    }
  }
}
provider "confluent" {
  cloud_api_key    = var.confluent_cloud_api_key    # optionally use CONFLUENT_CLOUD_API_KEY env var
  cloud_api_secret = var.confluent_cloud_api_secret # optionally use CONFLUENT_CLOUD_API_SECRET env var
}
...
resource "confluent_kafka_client_quota" "example" {
  display_name = "test-quota"
  description  = "Test Quota"
  throughput {
    ingress_byte_rate = "1000000"
    egress_byte_rate  = "1000000"
  }
  principals = ["sa-12345", "sa-abc456", "pool-xyz111"]
  kafka_cluster {
    id = "lkc-12345"
  }
  environment {
    id = "env-a12b34"
  }
  lifecycle {
    prevent_destroy = true
  }
}
# Create more resources ...
You must provide appropriate Confluent Cloud credentials to use the provider.
Manage client quotas
List your quotas to verify that the new quota was created:
confluent kafka quota list --cluster lkc-12345
Use the update command to change a quota. The update subcommand can change the display name, description, ingress and egress limits, and the principal list. For example, to add or remove a principal:
confluent kafka quota update cq-abcde --add-principals sa-12345
confluent kafka quota update cq-abcde --remove-principals sa-12345
Use the delete command to delete a quota:
confluent kafka quota delete cq-abcde
From the Client Quotas page, you can view, edit, or delete the quotas for a cluster.
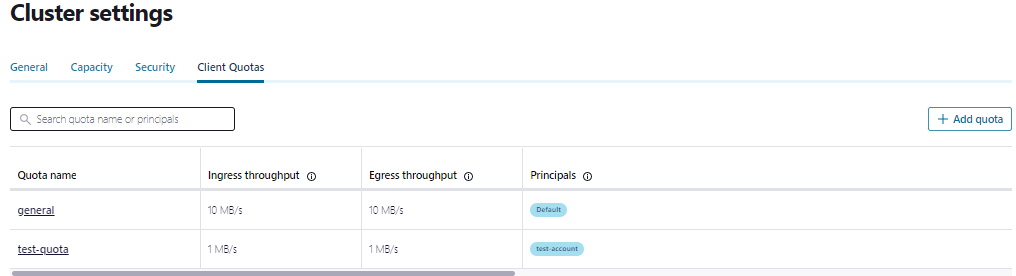
To edit a quota, select its name in the list, then click Edit quota. When edits are complete, click Confirm.
To delete a quota, click Delete quota, enter the quota name, and click Confirm.
Note
Cloud Console displays the first 100 quotas for each Kafka cluster. If you have more than 100 quotas on a cluster, use the API or Confluent CLI to view all of them.
To update or delete a quota, edit the confluent_kafka_client_quota resource in your configuration, then apply the change.