
Query Iceberg Tables with Snowflake and Tableflow in Confluent Cloud
Tableflow enables seamless integration with Snowflake® by materializing Apache Flink® topics into Apache Iceberg™ tables, which you can query directly in Snowflake. By leveraging Snowflake’s externally managed Iceberg table capabilities, Tableflow publishes metadata to its built-in Iceberg REST Catalog or compatible external catalog, like AWS Glue, which ensures efficient, query-ready access to streaming data.
You can use Snowflake with the Tableflow Catalog, or you can use Snowflake with the AWS Glue Data Catalog.
- Use Snowflake with Tableflow Catalog
- Use Snowflake with Snowflake Open Catalog
- Use Snowflake with AWS Glue Data Catalog integration
Prerequisites
Tableflow is enabled for the topic you plan to materialize into a table, by completing steps 1-4 in the Tableflow Quick Start.
Docker is installed and running in your development environment.
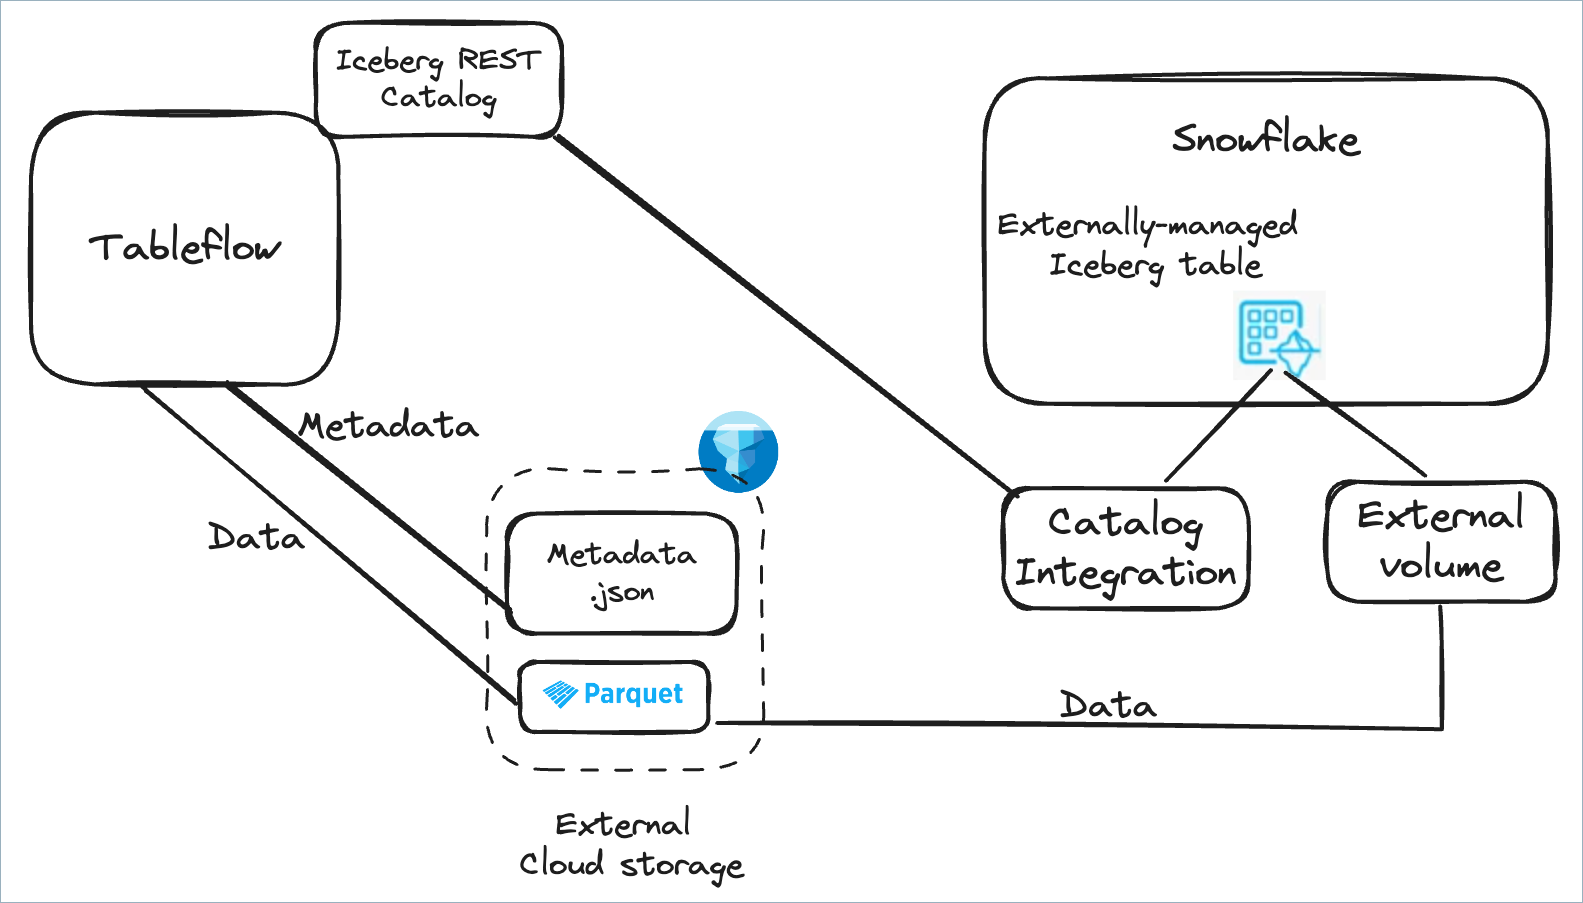
Use Snowflake with Tableflow Catalog
An Iceberg REST catalog integration enables Snowflake to access Iceberg tables managed in a remote catalog that complies with the open-source Iceberg REST OpenAPI specification. This means that you can access Confluent Tableflow’s Iceberg tables by using the built-in Iceberg REST Catalog.
Step 1: Enable access to your S3 bucket
Enable Snowflake access to your S3 bucket by following the Snowflake documentation, and obtain the following properties for the storage bucket.
STORAGE_BASE_URL
STORAGE_AWS_ROLE_ARN
STORAGE_AWS_EXTERNAL_ID
Step 2: Create a Snowflake external volume
In Snowflake, run the following query to create a Snowflake external volume. Use the values from the previous step in the storage locations properties.
CREATE OR REPLACE EXTERNAL VOLUME stock-trades-volume
    STORAGE_LOCATIONS =
       (
           (
               NAME = 'tableflow-quickstart-storage'
               STORAGE_PROVIDER = 'S3'
               STORAGE_BASE_URL = 's3://tableflow-quickstart-storage'
               STORAGE_AWS_ROLE_ARN = '<role-arn>'
               STORAGE_AWS_EXTERNAL_ID = '<external-id>'
           )
       )
ALLOW_WRITES = FALSE;
In Snowflake, run the following command.
DESCRIBE EXTERNAL VOLUME stock-trades-volume
From the result, get the following properties and provide them to the Confluent Tableflow team to update the trust policies of the S3 bucket.
STORAGE_AWS_IAM_USER_ARN
STORAGE_AWS_EXTERNAL_ID
Step 3: Create the Snowflake catalog integration
Run the following query to create the Snowflake catalog integration. For the
CATALOG_URI,OAUTH_CLIENT_ID, andOAUTH_CLIENT_SECRETproperties, use the values you obtained previously.CREATE OR REPLACE CATALOG INTEGRATION tableflow_rest_catalog_integration CATALOG_SOURCE=ICEBERG_REST TABLE_FORMAT=ICEBERG CATALOG_NAMESPACE='<cluster-id>' REST_CONFIG = ( CATALOG_URI = '<tableflow-catalog-uri>' CATALOG_API_TYPE = PUBLIC ) REST_AUTHENTICATION=( TYPE=OAUTH OAUTH_CLIENT_ID='<oauth-client-id>' OAUTH_CLIENT_SECRET='<oauth-client-secret>' OAUTH_ALLOWED_SCOPES=('catalog') ) ENABLED=true;
Step 4: Create the Iceberg table
Create the Iceberg table using the external volume and Snowflake catalog integration you created in the previous steps. Replace <kafka-topic-name> with tableflow-ea-stock-trades.
CREATE OR REPLACE ICEBERG TABLE snowflake_stock_trades
    EXTERNAL_VOLUME = 'stock-trades-volume'
    CATALOG = 'tableflow_rest_catalog_integration'
    CATALOG_TABLE_NAME = '<kafka-topic-name>'
Step 5: Query the Iceberg table
Run the following statement to query the Iceberg table:
SELECT * from snowflake-stock-trades;
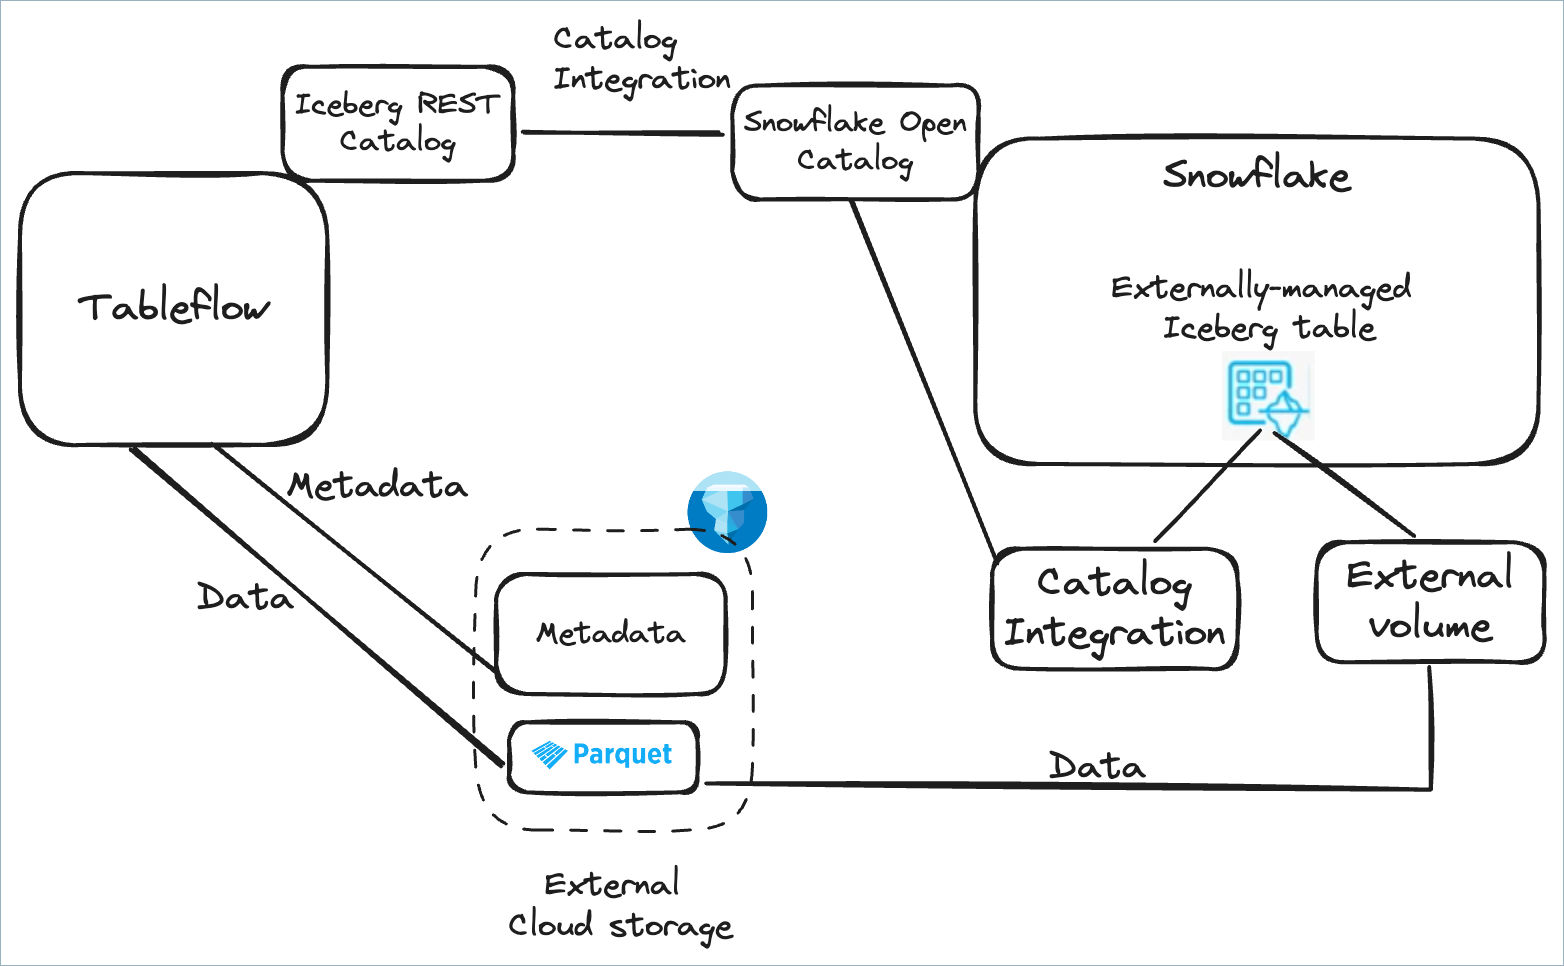
Use Snowflake with Snowflake Open Catalog
You can use the Snowflake Open Catalog as the Iceberg catalog to query Iceberg tables created by Tableflow.
Configure the Snowflake Open Catalog as an external catalog by using catalog integration in Tableflow. This enables the metadata of Iceberg tables materialized by Tableflow to be published to the Snowflake Open Catalog.
Create a Snowflake catalog integration with Snowflake Open Catalog to enable seamless access.
Configure Tableflow catalog integration for Snowflake Open Catalog by following the steps in Integrate Tableflow with Snowflake Open Catalog or Apache Polaris
To query Tableflow Iceberg tables published to Snowflake Open Catalog, you must create an external volume using the same storage bucket you used to store Iceberg tables by following the steps in Configure an external volume for Amazon S3.
To use Snowflake to query your Iceberg tables, you must create a catalog integration in Snowflake pointing to the Snowflake Open Catalog service by running the following query.
CREATE OR REPLACE CATALOG INTEGRATION my_snowflake_open_catalog_int
  CATALOG_SOURCE=POLARIS
  TABLE_FORMAT=ICEBERG
  CATALOG_NAMESPACE='<kafka-cluster-id>'
  REST_CONFIG = (
     CATALOG_URI ='https://<org-name>-<my-snowflake-open-catalog-account-name>.snowflakecomputing.com/polaris/api/catalog'
     WAREHOUSE = 'my_tableflow_ext_catalog'
  )
  REST_AUTHENTICATION = (
     TYPE=OAUTH
     OAUTH_CLIENT_ID='<my_client_id>'
     OAUTH_CLIENT_SECRET='<my_client_secret>'
     OAUTH_ALLOWED_SCOPES=('PRINCIPAL_ROLE:my_polaris_principal_role')
  )
  ENABLED=true;
Run the following query to create an externally managed Iceberg table.
CREATE ICEBERG TABLE open_catalog_orders_iceberg_table
  CATALOG = 'my_snowflake_open_catalog_int'
  EXTERNAL_VOLUME = 'my_tableflow_data_volume'
  CATALOG_TABLE_NAME = 'orders_topic';
Run the following query to query your data.
SELECT * FROM open_catalog_orders_iceberg_table;
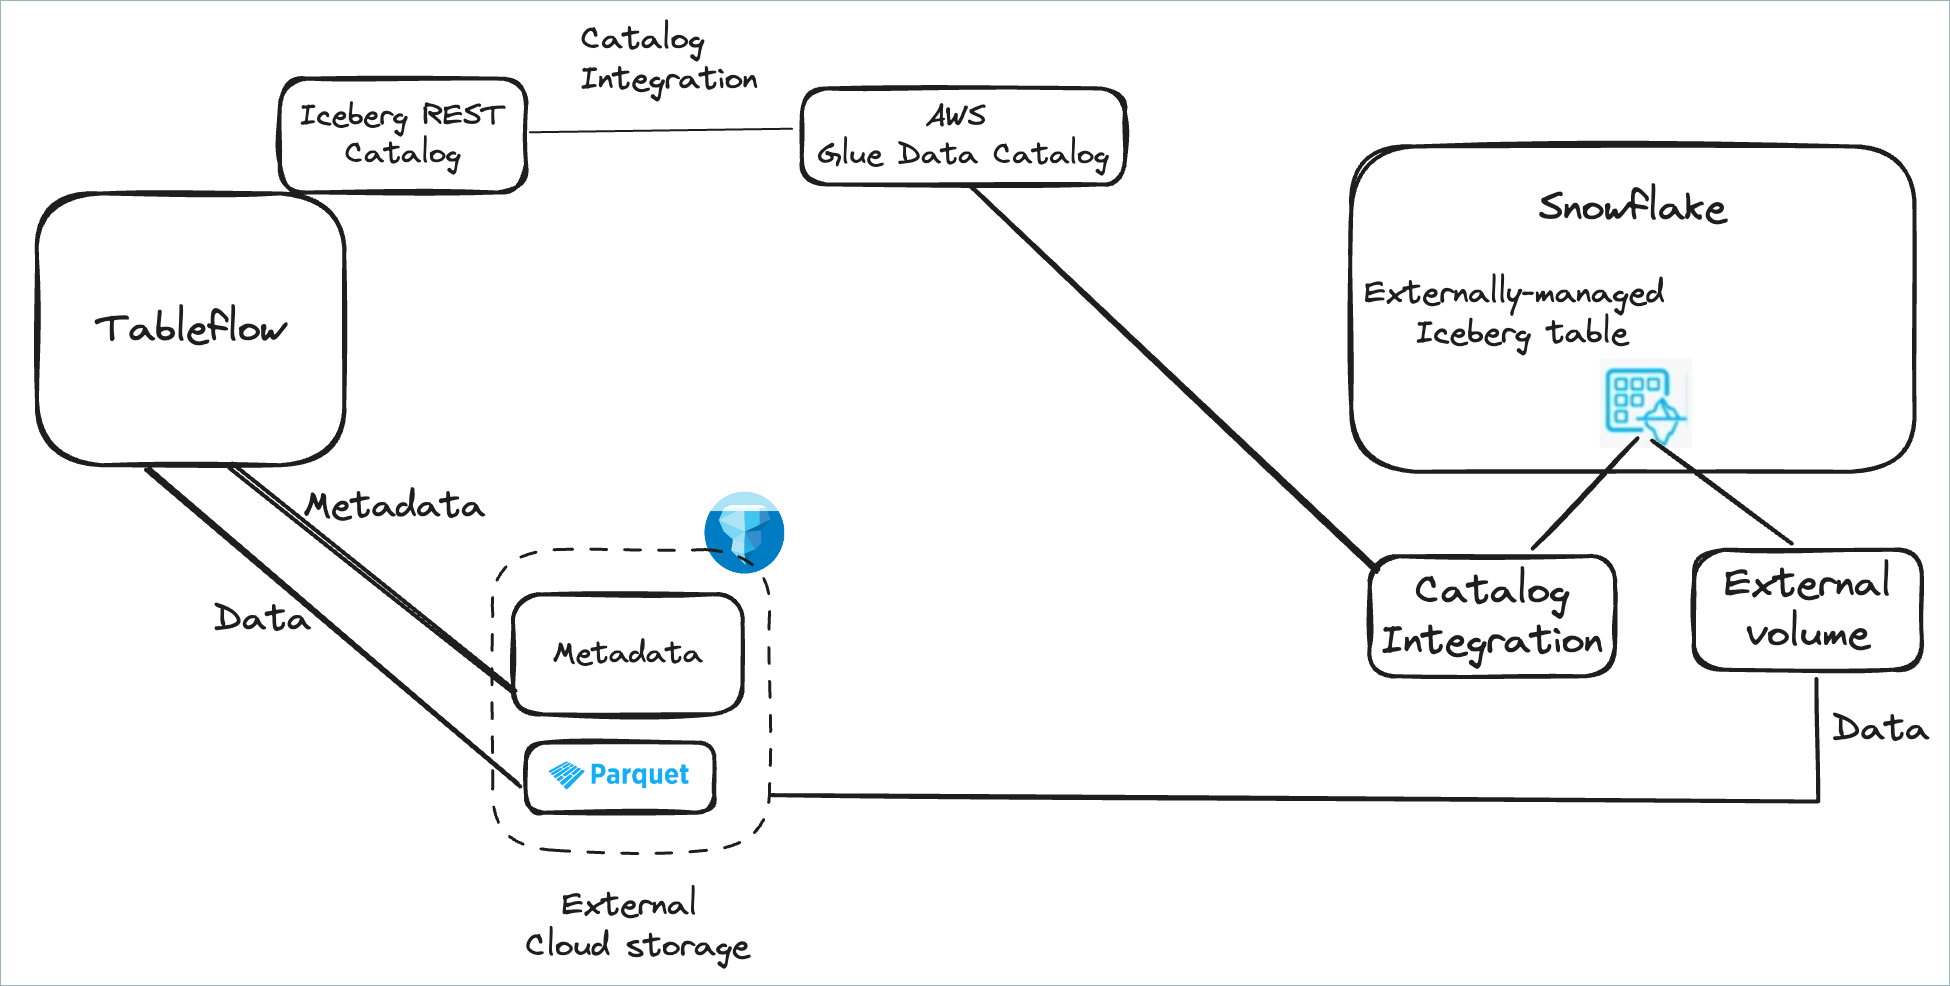
Use Snowflake with AWS Glue Data Catalog integration
You can use the AWS Glue Data Catalog as the Iceberg catalog to query Iceberg tables created by Tableflow. To do this, first configure the AWS Glue Data Catalog as an external catalog. This enables the metadata of Iceberg tables materialized by Tableflow to be published to AWS Glue. Next, create a Snowflake catalog integration with AWS Glue to enable seamless access.
Step 1: Configure AWS Glue Data Catalog integration in Tableflow
To consume Tableflow tables in Snowflake with the AWS Glue Data Catalog, configure AWS Glue Catalog Integration.
Step 2: Create a Snowflake external volume and Snowflake catalog integration
Follow these steps to create a Snowflake external volume and Snowflake catalog integration.
Step 3: Configure access permissions for the AWS Glue Data Catalog
Configure access permission in AWS to enable Snowflake and AWS Glue Data Catalog connectivity by following the instructions in the Snowflake documentation.
Step 4: Create a Catalog integration in Snowflake
In Snowflake, run the following SQL query to create a Snowflake catalog integration for the AWS Glue Data Catalog.
CREATE CATALOG INTEGRATION myGlueCatalogIntegration
  CATALOG_SOURCE = GLUE
  CATALOG_NAMESPACE = '<catalog-namespace>'
  TABLE_FORMAT = ICEBERG
  GLUE_AWS_ROLE_ARN = '<arn-for-aws-role-to-assume>'
  GLUE_CATALOG_ID = '<glue-catalog-id>'
  GLUE_REGION = '<aws-region-of-the-glue-catalog>'
  ENABLED = TRUE;
Step 5: Retrieve the AWS IAM user and external ID for your Snowflake account
Obtain the AWS IAM user ARN and external ID for your Snowflake account by following the instructions in the Snowflake documentation.
Step 6: Grant the IAM user permissions to access the AWS Glue Data Catalog
Update the trust policy for the same IAM role that you specified with the ARN when you created the catalog integration, by following the instructions in the Snowflake documentation.
Step 7: Create an Iceberg table
Create the Iceberg table using the external volume and Snowflake catalog integration that you created in Step 3. Replace <kafka-topic-name> with tableflow-stock-trades.
CREATE OR REPLACE ICEBERG TABLE snowflake_stock_trades
  EXTERNAL_VOLUME = 'stock-trades-volume'
  CATALOG = 'myGlueCatalogIntegration'
  CATALOG_TABLE_NAME = '<kafka-topic-name>'
Step 8: Query the Iceberg table
Run the following statement to query the Iceberg table.
SELECT * from snowflake-stock-trades;