

Integrate Tableflow with the AWS Glue Data Catalog in Confluent Cloud
Tableflow enables you to integrate the AWS Glue Data Catalog as an external catalog, making the Apache Iceberg™ tables that Tableflow materializes accessible to any query or compute engine that uses the Glue Data Catalog. Tableflow integrates with the Glue Data Catalog in these ways:
External catalog sync: Tableflow publishes the metadata of its Iceberg tables into your Glue Data Catalog and keeps it up to date. Tables appear as native Glue tables that any Glue-integrated engine can consume.
Catalog federation: You create a federated catalog in AWS Lake Formation that reads table metadata live from the Tableflow Iceberg REST Catalog at query time. No metadata is copied. Lake Formation governs access.
In these cases, the Tableflow catalog remains the single source of truth, table data stays in your storage bucket, and you must consume the tables as read-only. Integrating with the AWS Glue Data Catalog is only available to clusters running in AWS.
The following table compares the two methods:
Decision factor |
External catalog sync |
Catalog federation |
|---|---|---|
Engine compatibility |
Broadest. Any Glue-integrated engine. |
AWS analytics services using Lake Formation. |
Scoping |
Per cluster. |
Environment-wide. |
Metadata |
Copied to Glue and kept in sync. |
Read live at query time. Never copied. |
External catalog sync
Tableflow publishes the metadata of the Iceberg tables it materializes to AWS Glue, making the tables accessible to any Iceberg-compatible query or compute engine that uses the AWS Glue Data Catalog. You must consume these tables as read-only.
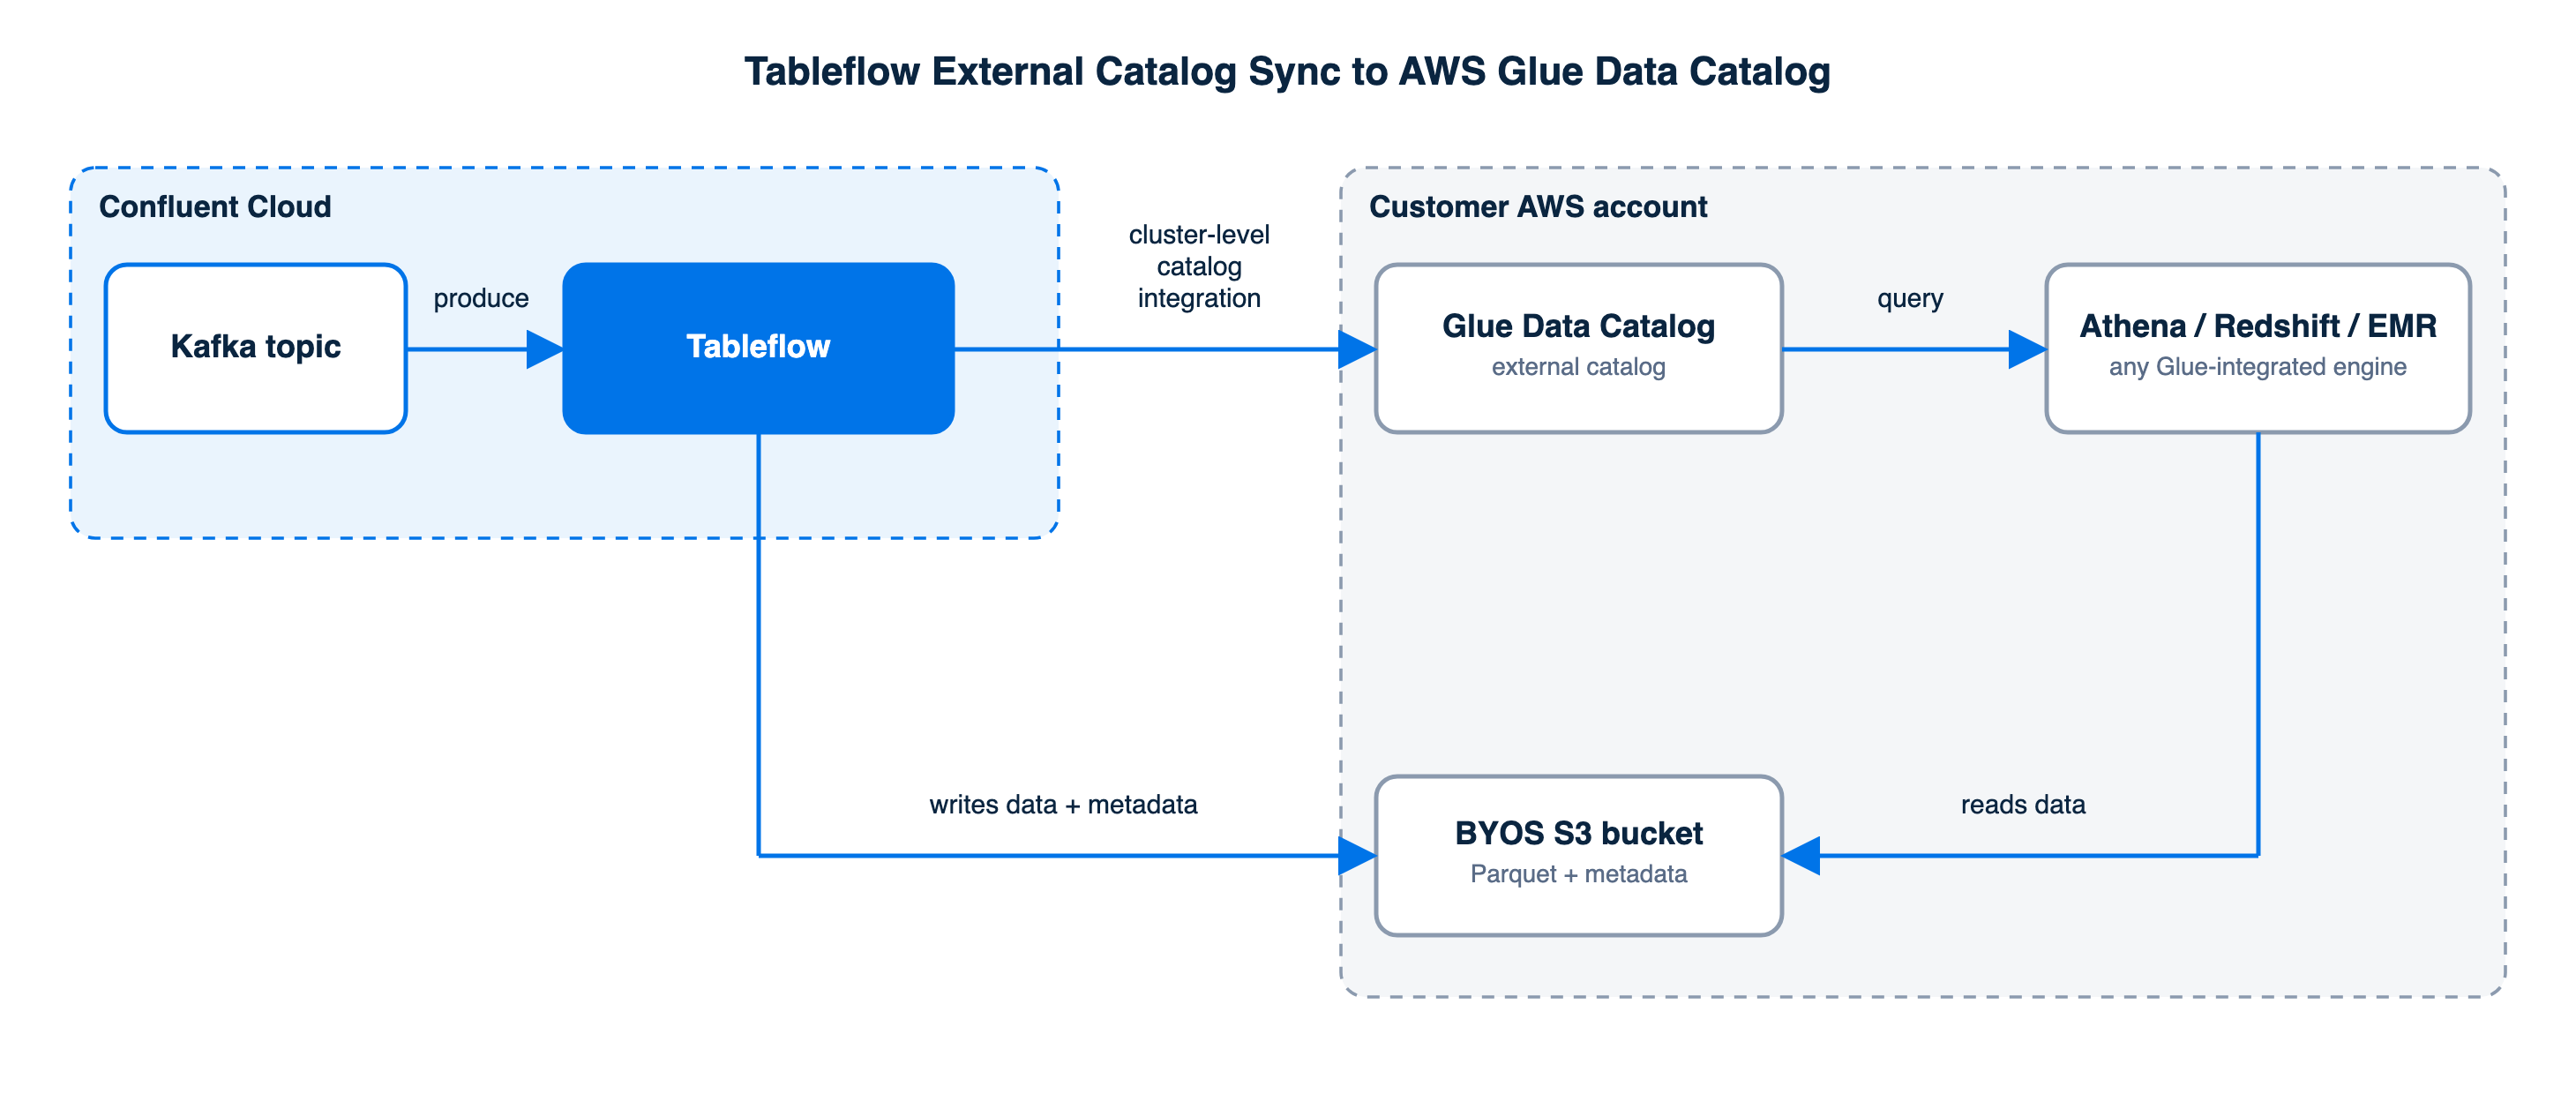
External catalog sync uses a catalog integration, which is a Confluent Cloud resource created at the cluster level that connects Tableflow to an external catalog such as AWS Glue. The integration automatically publishes all Tableflow-enabled topics of the cluster as tables in Glue and keeps their metadata up to date. As shown in the following diagram, the database name maps to the cluster ID and each table name maps to the topic name.
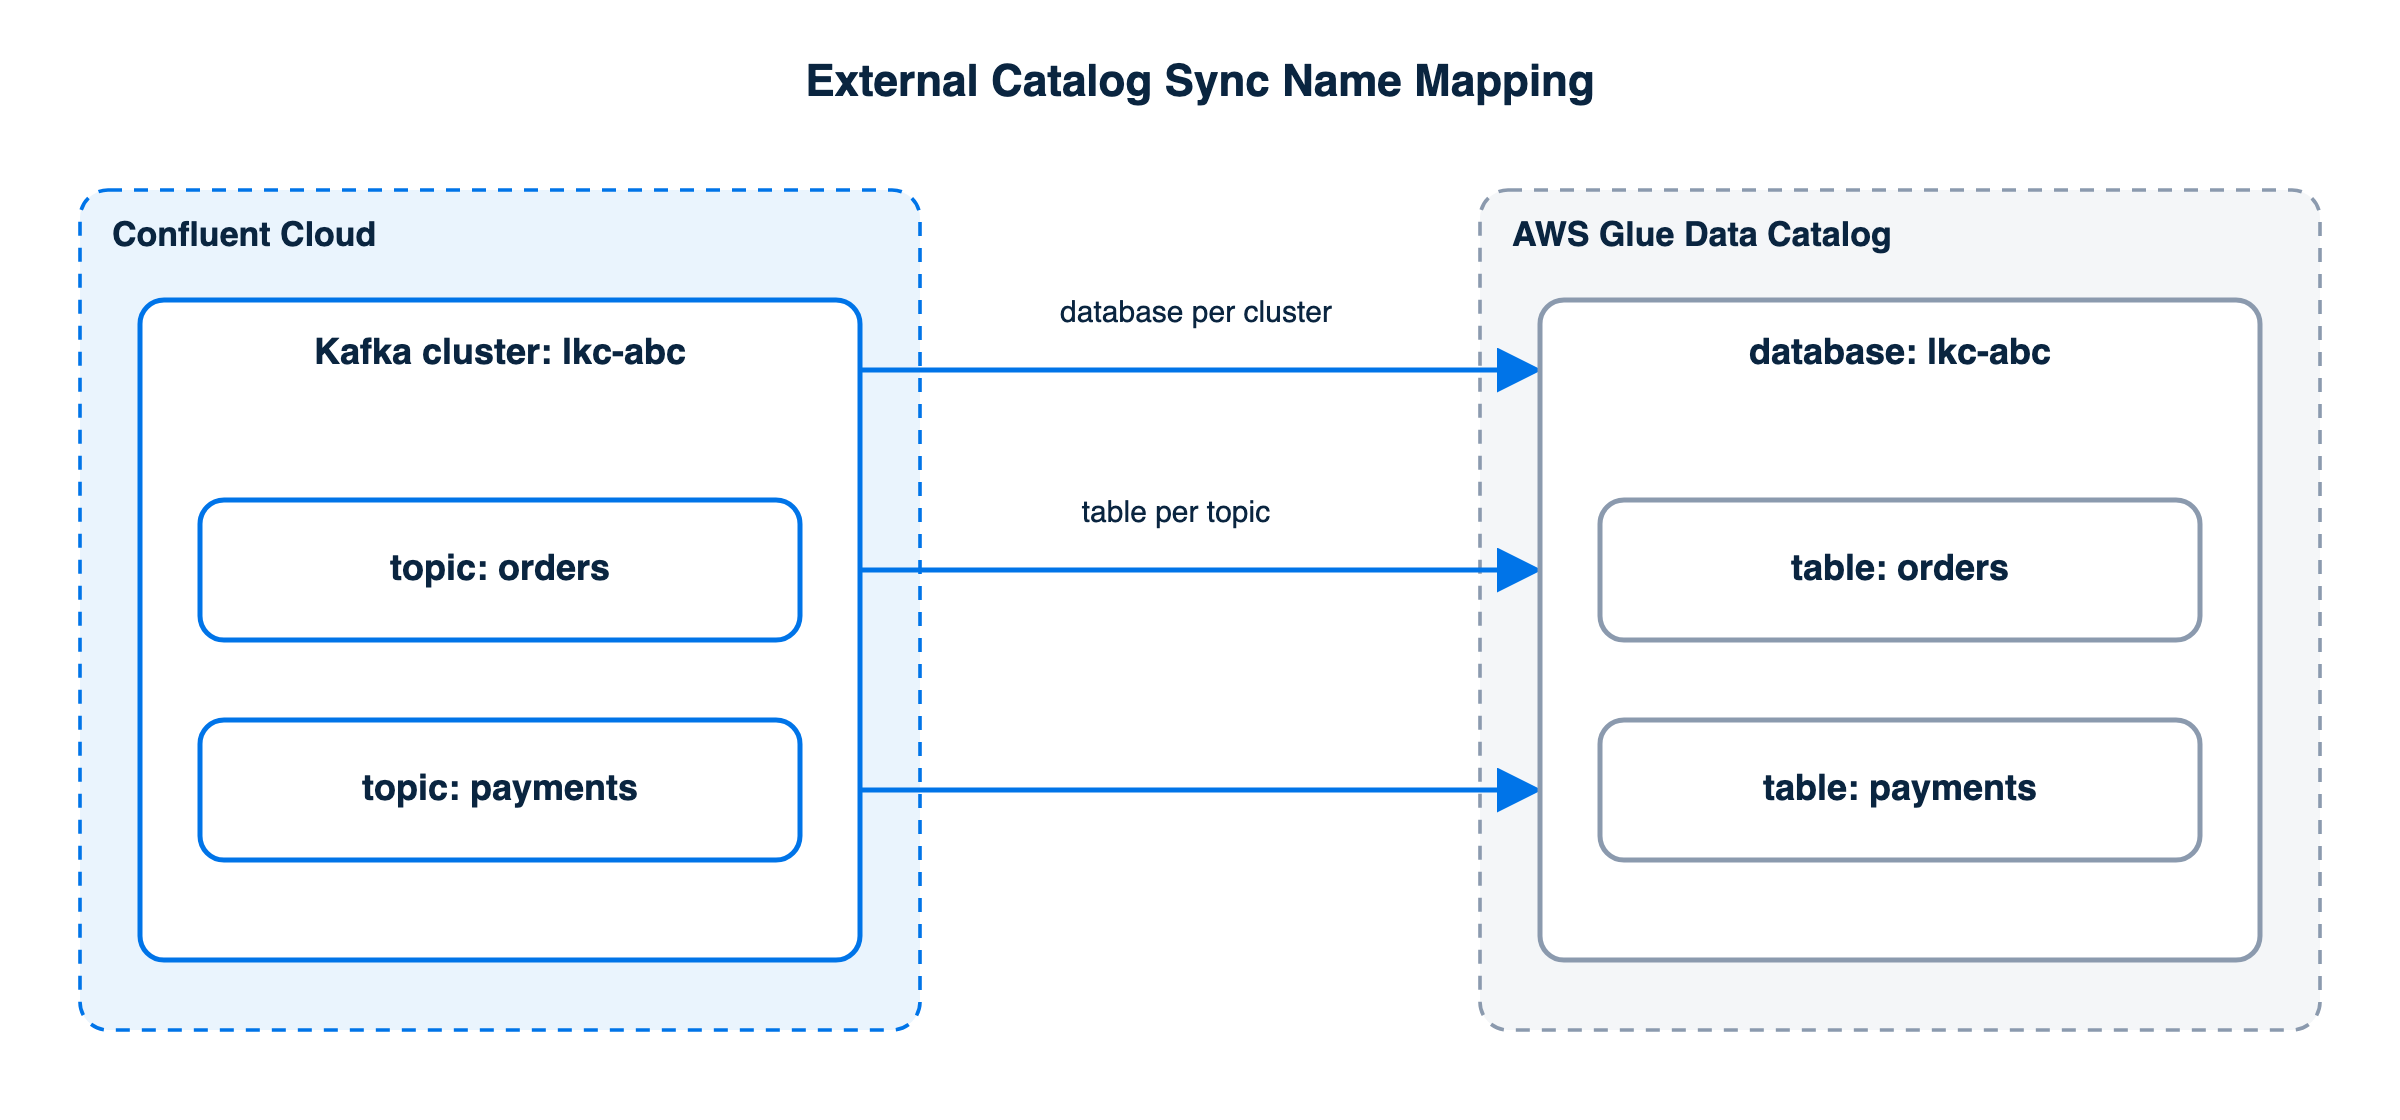
By default, the Glue database name is the cluster ID, and each topic becomes a table under it. With user-defined namespaces, you can instead organize tables under custom namespace names, which become the Glue database names.
Ensure sufficient Lake Formation access
If AWS Lake Formation manages your Glue Data Catalog, grant Tableflow’s AWS Identity and Access Management (IAM) role access to the catalog objects and the underlying Amazon S3 data. This IAM role is the role you configure for the Glue catalog integration.
Grant the Lake Formation pass-through permission lakeformation:GetDataAccess
on the role so it can read and write underlying data.
{
  "Version": "2012-10-17",
  "Statement": [
    {
      "Effect": "Allow",
      "Action": "lakeformation:GetDataAccess",
      "Resource": "*"
    }
  ]
}
For more information, see the Lake Formation documentation.
Configure external catalog sync
Configure external catalog sync by creating a catalog integration at the cluster level. A provider integration is a separate Confluent Cloud resource that stores the AWS IAM role Confluent Cloud uses to access your AWS account. The catalog integration references a provider integration, which grants Tableflow’s IAM role access to your Glue Data Catalog. For more information, see Integrate with Cloud Service Providers in Confluent Cloud.
Before you begin
Ensure you have at least one Tableflow-enabled topic. Topics must be
materialized for catalog synchronization to complete, and catalog sync
remains in the pending state until at least one topic is enabled with
Tableflow.
Create the catalog integration
Start in Confluent Cloud Console by creating the catalog integration:
In the Confluent Cloud Console, navigate to the cluster that contains the topics you want to sync with tables in Glue.
In the navigation menu, click Tableflow.
On the Tableflow page, in the External Catalog Integrations section, click Add integration.
Select AWS Glue as the catalog.
For Name, enter a name to identify your catalog integration. For example,
tableflow-glue-sync.For Provider integration, do one of the following:
Use an existing provider integration
Select a provider integration that has access to your Glue Data Catalog.
Click Continue.
The wizard advances directly to the Review and launch step.
Review the configuration and click Launch to finish creating the catalog integration.
Set up a new provider integration
Click the new provider integration link.
The wizard takes you directly to the Configure role in AWS page and adds a Configure AWS Glue access step.
Continue with the next procedure.
Create the provider integration
Within the same wizard, set up the provider integration. The Configure AWS Glue access step walks you through creating the AWS IAM role. This role grants Confluent Cloud access to your Glue Data Catalog. For the standalone version of this procedure, see Create an AWS Provider Integration in Confluent Cloud.
Create the role in AWS
Start in Confluent Cloud Console, then switch to AWS to create the role using the trust policy Confluent Cloud provides:
In Confluent Cloud Console, start creating the role and copy its trust policy.
Select Create new role.
Click Continue.
On the Grant Confluent permission to your role in your AWS account page, under Step 1: Create a new role in AWS, copy the trust policy shown.
In the AWS console, create the role using the trust policy you copied.
Go to IAM > Roles.
Click Create role.
Select Custom trust policy.
Replace the default JSON with the trust policy you copied.
AWS requires a trust policy to create the role, but Confluent Cloud can’t generate the real trust policy until it has the role’s ARN. This placeholder trust policy denies all principals as a temporary stand-in. You replace it with the trust policy that Confluent Cloud generates later in this procedure.
Click Next twice to go to the review step.
Name the role. For example,
tableflow-catalog-role.Click Create role.
Under Roles, click the role’s name to open its details page.
Copy the new role’s Amazon Resource Name (ARN), which resembles
arn:aws:iam::<aws_account_id>:role/<your_role_name>.
Add the trust policy to the role
Map the role’s ARN to Confluent Cloud, then apply the trust policy it generates to the role in AWS:
In Confluent Cloud Console, map the role’s ARN and generate the trust policy.
Return to Confluent Cloud Console. Under Step 2: Map the AWS role to Confluent, for ARN, paste the role ARN.
Click Generate trust policy.
Under Step 3: Add the trust policy to your AWS role, copy the generated trust policy.
In the AWS console, replace the role’s trust policy.
Open the role in the AWS IAM console.
Click Trust relationships.
Click Edit trust policy.
Replace the existing trust policy with the one you copied.
Click Update policy.
Grant Glue permissions to the role
Generate a permission policy in Confluent Cloud, and then add it to the role in AWS as an inline policy:
In Confluent Cloud Console, generate a permission policy for your AWS Region and account.
Return to Confluent Cloud Console and click Continue to move to the Glue permissions step.
Select the AWS Region where your Glue Data Catalog lives.
Enter your AWS account ID.
Confluent Cloud generates a permission policy scoped to that Region and account.
Copy the generated permission policy.
In the AWS console, add the permission policy to the role.
Go to the AWS IAM console, open the same role, and click Permissions.
Click Add permissions, and then Create inline policy.
Switch to the JSON editor.
Replace the default JSON with the permission policy you copied.
Click Next.
For Policy name, enter a name for the policy. For example,
tableflow-glue-access-policy.Click Create policy.
Launch the integration
Finish the wizard in Confluent Cloud Console:
Return to Confluent Cloud Console and click Continue.
On the Review and launch page, review the catalog integration and provider integration details.
Click Launch.
Confluent Cloud can now access your AWS Glue Data Catalog and publish Iceberg table metadata pointers to it.
Verify and query the synced tables
After the catalog integration launches, verify the synced tables in the AWS Glue console and query them from your analytics engine.
Open the AWS Glue console.
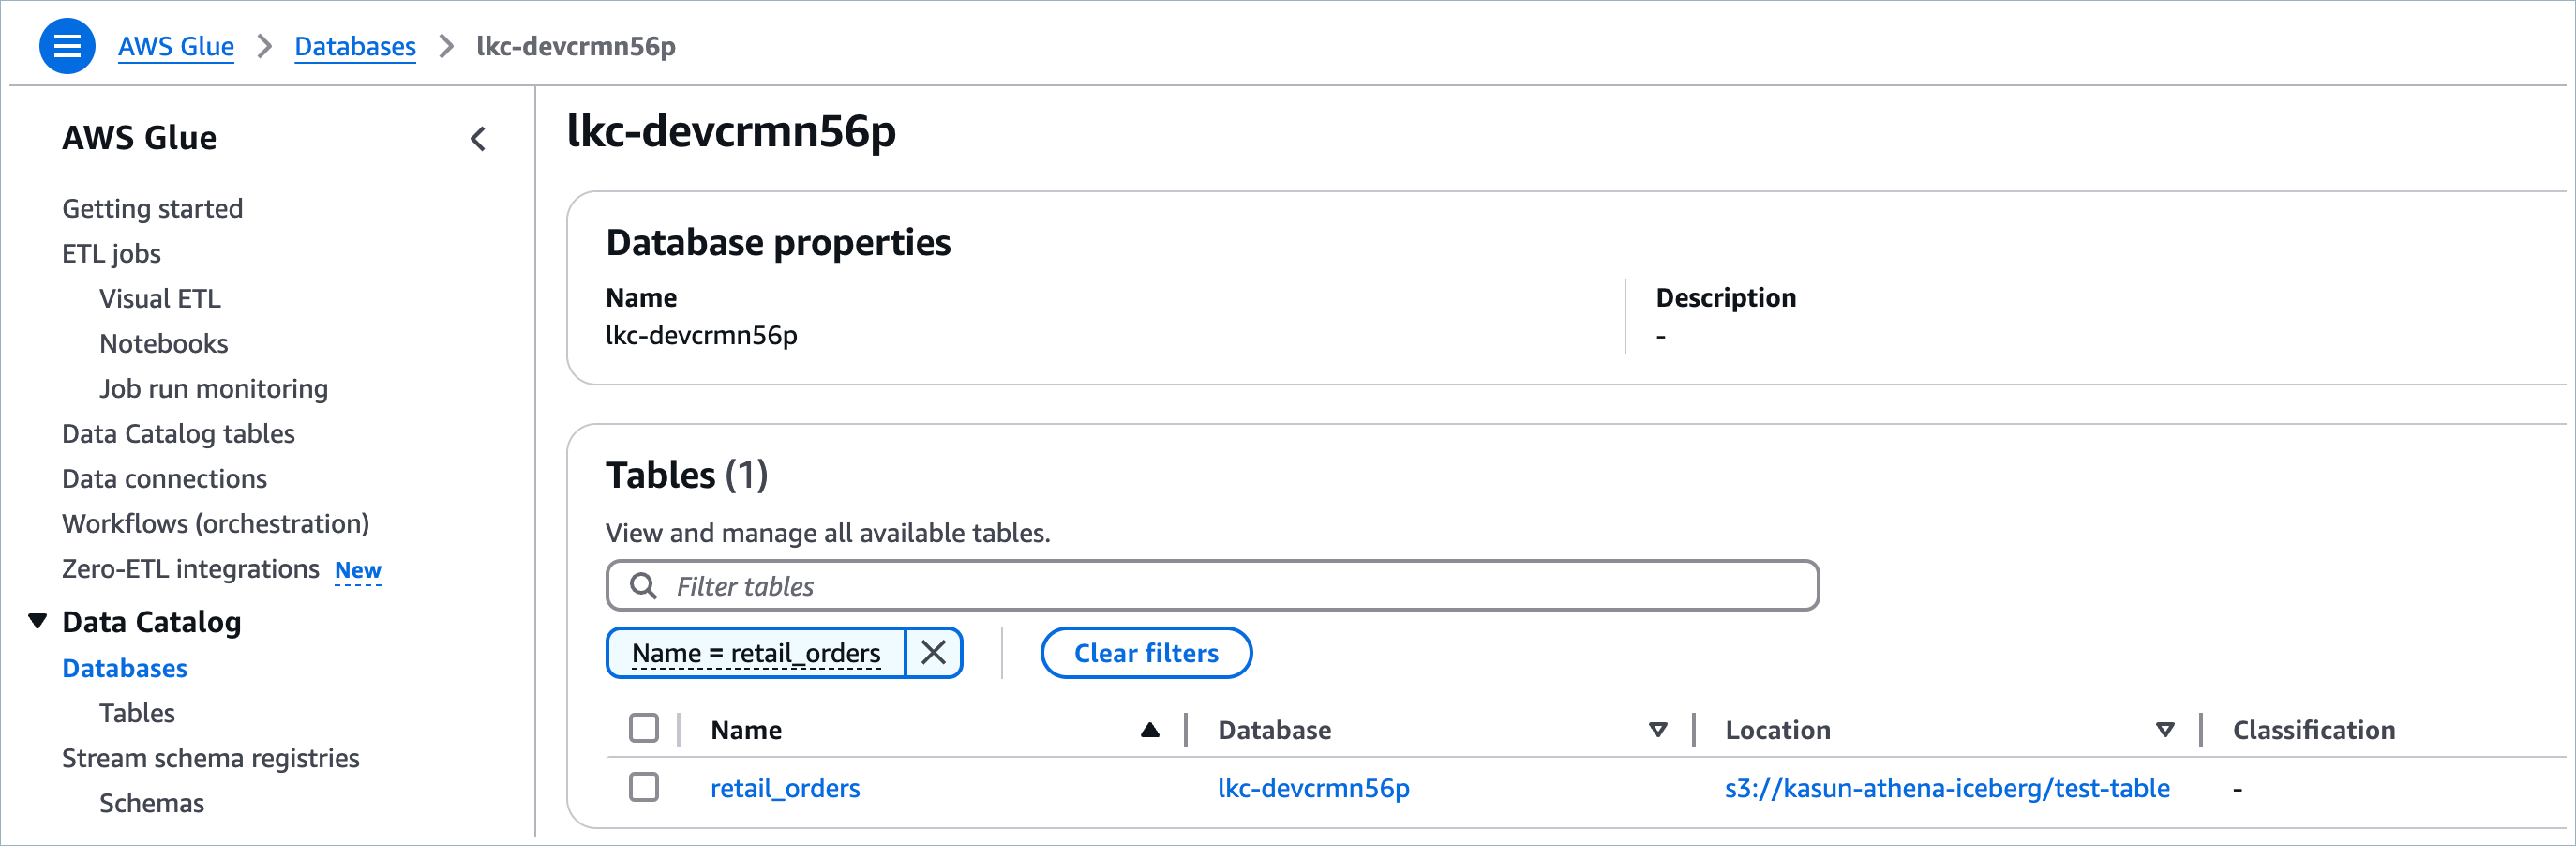
Find the Iceberg table that the catalog integration published as an AWS Glue table.
The cluster ID maps to the AWS Glue database name.
The Apache Kafka® topic name maps to the AWS Glue table name.
Query the tables from any analytics or compute engine that integrates with the AWS Glue Data Catalog. For more information, see Query Data.
Warning
Ensure that downstream analytics engines have read-only access to the tables. Writing to Tableflow-managed tables outside of Tableflow can corrupt table state or conflict with Tableflow’s commit and retention lifecycle.
Best practices for external catalog sync
Do not enable Glue table optimization features from the Glue or Lake Formation console when using Tableflow with Iceberg tables registered in the AWS Glue Data Catalog. These features include compaction, snapshot retention, and orphan file deletion. The optimizers are not required for Tableflow-managed tables and can interfere with Tableflow’s own commit, retention, and cleanup lifecycle.
By default, these optimizers are turned off for new Iceberg tables in Glue. No explicit configuration is required to ensure that they remain off. Tableflow automatically manages table maintenance, compaction, and cleanup across supported catalogs and table formats.
In addition, follow these best practices to prevent errors with your Glue integration:
Consider Tableflow-managed tables in Glue as read-only.
Do not modify, optimize, or alter them directly in Glue, Lake Formation, or other external tools.
Perform all write and maintenance operations through Tableflow to ensure consistency and correctness.
Catalog federation
Tableflow integrates with the AWS Glue Data Catalog through catalog federation, enabling you to consume Tableflow tables with AWS analytics services. Glue acts as the catalog, and AWS Lake Formation provides governance and fine-grained access control over those tables.
With catalog federation, you create a federated catalog on the Lake Formation side that federates with the Tableflow Iceberg REST Catalog (IRC). Each Tableflow cluster appears as a database in the federated catalog, and Tableflow-enabled topics appear as tables, which you must consume as read-only. If you use user-defined namespaces, your custom namespaces appear as the databases instead.
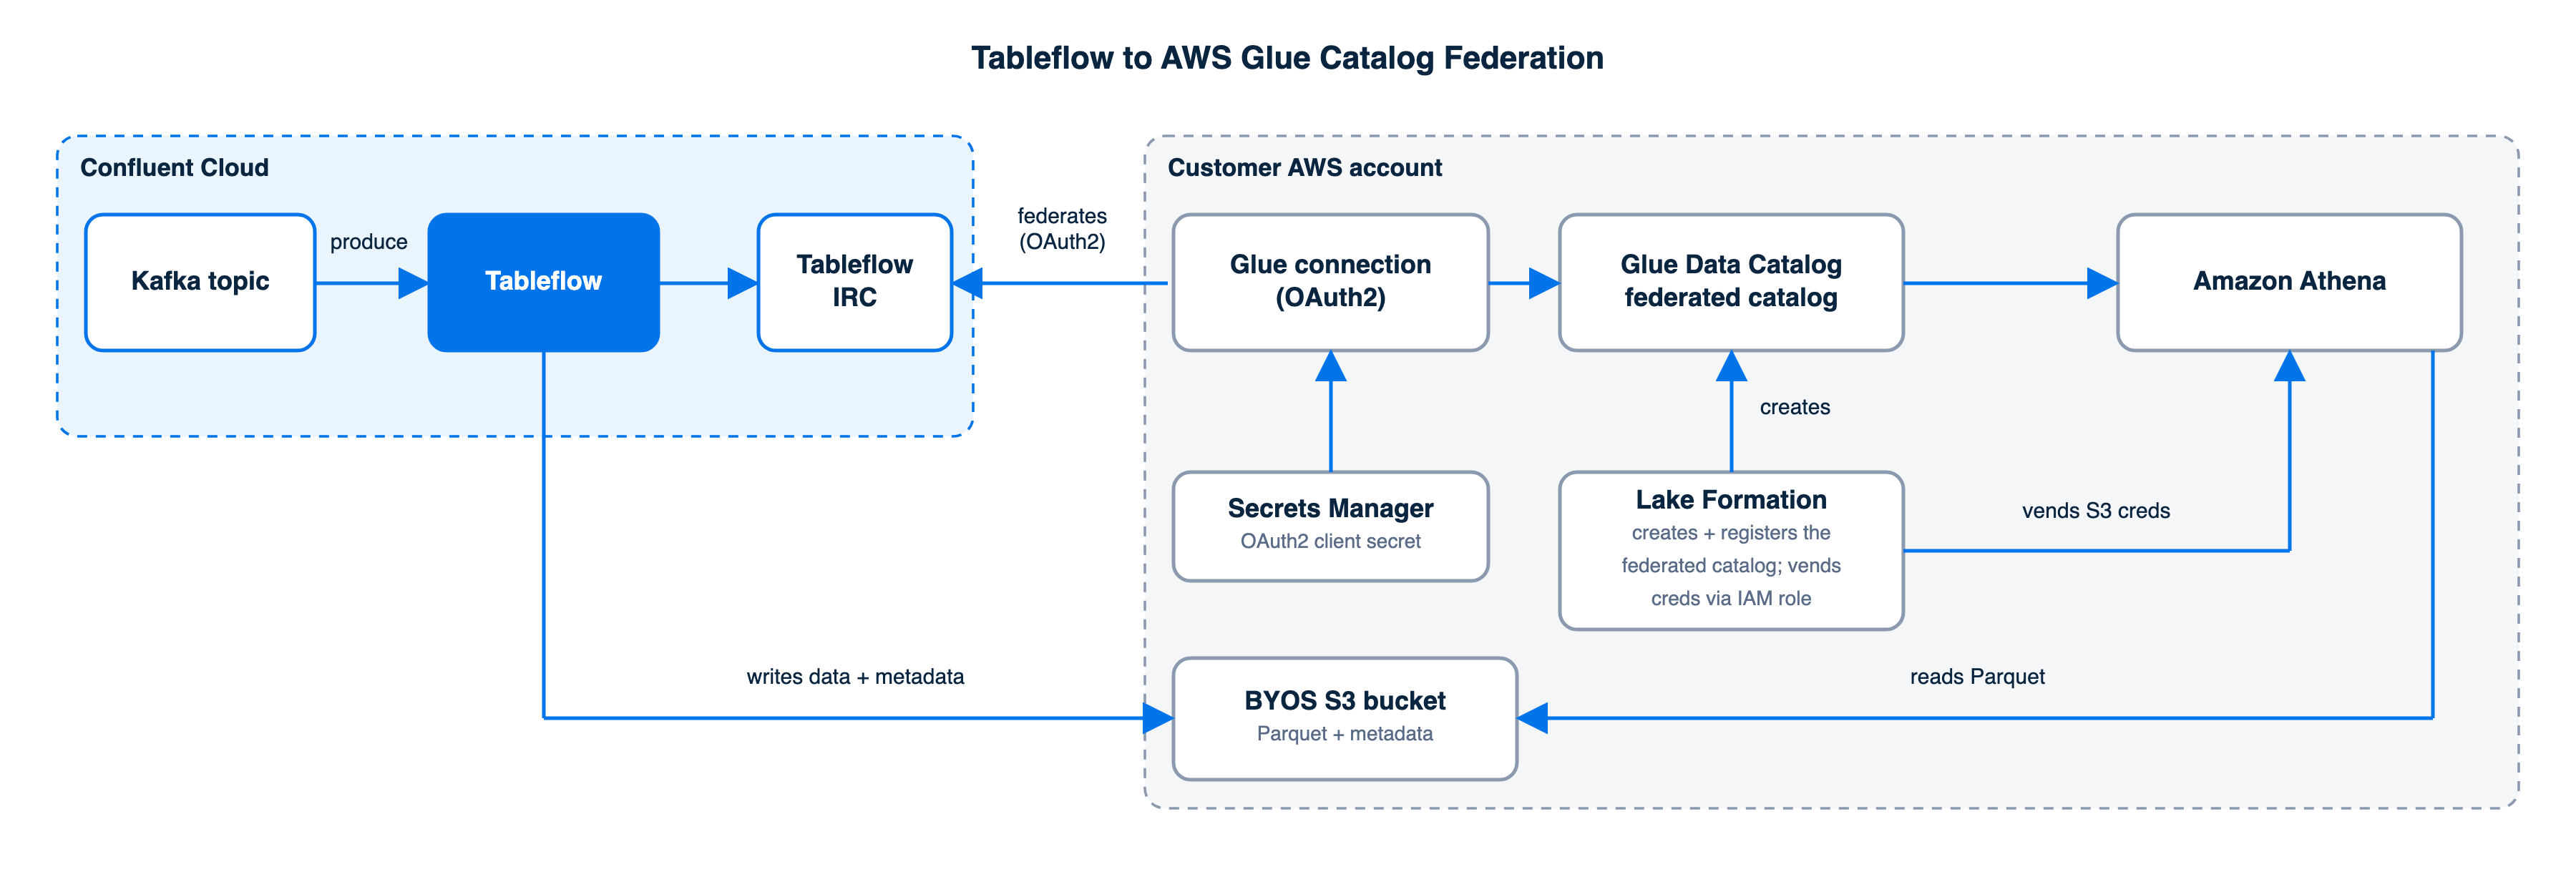
The federation has the following components:
Amazon Athena resolves tables through the Glue federated catalog and reads the Parquet data files directly from your bucket, where Tableflow continuously writes data and metadata.
The Glue connection federates to the Tableflow IRC by using OAuth2 client credentials, with tokens minted and refreshed by Glue.
Lake Formation registers the connection, holds the Lake Formation permissions, and vends temporary S3 credentials.
A dual-trust IAM role, which Glue and Lake Formation can assume, grants S3 read access on the storage bucket and read access to the AWS Secrets Manager secret.
Note
Federated tables are read-only by design. The Glue table optimizer guidance for external catalog sync does not apply to federated catalogs, because no table objects are materialized in Glue.
The end-to-end flow is:
Kafka topic
     └─> Tableflow (Iceberg on S3)
           └─> Tableflow IRC endpoint
                 └─> AWS Glue federated catalog
                       └─> Lake Formation (governance)
                             └─> Athena (querying)
Configure catalog federation
The following steps show how to create the federated catalog in AWS Lake Formation and query your Tableflow tables from Athena. The setup is console-based and requires no ongoing token maintenance.
Before you begin
Ensure you have the following:
A Confluent Cloud cluster with at least one Tableflow-enabled topic using custom storage, also called bring your own storage (BYOS).
A Tableflow-scoped Confluent Cloud API key and secret, used as the OAuth2 client credentials for the federated catalog connection. For steps to create one, see Add an API key.
The Iceberg REST Catalog endpoint for your environment, shown on the cluster’s Tableflow page under API access.
An AWS account with permissions to create IAM roles and use Lake Formation, Glue, and Athena in the same Region as your storage bucket.
Create the IAM role
Create one IAM role that AWS Glue and Lake Formation share. Glue assumes the role to read the OAuth secret, and Lake Formation assumes the role to vend S3 credentials to query engines. For instructions on creating an IAM role for a service, see Creating a role for an AWS service.
Configure the role with the following:
Use this trust policy. Both service principals are required.
{
  "Version": "2012-10-17",
  "Statement": [{
    "Effect": "Allow",
    "Principal": { "Service": ["glue.amazonaws.com", "lakeformation.amazonaws.com"] },
    "Action": ["sts:AssumeRole", "sts:SetContext"]
  }]
}
Attach a permission policy for Secrets Manager. The
secretsmanager:PutSecretValuepermission is required because Glue writes refreshed tokens back to the secret.{ "Version": "2012-10-17", "Statement": [{ "Effect": "Allow", "Action": ["secretsmanager:GetSecretValue", "secretsmanager:DescribeSecret", "secretsmanager:PutSecretValue"], "Resource": "arn:aws:secretsmanager:<region>:<account_id>:secret:<your_secret_prefix>*" }] }
Replace the placeholders with your own values:
<region>: your AWS Region<account_id>: your AWS account ID<your_secret_prefix>: the prefix of the secret name you plan to use
Attach a permission policy that grants S3 read access on the bucket or buckets holding your Tableflow table data. If the bucket uses server-side encryption with AWS Key Management Service (AWS KMS), known as SSE-KMS, add
kms:Decryptfor the bucket key.{ "Version": "2012-10-17", "Statement": [ { "Effect": "Allow", "Action": ["s3:GetObject"], "Resource": "arn:aws:s3:::<byos_bucket>/*" }, { "Effect": "Allow", "Action": ["s3:ListBucket"], "Resource": "arn:aws:s3:::<byos_bucket>" } ] }
Replace
<byos_bucket>with the name of your own storage bucket.
Create the federated catalog
In the AWS Lake Formation console, create the connection and the federated catalog in one flow:
In the AWS console, go to Lake Formation.
Choose Catalogs.
Choose Create catalog.
For the data source, select Custom Iceberg REST Catalog. This tile represents the generic Iceberg REST option. Vendor-specific tiles domain-lock their endpoint URLs.
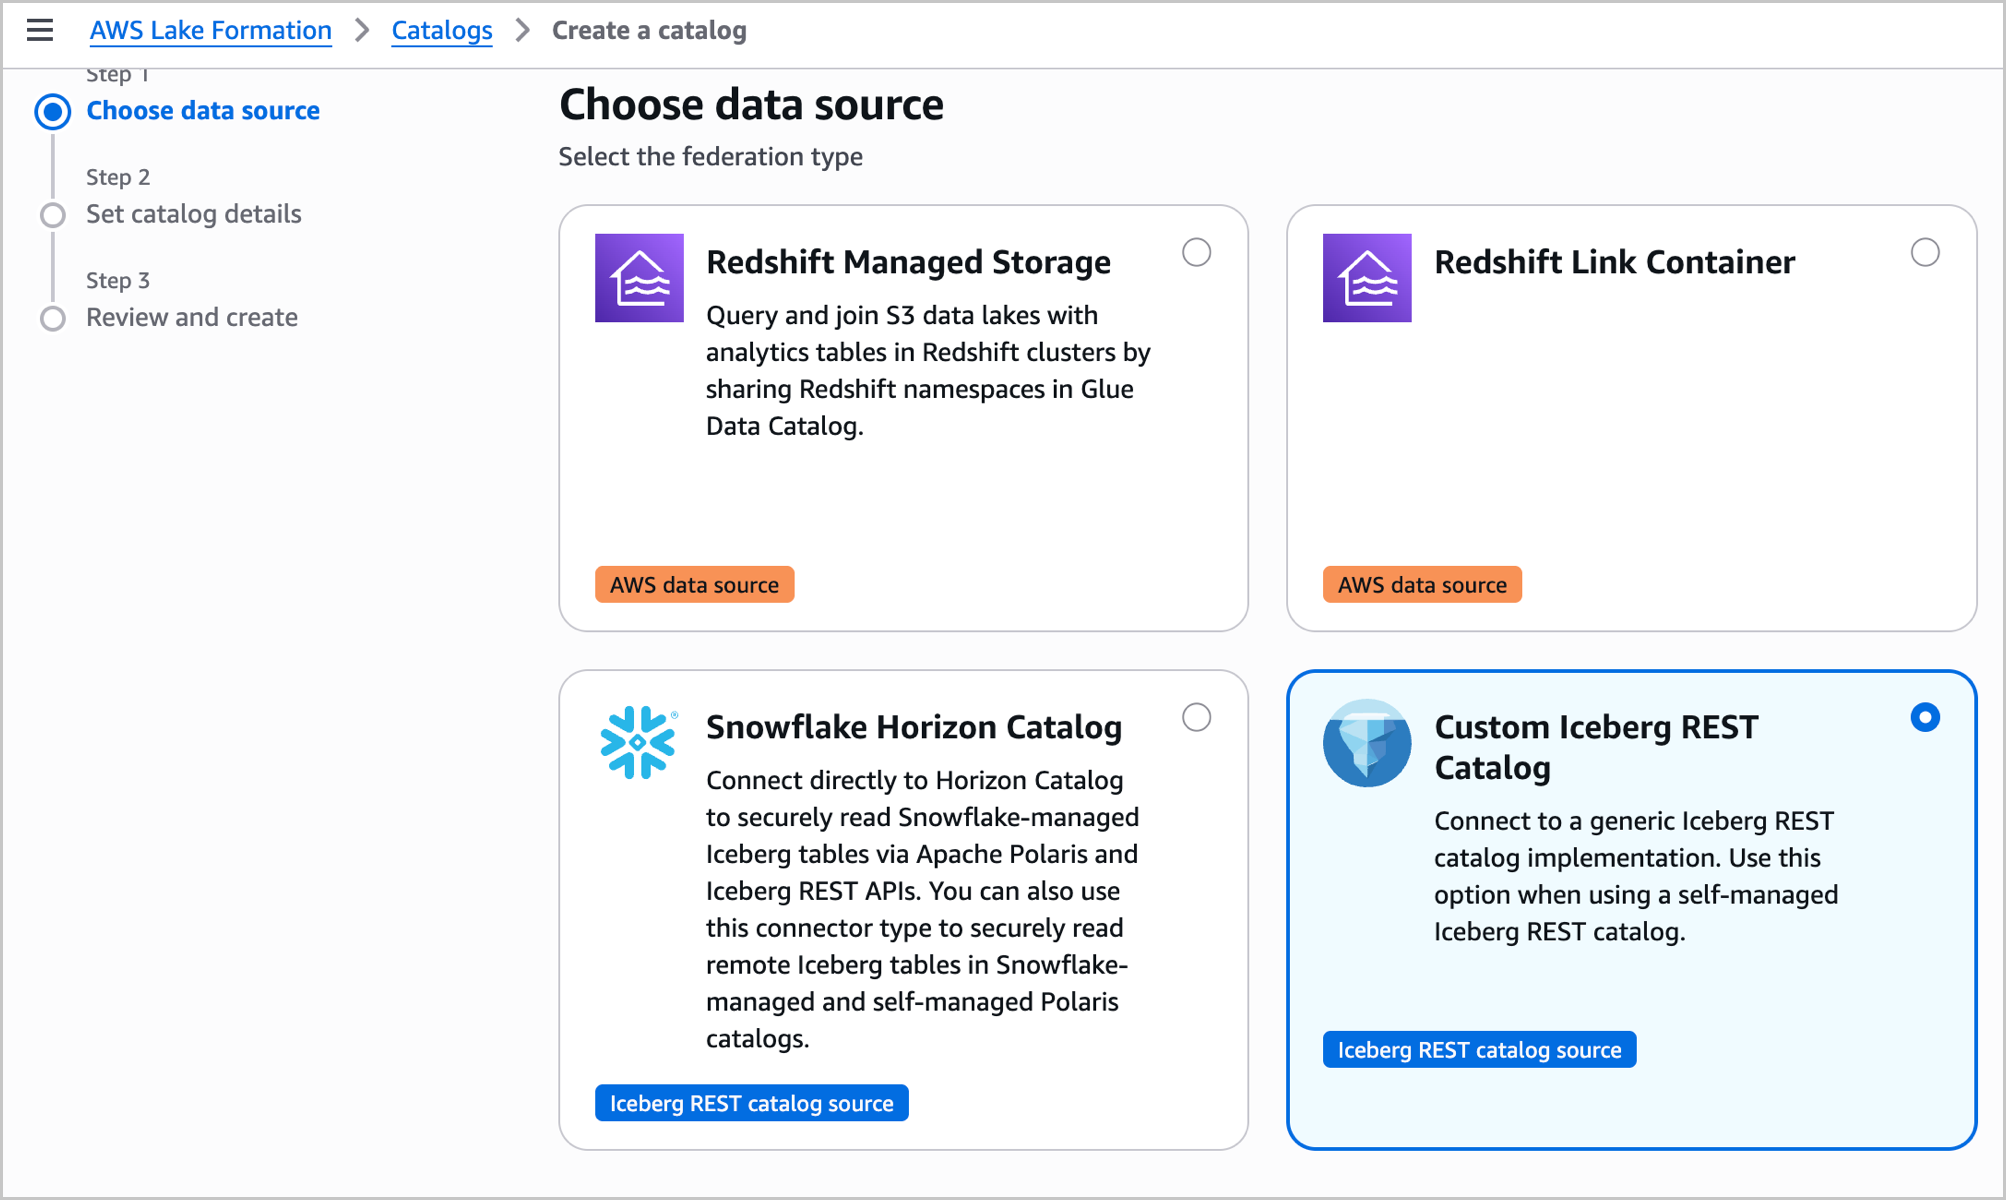
Click Next.
For Name, enter a lowercase name for the federated catalog, at most 255 characters.
For Remote catalog name, enter a period (
.). The wizard injects this mandatory field as the Iceberg REST URL prefix, and Tableflow uses an empty prefix, so the period normalizes away.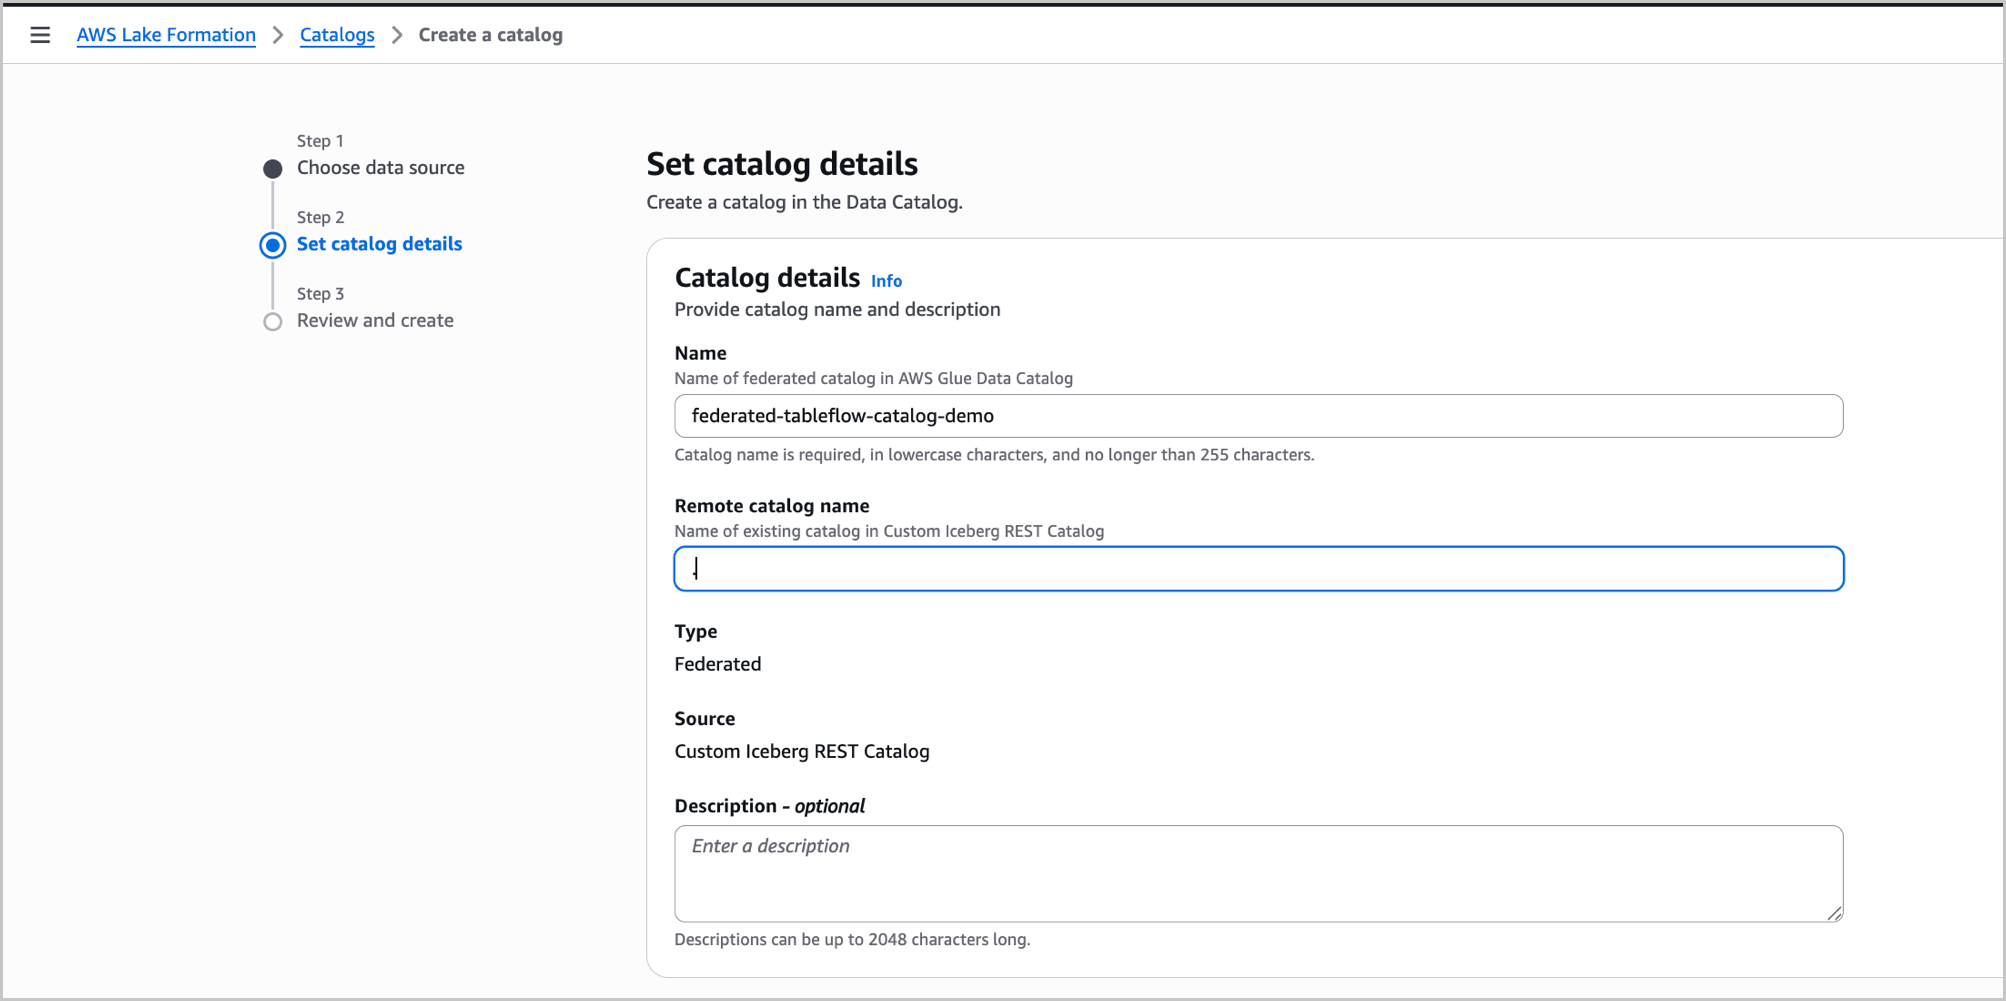
For Connector object, select Input new connection configuration or an existing
ICEBERGRESTCATALOGconnection.For Connection name, enter a lowercase name. You cannot change the name after the catalog is created.
For Workspace URL, enter your Tableflow Iceberg REST Catalog endpoint without a trailing slash. The endpoint is shown on the cluster’s Tableflow page under API access and has the following format:
https://tableflow.<region>.<cloud>.confluent.cloud/iceberg/catalog/organizations/<org_id>/environments/<env_id>
Copy your endpoint directly from the console because it already has
<region>,<cloud>,<org_id>, and<env_id>filled in with your own values.For Casing type, select Lowercase only. The default value, Uppercase only, hides Tableflow’s lowercase namespaces and tables.
For Authentication type, select OAuth2. AWS Glue mints and refreshes tokens automatically, with no manual token handling. For an alternative that doesn’t require an OAuth2-capable identity provider, see Alternative: custom authentication below.
For Token URL, enter the Tableflow token endpoint, which is the Workspace URL followed by
/v1/oauth/tokens.For OAuth Client ID, enter a Tableflow-scoped or global Confluent Cloud API key.
For OAuth Secret, pick an existing Secrets Manager secret whose JSON key is exactly
USER_MANAGED_CLIENT_APPLICATION_CLIENT_SECRET. Alternatively, enter the API secret manually, and the console creates the secret on your behalf.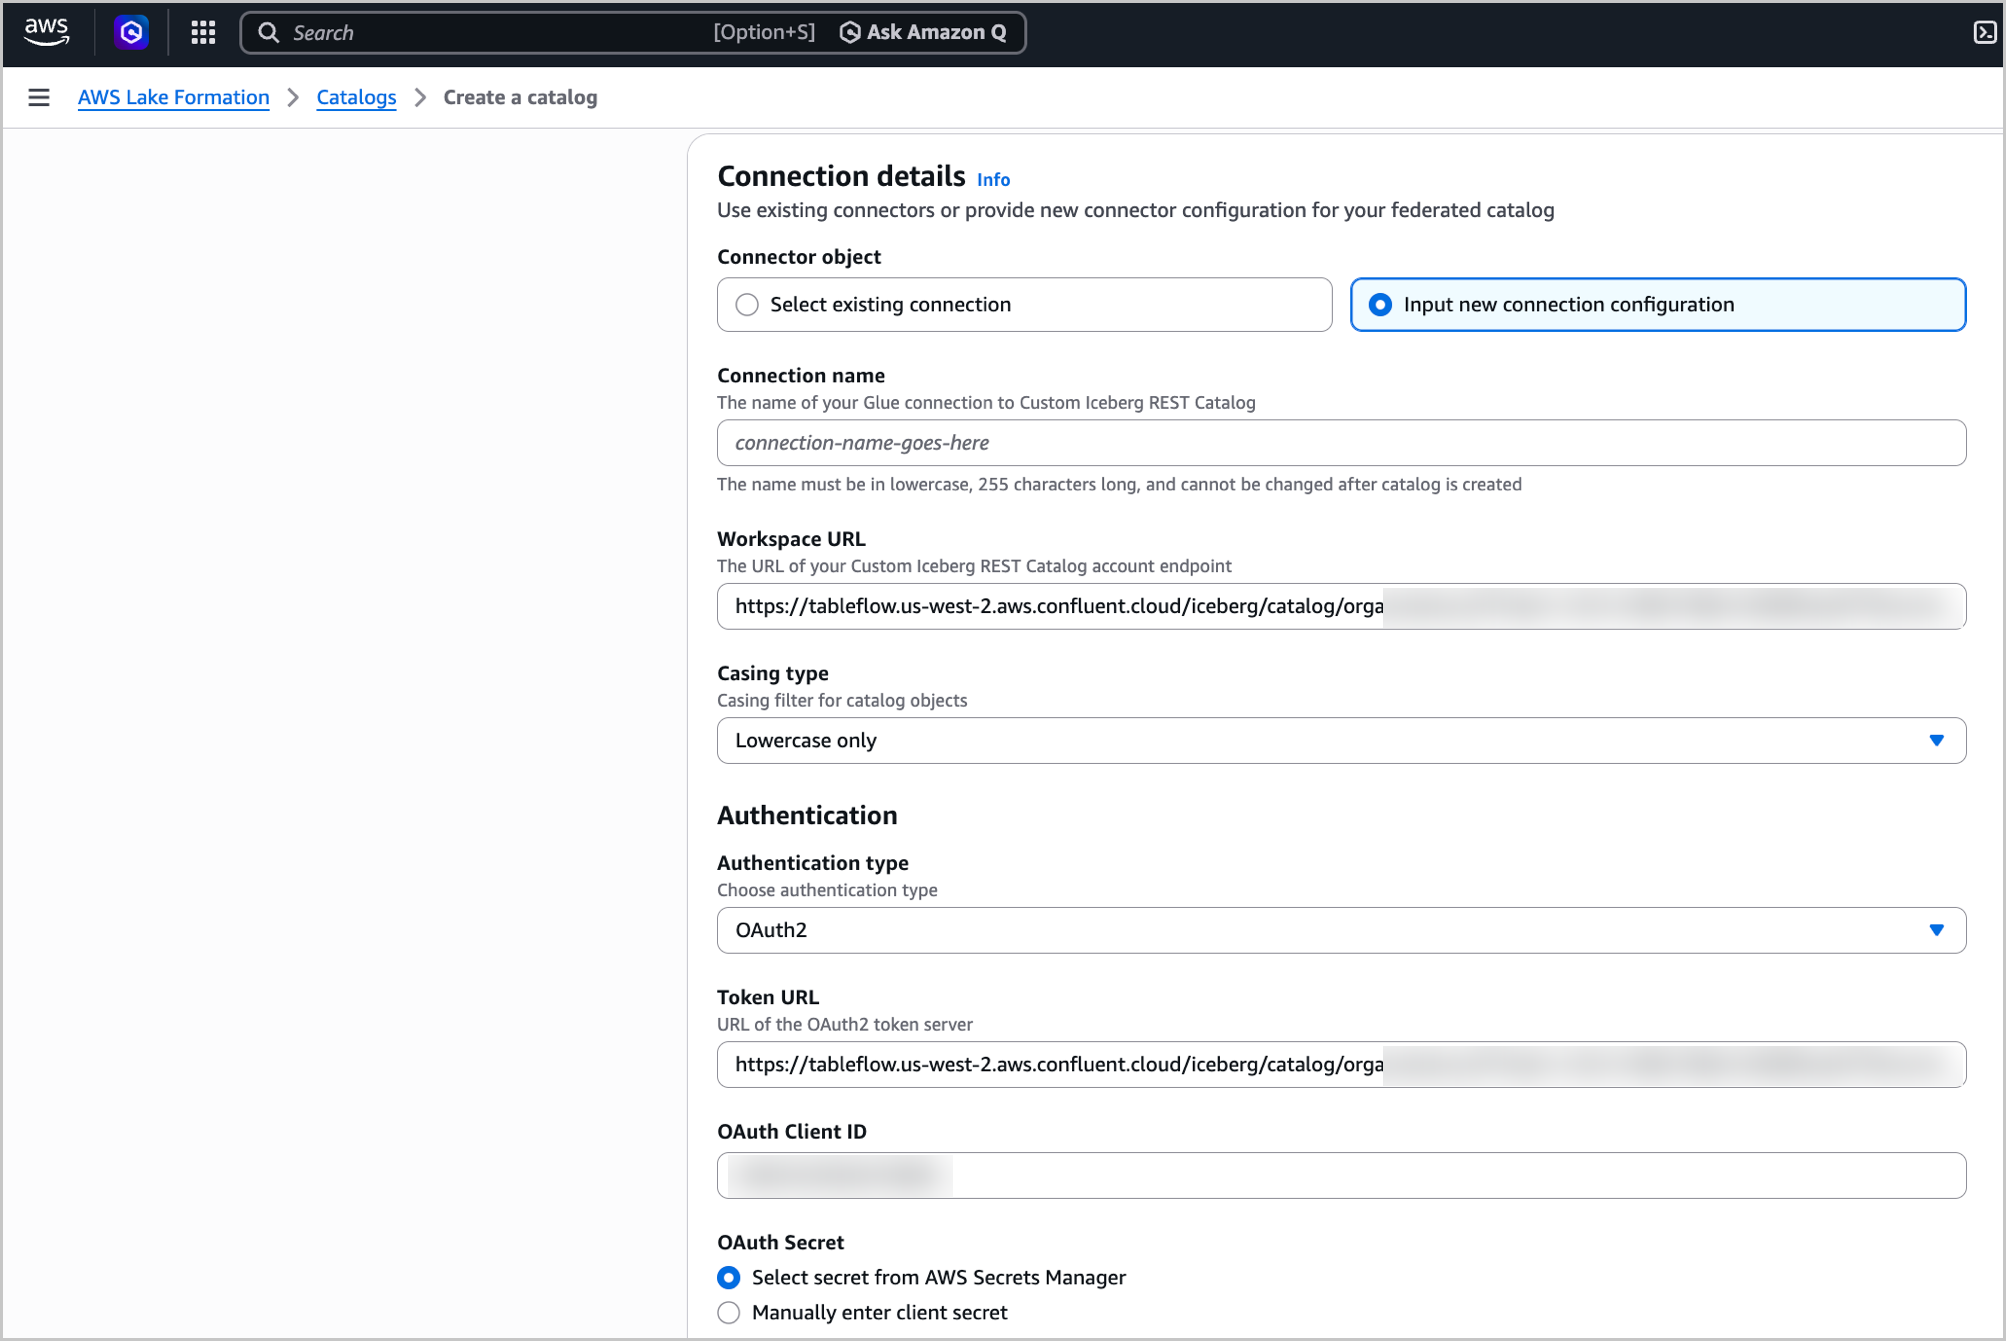
For Token URL parameter map scope, enter
catalog. The Tableflow token endpoint requires this scope.For IAM role, select the role you created in Create the IAM role.
Choose Next, review your settings, and choose Create catalog.
Glue validates the OAuth2 token exchange against the Iceberg REST Catalog during creation. A successful connection confirms the authentication chain. A green banner confirms that the connection was created, the resource was registered with AWS Lake Formation, and the catalog was created. No manual AWS Lake Formation grants are needed, because the registering principal automatically receives all supported AWS Lake Formation permissions on the catalog and its objects.
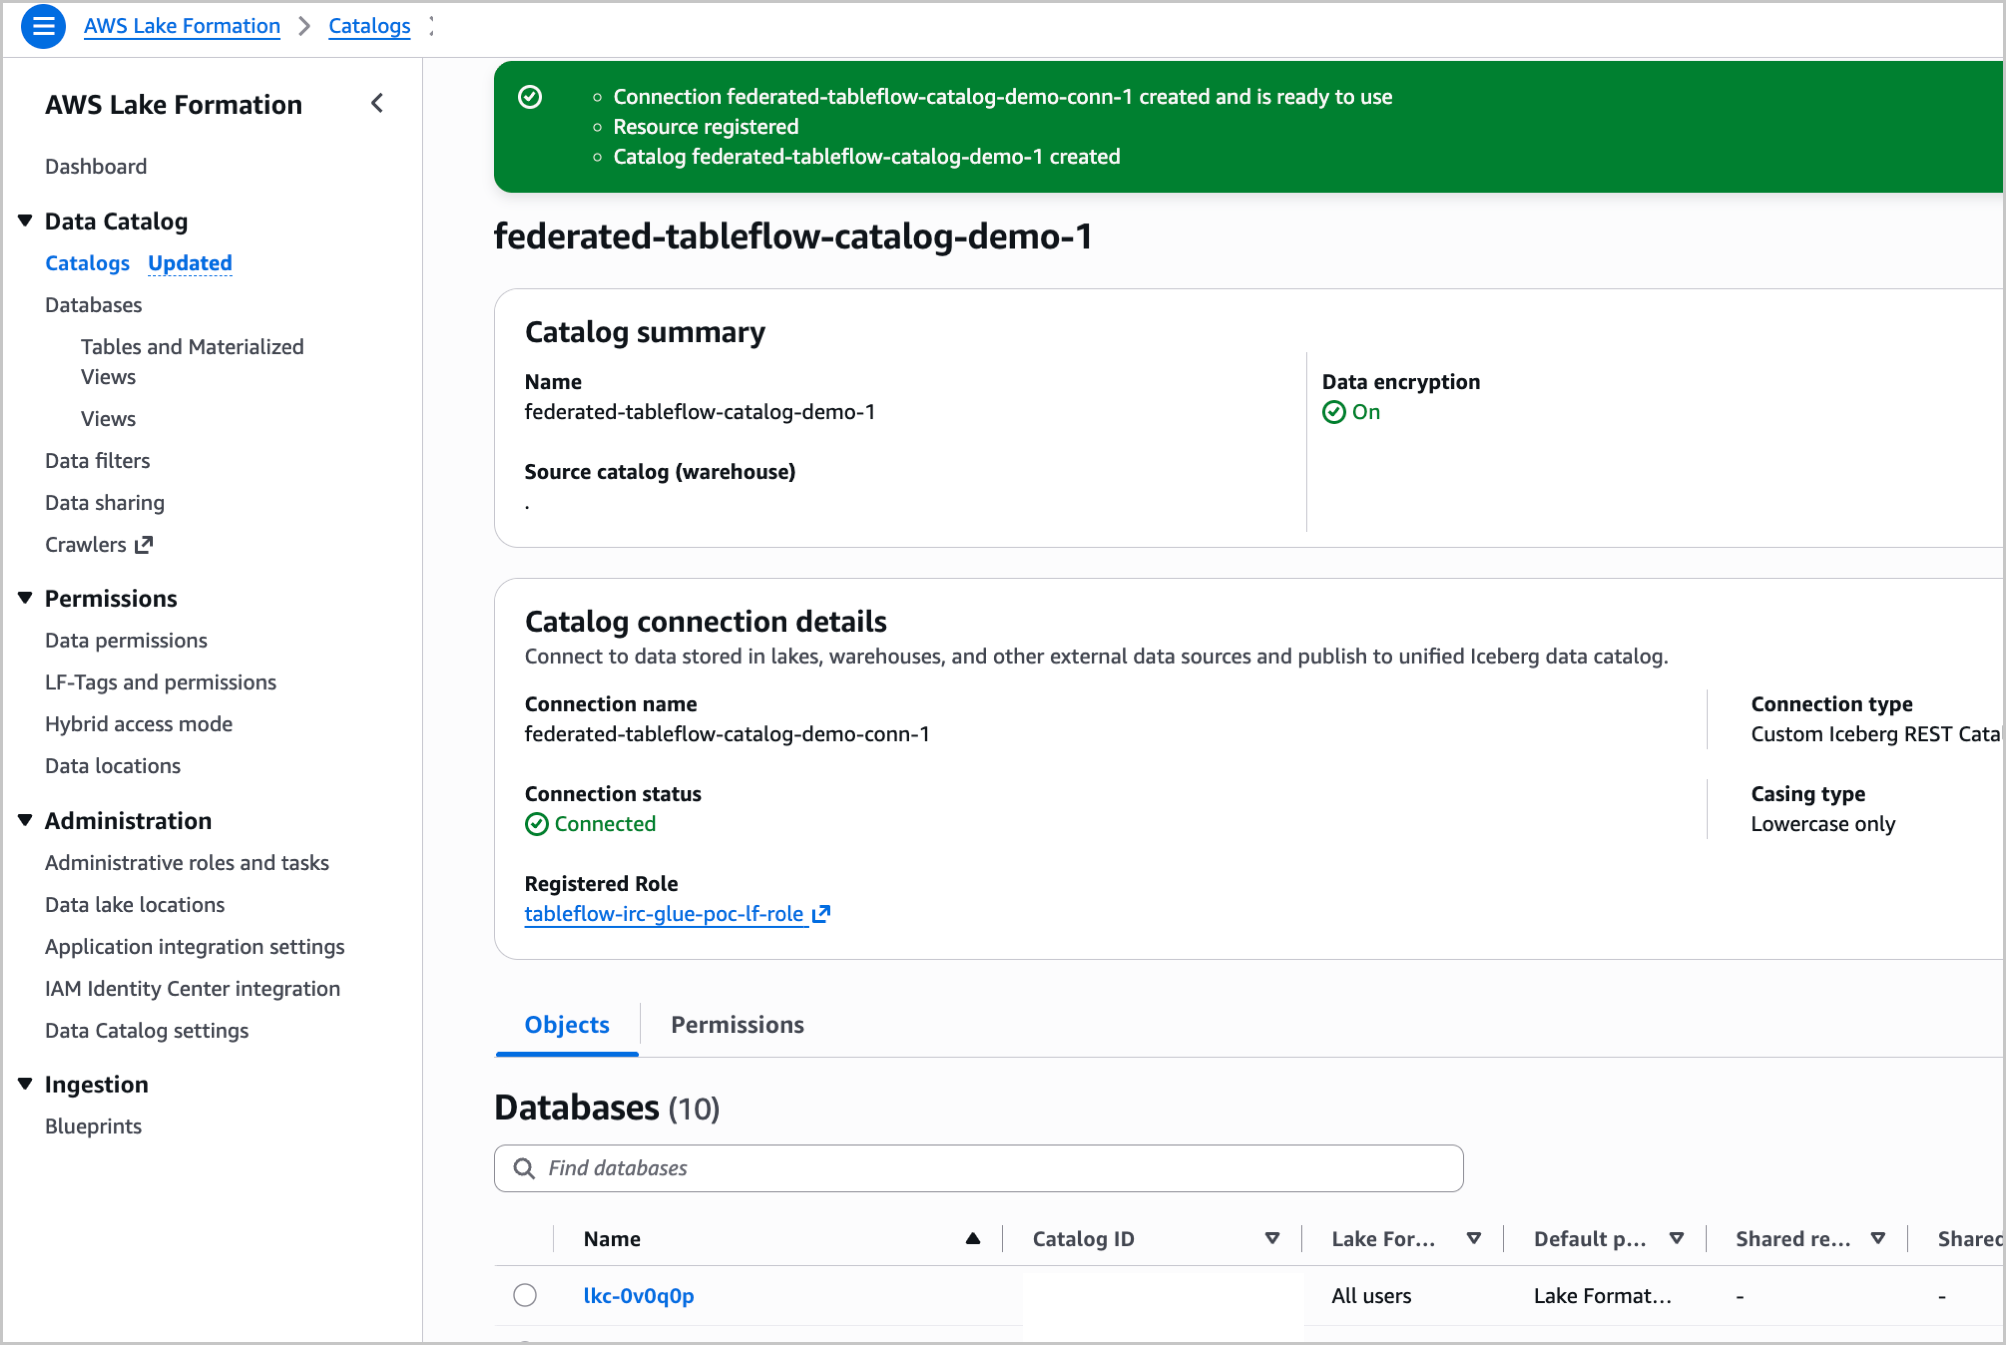
Query your tables from Athena
Follow these steps to query your Tableflow tables:
Open the Amazon Athena console, select Query your data in Athena console, and then choose Launch query editor.
Set Data source to
AwsDataCatalog, and in the Catalog dropdown, select your federated catalog.For Database, choose a cluster. Your Tableflow-enabled topics appear as tables.
Run a query like the following example:
SELECT * FROM "<cluster_id>"."<topic_name>" LIMIT 10
Replace
<cluster_id>with the database name shown for your cluster, and replace<topic_name>with the name of the topic you want to query.
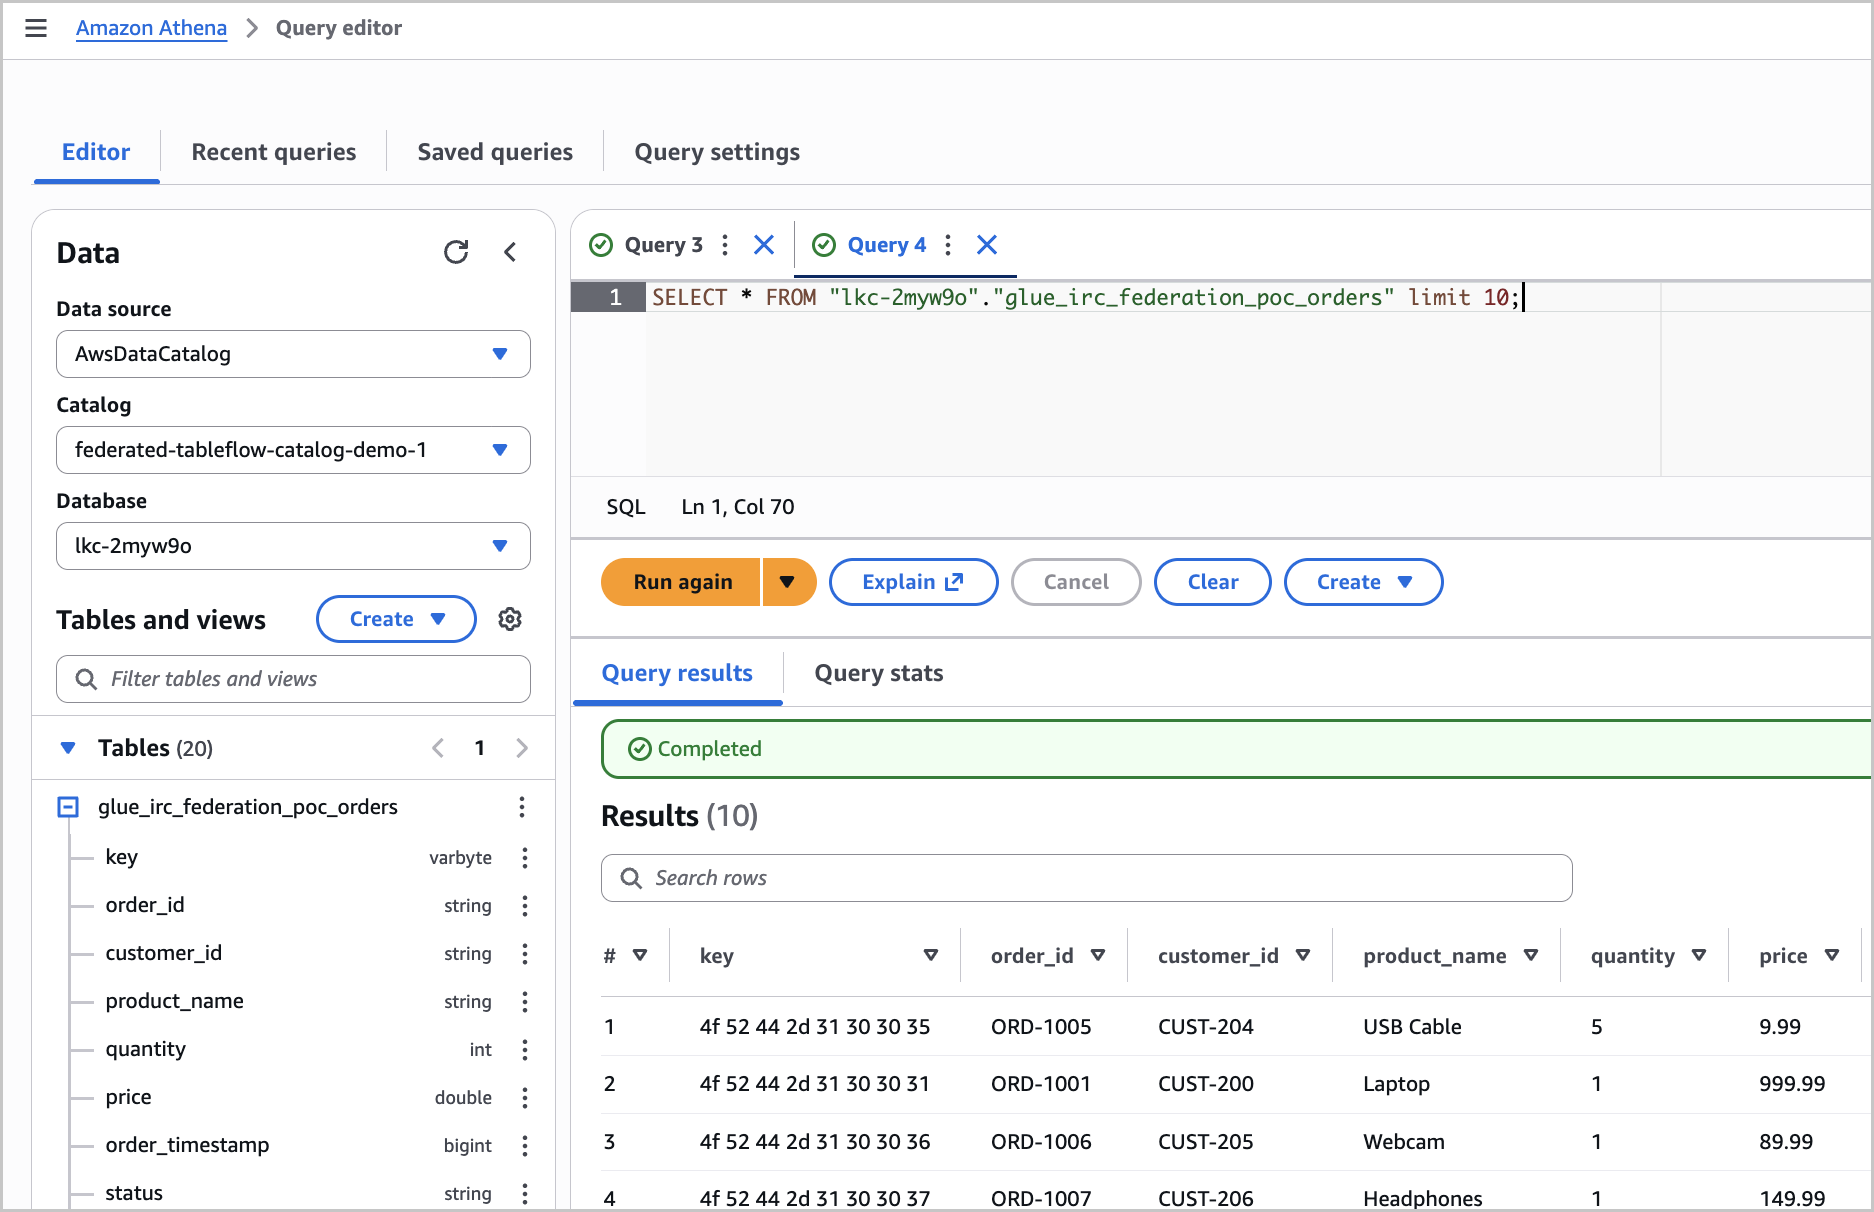
The query returns records from your Kafka topic, read live through the federation with data served from your own S3 bucket. For tools that need a flat data-source name, such as Java Database Connectivity (JDBC) or business intelligence (BI) clients, you can optionally register one. To register, run the following command with the AWS CLI:
aws athena create-data-catalog --name <flat_name> --type GLUE \
  --parameters catalog-id="<account_id>:<your_catalog_name>"
Replace the placeholders with your own values:
<flat_name>: the flat data-source name you want to register<account_id>: your AWS account ID<your_catalog_name>: the name of your federated catalog
Troubleshooting
The following issues are the most common during setup:
Access Denied for the given secret IDat federated catalog creationThe IAM role does not have the
secretsmanager:PutSecretValuepermission. Add the permission to the role’s Secrets Manager policy.STS error during role assumptionat federated catalog creationAn error with the AWS Security Token Service where the role’s trust policy is missing one of the two service principals. Add
glue.amazonaws.comandlakeformation.amazonaws.comto the trust policy.Namespaces or tables are missing when you browse the catalog
The Casing type is set to Uppercase only. Recreate the connection with Lowercase only.
A query fails with an S3 access error
The role’s S3 policy does not cover the bucket holding that table’s data. Add the bucket to the role’s S3 policy.
Alternative: custom authentication
The connection can also use custom authentication with a pre-minted bearer
token stored in a Secrets Manager secret whose JSON key is exactly
BEARER_TOKEN. Bearer tokens expire after 900 seconds and must be
refreshed by writing a new token to the secret with the AWS CLI
put-secret-value command. OAuth2 is the preferred authentication type.