
Use Private Network Interface on Confluent Cloud
Confluent Private Network Interface (PNI) enables private communication between your AWS resources, such as Kafka clients, and your Confluent Cloud clusters, specifically Freight and Enterprise clusters, through the Elastic Network Interface (ENI) that resides in your AWS account.
This capability is based on the AWS Multi-VPC ENI attachment feature. The feature can be used to attach a secondary Elastic Network Interface (ENI) in one VPC to a virtual machine (VM) running in another, even when those VPCs are in different AWS accounts or organizations. Key characteristics of ENIs for PNI are:
Located in Customer’s VPC: ENIs for PNI are associated with the subnets in customer VPC.
Owned and fully controlled by the Customer who can:
Create, update, and delete such ENIs
Create and attach Security Group (SG) on such ENIs to control origination of connections
Give limited permissions to Confluent to attach Confluent Cloud VMs to such ENIs
Used by Confluent: with limited ability to attach ENIs for PNI to Confluent Cloud VMs (after the customer gives permission)
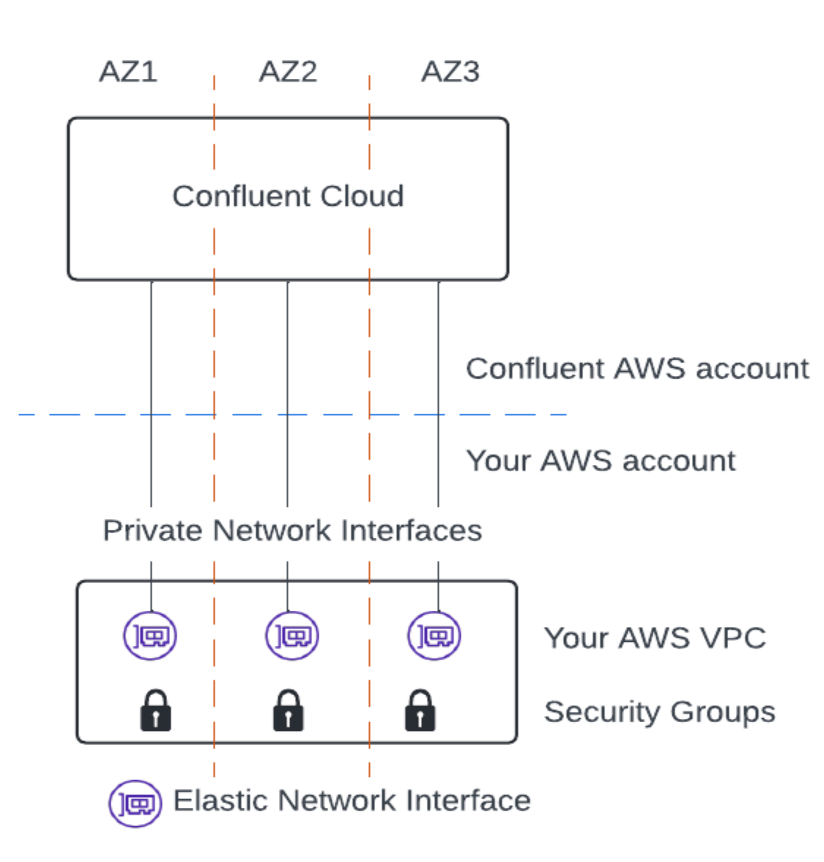
Confluent PNIs retain all properties and behaviors of AWS ENIs, including the security rules you defined through security groups.
The security groups applied to PNIs control the source and type of inbound and outbound traffic allowed between your environment and Confluent Cloud services. You can leverage your existing security operations to create, apply, and track changes to these security groups.
Confluent Cloud uses the following private networking resources for PNI.
- Gateway
A gateway is a resource that represents a connectivity type to and from Confluent Cloud services. It is created within an environment for the region and zone(s) you choose. The PNI gateway allows you to connect to Confluent Cloud services, such as Freight and Enterprise clusters, hosted in a given environment and region, from your network.
- Access point
An access point is a resource that represents a connection instance to a gateway and must match the type of the gateway it connects to. An access point of type PNI consists of a set of AWS ENIs in the same cloud region as the gateway, carrying traffic to and from Confluent Cloud services. The PNI access point provides you with a connection to services like Freight and Enterprise clusters, hosted in a specific environment and region, from your network.
You can set up PNI using one of two methods:
Automatic setup (Confluent Cloud Console only): Use AWS IAM temporary delegation to have Confluent Cloud create a gateway, ENIs, a security group, and an access point on your behalf.
Manual setup: Create a gateway, ENIs, an access point, and security groups using the Confluent REST API, Confluent CLI, Terraform, or the Confluent Cloud Console.
Requirements
On AWS, PNI is supported for Freight and Enterprise Kafka clusters. This requirement applies to both automatic and manual setup.
Considerations
Review the following before you set up PNI:
On AWS, Enterprise clusters support simultaneous connectivity using both PrivateLink Attachment and PNI.
Switching between AWS PrivateLink and PNI is fully supported and does not require redeploying the cluster.
Each ENI (or set of ENIs) can be associated with only one PNI access point.
You can use a single PNI gateway to access multiple Enterprise and Freight clusters in the same region/environment.
You can set up two PNI gateways per Confluent Cloud environment. If you need more than two gateways, contact Confluent Support.
Confluent Cloud Console components, such as topic management, require additional configuration to function as they use cluster endpoints. To use the Confluent Cloud Console with PNI, see Use the Confluent Cloud Console with Private Networking.
If you use manual setup, configure the security groups attached to your ENIs to enforce least-privilege access. If you use fully managed connectors, allow outbound traffic only to specific data system endpoints. See Update your AWS VPC security groups for recommendations and an example. Automatic setup creates a security group for you, so this step does not apply.
Egress over PNI is supported for fully managed connectors only. For example, you can use PNI to give a fully managed PostgreSQL CDC Source connector private access to an Amazon RDS instance in your VPC, without setting up AWS PrivateLink infrastructure. For other egress use cases, such as Cluster Linking or Custom Connect, use an Egress PrivateLink Endpoint.
If your environment uses Schema Registry, you can reach it over the same PNI connection with no extra setup. For more information, see Access Schema Registry over PNI.
For some of the common questions about PNI, see PNI FAQs.
Network security
An ENI for PNI is a network attachment point on your VPC subnet, capable of handling all network traffic independent of its origination direction.
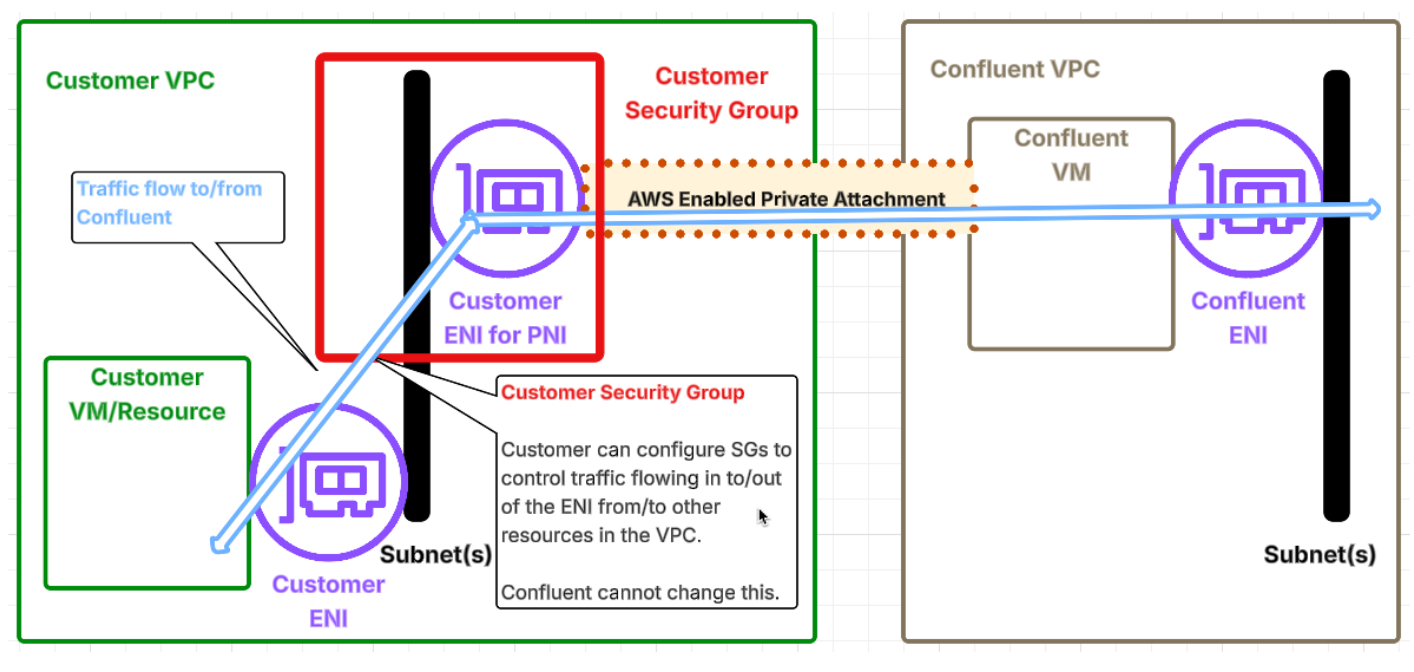
PNI can offer:
Security posture on par with AWS PrivateLink: While PNI uses a different shared responsibility model than AWS PrivateLink, you can achieve the same strong security posture. As shown in the preceding figure, use standard AWS Security Groups to control traffic flowing through the ENI. Customize these Security Groups to mimic the specific security behaviors of AWS PrivateLink by blocking all connections from Confluent into the customer network.
We strongly recommend such Security Group configurations.
More flexibility than AWS PrivateLink: ENI for PNI offers greater flexibility as compared to AWS PrivateLink, which is designed to allow traffic originating from one direction to specific network ports. PNI offers an optional capability to the user to open up select connections from Confluent into the customer network to allow legitimate use cases by services like Fully Managed Connectors.
Set up PNI automatically
Automatic setup uses the Confluent Cloud Console to create a gateway, ENIs, a security group, and an access point in a single guided workflow. This option uses AWS IAM temporary delegation to grant Confluent Cloud time-limited access to provision network resources in your AWS account.
Note
Automatic setup is available in the Confluent Cloud Console only. To use the Confluent REST API, Confluent CLI, or Terraform, see Set up PNI manually.
Prerequisites
Complete the following before you begin automatic setup:
Verify that you have access to the AWS Management Console.
Verify that the AWS IAM principal approving the delegation has the
iam:AcceptDelegationRequestpermission and the EC2 permissions being delegated, which are the following:ec2:CreateNetworkInterfaceec2:CreateNetworkInterfacePermissionec2:CreateSecurityGroupec2:AuthorizeSecurityGroupIngressec2:AuthorizeSecurityGroupEgressec2:RevokeSecurityGroupEgressec2:DeleteNetworkInterfaceec2:DeleteSecurityGroupec2:CreateTags
If you do not have these permissions, you can forward the approval request to an AWS administrator who does.
For more information about AWS IAM temporary delegation, see IAM temporary delegation in the AWS documentation.
The delegation grants Confluent Cloud the following temporary permissions in your AWS account:
Read-only EC2 permissions: Describe network interfaces, subnets, Availability Zones, security groups, and VPCs.
Write permissions for network resources: Create and delete network interfaces and network interface permissions, create and delete security groups, authorize ingress and egress rules, and revoke egress rules. Write operations are scoped to resources tagged with
Confluent=true.Tagging permissions: Create tags on network interfaces and security groups. Restricted to the
Confluenttag key and only during resource creation operations.
You can review the full delegation policy in the AWS Management Console when you approve the delegation request.
Requirements
Keep the following in mind during automatic setup:
After you activate the delegation session by clicking Share access in the AWS Management Console, you have 60 minutes to complete the remaining steps. If the session expires, you must start the process again.
Before you begin, determine which VPC, Availability Zones, and subnets you want to use. You need the following information ready:
The ID of the VPC where your Kafka clients run
Three Availability Zones
One subnet ID in each Availability Zone
Grant permissions
Start the automatic setup and grant Confluent Cloud temporary access to your AWS account.
Sign in to the Confluent Cloud Console at https://confluent.cloud/.
In the navigation menu, click Environments, and then select the environment for the PNI.
In the navigation menu, click Network management.
Click For serverless products.
Click Add gateway configuration or Create gateway configuration.
Select the Private Network Interface card.
Under Set up connections to/from Confluent Cloud, click Start automatic setup. The Automatic Private Network Interface setup page opens.
On the Permissions step, review the permissions summary.
Click Allow access (AWS). The AWS Management Console opens and shows a page where you review the temporary access request from Confluent.
Review the permissions that Confluent requests.
To grant access to Confluent, do one of the following:
If you have the required permissions, click Allow access to approve the delegation. When you click the button, you start the 60-minute session timer.
If you don’t have the required permissions, click Request approval to forward the request to your AWS administrator. After the delegation is approved, return to the AWS Management Console. Click Share access to activate the delegation session. When you click the button, you start the 60-minute session timer.
Note
The delegation request expires after seven days. If it expires before approval, return to the Confluent Cloud Console and start the automatic setup process again. While waiting for administrator approval, you can find the in-progress setup in Network Management.
Return to the Confluent Cloud Console. Verify that the page for the Permissions step shows the Temporary access granted status at the top of the page.
Click Next.
Configure VPC
Select the VPC and subnets where Confluent Cloud provisions the network resources.
On the Configure VPC step, verify that the page shows the Ready to configure your AWS account status at the top of the page.
Under Virtual Private Cloud (VPC) details, for Select a region, select the region for your VPC.
For Select VPC, select the VPC where your Kafka clients run.
For Select availability zones, select three Availability Zones.
For Select subnet IDs, select one subnet ID in each Availability Zone.
Click Next.
Create gateway
Review the gateway configuration and create the gateway in Confluent Cloud.
On the Create gateway step, review the gateway details, including the gateway name, region, and Availability Zones.
Click Create gateway. When the gateway is created, the page shows a message that says, “Gateway created”.
Click Next.
Create AWS resources
Review the resources that Confluent Cloud will create in your AWS account, and create them automatically.
On the Create AWS resources step, review the resources that will be provisioned in your environment. The resources include: one security group with ingress rules for Kafka client access, and 51 ENIs (17 per Availability Zone). All AWS resources are tagged with
Confluent=true.Click Create AWS resources. After Confluent Cloud provisions the resources, the page shows a message that says, “AWS resources created”.
If you want to view the details for the resources, click Show all created resources.
Click Next.
Create access point
Review the access point configuration, and create it in Confluent Cloud. The access point connects the ENIs to the gateway.
On the Create access point step, review the access point details, including the name, gateway, and AWS account.
Click Create access point. After the creation completes, the page shows a message that says, “Access point created”.
Click Complete setup. The Cloud Console shows the access point under the Access points tab on the gateway details page.
Troubleshooting automatic setup
- Delegation approval expired
The AWS approval request was not approved within seven days. Return to the Confluent Cloud Console and start the automatic setup process again from Grant permissions.
- Session expired
More than 60 minutes passed after you clicked Share access on an approved delegation request. Start the process again from Grant permissions.
- Insufficient AWS permissions
Your AWS user does not have permission to approve delegation requests. Click Request approval in the AWS Management Console to forward the request to an administrator.
- No VPCs or subnets found
Your AWS account may not have VPCs or subnets in the selected region. Verify that the region contains at least one VPC with subnets in three Availability Zones. For help creating subnets, see Create a subnet in the AWS documentation.
Set up PNI manually
Follow these steps to create a gateway, ENIs, an access point, and security groups using the Confluent REST API, Confluent CLI, Terraform, or the Confluent Cloud Console. Manual setup gives you direct control over each resource and is suited for environments where you need to integrate with existing infrastructure-as-code pipelines, customize security group rules beyond the defaults, or comply with policies that restrict delegated access to your AWS account.
For an automated alternative, see Set up PNI automatically.
Prerequisites
Complete the following before you begin manual setup:
Create or use an IAM role in your AWS account and attach policies that allow lifecycle management of network interfaces.
Expand the following to view an example policy:
pni-eni-policy.json
[
   {
      "Version": "2012-10-17",
      "Statement":
      [
         {
            "Effect": "Allow",
            "Action": [
               "ec2:CreateNetworkInterface",
               "ec2:CreateNetworkInterfacePermission",
               "ec2:DescribeNetworkInterfaces",
               "ec2:DeleteNetworkInterface",
               "ec2:DescribeSubnets",
               "ec2:DescribeAvailabilityZones",
               "ec2:DescribeSecurityGroups"
            ],
            "Resource": [
               "arn:aws:ec2:*:*:network-interface/*",
               "arn:aws:ec2:*:*:subnet/*",
               "arn:aws:ec2:*:*:security-group/*"
            ]
         }
      ]
   }
]
Requirements
Keep the following in mind during manual setup:
You need to create 51 ENIs and assign network interface permissions to them. This ensures that the network layer can support scaling operations without becoming a bottleneck for the service.
The ENIs you create in your AWS account must be in the same Availability Zone and have the same Availability Zone ID as the zones in Confluent Cloud.
Configure the security groups attached to your ENIs to enforce least-privilege access. For recommended settings, see Update your AWS VPC security groups.
Create a gateway
Create a gateway to enable PNI connectivity between Confluent Cloud clusters and your network.
To create a gateway:
Sign in to the Confluent Cloud Console at https://confluent.cloud/.
In the navigation menu, click Environments.
Select the environment for the PNI.
In the navigation menu, click Network management.
Click For serverless products.
Click Add gateway configuration (if you have one or more existing gateways in the environment) or Create gateway configuration (if you are creating the first gateway in the environment).
Select the Private Network Interface card to select the type of gateway configuration.
Click Create configuration.
On the Configure gateway sliding panel, enter the following information.
Gateway name
Cloud provider: AWS
Region
Zones
Click Submit.
Send a request to create a gateway:
POST https://api.confluent.cloud/networking/v1/gateways
For authentication details, see Authentication.
The following is an example request body:
{
  "spec": {
    "display_name": "my-gateway",
    "config": {
      "kind": "AwsPrivateNetworkInterfaceGatewaySpec",
      "region": "us-west-2",
      "zones": ["usw2-az1", "usw2-az2", "usw2-az3"]
    },
    "environment": {
      "id": "env-000000"
    }
  }
}
The following are the request body fields under spec:
display_name: Required. The name of the gateway.config.kind: Required. Set toAwsPrivateNetworkInterfaceGatewaySpec.config.region: Required. The AWS region of the gateway.config.zones: Required. A list of AWS Availability Zone IDs.environment.id: Required. The environment ID where the gateway belongs.
Use the confluent network gateway create Confluent CLI command to create a PNI gateway:
confluent network gateway create [name] [flags]
The following is an example Confluent CLI command to create a PNI gateway:
confluent network gateway create \
  --cloud aws \
  --region us-west-2 \
  --type private-network-interface \
  --zones usw2-az1,usw2-az2,usw2-az3
The following are the command-specific flags:
--cloud: Required. The cloud provider. Set toaws.--region: Required. AWS region of the gateway.--type: Required. Set toprivate-network-interface.--zones: Required. Set to a comma-separated list of Availability Zones.
You can specify additional optional CLI flags described in the Confluent CLI command reference, such as --environment.
Use the confluent_gateway resource to create a PNI gateway.
The following is an example Terraform configuration:
resource "confluent_environment" "development" {
  display_name = "Development"
}

resource "confluent_gateway" "staging" {
    display_name = "test-gateway"
    environment {
        id = confluent_environment.staging.id
    }
    aws_private_network_interface_gateway {
        region = "us-west-2"
        zones = ["usw2-az1", "usw2-az2", "usw2-az3"]
    }
}
The following are the resource-specific attributes under aws_private_network_interface_gateway:
region: Required. The AWS region of the gateway.zones: Required. A list of AWS Availability Zone IDs.
Create ENIs
Create the ENIs using Terraform or the AWS CLI. For PNI, you need a minimum of 51 ENIs.
Create ENIs using Terraform
The following is a sample code to create an ENI and the permission to be attached.
The code revokes the egress rule from the security group.
create_enis.tf
main.tf:
# Data sources to get VPC and subnet information
data "aws_vpc" "main" {
  id = var.vpc_id
}

data "aws_subnet" "pni_subnets" {
  count = length(var.subnet_ids)
  id    = var.subnet_ids[count.index]
}

# Dynamic private IP calculation using actual subnet CIDR blocks
# Starts at offset 10 in each subnet and increments for each ENI

# Create network interfaces
resource "aws_network_interface" "pni" {
  count = length(var.subnet_ids) * var.num_pni_per_subnet

  subnet_id = var.subnet_ids[floor(count.index / var.num_pni_per_subnet)]
  security_groups = [aws_security_group.main.id]

  # Conditional IP assignment based on auto_assign_ips variable
  # When auto_assign_ips = false (default): Use sequential IP assignment starting at offset 10
  # When auto_assign_ips = true: Let AWS auto-assign IP addresses from available addresses

  private_ips = var.auto_assign_ips ? [] : [
    cidrhost(
      data.aws_subnet.pni_subnets[floor(count.index / var.num_pni_per_subnet)].cidr_block,
      10 + (count.index % var.num_pni_per_subnet) + 1
    )
  ]

  description = "Confluent PNI-sub-${floor(count.index / var.num_pni_per_subnet)}-eni-${(count.index % var.num_pni_per_subnet) + 1}"

  tags = {
    Name = "Confluent-PNI-sub-${floor(count.index / var.num_pni_per_subnet)}-eni-${(count.index % var.num_pni_per_subnet) + 1}"
  }
}

resource "aws_network_interface_permission" "pni_permit" {
  count = length(aws_network_interface.pni)

  network_interface_id = aws_network_interface.pni[count.index].id
  permission           = "INSTANCE-ATTACH"
  aws_account_id       = var.aws_account_id
}

resource "aws_security_group" "main" {
  name        = "pni-demo"
  description = "Demo security group for PNI test (EC2 + ENIs)"
  vpc_id      = data.aws_vpc.main.id

  # Block all outbound traffic.
  # See https://docs.confluent.io/cloud/current/networking/aws-pni.html#update-the-security-group-recommended.
  egress = []

  tags = {
    Name = "enterprise-pni-aws-kafka-rbac"
  }
}

# Required:Kafka broker access for ENIs
resource "aws_vpc_security_group_ingress_rule" "allow_kafka_broker_access" {
  security_group_id = aws_security_group.main.id
  from_port     = 9092
  to_port       = 9092
  ip_protocol   = "tcp"
  cidr_ipv4     = data.aws_vpc.main.cidr_block

  tags = {
    Name = "enterprise-pni-aws-kafka-rbac"
  }
}

# Required:Kafka REST API access
resource "aws_vpc_security_group_ingress_rule" "allow_kafka_REST_access" {
  security_group_id = aws_security_group.main.id
  from_port     = 443
  to_port       = 443
  ip_protocol   = "tcp"
  cidr_ipv4     = data.aws_vpc.main.cidr_block

  tags = {
    Name = "enterprise-pni-aws-kafka-rbac"
  }
}
variables.tf:
variable "subnet_ids" {
  type = list(string)
  description = "List of subnet IDs where network interfaces will be created"
}

variable "aws_account_id" {
  type = string
  description = "Confluent AWS Account ID for setting network interface permission"
}

variable "aws_region" {
  type = string
  description = "The AWS region where resources will be created"
}

variable "num_pni_per_subnet" {
  type = number
  description = "Number of private network interfaces per subnet"
}

variable "vpc_id" {
  type = string
  description = "VPC ID where the subnets are located"
}

variable "auto_assign_ips" {
  type = bool
  description = "Whether to let AWS auto-assign IP addresses (true) or use sequential assignment (false)"
  default = true
}
Example terraform.tfvars:
subnet_ids = ["subnet-00000000000000001", "subnet-00000000000000002", "subnet-00000000000000003"]
aws_account_id = "012345678901"
aws_region = "eu-west-1"
num_pni_per_subnet = 17
vpc_id = "vpc-00000000000000001"
auto_assign_ips = true
Create ENIs using the AWS CLI
The following is an AWS CLI script to create ENIs. You need to have the AWS CLI installed to run the script.
create_aws_enis_with_permission.sh
Run the script with the following 10 arguments. The script creates 17 ENIs in each subnet, 51 total ENIs.
3 pairs of subnets and their start IP addresses
Provide subnet IP addresses according to the AWS subnet IP address requirements.
1 security group ID
1 Confluent AWS account ID from the PNI gateway creation response. Note that this is NOT your AWS account ID.
1 AWS region
17 ENIs per subnet
#!/bin/bash

# Check if 10 arguments are given (3 subnets, 3 start IPs of the subnets,
# 1 security group, 1 AWS account, 1 AWS region, 17 pnis per subnet)
if [ "$#" -ne 10 ]; then
    echo "Usage: $0 <subnet-id1> <base-ip1> <subnet-id2> <base-ip2> <subnet-id3> <base-ip3> <security-group-id> <confluent-aws-account-id> <aws-region> <num_pni_per_subnet>>"
    echo
    echo "Example: ./create_aws_enis_with_permission.sh subnet-00000000000000001 100.251.1.10 subnet-00000000000000002 100.251.2.10 subnet-00000000000000003 100.251.3.10 sg-9999999999999999 012345678901 eu-west-1 17"
    exit 1
fi

# Assigning arguments to readable variables
subnet_ids=($1 $3 $5)
base_ips=($2 $4 $6)
security_group_id=$7
aws_account_id=$8
aws_region=$9
num_pni=${10}

# Initialize an array to store successful NetworkInterfaceIds
created_network_interface_ids=()

for i in 0 1 2; do # Adjusted to correct array indexing
    subnet_id=${subnet_ids[$i]}
    base_ip=${base_ips[$i]}
    ip_prefix=$(echo $base_ip | cut -d '.' -f 1-3)
    last_octet=$(echo $base_ip | cut -d '.' -f 4)

    for j in $(seq 1 $num_pni); do
        next_ip_last_octet=$((last_octet + j))
        if [ $next_ip_last_octet -le 255 ]; then
            next_ip="$ip_prefix.$next_ip_last_octet"
        else
            echo "Skipping IP $ip_prefix.$next_ip_last_octet - exceeds valid range."
            continue
        fi

        description="Confluent PNI-sub-${i}-eni-$j"
        tag="Confluent-PNI-sub-${i}-eni-$j"

        create_ni_output=$(aws ec2 create-network-interface \
          --subnet-id $subnet_id \
          --description "$description" \
          --groups $security_group_id \
          --private-ip-address $next_ip \
          --tag-specifications "ResourceType=network-interface,Tags=[{Key=Name,Value=$tag}]" \
          --region $aws_region)

        if [ $? -eq 0 ]; then
            network_interface_id=$(echo $create_ni_output | jq -r '.NetworkInterface.NetworkInterfaceId')
            created_network_interface_ids+=("$network_interface_id")
            echo "Created network interface $network_interface_id with IP $next_ip"

            aws ec2 create-network-interface-permission \
              --network-interface-id $network_interface_id \
              --permission INSTANCE-ATTACH \
              --aws-account $aws_account_id \
              --region $aws_region

            if [ $? -eq 0 ]; then
                echo "Permission set for $network_interface_id"
            else
                echo "Failed to set permission for $network_interface_id"
            fi

        else
            echo "Failed to create network interface for $next_ip"
        fi
    done
done

# Convert the array of NetworkInterfaceIds to a comma-separated string
network_interface_ids_str=$(IFS=, ; echo "${created_network_interface_ids[*]}")


# Describing the security group rules
echo "Describing security group rules for group ID: $security_group_id"
aws ec2 describe-security-groups --group-ids $security_group_id --region $aws_region --output table --no-cli-pager

# Emit the comma-separated list of NetworkInterfaceIds
echo "All created NetworkInterfaceIds with above security group: $network_interface_ids_str"
For example:
./create_aws_enis_with_permission.sh \
  subnet-00000000000000001 100.251.1.10 \
  subnet-00000000000000002 100.251.2.10 \
  subnet-00000000000000003 100.251.3.10 \
  sg-9999999999999999 \
  012345678901 \
  eu-west-1 \
  17
Create an access point
Create a Confluent Cloud access point that represents a PNI connection.
In the Network Management tab of the desired Confluent Cloud environment, click the For serverless products tab.
Click the gateway to which you want to add this access point.
In the Access points tab, click Add access point.
Follow the guided steps to specify the field values:
Specify the name of the access point.
Create ENIs.
To use the AWS CLI script, in the AWS CLI tab, click Download script, and then click Instructions for running the script for the steps to execute the script.
To use Terraform, in the Terraform tab, click Terraform instructions and follow the steps and example code.
Specify the IDs of the ENIs that you created in the previous step.
Enter the AWS account ID where the ENIs were created.
Optionally, to configure egress connectivity for fully managed connectors, enter up to five CIDR blocks for the destination networks where your private data targets are located. You can find these CIDR blocks in the VPC dashboard in the AWS Management Console. Enter each CIDR block on a separate line.
You can’t use the following CIDR ranges:
240.0.0.0/4172.17.0.0/16172.23.0.0/1610.100.0.0/1610.255.0.0/16
Click Submit.
Send a request to create an access point:
POST https://api.confluent.cloud/networking/v1/access-points
For authentication details, see Authentication.
The following is an example request body:
{
  "spec": {
    "display_name": "my-access-point",
    "config": {
      "kind": "AwsPrivateNetworkInterface",
      "network_interfaces": [
        "eni-00000000000000000",
        "eni-00000000000000001"
      ],
      "account": "000000000000",
      "egress_routes": ["10.10.0.0/16", "10.1.0.0/16"]
    },
    "environment": {
      "id": "env-000000"
    },
    "gateway": {
      "id": "gw-000000"
    }
  }
}
The following are the request body fields under spec:
display_name: Required. The name for the access point.config.kind: Required. Set toAwsPrivateNetworkInterface.config.network_interfaces: Required. A list of 51 or more ENI IDs.config.account: Required. The AWS account ID associated with the ENIs you created in Create ENIs.config.egress_routes: Optional. A list of up to five CIDR blocks for egress connectivity to your private data targets. Required if you use fully managed connectors over PNI.environment.id: Required. The environment ID where the access point belongs.gateway.id: Required. The gateway ID to which this belongs.
Use the confluent network access-point private-network-interface create Confluent CLI command to create a PNI access point.
confluent network access-point private-network-interface create [name] [flags]
The following is an example Confluent CLI command to create a PNI access point:
confluent network access-point private-network-interface create \
  --cloud aws \
  --gateway gw-123456 \
  --network-interfaces eni-00000000000000000,eni-00000000000000001,... \
  --account 000000000000 \
  --routes 10.10.0.0/16,10.1.0.0/16
The following are the command-specific flags:
--cloud: Required. The cloud provider. Set toaws.--gateway: Required. Gateway ID.--network-interfaces: Required. A comma-separated list of the IDs of the ENIs you created in Create ENIs. You need to specify a minimum of 51 ENI IDs.--account: Required. The AWS account ID associated with the ENIs you created in Create ENIs.--routes: Optional. A comma-separated list of up to five CIDR blocks for egress connectivity to your private data targets. Required if you use fully managed connectors over PNI.
You can specify additional optional CLI flags described in the Confluent CLI command reference, such as --environment.
Use the confluent_access_point resource to create an access point.
The following is an example Terraform configuration:
resource "confluent_access_point" "staging" {
    display_name = "test-access-point"
    environment {
        id = confluent_environment.staging.id
    }
    gateway {
        id = confluent_gateway.staging.id
    }
    aws_private_network_interface {
       network_interfaces = aws_network_interface.pni[*].id
       account            = var.aws_account_id
       routes             = ["10.10.0.0/16", "10.1.0.0/16"]
    }
}
The following are the resource-specific attributes under aws_private_network_interface:
network_interfaces: Required. A list of 51 or more ENI IDs. Use the splat expressionaws_network_interface.pni[*].idto reference ENIs created with the code from Create ENIs using Terraform.account: Required. The AWS account ID associated with the ENIs you created in Create ENIs.routes: Optional. A list of up to five CIDR blocks for egress connectivity to your private data targets. Required if you use fully managed connectors over PNI.
Update your AWS VPC security groups (Recommended)
The security groups attached to your ENIs control the traffic that flows between Confluent Cloud and your network. The following are recommended configurations to enforce least-privilege access. For more information about security groups, see Control traffic to your AWS resources using security groups in the AWS documentation.
Inbound rules
Allow inbound traffic from your Kafka producer and consumer applications on port 9092 for Kafka and port 443 for HTTPS. Specify the CIDR blocks of the subnets where your applications run.
Outbound rules
Remove the default outbound rule (allow 0.0.0.0/0) from the ENI security group to block all outbound traffic from Confluent Cloud into your network.
If you use fully managed connectors with PNI, add outbound rules that allow outbound traffic only to the specific IP addresses and ports of your target data systems.
Example: Allow a managed connector to reach a PostgreSQL database
As an example scenario, a fully managed PostgreSQL Change Data Capture (CDC) Source connector runs in Confluent Cloud. The connector captures changes from a PostgreSQL database and writes them as events to a Kafka topic. The target database is an Amazon RDS PostgreSQL instance at 10.0.5.20 on port 5432, located in your AWS VPC. The connector initiates a connection outbound from Confluent Cloud through the ENI in your VPC to reach the database.
The following example security groups show how to configure access for this setup.
ENI security group
The following table describes the security group attached to the ENIs in your AWS VPC.
Direction | Protocol | Port range | Source | Destination | Purpose |
|---|---|---|---|---|---|
Inbound to Confluent Cloud | TCP | 9092 |
| N/A | Kafka client access |
Inbound to Confluent Cloud | TCP | 443 |
| N/A | HTTPS access for the Kafka REST API |
Outbound to AWS | TCP | 5432 | N/A |
| Connector access to PostgreSQL |
Database security group
The following table describes the security group attached to the RDS instance.
Direction | Protocol | Port range | Source | Destination | Purpose |
|---|---|---|---|---|---|
Inbound from Confluent Cloud | TCP | 5432 | ENI security group ID | N/A | Allow traffic from the ENI |
Access Schema Registry over PNI
If you use PNI to connect to Enterprise or Freight clusters, you can reach Schema Registry over the same PNI connection. You don’t need a separate AWS PrivateLink connection for Schema Registry. After you set up a PNI gateway and access point in an environment, Confluent Cloud creates a PNI endpoint for Schema Registry in that environment automatically. No extra setup or per-cluster configuration is required. Your client applications use this endpoint to register, retrieve, evolve, and delete schemas privately over PNI.
The Schema Registry PNI endpoint is scoped to the access point and uses the following format:
lsrc-<schema_registry_id>-<access_point_id>.<region>.aws.accesspoint.glb.confluent.cloud
For example:
lsrc-abc123-apxyz789.us-west-2.aws.accesspoint.glb.confluent.cloud
Look up the Schema Registry PNI endpoint
To look up the Schema Registry PNI endpoint, use the Confluent Cloud Console or Terraform.
Sign in to the Confluent Cloud Console at https://confluent.cloud/.
In the navigation menu, click Environments, and then select the environment that contains your Schema Registry.
In the navigation menu, click Schema Registry.
On the Schema Registry page, click the Endpoints tab.
In the list of endpoints, find the endpoint with the Private Network Interface connection type. Copy it to use in your client configuration.
Use the confluent_endpoint data source to read the endpoint. Filter by your environment, set service to SCHEMA_REGISTRY, set resource to your Schema Registry cluster ID, and set is_private to true.
The following example looks up the Schema Registry PNI endpoint:
data "confluent_endpoint" "schema_registry_pni" {
  filter {
    environment {
      id = "env-abc123"
    }
    service    = "SCHEMA_REGISTRY"
    resource   = "lsrc-abc123"
    cloud      = "AWS"
    region     = "us-west-2"
    is_private = true
  }
}

output "schema_registry_pni_endpoint" {
  value = data.confluent_endpoint.schema_registry_pni.endpoints
}
The endpoints output is a list of the endpoints that match the filter. The PNI endpoint is the entry with a connection_type of PRIVATE_NETWORK_INTERFACE. Each entry includes the endpoint address in endpoint and the originating access point in access_point.id.
To configure client applications to use a private endpoint, see Enable Private Networking on Confluent Cloud for Schema Registry.
Considerations for Schema Registry over PNI
Keep the following in mind when you connect to Schema Registry over PNI:
Connections use HTTPS on port
443. Connections on other ports are rejected.Allow port
443in the security groups attached to your ENIs.The endpoint reaches only Schema Registry in the same environment as the access point.
Schema Registry stays reachable over AWS PrivateLink at the same time, so you can use both connection types together.
Schema Registry uses the same public DNS resolution as other PNI endpoints. Your clients must be able to resolve records from public DNS servers, which resolve to the ENI addresses in your VPC. For more information, see DNS resolution.
DNS resolution
Confluent Cloud hosts and manages the DNS records for endpoints which use PNI connectivity. In order for your Kafka clients to resolve these DNS names, they must be able to resolve records from public DNS servers.
To resolve private hostnames for fully managed connectors that need to access data systems in your VPC, you can configure DNS forwarding. See Configure DNS forwarding on AWS.